Wedge - Tripod CELESTRON - Free user manual and instructions
Find the device manual for free Wedge CELESTRON in PDF.

| Product type | Polar alignment wedge for telescope |
| Brand | Celestron |
| Model | Prisma Pro HD (no. 93664) |
| Category | Tripod accessory |
| Adjustable latitude ranges | 0° – 50° or 40° – 90° (depending on configuration) |
| Tilt mechanism | Latitude adjustment by worm screw and tilting plate |
| Azimuth adjustment | By azimuth adjustment knobs (loosening azimuth plate screws) |
| Adjustable center of gravity | Lateral plates movable forward for stability at high latitude |
| Tripod attachment | By 3 hex socket screws 5/16-18 x 1-1/4 in (centering pin) |
| Telescope attachment | By 3 bolts 3/8-16 (one in a slotted hole) |
| Main materials | Aluminum and steel |
| Estimated weight | Approximately 2.5 kg |
| Dimensions (approx.) | 300 x 200 x 100 mm |
| Fork arm position | Two configurations: on one leg or between two legs |
| Included accessories | Latitude adjustment rod, mounting screws, keys |
| Warranty | One year limited |
| Maintenance and cleaning | Wipe with a soft dry cloth; do not use oil or solvent |
| Safety | Do not exceed maximum load; tighten screws properly |
| Spare parts and repairability | Contact Celestron or authorized dealer (reference 93685) |
| General information | Allows polar alignment for astrophotography |
Frequently Asked Questions - Wedge CELESTRON
User questions about Wedge CELESTRON
0 question about this device. Answer the ones you know or ask your own.
Ask a new question about this device
Download the instructions for your Tripod in PDF format for free! Find your manual Wedge - CELESTRON and take your electronic device back in hand. On this page are published all the documents necessary for the use of your device. Wedge by CELESTRON.
USER MANUAL Wedge CELESTRON
Your Celestron telescope has a motor drive built into the base allowing it to track the stars as they move across the sky from east to west. However, for this drive to be useful, (particularly for astrophotography) the telescope's axis of rotation should be made parallel to the Earth's axis. The Pro HD Wedge allows you to tilt the telescope's axis of rotation (polar or R.A. axis) so that the telescope can track the stars as they move in an arc around
the celestial pole. When this is accomplished, the sky's motion can be cancelled out simply by having the telescope rotate at the same rate as the rotation of the Earth, but in the opposite direction. This process is known as polar alignment.
Your wedge comes pre-assembled out of the box. However you will need to attach the latitude adjustment rod and may need to adjust the side latitude plate depending on your latitude.
ASSEMBLING THE WEDGE
- Loosen the two latitude locking screws on both sides of the wedge (Figure 2).
- Push the tilt plate all the way forward as far as it will go, and hand tighten the locking screws to hold the tilt plate in place.
- Thread back the latitude adjustment knob so that the threaded rod does not interfere with the orange support rod.
- Remove the three top screws from each of the L-brackets on the bottom of the tilt plate. Do not remove the bottom screws.
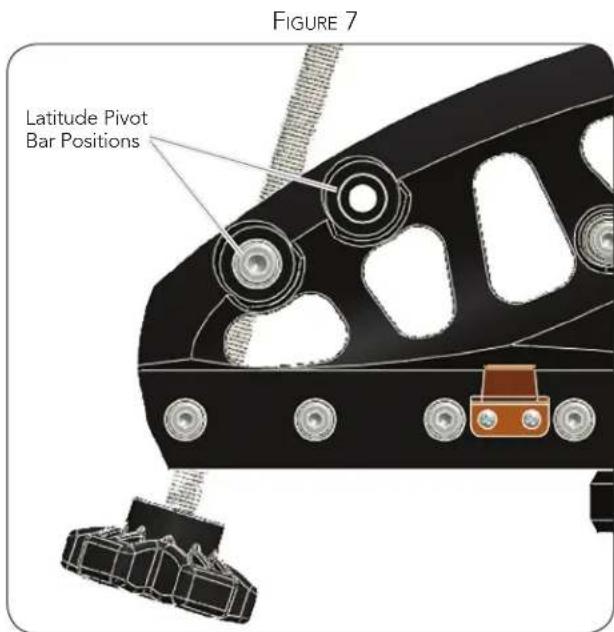
- Place one end of the swivel block into one of the top holes on the inside of the L-bracket. It may be necessary to loosen the bottom screws and rotate the L-bracket enough to fit the swivel block between the brackets.
Note: The top hole position can be used for most latitudes. At higher latitudes the upper hole will give more stability. However at lower latitudes the middle or lower hole position will give more range of motion if needed.
- Once one side of the swivel block is in place, reattach the screws to hold the L-bracket to the tilt plate.
- Attach the remaining L-bracket to the bottom of the tilt plate making sure the other end of the swivel block fits inside the corresponding hole on the bracket. Tighten both brackets.
Your wedge can be configured in two different ways; for latitude range of 0^ - 50^ , or a latitude range of 40^ - 90^ . If you are at a latitude between 40^ - 50^ either configuration should work for you. The wedge comes pre-assembled in the 40^ - 90^ configuration. However, if you are located at a latitude of 40^ or below you will need to adjust the latitude plates on the side of the wedge. To adjust the latitude plates:
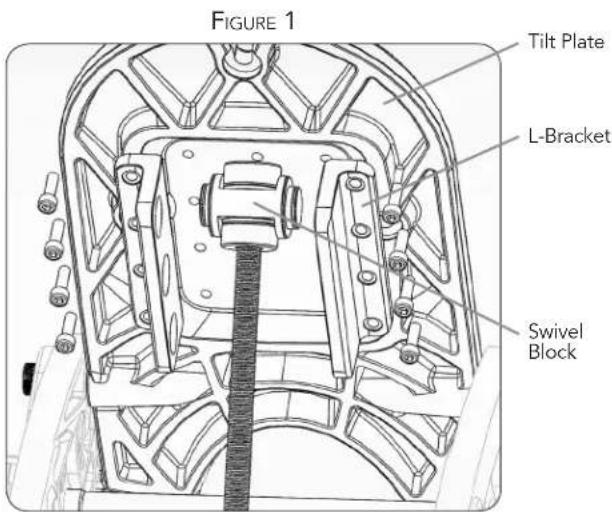
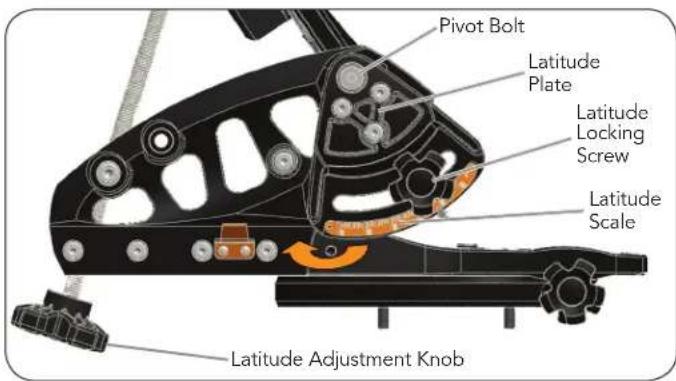
FIGURE 2
- Loosen the pivot bolt on one of the side latitude plates.
- Remove the three countersunk bolts holding the latitude plate to the wedge.
-
Rotate the latitude plate downward so that the three holes line up with the lower set of holes.
-
Replace the three bolts to attach the plates to the wedge and tighten the pivot bolt.
- Repeat the steps above for the second latitude plate.
- Reattach the latitude locking screws and hand tighten.
WHICH LATITUDE SCALE SHOULD I USE?
You may notice that the scales on the two side latitude plates are not the same. For accuracy, each scale is used for different latitudes.
- When the wedge is configured for the latitude range of 40^ - 90^ , the scale on the latitude plate facing east (marked with an "L") should be used.
- When the wedge is configured for the latitude range of 0^ - 50^ , the scale on the latitude plate facing west (marked with an "R") should be used.
ADJUSTING THE CENTER OF GRAVITY OF THE WEDGE
Before mounting a telescope to your wedge you may wish to change its center of gravity by shifting the wedge side plates
forward. The side plates can be moved forward if you are observing from a higher latitude (50^ or higher). This will place the telescope's center of gravity closer to the center of your tripod for maximum stability. To adjust the side plates:
- Make sure your telescope is not mounted to the wedge before making any adjustments.
- Remove the eight screws (four on each side) that attach the side plates to the base plate of the wedge.
- Slide the entire wedge forward so that the holes line up with the front four holes on the base plate. It may be necessary to loosen the bolts holding the orange support bar and latitude rod bar between the two side plates.
- Replace the screws in the side plates in their new position.

FIGURE 3
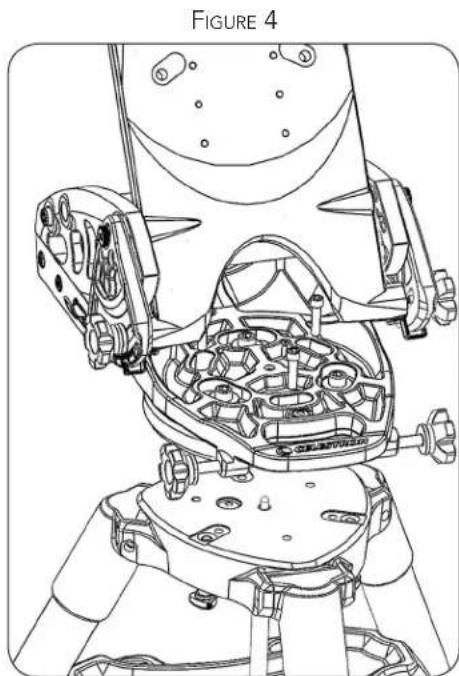
ATTACHING THE WEDGE TO YOUR TRIPOD
The HD tripod (93493) has six holes on its base for mounting the telescope with or without the wedge. Three of the holes have captured bolts for attaching your telescope directly to the tripod. The other three holes are threaded to be used with the wedge.
The wedge can be attached in two different configurations; one with the telescope fork arms extended over one of the tripod legs (for more stability at lower latitudes), and one with the telescope fork arms extended between two of the tripod legs (for more stability at higher latitudes).
To attach the wedge to the tripod:
- Locate the positioning pin in the center of your tripod.
- Lower the wedge onto the tripod so that the hole underneath the center of the base plate fits over the tripod positioning pin. This will allow you to center the wedge on the tripod head.
- Rotate the wedge until the three slotted holes on the wedge align with the three threaded holes in the tripod head. Keep in mind there are two alignment configurations as mentioned above.
- Thread the three 5/16-18x1-1/4" socket head cap screws and washers into the holes and tighten.
LATITUDE ADJUSTMENT
Before attaching your telescope to the wedge, you may wish to first adjust the wedge to the proper latitude. To do so:
-
Loosen the two latitude locking screws (located on the side of the wedge) that secure the tilt plate. (See Figure 2).
-
Use the latitude adjustment knob to move the tilt plate until the latitude scale indicates the latitude of your location.
-
Tighten the latitude locking screws on the side of the wedge to secure the tilt plate in place.
You are now ready to attach the telescope to the wedge.
ATTACHING THE TELESCOPE TO THE WEDGE
-
Lay the telescope on its side and locate the three threaded holes in the bottom of the drive base.
-
Partially thread one of the 3/8'' - 16 bolts into the hole closest to the fork arm with a handle. Rotate the telescope base if necessary to align the fork arm with the closest hole.
-
Pick the telescope up by the fork arm and the base, and position it above the wedge.
-
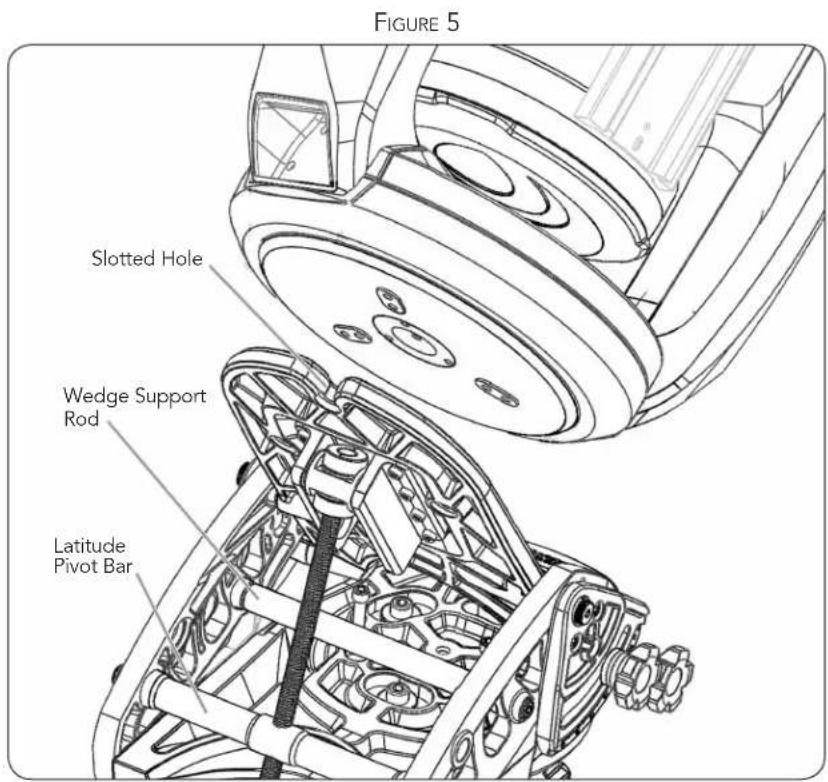
Slide the bolt into the slotted hole at the top of the tilt plate.
-
Tighten the bolt slightly so that the bottom of the telescope base is flush to the tilt plate. Do not tighten it fully or you will not be able to move the base enough to insert the two remaining bolts.
-
Move the base of the telescope until the two remaining holes in the base line up with the holes in the tilt plate on the wedge. The raised feet on the bottom of the telescope base should drop into the recesses on the wedge tilt plate.
-
Insert the bolts and tighten all three completely.
POLAR ALIGNING THE WEDGE
Use the latitude adjustment knob to make final adjustments to your polar alignment in altitude. Use the azimuth adjustment knobs to make adjustments to your polar alignment in azimuth. In order to move your telescope smoothly in azimuth, slightly loosen the three azimuth plate screws before using the azimuth adjustment knobs (see Figure 6). Do not loosen the actual mounting screws that attach the wedge to the tripod.

TIPS FOR USE
- If the latitude adjustment knob is difficult to turn, slightly loosen the bolts holding the orange latitude pivot bar. See Figure 5. This will allow the bar the rotate more easily as the latitude angle changes.
- The wedge has two positions to attach the latitude pivot bar. The forward position can be used to give more range of motion when used at lower latitudes.
WARRANTY: ONE YEAR LIMITED WARRANTY.
SEE THE CELESTRON ACCESSORY CATALOG (#93685) FOR COMPLETE WARRANTY DETAILS OR CONTACT CELESTRON AT WWW. CELESTRON.COM
Celestron, 2835 Columbia Street, Torrance, CA 90503 • Phone (310) 328-9560 • Fax (310) 212-5835
93664-INST 09-10

CELESTRON
CALE PRO HD
MODELE N° 93664
FRANCAIS