NexImage 93709 - Digital Camera CELESTRON - Free user manual and instructions
Find the device manual for free NexImage 93709 CELESTRON in PDF.

| Product Type | Digital camera for astronomy (planetary imager) |
| Brand | Celestron |
| Model | NexImage 93709 |
| Sensor | 1 megapixel color CMOS |
| Maximum resolution | 1280 x 720 pixels |
| Sensor size | 3.864 mm x 2.184 mm |
| Pixel size | 3.0 μm x 3.0 μm |
| Connection | USB 2.0 |
| Provided software | NexImage iCap (capture) and RegiStax (processing) |
| Minimum system requirements | Pentium IV 2.0 GHz, 1 GB RAM, Windows XP/Vista/7, DirectX 9.0c |
| Eyepiece mount | 1.25 inch (31.75 mm) |
| Power supply | Via USB port (bus-powered) |
| Weight | Approximately 100 g (estimated) |
| Dimensions | Approximately 60 x 40 x 40 mm (estimated) |
| Recommended age | From 14 years old |
| Maintenance and cleaning | Clean the lens with a soft, dry cloth; avoid any contact with liquids. Protect from dust and moisture. |
| Safety | Do not look at the Sun directly through the telescope or camera; risk of irreversible eye damage. |
| Spare parts and repairability | Not planned by the manufacturer; in case of failure, contact Celestron customer service. |
| General information | Camera dedicated to planetary and lunar astrophotography. Captures videos for image stacking. Works with Windows only. |
Frequently Asked Questions - NexImage 93709 CELESTRON
User questions about NexImage 93709 CELESTRON
0 question about this device. Answer the ones you know or ask your own.
Ask a new question about this device
Download the instructions for your Digital Camera in PDF format for free! Find your manual NexImage 93709 - CELESTRON and take your electronic device back in hand. On this page are published all the documents necessary for the use of your device. NexImage 93709 by CELESTRON.
USER MANUAL NexImage 93709 CELESTRON
natural_image
Black handheld electronic device with a red circular indicator light and USB port, connected by a black cable (no visible text or symbols on the device body)NEXIMAGE®
USERS MANUAL
Model #93709
Congratulations on your purchase of the Celestron NexImage Solar System Imager. Please read the instructions carefully and be sure to setup your camera and computer indoors first before taking it outside and trying it at night.
Your NexImage camera comes with:
- NexImage Camera
- NexImage iCap and RegiStax processing software CD-ROM
Recommended Minimum System requirements:
- Pentium IV, 2.0 GHz, 1GB RAM
- Graphics card with 24 or 32 bit
- Windows XP, Windows Vista, Windows 7 (32 & 64 bit)
- DirectX 9.0c or higher
SETTING UP THE CAMERA
- Place the CD into your computer's CD-ROM drive.
- Install both the NexImage iCap and RegiStax software onto your computer.
- Plug the USB 2.0 connector into a port on your computer. Once connected, the Found New Hardware message will appear. Follow the installation Wizard until the device has been successfully installed.
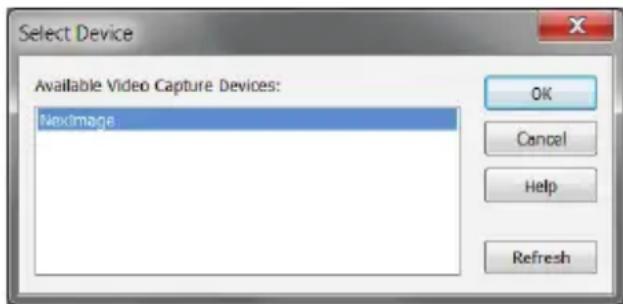
- Double click the NexImage iCap icon on your desktop to start the program.

- If the NexImage is not already detected, select the camera from the list and press OK.
- You should be able to see light displayed in the Preview window of the iCap software
text_image
Select Device Available Video Capture Devices: Nextimage OK Cancel Help RefreshYou are now ready to use the camera outside and image the planets!
CAPTURING IMAGES
-
Setup your telescope outside with an eyepiece
-
Select an easy target like the moon to begin with. Using the telescope's normal eyepiece, center and focus your telescope on the feature you wish to image.
-
Replace the eyepiece on the telescope with the NexImage camera by sliding the 1.25" eyepiece into the eyepiece holder. Secure the NexImage in place.
-
Double click on the NexImage iCap icon to launch the image capturing software. If necessary, select the NexImage from the Select Device screen.
-
You should see light displayed in Preview Window.
-
Use the telescope focuser to focus the image until the object is visible and sharp.
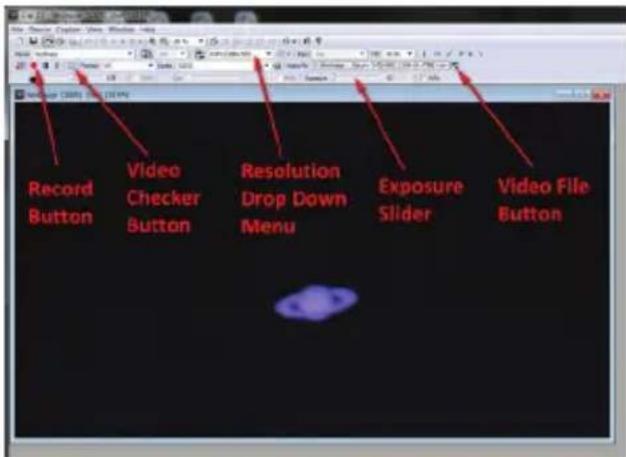
text_image
Record Button Video Checker Button Resolution Drop Down Menu Exposure Slider Video File Button-
Use the exposure slider to adjust the image so that it is not over or under exposed.
-
Select the resolution setting using the drop down menu. For the highest resolution, select 1280x720. Sometimes planets may not fill the field of view, so you may use a lower resolution setting to avoid taking up memory by recording a lot of empty space in the frame.
-
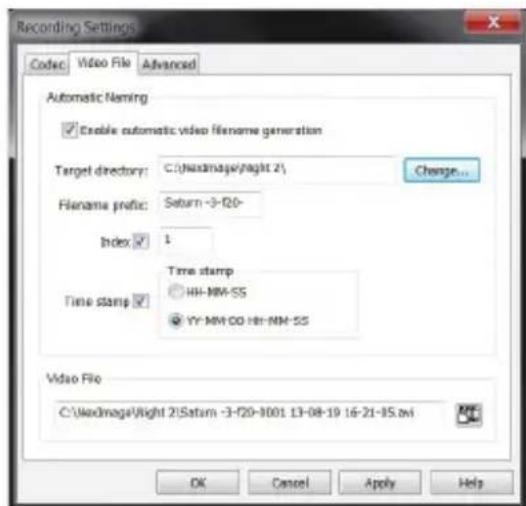
Press the Video File button to bring up the Recording Setting box.
a. Click on the Video File tab to display and change the file locations where you will save your video files.
b. Click on the Advanced tab to control the length of the video you want to take. You can either select the amount of time or the total number of frames you want captured
c. Press OK to save your settings
- Press the record button when you are ready to begin recording the video file.
- Once the recording has been completed, press the Check Video button to view the captured video.
To learn more about the more advanced features of iCap software, please click on the Help button on the main toolbar.
Now that you have captured your first video you are ready to process it into one high resolution image.
text_image
Recording Settings Codec Video File Advanced Automatic Naming ✓ Enable automatic video filename generation Target directory: C:\Naximage\night 2\ Change... Filename prefix: Saturn -3-120- Index ✓ 1 Time stamp ○ HH-MM-SS ● YY-MM-DD HH-MM-SS Time stamp ✓ Video File C:\Naximage\night 2\Saturn -3-120-1001 13-08-19 16-21-15.avi OK Cancel Apply Help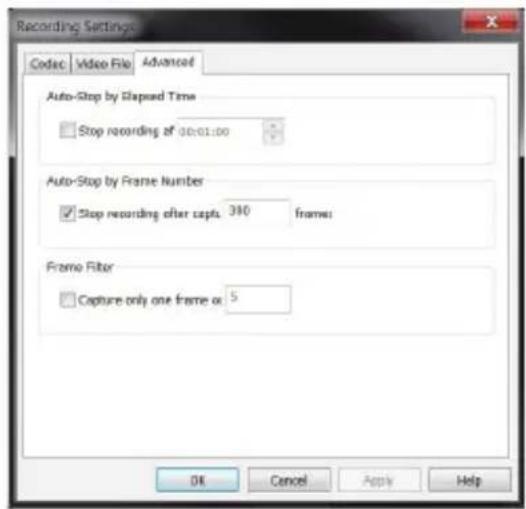
text_image
Recording Settings Codec Video File Advanced Auto-Stop by Slaped Time □ Stop recording at 00:01:00 Auto-Stop by Frame Number ☑ Stop recording after capto. 390 frames Frame Filter □ Capture only one frame or 5 OK Cancel Apply HelpDouble click on the RegiStax icon on your computer desktop to start the program.

text_image
Angricade pose estimation Geometry: V10000000000000000000000000000000000000000000000000000000000000000000000000000000000000000000000000000 File version 3.12.4 05.26.2014 22:48 Memory AnalysisPage 524(2)94-48/88 Set parameters: Linear Linear Angle: 12.7° Max Angle: 12.7° Min Angle: 12.7° Linear Position: 12.7° Linear Thickness: 12.7° Linear Angle: 12.7° Linear Angle: 12.7° Linear Angle: 12.7° Linear Angle: 12.7° Linear Angle: 12.7° Linear Angle: 12.7° Linear Angle: 12.7° Linear Angle: 12.7° Linear Angle: 12.7° Linear Angle: 12.7° Linear Angles: 12.7° Linear Angles: 12.7° Linear Angles: 12.7° Linear Angles: 12.7° Linear Angles: 12.7° Linear Angles: 12.7° Linear Angles: 12.7° Linear Angles: 12.7° Linear Angles: 12.7° Linear Angles: Linear Angle: 12.7° Linear Angle: 12.7° Linear Angle: 12.7° Linear Angle: 12.7° Linear Angle: 12.7° Linear Angle: 12.7° Linear Angle: 12.7° Linear Angle: 12.7° Linear Angle: 12.7° Linear Angle: 12.7°-
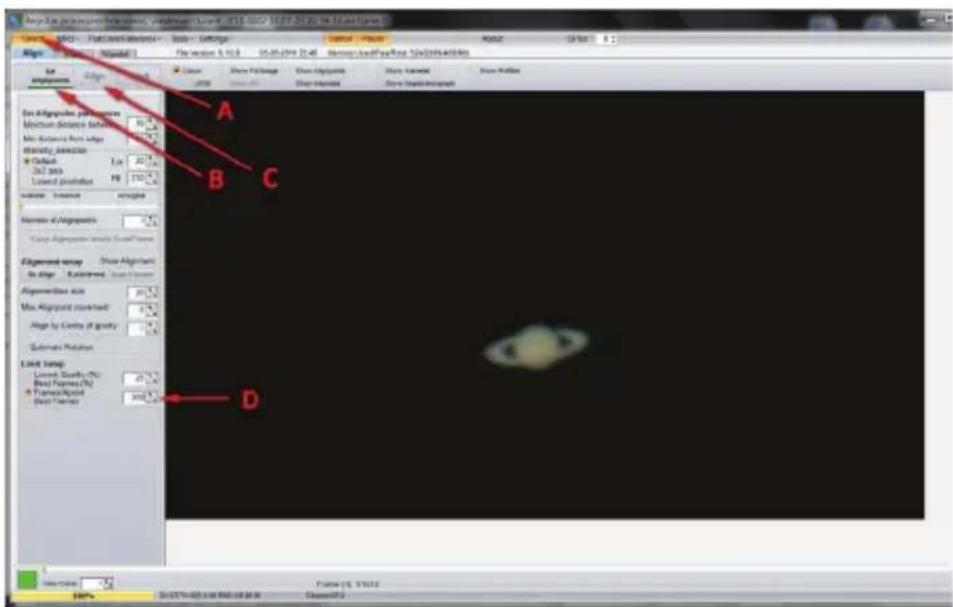
Press the Select button (A) and select the video that was just recorded.
-
Press the Set Alignment Points button (B) to have RegiStax automatically select the alignment positions over your image.
-
Press the ALIGN button (C) to begin the alignment process.
-
Select the Best Frame option under the Limit Setup box (D) and enter a number that represents one-half of the number of image frames that were captured, i.e. if 300 frames were captured then enter 150. Press the LIMIT button (E).
-
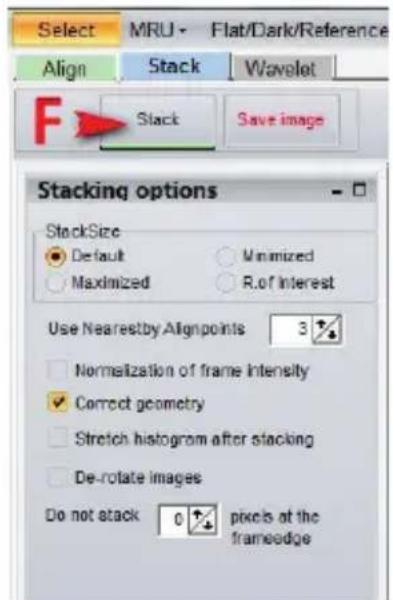
You will automatically advance to the STACK screen. Accept the default settings and press the STACK button (F).
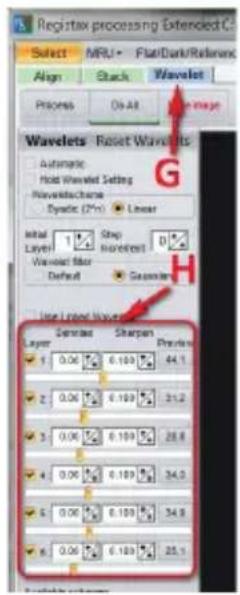
- Next moved to the wavelet processing screen by clicking on the Wavelet tab (G). See Fig 14.
- On the wavelet page use the wavelet-sliders (H) to enhance the image. The power of RegiStax sits in the usage of Wavelets. This is a special filtering technique that is very good for enhancing details in images. Each wavelet layer carries part of the image within it. The lower numbered wavelets control the fine detail stored in the image whereas the larger numbered wavelets control the coarse detail. Each layer can be adjusted individually to reveal the desired amount of detail for your image.
- Finally, press the SAVE IMAGE button to save the final image.
To explore the many other features of RegiStax and view helpful tutorials, go to the RegiStax homepage at: http://www.astronomie.be/registax/index.html
text_image
Select MRU - Flat/Dark/Reference Align Stack Wavelet F Stack Save image Stacking options StackSize Default Minimized Maximized R.of interest Use Nearestby Alignpoints 3 Normalization of frame intensity Correct geometry Stretch histogram after stacking De-rotate images Do not stack 0 pixels at the frameedge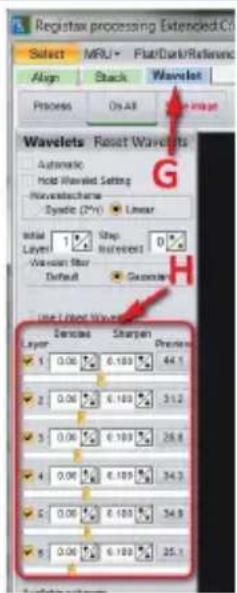
text_image
Registax processing Extended C: Select MRU+ Flat/Dark/Reference Align Stack Wavelet Process On All Wavelets Reset Wavelets Automatic Hold Wavelet Setting Wavelet spectra Dynamic (2*) Initial 1% Layer 1 Step Interval 0% Wavelet filter Default Gaussian Use Filter Wavelets Layer 1 Densities Sharpen 1 0.06 6.189 44.1 2 0.06 6.189 31.2 3 0.06 6.189 26.8 4 0.06 6.189 34.3 5 0.06 6.189 34.9 6 0.06 6.189 25.1HOW NEXIMAGE WORKS
NexImage utilizes a light sensitive imaging sensor to capture streaming video of any solar system object. This video can easily be viewed as hundreds of individual images (frames) that can be digitally stacked to significantly reduce the electric “noise” inherent in video chips and bring out the unseen fine detail (signal) hidden within your image. The NexImage camera takes advantage of the fact that the signal to noise ratio of your stacked composite image is proportional to the square root of the number of frames combined. This means that stacking as few as 16 frames will reduce the grainy noise of the composite image by
THE BASICS
Focusing
As with all astrophotography, sharp focus is essential for high quality results. Although there are many techniques and devices for focusing your telescope, the human eye still remains one of the best detectors of subtle changes in detail. One advantage that video imaging has over imaging with more sophisticated (and expensive) CCD cameras is the speed in which it can display its image. Focusing NexImage is more similar to focusing an eyepiece than a CCD camera. Unlike with long exposure cameras you don't have to wait many seconds to see the effect of a focus change.
4 times. While stacking as many 900 frames will improve the image by 30 times! However, stacking the individual frames is only half the power of the NexImage imager. With the included software package, each individual frame is analyzed for quality to filter out those frames most affected (blurred) by poor atmospheric “seeing”. This form of after-the-fact adaptive optics, leaves only the sharpest, clearest frames to be stacked and aligned into a high quality image. Finally, powerful processing features automatically break the image up into individual unsharp mask layers that can be used to bring out tremendous detail.
To achieve best focus, concentrate on a high contrast feature of the object you are imaging. Focusing on small features such as a moon's shadow on Jupiter or Cassini's division in the ring of Saturn will guarantee best focus across the entire image.
Once the frames of your video are stacked, the overall brightness of the composite (stacked) image is usually brighter than its individual component frames. For this reason it is best to keep the brightness of the video image seen on the screen dimmer than you would normally desire. It is important that no part of the image is over-exposed to assure the maximum amount of detail in the final composite image.
Collimation
No matter what type of telescope you image with, poor collimation (alignment of the optics) will ruin your chances for a good image. Before you begin imaging, always check the collimation of your instrument and make adjustments if necessary. Refer to your telescopes owner's manual for instruction in collimating the optics.
Finding Objects
At first it can be difficult to locate individual planets due to their relative brightness. To make it easier to initially find your object in the imaging window, increase the brightness and gain controls on the Exposure Tool Bar. This will allow you to better see the object as it passes through the imaging window. Once the object is located and centered, you can adjust the setting until the object is at the desired brightness and contrast.
Video Length
At first you may think that the more frames you record the better. However there are some limitation to the duration of video and the amount of frames you can acquire. Resolution and file size can both limit the length of time of your video. Since the NexImage will combine as many sharp frames as possible to achieve one high quality image, you don't want to take so many images that you start to detect the rotation of the planet, especially on Jupiter which makes one complete rotation in under 10 hours!
Also each frame of a high resolution video can equal a large file size. Hundreds of frames can take up much of your hard drive space. Since file sizes of each video taken can be quite large, it is recommended that you save your video data onto a CD-ROM. This way you can have a library of files stored for processing without filling up your hard drive in the process.
Specifications
Sensor: 1 MP color CMOS Sensor
Camera Resolution: 1280x720
Sensor Size: 3.864mm x 2.184mm
Pixel Size: 3.0μ x 3.0μ
Computer Connection: USB 2.0
www.celestron.com
Torrance, CA 90503 U.S.A. • Telephone: 800.421.9649
©2013 Celestron . • All rights reserved. • Printed in China • 09-13
FCC Note: This equipment has been tested and found to comply with the limits for a Class B digital device, pursuant to part 15 of the FCC Rules. These limits are designed to provide reasonable protection against harmful interference in a residential installation. This equipment generates, uses, and can radiate radio frequency energy and, if not installed and used in accordance with the instructions, may cause harmful interference to radio communications. However, there is no guarantee that interference will not occur in a particular installation. If this equipment does cause harmful interference to radio or television reception, which can be determined by turning the equipment off and on, the user is encouraged to try to correct the interference by one or more of the following measures:
- Reorient or relocate the receiving antenna.
- Increase the separation between the equipment and receiver.
- Connect the equipment into an outlet on a circuit different from that to which the receiver is connected.
- Consult the dealer or an experienced radio/TV technician for help.
Celestron binoculars/monoculars are designed and intended for those 14 years of age and older.
Product design and specifications are subject to change without prior notification.
FRANÇAIS
MANUEL DE L'UTILISATEUR MODÈLE #93709
text_image
Select Device Available Video Capture Devices: NextImage OK Cancel Help Refreshtext_image
Recording Settings Codec Video File Advanced Automatic Naming ✓ Enable automatic video filename generation Target directory: C:\Naximage\night 2\ Change... Filename prefix: Saturn -3-120- Index ✓ 1 Time stamp ○ HH-MM-SS ● YY-MM-DD HH-MM-SS Time stamp ✓ Video File C:\Naximage\night 2\Satam -3-120-1001 13-08-19 16-21-15.avi OK Cancel Apply Help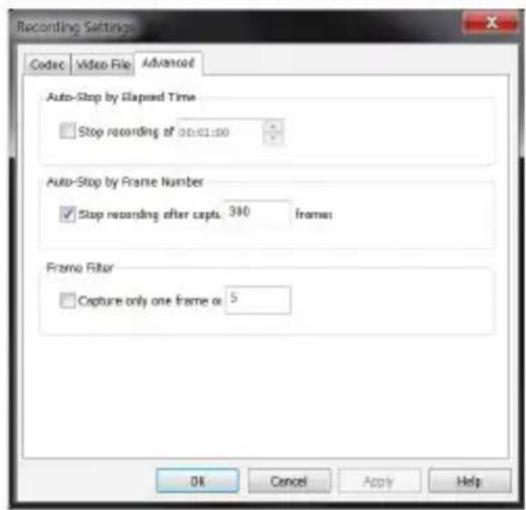
text_image
Recording Settings Codec Video File Advanced Auto-Stop by Elapsed Time □ Stop recording at 00:01:00 Auto-Stop by Frame Number ✓ Stop recording after capta. 390 frames Frame Filter □ Capture only one frame at 5 OK Cancel Apply Helptext_image
Top-Algorithm: Linearized (P) - Linearized (P) = 0.125 (P) / (P) / (P) / (P) / (P) / (P) Design: AutoCAD/AutoCADs Sort: Settings Close View Filing Show Alignment Show Frame Show Position Set Agglomeration Align Close View Filing Show Alignment Show Frame Show Position Set Agglomeration Minimum offset distance: 100% Min Distance from edge: 100% Intensity direction: 0% Default: 100% 2x2 axis: 200% Lowered position: 100% Number: 100% Number of Agglomeration: Change Agglomeration between Fixed States Alignment setup: Show Alignment No gap: Adjusted, Next Sequence Agglomeration Size: 100% Max Agglomeration selected: 100% Gap by Combo of gravity: 100% Estimate Relative Lock Setup: Lowering Squares (%) Reset Frames (%) Forward Frames (%) Forward Frames: 100% Dtext_image
Select MRU Flat/Dark/Reference Align Stack Wavelet F Stack Save image Stacking options StackSize Default Minimized Maximized R.of Interest Use Nearestby Alignpoints 3 Normalization of frame intensity Correct geometry Stretch histogram after stacking De-rotate images Do not stack 0 pixels at the frameedge Registax processing Extended C: Select MRU Flat/Dark/Reference Align Stack Wavelet Process ON A8 20000000000000000000000000000000000000000000000000000000000000000000000000000000 Wavelets Reset Wavelets Automatic Hold Wavelet Setting WaveletName Dyadic (27%) Linear Initial 1 Drop 0% Layer Increment Wavelet Filter Default Gaussian Use Linked Wavelet Spread Sharpen Preview 1 0.06 6.169 44.1 2 0.06 6.169 31.2 3 0.06 6.169 28.6 4 0.06 6.169 34.3 5 0.06 6.169 34.9LE FONCTIONNEMENT DE NEXIMAGE
text_image
Select Device Available Video Capture Devices: Nextimage OK Cancel Help Refreshtext_image
Recording Settings Codec Video File Advanced Automatic Naming ✓ Enable automatic video filename generation Target directory: C:\Naximage\night 2\ Change... Filename prefix: Saturn -3-120- Index ✓ 1 Time stamp ○ HH-MM-SS ● YY-MM-DD HH-MM-SS Time stamp ✓ Video File C:\Naximage\night 2\Saturn -3-120-1001 13-08-19 16-21-15.avi OK Cancel Apply Help
text_image
Recording Settings Codec Video File Advanced Auto-Stop by Slaped Time □ Stop recording at 00:01:00 Auto-Stop by Frame Number ☑ Stop recording after capto. 390 frames Frame Filter □ Capture only one frame or 5 OK Cancel Apply Helptext_image
Regi Stax File version 8.10.0 05-05-2016 2:46 Area: Area: Area: Area: Area: Area: Area: Area: Area: Area: Area: Area: Area: Area: Area: Area: Area: Area: Area: Area: Area: Area: Area: Area: Area: Area: Area: Area: Area: Area: Area: Area: Area: Area: Area: Area: Area: Area: Area: Area: Area: Area: Area: Area: Area: Area: Area: Area: Area: Area: Area: A A B C D Regi Stax Set Alligatorial patterns Minimum Scatters (between 90%) Max Intersection Point edge Distance direction In Default 367 mm Limited Position PB 110% Number of Alligatorial Show Alligatorial Show Alligatorial Show Alligatorial Algorithm search Show Alligatorial In align Customize Show Pattern Algorithm size 30% Max Alignment coefficient 8% Align by Centre of gravity 0% Substrate Position Clock design Limited Quantity (%) Rest Points (%) 4 Perfect Point Point Devices 300% Balance (%): 100% Balance (%): 100%text_image
Select MRU Flat/Dark/Reference Align Stack Wavelet F Stack Save image Stacking options StackSize Default Minimized Maximized R.of Interest Use Nearestby Alignpoints 3 Normalization of frame intensity Correct geometry Stretch histogram after stacking De-rotate images Do not stack 0 pixels at the frameedge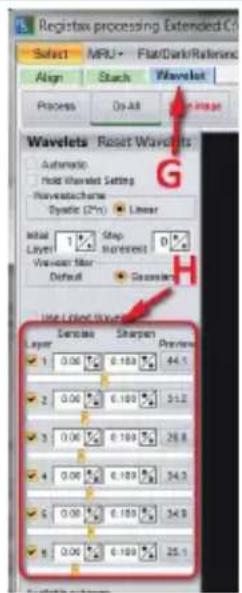
text_image
Registex processing Extended Select MPU+ Flat/Dark/Reference Align Starch Wavelet Process On All Image Wavelets Reset Wavelets Automatic Hold Wavelet Setting Wavelet通道 Dynamic (20%) Linear Initial 1 Stop Layer 0 Step 1 Spread 0 Wavelet Map Default Geometric Use Filter Wavelets Layer Exercise Sharpen Preview 1 0.06 0.183 44.1 2 0.06 0.189 51.2 3 0.06 0.189 28.8 4 0.06 0.189 34.3 5 0.06 0.189 34.9 6 0.06 0.189 25.1CÓMO FUNCIONA NEXIMAGE
text_image
Select Device Available Video Capture Devices: Nextimage OK Cancel Help Refreshtext_image
Recording Settings Codec Video File Advanced Automatic Naming ✓ Enable automatic video filename generation Target directory: C:\WedImage\light 2\ Change... Filename prefix: Saturn -3-F20- Index ✓ 1 Time stamp ● HH-MM-SS ● YY-MM-DD HH-MM-SS Video File C:\WedImage\light 2\Saturn -3-F20-8001 13-08-19 16-21-15.avi OK Cancel Apply Help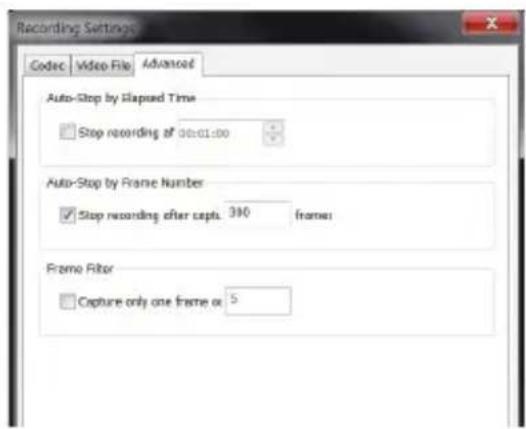
text_image
Recording Settings Codec Video File Advanced Auto-Stop by Flapued Time Stop recording of 00:01:00 Auto-Stop by Frame Number Stop recording after sept. 390 frames Frame Filter Capture only one frame or 5text_image
Key: 3D01-3D02 File Edit View Date Settings Close - Save Add: 0.00 Align: 3D01-3D02 By: An Apply Close Show Image Show Alignment Show Named Show Selected A B C D Linear Graph Linear Graph Linear Graph Linear Graph Linear Graph Linear Graph Linear Graph Linear Graph Linear Graph Linear Graph Linear Graph Linear Graph Linear Graph Linear Graph Linear Graph Linear Graph Linear Graph Linear Graph Linear Graph Linear Graph Linear Graph Linear Graph Linear Graph Linear Graph Linear Graph Linear Graph Linear Graph Linear Graph Linear Graph Linear Graph Linear Graph Linear Graph Linear Graph Linear Graphtext_image
Select MRU Flat/Dark/Reference Align Stack Wavelet F Stack Save image Stacking options StackSize Default Minimized Maximized R.of interest Use Nearestby Alignpoints 3 Normalization of frame intensity Correct geometry Stretch histogram after stacking De-rotate images Do not stack 0 pixels at the frameedge Registex processing Extended C: Select MRU Flat/Dark/Reference Align Stack Wavelet Process Do All Save Image Wavelets Reset Wavelets Automatic Hold Wavelet Setting Wavewavewave Dynamic (2Pv) Linear Initial Step Layer Moregent 0% Wavelet Filter Default Geometer Use Linked Wavelet Dense Sharpen Layer 6.189 44.1 2.00 6.189 31.2 3.00 6.189 28.8 4.00 6.189 34.2 5.00 6.189 34.9 6.00 6.189 25.1WIE NEXIMAGE FUNKTIONIERT
text_image
Select Device Available Video Capture Devices: Nextimage OK Cancel Help Refreshtext_image
Recording Settings Codec Video File Advanced Automatic Naming ✓ Enable automatic video filename generation Target directory: C:\Naximage\night 2\ Change... Filename prefix: Saturn -3-120- Index ✓ 1 Time stamp ○ HH-MM-SS ● YY-MM-DD HH-MM-SS Time stamp ✓ Video File C:\Naximage\night 2\Saturn -3-120-1001 13-08-19 16-21-15.avi OK Cancel Apply Help
text_image
Recording Settings Codec Video File Advanced Auto-Stop by Slipped Time □ Stop recording of 00:01:00 Auto-Stop by Frame Number ✓ Stop recording after capa 380 frames Frame Filter □ Capture only one frame or 5 OK Cancel Apply Helptext_image
An Alligator polygon Minimum Simples (100.0) Min Distance: Max Edge Distance: Position Cutoff D2 and Lowered placement Source: Inseret Number of Alignments: Start Alignments: Start Alignments Alignment setup: Close Alignment In Edge: K-measurement Alignment size: 30 px Max Alignment offset: 0 px Align by Centre of gravity: 0 px Settle/Finisher Lectal Swap Lared Quality Pro Best Performance(%) Frontal Offset Front Tages A B C Dtext_image
Select MRU Flat/Dark/Reference Align Stack Wavelet F Stack Save image Stacking options StackSize Default Minimized Maximized R.of Interest Use Nearestby Alignpoints 3 Normalization of frame intensity Correct geometry Stretch histogram after stacking De-rotate images Do not attack 0 pixels at the frameedge