Gysmatic 913 G - Welding mask GYS - Free user manual and instructions
Find the device manual for free Gysmatic 913 G GYS in PDF.
| Product Type | Welding mask with TH2 P R SL respiratory protection system |
| Model | Gysmatic 913 G (GYSMATIC 9/13 XL) |
| Brand | GYS |
| Filter Dimensions | 133 x 114 mm |
| Field of View | 100 x 60 mm |
| Total Weight (mask + respiratory system) | 1.7 kg |
| Power Supply | Solar + 2 lithium CR2450 batteries (3V) |
| Respiratory System Battery | Lithium-ion, mains charger, charging time 3-4 h |
| Shades | Light 3, Dark 9 to 13 |
| Reaction Time | 0.08 ms |
| Airflow Levels | 3 levels: ~170, ~200, ~230 L/min |
| Operating Temperature | -5°C to +55°C |
| Storage Temperature | -10°C to +60°C |
| Warranty | 2 years (parts and labor) |
| Standards | EN 175:1997, EN 166:2001, EN 379+A1:2009, EN 12941:1998+A2:2008 |
| Compatible Welding Processes | MMA, TIG, MIG-MAG (except oxyacetylene, laser, gas) |
| Recommended Lifespan | 5 years (mask), 12 months (filters) |
| Cleaning and Maintenance | Soft cloth, neutral detergent; do not use solvent; replace batteries once a year; change filters every 12 months |
| Spare Parts | Battery, filters, pre-filter, breathing tube, hood, guard screens, batteries |
| Safety | Do not use in explosive atmosphere (<17% O2), nor in confined spaces; audible and visual alarm in case of insufficient flow |
Frequently Asked Questions - Gysmatic 913 G GYS
User questions about Gysmatic 913 G GYS
0 question about this device. Answer the ones you know or ask your own.
Ask a new question about this device
Download the instructions for your Welding mask in PDF format for free! Find your manual Gysmatic 913 G - GYS and take your electronic device back in hand. On this page are published all the documents necessary for the use of your device. Gysmatic 913 G by GYS.
USER MANUAL Gysmatic 913 G GYS
ANOMALIES, CAUSES, REMÉDES
This user's manual includes information on the operation of the equipment and the precautions to be followed for the user's safety. Please read it carefully before first use and keep it in a safe place for future reference. These instructions must be read and understood before any operation. Any modification or maintenance not indicated in the manual must not be undertaken. Any damage to persons or property caused by use not in accordance with the instructions in this manual shall not be borne by the manufacturer. In the event of a problem or uncertainty, consult a qualified person to handle the product correctly.
Use the welding helmet only for eye and face protection against harmful ultra violet and infrared radiation, sparks and spatter from welding.
Never look directly at welding arcs without eye protection when the arc is initiated. Failure to do so may cause painful inflammation of the cornea and potentially irreversible damage to the lens which may result in cataracts.

Look out! Danger of injury if a person wearing a mask and goggles is hit by particles thrown at high speed.
The mask, filter and shields do not guarantee unlimited protection against major shocks or impacts, explosive mechanisms or corrosive liquids. Avoid welding or cutting in these severe environments.
Do not weld or cut above his head with this mask.
Move his face away from the smoky area. Use forced ventilation or local exhaust to remove smoke.
Oxyacetylene, laser or gas welding and cutting is not permitted with this mask.
Before each use :
- Carefully inspect the mask and its UV/IR filter.
- Replace worn or damaged parts immediately.
- Replace filter lenses or face shields if they are cracked or scratched to prevent damage to the user's eyes.
The headband can potentially cause allergies in sensitive individuals.
The operating temperatures of the optoelectronic filter are from -5^ to +55^ .
The opto-electronic filter in the mask is not waterproof and will not function properly if it has been in contact with water.
The welding mask must be moved carefully to avoid damage to the filter, guards and/or protective shell.
Maintenance :
- Do not place heavy objects or tools on or in the facepiece to avoid damage to the filter or face shields.
Mask storage temperatures range from -10^ to +60^ . - Clean the Optoelectronic Filter with a clean cotton or special lens cloth.
- Regularly clean and change the guard screens.
- Clean the inside and outside of the mask with a neutral detergent-disinfectant. Do not use solvents.
- Make sure that the sensors and cell are not obstructed by dust or debris.
- We recommend using the mask and visors for 5 years.
The length of use depends on various factors such as type of use, cleaning, storage and maintenance.
BEFORE WELDING
- Check that the welding helmet is in good condition and headband adjustment.
- Check whether the front cover lens, the front frame and filter are inserted and fixed in place. In case of anomalie, please proceed to its reconditioning.
- Make sure that the sensors and the cell (2) are not obstructed by dust or debris.
- Make sure that the protection films on both screens are removed.
- Check that the protection level matches your welding processes. Please refer to the following chart to help your choice (cf. welding process board)
INTRODUCTION
The welding helmet GYSMATIC 9/13 XL and 5/13 XXL the air purifying/respiratory unit combine to form a face and breathing protection device for increased safety and comfort. Base on the principle of overpressured air circulation, the respiratory protection system is mounted on a waist belt and delivers a regulated air flow through a tube straight into the helmet. The flow of purified air creates an overpressure, thus preventing the outside air from going into the helmet.
The complete system is a class TH2 P R SL breathing apparatus. The system is delivered as standard with a TH2 filter (ref. 038424).
PRECAUTIONS
- The welding helmet is suitable for use with virtually all welding processes except Oxy-Acetylene welding, laser welding and gas welding.
- Standard protective screens must be installed on both inside and outside surfaces of the module. Failure to use protective screens may constitute a safety hazard or result in irreparable damage to the module.
- All components used in the respiratory system must be GYS approved parts and must be used in accordance with the instructions in this manual.
- The respirator must be stored in a dry and clean place in a temperature range of -10^ to +60^ and a relative humidity of less than 90% .
- Caution! The breathing tube can become entangled and jammed in the surrounding area.
- At very high work rates, the pressure in the respiratory protective device may become negative at the time of maximum inhalation flow.
| 9/13 XL 5/13 XXL | ||
| Clear shade 3 4 | ||
| Dark shade 9-13 5-13 | ||
| Filter dimension 133 x 114 mm | m 133 x 114 mm | |
| Reaction speed 0,08 ms 0,08 | ms | |
| Power supply solar + battery | solar + battery | |
| Weight 1,7 kg 1,7 kg | ||
| Field of vision 100 x 60 mm 100 x 83 mm | ||
| Applications | MMA SMAW 5>400 A / TIG GTAW 2>300A MIG-MAG GMAW/FCAW 5>500A | MMA SMAW 5>400 A / TIG GTAW 2>300A MIG-MAG GMAW/FCAW 5>500A |
| Warranty | 2 years | |
| Application temperature | -5°C / + 55°C | |
| Storage temperature | -10°C / + 60°C | |
INSTRUCTIONS

OFF
When the respiratory system is off, no air purification/respiratory protection is possible. The concentration of carbon dioxide increases and the oxygen level decreases, thus the system must not be used when it's switched off.
THE RESPIRATORY PROTECTION SYSTEM MUST NOT BE USED :
- in a dangerous environment for the user's health and safety, an environment with an oxygen level below 17% or containing unknown substances.
- In confined or non ventilated environments such as cuves, etc.
- Near flames or projections.
- in an explosion risk zone.
- In a very windy zone.
- if the respiratory protection system stops working: the user must evacuate the contaminated area immediately.
- If the filter is not installed.
IT IS ESSENTIAL :
- that nothing comes in contact or alters moving parts.
- do not try to modify the device or the filter.
- that no liquid or fluid goes into the device - especially the motor, the liquid and the battery.


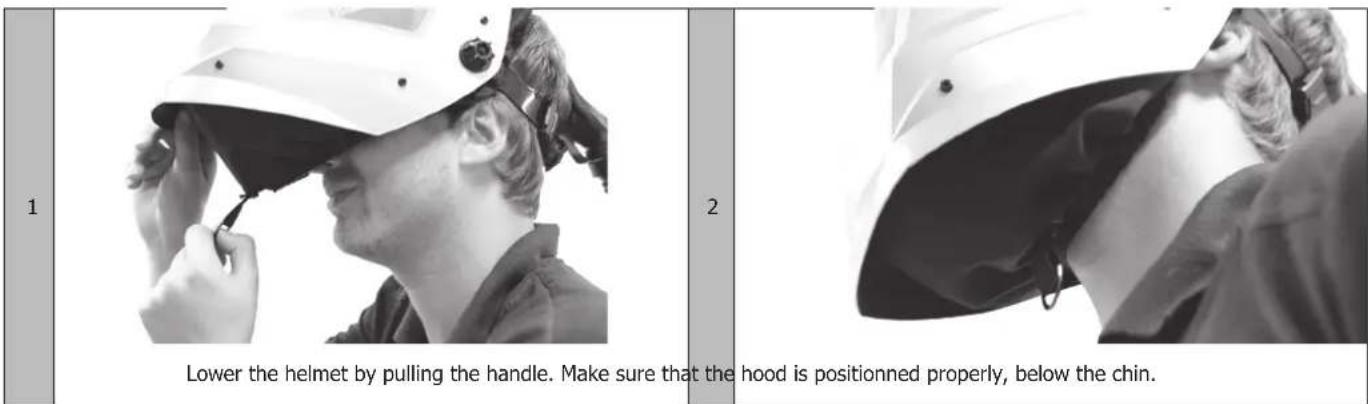
Make sure that the hood (made of cloth) is properly positioned and not damaged. The filtration efficiency depends on it. The protection level decreases if the hood is not positioned properly (big beard, long hair, etc).
Make sure that the air hose is not obstructed or folded.
The unit must be positioned behind the user to reduce these risks.
The filter must not be installed directly in the helmet, nor modified. An effective filtration cannot be ensured if one or some of the filter's parts are modified.
The respiratory protection system must only be used by a qualified/trained user. The filter must not be modified to fit other filtration units.

If one of these recommendations is not followed, the warranty is automatically void.
IT IS RECOMMENDED TO LEAVE THE CONTAMINATED AREA IF :

- the minimum air flow alarm beeps.
- breathing becomes difficult.
- a feeling of dizziness or loss of balance.
- one or several of the device's parts are damaged.
- the air flow suddenly decreases or stops.
- contaminated air or elements are felt inside the helmet.
UNPACKING
Make sure that the packaging is intact and that no parts were damaged during transport. Check that the device is complete, in working order and properly assembled. The faulty/damaged parts must be replaced before use.
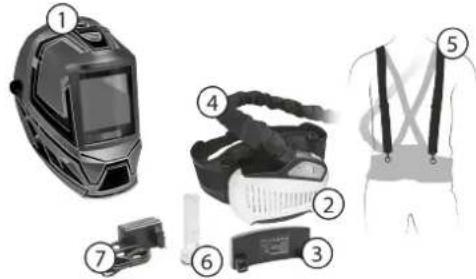
The package must include :
- The air fed welding + welding hood
- the respiratory protection system (motor + filter + waist belt)
- lithium-ion battery
- the air hose, its anti-fire cloth and both end fittings
- the shoulder harness
- the air flow tester
- the lithium-ion battery charger
- the carrying bag (only for GYSMATIC 5/13 XXL)
9.2 instruction manuals (helmet + respiratory system)
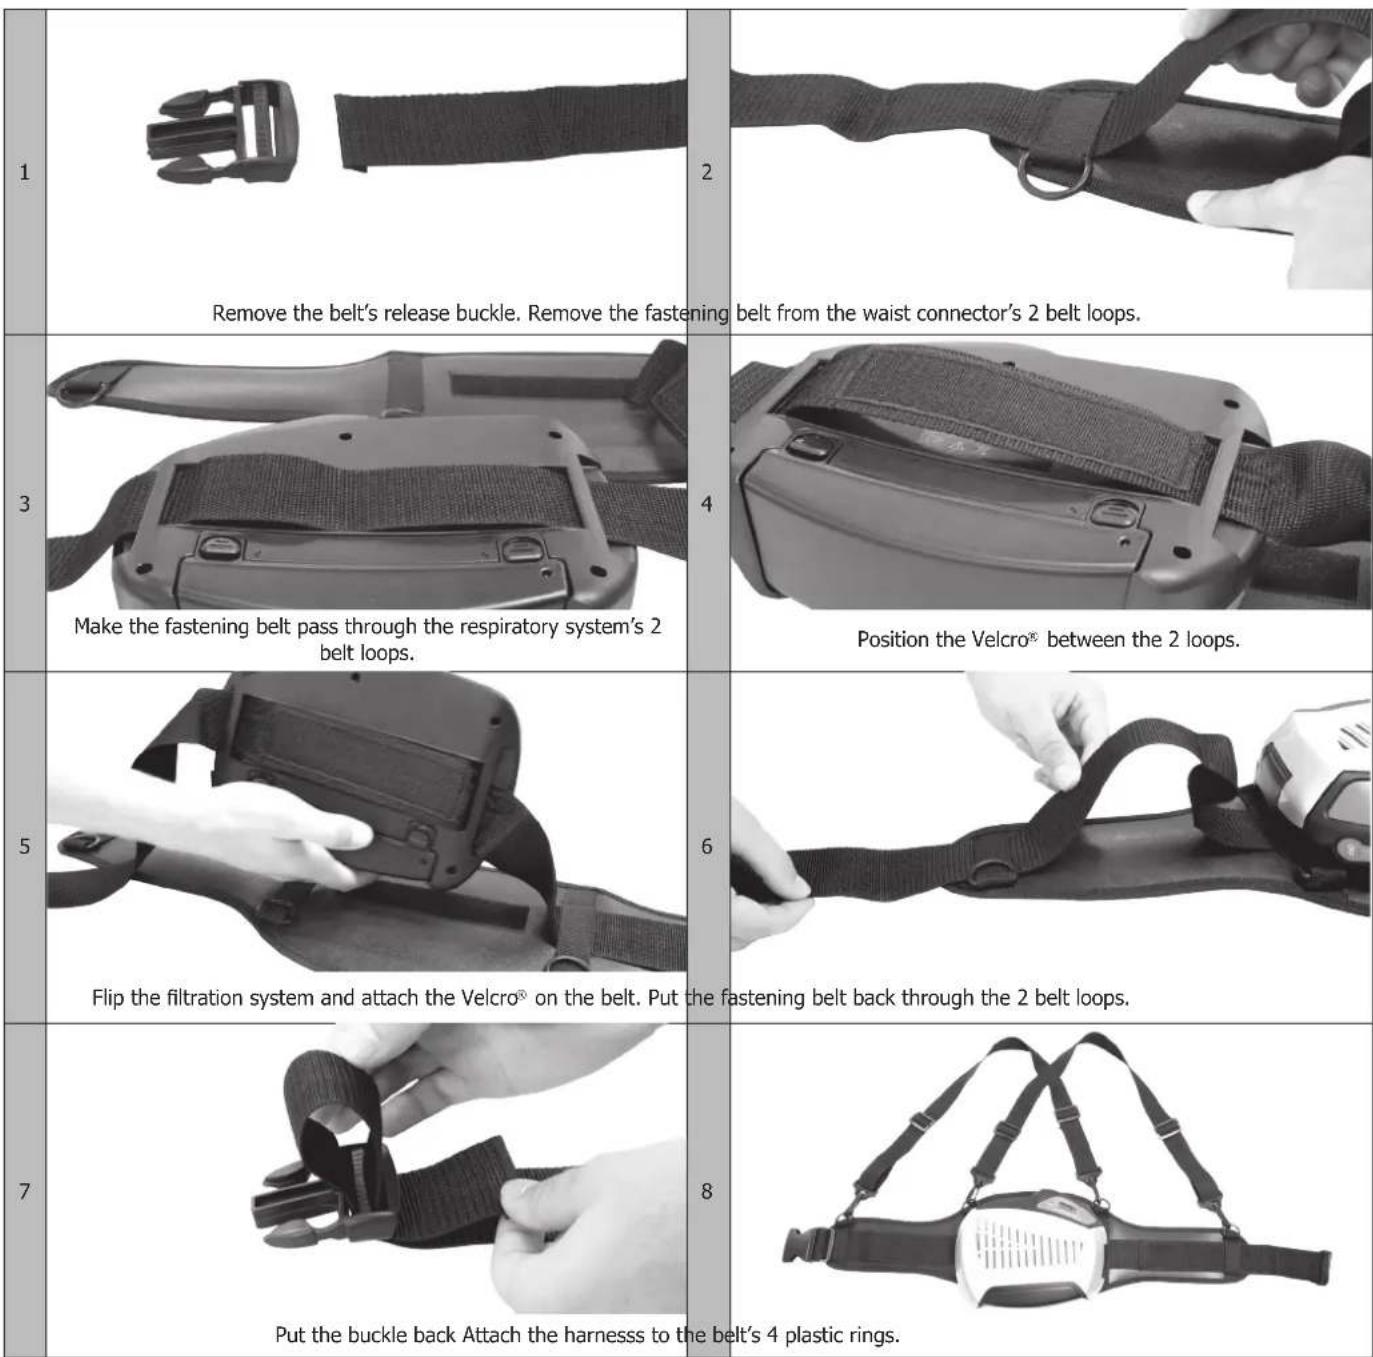
FIXING THE RESPIRATORY SYSTEM ON THE BELT
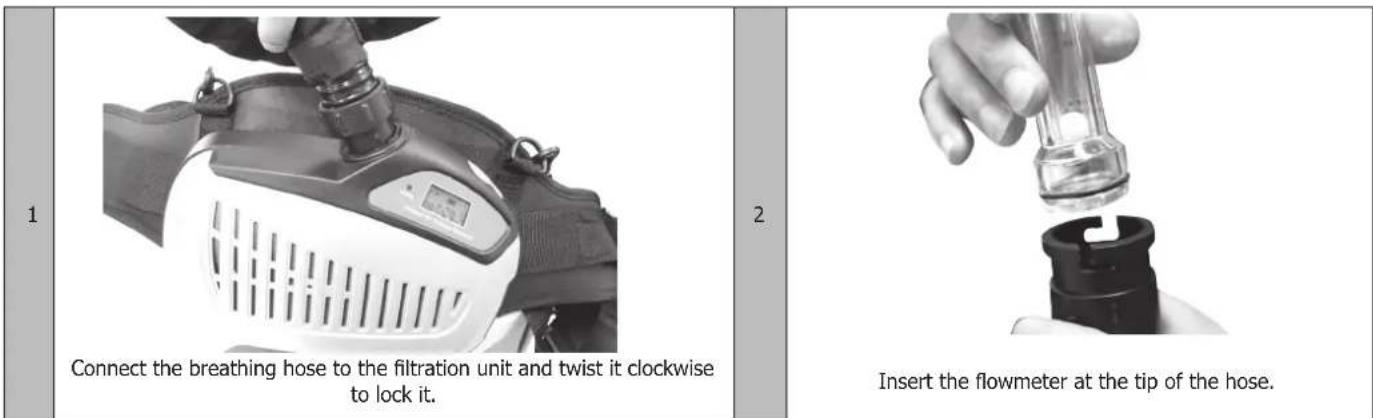
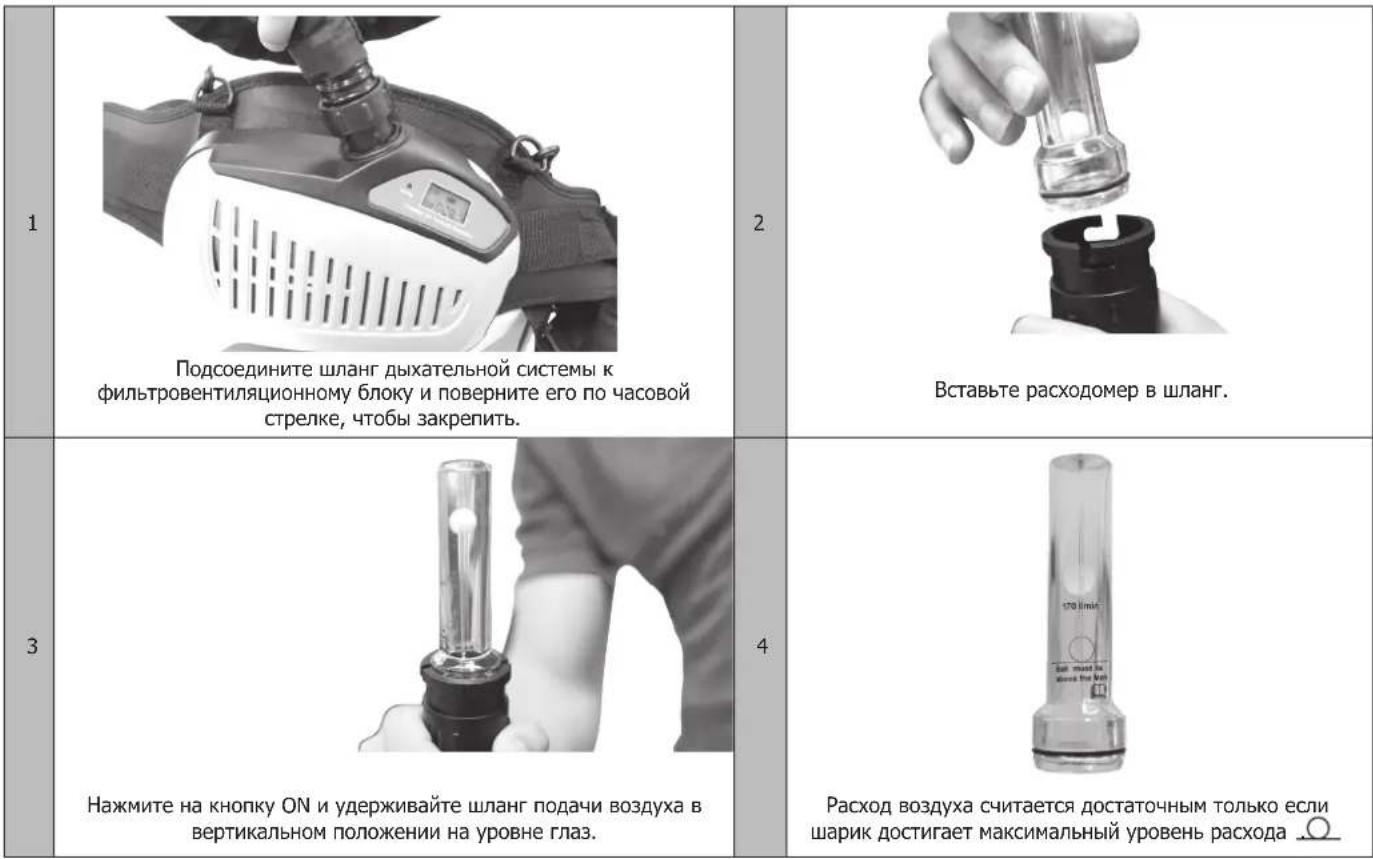
CONNECTING THE HOSE
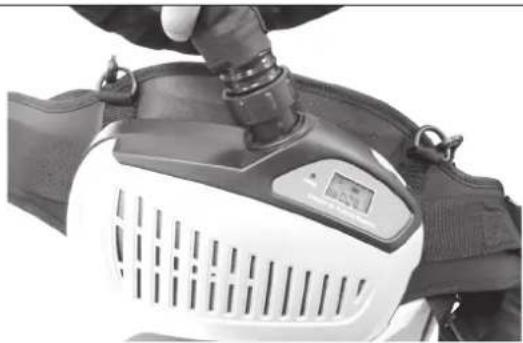
1
Connect the air hose to the respiratory system and twist it clockwise to lock its position.
2
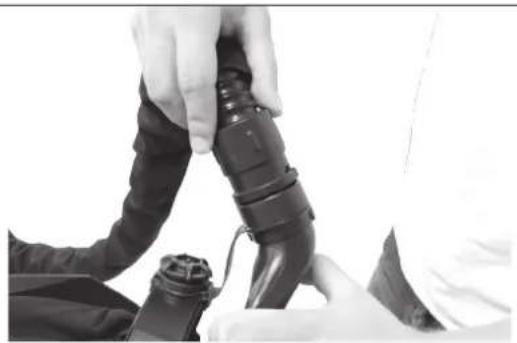
Connect the other end of the hose to the headgear in the same way.
Check that the respiratory hose is strongly connected. If the tube is broken, replace it.
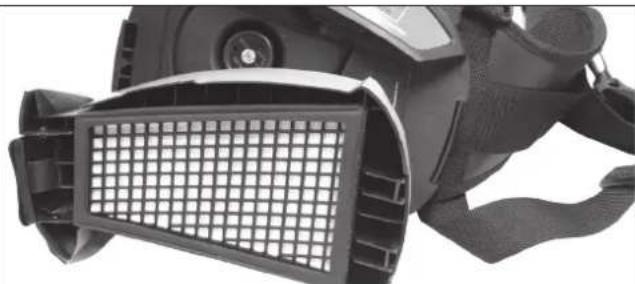
INSTALLING THE BATTERY / CHARGING
1
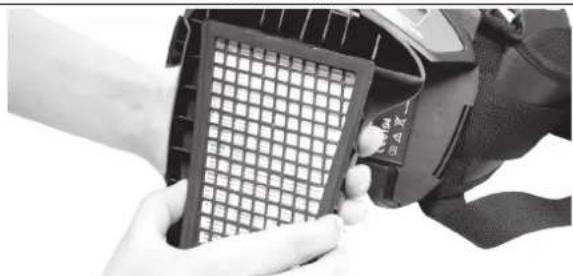
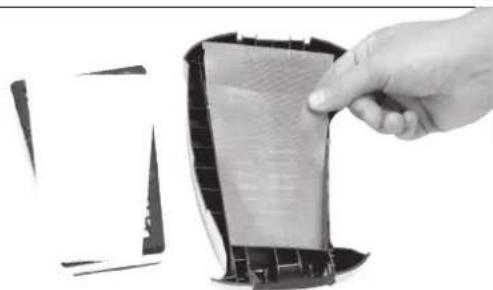
Remove the filter cover by pressing in the latch of the filter cover The filter cover is released.
2
3
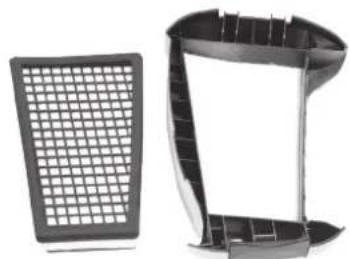
Remove the used filter by lifting it out from the filter cover.
4
5
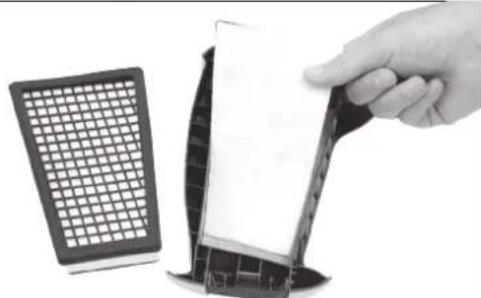
Remove the pre-filter. If the filtration grill is dirty, clean it (blower).
6
The pre filter and filter expected lifetime is 12 months. When under intensive use, check the filter cleanliness periodically and if needed, change them more often than every 12 months.
INSTALLING THE BATTERY / CHARGING
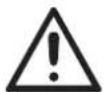
The battery is partially charged when delivered. It must be charged at a 100% (4 bars) before the first use. It is recommended to charge the batteries at a 100% before each use.

The charger must not be used for anything else than it was desgined for. Do not charge the battery in a potentially explosive area. The charger must only be used indoors.
The charger regulates the charge automatically, once the battery is fully charged, it will maintain it at a 100% (floating charge).
The charge time is 3 to 4 hours.

The battery will discharge itself after long storage periods. Always charge the battery if the device was stored for more than 15 days. Once the battery is new or has been stored for more than 3 months, charge it and discharge it at least twice in a row to reach the nominal/rated charge capacity.
Battery charge :
- Connect the charger to the mains.
- Connect the battery to the charger. The connector is above the battery.
- The state of charge is displayed via a red LED on the mains charger.
- Once the charge is finished, the floating charge becomes active: the red LED switches off and a green LED switches on.
- Disconnect the charger from the mains (do not keep the charger plugged to the mains if it's not in use).
REPLACING THE MASK BATTERY
The opto-electronic filter requires 2 3V lithium batteries (CR2450).
Follow the instructions below to change batteries:
- Pull the cover (11) and then remove the battery.
- Place a new battery in position. Polarity + must stay visible.
- Put the cover back (11)
- We recommend to replace the battery once a year.
CAUTION - Recycle used lithium batteries. In Europe, batteries are considered as dangerous waste.
- Do not throw in the bin. To drop off only in collection point for used batteries.
INSTALLING THE HOOD
To adjust the headband, refer to the instruction manual.
AIR FLOW ADJUSTMENT
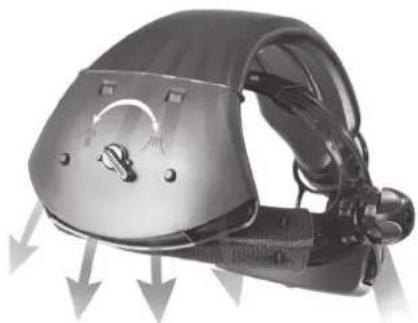
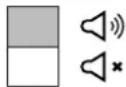
A knob located on the air duct, at the level of the headband, allows you to adjust the direction of the air in the mask. There are 2 possible settings:
川
Air is directed at the user's nose.
八
Air is sent to the user's cheeks.
BEFORE USE
Before each start, make sure that:
- the parts are not damaged. Replace each damaged/worn out part. Check the hose and the fireproof hood.
- the good and secured connection between the hose and the filtration unit, and between the hose and the helmet.
- the air flow is sufficient
- the air flow is constant between the filtration unit and the helmet.
- that the battery is fully charged.
Air flow test :
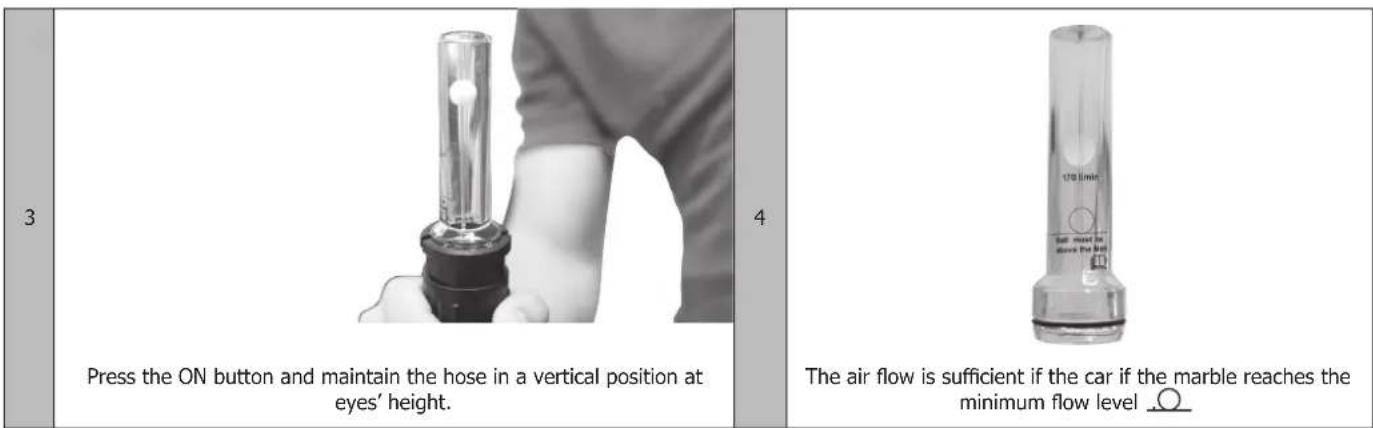

If the marble does not reach the minimum, it is necessary change/replace the battery or to change the filter and pre filter. Is the problem persists, check page 15 for more details.
Air flow alarm test :

The «Warning» LED blinks, an alarm sounds and the icon on the display.

If the alarm does not work, the respiratory system is damaged. If the device is under warranty, return it to your distributor to diagnose the fault.
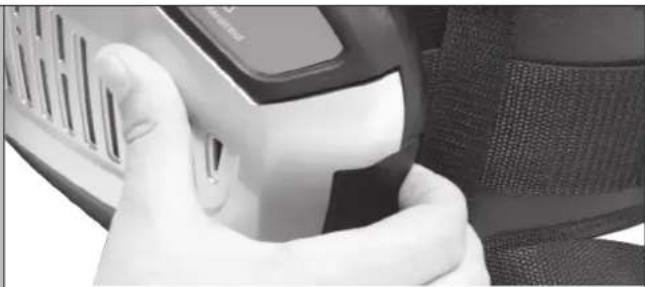
| INSTALLATION | |
| 1xON Switch the device on by pressing the ON button once. | 2 |
| 2xON Press the ON button once again, the air flow is at level 1 (~170L/min). | 3 |
| 3xON Press the ON button once again, the air flow is at level 2 (~200L/min). | 4 |
| 4xON Press the ON button once again, the air flow is at level 3 (~230L/min). Press the ON button once again, the air flow reverts to level 1 (~170L/min). | 5 |
The filtration system goes automatically in sleep mode after 30 minutes of inactivity.
TROUBLESHOOTING
| MEANING CAUSES SOLUTIONS | ||
| Fault code «E01» + blinks | Motor is obstructed or damaged. | Visually check the motor by removing the filter panel and restart the filtration system. If the error persists, the system is damaged, do not use it. |
| Fault code«E02» + blinks | - Obstructed motor - Circuit overheating | |
| blinks + blinks + alarm sounds | Low battery Charge the battery | |
| blinks + blinks + alarm sounds | Obstructed filter or hose Remove the obstruction, change | clean the flexible hose |
| blinks + alarm sounds | Thermal protection | Wait for the indicator to turn off before resuming welding operations. |
| No air flow, no alarm | - No power - Loose electrical contact (battery) | - Charge the battery - Remove and put the battery back. |
| Battery autonomy is too low | - The battery is not charged at a 100% - Obstructed filter - Worn out battery | - Charge the battery - Remove the battery, change the filter - Replace the battery |
| Unusual smell in the helmet | - Broken filter - Broken hose - Internal helmet screen is broken | Leave the working area : - Replace the filter - Replace the hose - Replace the internal screen |
| Insufficient air flow | - Pierced or broken hose - Semi obstructed filter | - Check that the hose is connected to the respiratory system and the helmet. - Change the respiratory hose. - Remove the obstruction or replace the filter. |
MAINTENANCE
The filtration unit and the helmet must be regularly cleaned in order to remain in a good working order.
No liquid must go inside the filtration unit or on the main filter Let the cleaned parts dry out before putting them back. Never use solvents or abrasive cleaners. The filtration unit must not be dried with hot air or with a heater.
The filter must be replaced if it blocked or broken. The breathing hose must be replaced if fractured.
The battery must be charged as soon as the «low battery» indicator switches on. To keep the battery in good working order, it is strongly recommended not to exceed 10 months of storage without use.
Use a soft cloth to clean external surfaces. Do not use water!
The filter must be replaced at the same time as the pre-filter.
WARRANTY
The warranty covers faulty workmanship for 2 years from the date of purchase (parts and labour).
The warranty does not cover:
- Transit damage.
Normal wear of parts (eg.: cables, clamps, etc.). - Damages due to misuse (power supply error, dropping of equipment, disassembling).
- Environment related failures (pollution, rust, dust).
In case of failure, return the unit to your distributor together with:
- The proof of purchase (receipt etc ...)
- A description of the fault reported.
ALLGEMEINEANWEISUNG

He cBapnBaIte n He pexbTe 3Toi mackoHaI roIobOi.
OTOBINbTe erO IIO OT 3aDbIMJeHHoro MeCTa.
IyadaneHn YbIma NcNoJb3yIe PpHHydnteJbHyIO
BENTIIaIIO IIN MeCTHyIO BbITJxKy.
OkcaeTnleHOBa, Ia3epHa nI r3OBa CBapKa N pe3ka 3ToMacko He pa3peWeHbl.
Ipeed KaXdbIM NcNoIb30BaHnEm :
-BHnMaTeIbHo OcMoTpIte MaCKy I ee YΦ/IK-ΦnIbTp.
- HemeJneHNO 3aMeHnTe n3HOWeHHbIe nII NOBpeKdEHHbIe DeTAlN.
- 3aMeHnte IINH3bl fIInbTpa IINI IINCeBbIe 3KpaHbI, eCIn OHNOTpeckaJIncs b IINI NOUapApaJIncs, UTO6bl IpeDoTbPaTITbIOBpeJDeHne rla3 NOLb3OBaTeJIa.
OroIobbe MoKeT BbI3BaTb aJIeprnIO y ChyBCTBNTeJIbHbIX IIODeI.
Pa6o7a TeMnepaTpa ONTOJNeKTpOHHoro ΦnIbTpacocTaBnraTeOT-5°Cdo+55°C.
OnTo3JIeKTPoHHbI ΦnIbTp B MaCKe He YBnIeTcR BOHOHePPOHnIaEmbIM n He 6yEdT pa6OtaTb DOJXHbIM 06pa3OM, ecn OH cOpnKacJcra C BoDoI.
Cbapouhyo Macky cIeDyET nepemeaTb octopoxHo, yTO6bl He noBpeiNbTb 0nIbTp, 3aunTHbIe orpaXdEHHn I/ nII 3aunTHyIO oboIoKy.
06cnyxmbaHne:
-Bo n36eXaHne NOBpeJdeHnA ΦnIbTp a nn IInCeBbIX ⅢntOB He KlaIte TjXeJIbI ppeMTebl nn INHCTpyMeHTbl Ha IInCeByIO paHeIb nn B Hee.
- Temnepaotypa xpaenmia macok ot -10oC do +60oC.
- OuHuaTe ONTOJKeKTPoHHbI ΦnIbTp C NOMOaBIO YNCTOxIOnuTObymaxHoN nn CneuaJIbHO TkaHN dJa LnH3.
- Perylnpno ouuauTe n MeHnTe 3aunTHbI eKpaHbl.
- OuHsAaTe MaCKy n3HyTpN i ChapxN HeiTpaJIbHbIM MOIOUIm CpeIcTBOM - De3nHΦnCnpyUOuM CpeIcTBOM. He NCNoJIb3yIte paCTBOpNTeJI.
- CleteTe 3a Tem, yTo6bI DaTUnKn n JaYeJaKa He 6bln 3a6ntbI PbIbIO nn MycOpom.
- Мыpekomeндуем Испльб30ВаТь Mackу И КОЗьрьк IN Teчehne 5.net. Пюдлжnteльноctь Испльб3OBaHnA 3aBnCnT OT pa3Личных ФakTOpOB, TaKnx KaK TIN ИСПОЛБ3OBaHnA, OчИСТka, XpaHeHne IN TextнчecKoe 6cIvyЖиВaHnE.
NEPEI NcNoJIb3OBAHNEM
- Y6eIntecb, yTO MaCKa B XopoWem CoCToHnnn n OtperyInpyte 0xbat 0pbya.
- Pnpobpe npabnHoe nooKeHne n coCTOHe 3aunTHbIX kpaHO B n pHaUNn aHomann, npBedeTe macky B nCnpabHoe COCTOHe.
- Y6eDnTecb, yTO DaTcHka n 3JIeMeHT He NOKpbTbI nbJIbIO nn HAnetOM.
- Y6eHITcB,чTo 3aunTHbIe PJIeHNK C BHYTpEHHeRo N BHeUHrO 3kpaHa 6blJN OTKJeeHbI.
- y6eIITecb, cyTO yPoBeHb 3aunTbI COOTBETCTByET npImeHReMOMy MeToDy CBapKn. YTo6bI NOMOHy BAM B BaIeM BblOpe CMOTpnte Ta6nUcY «MeToDbI CBapKn».
BCTYJIENHE
Macka cBapuika GYSOMATIC 9/13 XL n 5/13 XXL BmecTe co CBoe cnCTemO peCnnpaTOpHoi 3auHToI yBnaETcpeDCTBOM 3auNTbI Nua n DbxAteJbHOH CNCTEmo. OCHOBaHHa Ha npHnUne UPKyIaUM BO3dyxa NOd NOBbIeHHbIM DaBHeHem CnCTema pecnnapatopHoi 3auNTbI MOHTnpyETcHa HIOc I Noaet BO3dyx K MaCKe ueepz pyKaB, perynpY erO paCXoI. POna OUnIeHHoro BO3dyxa CO3daET TAKIM O6pa30m NobbiueHHoe daBleHne INpePnTCTBye 3arPra3HeHHOMy BO3dyxu N3BHe NocTyNaTb B MaCKy CBAPuika.
Bcra cncema npedctabnreT co6oB dIbIXaTeIbHbI annapat Klacca TH2 P R SL. B cTaHapTHoKOMnleKtaun cnCTema nocTabnaretc C fNtPOM TH2 (apT 038424).
MEPbI INPEIOCTOPOXHOCTN
- Macka MoXeT 6bITb HcNoIb3OBaHa dIg BCEx MeToOB CBapKn Kpome AueTnIeHo-KncIopOHO, Ja3epHoi Ira3oBOi CBapKn.
BHeHn HByTpEHHN 3aunTHbIe 3KpaHbI dONKbI 6bITcCTMaTneCkN oMeueHbI no 06e CTopoHbI p. OTCyTCTBn E3KpaHa MoKeT Bbl3BaTb HeonnpabIMbI yuep6 n onachOCTb Ira BaWe 6eOnacHOCTn.
Bce KOMIOHEHTbI, INCNOJIb3yEmble B DbIXaTeINbHO CnCTeMe, DOJXHbI 6bITc PeTnOuNipOBaHbI GYS INCNOJIb3OBAtbcR B
COOTBETCTBnC INHCTpyKUJMAm DaHHORO PYKOBOCDTBA. - Bыдьхател должен xpaHNTbCBA cyxOM n uHCTOM MeCTe B dlna3OHe Tempepatyp ot -10°C Do +60°C n OTHOCHTeHOBn BlaJXHocTn BO3dYxa MeHee 90%.
BHHMaHHe! DbIXaTeJIbHaTpy6ka MoKet 3anyTaTbcn 3aCTpTaB OkpyKaHOeM npOcTpaHCTBe. - Pn ouheB BbICOKNx CKOPOCTaX pa60Tb I daBHeHne B DbIXaTeNbHOM 3auHTHom yCTpoIcTBe MOKeT CtaTB OTpuaTeNbHbIM B MOMENT MaKcMmaJIbHO BdIxHaHn.
ApeKomeHdyetcNcNoIb3ObaTbToIbKO NoJIHOCTbIO 3apJKeHHbIe AKKMyJITOpbl KaKdbl pa3, KOrda Bbl HaHnHaTe pa6oTaTb.

3apnHoe yctpoCTBO He doJNHO 6bIt NcNoJIb3OBAHO dIpyrO npImeHHeY cEM To, IIN KOtporo OHO pa3pa60TaHO. He 3apjXaIte akymyIaTOP B noteHuaNbHO B3pIbOONaCHO cpeE. 3apnHoe yctpoCTBO DOJNHO 6bIT NCIOB3OBAHO NCKIOHTeBHO B NOMeUeHH.
3apnHoe yctpoNCTBO aBOMATnueckn KOHTpOInpyet 3apnky. KaK TOLbKO aKKyMnTOp nOHOCTbO 3apxKeH, 3apnHoe yctpoNCTBO nODePknBaet 3apnI aKKyMnTOp oCTaETc 3apxKeHHbIM. BpeM 3apnKn coCTabJIeT 3-4 Yaca.
AkkymyIop npa3pJxaeTc 3a BpeM dolrro Tepnoa xpaehn. Bcerda zapkaTe akmyIop, cIn OHa He Hcnonb3ObaIacb 6oee 15 dHe. Korda akkymyIop Hop HOBH mHne Hcnonb3ObaIacB TeueHne 6oee 3 mecaeB, ero hao 3apdntb n pa3pIITb kak MmHIMyM 2 pa3a NODPd, YTO6bl DOCTuHbHomHaJIbHOeMKoCTn 3apra.
3apd akkymyITopa:
1.ПОДКЛЮЧNTe 3apЯнhoeуctpoNCTBOKceTN.
2.Подсоeинite AkkymлгтОКЗapdHOMy yctpoNCTBy.KOHNeKToP pacNoLoXeH CBepxу AkkymлгTopa.
3. CoctoHne 3apAkn yka3bIbaETcC nOMOsbIO Kpachoro CBetOnnOHa HcTeBOM hHype.
4. Iocne OKOHuaHn 3apdKn HauHnaeTc npDepKka 3apdKn: KpaChb CBeToND rachET n 3aKnaeTc 3eHeh.
5. OToeHNHtE 3apAHOe yCTPOIcTBO OT cTe (He octaBnIte 3apAHOe YCTPOIcTBO NOKIIIOHbIM K cTe, KOrDa OHO He IcNOnb3yETc).
3AMEHA BATAPEN MACKN
OnTo3NeKtpoHHbI p60Ta8eHa 1 NHTHeB6aTapeKe 3B (CR2450).
Ja 3ameHb6aTapeek, cJeYte nepeueNCHeHHbIM Hxke yKa3aHnA:
-NotraHHTe 3a KpbIuKy u DocTaHbTe 6aTapeiKy.
- NomeCTnte HObyo 6aTapeKy B ee rHe3do. NolpHocTB «+» DoJxHa 6bITb Ha BnDMoN qactn 6aTapeKn.
- 3akpoIte KpbIkiKy.
-Cobetycra3aMeHb6atapekypa3BroI PEPyIPEXKDEHNE:
- IcnoIb3ObaHHbIe IInTHeBbIe 6aTapeKn DoJXHbI 6bITb OTdHa Hnepepa6OtKy. BaTapeKn OTHocrTc K KaTeOpN onaChbIX OTOxOOB.
-HeBbIbPaBaTbMycOpOnpOBoD,a NOMeCTnTB CneuaNbHbNc6OpHNdIA NcNoIb3OBaHHbIX 6aTaapeek.
ONYCTNTMACKY,NOTAHYB3A 3bIyOK.
1
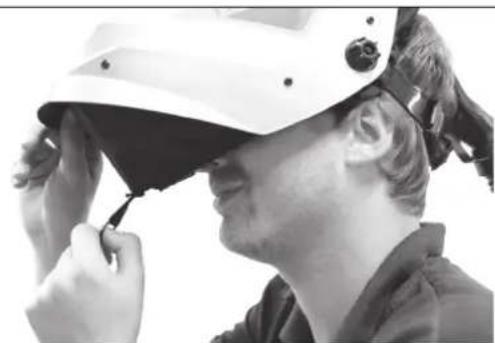
y6eHNTecb B TOM, yTO WJEM XOPOW 3aФИKcIPOBAn NOI NO60pOKOM.
2
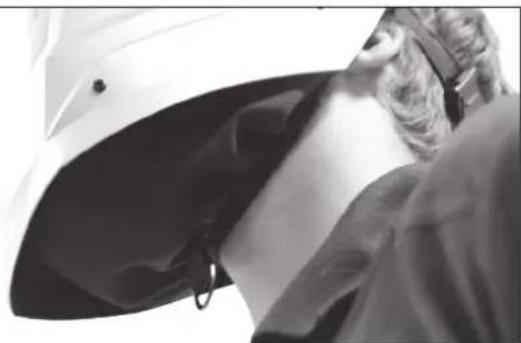
Y6eNTecb B TOM, YTO WnEM npabInbHO Haet n 3akpenIeH noI NO6OpOqKOM.

Toro, yTo6bI noTAYt bnn Ocnabntb 0oD, cm. HCTpyKuIO MaCKn CBapuika, KOtopa npunaraetcB Haabope.
PERYJINPOBKA BO3DyUHORO NOTOKA
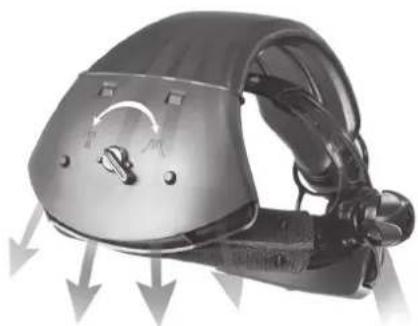
Pyka, paonnoxkeHHa Ha Bo3yxoBoe, Ha ypOBHe oroNoBb, cnYkn TnpepynpobKn HapabIeHn noToKa BO3yxa, noCTynAioUero B macky. Bo3moKhbl 2 bapnaHTa hactpoKn:
11
Bo3dyx HanpaBlaerC B Hoc Nl6b30BaTeNa.
川
Bo3dyx HanpaBnIeTcK uekam nIb3ObaTeIa.
NEPEI NcNoJIb3OBAHHEM
IpeepKaKdbim HcNoIb3ObaHHe m6eintecb, qTo:
-
HN OJHa N3 DeTaleH He NOBpeKdeHa. 3aMeHInTe KaXkyIO NOBpeKDeHHyIO IIN I3HOWeHHyIO DeTaNb. OCMOTPnTE IJIaHr I JIeM I3 ORHeCToIKoro MaTeepnAna.
-
noDcoeHHeHne XopoOee H63onacHoe MeKdy UaHaROM uNbTpoBeHTnIaUHOHHbIM 6LoKOM, a TAKKe MeKdy UaHaROM mackoJ.
-pacxoB Bo3dyxa DoCTaTOHbI
-pacxOBD3nya noCToRHeHOTnBtPoBeHTnlaMQHOHorO6NoKaDoMaCKN.
-akkymyIaTOp NnHOCTbIO 3apJKeH.
Tecpacxoa BO3dyxa:

Ecnn npoIbnema npoDnKbCm. rnaBpy 42 ndoonHnteBHO HOpmaun.
Tect npedynpeintenbHoro cnHnaja pacxoDa BO3dyxa:
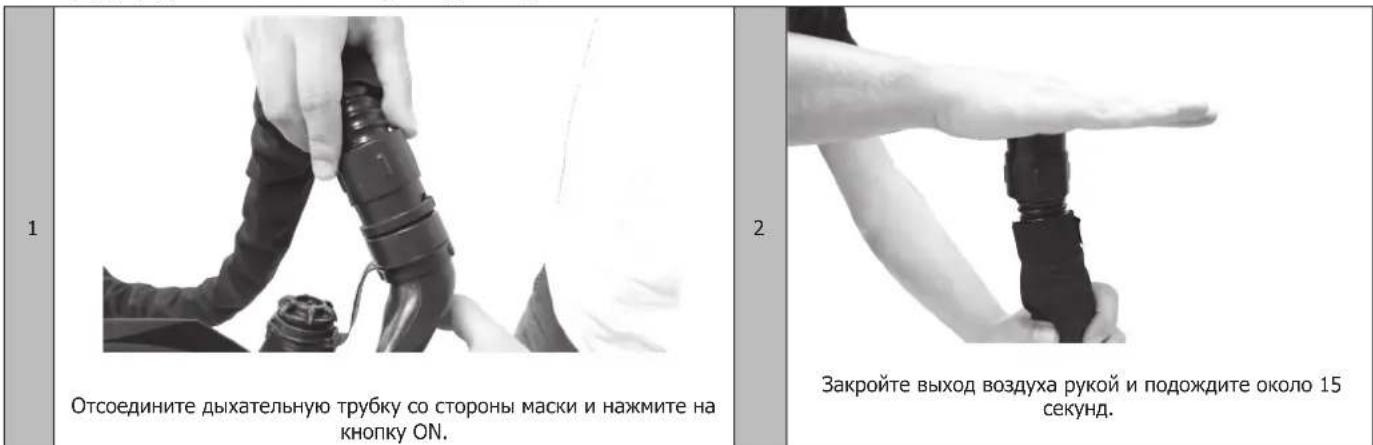
Muraet cBeToIouoD «Warning», pa3daeTcra 3bYkoBoi CunHai N Ha 3kpaHe Mfrae I KOKHa

Ecn npdpynpeintelh bnr hne paoaet, to cnctema pecapatopno 3auNTb noBpexdeHa. Ecn deeCTbyET rapaHTnHbI nepo,TO BO3BpaTNE Bae ue yctpoNCTBO npodabuy IIN daNarHOCTNK NOLOMKN.
IpynpnBHeHHX NOBepxHocTe NcNoJIb3yIte MRAKyIO TkaHb. He NcNoJIb3yIte BDOY!
ΦnIbTp DOnJKeH 6bItb 3aMeHeH ODoHOBpeMeHHO C ΦnIbTpom NpeDbapHTeJIbHO OHCTKn.
TAPAHTR
Iapantn paocpTaHcra Ha IIO6o 3aOdcKo deEeK Tnn 6paK B TeueHne 2x net C daTbI NOKyKn n3denn (anactn pa60aCna).
IapaHTnHe paCnPoCTpaHReTcHa:
JIIO6bIe NOOMKIN, BbIBaHHbIE TpaHCnOpTnpOBKOJ.
- HopmaJIbHbI n3Hoc detaJIe (HaIpIMep : ka6eII, 3aXIMbI n T.D.).
Cnyan HenpaBnHoro nOJb3oBaHHa (On6ka nTahnna, naepe, pa360pKa).
CnyanBbIXOa n3 cTPOn3-3aOkpyKaHOue CpeDb (3arpa3HeHne Bo3dyxa, Kopp03na, nbIb).
PnBbIXOe n3 cTPO,OBpatNTecb B NHTK TOKyNk annapata C npEdbBHeHem CneIyUoNx DOKymeHToB:
-OKyMeHT, NOtBepKdAIOUIM NOKyNkY (c DaTo): KaccOBbYeK, INHBOc....
-ONINCAHNEIPOLOMKN.
VEILIGHEIDSBEVELEN

VOORZORGSGMAATREGELEN
If the eyepiece and frame do not have the same degree of protection, F, B and A, the degree of protection of the entire lens assembly will be reduced. Eye protection device corresponds to the lowest degree of protection. The eye protection must only be used against high-speed particles at temperature.
MARQUAGE DU FILTRE / FILTER MARKING / FILTERMARKIERUNG / MARCADO DE FILTROS / MAPKINPOBKA ΦИЛБТРА / FILTERMARKEREN / MARCATURA FILTRO
Chaque filtre a particule posse de un marque en 12941. / Each particle filter is marked in accordance with EN 12941. / Jeder Partikelfilter ist gemeaEN 12941 gekennzeichnet. / Cada filtre de particles est markado en la norma EN 12941. / Kaqdu cakbeu fmeet mapkpovky co oortbctbnco stranaptom EN 12941. / Elk deeltjesifiler is gemickeerd volgens EN 12941. / Ogni filto antiparticolato e contrassegnto seconda la norma EN 12941.
| FR Performance d'étanchéité - TH2 : Le dispositif est étanche à 98 %EN Tightness performance - TH2: The device is 98% watertight.DE Dichtungsleistung - TH2: Das Gerät ist zu 98% wasserdichtES Rendimiento de sellado - TH2: El dispositivo es 98% resistidente al aguaRU Γερμετημυκόθβ - TH2: Μγαροίστον δοῦηρερημιαμεΜο Na 98%.NL Aïdichtingsprestaties - TH2: Het apparaat is voor 98% waterdicht.IT Prestazioni di tenuta - TH2: Il dispositivo è impermeabile al 98%. |
| FR Indique que le filtre assure une protection contre les particulesEN Indicates that the filter provides protection against particles.DE Zeigt an, dass der Filter einen Schutz gegen Feinstaub bietet.ES Indica que el filtro proporcióna protección contra las particulas.RU Μαçázbaeτ Ha To, Κτο φιπlbtp sobre Μαπιγτο Θ TverdxbixЧасти. NL Geeft aan dat het filtre bescheming biedt tegen stofdeeltjes.IT Indica che il filtro fornisce protezione contro il particolato. |
| FR Indique que le filtre est réutilisableEN Indicates that the filter is reusable.DE Zeigt an, dass der Filter wiederverwendbar istES Indica que el filtro es reutilizableRU Μαçázbaeτ, ττο φιπlbtp sobre Μαπoropazobii. NL Geeft aan dat het filtre herbruikbaar isIT Indica che il filtro è riutilizzabile |
| FR Filtre apportant une protection contre des particules solides et/ou liquides.EN Filtr providing protection against solid and/or liquid particles.DE Filtr zum Schutz gegen feste und/oder flüssige Partikel.ES Filtr que proportióna protección contra las particulas solidas y/o liquidas.RU Μαπlbtp, sobre Μαπiγntu OT Tverdxbix N/niin xincknx Chactn. NL Filtr dat bescherming biedt tegen vaste en/of vloeibare deeltjes.IT Filtr che fornisce protezione contro particelle solide e/o liquide. |
PROCEDE DE SOUDAGE / WELDING PROCESS / SCHWEISSMETHODEN / PROCESO DE SOLDADURA / METOД CBAPKIN / PROCEDIMENTO DI SALDATURA
| Procedé de soudage / Welding process / SchweiBmethoden / Proceso de soldadura /Metórdcwbapkn/Procedimento di saldatura | |||||||||
| FRENDEUSRULIT | Intensité courant | Electrodes enrobées | MAG TIG MIG métaux | lourd MIG alliages lègers | Gougeage arc air | Coupage plasma | Soudage au jetplasma | ||
| current intensity | Coated electrodes MAG | TIG heavy metals | light alloys arc air gouging | plasma cutting plasma welding | |||||
| Stromstärke Umhülle Elektroden E-Hand WIG MIG-Stahlschweiben MIG Aluschweiben | ThermischesAbschmelzen | Plasma-Schneiden | sPlasmaschweiben | ||||||
| intensidad decorridente | Electrodos revestidos | MAG TIG | MIG metalespesados | MIG metales ligeros | ranurado con arcode aire | corte de plasma | soldadura conchorro de plasma | ||
| cima toka | 3neKtpdibocmbaekon | MAG TIG | cbapka MIFTjxejblx metanllo | cbapka MIF neknoxcnlabeob | bozduinó-dyrobaaCTpoxka | πλa3menhajpeka | πλa3menhajcwbapka | ||
| Stroomsterkte | Blede elektroden MAG | TIG MIG ware metalen | MIG liche verbindingen | Arc-air gutsen | Plasma snijden | Plasma lassen | |||
| Intensità corrente | Elettrodo rivevisto | MAG | TIG | MIG metallipesanti | MIG leghe leggere | Scriccatura ad arcoe aria | Taglio plasma | Saldatura a getto diplasma | |
| 5 | 8 | 8 | 8 | 9 | 10 | 10 | 9 | 4 | |
| 6 | 5 | ||||||||
| 10 | |||||||||
| 15 | 6 | ||||||||
| 30 | 9 | 7 | |||||||
| 40 | 9 | 8 | |||||||
| 60 | |||||||||
| 70 | 10 | 10 | 10 | ||||||
| 100 | 9 | ||||||||
| 125 | 11 | 11 | 10 | 10 | 10 | ||||
| 150 | 11 | 11 | 11 | ||||||
| 175 | 12 | 11 | 11 | 12 | 12 | 11 | |||
| 200 | 12 | 12 | |||||||
| 225 | 12 | 12 | 12 | 13 | 13 | 12 | |||
| 250 | |||||||||
| 275 | 13 | 13 | |||||||
| 300 | 13 | 13 | 13 | 14 | |||||
| 350 | 13 | ||||||||
| 400 | 13 | 14 | 14 | 15 | |||||
| 450 | 14 | ||||||||
| 500 | |||||||||
| 600 | 14 | ||||||||
PIÉCES DÉTACHÉES / PARTS LIST / ERSATZTEILE / REPUESTOS / 3ANACHBIE YACTN / PARTI DIRICAMBIO
| FR | EN | DE | ES | RU | NL | IT | |
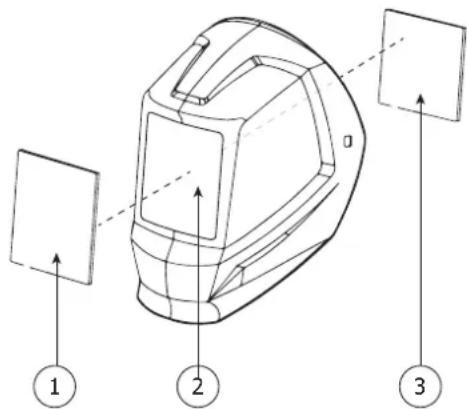
| 1 | Écran de gardeextérieur | Outer protection lens | ÄußereVorsatzscheibe | Pantalla deguardia exterior | Вnevшиnedзашатный ekран | Externebeschermlens | Schermo diprotezione esterna |
| 2 | Filtre | Filter | Filter | Filtro | Фильтpr | Filter | Filtro |
| 3 | Écran de gardeintérieur | Inner protection lens | InnereVorsatzscheibe | Pantalla deguardia interior | Внуншенизашатный ekран | Internebeschermlens | Schermo diprotezione interna |
| 4 | Serre-tête | Headgear | Stimband | Cinta | Образу | Hoofdband | Crociera |
| 5 | Bandeauanti-transpirant | Anti-perspirantheadband | Schweißband | Cinta antitranspirante | Лenetта дая пота | Anti-transpiratiehoofdband | fascia anti-traspirante |
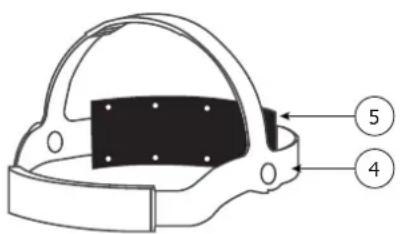
| 5 | 9/13 AIR XL | 043466 (x2) |
| 5/13 AIR XXL | 070844 |
| 1 | 9/13 AIR XL | 114 x 133 (x10) | 043893 |
| 5/13 AIR XXL |
| 3 | 9/13 AIR XL | 106 x 66 (x10) | 043886 |
| 5/13 AIR XXL | 106 x 89.5 (x10) | 046825 |

| FR EN DE E\$ RU NL IT | |||||||
| 1 | Alarmé défaut | Fault alarm | Fehleralarm | Fallo alarma | Аварийский синhal,Pre dedурижданошиюшиоб ошибке | Foutmeling Allarme di guasto | |
| 2 | Niveau du débitd'air (0-1-2-3) | Air flow level(0-1-2-3) | Luftdurchsatzni-veau (0-1-2-3) | Nivel del caudal deaire (0-1-2-3) | Уровень расхаявоздуна(0-1-2-3) | Niveau luchttoe-voer (0-1-2-3) | Livello del flusso d'aria (0-1-2-3) |
| 3 | Niveau de labattery | Battery chargelevel | Batteriezustand Nivel | de la batería | Уровень зардабатерки | Niveau accu | Livello di caricada della batteria |
| 4 | Icône protectionthermique | Thermalprotection icon | Signal thermischerSchutz | Icono de proteción semiclassical | Иkonнka телловьзаштей | Icon thermischebeveiliging | Simbolo di protezione termica |
| 5 | État du filtrate Stateof the filter Filterzustand | of the filter Filterzustand | Estado del filtrato | Состаянецфальта | Staat van het filtrat | Stato del filtroto | |
| 6 | Afficheur débitd'air | Air flow indicator | Anzeige Luft durch-satz | Indicator delcaudal de aire | Индикаторрасхая bozensha | Geeft de luchttoe-voer aan | Visualizzazione delflusso d'aria |
PIÉCES DE RECHANGE / SPARE PARTS / ERSATZTEILE / PIEZAS DE RECAMBIO / 3ANYACTN / RESERVE ONDERDELEN / PARTI DI RICAMBIO
GYSMATIC 9/13 XL • 5/13 XXL
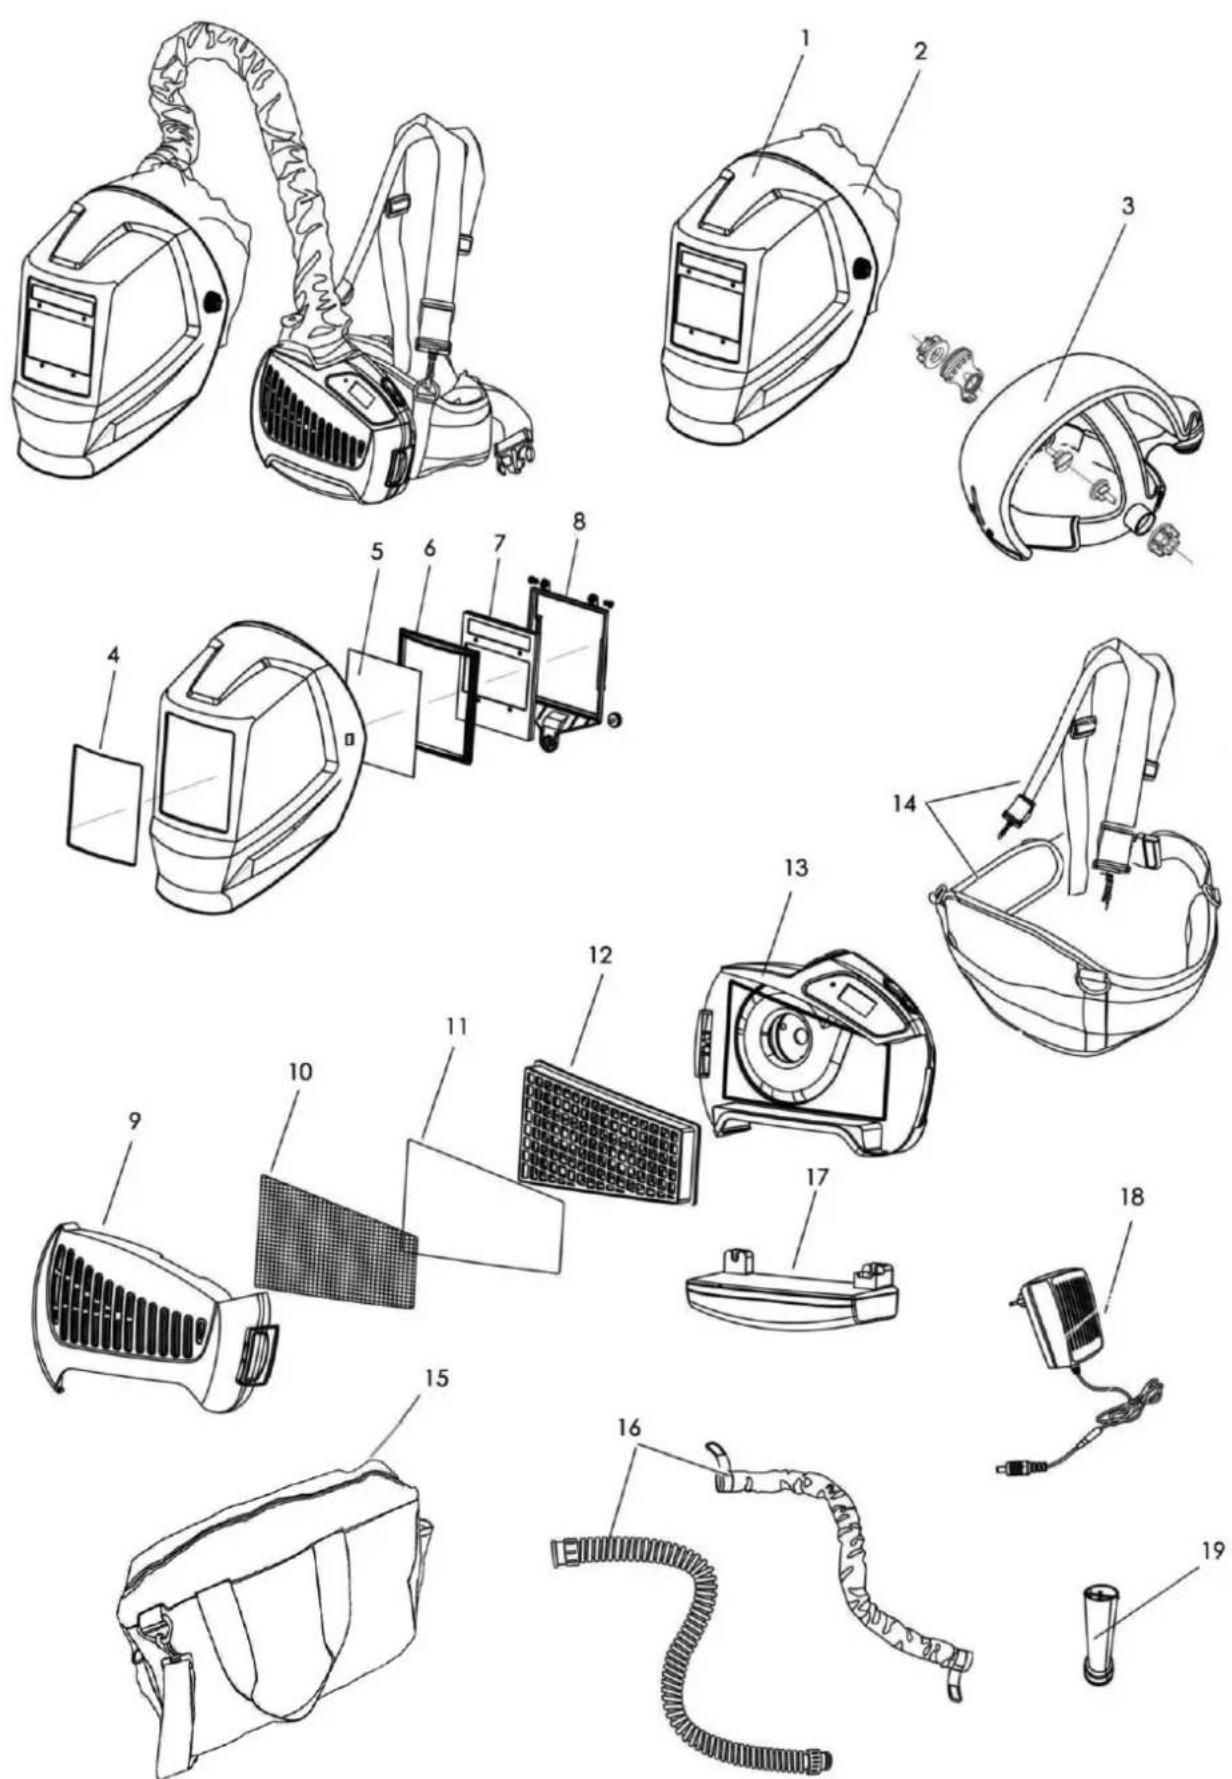
| 9/13 XL 5/13XXL065727 | 047846028852 | ||
| 1 | Masque / Helmet - | ||
| 2 | Cagoule protection tissu / Fabric protection hood 53387 | ||
| 3 | Serre-tête avec conduit d'air sans réglage (ancien) / Headband with air duct without adjustments (old) | 53415 | |
| Serre-tête avec conduit d'air avec réglages / Headband with air duct with adjustments | 53721 | ||
| 4 | Ecran externe / External screen 043893 | (x10) | |
| 5 | Ecran interne / Internal screen 043886 | (x10) | 046825 (x10) |
| 6 | Cadre plastique / Plastic frame - | ||
| 7 | Filtre optéoéclectronique / Optoelectronic filter 53692 53392 | ||
| 8 | Fixation cellule interne / Internal cell mounting - 76014 | ||
| 9 | Capot filtre / Filter panel - | ||
| 10 | Pare-étincelles / Spark guard | 53449 | |
| 11 | Pré-filtre / Pre-filter | 038417 (x5) | |
| 12 | Filtre TH2 / TH2 filter | 038424 (x1) | |
| Filtre TH3 en option / TH3 filter optional | 065734 (x1) | ||
| 13 | Moteur / Motor | 53386 | |
| 14 | Ceinture matelassée + Harnais / Waist belt + Harness | 53408 | |
| 15 | Sac de transport / Carrying bag | - | |
| 16 | Tuyau respiratoire + Housse tuyau ignifugée / Respiratory/breathing hose + Anti-fire cloth for the breathing hose | 76075 | |
| 17 | Batterie lithium-ion / Lithium-ion battery | 037465 | |
| 18 | Chargeur / Charger (12.6V / 1.5A) EU | 037472 | |
| UK | 028869 | ||
| 19 | Débimètre / Air flow tester | - | |
SPÉCIFICATIONS TECHNIQUES / TECHNICAL SPECIFICATIONS / TECHNISCHE DATEN / TEXHNUECKNE CNEUΦIKEAÇUN / ESPECIFICAZIONES TÉCNICAS / TECHNISCHE GEGEVENS / SPECIFICHE TECNICHE
| Dimensions (Lx1xh) / Dimensions (LxWxH) / Abmessungen (Lxbxt) / Dimensiones (Lx1xh) / Paşmepbí (ДхшxB) / Afmetingen (Lx1xh) / Dimensioni (LxWxH) | 240 x 165 x 70 mm | |
| Poids / Weight / Gewicht / Bec / Peso / Gewicht / Peso | 1.7 kg | |
| Type de filtré / Filter type / Filtrotyp / Tipo de filtró / Tún píntbtra / Type filter / Tipo di filtró | TH2 PR SL | |
| Débit d'air / Air flow / Luft durchfluss / Caudal de aire / Pacxod bozduxa / Luchtstroom / Flusso d'aria | (?) | ≥ 165 L/min |
| (?) | 200 L/min | |
| (?) | 230 L/min | |
| Niveau sonore / Noise level / Schallpegel / Nivel sonoro / Uroboh shyma / Geluidsniveau / Livello di rumore | 73 dB max | |
| Température de fonctionnement / Operating temperature / Betriebstemperatur / Paôchay Tempepatуra / Temperatura de funzonamento / Gebruikstemperatuur / Paôchay Tempepatуra / Gebruikstemperatuur / Temperatura di funzonamento | -5°C +55°C | |
| Température de stockage / Storage temperature / Lagerungstemperatur / Tempepatуra xpanenía / Temperatura de alma-cenaje / Bewaartemperatuur / Tempepatуra xpanenía / Bewaartemperatuur / Temperatura di conservazione | -10°C +60°C | |
| Autonomie / Autonomy / Dauer / Autonomía / Àbtonomnoctb / Autonomie / Autonomia | (?) | >8 h |
| (?) | >6 h | |
| (?) | >4 h | |
| Temps de charge / Charge time / Ladezeit / Tiempo de carga / Bpemá zarapánni / Laadtijd / Tempo di ricarica | 3.5 h | |
| Nombre de cycles de recharge / Number of charge cycles / Anzahl von Ladezyklus / Numero de ciclos de recarga / Kolünechtbo zúñkov第三者 / Aantal laadcycli /Numero di cicli di carica | >500 | |
| Taille ceinture / Waist belt size / Groß Gurtel / Talla de cintura / Paşmep noxia / Maat riem / Misura della cintura per la vita | 900 mm - 1300 mm | |
AVERTISSEMENT SONORE / WARNING SOUND / TONWARNUNG / ALERTA SONORA / 3BYKOBOI ПЕДУПЕДNTIELБИСГHAЛ / GELUIDSSIGNAAL / SUONO DI AVERTIMENTO
| x100 ms | 0 | 1 2 | 3 | 4 5 | 6 | 7 8 | 9 | 10 | |||||||
| Installation batterie / Battery installation / Batteriemontage / Instalacion de la batería / Üstánobka akkymyntopora / Installatie accu / Installazione della batteria | |||||||||||||||
| Mise en route / Start up / Inbetriebsnahme / Puesta en marcha / Bkliouchenne / Opstarten / Avviamento | |||||||||||||||
| Changement du débit d'air / Air flow change / Luftdurchfluss-Warningsung / Cambio de caudal de aire / Именения paxxoida bozduxa / Wijzigen van de luchttoevoer / Cambio del flusso d'aria | |||||||||||||||
| Eteindre le système / Switch the system off / System ausschalten / Apague el dispos-sitivo / Выкючпь сису / Systeem uitschakelen / Specnere ilsystema | |||||||||||||||
| Surcharge de courant / Current overload / Stromüberlast / Sobrecarga de corriente / Пекенапожениcope / Overbelasting stroom / Sovraccarico di corrente | |||||||||||||||
| Sortie d'air bloqué / Obstructed air output / Luftausgang verstöpt / Salida de airebloqueada / 3abito boхдоне отberстце對於 bozduxa / Luchtafoer geblokkeerd /Ostruzione dell'aria d'uscita | |||||||||||||||
| Surchauffe / Overheat / Überhitzung / Sobrecalentamento / Perperpeb / Oververhitt-ing / Surriscaldamento | |||||||||||||||
| Batterie faible / Low battery / Akku schwach / Bateria débil / Нзкий уровеньberryada akkymyntopora / Zwakke accu / Batteria bassa | |||||||||||||||
| Filtre bloqué / Obstructed filter / Filter blockiert / Filtrbloqueado / Бл_OKированныйфальт / Filter geblokkeerd / Filtr ostruito |
DECLARATION DE CONFORMITE / DECLARATION OF CONFORMITY / KONFORMITÄTSERKLÄRUNG / DECLARATION DE CONFORMIDAD / CEPTHΦMKAT COOTBETCTBnA / VERKLARING VAN OVEREENS-TEMMING / DICIHIARAZIONE DI CONFORMITA
EN · The welding helmet GYSOMATIC 9/13 AIR TRUE COLOR XL complies with (EU) 2016/425. This confirmity is established in compliance with EN 175:1997, EN 166:2001 and EN 379+A1:2009.
Cell model : XA-5001T
Model of the helmet : AS-4000F
The welding helmet GYSMATIC 5/13 AIR TRUE COLOR XXL complies with (EU) 2016/425. This confirmity is established in compliance with EN 175
:1997,EN166:2001and EN379+A1:2009.
Cell model : XA-5122D
Model of the helmet : AS-4000F
The respiratory protection system complies with Regulation (EU) 2016/425 on personal protective equipment. This conformity is established by compliance with EN 12941:1998 + A2:2008.
Respiratory protective device model: P1004
EN Welding hood / Protection screen
12103 Berlin, Germany
TTH OPERATOR, PHYXPHAR
NoTried to Say: Not
N identification:0196
Respiratory protection system
INSPEC International Ltd.
56 Leslie Hough Way, Salford.
Greater Manchester M6 6AJ
England
Notified Body:0194
^p identification:0194
European Certification Service
73430 Aalen, Germany
Notified body:1883
^o identification:1883
PICTOGRAMMES / SYMBOLS / ZEICHENERKLÄRUNG / ICONOS / CUMBOJIbI / PITTOGRAMMI / PICTOGRAMMEN / SIMBOLI
| CE | - Matériel conforme aux directives européennes. La déclaration UE de conformité est disponible sur notre site. - Device(s) compliant with European directives. The certificate of compliance is available on our website. - Die Geräte entsprechen die europäischen Richtlinien. Die Konformitätskerklung finden Sie auf unsere Webseite. - El aparato está conforme à las normas europeas. La déclaration de conformidad está disponible en vueira网页a Web. - Aparato (s) conforme (s) a las directivas europeas. La déclaration de conformidad está disponible en vueira网页a Web. - Het apparaat is in overeenstemming met met de Europese richtlijn. De conformiteitsverklaring is te vinden op unsere internetsite. - Dispositivo(i) conforme(i) alle direttive europee. La dichiarazione di conformità è disponibile sul loro site internet. |
| - Ce matériel fait l'objet d'une collecte sélective selon la directive européen 2012/19/UE. Ne pas jeter dans une poubelle domestique! - This hardware is subject to waste collection according to the European directives 2002/96/UE. Do not throw out in a domestic bin! - Für die Entsorgung Ihres Gerätes gelten besondere Bestimmungen (sondermüll) gemäß europäische Bestimmung 2012/19/EU. Es darft nicht mit dem Haumüll entsorgt werden. - Este material suyeto a la recogida poreparado de acuerdo con la Direita de la UE 2012/19 / UE. No tire en un cubo de basura domestica! - Θto obórpudanhe naopděkniţ nepeapobotke corglascno dinépctiune Ebrocóoz3a 2012/19/UE. He býbpaçbvatb v obşùm mycopocbohnik! - Afzonderlijke inzameling vereist volgens de Europese richtlijn 2012/19/UE. Gooi het apparaat niet bij het huishoudelijk afval! - Quito disposito è oggetto di ragcolla differenziata seconda la direttiva europea 2012/19/UE. Non gettare nei rifiuti domestici! | |
| - Produkt recyclable qui relève d'une consigne de tri - This product should be recycled appropriately - Produkt muss getrennt ensorgt werden. Werfen Sie das Gerät nicht in den Haumüll. - Producto reciclable que require una separación determinada. - Θtot annapat nopdlékniţ utnilizazhi - Product recyclebar, Niet bij het huishoudelijk afval gooien - Prodotto riciclabile che assume un ordine di smistamento | |
| -10°C | - Température de stockage - Storage temperature - Lagertemperatur - Tempepatуra xpanenies - Bewaartemperatuur - Temperatura de almacenaje - Opslagtemperatuur - Temperatura di conservazione |
| <90% | - Stockage: taux d'humidité recommends < 90%. - Storage: recommended humidity level < 90%. - Lagerung: Feuchtigkeitsgehalt < 90% empfohlen - Almacenado: tasa de humedad recommendada < 90%. - Xpanenme: pekomendevoanhoe codepxanie Blangn < 90%. - Opslag: aanbevolen luchtvochichtigid < 90%. - Magazzino: livello di umidità consigliato < 90%. |
| - Attention! Lire le manuel d'instruction avant utilisation. - Caution! Read the user manual. - Achtung! Lesen Sie die Betriebsanleitung. - Cuidado, leer las instrucciones de'utilización. - Виимаиме!Читайто"Incentrρukцино поinciónьзов�и. - Let op! Lees voorzichtig de gebruiksaanwijzing. - Attenzione! Leggere il manuale d'istruzioni prima dell'uso |