ZIDS2VAKKU - Sprayer Zipper - Free user manual and instructions
Find the device manual for free ZIDS2VAKKU Zipper in PDF.

User questions about ZIDS2VAKKU Zipper
0 question about this device. Answer the ones you know or ask your own.
Ask a new question about this device
Download the instructions for your Sprayer in PDF format for free! Find your manual ZIDS2VAKKU - Zipper and take your electronic device back in hand. On this page are published all the documents necessary for the use of your device. ZIDS2VAKKU by Zipper.
USER MANUAL ZIDS2VAKKU Zipper
EN EC-CONFORM: This product complies with the EC-directives.
EN READ THE MANUAL! Read the user and maintenance manual carefully and get familiar with the controls in order to use the machine correctly and to avoid injuries and machine defects.
EN Attention! Ignoring the safety signs and warnings applied on the machine as well as ignoring the security and operating instructions can cause serious injuries and even lead to death.
EN Protective clothing!
FR Vêtements de protection!
Please check the product contents immediately after receipt for any eventual transport damage or missing parts. Claims from transport damage or missing parts must be placed immediately after initial machine receipt and unpacking before putting the machine into operation. Please understand that later claims cannot be accepted anymore.
This manual contains important information and advice for the correct and safe use and maintenance of the Akku Garden Sprayer ZI-DS2V-AKKU.
Following the usual commercial name of the device (see cover) is substituted in this manual with the name "machine".
The manual is part of the machine and may not be stored separately. Read it profoundly before first use of the machine and keep it for later reference. When the machine is handed to other persons always put the manual to the machine.
Please follow the security instructions!
Please read the entire manual, to prevent misunderstandings, machine damage or even injuries! Due to continuous development of our products illustrations, pictures might differ slightly.
If you however find errors in this manual, please inform us.
Technical changes excepted!
Copyright law
© 2018
This manual is protected by copyright law - all rights reserved. Especially the reprinting as well as the translation and depiction of pictures will be prosecuted by law. Court of jurisdiction is the Landesgericht Linz or the competent court for 4707 Schlüsslberg, AUSTRIA.
Customer Support
The machine must only be used for its intended purpose! Any other use is deemed to be a case of misuse.
To use the machine properly you must also observe and follow all safety regulations, the assembly instructions, operating and maintenance instructions lay down in this manual.
All people who use and service the machine have to be acquainted with this manual and must be informed about the machine's potential hazards.
It is also imperative to observe the accident prevention regulations in force in your area.
The same applies for the general rules of occupational health and safety.
The machine is used for:
Spraying water like liquids: in private house and hobby gardens
Any manipulation of the machine or its parts is a misuse, in this case ZIPPER-MASCHINEN and its sales partners cannot be made liable for ANY direct or indirect damage.

WARNING
- Never use a damaged operationg elements!
The removal or modification of the safety components may result in damage to equipment and serious injury!
HIGHEST RISK OF INJURY!
Ambient conditions
The machine may be operated:
humidity
max. 70%
temperature
+5°C to +40°C (+41°F to +104°F)
The machine, especially the battery; may not be exposed to a temperature of about 80^ C. Do not store in the blazing sun or a long time in the trunk of a car.
Prohibited use:
- The operation of the machine outside the stated technical limits described in this manual is forbidden.
- The operation of the machine without provided protective devices is prohibited.
The use of the machine not being suitable for the use of the machine and not being certified is forbidden - The use of the machine not according with the required dimensions is forbidden.
- Any manipulation of the machine and parts is forbidden.
- The use of the machine for any purposes other than described in this user-manual is forbidden.
- It is not allowed to leave the immediate work area during the work is being performed.
Operation in a potentially explosive atmosphere.
11.1 Security instructions
Missing or non-readable security stickers have to be replaced immediately!
The locally applicable laws and regulations may specify the minimum age of the operator and limit the use of this machine!
To avoid malfunction, machine defects and injuries, read the following security instructions!
GENERAL:
- Use the machine only in good enough light to allow a safe operation can be guaranteed.
- In tiredness, decreased concentration or under the influence of alcohol or drugs, the work on the machine is prohibited!
- Caution in slippery conditions - slip hazard - risk of injury. When working, robust and non-slip footwear. Slides / stumble / traps are a major cause of serious injury or death.
- The machine must be operated only by trained persons (knowledge and understanding of this manual), which have no limitations of motor skills compared with conventional workers.
- Keep the machine in use with both hands
- Unauthorized persons, especially children and not trained personnel must be kept away from the running machine!
- If you pass the machine to third, these instructions must be attached to the machine.
- Before each use, the reliability of the machine is to be checked (tightness of the cutting tool, the proper function)
- Before the start, after the failure or shock, be sure to check the device and make sure that it is in good condition
- Never leave the machine unattended where you are working. If you stop work, unplug the battery and store the machine in a safe place.
- Take special care when work near swimming pools or garden ponds.
- Never use the machine when it is raining or in damp, wet areas
- Unplug battery before all maintenance and settings!
- Trial spraying with clean water and a check of tank, hose, spray head for possible leakage are required prior to operation.
- The preparation of chemical shall follow the instructions and formula furnished by the pesticide manufacturer. Unauthorized altering of the dilution rate of chemical is prohibited, which may either endanger the human being and animal, or result in the failure of pest control.
- Upon the finish of operation, you shall change clothes and wash those exposed part of body such as hands and face. In case of highly toxic pesticide and germicide, a shower after operation is required to ensure safety.
CHARGER:
- The charger is designed exclusively to charge the lithium - ion battery of this machine. Charging other batteries is not permitted.
- Never use the charger in a damp or wet environment
- Disconnect cable connections only by pulling the plug. Pulling on the cable could damage the cable and plug and electrical safety would no longer be guaranteed.
- Never use the charger if the cord, plug or the appliance itself is damaged by external influences. Attach the charger then to the next workshop.
- Do not use the unit near heat sources
- Do not use extension cord to supply power to the charging station
- Do not place metal objects in the area of the charging contacts of the charger.
- Do not open the charger. In case of failure, contact a specialist workshop.
- Use to recharge your battery only with the original charger. Use of other chargers defects may occur or fire hazard.
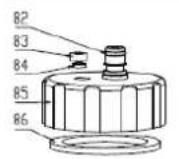
BATTERY:
- Improper use or the use of damaged batteries leaking vapors. Run to fresh air and seek medical attention in case of complaints. The vapors can irritate the respiratory tract.
- FIRE HAZARD! Never charge batteries near acids and flammable materials.
- Charge the battery only in an ambient temperature between 0^ to +40^ . Leave to cool down after heavy load.
- EXPLOSIVE! Protect the battery from heat and fire.
- Use the battery only in an ambient temperature between 0^ to +45^ .
- SHORT CIRCUIT! For disposal, transport or storage, the battery must (plastic bag, box) or the contacts are packed must be taped.
- Never open the battery
12 ASSEMBLY
12.1 Assembly with Trolley Base
12.1.1 Water tank assembly :
Place the water tank on the trolley base (take care to have the right orientation of the tank, fixation bore towards the trolley base)
Attach the bracket by turning the screw counterclockwise tank.


12.1.2 Secure handle:
Loose the nut.
Slide the handle on the metal pipe.
The locking pin has to be inserted into the bore of the metal pipe.
Turn the nut clockwise.

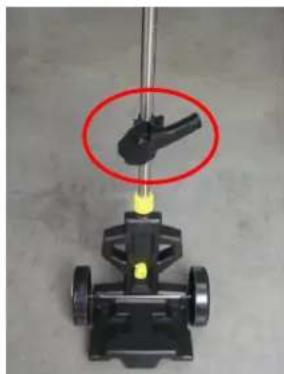
12.1.3 Attach spray gun holder
Put the gun holder on the metal pipe.

12.1.4 Install metal pipe to trolley base
Loosen the nut. Insert the metal pipe to the base trolley. Adjust the height and secure with locking pin. For fixation turn the nut clockwise.

12.2 Assembly with shoulder strap
12.2.1 Connection the mounting hooks for spray gun and nozzle
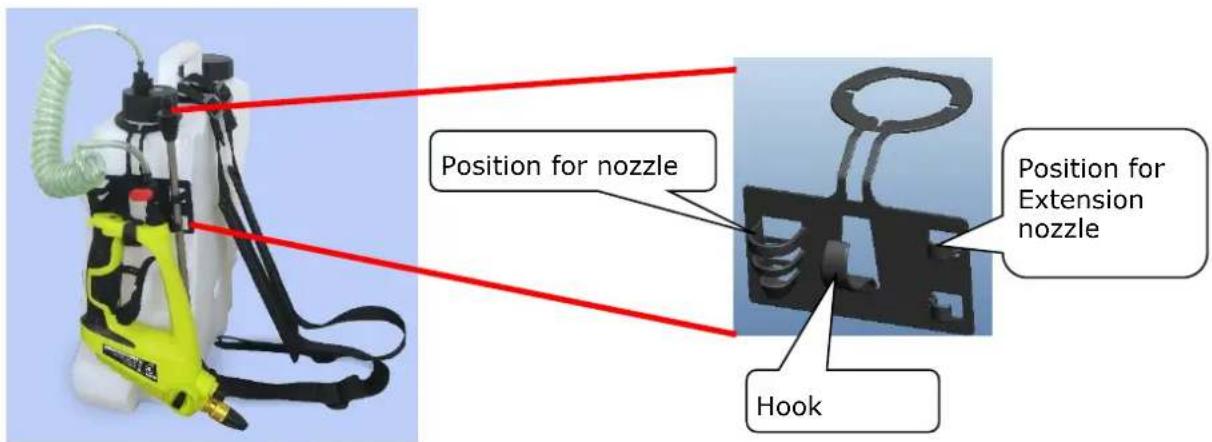
12.2.2 Connecting hose to spray gun and tank
There are quick release adapter on both ends of the pressure hose. Connect the pressure hose to the shut-off valve on / off and then you can connect the spray gun. Connect Tank
Press the quick-release adapter to connect to the tank.
Connect the other end to the lid of the tank. Make sure that the adapter is securely connected to both ports.
To release, pull the quick release adapter again.
You must open the ON / OFF valve before use.
When you stop spraying, set to valve to the OFF position to avoid leakage of the tank..

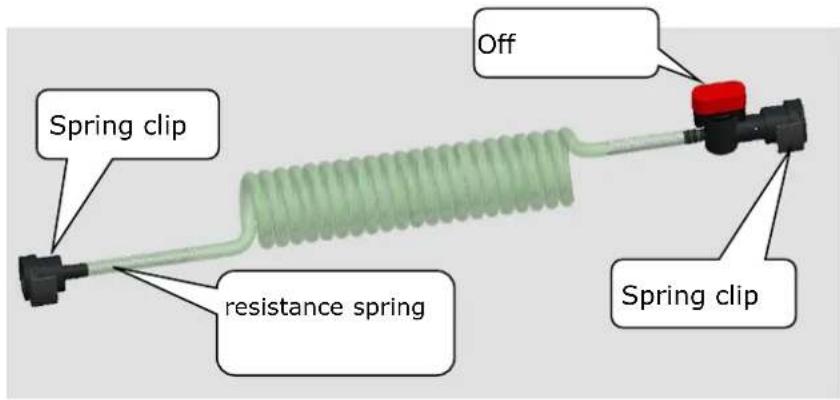
12.2.3 Hose and Shut-off valve (On / Off)

12.2.4 Usage of the water tank
Take the tank cap off by turning it counter-clockwise. Pour water, pesticide or liquid fertilizer into the tank and close the tank again with the tank cap.
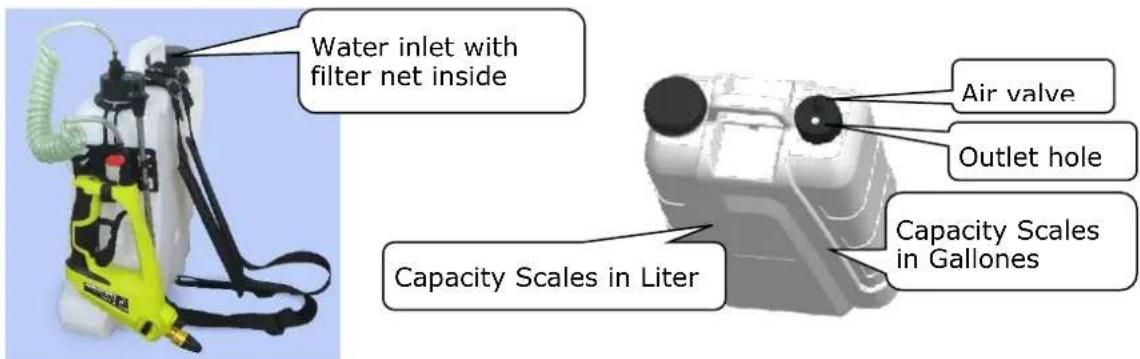
Warning: pesticide or liquid fertilizer must dissolve completely before the mixture is poured into the tank. Otherwise, the undissolved granules / solids can blog the nozzles. Remove any solids on the filter after filling.
12.2.5 Charging a battery:
The battery must be fully charged before first use or after prolonged storage.
Insert the charger plug into the charging socket (14) on the gun and connect the charger to a
socket.
The charge indicator LED (15) lights up red. Charging is in progress.
The machine warms during charging. This is normal. Do not use pressure sprayer while charging!
Charging is around 2 2.5 hours. Charging is completed when the charging indicator light is off.
After charging, unplug the charger and then the charger from the socket.
Charge the battery only in temperatures between 10^ - 45^ .

After prolonged use, let the battery cool before you begin charging.
The supplied charger supplies the lithium battery. Do not use any other charger to charge the pressure sprayer.
Warning: The lithium battery can be damaged if you use the device during the charging process.
13 OPERATION
13.1 Operation of the spray gun
Start:
Slide the safety lock upwards and press the spray lever on the spray gun.
Stopp:
Release the spray lever

Warning: Please keep the safety lock in the place when not in use to prevent from switching on unintentionally.


Set of nozzles:
The pressure sprayer is equipped with two nozzles and can be set for 3 different applications: mist, jet-and fan-shaped spray for different uses.


13.1.1 Main nozzle:
The main nozzle can spray 2 modes: mist and jet, these modes are alternative changed by rotation the nozzle. Mist mode is mainly for large area spray nearby, jet spray is used for long distances.
13.1.2 Fan nozzle:
Fan nozzle is for fan shaped spraying, this mode is specially suitable for large area spraying and long distance.

13.1.3 Change the nozzle:
The nozzles on the spray gun can be easily changed by turning on the changing switch. Upper position main nozzle activated lower positon fan nozzle activeted.
13.1.4 Use spray Extension
Pull the quick release back to the gun and remove the main jet. When the clutch is tightened you can use the spray extension and release the clutch again. The nozzle can be adjusted by turning and pulling.
The spray extension, you can rotate through 360^ and thus spray on hard to reach places.

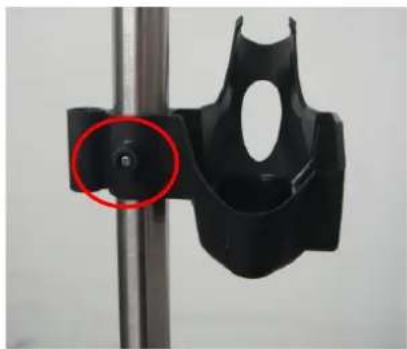
13.1.5 Adjust the Spray Gun Holder
Adjustment of the sprayer gun holder see figures.
14 MAINTENANCE
Do not store any chemicals in the tank, this can lead to deposits and clogging the filter.
Make sure that the cap is securely on the tank.
Clean the filters regularly to ensure good performance.
14.1.1 Cleaning
After each use, release pressure (set pressure sprayer always to a vertical position), empty the tank, clean thoroughly and rinse with clear water.
Afterwards dry the pressure sprayer (open tank,...)
Do not dispose of residual liquids through the sewer system
To avoid any chemical reactions clean the pressure sprayer before use of other pesticides.
To clean the valves and the nozzle of the spray tube operate the pressure sprayer with clean water (possibly with the addition of detergent).
Never use aggressive cleaning agents containing solvents or gasoline.
In case of external contamination of the lid and container, thoroughly clean the thread and thread O-ring area.
14.1.2 Storage
Note: Please remove the pressure hose from the water tank.
There should be no water in the hose to drain the tank by the differential pressure.
During storage, charge the battery at least once every three months to protect the battery from damage.
Keep the sprayer in dry rooms, safe places out of the reach of children.
Do not place any other objects on the sprayer.
The sprayer should not be stored at temperatures above 35^ or in direct sunlight.
14.1.3 Disposal

Waste electrical products should not be disposed of with household waste. Please recycle where facilities exist. Check with your Local Authority or retailer for recycling advice
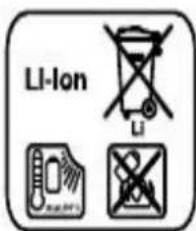
This product contains a lithium-ion battery. Do not dispose of battery powered spray gun in household waste, water or fire. Spray gun must be collected, recycled or disposed of in an environmentally friendly way. Please dispose of properly at a public recycling facility.
15 TROUBLESHOOTING
| In case of leakage or poor spraying performance | • Seal rings at various joints may loose or be damaged. • The switch filter screen or the small filter screen at the suction hose has been blocked. • The spray hole has been blocked. | • Tighten or replace it • Clean it • Clean and repair it. |
| Extra-high pumping pressure | • Poor lubrication of piston O-ring. • Extra-high pressure in the tank | • Apply grease to the piston O-ring • Stop boosting. Check the relief valve for possible jamming. Apply grease to the O-ring of relief valve |
| Extra-small pumping pressure | • Piston O-ring is worn out or damaged • Water-proof washer comes off | • Replace the piston O-ring • Repair. |
| Spray air instead of water | • The suction hose in the tank comes off | • Fix it |
Note: only thoroughly cleaned sprayers are allowed to be sent in for repair!
16 PREFACE (FR)
Cher client!
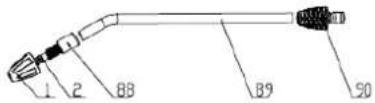
| No. | Description | Qty | No. | Description | Qty |
| 1 | Handle | 1 | 8 | Trolley base | 2 |
| 2 | Nut M6 | 2 | 9 | Circlip | 2 |
| 3 | Bolt M6x35 | 2 | 10 | Big wheel cover | 2 |
| 4 | Handle knob | 2 | 11 | Reinforced sheet | 1 |
| 5 | Sprayer machine storage | 1 | 12 | Big roller shaft | 2 |
| 6 | Metal tube | 1 | 13 | Bayonet lock | 2 |
| 7 | Fixed knob of water tank | 1 |
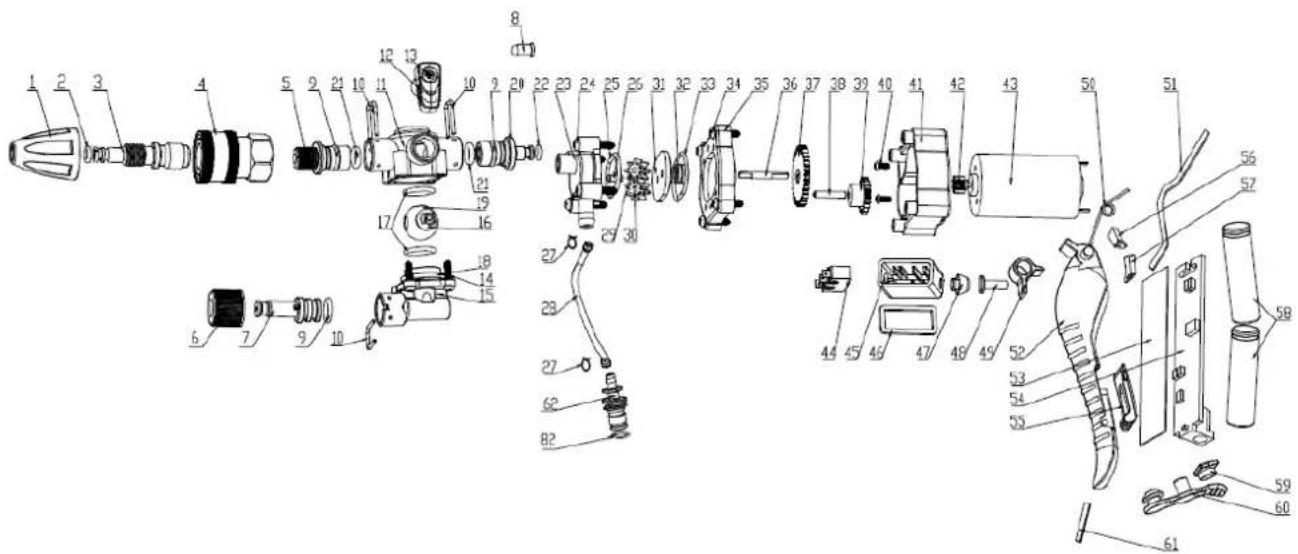
| No. | Description | Qty | No. | Description | Qty |
| 1 | Quick nozzle cap | 2 | 48 | Switch drive link | 1 |
| 2 | o-ring seal 7.0 | 2 | 49 | Switch lever | 1 |
| 3 | Quick nozzle body | 1 | 50 | Trigger torsional spring | 1 |
| 4 | Quick connector | 1 | 51 | Clam shell seal | 1 |
| 5 | Brass connector | 1 | 52 | Trigger | 1 |
| 6 | Fan shape nozzle cap | 1 | 53 | Fiber paper | 1 |
| 7 | Fan shape nozzle | 1 | 54 | PCB | 1 |
| 8 | Work light groupware | 1 | 55 | Safety lock | 1 |
| 9 | o-ring seal 1.0 | 3 | 56 | Left block rubber of clam shell | 1 |
| 10 | u-shape bolt 1.0 | 3 | 57 | Right block rubber of clam shell | 1 |
| 11 | Triple valve body | 3 | 58 | Battery | 1 |
| 12 | Triple valve switch | 1 | 59 | Clear lampshade | 1 |
| 13 | Screw 6.0 | 1 | 60 | Seal for charger hole | 1 |
| 14 | Screw 1.0 | 4 | 61 | Seal for tight clam shell | 1 |
| 15 | Triple valve elbow | 1 | 62 | Water supply connector | 1 |
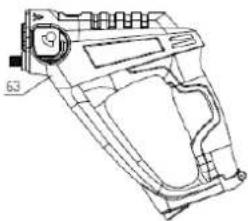
| 16 | O-ring seal 6.0 | 1 | 63 | Left clam shell | 1 |
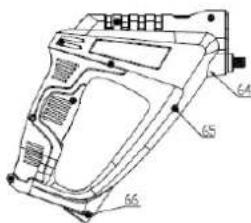
| 17 | O-Ring seal 3.0 | 2 | 64 | Righl clam shell | 1 |
| 18 | O-Ring seal 5.0 | 1 | 65 | Screw 1.0 | 8 |
| 19 | Triple valve core | 1 | 66 | Screw 2.0 | 1 |
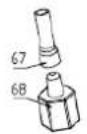
| 20 | Plastic connect pipe | 1 | 67 | Water supply hose of water tank | 1 |
| 21 | O-Ring seal 4.0 | 2 | 68 | Brass balancing weight | 1 |
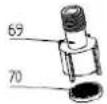
| 22 | O-ring seal 2.0 | 1 | 69 | Plastic body for balancing weight | 1 |
| 23 | Pump body | 1 | 70 | Filter | 1 |
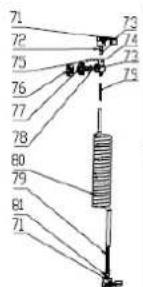
| 24 | Screw 3.0 | 4 | 71 | Quick connector buckle | 2 |
| 25 | u-shape seal | 1 | 72 | Quick connector 2 | 1 |
| 26 | Small shaft | 1 | 73 | O-ring seal 9.0 | 3 |
| 27 | Wire clip | 2 | 74 | Valve body | 1 |
| 28 | Water supply hose for spray gun body | 1 | 75 | u-shape blot 2.0 | 1 |
| 29 | Pump gear 1 | 1 | 76 | Switch knob | 1 |
| 30 | Pump gear 2 | 1 | 77 | Valve core | 1 |
| 31 | Pump cover | 1 | 78 | o-ring seal 10.0 | 1 |
| 32 | Shaft seal | 1 | 79 | Bendproof spring | 2 |
| 33 | u-shape seal for gear box cover | 1 | 80 | Spring hose | 1 |
| 34 | Screw 4.0 | 4 | 81 | Quick connector 1 | 1 |
| 35 | Gear box cover | 1 | 82 | o-ring seal 8.0 | 2 |
| 36 | Transmission shaft | 1 | 83 | Ventilate valve body | 1 |
| 37 | Big gear | 1 | 84 | Silica gel plug for ventilate valve | 1 |
| 38 | Shaft | 1 | 85 | Water tank cap for outlet | 1 |
| 39 | Dublicate teeth | 1 | 86 | Seal for water tank cap | 1 |
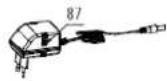
| 40 | Screw 5.0 | 2 | 87 | Charger | 1 |
| 41 | Gear box body | 1 | 88 | Nozzle body for extension nozzle | 1 |
| 42 | Motor gear | 1 | 89 | Extension nozzle | 1 |
| 43 | motor | 1 | 90 | Quick connector for extension nozzle | 1 |
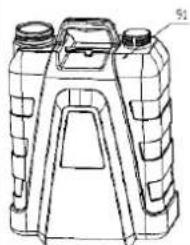
| 44 | microswitch | 1 | 91 | Water tank | 1 |
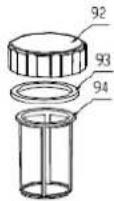
| 45 | Microswitchbox | 1 | 92 | Water tank cap for inlet | 1 |
| 46 | Packing ring | 1 | 93 | Big gasket seal for water tank cap | 1 |
| 47 | Fan shape rubber cap | 1 | 94 | Filter for fill water | 1 |
29 ERSATZTEILE / SPARE PARTS / PIECES DÉTACHÉES
(EN) With original ZIPPER spare parts you use parts that are attuned to each other shorten the installation time and elongate your machines lifespan.
IMPORTANT
The installation of other than original spare parts voids the warranty!
So you always have to use original spare parts
When you place a spare parts order please use the service formular you can find in the last chapter of this manual. Always take a note of the machine type, spare parts number and partname. We recommend to copy the spare parts diagram and mark the spare part you need.
You find the order address in the preface of this operation manual.
Company ZIPPER Maschinen GmbH grants for mechanical and electrical components a warranty period of 2 years for amateur use; and warranty period of 1 year for professional use, starting with the purchase of the final consumer. In case of defects during this period, which are not excluded by paragraph 3, ZIPPER will repair or replace the machine at its own discretion.
2.) Report:
In order to check the legitimacy of warranty claims, the final consumer must contact his dealer. The dealer has to report in written form the occurred defect to ZIPPER. If the warranty claim is legitimate, ZIPPER will pick up the defective machine from the dealer. Returned shipments by dealers which have not been coordinated with ZIPPER, will not be accepted and refused.
3.) Regulations:
a) Warranty claims will only be accepted, when a copy of the original invoice or cash voucher from the trading partner of ZIPPER is enclosed to the machine. The warranty claim expires if the accessories belonging to the machine are missing.
b) The warranty does not include free checking, maintenance, inspection or service works on the machine. Defects due to incorrect usage of the final consumer or his dealer will not be accepted as warranty claims either. Some examples: usage of wrong fuel, frost damages in water tanks, leaving fuel in the tank during the winter, etc.
c) Defects on wear parts are excluded, e.g. carbon brushes, collection bags, knives, cylinders, cutting blades, clutches, sealings, wheels, saw blades, splitting crosses, riving knives, riving knife extensions, hydraulic oils, oil/air/fuel filters, chains, spark plugs, sliding blocks, etc.
d) Also excluded are damages on the machine caused by incorrect or inappropriate usage, if it was used for a purpose which the machine is not supposed to, ignoring the user manual, force majeure, repairs or technical manipulations by not authorized workshops or by the customer himself, usage of non-original ZIPPER spare parts or accessories.
e) After inspection by our qualified personnel, resulted costs (like freight charges) and expenses for not legitimated warranty claims will be charged to the final customer or dealer.
f) In case of defective machines outside the warranty period, we will only repair after advance payment or dealer's invoice according to the cost estimate (incl. freight costs) of ZIPPER.
g) Warranty claims can only be granted for customers of an authorized ZIPPER dealer who directly purchased the machine from ZIPPER. These claims are not transferable in case of multiple sales of the machine.
4.) Claims for compensation and other liabilities:
The liability of company ZIPPER is limited to the value of goods in all cases. Claims for compensation because of poor performance, lacks, damages or loss of earnings due to defects during the warranty period will not be accepted. ZIPPER insists on its right to subsequent improvement of the machine.
33 GARANTIE ET SERVICE (FR)
1.) Garantie:
Product experience form
We observe the quality of our delivered products in the frame of a Quality Management policy.
Your opinion is essential for further product development and product choice. Please let us know about your:
- Impressions and suggestions for improvement.
- experiences that may be useful for other users and for product design
- Experiences with malfunctions that occur in specific operation modes
We would like to ask you to note down your experiences and observations and send them to us via FAX, E-Mail or by post:
Please describe amongst others in the problem: What has cause the problem/defect, what was the last activity before you noticed the problem/defect? For electrical problems: Have you had checked you electric supply and the machine already by a certified electrician?
- Bitebeachten
Additional information
INCOMPLETELY FILLED SERVICE FORMS CANNOT BE PROCESSED! FOR GUARANTEE CLAIMS PLEASE ADD A COPY OF YOUR ORIGINAL SALES/ DELIVERY RECEIPT OTHERWISE IT CANNOT BE ACCEPTED. FOR SPARE PART ORDERS PLEASE ADD TO THIS SERVICE FORM A COPY OF THE RESPECTIVE EXPLODED DRAWING WITH THE REQUIRED SPARE PARTS BEING MARKED CLEARLY AND UNMISTAKABLE. THIS HELPS US TO IDENTIFY THE REQUIRED SPARE PARTS FASTLY AND ACCELERATES THE HANDLING OF YOUR INQUIRY.