ZI-EWB300-160L - Electric wheelbarrow Zipper - Free user manual and instructions
Find the device manual for free ZI-EWB300-160L Zipper in PDF.
User questions about ZI-EWB300-160L Zipper
0 question about this device. Answer the ones you know or ask your own.
Ask a new question about this device
Download the instructions for your Electric wheelbarrow in PDF format for free! Find your manual ZI-EWB300-160L - Zipper and take your electronic device back in hand. On this page are published all the documents necessary for the use of your device. ZI-EWB300-160L by Zipper.
USER MANUAL ZI-EWB300-160L Zipper
natural_image
Black ZIPPER wheelbarrow with green logo and 'ZI-EWB300-T60L' text, no additional signage or symbols visible.
ZI-EWB300-160L
EAN: 9120039234700
CE
YOUR
JOB.
OUR
TOOLS.
1 INHALT/INDEX/OBSAH
1 INHALT / INDEX / OBSAH 2
2 SICHERHEITSZEICHEN / SAFETY SIGNS / BEZPEČNOSTNÍ ZNAČKY / BEZPEČNOSTNÉ SYMBOLY / SEÑALES DE SEGURIDAD / SYMBOLES DE SÉCURITÉ 4
11.1 Intended use of the machine 19
11.1.1 Technical Restrictions....19
11.1.2 Prohibited Use / Hazardous misapplications....19
11.2 User Requirements....19
11.3 General safety instructions....19
11.4 Special safety instructions for this machine....20
11.5 Hazard warnings....20
12 ASSEMBLY 21
12.1 Checking delivery content 21
12.2 Assembly-steps 21
13 OPERATION....23
13.1 Operation instructions....23
13.2 Operation 23
13.2.1 Start electrical support 23
13.2.2 Machine stopping / parking 24
13.3 Charger....24
14 CLEANING, MAINTENANCE, STORAGE, DISPOSAL....24
14.1 Cleaning 24
14.2 Maintenance 25
14.2.1 Maintenance plan 25
14.3 Storage....25
14.4 Disposal 25
15 TROUBLESHOOTING....25
16 PŘEDMLUVA (CZ) 26
17 BEZPEČNOST 27
29.1.1 Restrictions techniques....45
29.1.2 Applications interdites / Mauvaises applications dangereuses....45
32.4 Elimination....52
33 RESOLUTION DE PANNE....52
34 ERSATZTEILE / SPARE PARTS....52
EN CE-Conformal! - This product complies with the EC-directives.
EN READ THE MANUAL! Read the user and maintenance manual carefully and get familiar with the controls in order to use the machine correctly and to avoid injuries and machine defects.
EN Protect from rain, splashing!
EN Protective clothing!
EN Warning signs and/or stickers on the machine which are illegible or have been removed must be replaced immediately!
text_image
Exploded view diagram of a vehicle's components with numbered labels for identification| Pos | Parts name | Qty |
| 1 | Mulde / tray / Zásobník / Bañera / Auge | 1 |
| 22a | Achse / axis / Osa / Eje / Axe Stützráder / support wheels / Opěrná kola / Ruedines / Roues de support | 12 |
| 3 | Rechter Griff mit Motorbedienelement + Leitungen und Stecker / right handle with motor control element + line and plug / Pravá rukojeť s ovládacími prvky motoru + vedení + zástrčka / Empuňadura derecha con elemento de mando del motor + conductos y conector /Poi-gnée droite avec éléments de com-mande du moteur + câbles et fiche | 1 |
| 4 | Linker Griff / left handle / Levá rukojeť / Empuňadura izquierda / Poignée gauche | 1 |
| 5 | Rahmen / frame / Rám / Bastidor / Châssis | 1 |
| 6 | Muldenstrebe / tray support / Podpěra zásobníku / Puntal de la bañera / Entretoise d'auge | 1 |
| 7 | Strebe vorne / front support / Přední podpěra / Varilla de soporte delante / Entretoise avant | 1 |
| 8 | Strebe / support / Podpěra / Varilla de soporte / Entretoise | 1 |
| 9 | Akkubox / battery box system / Skříňka s baterií / Caja de la batería / Boîtier de la batterie | 1 |
| 10 | Griffstrebe / handle support / Podpora rukojeti / Varilla de la empuňadura / Guidon | 1 |
| 11 | Montagematerial / fixation material / Montážní materiál / Material de montaje / Matériel de montage | |
| 12 | Rad mit Antrieb + Stecker + Leitungen / motor wheel + line and plugs / Kolo s pohonem + zásuvka a vedení / Rueda con propulsión + conector + conductos / Roue avec moteur + fiche + câbles | 2 |
| 13 | Betriebsanleitung / user manual / Návod k obsluze / Instrucciones de servicio / Mode d'emploi | 1 |
| 14 | Ladegerät / charger / Nabíječka / Cargador / Chargeur | 1 |
| 15 | Akku / battery / Baterie / Acumulador / Batterie | 1 |
| 16 | Montageplatten / mounting plates / Montážní desky / Placas de montaje / Plaques de montage | 4 |
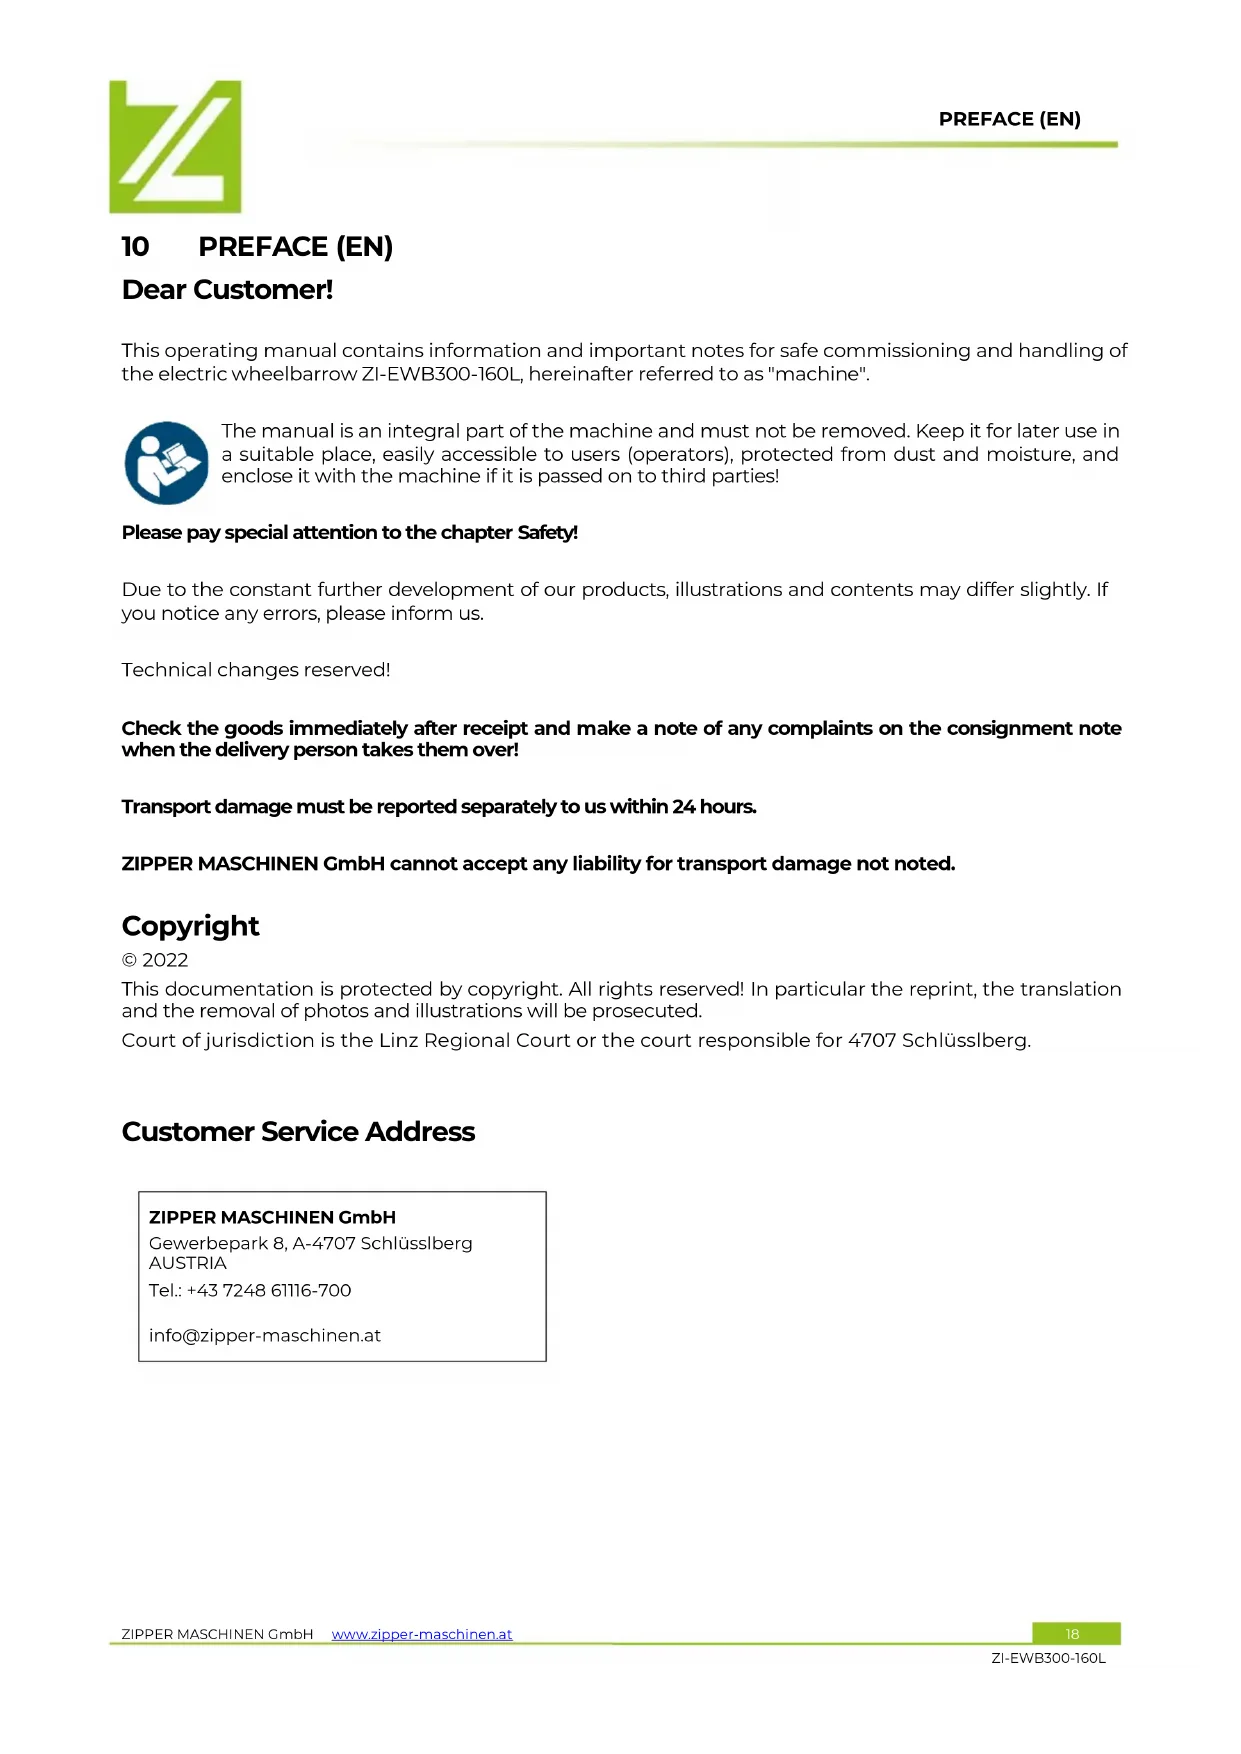
3.2 Komponenten / components / Komponenty / Componentes / Composants
text_image
ZIPPER WATERBOWING 1 2 2a 2b 1a 1b 2c 3 4 5 6 7| Nr. | Bezeichnung / description Nr. | Bezeichnung / description | |
| 1 | Akkubox / battery box system / Skříňka s baterií / Caja de la batería / Boítier de la batterie | 2c | Hebel elektrische Unterstützung / electrical support lever / Elektrická podpěrná páka / Palanca del apoyo eléctrico / Levier d'assistance électrique |
| 1a | Anschluss für Motor – Bedienelementkabel / Plug for motor control element cable / Připojení motoru - kabel ovládacího prvku / Conexión para el motor; cable del elemento de mando / Raccord du moteur – câble de commande | 3 | Handgriff / handle grip / Rukojet / Mango / Poignée |
| 1b | EIN-AUS-Schalter / ON-OFF-switch / Vypínač / Interruptor ON/OFF / Interrupteur MARCHE-ARRÊT | 4 | Mulde / tray / Zásobník / Bañera / Auge |
| 2 | Motor – Bedienelement / motor control element / Ovládací prvek motoru / Elemento de mando del motor / Élément de commande du moteur | 5 | Stützrad / support wheel / Opěrné kolo / Rueda de apoyo / Roue de support |
| 2a | Elektrische Unterstützung vor-rückwärts / electrical support for-backwards / Elektrická asistence vpřed-vzad / Asistencia eléctrica avance-retroceso / Assistance électrique en avant-arrière | 6 | Rahmen / frame / Rám / Bastidor / Châssis |
| 2b | Ein-Aus Schalter Bremse / ON-Off switch brake / Vypínač brzdy / Interruptor de encendido / Interrupteur marche-arrêt du frein | 7 | Rad mit Motor / motor wheel / Kolo s motorem / Rueda con motor / Roue motorisée |
3.3 Technische Daten / technical data / Technické údaje / Datos técnicos / Données techniques
| ZI-EWB300-160L | |
| Akkuspannung / rated voltage / Jmenovité napětí / Tensión del acumulador / Tension de la batterie | 40 V DC |
| Akkukapazität / battery capacity / Kapacita baterie / Capacidad del acumulador / Capacité de la batterie | 6 Ah |
| Akkulaufzeit [Std] / battery worktime [h] / Provoz baterie [h] / Autonomía de la batería [h] / Durée de fonctionnement de la batterie [heures] | 2,5 h |
| Motorleistung / motorpower / Výkon motoru / Potencia del motor / Puissance du moteur | 2 x 280 W |
| Motordrehzahl / motor rated speed / Otáčky motoru / Régimen de revoluciones del motor / Vitesse de rotation du moteur | 0-80 min ^-1 |
| Geschwindigkeit / speed / Rychlost Velocidad / Vitesse | max. 6 km/h |
| Drehmoment motor / motor rated output torque /Jmenovitý kroutící / Par de giro del motor / Couple de rotation du moteur | 2 x 150 Nm |
| Reifendimension / wheel dimension / Rozměr pneumatiky /Dimensiones de los neumáticos / Dimensions des pneus | 1 x (16 x 5.00-8)2 x (10 " ) |
| max. Ladekapazität / max. load capacity / Max. nosnost / Capacidad máx. de carga / Capacité de charge maximale | 300 kg / 160 l |
| Behälterdimension (L x B) / tray-dimension (L x W) /Rozměr zásobníku (d x š) / Dimensiones de la bañera (L x A) / Dimen-sion du conteneur (L x l) | 1080 x 820 mm |
| Behälterhöhe / tray-height / Výška kontejneru / Altura de la bañera /Hauteur du conteneur | 340 – 520 mm |
| Eigengewicht mit AKKU / weight with batterie (netto/net) /Hmotnost s baterií (netto) / Peso propio con ACUMULADOR / Poids propre avec BATTERIE | 53 kg |
| Verpackungsmaße / packaging dimension / Rozmery balenia /Dimensiones del embalaje / Dimensions d'emballage | 1120 x 920 x 510 mm |
| Maschinenmaße / dimension / Rozměry stroje / Medidas de la máquina / Dimensions de la machine | 1350 X 890x 900 mm |
| Stromüberwachung max-Wert / over current protection value of controller / Maximální hodnota monitorování proudu / Valor máx.monitorización de la corriente / Surveillance de la valeur maximale du courant | 18 A |
| Ladegerät / charger / Nabíječka / Cargador / Chargeur: | |
| Eingangsspannung / input voltage / Vstupní napětí / Tensión de entrada / Tension d'entrée | 220-240 V / 50-60 Hz / AC |
| Leistung / power / Výkon / Potencia / Puissance | 97 W (C4202) |
| Ausgang / output / Výstup / Salida / Sortie | 42 V |
| Ladezeit / charge time / Čas nabíjení / Tiempo de carga / Temps de charge | 3 h |
| Schutzklasse II / protection class II / Třída ochrany II / Clase de protección II / Classe de protection II | II |
| Gewicht Ladegerät / weight charger / Hmotnost nabíječky / Peso del cargador / Poids du chargeur | 0.36 kg |
| Maschinenmaße / dimension / Rozměry stroje / Medidas de la máquina / Dimensions de la machine | 160 x 75 x 46 mm |
| Akku / battery / Baterie / Acumulador / Batterie: | |
| Akkuspannung / rated voltage / Jmenovité napětí / Tensión del acumulador / Tension de la batterie | 40 V |
| Akkukapazität / battery capacity / Kapacita baterie / Capacidad del acumulador / Capacité de la batterie | 6 Ah |
| Akkuenergie / battery power / Výkon baterie / Energía del acumulador / Énergie de la batterie | 240 Wh |
| Gewicht AKKU / weight battery / Hmotnost baterie / Peso del acumulador / Poids de la batterie | 1,827 kg |
| Maße / dimension / Rozměr / Dimensiones / Dimensions | 180 x 106,5 x 76 mm |
4 VORWORT (DE)
text_image
Technical diagram of a vehicle chassis with numbered components and assembly notes in Chinese
text_image
1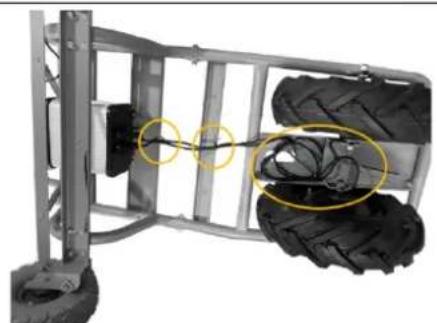
natural_image
Mechanical assembly with attached tire and motor components, no visible text or symbols2. Schritt
natural_image
Close-up of a transparent plastic enclosure with a red button, no visible text or symbols
text_image
1 2 3natural_image
Close-up of a black plastic electronic device with a yellow indicator light and label '1' (no readable text or symbols on the device itself)
text_image
1 2 3text_image
Diagram showing a device connected to an electronic power supply with labeled parts and wiringThis operating manual contains information and important notes for safe commissioning and handling of the electric wheelbarrow ZI-EWB300-160L, hereinafter referred to as "machine".

The manual is an integral part of the machine and must not be removed. Keep it for later use in a suitable place, easily accessible to users (operators), protected from dust and moisture, and enclose it with the machine if it is passed on to third parties!
Please pay special attention to the chapter Safety!
Due to the constant further development of our products, illustrations and contents may differ slightly. If you notice any errors, please inform us.
Technical changes reserved!
Check the goods immediately after receipt and make a note of any complaints on the consignment note when the delivery person takes them over!
Transport damage must be reported separately to us within 24 hours.
ZIPPER MASCHINEN GmbH cannot accept any liability for transport damage not noted.
Copyright
© 2022
This documentation is protected by copyright. All rights reserved! In particular the reprint, the translation and the removal of photos and illustrations will be prosecuted.
Court of jurisdiction is the Linz Regional Court or the court responsible for 4707 Schlüsslberg.
Customer Service Address
This section contains information and important notes on safe start-up and handling of the machine.

For your own safety, read these operating instructions carefully before putting the machine into operation. This will enable you to handle the machine safely and prevent misunderstandings as well as personal injury and damage to property. In addition, observe the symbols and pictograms used on the machine as well as the safety and hazard information!
11.1 Intended use of the machine
The machinery is intended exclusively for the following operations: Transportation of goods (sand, earth, wood, crushed stone, gravel or similar) within the maximum permissible load capacity.
NOTE

ZIPPER MASCHINEN GmbH assumes no responsibility or warranty for other activities and any resulting property damage or injuries!
II.1.1 Technical Restrictions
The machine is intended for use under the following ambient conditions:
Relative humidity:
max. 65 %
Temperature (for operation)
+5°C to +40°C
The machine, especially the battery; may not be exposed to a temperature of about 80 °C . Do not store in the blazing sun or a long time in the trunk of a car.
T1.12 Prohibited Use / Hazardous misapplications
- Operating the machine without adequate physical and mental aptitude
- Operating the machine without knowledge of the operating instructions
- Changes in the design of the machine
- Operating the machine in wet and rainy conditions
- Operating the machine outside the technical limits specified in this manual
- Remove the safety markings attached to the machine
- Modify, circumvent or disable the safety devices of the machine
The improper use or disregard of the versions and instructions described in this manual will result in the voiding of all warranty and compensation claims against Zipper Maschinen GmbH.
11.2 User Requirements
The machine is designed for operation by one person. The physical and mental aptitude as well as knowledge and understanding of the operating instructions are prerequisites for operating the machine. Persons who, because of their physical, sensory or mental abilities or their inexperience or ignorance, are unable to operate the machinery safely must not use it without supervision or instruction from a responsible person.
Basic knowledge of metalworking especially the correlation of material, tool, feed and speeds.
Please note that local laws and regulations may determine the minimum age of the operator and restrict the use of this machine!
Put on your personal protective equipment before working on the machine.
Work on electrical components or equipment may only be carried out by a qualified electrician or under the instruction and supervision of a qualified electrician.
11.3 General safety instructions
To avoid malfunctions, damage and health hazards when working with the machine, the following points must be observed in addition to the general rules for safe working:
- Before start-up, check the machine for completeness and function. Only use the machine if the guards and other non-parting guards required for machining have been fitted, are in good operating condition and have been properly maintained.
- Ensure sufficient lighting conditions at the workplace to ensure safe handling of the machine.
- Remove tool keys and other adjustment tools before switching on the machine.
-
Check the strength of the machine connections before each use.
-
Never leave the running machine unattended. Switch off the machine before leaving the working area and secure it against unintentional or unauthorised recommissioning.
- The machine may only be operated, serviced or repaired by persons who are familiar with it and who have been informed of the hazards arising from this work.
- Ensure that unauthorised persons maintain a safe distance from the machine and keep children away from the machine.
- Wear suitable work clothing and footwear.
• Always work with care and the necessary caution and never use excessive force. - Shut down the machine and disconnect it from the power supply before carrying out any adjustment, conversion, cleaning, maintenance or repair work. Before starting any work on the machine, wait until all tools or machine parts have come to a complete standstill and secure the machine against unintentional restarting.
- Do not work on the machine if it is tired, not concentrated or under the influence of medication, alcohol or drugs!
11.4 Special safety instructions for this machine
CHARGER:
- Caution in slippery conditions - slip hazard - risk of injury. When working, robust and non-slip footwear. Slides / stumble / traps are a major cause of serious injury or death.
- Never use the machine when it is raining or in damp, wet areas.
• Always use both hands to hold the machine when in use. - Before start, after failure or shock, be sure to check the machine and make sure that it is in good condition.
• Take special care when work near swimming pools or garden ponds. - Unplug battery before all maintenance and settings!
- The charger is designed exclusively to charge the battery of this machine. Charging other batteries is not permitted.
- Never use the charger in a damp or wet environment.
- Disconnect cable connections only by pulling the plug. Pulling on the cable could damage the cable and plug and electrical safety would no longer be guaranteed.
- Never use the charger if the cable, plug or the machine itself are damaged by external influences. Then take the charger to the nearest specialist workshop.
- Do not operate the machine in close proximity to heat sources.
- Do not use an extension cord to plug in the charging station's power supply.
- Do not place any metal objects in the area of the charging contacts of the charger.
- Do not open the charger. In case of failure, contact a specialist workshop.
- Only use the original charger to charge the battery. If other chargers are used, defects may occur or a fire might be caused.
BATTERY:
- Vapours may be emitted during improper use or when using damaged batteries. These vapours can irritate the respiratory tract. Inhale fresh air and consult a physician if you experience any discomfort.
- FIRE HAZARD! Never charge batteries near acids and flammable materials.
- Only charge the battery in an ambient temperature between 0^ C and +40^ C. Allow to cool down first after heavy load.
- EXPLOSION HAZARD! Protect the battery from heat and fire.
- Only use the battery in an ambient temperature between 0^ and +45^ .
- HAZARD OF SHORT-CIRCUIT! For disposal, transport or storage, the battery must be packed (plastic bag, box) or the contacts must be taped.
- Never open the battery.
11.5 Hazard warnings
Despite their intended use, certain residual risks remain. Due to the structure and construction of the machine, hazardous situations may occur when handling the machines:
DANGER

A safety instruction designed in this way indicates an imminently hazardous situation which, if not avoided, will result in death or serious injury.
WARNING

Such a safety instruction indicates a potentially hazardous situation which, if not avoided, may result in serious injury or even death.
CAUTION

A safety instruction designed in this way indicates a potentially hazardous situation which, if not avoided, may result in minor or moderate injury.
NOTICE

A safety note designed in this way indicates a potentially dangerous situation which, if not avoided, may result in property damage.
Irrespective of all safety regulations, their sound common sense and corresponding technical suitability/training are and remain the most important safety factor in the error-free operation of the machine. Safe working depends first and foremost on you!
12 ASSEMBLY
12.1 Checking delivery content
Always note visible transport damages on the delivery note and check the machine immediately after unpacking for transport damage or missing or damaged parts. Report any damage to the machine or missing parts immediately to your retailer or freight forwarder.
12.2 Assembly-steps
NOTICE

Do not fully tighten all screws until assembly is complete.
text_image
1 2 3a 3b 4 5 6
text_image
1 2 3 4 5 6 71. step
Assemble the wheels (1) with nut (4) and washer (3) to the frame (6).
Note:
Make sure that the mounting plates (2) are positioned exactly in the holder and that the connection cables (5) are led out on the inside.
2.st ep
Insert the right (1) and left (2) handles into the mounting holes of the frame (3).
Fix the handles with screws (7), washers (4), spring washers (5) and cap nuts (6).
 | 3. stepFix the axis with support wheels (1) to the brackets on the frame using screws, nuts, spring washers and washers (2).Fix the struts (3, 4) to the frame with Phillips screws (5), nuts, lock washers and washers (6). Fix the battery box (7) to the struts with screws (8), nuts, spring washers and washers (6). Attach the wheels to the axis and secure them with washers (9) and a split pin. |
 | 4. stepThread the ends of the handle support into the holes of the right and left handle. Fix the handle support on both sides with washers and nuts (1). |
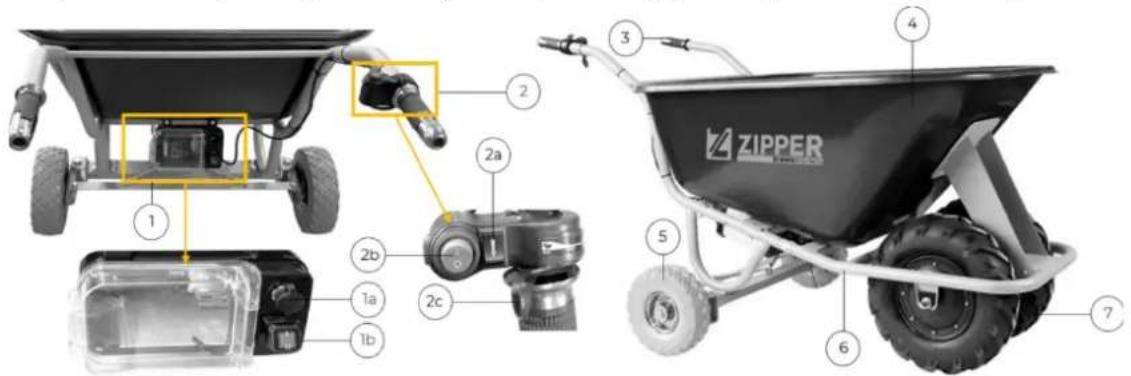
 | 5. stepInstall the connection cables as shown in the illustration and fix them with cable ties. |
 | 6. stepConnect the connection cable of the motor operating unit to the battery box as shown |
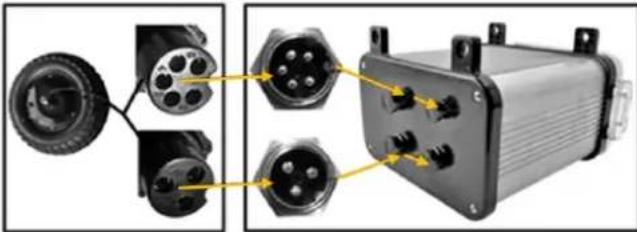 | 7. stepConnect the connection cable of the wheels to the battery box as shown |
 | 8. stepFix the tray strut (1) with screws, nuts, lock washers and washers (3).Fix the tray (2) with screws, nuts, spring washers and washers (3).Fix the handle strut (4) cap nuts and washers (5). |
 | machine assembling completed |
13 OPERATION
Only operate the machine when it is in perfect condition. Inspect the machine visually every time it is to be used. Check in particular the safety equipment, electrical controls, electric cables and screwed connection for damage and if tightened properly. Replace any damaged parts before operating the machine.
13.1 Operation instructions
WARNING

Unplug battery before all maintenance and settings!
NOTICE

- Never remove the battery while the machine is running
• In case of longer standstill, press the shut-down button
• Use the electric motor only with sufficient battery charge
13.2 Operation
13.2.1 Start electrical support

natural_image
Close-up of a black electronic device with a red indicator light and label '1' (no readable text or symbols beyond the label)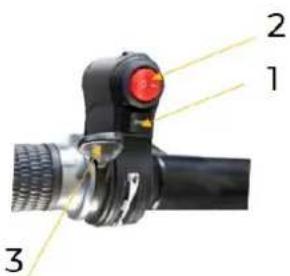
text_image
1 2 3-
Turn ON-Off-Switch (1) to Position „I“
-
Turn switch (1) on the handle to "0" BAS activated /EBS deactivated.
BAS = Brake assistance if no electronic support is requested EBS = Electronic Brake: Machine is braked and braking effect is maintained as long as
- until battery empty - until EBS is deactivated again
- Turn the right-hand control handle (2) to adjust the strength of the electrical support, the further the handle is turned counter clockwise (+) the stronger the support.
Note: no activation on electrical support means BAS active (braking effect noticeable)
Note: If EBS is set to "I", no electric drive assistance in forward or reverse direction.
1322 Machine stopping / parking

natural_image
Close-up of a black electronic device with a red indicator light and a yellow arrow pointing to it, labeled '1' (no readable text or symbols beyond the label)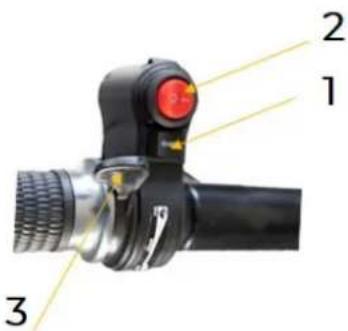
text_image
1 2 3-
Turn ON-Off-Switch (1) to Position „I“
-
Switch (1) on the handle set to "0" BAS activated. The machine must be braked by manually by manpower when used on slopes.
-
Switch (1) on the handle set to "I" EBS activated The machine brakes until it comes to a complete stand still and the braking effect remains active as long as the switch is set to position "I". Also holds the machine in position on slops up to 20%. If the machine is to remain in position for a longer period of time, first bring it onto level ground and secure it against rolling away (chock under the wheels)..
Note: Braking function EBS requires battery energy, designed for short times only (max. 15 minutes)
13.3 Charger
Charging the battery:

text_image
Diagram showing a device connected to an AC power supply with labeled parts and wiring connections-
remove battery from battery box.
-
connect the charger to the power supply (socket) 230 V / 50 Hz and the charging socket (1).
-
battery charging
-
When the battery is fully charged (display on the charger), disconnect the charger again.
-
charging status is indicated by pressing button (2) on the display (3).
Voltage display on battery box system indicates the status of the battery:
| Voltage display shows 42 V | Battery capacity 100% |
| Voltage display shows 35 V | Battery capacity ~50% |
| Voltage display shows < 30 V | Please charge the battery (too less capacity left) |
Note:
- Avoid overheating when charging the battery. Ensure sufficient air supply so that no heat can accumulate.
- Only charge the battery in an ambient temperature between 0^ and +40^ .
- Allow the battery to cool down after intensive use before recharging it.
• Always charge the battery in a well-ventilated area. - FIRE HAZARD! Never charge batteries near acids and flammable materials.
- Do not smoke when charging the battery. Keep the battery away from open flames and sparks.
- Allow the battery to cool down immediately after charging.
14 CLEANING, MAINTENANCE, STORAGE, DISPOSAL
14.1 Cleaning
NOTICE

The usage of certain solutions containing ingredients damaging metal surfaces as well as the use of scrubbing agents will damage the machine surface!
Clean the machine surface with a wet cloth soaked in a mild solution Never use running water or a high pressure cleaner to clean the machine.
- Clean the outer parts with a damp sponge.
- Never clean the electronic parts with water!
- Check the machine and remove the deposits and / or residues with a brush.
14.2 Maintenance
CAUTION

Unplug battery before all maintenance and settings! Serious injury due to unintentional or automatic activation of the machine!
The machine does not require extensive maintenance. If malfunctions and defects occur, let it be serviced by trained persons only.
NOTICE

Clean your machine regularly after every usage – it prolongs the machines lifespan and is a pre-requisite for a safe working environment. Repair jobs shall be performed by respectively trained professionals only!
Check regularly the condition of the security stickers. Replace them if required.
Check regularly the condition of the machine.
Store the machine in a closed, dry location.
14.21 Maintenance plan
After each workshift:
- Check the cables (tight fit, damage)
Monthly:
- Charge the battery: if the machine is stored for a longer period of time.
14.3 Storage
- Clean thoroughly all components before storage.
- Store all components separately in a dry area at not less than 0^ (optimum for battery 10 - 25^ ).
Important notes on storing the battery to avoid possible damage:
If the machine will not be used for a longer period of time, the battery should be disconnected and disassembled from the machine. Before storage, the battery should be charged again. An exception to this rule are batteries permanently installed in the machine, which should not be disassembled and simply charged with the charger supplied. Batteries should be stored at room temperature (approx. 20^ C) in a dry and frost-proof place. Avoid large temperature fluctuations (e.g. do not expose battery to direct sunlight or store near heating systems). Higher temperatures can lead to accelerated ageing and premature loss of function of the battery. If the battery is not used for a longer period of time, check the charge level regularly (monthly, max. every 3 months). If necessary, recharge the battery.
14.4 Disposal

Observe the national waste disposal regulations. Never dispose of the machine, machine components or equipment in residual waste. If necessary, contact your local authorities for information on the disposal options available.
If you buy a new machine or an equivalent device from your specialist dealer, he is obliged in certain countries to dispose of your old machine properly.
15 TROUBLESHOOTING
BEFORE YOU START WORKING FOR THE ELIMINATION OF DEFECTS, UNPLUG THE BATTERY.
| Trouble | Possible cause | Solution |
| No electrical support | Battery is not charged | Recharge battery |
| Motor stucks | Check motor | |
| Power switch is damaged | Check switch | |
| Broken or loose cables | Check cables | |
| No charging of battery | Loosen cable | Check cable connection |
16 PŘEDMLUVA (CZ)
Vážený zákazníku!
text_image
Technical diagram of a vehicle chassis with numbered components and labeled parts, likely for assembly or maintenance instructions.
text_image
1
natural_image
Mechanical vehicle chassis with attached suspension components and highlighted cable (no visible text or symbols)2. paso
natural_image
Close-up of a transparent plastic enclosure with a red button, no visible text or symbols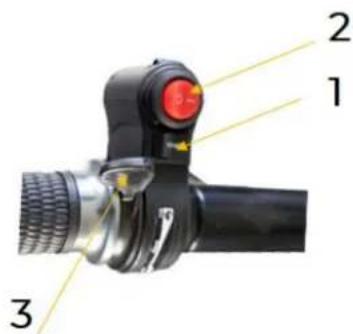
text_image
1 2 3natural_image
Close-up of a black plastic enclosure with a yellow indicator light and a red button, labeled '1' (no readable text or symbols on the device itself)
natural_image
Close-up of a black mechanical device with a red circular component and yellow highlight, labeled with numbers 1 and 2 (no text or symbols on the device itself)3
text_image
Diagram showing a device with labeled parts and connected to an electronic charger, likely illustrating a power or signal testing setup.29.11 Restrictions techniques
text_image
Technical diagram of a mechanical assembly with numbered components and directional arrows indicating motion or flow.
text_image
Labeled diagram of a vehicle chassis with numbered parts and accessories for assembly or maintenance reference.
natural_image
Diagram of two black cable connectors with yellow circular annotations and a yellow line labeled '1' (no text or symbols beyond labels)
natural_image
Mechanical assembly diagram showing a vehicle chassis with wheels and a connecting rod, no visible text or symbols
natural_image
Close-up of a mechanical component with connectors and a transparent housing, showing internal wiring (no text or symbols visible)2. étape
natural_image
Close-up of a transparent plastic enclosure with a red button, no visible text or symbols
text_image
1 2 3(EN) With original ZIPPER spare parts you use parts that are attuned to each other shorten the installation time and elongate your products lifespan.
NOTE

The installation of parts other than original spare parts leads to the loss of the guarantee! Therefore: When replacing components/parts, only use spare parts recommended by the manufacturer.
Order the spare parts directly on our homepage – category SPARE PARTS or contact our customer service
• via our Homepage – category SERVICE/NEWS - SPARE PARTS,
• by e-mail to eg01@zipper-maschinen.at.
Always state the machine type, spare part number and designation. To prevent misunderstandings, we recommend that you add a copy of the spare parts drawing with the spare parts order, on which the required spare parts are clearly marked, especially when not using the online-spare-part catalogue.
text_image
Exploded view diagram of a mechanical device with numbered parts for identification| Pos | Parts name | Qty |
| 1 Tray 160l 1 | ||
| 2 Front tray support 1 | ||
| 3 Motor with tyre 2 | ||
| 4 Right handle 1 | ||
| 5 Back reinforce rib 1 | ||
| 6 Front reinforce rib | 1 | |
| 7 Front tubular frame | 1 | |
| 8 Left handle | 2 | |
| 9 Battery | 1 | |
| 10 | Battery box with motor controller | 1 |
| 11 | Steerying system with rear wheels | 1 |
| 12 | Speed control lever | 1 |
| 13 | Handle grip | 2 |
| 14 | Reinforced bar | 1 |
| 15 | Charger | 1 |
| 17 | Spring | 2 |
| 18 | nut ot fasten the motor | 2 |
ZIPPER machines are subject to the legal warranty, which is valid in the current version. (For electrical and mechanical components, this is equivalent to 2 years (excluding wearing parts and batteries), starting from the date of purchase by the end user/buyer. For rechargeable batteries and batteries, the legal warranty of 6 months applies, starting from the date of purchase by the end user/buyer). In case of defects during this period, which are not excluded by paragraph 3, ZIPPER will repair or replace the machine at its own discretion.
2.) Report:
In order to check the legitimacy of warranty claims, the final consumer must contact his dealer. The dealer has to report in written form the occurred defect to ZIPPER. If the warranty claim is legitimate, ZIPPER will pick up the defective machine from the dealer. Returned shippings by dealers which have not been coordinated with ZIPPER, will not be accepted and refused.
3.) Regulations:
a) Warranty claims will only be accepted, when a copy of the original invoice or cash voucher from the trading partner of ZIPPER is enclosed to the machine. The warranty claim expires if the accessories belonging to the machine are missing.
b) The warranty does not include free checking, maintenance, inspection or service works on the machine. Defects due to incorrect usage of the final consumer or his dealer will not be accepted as warranty claims either. Some examples: usage of wrong fuel, frost damages in water tanks, leaving fuel in the tank during the winter, etc.
c) Defects on wear parts are excluded, e.g. carbon brushes, collection bags, knives, cylinders, cutting blades, clutches, sealings, wheels, saw blades, splitting crosses, riving knives, riving knife extensions, hydraulic oils, oil/air/fuel filters, chains, spark plugs, sliding blocks, etc.
d) Also excluded are damages on the machine caused by incorrect or inappropriate usage, if it was used for a purpose which the machine is not supposed to, ignoring the user manual, force majeure, repairs or technical manipulations by not authorized workshops or by the customer himself, usage of non-original ZIPPER spare parts or accessories.
e) After inspection by our qualified personnel, resulted costs (like freight charges) and expenses for not legitimated warranty claims will be charged to the final customer or dealer.
f) In case of defective machines outside the warranty period, we will only repair after advance payment or dealer's invoice according to the cost estimate (incl. freight costs) of ZIPPER.
g) Warranty claims can only be granted for customers of an authorized ZIPPER dealer who directly purchased the machine from ZIPPER. These claims are not transferable in case of multiple sales of the machine.
4.) Claims for compensation and other liabilities:
The liability of company ZIPPER is limited to the value of goods in all cases. Claims for compensation because of poor performance, lacks, damages or loss of earnings due to defects during the warranty period will not be accepted. ZIPPER insists on its right to subsequent improvement of the machine.
SERVICE
After Guarantee and warranty expiration specialist repair shops can perform maintenance and repair jobs. But we are still at your service as well with spare parts and/or product service. Place your spare part/repair service cost inquiry by
- Mail to service@zipper-maschinen.at.
- Or use the online complaint order formula provided on our homepage – category SERVICE/NEWS.
38 PROHLÁŠENÍ O ZÁRUCE (CZ)
(EN) We monitor the quality of our delivered products in the frame of a Quality Management policy.
Your opinion is essential for further product development and product choice. Please let us know about your:
- Impressions and suggestions for improvement.
- Experiences that may be useful for other users and for product design
- Experiences with malfunctions that occur in specific operation modes
We would like to ask you to note down your experiences and observations and send them to us via E-Mail or by post: