
233856 - Refrigerator Arktic - Free user manual and instructions
Find the device manual for free 233856 Arktic in PDF.
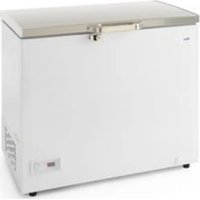
| Product type | Chest freezer |
| Brand | Arktic |
| Model | 233856 |
| Net capacity | 190 L |
| Dimensions (W x D x H) | 953 x 607 x 840 mm |
| Net weight | 33.5 kg |
| Power supply | 220-240 V ~ 50 Hz, 0.8 A |
| Energy class | E |
| Star rating | 4 **** |
| Temperature range | -18 °C to -26 °C |
| Refrigerant | R600a (65 g), flammable |
| Freezing capacity | 8.8 kg/24 h |
| Climate class | T (temperate) |
| Protection class | I (earthing required) |
| Noise level | < 60 dB(A) |
| Interior lighting | LED 2 W (E14) |
| Included accessories | Hanging basket, lid handle, drain plug |
| Functions | Thermostatic adjustment (0-7), digital temperature display |
| Maintenance | Manual defrosting when frost reaches 10-15 mm; cleaning with damp cloth and mild detergent |
| Safety | Earthing mandatory; do not use metal objects to defrost; keep out of reach of children |
| Warranty | 12 months (manufacturing defects) |
| Repairability | Repairs by qualified technician only; original spare parts |
Frequently Asked Questions - 233856 Arktic
User questions about 233856 Arktic
0 question about this device. Answer the ones you know or ask your own.
Ask a new question about this device
Download the instructions for your Refrigerator in PDF format for free! Find your manual 233856 - Arktic and take your electronic device back in hand. On this page are published all the documents necessary for the use of your device. 233856 by Arktic.
USER MANUAL 233856 Arktic
You should read this user manual carefully before using the appliance.
Keep these instructions with the appliance.
For indoor use only.
Thank you for purchasing this Arktic appliance. Read this manual carefully, paying particular attention to the safety regulations outlined below, before installing and using this appliance for the first time.
Safety regulations
- This appliance is intended for buffet and household use only.
- Only use the appliance for the intended purpose it was designed for as described in this manual.
- The manufacturer is not liable for any damage caused by incorrect operation and improper use.
- Keep the appliance and electrical plug away from water and other liquids. In the event the appliance falls into water, immediately remove the power plug from the socket. Do not use the appliance until it has been checked by a certified technician. Failure to follow these instructions will cause life threatening risks.
- Never attempt to open the housing of the appliance by yourself.
- Do not insert objects into the housing of the appliance.
- Do not touch the plug with wet or damp hands.
DANGER OF ELECTRIC SHOCK! Do not attempt to repair the appliance by yourself, repairs are only to be conducted by qualified personnel. - Never use a damaged appliance! When it's damaged, disconnect the appliance from the socket and contact the retailer.
- WARNING! Do not immerse the electrical parts of the appliance in water or other liquids.
- Never hold the appliance under running water.
- Regularly check the power plug and cord for any damage. When damaged it must be replaced by a service agent or similarly qualified person in order to avoid danger or injury.
- Make sure the cord does not come in contact with sharp or hot objects and keep it away from open fire. Never pull the power cord to unplug it from the socket, always pull the plug instead.
- Make sure that the power cord and/or extension cord do not cause a trip hazard.
- Never leave the appliance unattended during use.
- WARNING!As long as the plug is in the socket the appliance is connected to the power source.
- Turn off the appliance before unplugging it from the socket.
- Connect the power plug to an easily accessible electrical socket so that in case of emergency the appliance can be unplugged immediately.
- Never carry the appliance by the cord.
- Do not use any extra devices that are not supplied together with the appliance.
- Only connect the appliance to an electrical outlet with the voltage and frequency mentioned on the appliance label.
-
Never use accessories other than those recommended by the manufacturer. Failure to do so could pose a safety risk to the user and could damage the appliance. Only use original parts and accessories.
-
This appliance should not be operated by persons with reduced physical, sensory or mental capabilities, or persons that have a lack of experience and knowledge.
- This appliance should, under any circumstances, not be used by children.
- Keep the appliance and its power cord out of reach of children.
- WARNING: ALWAYS switch off the appliance and unplug from power socket before cleaning, maintenance or storage.
Special Safety Regulations
- This appliance is designed only for freezing fresh food and storage of frozen food.
- Use the appliance only as described in this manual.
CAUTION! RISK OF FIRE! The refrigerant used is R600a. It is a flammable refrigerant which is environmentally friendly. Although it is flammable, it does not damage the ozone layer and does not increase the greenhouse effect. The use of this coolant has, however, led to a slight increase in the risk of the appliance. In addition to the noise of the compressor, you might be able to coolant flowing around the system. This is unavoidable, and does not have any effect on the performance of the appliance. Care must be taken during the operation and setting up of the appliance that no parts of the cooling system are leaking coolant can damage the eyes. The foam blowing agent used is one in this appliance. It is highly flammable.
- Do not place the appliance on a heating object (gasoline, electric, charcoal cooker, etc). Keep the appliance away from any hot surfaces and open flames. Always operate the appliance on a level, stable, clean, heat-resistant and dry surface.
- This appliance is not intended to be operated by means of an external timer or separate remote-control system.
- WARNING: Keep all ventilation openings in the appliance enclosure clear of obstruction.
- WARNING: Do not use mechanical devices or other means to accelerate the defrosting process, other than those recommended by the manufacturer.
- WARNING: Do not damage the refrigerant circuit.
- Do not store explosive substances such as aerosol cans with a flammable propellant in this appliance.
- Allow at least 20~cm spacing around the appliance for ventilation purpose during use.
- Do not use hard utensils to hit the outer surface. Do not use water jet, flush directly with water or steam cleaner as the parts will get wet and electric shock might be resulted.
- Do not expose it to direct sunlight. Avoid mechanical shocks and vibrations.
- Always move or transport the appliance in an upright position or it may damage the appliance.
- CAUTION! Securely route the power cord if necessary in order to prevent unintentional pulling or contact with the heating surface.
- No any parts are dishwasher safe.
-
Never handle frozen food with wet hands. Your hands may freeze to the frozen food. Danger of frost burn. Wear protective gloves (not supplied) if necessary.
-
Do not keep the key near the appliance or within the reach of the children. This is to prevent children from accidentally locking themselves inside the appliance and endangering their lives.
- Keep clear of obstruction all ventilation openings in the appliance enclosure or in the structure for building-in.
Intended use
- This appliance is intended for buffet and household use.
-
The appliance is designed only for freezing and storage of frozen food. Any other use may lead to damage to the appliance or personal injury.
-
Operating the appliance for any other purpose shall be deemed a misuse of the device. The user shall be solely liable for improper use of the device.
Grounding installation
This appliance is classified as protection class I and must be connected to a protective ground. Grounding reduces the risk of electric shock by providing an escape wire for the electric current.
This appliance is fitted with a power cord that has a grounding wire and grounded plug. The plug must be plugged into an outlet that is properly installed and grounded.
Overview of different parts
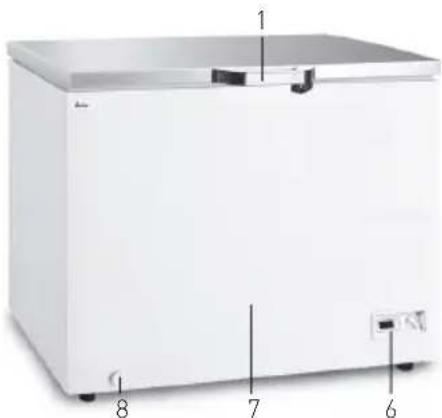
- Lid handle [This has to be assembled by the user]
- Hinged lid
- Interior cabinet
- Hanging basket
- Rubber seal
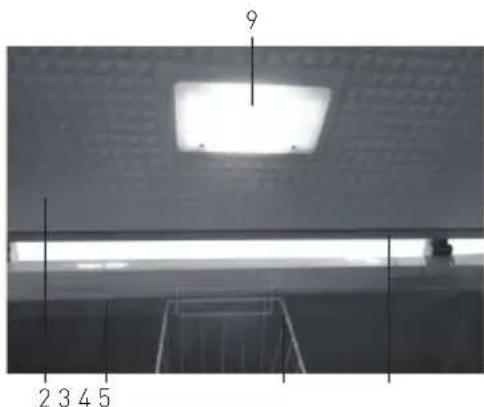
- Control panel
- Exterior
- Drainage hole
- Lamp
Control panel of the appliance
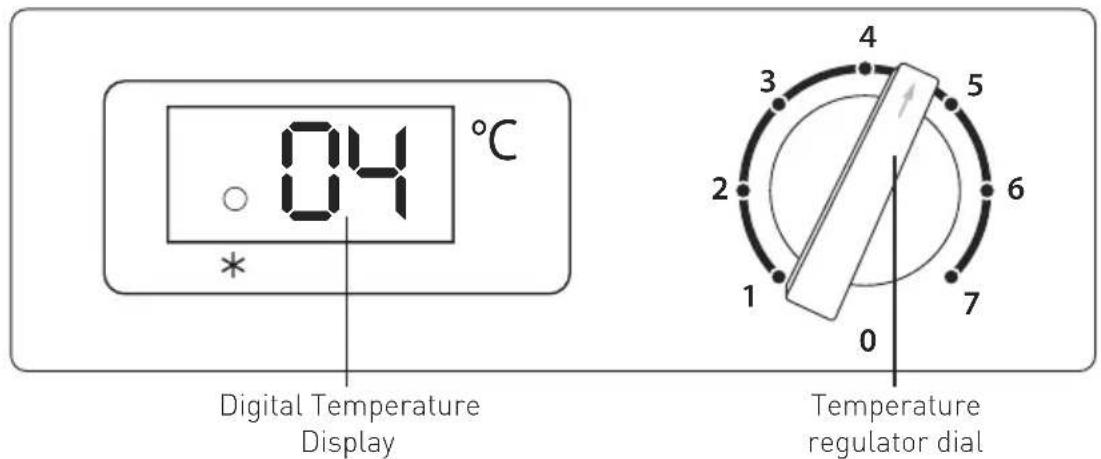
A.Temperature Regulator
The temperature can be adjusted by rotating this knob in the range of setting 1 to 7.
Setting 0: At "Stop" mode, not operate.
Setting 1: Temperature range [-18^ to -20^]
Setting 7: Temperature range (-24^ to -26^)
Note: The setting temperature will be affected by the below factor:
- Ambient temperature and humidity of the appliance
Quantity of the stored food item
Frequency of opening the lid
We recommend to place the food at the middle position.
B. Digital temperature display
It shows the current temperature inside the appliance.
Note: Green dot light ON to indicate the compressor is working.
EN
Installation of the appliance
Attention: Any installation, maintenance and repair work should be performed by qualified and authorized technician only.
- Check to make sure that the appliance is undamaged or complete delivery (basket and drain stopper are included). In case of any damage or incomplete delivery, DO NOT use the appliance and contact the supplier immediately.
- Remove all packing material and protective film (if applicable).
- Let the appliance stand still for at least 3 hours after installation before putting the appliance into operation, this is to allow the cooling agent to level off for optimum efficiency.
- Place the appliance on a dry, level, steady and safe floor away from any heat source. Recommend to place in an air-conditioned room.
- Avoid expose to direct sunlight or direct source of heat such as cooker, heater, stoves, etc.
-
Make sure that a minimum of 20~cm distance is kept around all sides of the appliance for ventilation purposes.
-
Place the appliance in such a way that the plug is easily accessible and can be quickly removed from its socket in case of necessity.
- Due to heavy weight of the appliance, it should be installed and moved by at least 2 persons.
- The inclined angle of the cabinet should not be over 45^ during transportation.
Installation of lid handle
- Get the lid handle, screws and handle cover inside the appliance.
- Place the lid handle on the front side of the lid, aligning the screw holes. Fasten them securely.
- Then, place the handle cover to cover the screws, bending it slightly and fixing it flat onto the lid handle.
Operation
1). Preparation
- Before first use, clean the appliance interior and exterior surface with a damped cloth and some mild cleaning agent.
- Hang the basket [4] in a desired position inside the cabinet.
Then, close the lid of the appliance.
Note: As the lid is equipped with a tightly closing seal, it is not easy to reopen it shortly after closing (due to the vacuum formed inside). Wait a few minutes before reopen the lid.
2]. Start operation
Switching ON
- Insert the plug to a suitable electrical outlet.
- Turn the temperature regulator in clockwise direction away from the "0" position.
- The digital temperature display will show the current temperature inside the cabinet.
- To enable the temperature to get sufficiently cold inside the appliance, allow the appliance to run for few hours before placing food inside.
Switching OFF
- Turn the temperature regulator in anti-clockwise direction back to the "0" position, allow the appliance to run for few hours before placing food inside.
- The cooling system will then switch OFF.
Switching OFF for long period of time
If the appliance is not going to be used for long period of time, e.g. whilst on holiday
- unplug the appliance from the main electrical supply;
- defrost the appliance and then clean it and leave the lid open to air the appliance.
3). Freezing fresh food
- Freeze only those food that are allowed for freezing or those that can preserve in low temperature.
- The freezer compartment is suitable for freezing fresh food and storing frozen and deep-frozen food for long period of time.
-
Ensure the food is packed properly using suitable packaging. The packaging should be airproof and waterproof. Do not put inside the freezer the food without any packaging.
-
DO NOT place glass bottle or jar with liquid inside the appliance. It may causes the glass bottle to crack
- Remember not to refreeze the food that have been defrosted. The defrosted food should be consumed quickly or cooked at once.
- Avoid mix up of fresh food with those already frozen. Frozen food may start thawing and the use before date are not met.
- Important: When cooling drinks, make sure bottles are not left in the freezer as it may burst when freezing.
4]. Storage of frozen food
- Follow the storage recommendations on the food packaging. If no recommendation provided, the food may be stored up to 3 months.
- Do not open the lid frequently or leave it open longer than necessary.
- Do not exceed storage time indicated by the food manufacturer
-
For fresh food, observe the following general storage time:
-
Fish and processed meat do not exceed 6 months;
-
Cheese, poultry, pork, lamb do not exceed 8 months;
- Beef, fruit and vegetables do not exceed 12 months.
Note: Above time is just for reference only.
5]. Food defrosting
Frozen food can be defrosted in different ways:
- in a microwave oven;
- at room temperature;
- in the refrigerator (the cold given off by the frozen food helps to keep other food cold);
- in a steam oven.
Poultry: It is particular important to observe food hygiene rules when defrosting poultry. Do not use liquid come from the defrosted poultry. Pour it away and wash the container it was in, the sink and your hands, wear gloves (not supplied) if necessary.
Important: Never re-freeze partially or fully defrosted food. Consume defrosted food as soon as possible for the reason of hygiene and due to loss of nutritional value.
Cleaning & Maintenance
Attention: Always unplug the appliance from the electrical power outlet and let it cool down completely before cleaning or doing repair or maintenance work. And this should be performed by qualified and authorized technician only.
Cleaning
- Clean the appliance regularly.
- The exterior and interior surfaces can be cleaned with a damp cloth and some mild cleaning agent.
- Do not use water jet or steam cleaner for cleaning and do not immerse the appliance under the water.
- After the cleaning procedure, you should use a soft and dry cloth to wipe the surface dry thoroughly.
- Never use hot water for cleaning the appliance.
- Never use aggressive or coarse cleaning agents such as sourcing powder, alcohol, solvents or other substances that could damage the appliance's surfaces.
- If not in use for a long period of time, left the freezer open to avoid accumulation of unpleasant smell inside.
EN
Defrosting
- Defrost the freezer when the frost layer reaches a thickness of about 10 - 15mm .
- The best time to defrost the freezer when it contains no or only little food.
-
To remove the frost, do these steps:
-
Set te temperature regulator to the "0" position and unplug the freezer.
- Remove any stored food, wrap it in several layers of newspaper and put it in a cool place.
- Leave the lid open, remove the stopper inside the interior cabinet [3] and unscrew anti-clockwise the cover of the drain hole [8]. Collect all defrost water on a tray. Use a scraper to remove the ice quickly.
- When defrosting is completed, dry the interior thoroughly and refit the stopper.
- Plug in again and set the temperature regulator to obtain the maximum coldness and run the appliance for two or three hours using this setting.
- Reload the previously removed food into the cabinet compartment.
Important!
- Never use sharp metal tools to scrape off frost as you could damage the appliance. Do not use a mechanical device or any artificial means to speed up the thawing process other than those recommended by the manufacturer.
- The amount of frost on the walls of the appliance will be increased due to high level of humidity from external environment or the frozen food is not wrapped properly.
Maintenance
- Only a qualified technician and original spare parts and accessories should be used to carry out the repair and maintenance work. DO NOT attempt to repair the appliance yourself.
Replacement of lamp
- Unplug the appliance from the main supply.
- Take out the lamp cover by loosing 2 screws.
- Unscrew the lamp bulb and replace with a new one.
- Replace the cover.
Specification of the Lamp:
220-240V~max.2W,E14cap
Note: Do not use a lamp more than 2W.
Screw driver (not supplied)
Troubleshooting
If the appliance does not function properly, please check the below table for the solution.
If you are unable to solve the problem, please contact the supplier / service provider.
| Problem Possible cause Possible solution | ||
| The appliance is too noisy. | - Appliance is not supported properly. | - Check if the appliance stands stable (all four feet should be on the floor firmly). |
| - The appliance does not cool sufficiently.- Freezing time too long.- The compressor starts too often. | - Before switching on, the appliance has not stand still long enough (3 hours) to level off the refrigerant | - Let stand still again before start to oper the appliance. |
| - The lid does not close tight. - Contact the supplier | ||
| - The seal is not placed tight enough. - Contact the supplier | ||
| - Excessive ice formation on the inter-rior walls of the appliance. | - Time to perform defrost.See => Cleaning and maintnance | |
| - The appliance is located near the heat source (e.g. stove, heater, etc). | - Keep the appliance away from the heat source. | |
| - Put too warm or too much food in-side cabinet of the appliance. | - Cool down the warm food before put inside the cabinet.- Do not put too much food inside. | |
| Exterior (7) surface is too wet. | - Humidity of the outside environment is too high. | - Put inside a air-conditioned room to lower the humidity. |
EN
Technical specification
| Item no. 235904 235911 | 233856 233863 | 233870 233887 | 233894 | ||||
| Operating voltage and frequency | 220-240V~50Hz | ||||||
| Rated current 0,8 A 1,5A | |||||||
| Refrigerant used &quantity | R600a/52g R600a/58g R600a/65g R600a/75g R600a/86g R600a/98g R600a/100g | ||||||
| Energy efficiency class EF | |||||||
| Star rating | |||||||
| Setting temperature range | -18°C to -26°C | ||||||
| Climate class T | |||||||
| Protection class Class I | |||||||
| Noise level < 60 dB (A) | |||||||
| Foam blowing agent Cyclopentane | |||||||
| Specification of the lamp | LED 2W | ||||||
| Freezing capacity | 4,7 kg/24hr | 7,2 kg/24hr | 8,8 kg/24hr | 13,9 kg/24hr | 18 kg/24hr | 20 kg/24hr | 22 kg/24hr |
| Net volume | 93L | 140L | 190L | 282L | 345L | 435L | 488L |
| Net weight | 24 kg | 27 kg | 33.5 kg | 38.5 kg | 53 kg | 59 kg | 62.5 kg |
| Approx. dimension after installation of handle | 574 x 608 x (H) 845 mm | 754 x 608 x (H) 845 mm | 953 x 607 x (H) 840 mm | 1116 x 686 x (H) 840 mm | 1275 x 785 x (H) 840 mm | 1538 x 785 x (H) 840 mm | 1655 x 785 x (H) 840 mm |
Remark: Technical specification is subjected to change without prior notification.
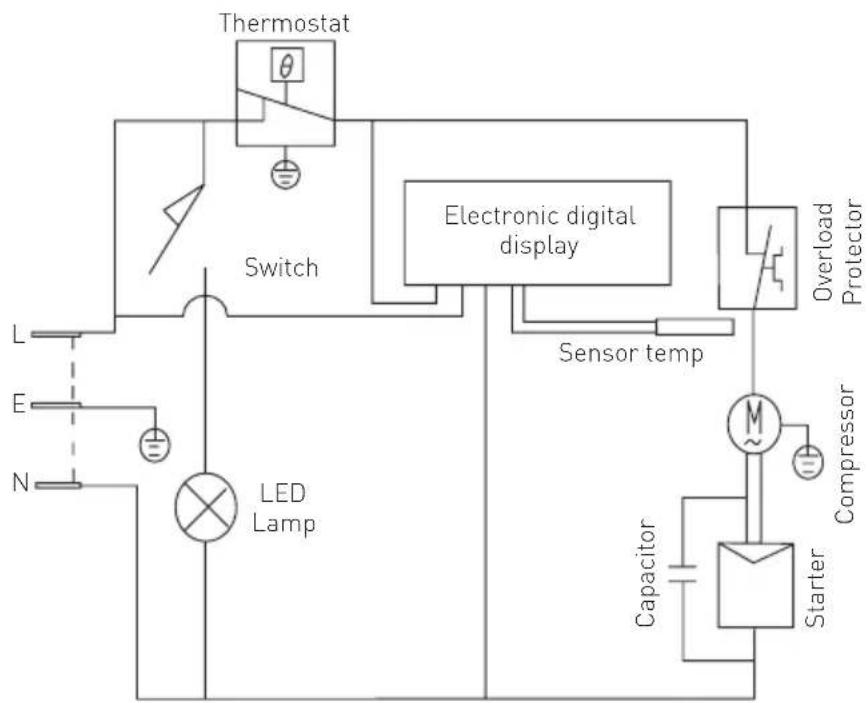
Circuit diagram (Item 233904, 233911, 233856, 233863)
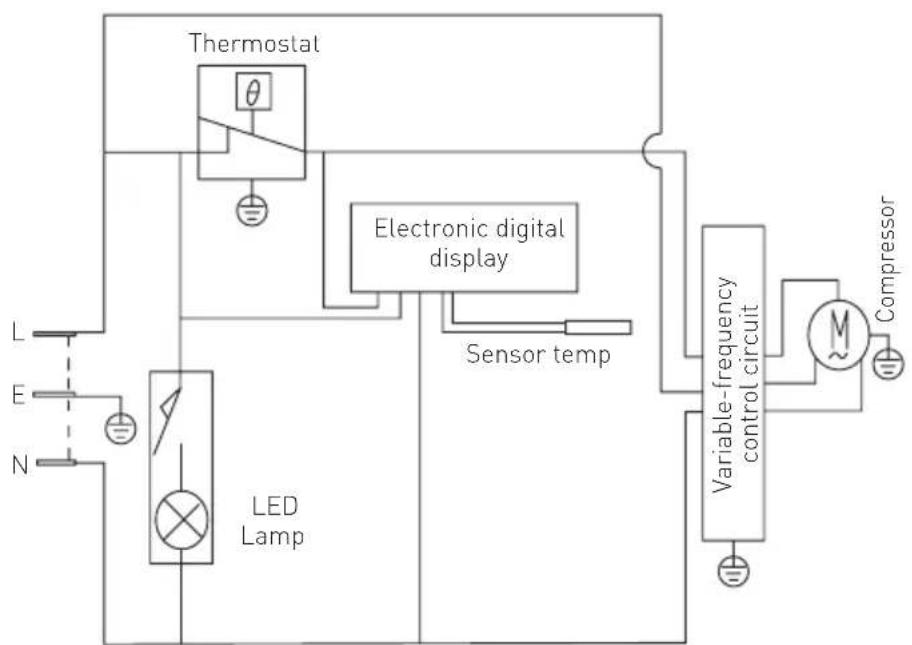
Circuit diagram (Item 233870, 233887, 233894)
EN
Warranty
Any defect affecting the functionality of the appliance which becomes apparent within one year after purchase will be repaired by free repair or replacement provided the appliance has been used and maintained in accordance with the instructions and has not been abused or misused in any way. Your statutory rights are not affected. If the appliance is claimed under warranty, state where and
Discarding & Environment
When decommissioning the appliance, the product must not be disposed of with other household waste. Instead, it is your responsibility to dispose to your waste equipment by handing it over to a designated collection point. Failure to follow this rule may be penalized in accordance with applicable regulations on waste disposal. The separate collection and recycling of your waste equipment at the time of disposal will help conserve natural re
when it was purchased and include proof of purchase (e.g. receipt).
In line with our policy of continuous product development we reserve the right to change the product, packaging and documentation specifications without notice.
sources and ensure that it is recycled in a manner that protects human health and the environment.
For more information about where you can drop off your waste for recycling, please contact your local waste collection company. The manufacturers and importers do not take responsibility for recycling, treatment and ecological disposal, either directly or through a public system.
Aarding installation
YcTaHOBKa 0:peKIM OcTaHOBKn, yCtpoiCTBO He oxJaXJaet.
YcTaHOBka 1:Диana3oH TempepaTyp [-18°C ]0 -20°C)
YcTaHOBka 7:Диana3oH TempepaTyp [-24°C ] -26°C]
PpmeHne. CJeDyUoIe 0aKTopbBnnaHt Ha 3aDaHHyo Tempepatyp:
- Tempepatya okpykaiouei cpebln BnaX-HOCTb BHyTpnu yctpoiCTBa
KoInueCTBOxpaHuaXxCnIuSeBbIX npOdykTOb
-HaCToTaOToKpbItnRAKpbIiKN
PeKOMeHnyetyra pa3MeaTaB NiueBbIe npOdyKTbl B uHTpe KaMepbl.
B. LünpoboiДиспел TempepaTpybI
Ha dncnnee oTo6paxaetcTekuza TEmnpatypa BHytpn yctpoiCTBa.
PpmeHHe.3HaOK 3aRopaetc3eIeHbIM CBeTOM, CnHann3npyra pa60Tu KOMnPecccopa.
YcTaHOBka yCToPoIcTBa
Ppeynpexkdenne: Bce pa60tbi no MOHTaxy, TexHnueckomy o6cnyXnBaHHIO n peMOHTy doJxHbI BblONHrTbcra
TOJIbKO KBaJIINΦUINPOBAHHbIMN CNEuaJIINCTaMn.
- Поберпу устюн Ha п徝met КOMпгкТНOCи И BO3MOxHOrO NOВржденя (поберпte, BXODЯЛ N B KOMПЕКТ NOCTaBKN KOp3NHa N CnIB-Ha npo6ka). B clyuae HeNoJHoД NOCTaBKn IInI NOВржденя, HE IncnoJIb3yIte ySTpoiCTBOИ HeMeДлEHNO CBJXITecb C NOCTaBUnKOM.
- ydaInte BCE əJIemEHTbI ynaKOBKn n 3aunTHyIO nnEHKy (ecn nMeetc).
He 3anyckaIte yctpoiCTBO B teueHne npimepHo 3 yacob nocle yctaHOBKN, YTO6bl oecneuHTb HndJeXaUee paCnpedEnHne XnaIaReHtA JnObecneueHn ONTImaJIbHOn pa60tby yctpoiCTBa. - Iomectte yctpoiCTBO Ha cyxyo, poBHyIO, cta6nIbHyIO n 6e3OpanachyIO nobepxHocTb BdaIIO TIO6bIX NCTouHHKOB TEIIa. PeKOMeHNdyETcpa3MeUaTB yCTpoiCTBO B NOMEueHIn, rDe IMeETc HndJeXaUaB eHTnlaU.
He noDBepraTe ycTpoNCTBO Bo3deNCTBnIO npraMbIX cOJIHeuHbIX JyueH N He pa3MeuaTe B6IIN3N ICTOUYHKa TeIIa, HApPImEp, Neu, DxyOBKn T.I. -
Y6eHntecb, yTO BOKpyr yCTpOYCTBa NOIDepKINBa-etc CBO6oHoe npocTpaHCTBO 20 cm IJRA oBeCneueHn HaIJIeXaUeB eHTINaIuN.
-
IomeCTnTe yCTpoiCTBO B MeCTo, rIe 6yJeT oBeCneueH CBO6OHNbI DoCTyn K BNKe, YTO6bl 6bl-CTPO OTKJIouHTb yCTpoiCTBO OT PO3eTKN, B Cnyuae Heo6xOIMOCtN.
- 13-3a Beca, yctpoiCTBO dOJIxHbI co6npaTb n pepeMeuataB He MeHee DByx IIOJeN.
BoBpemnpepehenKaMepaHeDOnKHaHa-KHOHTbCnOyIOM,60JIbShm,Yem 45^
YcTaHOBka pyuK KpbIshKn
-PyuKa,BnHTbI NaKlaJaKa pyuKn paCnoJoxeHbBHyTpN yCTpOJCTBa.
- Помecтinte ручу крblшкн Ha поедно уастб крblшкн, Вставиь EE B OTBepctnЯ Дя ВИНТов. Кpenko 3atЯнite ручу.
3aTeM HadeHbTe HaKlaKy Ha pyuKy, 4To6bl 3a-KpbITb BnHTbl, CJIeRka eE n3rN6aR n 3aΦNKcnpynte Ha pyUKe KpbIShKn.
RU
3Kcnnyataun
1].NoDrroBka
- ПраздуемиспьзоваыстювперВын pa3,очNTe erO BHyTpEHnE n BHeшHnE NOBepxHocTN MЯrkОТKaHbI,CMoЧENHOI TeПLOВ BOДОС MЯrkIM MOIUSM cpeДCTBOM.
- IomeCTte Kop3nHy (4) Byo6Hoe MeTo BHyTpN KaMepbl. 3aTe 3akpoTte KpbIuKy yctpoiCTBa.
Примechан.Кршka ochaшиа npokladko, KOtopa no3B0JareT nIoTHO 3akpbITb yCTpoi-CTBO -no 3ToI npuHHe,OTKpbITne yCTpoiCTBa cpa3y Jke nocI eero 3akpbTnI 3aTpudHeo (n3-3a 3acacbHaHn).IdoXdTe Heckolbko MInHy, npexde Yem ChOBa OTKpbITb KpUkKy
2].Hauaio pa60tbI
BkIoueHne
BctabBe Bnky B noDxOaIyIO 3JeKtpuYeCKyIO p03eTKy.
- ПовернITE руку Perултopa TemпepаТурьи по уасови стpeлke до унора [нанягот положеня „0")
- ΚιφροBoN Дисплeн TempePаТурьуka3ыВаeТ ha TeKuшую TempePаТурьВнУтPN yCтpoИСТВa.
- Pered pa3MeHem BHyTpN NnueBbIX npOdyKTOB, OCTaBBte YcTPOINCTBO Ha HeCKoJIbKO yacOB, YTO6bl OHO MoIIO DoCTNuB DoCTaToUHO Hn3KoI TempepaTypbl.
BbIKIOueHne
Ecn yctpoiCTBO He pa6oTaET DoJXHbIM o6pa3OM, 6paTntecb K npBedeHHo HnHex Ta6nue, YTObI HaHTn npaBnHoe peweHne. Ecn BBy BCE eune He moKeTe peuNTb np6nemy, 6paTntecb K noCTaBnky.
6pa30m, KOToPbI He BpeDeH IJIa 3OpOBBy N OkpyKaUoUeN CpeDbI.
- Zapojte zăstrčku do vhodné zăsuvky.
- Turn the temperature regulator in clockwise direction away from the "0" position.
- The digital temperature display will show the current temperature inside the cabinet.
- To enable the temperature to get sufficiently cold inside the appliance, allow the appliance to run for few hours before placing food inside.
Vypnuti
- Turn the temperature regulator in anti-clockwise direction back to the "0" position, allow the appliance to run for few hours before placing food inside.
- The cooling system will then switch OFF.
Hendi Food Service Equipment GmbH
Ehring 15
Hendi Food Service Equipment Romania S.R.L.
PKS Hendi South East Europe SA
5 Melsoyou Str.
18346 Moschato, Athens, Greece
Tel: +30 210 4839700
Email: info@pks-hendi.com
Hendi Italia S.R.L.
Via Leonardo da Vinci 4
39100 Bolzano [BZ], Italy
Tel: +39 800 727 438
Email: office.italy@hendi.eu
Hendi HK Ltd.
1208, 12/F Exchange Tower
33 Wang Chiu Road, Kowloon Bay, Hong Kong
Tel: +852 2154 2618
Email: info-hk@hendi.eu
FindHendi on internet:
www.hendi.eu
www.facebook.com/HendiToolsforChefs
www.linkedin.com/company/hendi-food-service-equipment-b.v.
www.youtube.com/HendiEquipment
- Changes, printing and typesetting errors reserved.
- Änderungen, Druck- und Satzfehler vorbehalten.
Wijzigingen, druk- en zefouten voorbehonden.
-Zastrzega sio mozliwoczmian,blgodow w druku i sktadzie. - Sous réserve d'erreurs de modification, d'impression et de composition.
-
Con riserva di modifiche, errori di stampa e composizione.
-
Rezervate modificarile, tipärarea si erorile de tipärire.
- Mbl octabnem 3a cobon npabo BHOCNTb n3MeHeHn, Own6Knechatn Hapopa.
- Enpuiaaoovai aaiayec, ekunon kai atoixeioaia.
Změny, chyby tisku a szby vyhrazeny. - Sios instrukcijos gali buti keiçiamos, jose taip pat gali pasitakyti spausdinimo klaidy.


- Safety regulations
- Special Safety Regulations
- Intended use
- Grounding installation
- Overview of different parts
- Control panel of the appliance
- A.Temperature Regulator
- Digital temperature display
- EN
- Installation of the appliance
- Installation of lid handle
- Operation
- 1). Preparation
- 2]. Start operation
- Switching ON
- Switching OFF
- Switching OFF for long period of time
- 3). Freezing fresh food
- 4]. Storage of frozen food
- 5]. Food defrosting
- Cleaning & Maintenance
- Cleaning
- Defrosting
- Important!
- Maintenance
- Replacement of lamp
- Troubleshooting
- Warranty
- Discarding & Environment
- Aarding installation
- LünpoboiДиспел TempepaTpybI
- YcTaHOBka yCToPoIcTBa
- YcTaHOBka pyuK KpbIshKn
- 3Kcnnyataun
- 1].NoDrroBka
- 2].Hauaio pa60tbI
- BkIoueHne
- BbIKIOueHne
- Vypnuti
Brand : Arktic
Model : 233856
Category : Refrigerator