237564 - Fridge Arktic - Free user manual and instructions
Find the device manual for free 237564 Arktic in PDF.

User questions about 237564 Arktic
0 question about this device. Answer the ones you know or ask your own.
Ask a new question about this device
Download the instructions for your Fridge in PDF format for free! Find your manual 237564 - Arktic and take your electronic device back in hand. On this page are published all the documents necessary for the use of your device. 237564 by Arktic.
USER MANUAL 237564 Arktic
natural_image
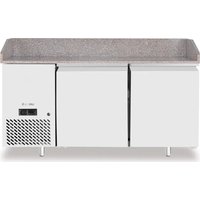
Two black wine cabinets with blue-lit liquid storage, one open and one closed, displayed against a white background (no text or symbols visible)Item: 237588 237557 237564 237595
You should read this user manual carefully before using the appliance.
text_image
READ MANUALKeep these instructions with the appliance.
natural_image
Simple icon of a house with an arrow pointing left, labeled 'INDOOR' below (no other text or symbols)For indoor use only.
natural_image
Symbol of a trash bin crossed with no text or numbers, enclosed in a square frame (no readable text or symbols)
text_image
RoHS
text_image
HEAVY
Thank you for purchasing this Arktic appliance. Read this manual carefully, paying particular attention to the safety regulations outlined below, before installing and using this appliance for the first time.
Safety regulations
- This appliance is intended for buffet and household use.
- Only use the appliance for the intended purpose it was designed for as described in this manual.
- The manufacturer is not liable for any damage caused by incorrect operation and improper use.
- Keep the appliance and electrical plug away from water and other liquids. In the event the appliance falls into water, immediately remove the power plug from the socket. Do not use the appliance until it has been checked by a certified technician. Failure to follow these instructions will cause life threatening risks.
- Never attempt to open the housing of the appliance by yourself.
- Do not insert objects into the housing of the appliance.
- Do not touch the plug with wet or damp hands.
- DANGER OF ELECTRIC SHOCK! Do not attempt to repair the appliance by yourself, repairs are only to be conducted by qualified personnel.
- Never use a damaged appliance! When it's damaged, disconnect the appliance from the socket and contact the retailer.
- WARNING! Do not immerse the electrical parts of the appliance in water or other liquids.
- Never hold the appliance under running water.
- Regularly check the power plug and cord for any damage. When damaged it must be replaced by a service agent or similarly qualified person in order to avoid danger or injury.
- Make sure the cord does not come in contact with sharp or hot objects and keep it away from open fire. Never pull the power cord to unplug it from the socket, always pull the plug instead.
- Make sure that the power cord and/or extension cord do not cause a trip hazard.
- Never leave the appliance unattended during use.
- WARNING! As long as the plug is in the socket the appliance is connected to the power source.
- Turn off the appliance before unplugging it from the socket.
- Connect the power plug to an easily accessible electrical socket so that in case of emergency the appliance can be unplugged immediately.
- Never carry the appliance by the cord.
- Do not use any extra devices that are not supplied together with the appliance.
- Only connect the appliance to an electrical outlet with the voltage and frequency mentioned on the appliance label.
-
Never use accessories other than those recommended by the manufacturer. Failure to do so could pose a safety risk to the user and could damage the appliance. Only use original parts and accessories.
-
This appliance should not be operated by persons with reduced physical, sensory or mental capabilities, or persons that have a lack of experience and knowledge.
- This appliance should, under any circumstances, not be used by children.
- Keep the appliance and its power cord out of reach of children.
- WARNING: ALWAYS switch off the appliance and unplug from power socket before cleaning, maintenance or storage.
Special Safety Regulations
- Use the appliance only as described in this manual.
CAUTION! Risk of fire! The refrigerant used is R600a. It is a flammable natural gas which is environmentally friendly. It does not damage the ozone layer and does not increase the greenhouse effect. The use of this coolant has, however, led to a slight increase in the noise level of the appliance. In addition to the noise of the compressor, you might be able to hear the coolant flowing around the system. This is unavoidable and does not have any adverse effect on the performance of the appliance. Care must be taken during transportation and setting up of the appliance that no parts of the cooling system are damaged. Leakage coolant can damage the eyes. - The foam blowing agent used is Cyclopentane in this appliance. It is highly flammable.
- This appliance is suitable for an ambient temperature from 16^ 38^ .
- Do not place the appliance on a heating object (gasoline, electric, charcoal cooker, etc.) Keep the appliance away from any hot surfaces and open flames. Always operate and place the appliance on a horizontal, stable, clean, heat-resistant and dry surface.
- Do not use the appliance near explosive or flammable materials, credit cards, magnetic discs or radios.
- This appliance is not intended to be operated by means of an external timer or separate remote-control system.
- WARNING: Keep all ventilation openings in the appliance enclosure clear of obstruction.
- WARNING: Do not use mechanical devices or other means to accelerate the defrosting process, other than those recommended by the manufacturer.
- WARNING: Do not damage the refrigerant circuit.
- Allow at least 10 cm spacing around the appliance for ventilation purpose during use.
- Do not use a water jet, flush directly with water or steam cleaner as the parts will get wet and electric shock might be resulted.
- CAUTION! Securely route the power cord if necessary in order to prevent unintentional pulling or contact with the heating surface.
- Do not clean or store the appliance unless it is completely cooled down.
- The appliance should not be tipped over an angle of 5^ . After installing the appliance, wait for 2 hours before connecting it to the electrical power supply to switch on. The same applies if the appliance is moved at a later date.
Intended use
- This appliance is intended for buffet and household use.
- The appliance is designed only for wine storage and cooling. (e.g. Champagne, white wine, red wine, etc.). Any other use may lead to damage to the appliance or personal injury.
- Operating the appliance for any other purpose may deemed as a misuse of the device. The user shall be solely liable for the improper use of the device.
Grounding installation
This appliance is classified as protection class I and must be connected to a protective ground. Grounding reduces the risk of electric shock by providing an escape wire for the electric current.
This appliance is fitted with a power cord that has a grounding wire and grounded plug. The plug must be plugged into an outlet that is properly installed and grounded.
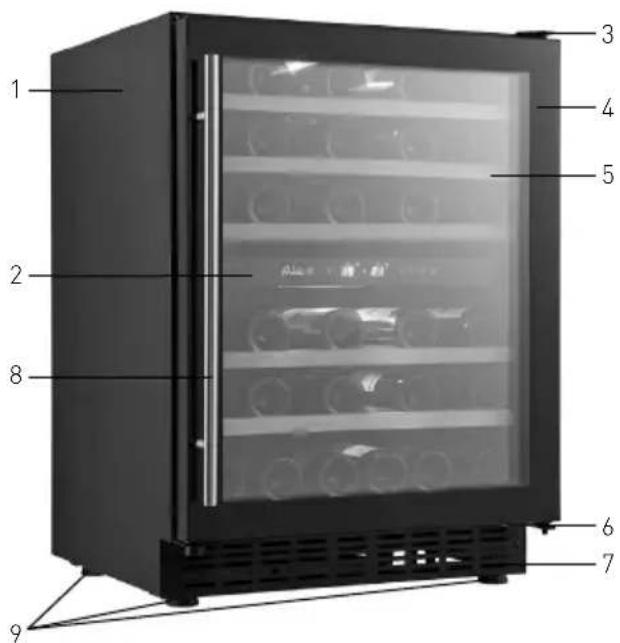
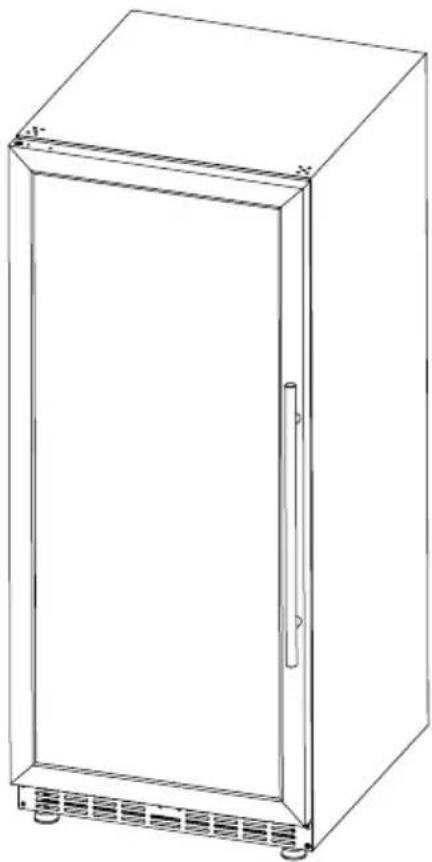
Main components of the machine
- Housing enclosure
- Touch control panel (See ==> Operation)
- Upper hinge cover
- Door frame
- Wooden shelves
- Lower hinge cover
- Ventilation holes
- Doorhandle
- Adjustable feet
text_image
1 2 8 9 3 4 5 6 7EN
Installation instructions
- Remove the appliance from the carton box, then remove the external and internal packaging and wrapping.
- Check to make sure the appliance is undamaged. In case of incomplete delivery and damages, DO NOT use the appliance. Please contact supplier (See == > Warranty).
- Keep the packaging if you intend to store your appliance in the future.
-
Let the appliance stand upright for about 2 hours. This is to reduce the malfunction of the cooling system from improper handling during transportation.
-
Clean interior surface with warm water and soft cloth. (See == > Cleaning and Maintenance).
- Place the appliance on a horizontal, stable and heat resist surface that is safe against water splashes.
- Optimum working ambient temperature is between 16°C and 38°C. Otherwise, the functionality will be limited.
- Ensure that there is sufficient ventilation. Keep a minimum distance of 10cm around the appliance. Do not block the ventilation holes.
- For energy savings, always make sure the door is closed.
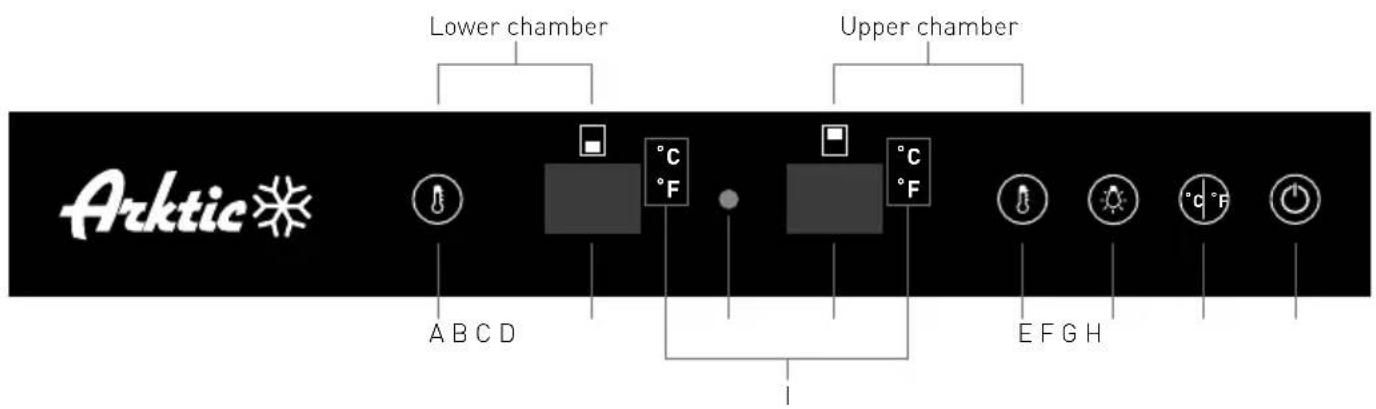
Operation
The appliance is divided into 2 separate zones. The "Upper chamber" and "Lower chamber" of the appliance are cotrolled independently with the use of the control panel.
text_image
Lower chamber Upper chamber Arktic A B C D E F G HDisplay indicator:
B: Display of the actual temperature of the lower chamber.
C: Indicator light of compressor working. While the compressor operating, the red light is on. While it stops operating, the red light is off.
D: Display of the actual temperature of the upper chamber.
I: When the °C light is on, it indicates Celsius temperature; When the °F light is on, it indicates Fahrenheit temperature.
Touch control:
E: Temperature setting button of the upper chamber; Once you press the button, the temperature increase 1°C or 1°F. Setting range is between 5°C\~12°C or 41°F\~54°F.
A: Temperature setting button of the lower chamber; Once you press the button, the temperature increase 1°C or 1°F. Setting range is between 12°C\~22°C or 54°F\~72°F.
F: Cabinet light control button
Note: Once the light is turned on, it will automatically off after 10 minutes all out of protecting the wines inside.
G: Celsius and Fahrenheit conversion button
H: Power on and off button; Press the button for 3 seconds, it starts; press it for 3 seconds again, it stops.
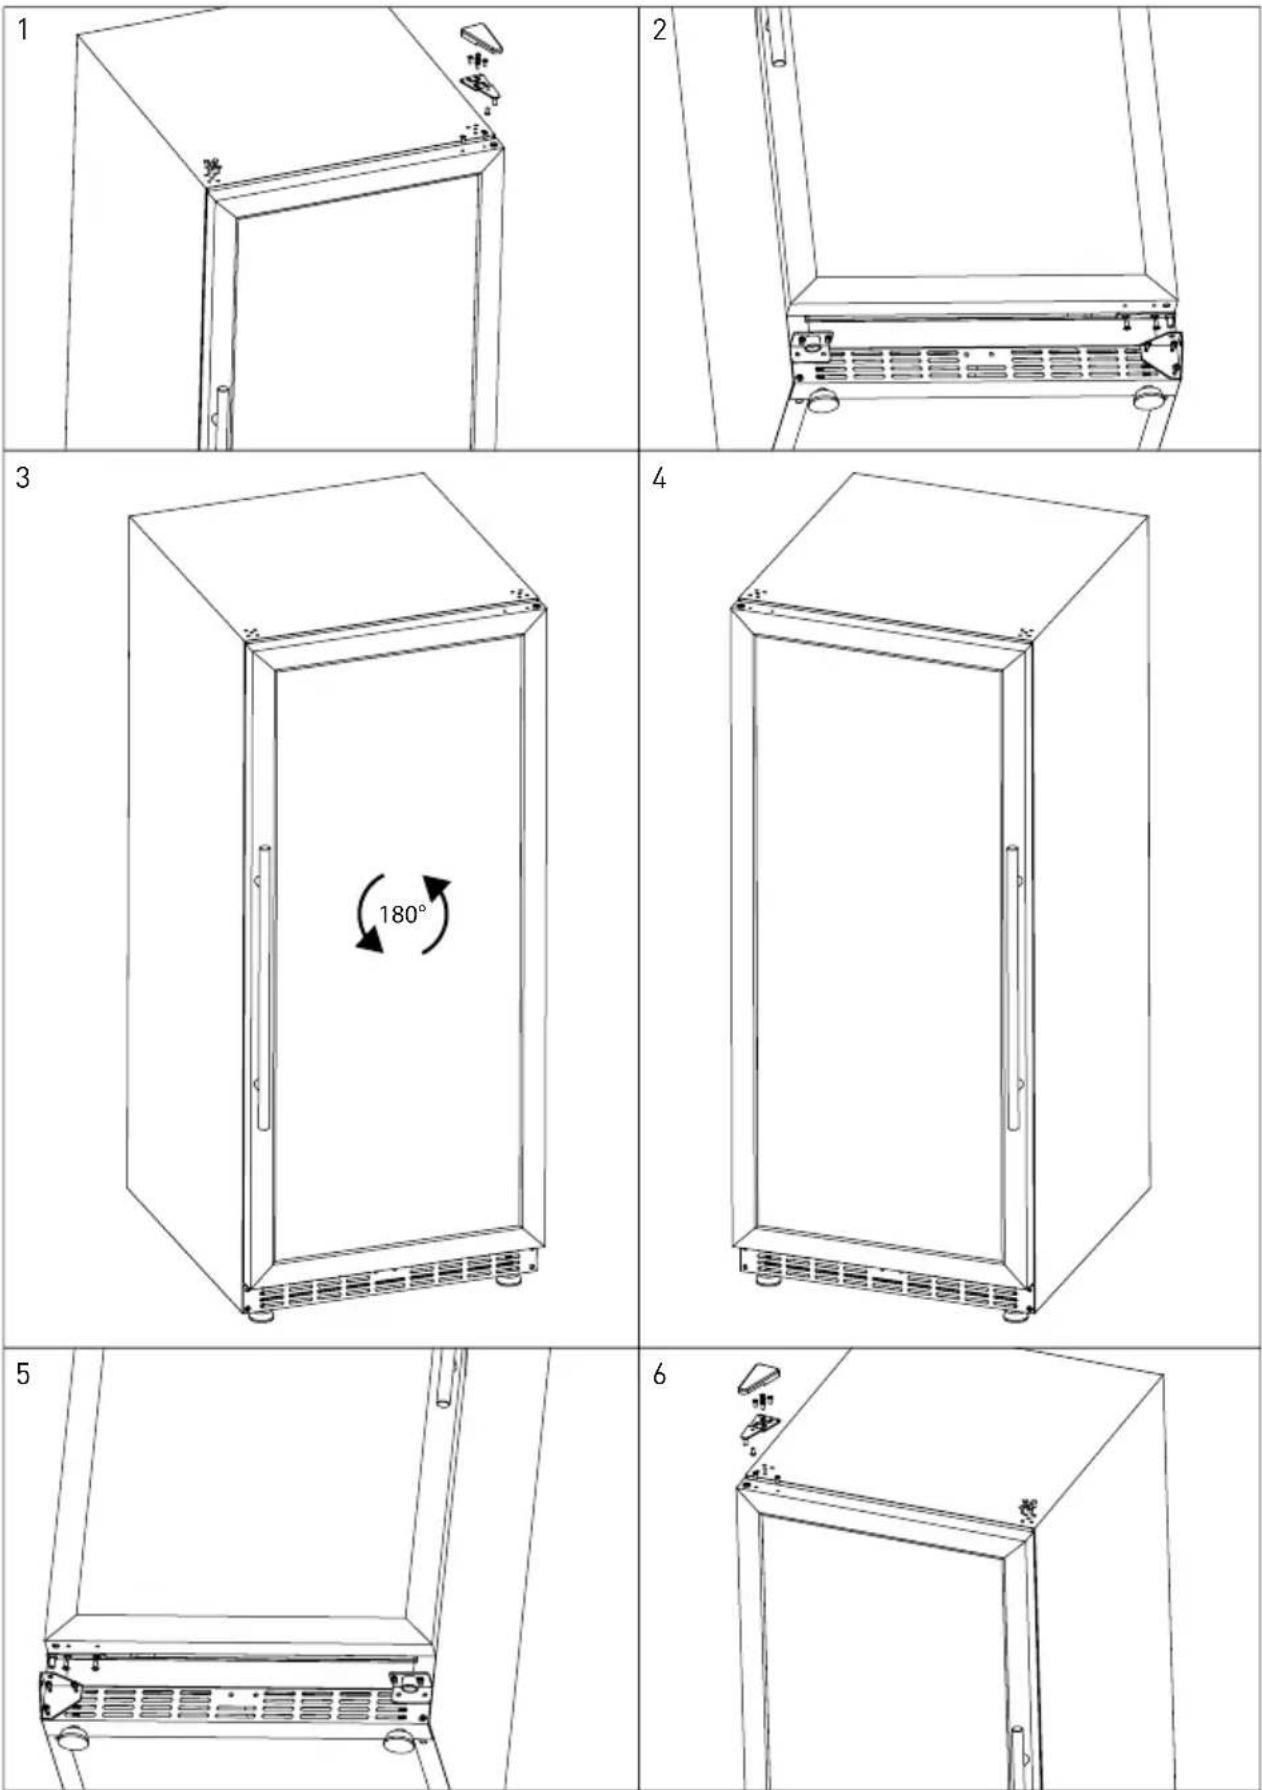
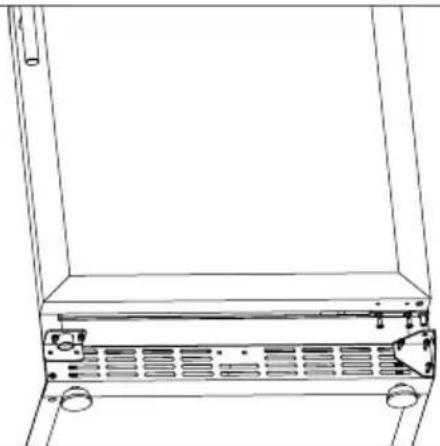
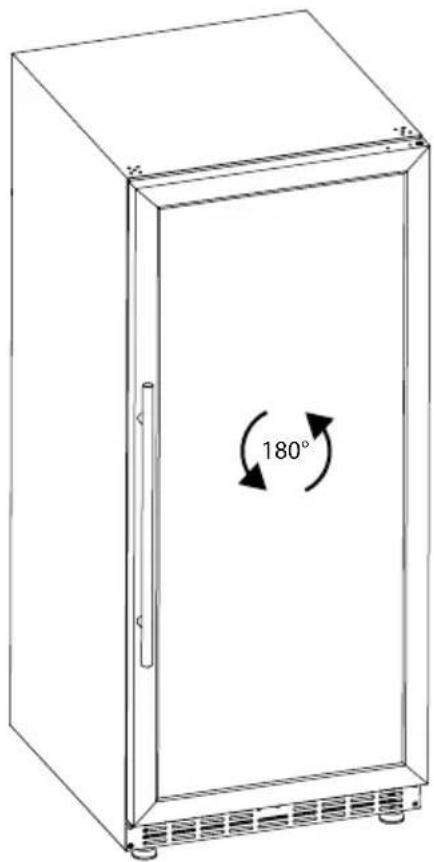
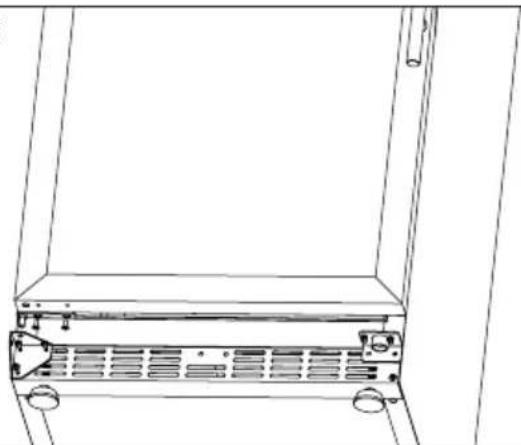
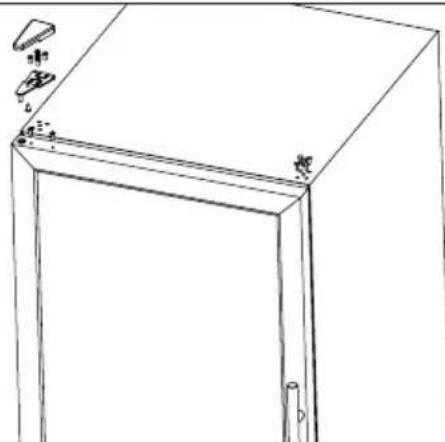
Change door open direction
- CAUTION! Do protection (not supplied) for the glass door to avoid damage.
• The door is only changing by trained personnel.
- The user shall be solely liable for the damage of changing open direction of the door.
- Follow the working procedure below:
Optimal Wine Serving Temperature
| Temperature Type of wine | Wine Category | |
| 18°C (65°F) Rich, Intense | Oaky, Pepper Bordeaux, Cabernet | Sauvignon,Shiraz |
| 17°C (63°F) Reds Barolo, | Burgundy Grand Cru | |
| 16°C (61°F) | Medium To Lighter Bodier Reds Madeira | Rioja,Pinot Noir,CDP |
| 15°C (59°F) Chianti,Zinfand | ||
| 14°C (57°F) Chinon,Port, | ||
| 13°C (55°F) Dolcetto,Cotes Du Rhone | ||
| 12°C (54°F) Juicy, Fruity | Reds Beaujolais, Valpolicella | |
| 11°C (52°F) Full-bodied/oaked whites White Burgundy | ||
| 10°C (50°F) Medium To Lighter Bodied Chardonnay,Sauternes | ||
| 9°C (48°F) Whites Sauvignon Blanc,Chablis | ||
| 8°C (47°F) | Sweet And Sparking Wines | Vintage Champagnes |
| 7°C (45°F) | ||
| 6°C (43°F) Champagne NV, Prosecco,Cava,Asti |
Remark: Above table is just for reference only.
Cleaning and Maintenance
ATTENTION: Always unplug the appliance from the electrical power outlet and let it cool down completely before cleaning & storage.
Cleaning
- Clean the appliance before and after each use.
- Never immerse the appliance in water or other liquids.
- Do not clean the appliance with a water jet.
- Clean the surface with a slightly damp cloth or sponge with some mild soap solution
- All washed parts should be rinsed with clean water to remove the cleaning residues.
- Never use abrasive sponges or detergents, steel wool or metallic utensils to clean the interior or exterior parts of the appliance.
- Dry the interior and exterior surface with a soft cloth.
Storage
- Before storage, always make sure the appliance has already been disconnected from the electrical outlet and cooled down completely.
- Store the appliance in a cool, clean and dry place.
Transportation
- Unplug the appliance from the electrical outlet.
- Remove all the wine bottles inside the appliance.
- Securely tape all loose items inside or outside the appliance.
- At least 2 people for assisting transportation.
Troubleshooting
If the appliance does not function properly, please check the below table for the solution. If you are still unable to solve the problem, please contact the supplier/service provider.
| Problems Possible causes Possible solutions | ||
| The appliance is connected to the power supply but does not function. | 1. Power plug is not connected properly to the electrical power. | 1. Check again to make sure it is connected properly. |
| 2. The circuit breaker tripped or a blown fuse. | 2. Contact the supplier. | |
| Temperature inside the appliance is too warm. | 1. Temperature is set too warm. 1. | Turn to a cooler setting. |
| 2. Door is kept open too long. 2. Open door less. | ||
| 3. The door gasket does not seal properly. | 3. Check to make sure the door gas- ket seal properly. | |
| Moisture forms on the in-side appliance walls. | 1. Door is kept on for too long. 1. Open the door less. | |
| Too much Vibration. 1. The appliance is not placed level. | 1. Check the level and adjust the feet until the wine cooler is level. (Mi- nor vibration is normal) | |
| The door will not close properly. | 1. The Wine Cooler is not placed level. | 1. Check the level and adjust the feet until the wine cooler is level. |
| 2. The door was reversed and not properly installed. | 2. Contact the supplier | |
| 3. The shelves are out of position. | 3. Check and put the shelves on right position. | |
EN
Error codes display
| Error code shown on the display (B and D) | Indication Possible causes P | Possible solutions | ||
| "E1" or E2" is displayed Upper zone temperature sensor failure | Upper zone temperature sensor failure | 1. The connection of upper zone temperature sensor is loose. | Reconnect the sensor | |
| 2. Upper zone temperature sensor is defective. | Contact the supplier | |||
| "E3" or E4" is displayed Defrost sensor failure 1. The connection of defrost sensor is loose. | Reconnect the sensor | |||
| 2. Defrost sensor is defective. | Contact the supplier | |||
| "E7" or E8" is displayed Lower zone temperature sensor failure | Lower zone temperature sensor failure | 1. The connection of lower zone temperature sensor is loose. | Reconnect the sensor | |
| 2. Lower zone temperature sensor is broken. | Contact the supplier | |||
| "HH" is displayed with beep sound | High temperature alarm (the temperature in the wine cabinet over 78.8°F/26°C) | 1. Gas leakage. Contact the supplier | ||
| 2. The capillary copper tube on the strainer beside the compressor is blocked. | ||||
| 3. The evaporator fan is defective. | ||||
| "LL" is flashing with beep sound and the compressor is stopped operation. | Low temperature alarm (temperature in the wine cabinet below 32°F/0°C) | 1. The fan of heater is stopped. | 1. Disconnect the power and connect it again after 5 mins.2. Contact the supplier | |
| 2. The control panel is abnormal. | ||||
| 3. The heater is defective. | ||||
Technical specification
| Item no. 237588 237557 237564 237595 | ||||
| Operating voltage and frequency 220-240V~ 50Hz | ||||
| Rated input power 90W 110W 130W 150W | ||||
| Rated current 0,5 A 0,6 A 0,7 A 0,9 A | ||||
| Setting temperature range 5°C to 22°C | ||||
| Protection class Class I | ||||
| Power of the illumination light 1,5 W | ||||
| Noise level < 50 dB (A) | ||||
| Refrigerant used and injection quantity | R600a / 30g R600a / 35g R600a / 50g | R600a / 52g | ||
| Energy efficiency class G | ||||
| Foam blowing agent | Cyclopentane | |||
| Climate class | N-ST (16°C to 38°C) | |||
| No. of temperature zones | 2 | |||
| Volume capacity | 133L 232L 387L | 447L | ||
| Storage bottle capacity | 46 bottles | 72 bottles | 135 bottles | 160 bottles |
| No. of shelves | 5 | 9 | 13 | 15 |
| Net weight (approx.) | 49 kg | 67 kg | 93 kg | 103 kg |
| Dimension | 595 x 588 x (H)820mm | 595 x 605 x (H)1225mm | 595 x 685 x (H)1625mm | 595 x 685 x (H)1795mm |
Remark: Technical specification is subjected to change without prior notification.
Circuit diagram
237588, 237557
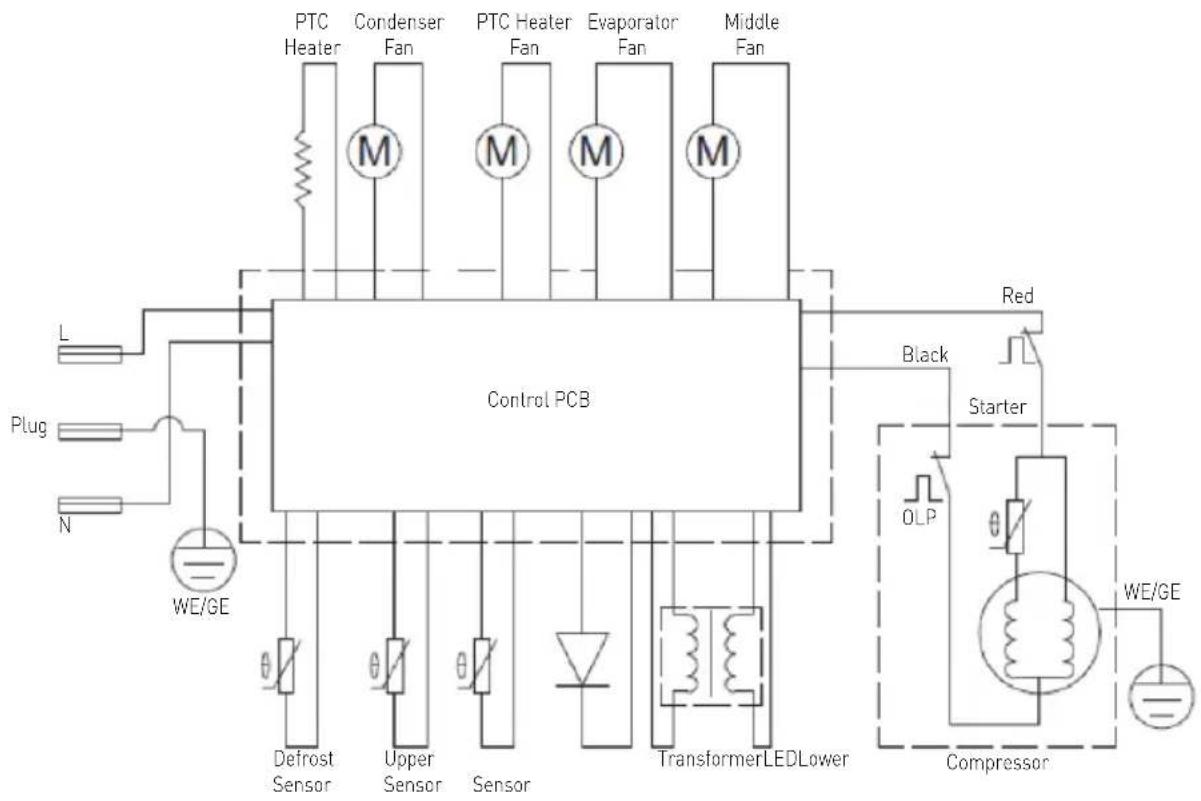
flowchart
graph TD
    A["Control PCB"] --> B["PTC Heater"]
    A --> C["Condenser Fan"]
    A --> D["PTC Heater Fan"]
    A --> E["Evaporator Fan"]
    A --> F["Middle Fan"]
    A --> G["TransformerLEDLower"]
    A --> H["Compressor"]
    A --> I["Red"]
    A --> J["Black"]
    A --> K["Starter"]
    A --> L["OLP"]
    A --> M["WE/GE"]
    A --> N["Defrost Sensor"]
    A --> O["Upper Sensor"]
    A --> P["Sensor"]
    A --> Q["Diode"]
    A --> R["WE/GE"]
    A --> S["L Plug"]
    A --> T["N"]
EN
237564, 237595
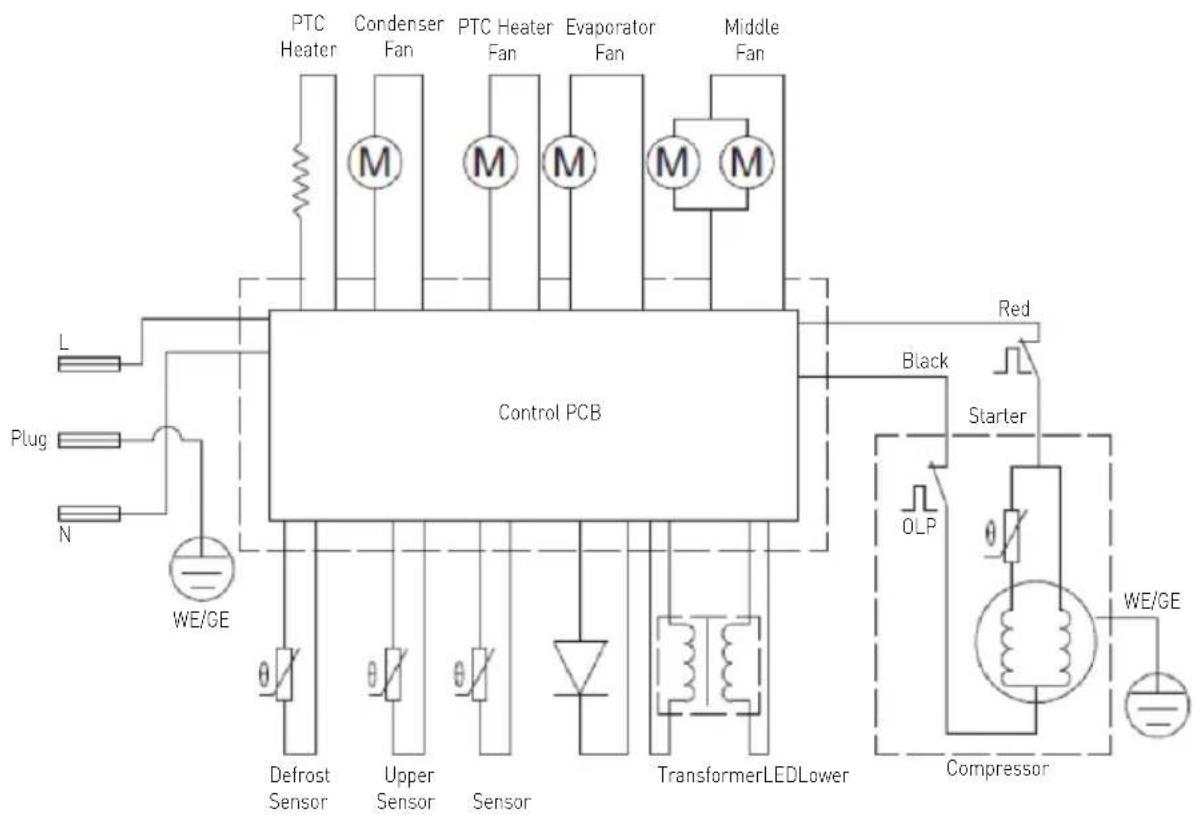
flowchart
graph TD
    A["Control PCB"] --> B["PTC Heater"]
    A --> C["Condenser Fan"]
    A --> D["PTC Heater Fan"]
    A --> E["Evaporator Fan"]
    A --> F["Middle Fan"]
    A --> G["TransformerLEDLower"]
    A --> H["Compressor"]
    A --> I["Red"]
    A --> J["Black"]
    A --> K["Starter"]
    A --> L["OLP"]
    A --> M["WE/GE"]
    A --> N["Defrost Sensor"]
    A --> O["Upper Sensor"]
    A --> P["Sensor"]
    A --> Q["WE/CE"]
    A --> R["L Plug"]
    A --> S["N"]
Warranty
Any defect affecting the functionality of the appliance which becomes apparent within one year after purchase will be repaired by free repair or replacement provided the appliance has been used and maintained in accordance with the instructions and has not been abused or misused in any way. Your statutory rights are not affected. If the appliance is claimed under warranty, state where and when it was purchased and include proof of purchase (e.g. receipt).
In line with our policy of continuous product development we reserve the right to change the product, packaging and documentation specifications without notice.
Discarding & Environment
When decommissioning the appliance, the product must not be disposed of with other household waste. Instead, it is your responsibility to dispose to your waste equipment by handing it over to a designated collection point. Failure to follow this rule may be penalized in accordance with applicable regulations on waste disposal. The separate collection and recycling of your waste equipment at the time of disposal will help conserve natural resources and ensure that it is recycled in a manner that protects human health and the environment. For more information about where you can drop off your waste for recycling, please contact your local waste collection company. The manufacturers and importers do not take responsibility for recycling, treatment and ecological disposal, either directly or through a public system.
natural_image
Line drawing of a cabinet or door with mounting feet and a handle (no text or symbols)2
natural_image
Line drawing of a server rack with ventilation grilles and mounting holes (no text or symbols)3
natural_image
Line drawing of a rectangular refrigerator with a 180-degree rotation indicator (no text or symbols on the cabinet itself)4
natural_image
Line drawing of a simple 3D cabinet with lid and ventilation grilles (no text or symbols)5
natural_image
Line drawing of a server rack with ventilation grilles and mounting feet (no text or symbols)6
natural_image
Line drawing of a cabinet or enclosure with a door, windows, and a small inset device (no text or symbols)text_image
Diagram of a black refrigerator with numbered labels pointing to different compartmentsnatural_image
Technical line drawing of a cabinet with two views (labeled 1 and 2), showing internal components and mounting points (no text or symbols present)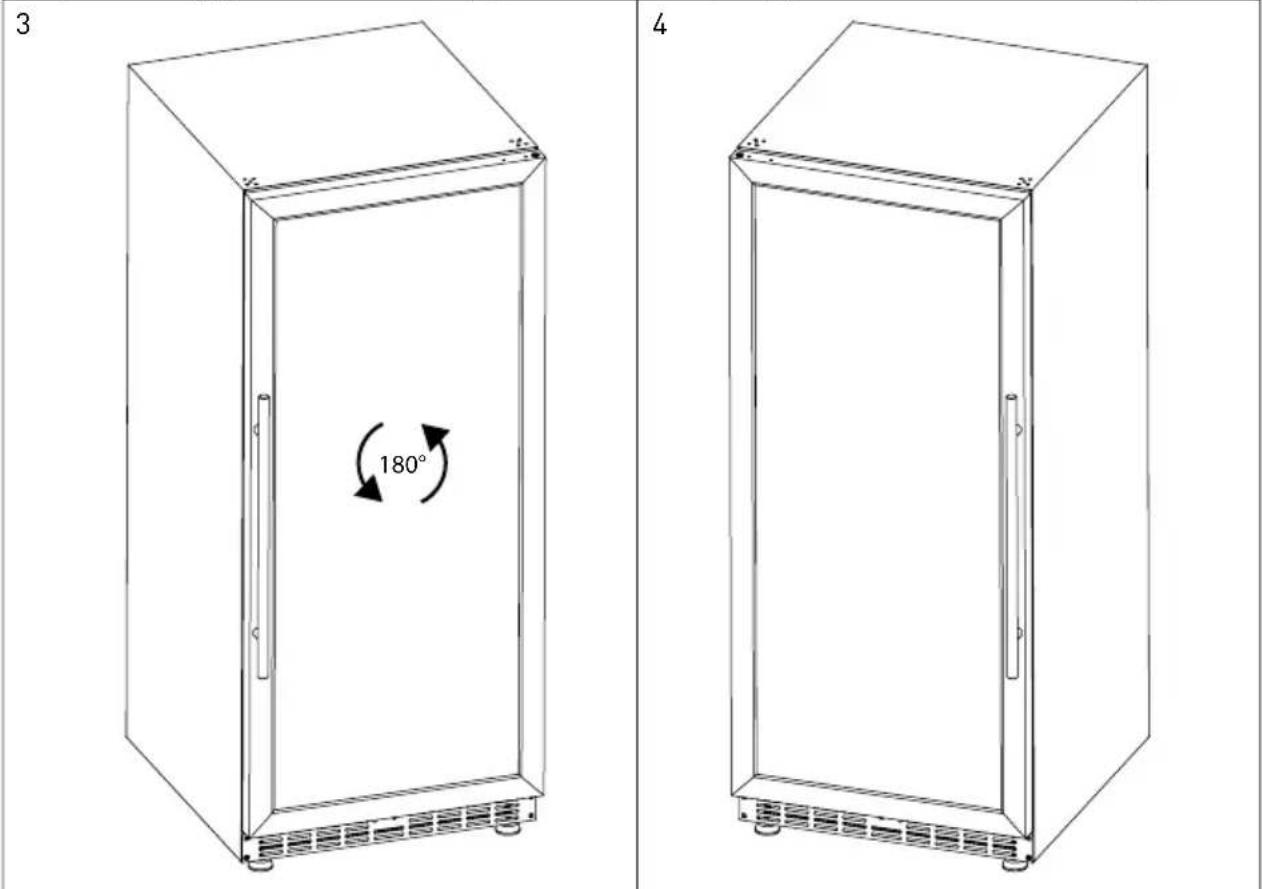
natural_image
Two technical line drawings of a rectangular enclosure with a 180° rotation indicator, shown from different angles (no text or symbols present)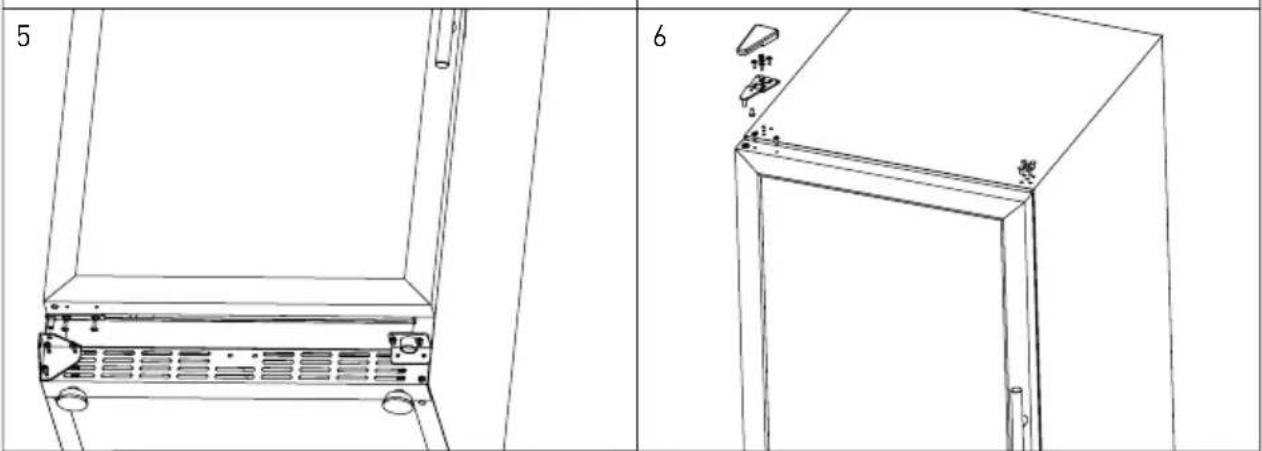
natural_image
Technical line drawing of a cabinet with internal components, shown from two views (labeled 5 and 6), no text or symbols present.natural_image
Line drawing of a door with mounting fixtures and a small inset image (no text or symbols)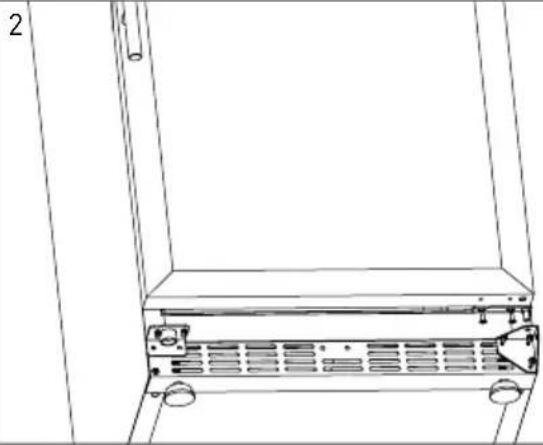
natural_image
Line drawing of a server rack unit with ventilation slots and mounting feet (no text or symbols)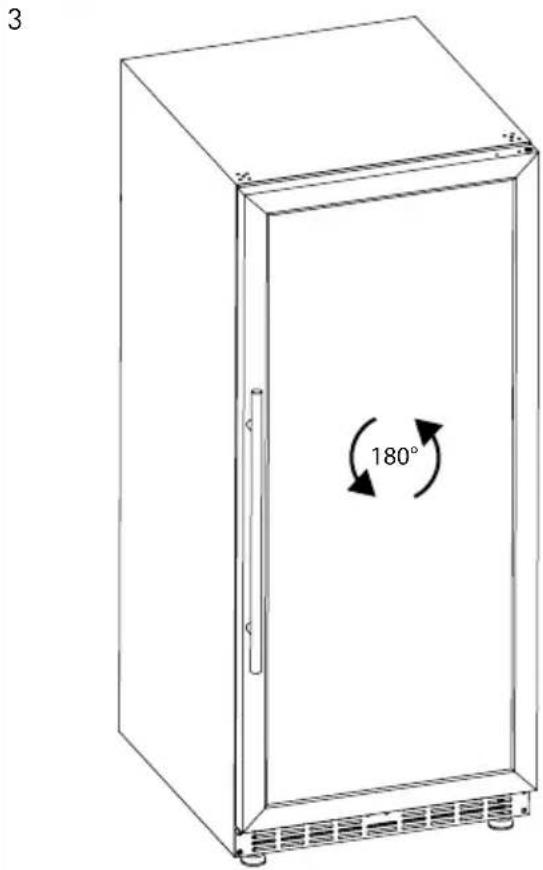
natural_image
Line drawing of a refrigerator with 180-degree rotation indicator (no text or symbols on the cabinet itself)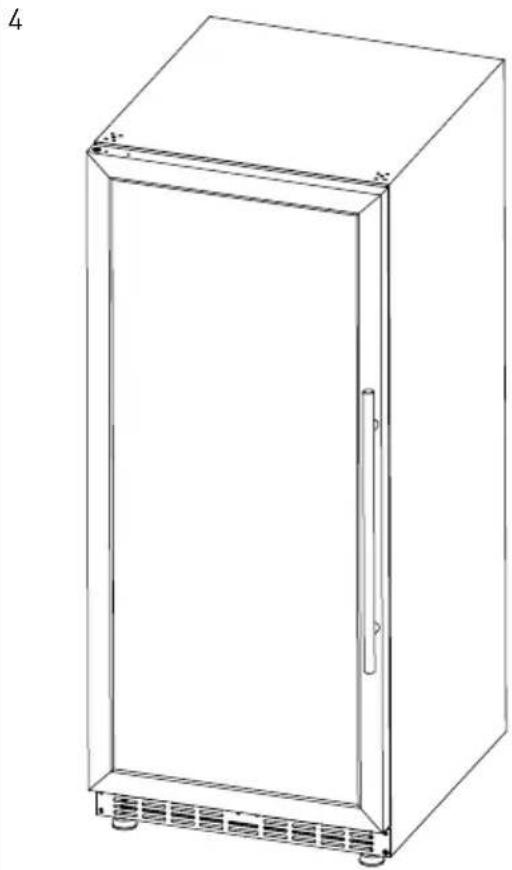
natural_image
Line drawing of a rectangular refrigerator with ventilation grilles at the base (no text or symbols)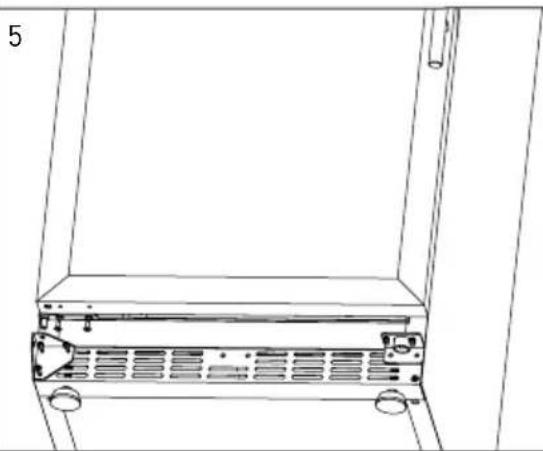
natural_image
Line drawing of a cabinet or rack unit with ventilation grilles and mounting holes (no text or symbols)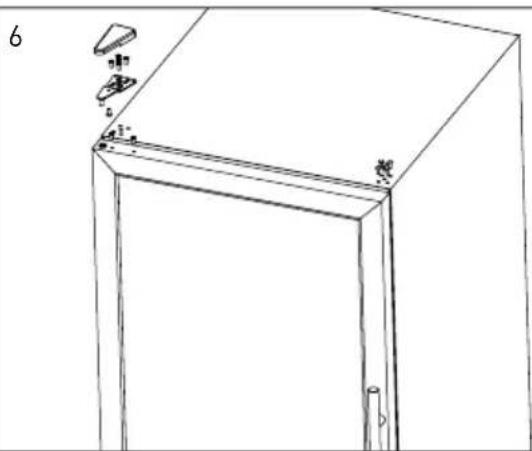
natural_image
Line drawing of a cabinet or enclosure with mounting feet and a small component, no text or symbols presenttext_image
Compartmentul inferior Compartmentul superior Arktic A B C D E F G HRO
Afişaj:
natural_image
Technical line drawing of a cabinet with two views (labeled 1 and 2), showing internal components and mounting points (no text or symbols present)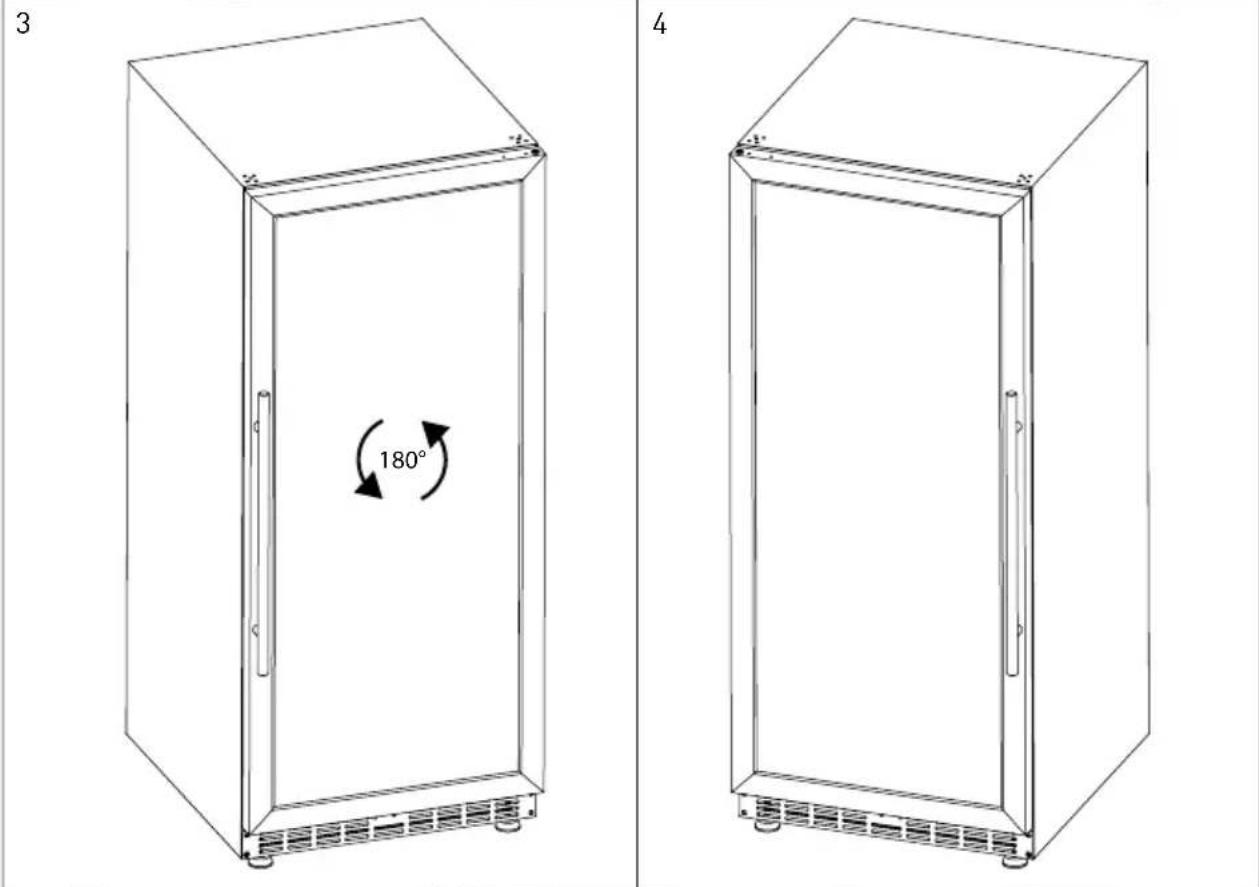
text_image
3 180° 4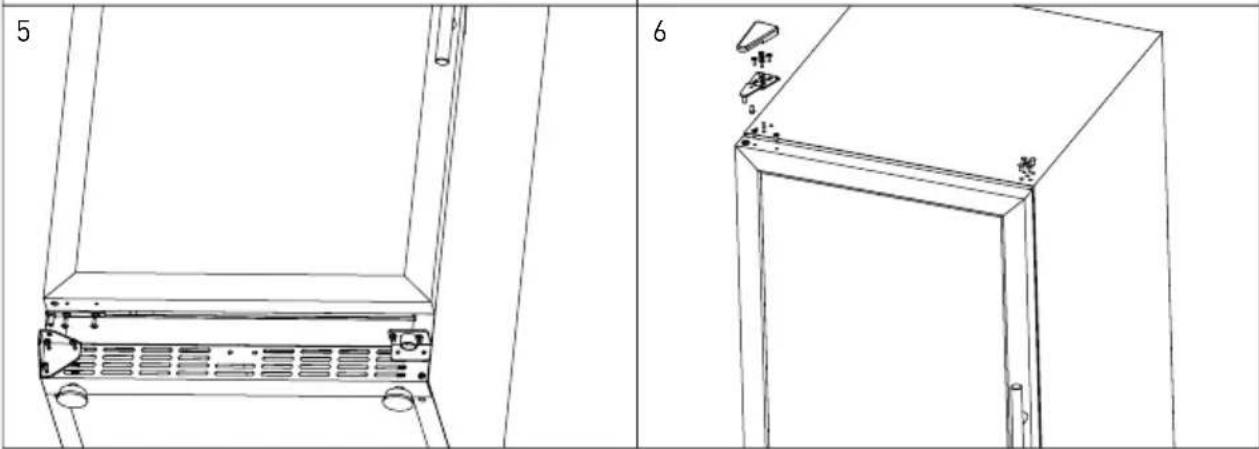
natural_image
Technical line drawing of a cabinet with labeled parts, showing front and side views (no text or symbols present)text_image
Diagram of a 9-pin refrigerator with numbered labels pointing to different compartmentsnatural_image
Technical line drawing of a cabinet with two views (labeled 1 and 2), showing internal components and mounting points (no text or symbols present)
text_image
3 180° 4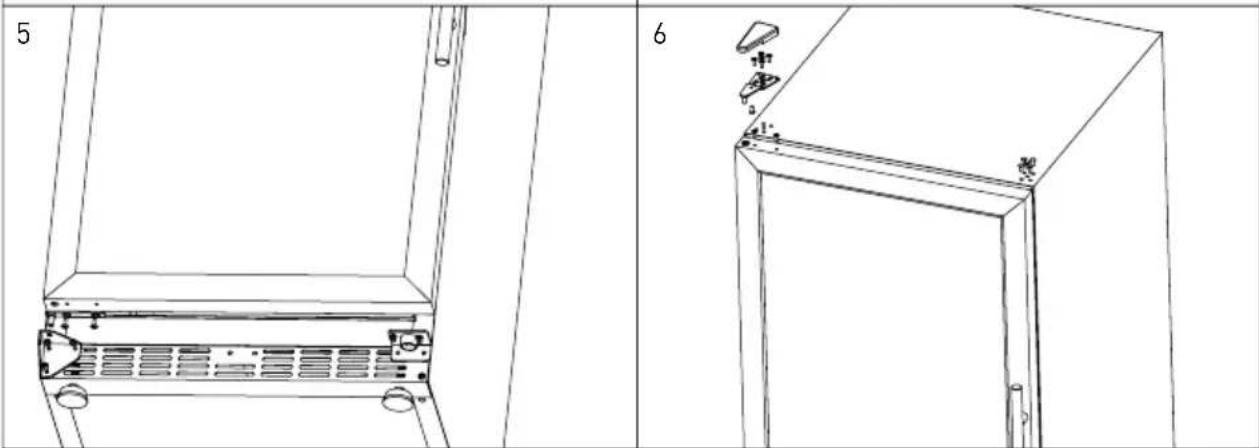
natural_image
Technical line drawing of a cabinet with internal components and mounting holes, shown from two views (labeled 5 and 6), no text or symbols present.Hendi Food Service Equipment GmbH
Ehring 15
Hendi Food Service Equipment Romania S.R.L.
PKS Hendi South East Europe SA
5 Metsovou Str.
18346 Moschato, Athens, Greece
Tel: +30 210 4839700
Email: info@pks-hendi.com
Hendi Italia S.R.L.
Via Leonardo da Vinci 4
39100 Bolzano (BZ), Italy
Tel: +39 800 727 438
Email: office.italy@hendi.eu
Hendi HK Ltd.
1208, 12/F Exchange Tower
33 Wang Chiu Road, Kowloon Bay, Hong Kong
Tel: +852 2154 2618
Email: info-hk@hendi.eu
Find Hendi on internet:
www.hendi.eu
www.facebook.com/HendiToolsforChefs
www.linkedin.com/company/hendi-food-service-equipment-b.v.
www.youtube.com/HendiEquipment
- Changes, printing and typesetting errors reserved.
- Änderungen und Druckfehler vorbehalten.
- Wijzigingen en drukfouten voorbehouden.
-
Producent zastrzega sobie prawo do zmian oraz błędów drukarskich w instrukcji.
-
Variations et fautes d'impression réservés.
- Errori di cambiamenti, di stampa e di impaginazione riservati.
- Drepturi rezervate cu privire la modificări și greșeli de imprimare.
- Изменения, печати и верстки ошибки защищены.
- Με επιφύλαξη αλλαγών, λαθών εκτύπωσης και στοιχειοθεσίας.