CLR700QI - Alarm clock radio ROADSTAR - Free user manual and instructions
Find the device manual for free CLR700QI ROADSTAR in PDF.
User questions about CLR700QI ROADSTAR
0 question about this device. Answer the ones you know or ask your own.
Ask a new question about this device
Download the instructions for your Alarm clock radio in PDF format for free! Find your manual CLR700QI - ROADSTAR and take your electronic device back in hand. On this page are published all the documents necessary for the use of your device. CLR700QI by ROADSTAR.
USER MANUAL CLR700QI ROADSTAR
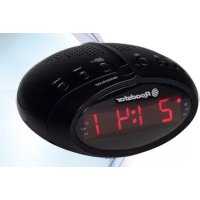
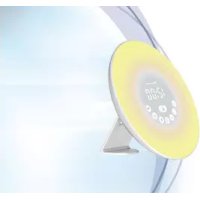
FM Clock Radio with smartphone wireless charger
User manual
Bedienungsanleitung
- Your new unit was manufactured and assembled under strict ROADSTAR quality control. Thank-you for purchasing our product for your music enjoyment. Before operating the unit, please read this instruction manual carefully. Keep it also handy for further future references.
text_image
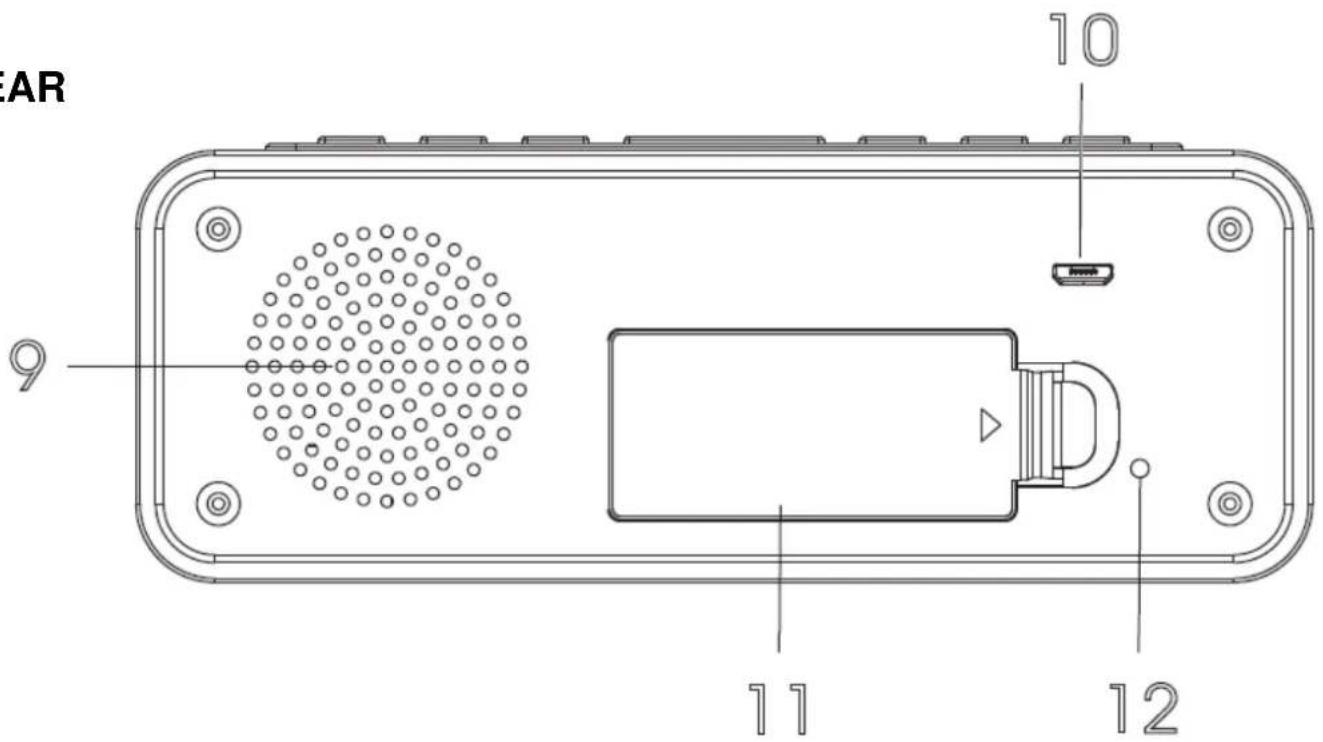
Wireless Charge 1 2 3 4 5 6 7 8REAR
text_image
EAR 9 10 11 121 English
LOCATION OF CONTROLS
- CLOCK SETTING / PRESET
- HOUR / TUNING -
- MINUTES / TUNING +
- SLEEP TIMER / SNOOZE / AUTOSCAN / DIMMER
- ALARM 1 / VOLUME -
- ALARM 2 / VOLUME +
- FM RADIO ON-OFF / ALARM OFF
- SMARTPHONE WIRELESS CHARGER
- SPEAKER
- MICRO USB PORT
- BATTERY COMPARTMENT
- ANTENNA
POWER SOURCE
AC POWER: To power on your product, plug the AC/DC adaptor into the micro USB port (10) at the back of the unit and into a wall AC power outlet.
Check that the rated voltage of your appliance matches your local voltage.
BATTERY BACK-UP POWER FAILURE PROTECTION
This radio has a battery back up circuit that will keep the correct time and alarm settings in the event of a temporary power interruption. Install 2 x "LR03" batteries (not included), into the battery compartment located on the bottom of the unit (11).
DISPLAY BRIGHTNESS SETTING
When the radio is OFF, press repeatedly the [DIMMER] (4) to select desired level (LOW, HIGH, OFF).
CLOCK SETTING
When the radio is OFF:
- Press and hold the [TIME] button (1);
- Press [HOUR] button (2) to select 12 or 24 h;
- Confirm with the [TIME] button (1);
- Use the [HOUR] button (2) to adjust the hour;
- Use the [MIN] button (3) to adjust the minutes;
- Confirm with the [TIME] button (1).
TO USE THE RADIO
- Press the [POWER] button (7) to power on;
- Use the [TUNE- / TUNE+] buttons (2/3) to select the desired radio station;
- Adjust the volume with the [VOL- / VOL+] buttons(5/6) to the desired level;
- To power off the radio, press the [POWER] button (7).
Note: For a better reception reorient the antenna (12).
PRESETS
- Tune the desired station as explained above;
- Press and hold [PRESET] button (1) until "P" and the number will flash;
- Press the [TUNE- / TUNE+] buttons (2/3) to choose the number;
- Press the [PRESET] button (1) to save the radio station.
STORE RADIO STATIONS AUTOMATICALLY:
Press & Hold the [SCAN] button (4) (for 3 seconds) and the radio will automatically scan the radio. During the scanning process, the radio will save the scanned stations sequentially into the memory.
RECALL A PRESET STATION:
Press the [PRESET] button (1) and then choose the number of the preset by pressing the [TUNE- / TUNE+] buttons (2/3).
ALARM SETTING
When the radio is OFF:
- Press and hold the [ALARM] button (5 or 6);
- Use the [HOUR] button (2) to adjust the hour;
- Use the [MIN] button (3) to adjust the minutes;
- Confirm with the [ALARM] button (5 or 6);
- Use the [HOUR] button (2) to choose the alarm mode (Buzzer or radio);
- Confirm with the [ALARM] button (5 or 6);
- Use the [TUNE- / TUNE+] (2/3) to adjust the volume;
- Confirm with the [ALARM] button (5 or 6).
Note: To set the second Alarm, repeat all the steps with “Alarm2” (6) instead of “Alarm1” (5).
ALARM OFF:
During Alarm on, press [ALARM OFF] button (7) to deactivate the alarm or press [SNOOZE] button (4) to postpone the alarm for 9 minutes.
ACTIVATE / DEACTIVATE ALARM SETTINGS:
In stand-by, press the [ALARM] button (5 or 6) to activate / deactivate the alarm (the alarm icon will appear / disappear).
SLEEP TIMER
The sleep timer switches the radio off automatically after an adjustable time.
When the radio is ON press repeatedly the [SLEEP] (4) to choose the desired timer.
Note: To remove the sleep timer select "OFF".
QI ENABLED - SMARTPHONE CHARGING
Place your Qi enabled smartphone on the center of the wireless charging pad.
Please check if your phone screen shows charging status.
If your phone is not charging:
• Check if your device supports Qi wireless charging
- Place mobile device in center
- Remove the case with magnet, metal, or thicker material than 0.12"(3mm)
Note: Charges through most cases of Polycarbonate (PC) or Thermoplastic Polyurethane (TPU) material up to 0.12"(3mm). Compatibility (Qi Wireless Charging Pad).
TECNICAL SPECIFICATIONS
Power Supply: AC 100-240V\~ 50/60Hz
(AC/DC 5V=2A adaptor).
Radio Frequency Coverage
FM: 87.5 - 108 MHz.
Speaker
Output Power: 1 x 0.5 Watt RMS.
General
Wireless Charger Power: 5 Watt.
Specifications and design are subject to possible modifications without notice due to improvement.
WARNINGS


CAUTION
RISK OF ELECTRIC
SHOCK
DO NOT OPEN
230v\~


The exclamation point within the triangle is a warning sign alerting the user of important instructions accompanying the product.
The lightening flash with arrowhead symbol within the triangle is a warning sign alerting the user of “dangerous voltage” inside the unit.
To reduce the risk of electric shock, do not remove the cover. No user serviceable parts inside the unit. Refer all servicing to qualified personnel.
This unit operates on 230V \~ 50Hz. If the unit is not used for a long period of time, remove the plug from the AC mains.
Ensure all connections are properly made before operating the unit.
This unit must not be exposed to moisture or rain.
This unit should be positioned so that it is properly ventilated. Avoid placing it, for example, close to curtains, on the carpet or in a built-in installation such as a bookcase.
Do not expose this unit to direct sunlight or heat radiating sources.

natural_image
Simple line drawing of a trash bin with two crossed lines above and below (no text or symbols)CORRECT DISPOSAL OF THIS PRODUCT
(Waste Electrical & Electronic Equipment)
This marking shown on the product or its literature, indicates that it should not be disposed with other household wastes at the end of its working life. To prevent possible harm to the environment or human health from uncontrolled waste disposal, please separate this from other types of wastes and recycle it responsibly to promote the sustainable reuse of material resources. Household users should contact the retailer where they purchased this product, or their local government office, for details of where and how they can take this item for environmentally safe recycling. Business users should contact their supplier and check the terms and conditions of the purchase contract. This product should not be mixed with other commercial wastes for disposal.
ORT DER BEDIENELEMENTE
- CLOCK SETTING / PRESET (UHREINSTELLUNG)
- HOUR / TUNING - (UHR / FREQUENZ -)
- MINUTES / TUNING + (MINUTEN / FREQUENZ +)
- SLEEP TIMER / SNOOZE / AUTOSCAN / DIMMER (BILDSCHIRMHELLIGKEIT)
- ALARM 1 / VOLUME - (LAUTSTÄRKE -)
- ALARM 2 / VOLUME + (LAUTSTÄRKE +)
- FM RADIO ON-OFF / ALARM OFF (ALARM AUS)
- SMARTPHONE WIRELESS CHARGER
- SPEAKER (LAUTSPRECHER)
- MICRO USB BUCHSE
- BATTERY COMPARTMENT (BATTERIEFACH)
- ANTENNA (ANTENNE)
STROMQUELLEN
natural_image
Simple line drawing of a trash bin with two crossed lines and a blank bottom bar (no text or symbols)KORREKTE ENTSORGUNG DIESES PRODUKTS (Elektromüll)
natural_image
Simple line drawing of a trash bin with two crossed lines and a black bar at the bottom (no text or symbols)natural_image
Simple line drawing of a trash bin with two crossed lines and a black bar below (no text or symbols)natural_image
Simple line drawing of a trash bin with two crossed lines and a black bar below (no text or symbols)natural_image
Simple line drawing of a trash bin with two crossed lines and a black bar below (no text or symbols)CORRECTE AFVALVERWERKING VAN HET PRODUCT (elektrisch en elektronisch afval)
NASTAVENÍ JASU U DISPLEJE
natural_image
Simple line drawing of a trash bin with two crossed lines and a black rectangular base (no text or symbols)NASTAVENIE JASU U DISPLEJA
Ak je rádio vypnuté, opakovane stlačte tlačidlo [DIMMER] (4) pre vol'bu požadovanej úrovne (LOW, HIGH, OFF).
NASTAVENIE HODÍN
natural_image
Simple line drawing of a trash bin with two crossed lines above and below, no text or symbols present.Hereby, Roadstar Management SA declares that the radio equipment type CLR-700QI is in compliance with Directive 2014/53/EU.
The full text of the EU declaration of conformity is available at the following internet address:
http://roadstar.com/images/ce/CLR-700QI.pdf
or by scanning the following QR Code.
http://roadstar.com/images/ce/CLR-700QI.pdf
http://roadstar.com/images/ce/CLR-700QI.pdf
http://roadstar.com/images/ce/CLR-700QI.pdf
http://roadstar.com/images/ce/CLR-700QI.pdf
http://roadstar.com/images/ce/CLR-700QI.pdf
http://roadstar.com/images/ce/CLR-700QI.pdf
http://roadstar.com/images/ce/CLR-700QI.pdf
text_image
QR code image containing encoded data, no visible human-readable textMANUAL VER.:1.0
20.05.2019
Roadstar Management SA, via Passeggiata 7 CH 6883 Novazzano (Switzerland)