BH420W - Speaker ACME - Free user manual and instructions
Find the device manual for free BH420W ACME in PDF.

| Product Type | Bluetooth In-Ear Headphones |
| Brand | Acme |
| Model | BH420W |
| Bluetooth Version | 5.0 + EDR |
| Frequency Range | 2.4 - 2.48 GHz |
| Frequency Response | 20 – 20,000 Hz |
| Speaker Size | 8.2 mm |
| Operating Range | Up to 10 m |
| Playback Battery Life | Up to 5 hours |
| Standby Battery Life | Approximately 400 hours |
| Earbud Charging Time | Up to 1.5 hours |
| Case Charging Time | Up to 2 hours |
| Additional Charges (Case) | 3 full charges |
| Total Weight | 40 g |
| Main Functions | Play/pause, call management, volume control, next/previous track, voice assistant |
| Control | Touch (multifunction button on each earbud) |
| Voice Assistant | Yes (3 presses on earbud) |
| Maintenance and Cleaning | Avoid abrasive solvents, extreme temperatures, sharp objects and drops |
| Safety | Risk of hearing damage at high volume; do not dispose of in fire |
| Compliance | RED 2014/53/EU, RoHS 2015/863/EU |
Frequently Asked Questions - BH420W ACME
User questions about BH420W ACME
0 question about this device. Answer the ones you know or ask your own.
Ask a new question about this device
Download the instructions for your Speaker in PDF format for free! Find your manual BH420W - ACME and take your electronic device back in hand. On this page are published all the documents necessary for the use of your device. BH420W by ACME.
USER MANUAL BH420W ACME
natural_image
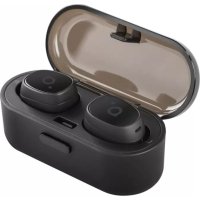
White wireless earbuds with open case against green background (no text or symbols visible)BH420W
TRUE WIRELESS
Earbuds
4 GB User manual
8 LT Vartotojo gidas
12 LV Lietošanas instrukcija
16 EE Kasutusjuhend
Technical specifications
Type: in-ear, Bluetooth
Frequency response: 20-20,000 Hz
Driver size: 8,2 mm
Bluetooth version: v5.0 + EDR
Frequency range: 2.4–2.48 GHz
Maximal output radio frequency power: 8 dBm / 6,3 mW
Working distance: up to 10 m
Power supply: USB Type-C, 5 V DC
Microphone: built-in
Battery (charging case): Li-ion, 3.7 V, 450 mAh (1.67 Wh)
Earphones charging time: up to 1,5 hours
Charging time of the charging case: up to 2 hours
Standby time: about 400 hours
Playback time: up to 5 hours
Recharging with the charging case: 3 times
Total weight: 40 g

WARNING: Listening at a high volume for a long time may damage your hearing.
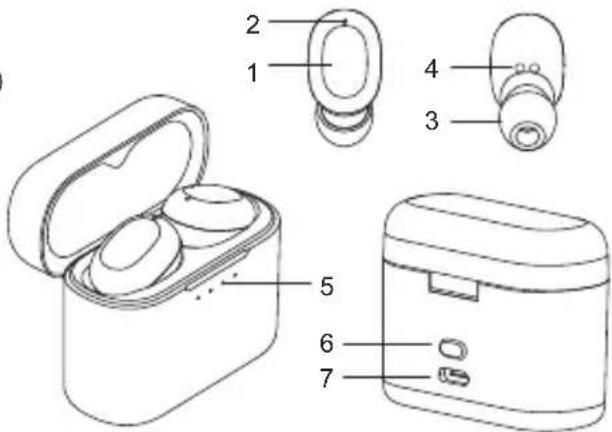
Product overview
1) Power (multifunction button)
2) Indicator light and MIC
3) Speaker
4) Charging contacts
5) Charging indicator
6) Battery status button
7) USB Type-C charging port

Before you start using the earphones, you must charge the battery and pair the earphones with a compatible device.
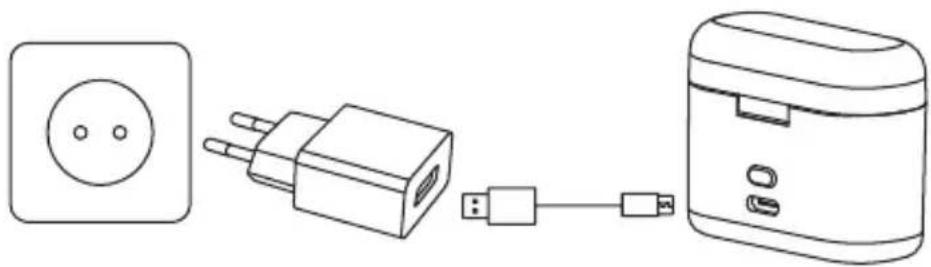
Charging the earphones and charging case
natural_image
Line drawing of a power cord, plug, and socket connected to a heater (no text or symbols)The BH420W charging case has an internal, rechargeable battery that must be fully charged before being used for the first time. It takes about 2 hours to fully charge the battery for the first time. If you do not use the device for a long period of time, please charge it once every 2 months to avoid damage to the battery.
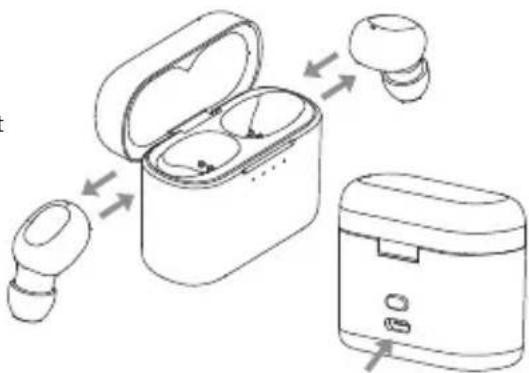
- Put the earphones in the charging case and close the cover to charge. During charging, the indicators will show a steady red colour. When the battery is fully charged, the red light will turn off.
- Use the USB charging cable to charge the charging case. The indicator lights of the charging case are blinking blue when being charged. They will turn off automatically after being fully charged.

Fully charged earphone batteries have the power for up to 5 hours of playback time (15 hours more from the charging case). When the batteries running out of power, a sound prompt will be heard. This indicates that the ones need to be charged as soon as possible.
Pairing
Automatic (first time setup) method:
- Power on or remove the two earphones from the charging case and wait for 3 seconds. The two earphones will power on and enter to the pairing mode automatically. A fast-blinking red/blue LED from left headphone will indicate that the earphones are ready to pair with your device.
- Turn on the Bluetooth function on your device, select BH420W from the list, and pair the earphone.
• A voice prompt will be heard from the right earphone saying that the earphones are connected.
Manual method:
- When both earphones are in an off state, press and hold the power (multifunction) button of both earphones till blue LED indicator is seen. Release right earphone power button, but keep holding left earphone power button until fast-blinking red/blue LED will be seen.
- Turn on the Bluetooth function on your device, select BH420W from the list, and pair the devices.
• A sound prompt will be heard from the right earphone confirming that the earphones are connected.

If no Bluetooth connection is made within 5 minutes, the earphones will turn off automatically.
Basic Use
To switch on, when both earphones are in an off state, press and hold the power (multifunction) button for 3 seconds for both earphones at the same time until the blue indicator light comes on.
To switch off, when both earphones are in an on state, press and hold the power (multifunction) button of one corresponding (left or right) for 3 seconds to power off both earphones until the red indicator light flashes or just put them back into the charging case.
Automatic reconnection
When both earphones are in an off state, remove them from the charging case at the same time, and they will reconnect automatically.
Answer a call
When there is an incoming call, press the power (multifunction) button on the left or right earphone.
Reject a call
Press and hold the power (multifunction) button of the left or right earphone for 2 seconds.
End a call
To end the call, press power (multifunction) button on the left or right earphone.
Play/Pause
Double tap the power (multifunction) button to pause/play the song.
Increase/Decrease volume
Press right earbud power button to increase the volume. Press the left earbud power button to decrease the volume.
Next/Previous song
Press and hold the right earbud power button to change song to next one. Press and hold the left earbud power button to change song to previous one.
Voice assistant
Triple tap left or right earbud and the smartphone's assistant will appear. After prompt sound you can ask any question and the answer will play to the earphones.
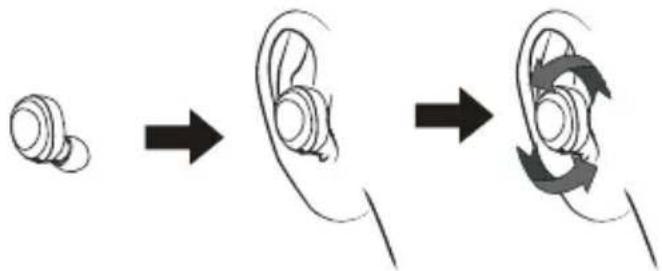
Wearing the earphones
To properly wear the earphones:
STEP 1. Place the earphones in the ears as shown.
STEP 2. Slightly rotate the earphone until it gets tight.
flowchart
graph LR
    A["Small ear icon"] --> B["ear ring with head"]
    B --> C["ear ring with arrow indicating rotation"]
LED indications
| No. | Status Headset Performance | |
| 1 | Pairing The indicator light of the | the left earphone flashes red and blue alternately; when successfully connected to the device, the indicator light keeps lighting blue. |
| 2 | Call state In case of the incoming | bing call, the indicator lights are blinking blue. |
| 3 | Headset charging state The in | indicator light of the headset is red when being charged and will turn off automatically after being fully charged. |
| 4 | Charging case charging state | The indicators blinking blue when being charged and will turn off automatically after being fully charged. |
| 5 | Power on state If earphones are connected to device, indicator light of left earphone stays blue. | |
| 6 | Power off state The indicator | ight stays red for 2 seconds and switches off. |
Troubleshooting
| Faults Reasons and Solutions | |
| The earphones cannot be turned on.The earphones turn off automatically.The earphones cannot turn on by picking them up from the charging case. | Charging case low battery protection. Recharge your earphones and charging case. |
| Music is not playing. Make sure that both devices are paired and connected and that “Media playback” is enabled in your Bluetooth settings. Try to pair it again. | |
| Pairing was successful but the device cannot find the right earphone or reconnect/connect. | Too many pairing records. Delete pairing records (unpair) and try again. It is possible that you are not able to connect because the earphones are paired with another nearby device. You will have to disconnect the other device, or even turn off its Bluetooth function. Now you can try again to pair or reconnect. To reset earphones, put them in to the charging box and hold power button of both earphones for 5 seconds till sound prompt will be heard. |
| The charging case indicator has no light while charging. | DC power supply does not output power. Check your USB connections and try to charge with a different charger. |
| The earphone indicator has no light while charging. | Check the pogo pin charging points. Place the earphone correctly in the charging case. |
| Only one earphone is working Turn off both earphones. Turn on both earphones again at same time. | |
Care and maintenance
- Don't use abrasive cleaning solvents to clean the headset.
- Do not expose the headset to extremely high or low temperature as this will shorten the life of electronic devices, destroy the battery or distort certain plastic parts.
- Don't dispose of the headset in a fire as it will result in an explosion.
- Don't expose the headset to contact with sharp objects as this will cause scratches and damage.
- Don't let the headset fall down onto the floor. The internal circuit might get damaged.
Waste Electrical and Electronic Equipment (WEEE) Symbol
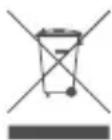
The use of the WEEE symbol indicates that this product may not be treated as household waste. By ensuring this product is disposed of correctly, you will help protect the environment. For more detailed information about the recycling of this product, please contact your local authority, your household waste disposal service provider or the shop where you purchased the product.

natural_image
Line drawing of a power cord, plug, and socket connected by a cable (no text or symbols)
flowchart
graph LR
    A["Small ear icon"] --> B["ear with ring"]
    B --> C["ear with arrow indicating rotation"]
LED indikatoriai
LV "BLUETOOTH" AUSTINAS
natural_image
Line drawing of a power adapter connected to a battery pack and plug (no text or symbols)
flowchart
graph LR
    A["Small ear"] --> B["ear with head"]
    B --> C["ear with ring and arrow indicating rotation"]
LED indikatori
natural_image
Line drawing of a power cord, plug-in socket, and heater connected by a cable (no text or symbols)
flowchart
graph LR
    A["Early ear"] --> B["Mid ear"]
    B --> C["Mid ear with rotation arrow"]
LED-tuled

natural_image
Line drawing of three connected devices: a power socket, a plug-in socket, and a battery pack (no text or symbols)
flowchart
graph LR
    A["Small ear"] --> B["ear"]
    B --> C["ear with rotation arrow"]
Wskaźniki LED

natural_image
Line drawing of a power cord, plug-in socket, and connected adapter (no text or symbols)

СИД-индикаторы

natural_image
Line drawing of a power cord, plug, and socket connected by a cable (no text or symbols)
flowchart
graph LR
    A["Small ear"] --> B["ear with inner ear"]
    B --> C["ear with outer ear"]
LED-Anzeigen
natural_image
Line drawing of a power plug, socket, and connected device (no text or symbols)flowchart
graph LR
    A["Small ear"] --> B["ear with inner ear"]
    B --> C["ear with outer ear"]
LED-Anzeigen

natural_image
Line drawing of a power plug, socket, and terminal device (no text or symbols)
flowchart
graph LR
    A["Small ear"] --> B["ear with rotation arrow"]
    B --> C["ear with rotation arrow"]
Tip: in-ear, Bluetooth
Mărime driver: 8,2 mm
Versiune Bluetooth: v5.0 + EDR

natural_image
Line drawing of a power adapter connected to a battery pack and plug (no text or symbols)
flowchart
graph LR
    A["Small ear icon"] --> B["ear ring with head"]
    B --> C["ear ring with arrow indicating rotation"]
Indicatoare LED
natural_image
Line drawing of a power adapter connected to a battery pack and plug (no text or symbols)
flowchart
graph LR
    A["Small ear"] --> B["ear"]
    B --> C["ear with rotation arrow"]
LED jelzések

Prije početka uporabe slušalica, morate napuniti bateriju i upariti ih s kompatibilnim uređajem.
natural_image
Line drawing of a wall-mounted power plug connected to a battery pack via a USB cable (no text or symbols)
Vrijeme reprodukcije u potpunosti napunjenih slušalica je do 5 sata (15 sati više ako se pune preko kućišta za punjenje). Kada baterije postanu slabe, oglasit će se zvuk upozorenja. To znači da se slušalice trebaju napuniti što je prije moguće.
Uparivanje
Automatski (za prvo uparivanje) način rada:
flowchart
graph LR
    A["Small ear icon"] --> B["ear ring with head"]
    B --> C["ear ring with arrow indicating rotation"]
LED indikatori
natural_image
Line drawing of a power adapter connected to a device via USB cable (no text or symbols)
flowchart
graph LR
    A["Small ear"] --> B["ear"]
    B --> C["ear with rotation arrow"]
Indicadores LED
natural_image
Line drawing of a power adapter connected to a battery pack (no text or symbols)

flowchart
graph LR
    A["Small ear"] --> B["ear"]
    B --> C["ear with rotation arrow"]
Pomen kazalnikov LED
Tipo: in-ear, Bluetooth
natural_image
Line drawing of a power cord, plug, and socket connected by a cable (no text or symbols)
flowchart
graph LR
    A["Single ear"] --> B["Oscillion"]
    B --> C["Circular ear with rotation arrow"]
Indicazioni LED
Type: in-ear, Bluetooth
Frequentierespons: 20–20 000 Hz
Driver unit: 8.2 mm
Bluetooth versie: v5.0 + EDR

natural_image
Line drawing of a power adapter connected to a device via USB cable (no text or symbols)
flowchart
graph LR
    A["Small ear icon"] --> B["ear with ring"]
    B --> C["ear with arrow indicating rotation"]
LED-lichtjes
Alimentation: USB Type-C, 5 V DC
Microphone: intégré
Batterie (boîtier de charge): Li-ion, 3,7 V, 450 mAh (1,67 Wh)

natural_image
Line drawing of a power cord, plug-in socket, and battery pack connected by cable (no text or symbols)flowchart
graph LR
    A["Small ear"] --> B["ear with rotation arrow"]
    B --> C["ear with rotation arrow"]
Indications LED
ACC Distribution hereby declares that this equipment is in compliance with the essential requirements and other relevant provisions of:
"RED 2014/53/EU" Directive;
"RoHS 2015/863/EU" Directive.
The declaration of conformity can be accessed at:
https://www.acme.eu/declarations-conformity
LT ES atitikties deklaracija
| Product Product model | |
| Product purchase date Seller name, address | |
| Failures (date, description, position of the person who accepts the product, first name, last name and signature) | |
1. Warranty period
Warranty enters into force starting with the day when the buyer acquires the product from the seller. Warranty period is indicated on the package of the product.
2. Warranty conditions
The warranty is valid only by providing an original document of the product acquisition and this warranty sheet, which includes name of the product model, product purchase date, name and address of the seller.
If it is noticed during the warranty period that the product has faults and these faults where not caused by any of the reasons when the warranty is not applied as indicated in the paragraphs below, manufacturer undertakes to replace the product.
The warranty is not applied to regular testing, maintenance and repair or replacement of the parts which are worn out naturally.
The warranty is not applied if damage or failures occurred due to the following reasons:
- Inappropriate installation of the product, inappropriate usage and/or operating product without following the manual, technical requirements and safety standards as provided by the manufacturer, and additionally, inappropriate warehousing, falling from heights as well as hard strikes.
• Corrosion, mud, water and sand.
- Repair works, modifications or cleaning, which were performed by a authorised by the manufacturer.
- Usage of the spare parts, software or consumptive materials which do not apply to the product.
- Accidents or events or any other reasons which do not depend on the manufacturer, which includes lightning, water, fire, magnetic field and inappropriate ventilation.
- If the product does not meet standards and specifications of a particular country, in which it was not bought. Any attempt to adjust the product in order to meet technical and safety requirements such as those in the other countries withdraws all the rights to the warranty service.
If no failures are detected in the product, all the expenses in relation to the service are covered by the buyer.
www.acme.eu