
Camspot NVR 4.0 - Surveillance Camera Overmax - Free user manual and instructions
Find the device manual for free Camspot NVR 4.0 Overmax in PDF.

| Brand | Overmax |
| Model | Camspot NVR 4.0 |
| Product type | NVR recorder kit + wireless IP cameras |
| Number of cameras included | 4 (not specified, estimated from the name) |
| Power supply | Mains adapter (voltage not specified) |
| Recording resolution | Full HD (1080p) |
| Night vision | Yes, via IR LEDs |
| Connectivity | Wi-Fi, LAN, USB, VGA, HDMI |
| Storage | Internal hard drive (formatable, replaceable) |
| Mobile app | Overmax Control (iOS and Android) |
| Remote access | Via P2P, QR code scan |
| User management | Multi-user, admin password |
| Main functions | Continuous recording, motion detection, video playback, backup |
| Maintenance | Avoid temperature variations to limit condensation |
| Operating temperature | -10°C to +50°C |
| Security | Password authentication, access rights management |
| Spare parts | Compatible hard drive, power supply |
| Compliance | EU directives, WEEE |
Frequently Asked Questions - Camspot NVR 4.0 Overmax
User questions about Camspot NVR 4.0 Overmax
0 question about this device. Answer the ones you know or ask your own.
Ask a new question about this device
Download the instructions for your Surveillance Camera in PDF format for free! Find your manual Camspot NVR 4.0 - Overmax and take your electronic device back in hand. On this page are published all the documents necessary for the use of your device. Camspot NVR 4.0 by Overmax.
USER MANUAL Camspot NVR 4.0 Overmax
EN: The product complies with requirements of EU directives.
Pursuant to the Directive 2012/19/EU, this product is subject to selective collection. The product must not be disposed of along with domestic waste as it may pose a threat to the environment and human health. The worn-out product must be handed over to the electrics and electronics recycling center.
https://ipc-eu.ismartlife.me/login
Thank you for placing trust in us and choosing Overmax.
Thanks to high-quality materials and modern solutions, we provide you with a product perfect for everyday use. We are convinced that the product will satisfy your requirements as it has been manufactured with utmost care. Before you use the product, please read this manual carefully.
Should you have any remarks or questions concerning the product, please do not hesitate to contact us: pomoctechniczna@overmax.pl
Glossary of terms used in the manual:
IPC - IP Camera
NVR - networks video recorder
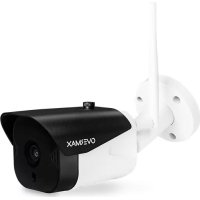
1. Description of camera (see fig. 1):
- IR LEDs
- Lens
- Dusk sensor
- Microphone
- Reset
- Power supply
- Aerial
2. Description of rear panel (see fig. 2):
- Aerial
- LAN
3.VGA - HD output
- USB
- Power supply
3. How to install and connect
a) How to connect elements (see fig. 3):
- Use a screwdriver to remove the top cover. Install the recorder hard drive.
- Fix the hard drive cable and feeder cable and then screw the drive on to the casing
- Once you have mounted the drive, connect the mouse and display unit. Switch the device on and connect power supply to IPC. Make sure NVR works properly.
NVR is connected to the display unit and all IPCs are located by NVR. The recorder may be installed in a default location.
b) How to place camera in default position
- Fix the wireless camera in a default position, at relevant distance and connect the power supply.
- After a couple of minutes the camera image will show up automatically on the display unit.
- If you cannot see any image, reduce distance between the camera and recorder.
NVR aerial emits a signal. It is best if the IPC aerial is turned towards the recorder to assure best signal.
4. How to switch on and log in (see fig. 4):
- Connect the feeder. The light on the front panel of the recorder will go red.
- The device will start.
- Once the system has been activated, the display unit will automatically display interface preview and login page. The user needs to log in to go to next step.
Steps:
- Press the user name box with a left key of the mouse and enter it. The default login is „admin".
-
Press the password box with a left key of the mouse and enter it. The default password is „admin".
-
Press "OK" with a left key of the mouse and log in.
The password may consist of numbers, letters and special characters. The password must include 12 characters at the most.
EN
5. How to log out (see fig. 5):
If you have to log out while using the device, press the menu with a right key of the mouse and choose to deactivate the system. Press log out to finish.
The user must re-enter its user name and password after logging out.
Reset
- If you have to restart the device, click the short menu with a right key of the mouse, choose to shut the system down and press restart to finish.
Switch off
If you have to switch the device off, press the menu with a right key of the mouse, select "shut system down" and press switch off to finish.
6. How to manage memory (see fig. 6):
Description of function: Configure and manage memory of the device. Up-to-date information about hard drive is displayed in the menu. It includes hard drives connected, access interface, status and drive capacity. The hard drive may be formatted. Click the relevant function with a right key of the mouse to enter it.
Note: Switch the device off before you install it or before you replace hard drive
7. How to manage users (see fig. 7a, 7b):
Description of function: In users management function, you can add user, delete user, modify user, modify password.
[Add user] To add a new user, you need to create a new user name and password. Remember to configure access too.
[Delete user] Delete users you do not need. It is not possible to delete main users.
[Modify user] Change parameters of existing users. Default administrator must not be modified.
[Modify user password] Modify user password. The password must be from 1 to 12 characters long.
8. How to play video (see fig. 8):
Description of function: Play video from the hard drive. You can enter the video screen from menu. Once you have clicked a right key of mouse, select [Play video].
Description of function:
- Time and date
- Full HD
- Select time
- Select channel
- Full screen mode
- File backup
- Playing speed
- Stop playing
9. How to download mobile application (see fig. 9):
- Find „Overmax Control" in iOS Store / Google Play or scan QR code and download the application. You can download it into iOS and Android.
10. How to register new user (see fig. 10)
To register in the application, click „register" field, then read and accept the Privacy Policy.
- Enter your phone number or e-mail address to receive verification code.
- Enter verification code in the blank.
- Enter your own password and click „finish".
EN
11. How to add device (see fig. 11):
Make sure the recorder is connected to router via network cable, to the same network as the mobile device.
- Connect the mobile device to local Wi-Fi network which the recorder will be connected to, next click „My home". Click „Add device" and „Scan QR code", next scan QR code displayed on the display unit „P2P ID" (see fig. 12).
The recorder will be automatically added to the application after scanning QR code.
12. Description of mobile application function (see fig. 13):
Real-time preview interface.
- Settings and management
- Wi-Fi signal strength
- Volume
- SD/HD
- Full screen
- Screenshot
- Microphone
- Record
- Play video
- Cloud
- Control
To gain access to camera image preview through the web browser, enter „Overmax Control" application, click add device, next scan QR code displayed in the browser of your PC.
Live camera preview available here: https://ipc-eu.ismartlife.me/login
Note: Temperature fluctuations can cause water to condense in the device. Device operating temperature: from - 10°C to + 50°C
The pictures are for reference only. The real design of the products may differ from the pictures presented.
Einführung
IPC - Telecamera IP
NVR - networks video recorder (videoregistratore direte)
https://ipc-eu.ismartlife.me/login
https://ipc-eu.ismartlife.me/login
https://ipc-eu.ismartlife.me/login
https://ipc-eu.ismartlife.me/login
BudaeHHraTIOBHXKOpNCyBauiBHeeMOxJIuBnM.
[PeDaryBaTn KOpncTyBaay] 3MiHHTn npaMeTpN CTBopeHnx KopncTyBauiB. AdmiHicTpapTop 3a 3aMObUyBaHHm He NiIJaRae peDaryBaHHIO.
[PeDaryBaTn napoIb kOpncTyBaau] PeDaryBaTu napoIb KopncTyBaau. NapoIb Mycntb MaTI BID 1do 12 cIMBOJIb.
UK
8. BiДтВоренья запсу (ДИВ. рис 8):
Onnc yHKci: BiTbOpEHn 3aNcCy 3 JopctKoro Dncky. BmOKeTe npeiTu Do BiTbOpEHn 3aNcCy 3 MeHIO. Picna Kliky npaBOIO KHOPIO MUsKn Bu6epiTb «BiTbOpEHn 3aNcCy
Oncs yHKci:
- Yac ta daTa
- Full HD
- Bn6ip roDnHn
- Bn6ip kaHany
- NOBHOeKpaHHn peXm
- Pe3epBHa koniia faIny
- WbNdkicTb BiIDTBOpehnHa
- 3yπnHnTbIaTBOpEHnHa
9. 3aBaHTaJxehnMObIbHOro DoaTky (dVB.pnc.9):
3haɪdɪt b iOS Store / Google Play ὁdaTOK „Overmax Control" a6o 3ickaHnyTe QR kOД Ta 3aBaHTaXTe ὁdaTOK. ὁdaTOK ἀocTyПнй Ha iOS Ta Android.
10. CTBOpEHHa HOBOrO KOpNcTyBaUa (dVB.pnc.10):
-ДяТOrO,и63apeectpyBaTnC8уДODaTKyKJIiKHiTb y noIe 3apeectpyBaTncb》,nicЯчero O3HaHOMTeCb Ta npiIMtBПoJIITNY KOHΦiDeHciHocTi.
Дя OТримань Вери КИЗИНО КODУ BKAKITb CBI HOMeР TelefoHy a6o aDpeCy eI. NowTN.
BnwiBbepiKaHnKoY npCTomy noJI.
BnuiTb iHnBiyaIbHn npoI b I haTnciTb Ha noJe «3aBepuNTn».
11.Прпсднань рпстpoю (ДИВ.pnc 11):
- Ipekehntecb, 0 peectpatop nIeHaHO do poytepa 3a DOnOMoTO MepexeBOrKa6eHIO TiEi Jx camoi Mepexi 0 i Mobihn npncptpi.
PiEHaTe npncptiI do loKaIbHOi MepeXi Wi-Fi,do KOTpoI 6yde nID'edHaHO BiDeopeeecTpApOp, nicJra Yoro KliKHiTb y noJe MiIM". KliKHiTb y noJe 3 Ha3BOHO «Doatn npncptiI» Ta «3icKaHyBaTu QR kOd», nicJra Yoro 3ickaHnyTe QR kOd, BnuBeHn Ha ekpaH y noJI «IdentnphiTop P2P" (DnB. pnc. 12). - PeectpaTop nID'eDHaETbCra aBtOMaTnUHO nicJia 3ickaHyBaHHa QR KoIy.
TpaHcIaIy BiJeO 3 KaMepn 3a NocuHaHHaM:
https://ipc-eu.ismartlife.me/login
https://ipc-eu.ismartlife.me/login
Pastaba: Del temperaturos svyravimu irenginye gali kondensuotis vanduo.


- Glossary of terms used in the manual:
- Description of camera (see fig. 1):
- Description of rear panel (see fig. 2):
- How to install and connect
- How to switch on and log in (see fig. 4):
- Steps:
- EN
- How to log out (see fig. 5):
- Reset
- Switch off
- How to manage memory (see fig. 6):
- How to manage users (see fig. 7a, 7b):
- How to play video (see fig. 8):
- How to download mobile application (see fig. 9):
- How to register new user (see fig. 10)
- How to add device (see fig. 11):
- Description of mobile application function (see fig. 13):
- Einführung
- UK
- BiДтВоренья запсу (ДИВ. рис 8):
- 3aBaHTaJxehnMObIbHOro DoaTky (dVB.pnc.9):
- CTBOpEHHa HOBOrO KOpNcTyBaUa (dVB.pnc.10):
- 11.Прпсднань рпстpoю (ДИВ.pnc 11):
Brand : Overmax
Model : Camspot NVR 4.0
Category : Surveillance Camera