
SS12010W - Water dispenser Sogo - Free user manual and instructions
Find the device manual for free SS12010W Sogo in PDF.
User questions about SS12010W Sogo
0 question about this device. Answer the ones you know or ask your own.
Ask a new question about this device
Download the instructions for your Water dispenser in PDF format for free! Find your manual SS12010W - Sogo and take your electronic device back in hand. On this page are published all the documents necessary for the use of your device. SS12010W by Sogo.
USER MANUAL SS12010W Sogo
Caution: please read and preserve these important instructions
ref. SS-12010W


1
1
一
一
This instruction manual can also be downloaded from our web page www.sogo.es
SAFETYWARNINGS
- These instructions are very important. Please read this instructions manual carefully before using the appliance and keep it at hand to refer to it at any time.
- Before using the product for the first time, unpack the product and check that it is in perfect conditions. If not, do not use the appliance and contact authorized technical service center.
- This product is only indicated for domestic use. Do not use the appliance outdoors. Never leave the appliance exposed to climatic agents such as rain, snow, sun, etc....
- This appliance can be used by children of 8 and more years old as well as by disabled people, people with reduced sensorial or mental capacities, people with lack of experience and knowledge, if the appropriate supervision and instruction of use was provided to them in reliable way and they understand the danger it entails. The cleaning and maintenance allow to be realized by the user, must no be realized by the children, only - in case they are more than 8 years old and only under supervision.
- Keep the appliance and its cable out of reach of the children younger than 8 years old.
- Before connecting the appliance to the mains, check that the cable and plug are in
perfect conditions. Also check that the voltage indicated on the appliance is valid for your electrical installation.
-
If you detect that the power supply cable or the plug are damaged, do not use the appliance or try to replace the cable yourself. Go directly to the authorized technical service where they will replace it correctly for you.
-
Do not immerse the appliance or any part of it in water or any other liquid.
-
Do not pull the cable to unplug the appliance from the mains, always pull from the plug.
If your appliance has been dropped or fallen into water or any other liquid do not use it or try to repair it. Take it to the technical service center.
-
Do not move the appliance when it is in use.
-
For your safety and for the appliance to work correctly, always use the spare parts and accessories which come with the product.
-
The water dispenser must be placed on a dry and flat surface, in a well-ventilated place.
-
Do not use the device near a heat source such as fire, stove, space heating appliance, etc...
-
Unwind the power cord completely in order to avoid overheating.
-
Leave enough space over and in both sides of the device for a correct flow of the air.
-
Before changing the water bottle or carafe, you must switch off and unplug the device.
-
After changing the water bottle or carafe, do not shake the device, as the water could spill.
It is recommended to empty a water tray periodically to avoid any overflow.
If you detect that a bottle you are using is
becoming deformed, it might be due to its too thin and fragile material. Use another type of bottle to avoid this.
- Refrigeration motor operates continually with 2 speeds. The fastest speed is of cooling, when desired temperature is reached, the motor passes to slow speed or to maintenance mode keeping desired temperature constantly (if over time you will note that a motor has started to make noise, it might be caused by dirt in the motor and it should be cleaned to eliminate this noise).
- This appliance can be used by children aged from 8 years and above if they have been given supervision or instruction concerning use of the appliance in a safe way and understand the hazards involved. Children shall not play with the appliance. Cleaning and user maintenance shall not be made by children unless they are older than 8 years and supervised.
- Keep the appliance and its cord out of reach of children aged less than 8 years.
- Do not use this appliance with a programmer, counter or another device which can automatically turn it on because if the appliance is covered or incorrectly positioned there is a danger of fire.
- If the supply cord is damaged, it must be replaced by manufacturer, its service agent or similarly qualified persons in order to avoid a hazard.
Instructions for use
IMPORTANT
Read this instruction booklet carefully.
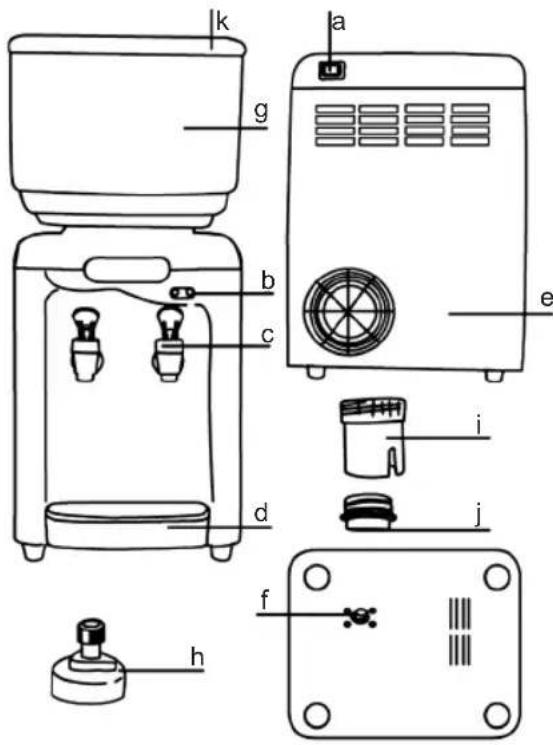
PRODUCT DESCRIPTION
a-ON/ OFF Switch
b-Illuminated pilot lights
c-Faucets water outflow
d-Pull-out tray with grating
e-Refrigeration tank
f-Drainage cap
g-Water tank
h-Tank adaptor
i-Adapter 1
j-Adapter 2
k-Lid
NOTE
- Your water dispenser is provided with the external water tank of 7 litres that can be filled as you wish, without worrying about the volume and shape of bottles you use. Moreover there are 2 adaptors for bottles from 1.5 to 6 litres, if you wish to use it in such way. If so - pay special attention to the instruction for bottle use and safety warnings.
INSTRUCTIONS FOR USE
See cleaning and storage section
Before using the device for the first time, make sure that the refrigeration tank has been cleaned with running water in order to eliminate the new flavor and smell.
- If after cleaning of a cooling tank a persists, use bicarbonate mixed with 5L bottle of water to pass it through a dispenser until it is completely finished in order to eliminate the taste totally.
- Connect the device to the mains and make sure that the ON/OFF switch is placed on the "0" position.
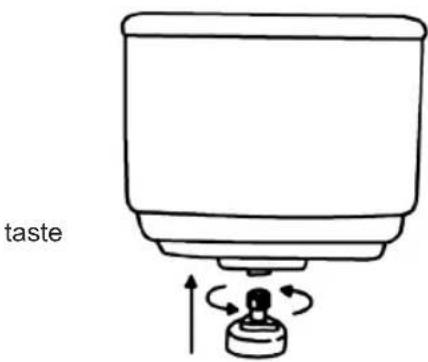
USE WITH WATER TANK
- Remove the white funnel of the dispenser turning it slightly (counterclockwise to remove and clockwise to fix) and then you can put the tank in the same position and fix it with turning it slightly clockwise.
- Screw the adapter H on the tank and place the tank on the dispenser.
USE WITH BOTTLES AND JUGS
(1)This device is provided with 2 adaptors for different types of bottles.
Adaptor 1 allows you to use the bottle of 1.5 / 2L and carafes of 5L due to 2 threats, one from inside of bottles and another from outside of carafes. Screw in this adaptor to a bottle or carafe. If your carafe does not fit in any of these threads, an adaptor 2 to your carafe and then an adaptor 1.
- To place a small or large bottle dispenser, please use the bottle adaptor provided; remove the cap of the bottle or container you wish to use and screw the adaptor on to said bottle.
If you detect that water does not transfer to
screw in
in the
a dispenser after bottle is put in a dispenser with an adaptor, it is because the bottle is too full.
- To avoid this problem, empty one water from the bottle directly into a dispenser and come back to place a bottle on a device as it is indicated before.
- Now the air must enter into the and thus water will be transferred to the dispenser.
- Once the adaptor has been screwed (the adapter has a anti-drip system to avoid water spilling), tilt the bottle or container on to the water dispenser and the water will pour into the inner tank.
Help yourself with your hands to this operation, so as to avoid the water spillage. - Press the ON switch and place position. Immediately afterwards, the green light will switch on, indicating that the water is being cooled.
When the water reaches its minimum temperature (10^) , the green light will switch off and the yellow one will switch on.
- Consider that the temperature of the water will rise slowly until reaching 15^ and then it will cool again until it completes the cycle from 10^ to 15^ .
- In order to get cold water, press colored faucet and, in order to get water at room temperature, press the white-colored faucet.
- To avoid water overflow caused by accumulated in a tank, open both taps before placing a bottle with water on a water dispenser for the first time, put a bottle and close both taps when water starts out.
NOTE:
On the following pictures you can see where exactly these two adapters can be found.
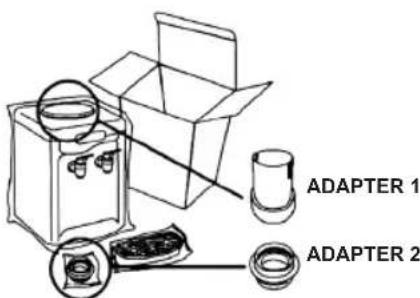
To use these adapters it is necessary follow the instructions, indicating how to use them (manual instructions),(1).
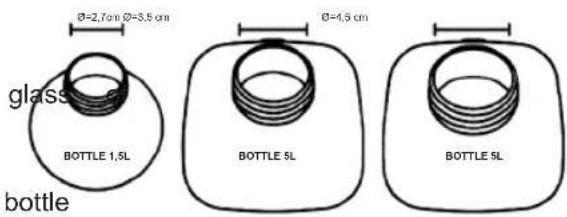
- With these 2 adapters 3 different types can be used, equivalent to all the bottles from 500ml to 5 liters (500 ml, 1.5 L, 2L, 5L). On the following pictures you can see 3 examples of bottle with different diameter of the necks perfectly adapted to the dispenser with the adapter.
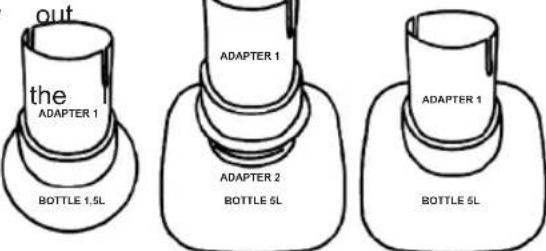
d - onOn the following pictures it is shown how the previous bottles are assembled with the adapter 1 or with the adapters 1 + 2
carry
CIEANING AND STORAGE
Before cleaning the appliance, make sure it has been disconnected from the mains.
the Dbluet use abrasive detergents or products that may damage the appliance.
Use a damp cloth or sponge to clean the outside of the appliance afterwards use a the drycloth.
NEVER IMMERSE THE APPLIANCE IN WATER OR ANY OTHER LIQUID.
It is recommended that the cooling tank to should be filled and drained before using it for the first time and should be drained every month before filling with fresh water.
The product can be cleaned with a sterilizing agent.
Ensure this is completely flushed through before resealing and filling with drinking water.
- Drain surplus water through the white drainage cap located underneath and then replace the drainage cap.
- Fill the tank with fresh water and then drain off the water, repeating step.
To clean the motor, disassemble a back side of a device using a screwdriver. With any hair dryer and its maximum air flow mode apply air to remove excessive dust or dirt that a motor might contain.
- Keep the appliance with the empty tank in a sure and dry place and turn off the water.
- If the dispenser of the electricity if it is not going to be used during a time.
threadstechnical specification
Voltage / Frequency:
220 - 240V ~ 50/60Hz
Power Consumption: 65W
Climate type: N
DECLARATION OF CONFORMITY
This device complies with Low Voltage Directive 2014/35/EC, Electromagnetic Compatibility Directive 2014/30/EU, Directive 2011/65/EU on the restriction of the certain hazardous substances in electrical and electronic equipment and Directive 2009/125/EC on the eco-design requirements applicable to energy-related products.

This symbol means that in case you wish to dispose of the product once its working life has ended, take it to an authorised waste agent for the selective collection of waste electrical and electronic equipment (WEEE)
Imported by:
Sanysan Appliances S.L, NIF: B98753056, C/ Barcas 2, 2
46002 Valencia, Spain Product made in P.R.C. -Designed by SOGO based on the European Quality Standards
Customer Service: www.sogosat.com / sogosat@sogosat.com/0034 902 222 161