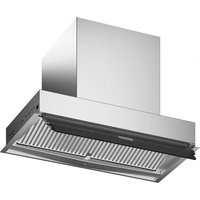
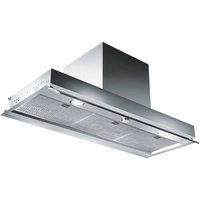
FS TS 906 I XS - Basket FRANKE - Free user manual and instructions
Find the device manual for free FS TS 906 I XS FRANKE in PDF.
| Product type | Kitchen hood |
| Brand | Franke |
| Model | FS TS 906 I XS |
| Intended use | Elimination of cooking vapors for domestic use |
| Operating mode | Recirculation or air extraction |
| Control panel | Touch with icons |
| Power levels | 3 levels + intensive mode (6 minutes) |
| 24h ventilation mode | Yes (10 minutes on, 50 minutes off) |
| Delayed shut-off | 15 minutes |
| Auto mode | Connection with compatible hob |
| Lighting | LED, adjustable power (full/half intensity) |
| Grease filter | Dishwasher safe |
| Odor filter | Activated charcoal, non-washable (replace every 4 months) |
| Filter saturation alarm | Yes (100 hours for grease filter, 200 hours for odor filter) |
| Hood-hob connectivity | Yes for compatible hobs |
| Safety | Protection against fire, electric shock, burns |
| Spare parts | Grease and odor filters (ref. 112.0016.756, 112.0174.992, 133.0195.979) |
Frequently Asked Questions - FS TS 906 I XS FRANKE
User questions about FS TS 906 I XS FRANKE
0 question about this device. Answer the ones you know or ask your own.
Ask a new question about this device
Download the instructions for your Basket in PDF format for free! Find your manual FS TS 906 I XS - FRANKE and take your electronic device back in hand. On this page are published all the documents necessary for the use of your device. FS TS 906 I XS by FRANKE.
USER MANUAL FS TS 906 I XS FRANKE
natural_image
Line drawing of a double door with ventilation grille and ventilation duct (no text or symbols)FS TS 906 I XS
EN User manual
Switching the control panel on 7
Selecting lighting and lighting level 7
Selecting the power level 7
Switching the ventilation off 7
Toggling the intensive mode 7
Ventilation mode 24h 7
Shutoff delay 7
AutoMode 8
Filter saturation alarm 8
Alarm messages 8
Hood to hob connection 8
Cleaning and care 9
Cleaning the surfaces of the hood 9
Odour filter 9
Grease filter 9
Lighting 9
Spare parts and accessories 10
Maintenance and repair 10
Disposal 10
Customer service 10
Technical data 10
aBoUT THIS manUaL
This user manual applies to several models of the device. Thus it may be possible that some of the described features and functions are not available on your specific model.
▶ Carefully read the user manual before using the device.
▶ Keep the user manual.
▶ Use the device described in this user manual only according to the intended use.
Symbol Meaning

Warning symbol. Warning against risks of injury.
▶ Actions in safety and warning notes to avoid injury or damage.
▶ Action step. Specifies an action to be done.
■ Result. Result of one or more action steps.
√ Precondition that has to be fulfilled before performing the following action.
InTenDeD USe
The hood was developed exclusively for domestic use to eliminate cooking vapours.
The hood, which is equipped with a grease filter, removes vapours forming over a stove top via an air circulation or an air exhaust system.
SafeTY Information
The manufacturer can not be made liable for possible damage which may occur due to incorrect installation and incorrect, improper or unreasonable use of the device.
The hood can not support heavy loads.
Do not climb, stand or sit on the hood.
Do not place heavy objects on the hood.
Children of 8 years or older and persons with restricted physical, sensory or mental abilities, or with limited experience or knowledge, may not use or clean the device, except they are supervised and instructed by a person responsible for their safety.
Children under 8 years may not use or clean the device even if supervised.
This device is not a toy.
▷ Keep children away from the device and the packaging material.
Do not leave children near the device unattended.
Do not let children play with the device.
▷ When using the hood, observe the manuals of the stove top and of the cooking devices that are used beneath the hood or while the hood is running.
Fire hazard and risk of injury due to open flame!
Deposits in the grease filter may catch fire.
Do not use open flames near the device (e.g. flambéing).
▷ Always clean or change all filters at the specified intervals.
When using deep fat fryers, overheated oil can burst into flames.
▷ Continuously monitor fryers during use.
Risk of eye injury due to LED light!
The LED light is very bright and may damage the eyes.
Do not look directly into the LED light for a prolonged time.
Risk of electric shock due to damaged device!
Do not switch on a damaged device.
▷ Switch off the fuse in the fuse box.
▷ Contact the customer service.
Risk of electric shock due to entering liquid!
The device contains electrical components.
▷ Make sure that no liquid enters the interior of the device.
Do not use pressurised steam to clean the device.
Do not use a wet cloth to clean the operating elements.
Risk of burns due to hot surfaces!
Accessible metallic parts of the hood may become very hot when used with cooking appliances, that emit great amounts of heat (e.g. gas hobs).
▷ Do not touch hot surfaces.
▷ Be careful when opening or closing the fold-out panel.
▷ Wear heat-resistant gloves.
oVerView
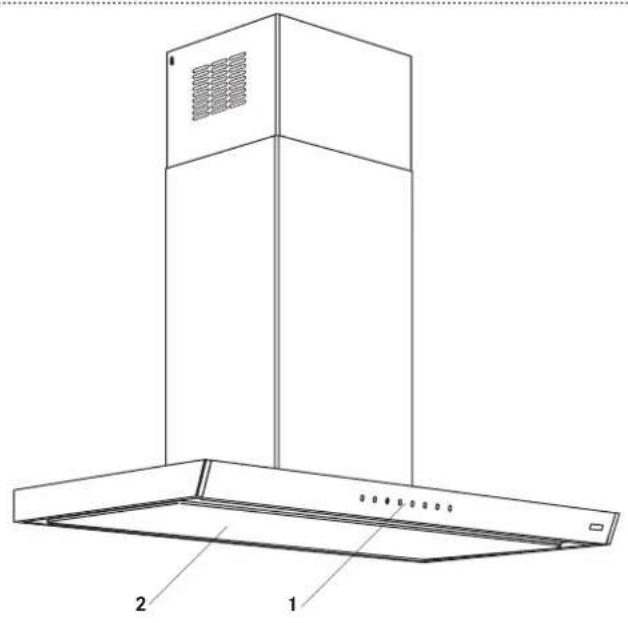
text_image
Technical diagram of a double-bay air duct hood with labeled components 1 and 21 Control panel
2 Cover of the grease filter
Key Function
| 1 | Control panel on/off Ventilation off |
| 10 | Power level 1 |
| Ventilation mode 24h |
| 2 | Power level 2 |
| 3 | Power level 3 |
| Intensive setting on/off |
| Shutoff delay on/off |
| Lighting on/off | |
| Lighting level |
| A | Alarm „filter saturation“ active/inactiveAutoMode (reactivating) |
oPeraTlon
Switching the control panel on
▶ Press Ⓘ
■ All icons light up with half their intensity.
■ If not used for 15 seconds it will revert to standby status.
Selecting lighting and lighting level
Lighting at full intensity
▶ Briefly press
Lighting at half the intensity
▶ Press 📄 for 2 seconds.
Selecting the power level
Level 1
▶ Press 1
■ The icon of the key lights up.
Level 2
▶ Press ②
■ The icon of the key lights up.
Level 3
▶ Press ③
■ The icon of the key lights up.
Switching the ventilation off
▶ Press Ⓘ
Toggling the intensive mode
The intensive mode fights extensive odour and smoke which may occur when cooking.
The intensive mode can be switched on at any time, at any power level and when the ventilation is switched off. The intensive ventilation runs for 6 minutes. At the end of the 6 minutes the originally selected power level is reactivated.
Switching on
▶ Press
■ During the running time the icon in the key 📋 blinks 1x per second.
Switching off
▶ Press 📋r . ⏱
Ventilation mode 24h
The ventilation mode 24h switches the drive to power level 1 (10 minutes on and 50 minutes off). The ventilation mode 24h can not be selected while the shutoff delay or the intensive mode is running.
Switching on
▶ Press and hold Ⓤ for 2 seconds.
■ The icon of the key ⑮ links.
Switching off
▶ Press and hold Ⓗ for 2 seconds or press . ⏻
Shutoff delay
The shutoff delay switches the ventilation off automatically after 15 minutes and helps to remove remaining odours. The shutoff delay can be selected at any power level. The shutoff delay cannot be selected while the intensive setting or the ventilation mode 24 h is running.
Switching on
▶ Press
■ The icon of the key lights up.
Switching off
▶ Press ① or . ①
AutoMode
The hood is designed to work automatically linked with the hob.
The automode function is automatically set when your are starting a cooking and the hob is operating.
The icon Ⓐ lights up and the lighting goes on. The speed level will be increased automatically by the hob.
If you manually choose a certain speed or switch the ventilation off, the AutoMode function is deactivated. After cooking and switching off the hob, the hood waits roughly 60 seconds before switching off (ventilation and lighting).
Reactivate the AutoMode
▶ Briefly press Ⓐ
■ The icon of the key lights up.
Filter saturation alarm
The alarm for cleaning the grease filter turns on after 100 hours of effective running time of the hood.
The alarm for changing the odour filter turns on after 200 hours of effective running time of the hood.
Activating the alarm „filter saturation“
▶ Press and hold ⏱ for 2 seconds.
■ All icons blink 2x. The alarm is activated.
Deactivating the alarm „filter saturation“
▶ Press ③
■ All icons blink 1x. The alarm is deactivated.
Resetting the „filter saturation“
▶ Press and hold for 2 seconds.
■ All icons blink 3x. The alarm is reset.
Alarm messages
Alarm 1 „Grease filter saturation“
When alarm 1 occurs you have to clean the grease filter.
The icons of the keys Ⓐ and Ⓛ are blinking.
▶ Clean the grease filter.
Alarm 2 „Odour filter saturation“
When alarm 2 occurs you have to change the odour filter and clean the grease filter.
The icons of the keys A^F and 3 are blinking.
▶ Change the odour filter.
▶ Clean the grease filter.
Hood to hob connection
Some models of this hood can be paired with specific hobs to establish a hood-hob-connection. When using for the first time, it may be necessary to establish the pairing of the hood with the hob.
Pairing of hood and hob
▶ Switch-on a new hood and a new hob within 1 minute one each other.
■ The pairing procedure starts automatically.
■ During pairing procedure hood will „beep“ periodically.
■ After few minutes beeping pairing is completed and the hood beeps with a specific sequence.
The hood and the hob are now able to re-connect to their known partner each time they are switched on/off.
Un-pairing of hood and hob
To un-pair hob or hood, repeat the following sequence for each device.
▶ 5 sec. switch-on, 5 sec. switch off for 5 times. This procedure could be done for the hood and the hob individually or for both devices.
■ After un-pairing the hood will restart beeping waiting for a hob to reconnect.
The pairing will not restart until hob and hood are switched off.
cLeanInG anD care
Before performing any cleaning and maintenance:
▷ Switch off the device.
For cleaning and care details, refer to the manual delivered with the filter.

Fire hazard! Risk of injury!
Deposits in the grease filter may catch fire. Filters that are not cleaned or changed regularly may catch fire if open flames or extensive heat are handled beneath the hood.
▷ Always clean or change all filters at the specified intervals.
Cleaning the surfaces of the hood
Do not use any scouring agents or chemical detergents, which could corrode or scratch the durfaces of the device.
▶ Clean the hood using a damp cloth and a neutral liquid detergent.
Odour filter
New odour filters (activated carbon filter) are available in specialist stores.
Do not wash or re-use an unwashable odour filter. Refer to the manual for cleaning and care details.
Change the odour filter after 4 months of operation or earlier after intensive use.
▷ Dispose of the used odour filter in the domestic waste.
Changing the odour filter
▶ Open the cover.
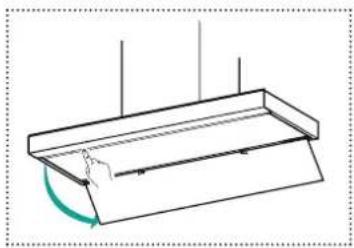
natural_image
Simple line drawing of a roof structure with a curved arrow indicating rotation (no text or symbols)▶ Remove the grease filter.
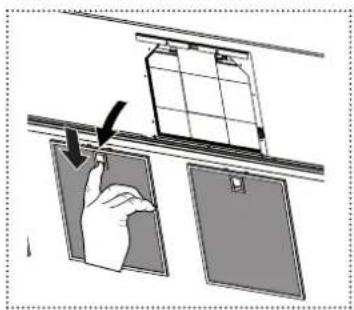
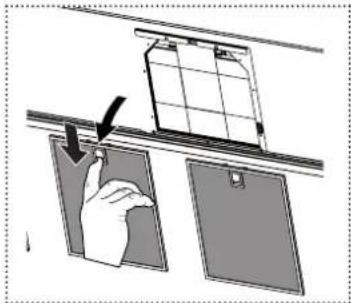
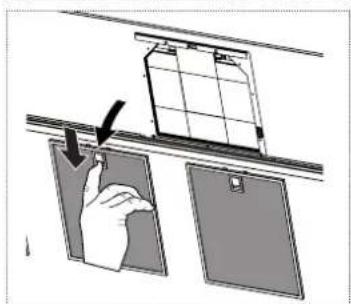
text_image
Diagram showing a hand holding a clipboard with an arrow indicating a process or change, next to two blank panels.▶ Change the odour filter.
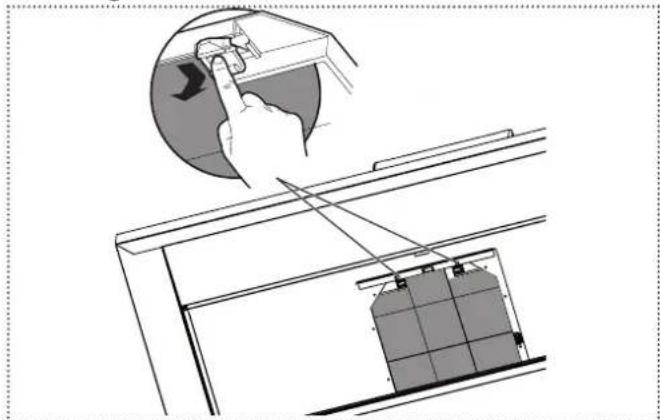
natural_image
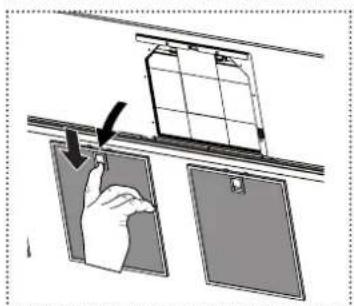
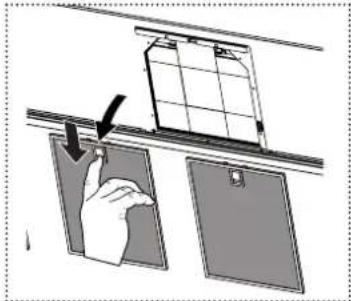
Diagram showing a hand pressing down on a device with a battery stack and connecting cables (no text or symbols)▶ Close the cover.
Grease filter
The grease filter can be cleaned in the dishwasher.
For cleaning and care details, refer to the manual delivered with the filter.
▷ Clean the grease filter after 2 months of operation or earlier after intensive use.
Cleaning the grease filter
▶ Open the cover.
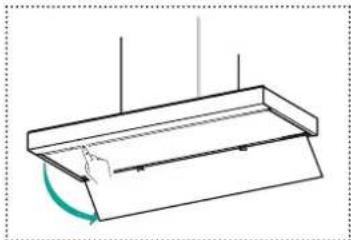
natural_image
Simple line drawing of a tray with a curved arrow indicating rotation or movement (no text or symbols)▶ Remove the grease filter.
natural_image
Diagram showing a hand hanging from a window onto a door panel, with no visible text or symbols.▶ Clean the grease filter.
▶ Put the grease filter back in place.
▶ Close the cover.
Lighting
▷ Make sure that the LED in the spotlights are changed only by the customer service.
SPare ParTS and accessSorleS
New odour and grease filters are available in specialist stores.
Component Type, item no. Remark
| Odour filter 112.0016.756 | not washable |
| 112.0174.992 | long lasting, washable |
Grease filter 133.0195.979 Cassette filter X 253x300
mainTenance anD rePalr
Repairs if carried out incorrectly may cause serious injury, damage to the device and fittings, as well as affect the functioning of the device.
▷ Make sure that maintenance on electrical components and on the smoke vent is carried out only by the manufacturer or the customer service.
▷ Make sure that damaged cables are changed only by the manufacturer or the customer service.
DISPoSaL
The symbol on the product or on the packaging indicates that the device must not be disposed of in the domestic waste.
By disposing of the device in a proper way you help to avoid harmful consequences to environment and health.
Further information about recycling the device is available from the competent authority, the local refuse disposal service or the vendor of the device.
▷ Dispose of the device, which is to be discarded, via a specialised waste collection point for electronic and electrical devices.
cUSTomer SerVice
▶ Refere to the contact address for your country on the back page or www.franke.com
TecHnlcaL DaTa
▶ Refer to the type plate placed on the product.
Further information on technical data is available on: www.franke.com
InHaLTSVerZelcHnIS
text_image
Technical diagram of a double-bay air duct hood with labeled components 1 and 2natural_image
Simple line drawing of a rectangular container with internal lines and a curved arrow indicating rotation (no text or symbols)natural_image
Diagram showing a hand holding a clipboard with a grid panel above, no text or symbols presentnatural_image
Diagram showing a hand using a tool to lift a battery into a rack, with no visible text or symbols.natural_image
Pure technical line drawing of a mechanical component with no text or symbolsnatural_image
Diagram showing a hand pressing down on a door panel with a magnified inset (no text or symbols)Fettfilter 133.0195.979 Kassettenfilter X 253x300
warTUnG UnD reParaTUr
text_image
Technical diagram of a double-bay air duct hood with labeled components 1 and 2natural_image
Pure technical line drawing of a mechanical component with no text or symbols▶ Retirez le filtre à graisse.

natural_image
Diagram showing a hand holding a clipboard above two panels, with a clipboard on top (no text or symbols present)natural_image
Technical line drawing of a mechanical assembly with a hand operating a component (no text or symbols present)▶ Fermez le couvercle.
Filtre à graisse
natural_image
Technical line drawing of a mechanical component with no visible text or symbols▶ Retirez le filtre à graisse.
natural_image
Diagram showing a hand holding a clipboard next to a grid on a shelf, with another panel partially visible below (no text or symbols)mainTenance eT rÉParaTlon
text_image
Technical diagram of a double-bay air duct hood with labeled components 1 and 2natural_image
Simple line drawing of a roof structure with a curved arrow indicating direction (no text or symbols)natural_image
Diagram showing a hand holding a clipboard with a grid panel above, next to two blank panels (no text or symbols)natural_image
Diagram showing a hand inserting a component into a device with a battery unit, no text or symbols presentnatural_image
Simple line drawing of a rectangular container with a curved arrow indicating rotation or movement (no text or symbols)natural_image
Diagram showing a hand hanging from a window frame to a door, with no text or symbols present.text_image
Technical diagram of a double-bay air duct hood with labeled componentsnatural_image
Pure technical line drawing of a rectangular structure with internal lines and a curved arrow, no text or symbols present.natural_image
Diagram showing a hand holding a clipboard next to a grid panel, with no visible text or symbolsnatural_image
Diagram showing a hand pressing down on a device with a circular arrow indicating motion (no text or symbols present)natural_image
Simple line drawing of a rectangular container with a curved arrow indicating rotation or movement (no text or symbols)natural_image
Diagram showing a hand holding a clip above two panels, with no visible text or symbolstext_image
Technical diagram of a double-bay air duct hood with labeled components 1 and 21 Panel de control
2 Cubierta del filtro de grasa
fUnclonamlenTo
Tecla Función
natural_image
Simple line drawing of a roof structure with a curved arrow indicating rotation (no text or symbols)▶ Retire el filtro de grasa.
text_image
Diagram showing a hand holding a clipboard with a lock mechanism, indicating a lock operation.natural_image
Diagram showing a hand pressing down on a device with a battery unit inside, no text or symbols presentnatural_image
Simple line drawing of a roof structure with a hand pointing to the angle (no text or symbols)▶ Retire el filtro de grasa.
natural_image
Diagram showing a hand holding a clipboard above two panels, with no visible text or symbolsLimpar as superfícies do exaustor 56
Filtro de cheiros 57
Filtro de gorduras 57
Illuminação 57
text_image
Technical diagram of a double-bay air duct hood with labeled components 1 and 21 Painel de controlo
2 Tampa do filtro de gorduras
Botão Função
Limpar as superfícies do exaustor
natural_image
Simple line drawing of a rectangular container with a curved arrow indicating rotation or movement (no text or symbols)natural_image
Diagram showing a hand holding a clipboard with an arrow indicating motion (no text or symbols present)natural_image
Diagram showing a hand pressing down on a device with a battery stack inside, no text or symbols present▶ Feche a tampa.
Filtro de gorduras
natural_image
Simple line drawing of a roof structure with no text or symbolsnatural_image
Diagram showing a hand holding a clipboard with a grid panel above, no text or symbols presenttext_image
Technical diagram of a double-bay air duct hood with labeled components 1 and 2natural_image
Simple line drawing of a roof structure with no text or symbolsnatural_image
Illustration of a hand inserting a card into two panels, showing alignment and shading (no text or symbols)natural_image
Diagram showing a hand pressing down on a device component with a battery stack inside (no text or symbols)natural_image
Simple line drawing of a rectangular object with a curved cutout and vertical lines, no text or symbols present.natural_image
Diagram showing a hand holding a clipboard next to a grid structure, with no visible text or symbolsSIKKerHeDSoPLYSnInGer
text_image
Technical diagram of a double-bay air duct hood with labeled components 1 and 2natural_image
Simple line drawing of a roof structure with a curved arrow indicating rotation (no text or symbols)natural_image
Diagram showing a hand holding a clipboard next to a window, with no visible text or symbolsnatural_image
Diagram showing a hand pressing down on a device with a battery unit inside, no text or symbols present▶ Luk skærmen.
Fedtfilter
natural_image
Simple line drawing of a rectangular container with a handle and a curved arrow indicating direction (no text or symbols)natural_image
Diagram showing a hand holding a clipboard above two panels, with no visible text or symbolsFedtfilter 133.0195.979 Kassettefilter X 253x300
VeDLIGeHoLDeLSe oG reParaTlon
Alarm for fullt filter 79
Alarmmeldinger 80
text_image
Technical diagram of a double-bay air duct hood with labeled components 1 and 21 Kontrollpanel
2 Fettfilterets deksel
BeTJenInG
Tast Funksjon
Alarm for fullt filter
natural_image
Simple line drawing of a roof structure with a hand pressing down and a curved arrow indicating rotation (no text or symbols)natural_image
Diagram showing a hand inserting a clip into two panels, with no visible text or symbolsnatural_image
Diagram showing a hand pressing down on a device with a battery unit inside, no text or symbols present▶ Lukk dekselet.
Fettfilter
natural_image
Simple line drawing of a tray with a handle and a curved arrow indicating rotation (no text or symbols)natural_image
Diagram showing a hand hanging from a window frame to a door panel, with no visible text or symbols.InneHÅLLSfÖrTecKnInG
natural_image
Line drawing of a double door with ventilation grille and base plate (no text or symbols)natural_image
Simple line drawing of a roof structure with a curved arrow indicating rotation (no text or symbols)natural_image
Diagram showing a hand inserting a component into two panels, with an arrow indicating the direction (no text or symbols present)▶ Byt kolfiltret.

natural_image
Diagram showing a hand pressing down on a device with a battery stack and connecting cables (no text or symbols)▶ Stäng skyddet.
Fettfilter
natural_image
Simple line drawing of a rectangular container with a curved arrow indicating rotation or movement (no text or symbols)natural_image
Diagram showing a hand holding a device above two panels, with no visible text or symbolsFranke Kindred Canada Limited
Midland, ON L4R 4K9
Phone +1 866 687 7465
Czech Republic
Franke s.r.o.
190 00 Praha 9
Phone +420 281 090 411
Denmark
Franke Kitchen Systems Denmark
8520 Lystrup
Phone +45 8624 9024
Egypt
Franke Kitchen Systems Egypt S.A.E.
6th of October City
Phone +202 3828 0000
Finland
Franke Finland Oy
76850 Naarajärvi
Phone +358 15 341 11
France
Franke France S.A.S.
60230 Chambly
Phone +33 130 289 400
Germany
Franke GmbH
79713 Bad Säckingen
Phone +49 7761 52 0
Greece
Franke Hellas S.A.
19003 Markopoulo Attikis (Athens)
Phone +30 22991 500 00
Hong Kong SAR
Franke Asia Hong Kong Office
Causeway Bay
Phone +852 3184 1900
India
Franke Faber India Limited
Aurangabad - 431 136
Phone +91 240 2556697/98
Italy
Franke S.p.A.
37019 Peschiera del Garda
Phone +39 045 644 9311
Kazakhstan
Franke Kazakhstan Ltd.
040918 Almaty City
Phone +7 727 297 3812
Morocco
Franke Kitchen System SARL
21 000 Casablanca
Phone +212 522 674 200
Norway
Franke Kitchen Systems Norway
8520 Lystrup, Denmark
Phone +47 35 566 450
P.R. China
Franke (China) Kitchen Systems Co., Ltd.
Heshan, Guangdong, 529700
Phone +86 750 841 9288
Shanghai office +86 215 150 6715
Poland
Franke Polska Sp. z o.o.
05-090 Raszyn
Phone +48 22 711 6700
Portugal
Franke Portugal S.A.
2735-531 Cacém
Phone +351 21 426 9670
Romania
Franke Romania SRL
Pantelimon 077145
Phone +40 21 350 1550
Russia
Franke Russia GmbH
199106 St. Petersburg
Phone +7 812 703 1503
Singapore
Franke Singapore Pte. Ltd.
068811 Singapore
Phone +65 6709 5608
Slovak Republic
Franke Slovakia s.r.o.
010 01 Žilina
Phone +421 41 733 6200
South Africa
Franke Kitchen Systems (Pty.) Ltd.
Durban 4052
Phone +27 31 450 6300
Spain
Phone +46 912 405 00
Switzerland
United Arab Emirates
Franke LLC
Ras Al Khaimah
Phone +971 7 203 4700
United Kingdom
Franke UK Ltd.
Manchester M22 5WB
Phone +44 161 436 6280
USA
Franke Kitchen Systems LLC
Smyrna, TN 37167
Phone 800 626 5771