
SCD1990 - Cd player/recorder Soundmaster - Free user manual and instructions
Find the device manual for free SCD1990 Soundmaster in PDF.
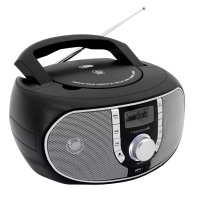
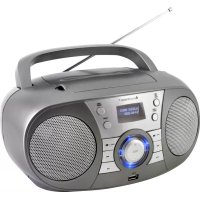
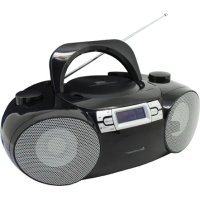
| Product type | CD player/recorder with DAB+ and FM radio, USB playback, auxiliary input |
| Main power supply | AC 230 V ~ 50 Hz |
| Backup power supply | 6 UM-2 / C 1.5 V batteries (not included) |
| Audio output power | 2 × 2 W RMS |
| Frequency ranges | DAB+: 174 – 240 MHz; FM: 87.5 – 108 MHz |
| Number of presets | 20 DAB+, 20 FM |
| Supported audio formats | Audio CD, CD-R, CD-RW, MP3 (on CD and USB) |
| Main functions | CD playback, DAB+/FM radio, USB playback, dual alarm, clock, sleep timer, track programming, repeat, random playback |
| Inputs | 3.5 mm auxiliary jack, USB port (front) |
| Outputs | 3.5 mm headphone jack (rear) |
| Speakers | 2 built-in speakers |
| Laser type | Class 1 – invisible laser radiation when open |
| Safety | Do not open the device – risk of electric shock; avoid exposure to laser radiation; do not place flame sources or liquids on the device |
| Maintenance and cleaning | Clean only with a dry cloth; do not use detergents or abrasive cloths |
| Dimensions (approx.) | Approx. 250 × 150 × 130 mm (estimate) |
| Weight (approx.) | Approx. 1.5 kg (estimate) |
| Used batteries | Do not dispose of with household waste; take to collection points |
| General information | Compliant with directive 2014/53/EU; imported by Wörlein GmbH, Germany |
Frequently Asked Questions - SCD1990 Soundmaster
User questions about SCD1990 Soundmaster
0 question about this device. Answer the ones you know or ask your own.
Ask a new question about this device
Download the instructions for your Cd player/recorder in PDF format for free! Find your manual SCD1990 - Soundmaster and take your electronic device back in hand. On this page are published all the documents necessary for the use of your device. SCD1990 by Soundmaster.
USER MANUAL SCD1990 Soundmaster
natural_image
Black portable electronic device with analog keyboard and control buttons (no visible text or symbols)DEUTSCH
ENGLISH
FRANÇAIS
NEDERLANDS
ITALIANO
ESPANOL
Do not dispose of this product with the normal household waste at the end of its life cycle. Return it to a collection point for the recycling of electrical and electronic devices. This is indicated by the symbol on the product, user manual or packaging
The materials are reusable according to their markings. By reusing, recycling or other forms of utilization of old devices you make an important contribution to the protection of our environment.
Please contact your local authorities for details about collection points.
| WARNING | ! | |
| Risk of electric shockDo not open! |
Caution: To reduce the risk of electric shock, do not remove the cover (or back). There are no user serviceable parts inside. Refer servicing to qualified service personnel.

This symbol indicates the presence of dangerous voltage inside the enclosure, sufficient enough to cause electric shock.

This symbol indicates the presence of important operating and maintenance instructions for the device

Used batteries are hazardous waste and NOT to be disposed of with the household waste! As a consumer you are legally obligated to return all batteries for environmentally responsible recycling – no matter whether or not the batteries contain harmful substances*)
Return batteries free of charge to public collection points in your community or shops selling batteries of the respective kind.
Only return fully discharged batteries
*) marked Cd = cadmium, Hg = mercury, Pb = lead
- Only use mercury and cadmium-free batteries.
- Used batteries are hazardous waste and NOT to be disposed of with the household waste!!!
- Keep batteries away from children. Children might swallow batteries.
- Contact a physician immediately if a battery was swallowed.
- Check your batteries regularly to avoid battery leakage.
- Batteries shall not be exposed to excessive heat such as sunshine, fire or the like.
- CAUTION: Danger of explosion if battery is incorrectly replaced
- Replace only with the same or equivalent type
CAUTION - INVISIBLE LASER RADIATION WHEN OPENING THE COVER OR PRESSING THE SAFETY INTERLOCK. AVOID EXPOSURE TO THE LASER BEAM.
To prevent possible hearing damage, do not listen at high volume levels for long periods
- Use the device in dry indoor environments only.
- Protect the device from humidity.
- This apparatus is for moderate climates areas use, not suitable for use in tropical climates countries.
Safety, Environmental and Setup Instructions
- No objects filled with liquids, such as vases, shall be placed on the apparatus.
- The mains plug or an appliance coupler is used as the disconnect device, the disconnect devices shall remain readily operable.
- Connect this device to a properly installed and earthed wall outlet only. Make sure the mains voltage corresponds with the specifications on the rating plate.
- Make sure the mains cable stays dry during operation. Do not pinch or damage the mains cable in any way.
- A damaged mains cable or plug must immediately be replaced by an authorized service center.
- In case of lightning, immediately disconnect the device from the mains supply.
- Children should be supervised by parents when using the device.
- Clean the device with a dry cloth only.
- Do NOT use CLEANING AGENTS or ABRASIVE CLOTHS!
- Do not expose the device to direct sunlight or other heat sources.
- Install the device at a location with sufficient ventilation in order to prevent heat accumulation.
- Do not cover the ventilation openings!
- Install the device at a safe and vibration-free location.
- Install the device as far away as possible from computers and microwave units; otherwise radio reception may be disturbed.
- Do not open or repair the enclosure. It is not safe to do so and will void your warranty. Repairs only by authorized service/ customer center.
- No naked flame sources, such as lighted candles, should be placed on the unit.
- When you are necessary to ship the unit store it in its original package. Save the package for this purpose.
- In case of malfunction due to electrostatic discharge or fast transient (burst), remove and reconnect the power supply.
- If the unit is not using for a long period of time, disconnect it from the power supply by unplugging the power plug. This is to avoid the risk of fire.
LOCATION OF CONTROLS
FRONT VIEW
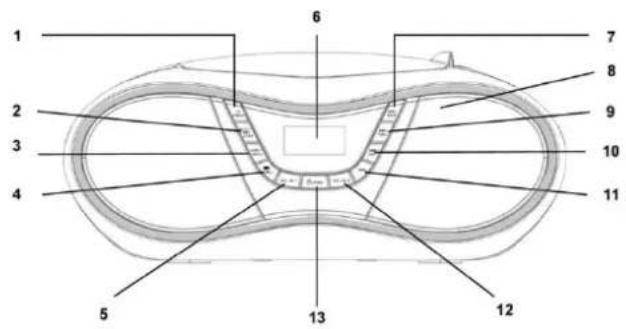
1 SLEEP / SNOOZE button
2 ENTER / PLAY / PAUSE / CLOCK button
3 STOP / MENU button
4 PRE. / FOLDER button
5 VOLUME- / ALARM 1 button
6 DISPLAY
7 AMS / MODE button
8 Speaker
9 SKIP+ / TUNING+ button
10 SKIP- / TUNING- button
11 INFO button
12 VOLUME+ / ALARM 2 button
13 STANDBY / FUNCTION button
SIDE VIEW
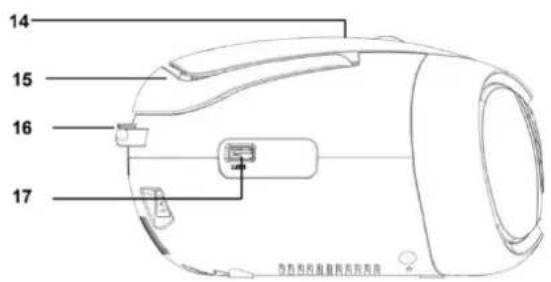
14 CD Door
15 Handle
16 FM Antenna
17 USB Jack
REAR VIEW
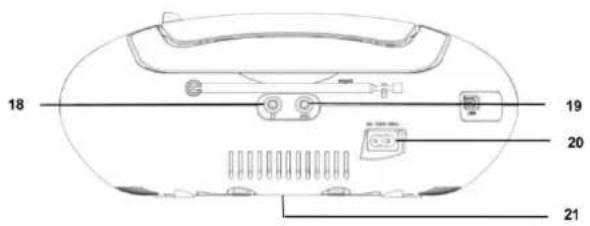
18 Headphone Jack
19 AUX-IN Jack
20 AC socket
21 Battery Door
INSTALLATION
- Select a suitable location for the device, such as a dry, flat, non-slip surface on which it is easy to operate the machine.
- Ensure that the device is sufficiently ventilated.
- Remove the protective film from the display if it is still present.
- Press the "STANDBY / FUNCTION" button to turn on the device.
- Press the "STANDBY / FUNCTION" button for approx. 3 seconds to switch into the standby mode.
Power Supply
- Ensure that the voltage is the same as that indicated on the model identification plate.
- Connect the power cable supplied (see battery compartment if necessary) to a properly installed safety power socket and the mains connector AC on the back of the machine.
Inserting the Batteries (not supplied)
- Open the lid of the battery compartment.
- Insert 6 batteries of type UM-2 ("C" size) 1.5 V. Please ensure that the polarity is correct (see the floor of the battery compartment)!
- Then close the battery lid.
NOTE:
When a mains cable is connected the batteries are automatically switched off.
After about 10 minute without a signal, the device will automatically switch to standby.
SETTING CLOCK AND DATE
The system must be in standby mode in order to set the clock.
- Press and hold the "ENTER / PLAY / PAUSE / CLOCK" button for approx.2 seconds.
- Use the "SKIP+/TUNING+" & "SKIP-/TUNING-" buttons to set the time format "12 / 24hr".
- Press the "ENTER / PLAY / PAUSE / CLOCK" button to confirm time format.
- Use the "SKIP+ / TUNING+" & "SKIP- / TUNING-" buttons to set the hours accordingly. The hour digits start flashing.
- Press the "ENTER / PLAY / PAUSE / CLOCK" button to confirm the hour.
- Repeat step 4 and 5 to set the minute / date.
NOTE:
Press and hold the "ENTER / PLAY / PAUSE / CLOCK" button during operation order to briefly display the current time.
ALARM
Setting of the alarm time
The system must be in standby mode in order to set the alarm.
You have the option of setting two alarm times. Proceed as follows:
- Press the "VOLUME-/ALARM 1" button for about 3 seconds. The hours of the currently set alarm time will start to flash.
- Perform the settings with the "SKIP+/TUNING+" & "SKIP-/TUNING-" buttons.
- Press the "VOLUME-/ALARM 1" button to confirm. The minutes will start to flash.
-
Perform the settings with "SKIP+ / TUNING+" & "SKIP- / TUNING-" button.
-
Press the "VOLUME- / ALARM 1" button to confirm. Then choose how you would like to be woken up. Perform the settings with the "SKIP+ / TUNING+" & "SKIP- / TUNING-" buttons. Press the "VOLUME- / ALARM 1" to confirm.
• FM:
As soon as the set alarm time has been reached, the radio will turn on. The last preset station will play.
• DAB:
As soon as the set alarm time has been reached, the radio will turn on. The last preset station will play.
• CD:
As soon as the set alarm time has been reached, the device will turn on in CD mode. The inserted CD will be played from the first track.
- USB:
As soon as the set alarm time has been reached, the device will turn on in USB mode. The tracks of the connected storage device will be played from the first track.
- BUZZ:
A buzzer will sound when reaching the alarm time.
- Finally, press the "SKIP+ / TUNING+" & "SKIP- / TUNING-" buttons to set the alarm volume. Press the "VOLUME- / ALARM 1" to confirm.
To set the second alarm time, repeat each of the above steps with the "VOLUME+ / ALARM 2" button.
Deactivate the alarm
Press "VOLUME- / ALARM 1" or "VOLUME+ / ALARM 2" shortly to choose "Alarm off".
Snooze
The automatically set alarm function can be switched off for 9 minutes with the "SLEEP / SNOOZE" button.
SLEEP TIMER
Press the "SLEEP / SNOOZE" button shortly to adjust the sleep timer in 10 minutes steps from 120 minutes to 10 and 5 to OFF.
DAB
Select the DAB mode with the "STANDBY / FUNCTION" button, until "DAB" is shown in the display.
The radio will automatically do a full scan of DAB+ stations. The list of stations is then stored, eliminating the need for another full scan when the radio is turned on next time. When the scan is complete, the stations are stored in alphabetical order. The first available station will be played back.
NOTE:
If there is no DAB+ reception at any time, change the position of the unit or adjust the antenna. Press and hold the "AMS/MODE" button for approx. 3 seconds to start a new search.
In DAB mode, press the "STOP/MENU" button to enter the DAB menu.
The DAB menu is divided into menus: Full scan, Manual tune, DRC, Prune and System.
- Full scan:
Starts the station scan. The DAB frequency band is scanned for stations.
- Manual tune:
To do so you need to know the station frequency. This can be found on the internet site of the broadcasting service. Select individual frequencies using the "ENTER / PLAY / PAUSE / CLOCK" button.
• DRC:
Short for Digital Range Control (dynamic range). The term DRC describes the ratio between the quietest and the loudest sound. If the dynamic range is very high there are very soft sounds as well as very loud sounds.
Under some circumstances this may present a problem with playback. Let us assume that you are listening to a radio station in a relatively loud environment. By increasing the volume you can play the quiet sections louder.
This however has the disadvantage that the loud sections become uncomfortably loud. It makes sense here to reduce the dynamic range. Select between the options:
- DRC off: The dynamic range is not reduced.
- DRC high: The dynamic range is sharply reduced.
- DRC low: The dynamic range is slightly reduced
- Prune:
It may be that you can no longer receive some stations after a station scan or change of location. With this function you can delete these stations from the reception list. Select "YES" and confirm with the "ENTER / PLAY / PAUSE / CLOCK" button.
- System
- Language
- Time Update
- Factory Reset
- SW version
Preset station:
- Press and hold the "AMS / MODE" button on unit for about 2-3 seconds to start the automatic preset process.
- Display will show the memory sequence number and radio stations will be automatically preset into the sequence number (Note: Each sequence number means 1 preset station while during automatic preset process.)
- Once all the stations were automatic preset, press the "PRE. / FOLDER" button to choose preset stations.
FM
- Select the RADIO mode with the "STANDBY / FUNCTION" button, until "FM" is shown in the display.
- For FM reception: Completely extend the telescopic antenna. Change its position to improve the reception.
- There are two options to search for and preset radio stations.
- Automatic scan:
Important! Any preset radio stations will be overridden.
Press and hold the "AMS / MODE" button for approx.3 seconds. The system scans the entire frequency band for radio stations. Any stations found will be preset from lowest to highest frequency.
- Manual scan for audio stations:
Briefly press the “SKIP+ / TUNING+” & “SKIP- / TUNING-” buttons, until you have found the radio station which you are looking for. If you keep one of the buttons pressed down, the device will search to the previous, respectively next radio station.
Preset station:
- Press and hold the "AMS / MODE" button on unit for about 2-3 seconds to start the automatic preset process.
- Display will show the memory sequence number and radio stations will be automatically preset into the sequence number (Note: Each sequence number means 1 preset station while during automatic preset process.)
- Once all the stations were automatic preset, press the "PRE. / FOLDER" button to choose preset stations.
Info display
Press the "INFO" button to show the FM information.
FM Menu
In FM mode, press the "STOP/MENU" button to enter the FM menu.
The FM menu is divided into menus: Scan setting, Audio setting and System.
- Scan setting: Select the desired option for automatic station search.
- All stations: Search for all stations that can be received. In this case, station search also stops for weak stations.
- Strong stations only: Only clear stations are searched.
- Audio setting: Select the MONO or STEREO for FM reception.
- System
- Language
- Time Update
- Factory Reset
- SW version
CD
- Select the CD mode with the "STANDBY / FUNCTION" button, until "CD" is shown in the display.
- Open the CD compartment by pulling the lid upwards by the tab.
- Insert an audio CD with the printed side facing upwards on to the central cone so that the CD clicks into place and then close the lid of the CD compartment.
- The CD will play from the first title.
- In order to remove a CD, please press the STOP button, open the CD compartment and lift the CD out carefully.
Always keep the CD deck closed.
NOTE:
If a disc is inserted the wrong way around, respectively if no disc is inserted, then the message "NO" appears in the display.
USB
This device has been developed in line with the latest technical advances in the USB field. The wide range of different USB storage devices of all types which are currently on the market, unfortunately do not allow us to guarantee full compatibility with all USB storage devices. For this reason, in rare cases there may be problems in playing back files from USB storage devices. This is not a malfunction of the device.
- Select the USB mode with the "STANDBY / FUNCTION" button, until "USB" is shown in the display.
- Connect a USB storage device directly into the port. Playback will automatically start after a few seconds.
For operation, please refer to the section "CONTROL BUTTONS".
NOTE:
- Always directly connect a USB storage medium to the USB port to prevent any malfunctions.
- The USB port is not designed for charging external devices.
CAUTION:
Switch the device to a different operating mode before you remove the USB storage device.
CONTROL BUTTONS
VOLUME
You can set the desired volume with the "VOLUME- / ALARM 1" or "VOLUME+ / ALARM 2" button.
ENTER / PLAY / PAUSE / CLOCK
- You can briefly interrupt and resume playback using this button. The display shows the elapsed playback time flashing. Pressing again continues playback.
- Press and hold this button during operation to briefly display the current time.
SKIP+ & SKIP-
With "SKIP+ / TUNING+" button you can jump to the next or previous track etc. If the button is kept pressed down, the machine starts to search through the tracks. The "SKIP- / TUNING-" button can be used as follows: Press once = This starts the current track again from the beginning. Press twice = This jumps back to the previous track.
STOP
The playback is stopped.
MODE
In stop mode for programming any order of tracks (see the section on "Programmed Play").
During the playback of an audio CD:
Press once = the normal play mode. The display will show "Normal". Press twice = the current track is repeated continuously. The display will show "Repeat One". Press three times = the whole CD is played continuously. The display will show "Repeat All". Press four times = all tracks will be played in random order. The display will show "Random". Press five times = back to the normal play mode.
During playback of MP3 music(Under USB mode):
Press once = the normal play mode. The display will show "Normal". Press twice = the current track is repeated continuously. The display will show "Repeat One". Press three times = the selected folder is repeated continuously. The display will show "Repeat Folder". Press four times = the whole CD is played continuously. The display will show "Repeat All". Press five times = all tracks will be played in random order. The display will show "Random". Press six times = back to the normal play mode.
PRE. /FOLDER
Use the "PRE. / FOLDER" button to chose the folder.
Programmed Play
This can be used to program any desired sequence of tracks.
- Press the "STOP" button.
-
Press the "AMS / MODE" button. "P_01" will start to flash..
P_01 means the storage space
Use the "SKIP+ / TUNING+" & "SKIP- / TUNING-" buttons to select the desired track and then press the "AMS / MODE" button again.
The display "P_01" will be changed to "P_02". -
Select the next track with the "SKIP+ / TUNING+" & "SKIP- / TUNING-" buttons and press the "AMS / MODE" button again. Repeat the procedure until all the desired tracks are selected.
NOTE:
Once the storage capacity of the tracks to be programmed has been reached "PROGFULL" will show in the display.
- Press the "ENTER / PLAY / PAUSE / CLOCK" button. The playback starts.
The upper-left of the display will show "MEM".
-
Press once the button to stop the playback while retaining the program.
-
To play the programmed back again, press the "ENTER / PLAY / PAUSE / CLOCK" button.
-
To delete the program, press the "STOP" button twice. The notification "MEM" will disappear.
Playing back Music in MP3 Format
With this device it is possible to play back pieces of music in MP3 format. The device also supports all standard CD types: CD, CD-RW, CD-R.
This machine of is able to play MP3 CDs. Up to 99 track scan be compressed and stored on these CDs. Your machine detects an MP3 CD automatically (the total number of tracks and MP3s appears in the display). If you would like to play one of these CDs, proceed as described under “Playing CDs/MP3”. Tracks can be programmed as described under “Playing Back Programmed Tracks”.
Headphone socket
To listen to music privately, use headphones with a 3.5 stereo jack plug and connect to the headphones socket on the back of the system. The speakers will then be muted.
AUX IN SOCKET
Via this socket you can also hear the sound of other playback devices such as MP3 players, CD players etc. through the loudspeakers.
- Please connect the external device with a 3.5 mm stereo jack plug to the AUX-IN socket.
- Repeatedly press the "STANDBY / FUNCTION" button, until "Aux" is shown in the display.
- You will hear the sound playback from the external device through the loudspeakers. You may adjust the volume with "VOLUME- / ALARM 1" or "VOLUME+ / ALARM 2" buttons. The CD buttons are not functional.
- For the remaining procedure please see the operating instructions of the external sound source.
NOTE:
Adjust the volume of the external device to a comfortable level.
TECHNICAL SPECIFICATION
Power input : AC 230V\~50Hz
Battery supply : 6 batteries type UM-2 / "C" size 1,5V
DAB+ Range : 174 – 240MHz
FM range : 87,5 - 108,0 MHz
Preset Stations : 20 DAB+, 20 FM
Audio power output : 2x 2W RMS
IMPORTER
Hereby, Wörlein GmbH declares that this device is in compliance with the essenal requirements and other relevant provisions of Direcve 2014/53/EU.
A copy of the Declaraon of Conformity may be obtained at the following locaon: Wörlein GmbH, Gewerbestrasse 12, D 90556 Cadolzburg, Germany Email: info@woerlein.com Tel.: +49 9103 71 67 0
- LOCATION OF CONTROLS
- FRONT VIEW
- SIDE VIEW
- REAR VIEW
- INSTALLATION
- Power Supply
- Inserting the Batteries (not supplied)
- NOTE:
- SETTING CLOCK AND DATE
- ALARM
- Setting of the alarm time
- SLEEP TIMER
- DAB
- - Full scan:
- - Manual tune:
- • DRC:
- - Prune:
- - System
- Preset station:
- FM
- - Automatic scan:
- - Manual scan for audio stations:
- Info display
- FM Menu
- CD
- USB
- CAUTION:
- CONTROL BUTTONS
- VOLUME
- ENTER / PLAY / PAUSE / CLOCK
- SKIP+ & SKIP-
- STOP
- MODE
- /FOLDER
- Programmed Play
- Playing back Music in MP3 Format
- Headphone socket
- AUX IN SOCKET
- TECHNICAL SPECIFICATION
- IMPORTER
Brand : Soundmaster
Model : SCD1990
Category : Cd player/recorder