HV 7184 - Broom SEVERIN - Free user manual and instructions
Find the device manual for free HV 7184 SEVERIN in PDF.
User questions about HV 7184 SEVERIN
0 question about this device. Answer the ones you know or ask your own.
Ask a new question about this device
Download the instructions for your Broom in PDF format for free! Find your manual HV 7184 - SEVERIN and take your electronic device back in hand. On this page are published all the documents necessary for the use of your device. HV 7184 by SEVERIN.
USER MANUAL HV 7184 SEVERIN
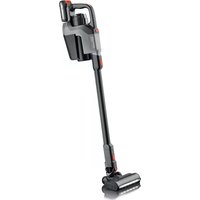
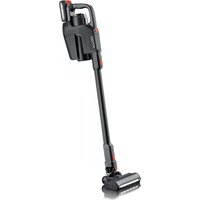
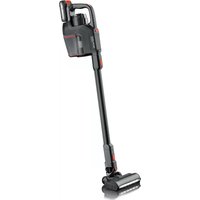
natural_image
Black SEPURO vacuum cleaner with red handle and black body (no visible text or symbols)ART.-NO. HV 7184 / HV 7185 / HV 7186 / HV 7187 SEPURO
DE Gebrauchsanweisung Kabelloser Akku-Staubsauger 4
GB Instructions for use Wireless vacuum cleaner with rechargeable battery 12
FR Mode d'emploi Aspirateur à batterie sans fil 20
NL Gebruiksaanwijzing Snoerloze accustofzuiger 28
ES Instrucciones de uso Aspirador inalámbrico 36
IT Manuale d'uso Aspirapolvere senza fili con batteria 44
DK Brugsanvisning Til ledningsfri batteridrevet støvsuger 52
SE Bruksanvisning Batteridriven dammsugare 60
FI Käyttöohje Johdoton akkukäyttöinen pölynimuri 67
PT Manual de instruções Aspirador a bateria sem fios 75
PL Instrukcja obstugi Bezprzewodowy odkurzacz akumulatorowy 83
GR Οδηγίες χρήσεως Ασύρματη πλεκτρική σκούπα με μπαταρία 92
text_image
1 2 3 4 I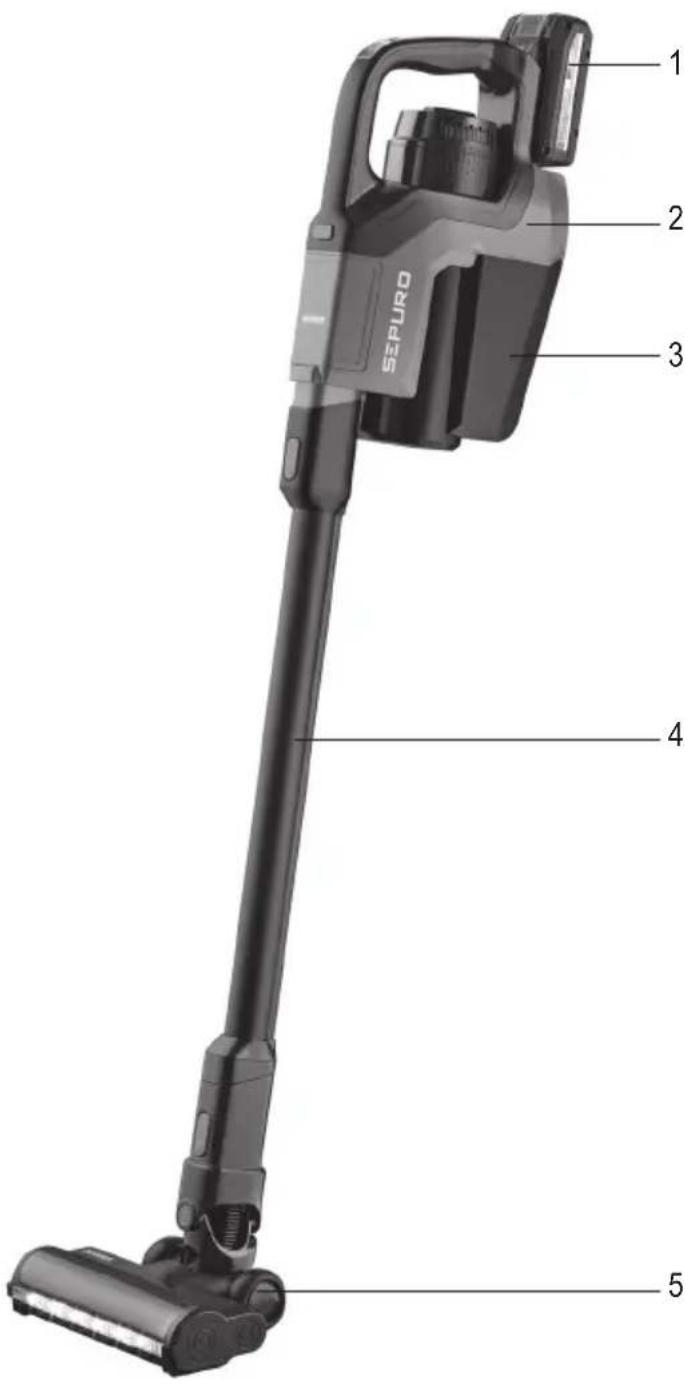
text_image
SEPURO 1 2 3 4 5
text_image
SEPURQ II 1 2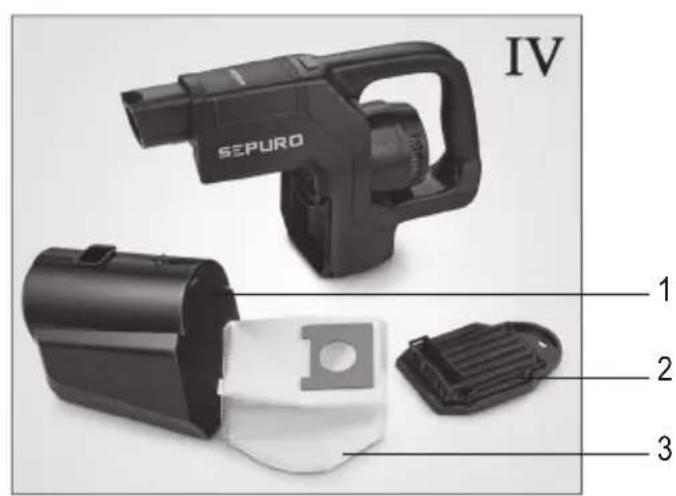
text_image
IV SEPURO 1 2 3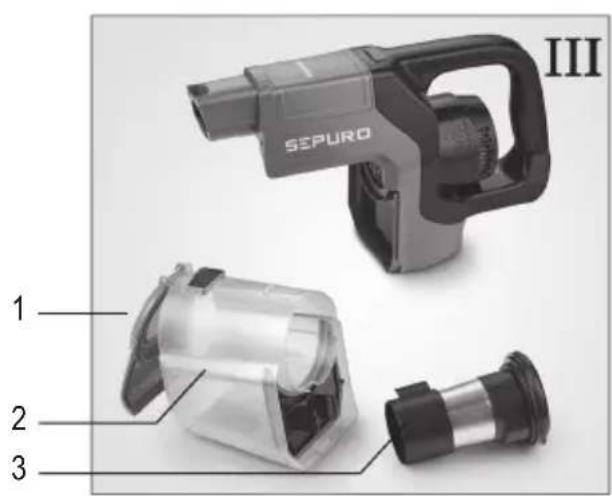
text_image
SEPURO III 1 2 3| Technische Daten / Technical Data / Caractéristiques techniques / Technische gegevens / Datos técnicos / Dati tecnici / Tekniske data / Tekniska data / Tekniset tiedot / Dados técnicos / Dane techniczne / Τεχνικά χαρακτηριστικά | |
| Art.Nr. / Item no. / Art. n° / Art.nr. / Nr. ° Art. / Num. art. / Artikelnr. / Art.nr. / Tuotenro / N.° Art.° / Nr art. / Áp. πρ. | HV 7184 & 7185 |
| Leistung / Power / Puissance / Vermogen / Potencia / Potenza / Effekt / Effekt / Teho / Potência / Moc / Iσχύς | 280 W |
| Gewicht / Weight / Poids / Gewicht / Peso / Peso / Vægt / Vikt / Paino / Peso / Waga / Bápoς | ~ 2 kg |
| 7184: Volumen Staubbehälter / Dust container volume / Volume du bac à poussière / Volume stofreservoir / Volumen del depósito de polvo / Volume del serbatoio raccogli polvere / Støvbeholderens rumindhold / Volym på dammbehållare / Pölysäilion tilavuus / Volume do reservatório de pó / Pojemność pojemnika na kurz / Χωρητικότητα δοχείου σκόνης | ~ 0,6 l |
| 7185: Volumen Staubbeutel / Dust bag volume / Volume du sac à poussière / Volume stofzak / Volumen de la bolsa para polvo / Volume dei sacchetti per la polvere / Støvsugerposens rumindhold / Volym på dammbehållare / Pölypussin tilavuus / Volume do saco de pó / Objetość worka na kurz / Χωρητικότητα σακούλας σκόνης | ~ 1,0 l |
| Art.Nr. / Item no. / Art. n° / Art.nr. / Nr. ° Art. / Num. art. / Artikelnr. / Art.nr. / Tuotenro / N.° Art.° / Nr art. / Áp. πρ. | HV 7186 & 7187 |
| Leistung / Power / Puissance / Vermogen / Potencia / Potenza / Effekt / Effekt / Teho / Potência / Moc / Iσχύς | 450 W |
| Gewicht / Weight / Poids / Gewicht / Peso / Peso / Vægt / Vikt / Paino / Peso / Waga / Bápoς | ~ 2,1 kg |
| 7186: Volumen Staubbehälter / Dust container volume / Volume du bac à poussière / Volume stofreservoir / Volumen del depósito de polvo / Volume del serbatoio raccogli polvere / Støvbeholderens rumindhold / Volym på dammbehållare / Pölysäilion tilavuus / Volume do reservatório de pó / Pojemność pojemnika na kurz / Χώρητικότητα δοχείου σκόνης | ~ 0,6 l |
| 7187: Volumen Staubbeutel / Dust bag volume / Volume du sac à poussière / Volume stofzak / Volumen de la bolsa para polvo / Volume dei sacchetti per la polvere / Støvsugerposens rumindhold / Volym på dammbehållare / Pölypussin tilavuus / Volume do saco de pó / Objetość worka na kurz / Χωρήτικότητα σακούλας σκόνης | ~ 1,0 l |
| Akku und Ladegerät als Starter-Kit im Lieferumfang enthalten. Es können alle Akkus und Ladegeräte der Einhell-Serie verwendet werden. / Battery and charger are included as a starter kit. All batteries and chargers of the Einhell series are supported. / Batterie et chargeur fournis dans le kit de démarrage. Vous pouvez utiliser toutes les batteries et tous les chargeurs de la série Einhell worden en oplader als startpakket inbegrepen in de leveringsomvang. Alle accu's en opladers van de Einhell-serie worden gebruikt. / En el material suministrado se incluyen una batería y un cargador como kit básico. Se pueden usar todas las baterías y cargadores de la serie Einhell / La batteria e il caricabatteria sono inclusi nella consegna come kit di partenza. È possibile utilizzare tutte le batterie e caricabatterie della serie Einhell / Batteri og oplader medfølger som startset i pakken. Alle batterier og opladere fra Einhell-serien / Leveransen omfattar ett startpaket med batteri och laddare. Alla batterier och laddare ur Einhell-serien / Akku ja laturi sisältyvät aloituspakkauksena toimitukseen. Kaikkia Einhell-sarjan akkuja ja latureita voidaan käyttää. / Bateria e carregador incluídos no âmbito de fornecimento enquanto kit de inicialização. Podem ser utilizados todos os carregadores e baterias / Bateria i ładowarka zawarte są w zestawie startowym. Można stosować wszystkie akumulatory i ładowarki firmy Einhell z serii FÖVÄUÖKÜKÜKÜKÜKÜKÜKÜKÜKÜKÜKÜKÜKÜKÜKÜKÜKÜKÜKÜKÜKÜKÜKÜKÜKÜKÜKÜKÜKÜKÜKÜKÜKÜKÜKÜKÜKÜKÜKÜKÜKÜKÜKÜKÜKÜKÜKÜKÜKÜKÜK | |
| Informationen zu den technischen Daten von Akku und Ladegerät können der Einhell -Originalbetriebsanleitung entnommen werden. / Information on the battery and charger specifications can be found in the Einhell-original instructions for use. / Vous trouverez les informations relatives aux caractéristiques techniques des batteries et chargeurs dans le mode d'emploi original de Einhell. / Informatie over de technische gegevens van de accu en de oplader kunt u vinden in de originele -gebruiksaanwijzing. / La información relativa a los datos técnicos de la batería y del cargador se puede obtener en el manual de instrucciones original de Einhell. / È possibile trovare informazioni sui dati tecnici della batteria e del caricabatteria sulle istruzioni per l'uso originali Einhell. / Oplysninger om de tekniske data for batteriet og opladeren kan findes i originale brugervejledning. / Information över de tekniska uppgifterna för batterier och laddare finns i originalbruksanvisningen Einhell. / Akun ja laturin tekniset tiedot voi tarkistaa -akuperiiskäyttöohjeesta. / Pode consultar os dados técnicos sobre a bateria e carregador no manuel da instruções original. / Informacje na temat danych technicznych baterii i ładowarki można znaleźć w oryginalnej instrukcji obsługi / ¿¿¿¿¿¿¿¿¿¿¿¿¿¿¿¿¿¿¿¿¿¿¿¿¿¿¿¿¿¿¿¿¿¿¿¿¿¿¿¿¿¿¿¿¿¿¿¿¿¿¿¿¿¿¿¿¿¿¿¿¿¿¿¿¿¿¿¿¿¿¿¿¿¿¿¿¿¿¿¿¿¿¿¿¿¿¿¿¿¿¿¿¿¿¿¿¿¿¿¿¿? | |
Wireless vacuum cleaner with rechargeable battery
Dear Customer,
Before using the appliance, read the following instructions carefully and keep this manual for future reference. The appliance must only be used by those familiar with the instructions below.
Safety information on battery and charger
Read carefully the Einhell -original instructions for use before using the battery and charger.
Safety information on the appliance
Certain groups of persons
- This appliance may only be operated by children over the age of 8 and by persons with reduced physical, sensory or mental capacities or a lack of experience and/or knowledge if they are supervised or have been instructed about the safe use of the appliance and are aware of the dangers associated with its use.
- Children are not allowed to play with the appliance or stand or sit on it.
- Cleaning and user maintenance shall not be carried out by children without supervision.
- Children under 8 years of age must be kept away from the appliance .
- The packaging material must not be used for play purposes. There is a risk of suffocation.
General safety information
The appliance is charged with electrical current. Thus, there is a risk of electric shock.
Therefore:
- Check the appliance for possible damage before use. Never operate a defective appliance
- Never attempt to repair the appliance yourself. To prevent hazards, any repairs to the appliance may only be carried out by our customer service:
- Arrange repair of a defective appliance with a specialist dealer or contact SEVERIN customer service (see contact information in appendix to this instruction manual or at www.severin.de).
- Arrange repair of a defective battery or charger with our customer service (see separate Einhell original instructions for use).
- Never immerse the appliance in water or other liquids and do not treat it with liquids. The appliance must not be exposed to rain and moisture. The appliance must not be operated outdoors or in indoor spaces with high humidity.
- Never handle the appliance with wet hands.
- Before cleaning or maintaining the appliance and before changing accessories, switch off the appliance.
Rotating brush roller
The appliance contains a floor tool and an upholstery tool with a powered brush roller. Therefore, note the following:
- Make sure that the appliance is switched off before cleaning or maintaining the appliance.
- Ensure that parts of your body can never get under the brush roller.
- Do not vacuum near cables, wires and long fringes. On the one hand, there is a danger that the cable's insulation will be damaged. On the other hand, these objects can get caught in the brush roller and thereby damage the appliance.
- Should the brush roller be blocked by any accidentally sucked item, the appliance will switch off automatically for safety reasons.
LED lighting
LEDs are installed in the floor nozzle. These illuminate the work area in front of the floor nozzle.
- Do not look into the LEDs during operation.
- It is not possible to exchange the LEDs.
Intended use
• The appliance must only be used domestically.
- The appliance may only be used for cleaning level, normally-soiled surfaces, low pile carpets, upholstery or other surfaces listed in these instructions for use that can withstand exposure to the rotating brush without sustaining damage.
• Any other use is deemed improper and is forbidden.
In order to prevent injuries, fires and damage, the appliance must not be used to vacuum:
- People, animals or plants. Always keep the device well away from all parts of the body, and from hair and clothing (e.g. shoelaces). Do not use near to your head.
- Glowing, burning or smouldering particles (such as ash, coal, charcoal, cigarettes, matches).
- Explosive or highly flammable substances or toners.
- Water and other liquids, e.g. wet carpet cleaning agents.
- Sharp objects, such as glass splinters, nails or construction waste.
- Fine dust, such as plaster, cement, fine drilling dust, powder
The following is also forbidden:
- Arbitrary alteration or repair of the appliance.
- Inserting objects into the appliance's openings. The specially provided accessories are the exception to this rule.
- Use, storage or charging outdoors.
CE Marking
This device is compliant with the mandatory EU directives for CE marking.
Device parts/Assembly
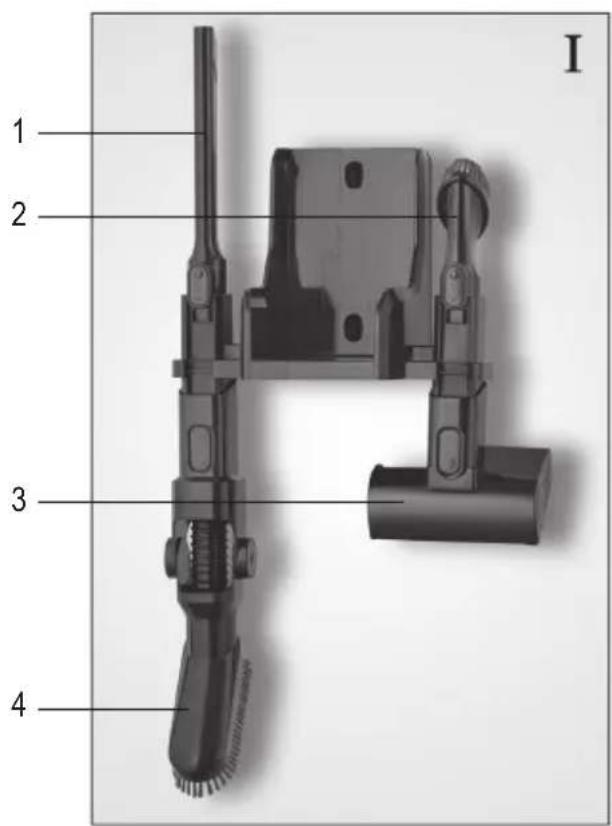
Assembled appliance
- inserted battery
- Main unit
- Dust container
- Suction tube
- Floor tool with brush roller
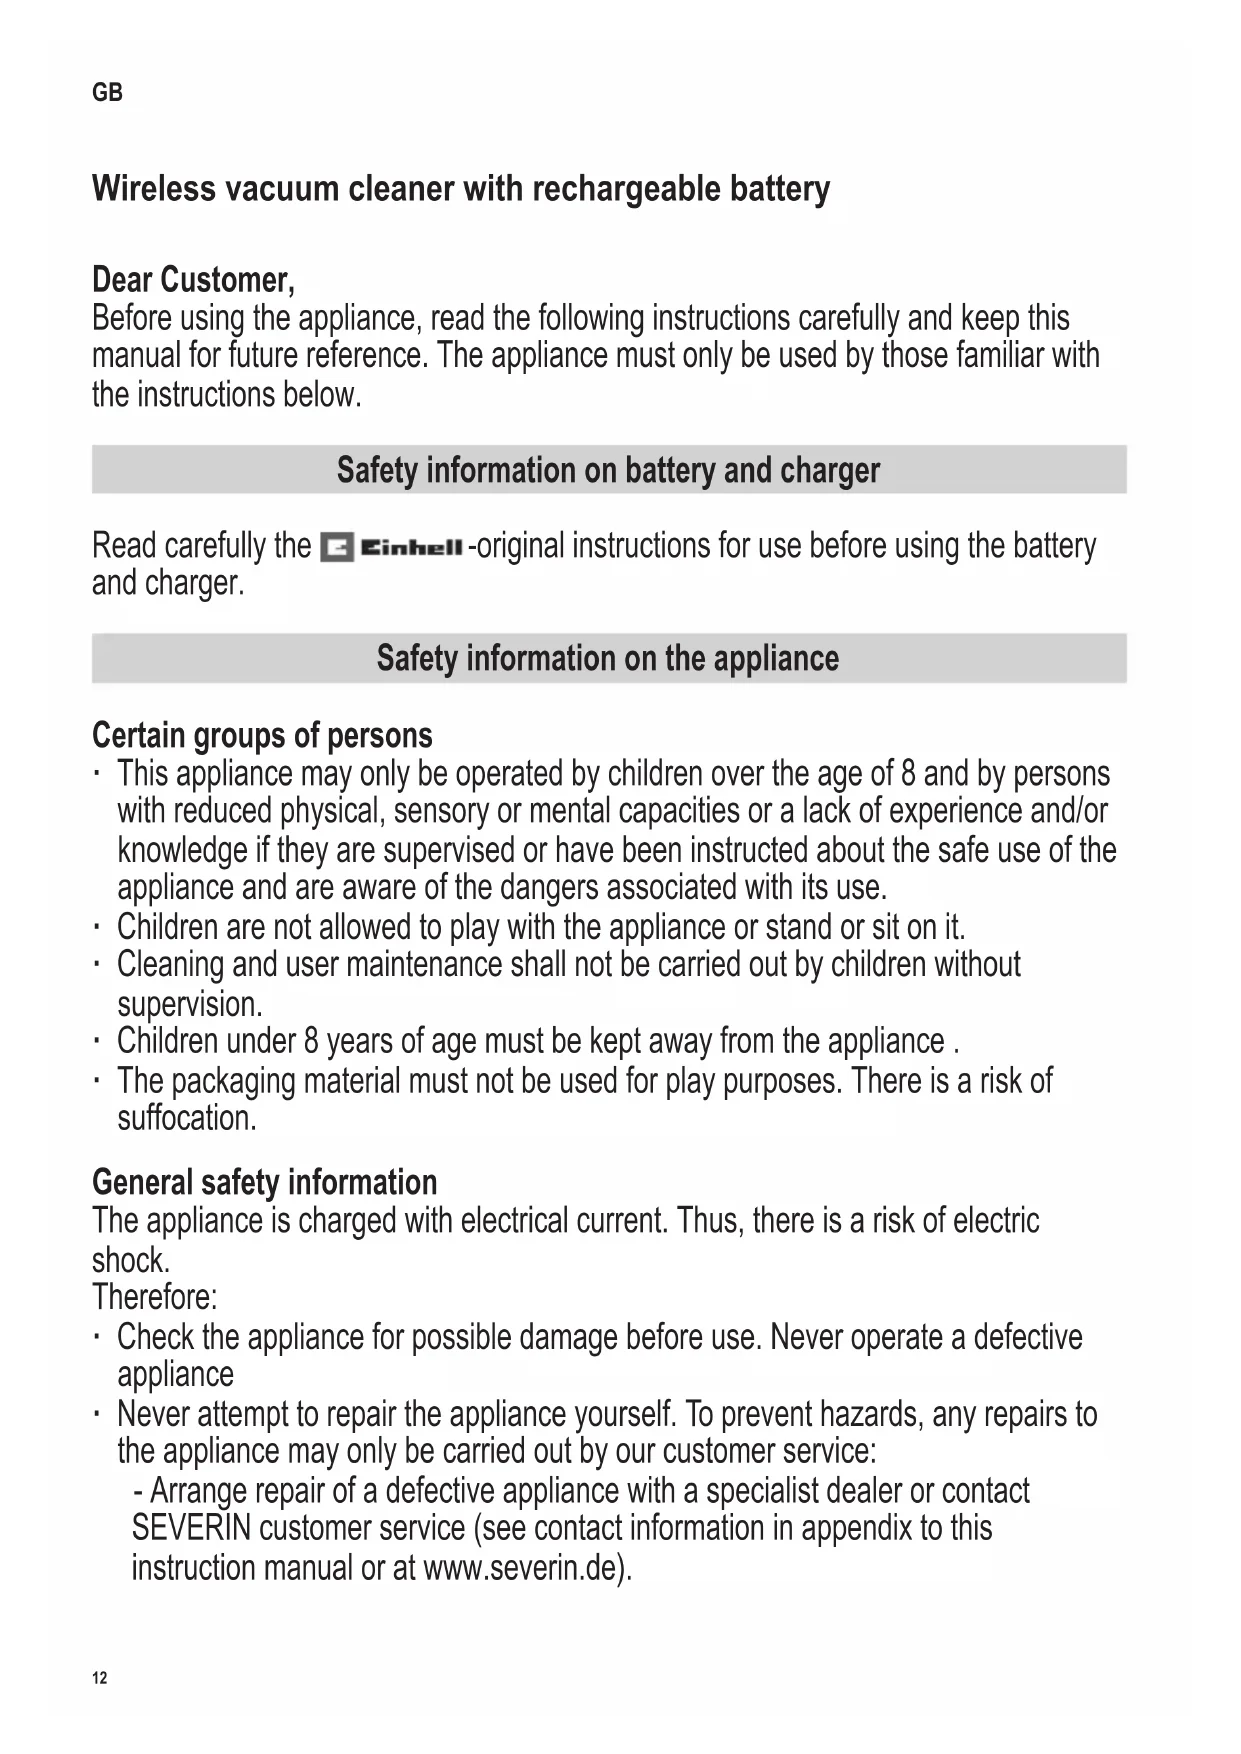
Fig. I Wall mount:
- Crevice tool
- Small furniture tool
- Upholstery tool
- Foldable furniture tool (only item no. 7186 & 7187)
Fig. II HEPA filter:
- HEPA filter
- Filter cover
- Dust container flap
- Dust container
- Dust container filter
Fig. III Dust container without bag (item no. 7184 & 7186):
Fig. IV Dust container with bag (item no. 7185 & 7187):
- Dust container
- Dust container cover
- Dust bag
Not illustrated:

Starter kit
Installing the wall mount
- Hold the wall mount to the wall, aligned in a vertical position.
- Use a pencil to mark the holes.
- Drill the holes (approx. 6 mm ∅).
- Insert the dowels (included) into the holes.
- Fasten the wall mount using the screws (included) and check that it is secure.
- Attach the tools to the wall mount as shown in Fig. I (foldable furniture tool with item no. 7186 & 7187 only).
Charge battery
• Information on battery charging can be found in the enclosed Einhell-original instructions for use.
- Information on ordering spare batteries can be found in the “Spare parts and accessories” section of these instructions for use.
Assembling the appliance
Remove any remaining packaging from the appliance and assemble the component parts:
- push the dust container into the appliance until you hear it click into place.
- Push the suction tube onto the appliance.
- Attach the desired tool to the suction tube (see "Operating the appliance").
Operating the appliance
Selecting tools
- Select the tools for the surface to be vacuumed:
With rotating brush roller. For vacuuming carpets, low pile carpets without loose threads and hard floors.
With rotating brush roller. For vacuuming upholstery, mattresses, car seats.
Floor tool
Upholstery tool
Small furniture tool
For vacuuming furniture and sensitive or hard-to-reach areas, such as cleaning space between keyboard keys.
Flexible furniture tool
Foldable. For vacuuming high cabinets, door frames and the like.
Crevice tool
For vacuuming spaces in the sofa and other hard-to-reach areas.
- The tools can be used with and without the suction tube.
- Always ensure that the surface to be cleaned can withstand the stress of the floor tool or upholstery tool with a powered brush roller without damage.
Vacuuming
- Attach the desired tool to the appliance or to the suction tube.
- Switch on the appliance with the button. The appliance operates in ECO mode.
-
Each time you press the button the suction mode is changed as follows: ECO→MIDDLE→POWER→ECO.
Press and hold down the button for 3 seconds to set the TURBO mode. The appliance will switch to POWER mode in two minutes. -
Vacuum the floor.
-
Switch off the appliance with the button.
-
Empty and clean the dust container (see chapter "Maintaining the appliance").
-
Place the appliance on the wall mount after use.
Recommended suction mode:
ECO : for slightly soiled hard floors, curtains, drapes and the like
MIDDLE : for slightly soiled carpets, heavily soiled hard floors
POWER : for carpets, rugs, upholstery, mattresses and car seats
TURBO mode : for heavily soiled floor coverings or upholstery
Approximate running time in power modes
With a fully charged battery, the running time is as follows:
ECO : approx. 60 minutes
MIDDLE : approx. 30 minutes
POWER : approx. 12 minutes
TURBO mode : the appliance switches to POWER mode in 2 minutes
Maintaining the appliance
Dust level indicator
- The appliance is equipped with a dust level indicator. Make sure you change the dust bag or empty the dust container when the LED above the display on the handle lights up red.
- The LED flashes when the dust bag needs to be changed promptly or the dust container needs to be emptied promptly.
- When the LED glows red steadily, the appliance is rendered inoperable and requires prompt change of the dust bag or emptying of the dust container.
For appliances without dust bags
Emptying the dust container
- The dust container can only hold a limited quantity of dirt.
- It is therefore highly recommended that you empty the dust container after every cleaning and when the suction power drops noticeably or when the dust level indicator lights up red:
- Make sure that the appliance is switched off.
- Remove the tool and the suction tube.
- Push the locking latch on the bottom of the dust container. Open the flap of the dust container and empty the dust container.
- Close the flap of the dust container.
Cleaning the dust container
- You can easily clean the dust container with filter:
- Make sure that the appliance is switched off.
- Remove the tool and the suction tube.
- Press the button on the top of the appliance and remove the dust container by pulling it downwards.
- Push the locking latch on the bottom of the dust container. Open the flap of the dust container and empty the dust container. (see Fig. III)
- Fold the handle (semicircle) back on the dust container filter and remove the filter.
- Loosen the filter insert with metal sieve by turning it and then remove it.
- Pull out the foam filter and brush it off carefully if necessary.
- All filter parts should be rinsed with lukewarm water and allowed to dry for 24 hours.
- The dust container should be rinsed with lukewarm water and allowed to dry for 24 hours with the lid open.
- We recommend that you dry the parts on a radiator. Make sure that the parts are completely dry before reassembling them.
- Replace the dry foam filter, attach the filter insert with metal sieve and turn to lock in place.
- Slide the filter back into the dust container. The locking tab on the filter must fit into the dust container recess.
For appliances with dust bags
Changing the dust bag
- The dust bag can only hold a limited amount of dirt.
- Therefore, make sure you change the dust bag if the suction power drops noticeably or the dust level indicator lights up red:
- Make sure that the appliance is switched off.
- Remove the tool and the suction tube.
- Press the button on the top of the appliance and remove the dust container by pulling it downwards.
- Remove the cover from the dust container (see Fig. IV).
- Remove the filled dust bag by pulling it upwards and dispose of it properly.
- Insert a new dust bag following the direction of the arrow.
- Replace the cover on the dust container and push it until you hear it click into place.
Attention! The dust container has a safety function that prevents incorrect insertion of the dust bag. If you cannot mount the dust container back on the appliance, check that the dust bag has been inserted correctly. - Push the dust container back into the appliance until you hear it click into place.
Cleaning the HEPA filter
- The HEPA filter can get clogged due to soiling, causing the suction power to drop. Make sure you clean the filter on a regular basis.
At the latest
- if the suction power seems to be reduced
- before storing the appliance for an extended period
- before sending the appliance to the service centre.
- Cleaning the filter:
- Make sure that the appliance is switched off and is not charging.
- Remove the tool and the suction tube.
- Remove the HEPA filter cover underneath the handle by turning it counter-clockwise.
- Pull out the filter.
- Tap the filter out. If necessary, brush off with a small brush and tap out any loose dust.
- Slide the filter back in.
- Replace the cover and lock in place by turning clockwise.
Changing the HEPA filter
When normally used for household purposes, the filter should be replaced every 6 months.
Cleaning the brush roller in the floor tool and the upholstery tool
Soiling may prevent the brush roller from rotating freely. Clean the brush roller regularly.
-
Make sure that the appliance is switched off and is not on charge.
-
Remove the tool from the suction tube.
Floor tool:
-
Press the button on the side of the tool (). You can pull the brush roller out of the housing from the side.
-
Remove any hair and dirt from the brush, using a pair of tweezers or scissors carefully, if necessary.
Attention! Carefully use scissors within the brush roller groove to cut away any hair or debris wrapped around the brush roller.
- Slide the brush roller back into the tool. To do this, press the red button and slide the brush roller back in from the side until you hear it click into place.
Upholstery tool:
- Loosen the locking latch on the side of the tool by turning it counter-clockwise.
- Remove the brush roller.
- Remove any hair and dirt from the brush, using a pair of tweezers or scissors carefully, if necessary.
- Slide the brush roller back into the tool, push it down and lock in place by turning clockwise until the lock engages above the elevation.
Troubleshooting by yourself
Change the dust bag on time and/or empty the dust container regularly and take this opportunity to check and clean the filter.
| Problem Possible | cause / solution |
| Appliance cannot be switched on. | The rechargeable battery is completely discharged. Switch off the appliance and charge the rechargeable battery, chapter “Charging the rechargeable battery”. |
| The appliance hardly picks up any dust. | The dust bag/dust container needs to be emptied or the filter and the dust container need to be cleaned, as described in section “Maintaining the appliance”. |
| The tool is clogged. Check that the suction chan-nel in the tool is free. | |
| The suction tube is clogged. Check that the suc-tion tube is free. | |
| The suction channel in the appliance is blocked. Check that the suction channel on the front panel of the appliance is free. | |
| The dust level indicator lights up red. | The dust bag/dust container needs to be emptied. If the LED continues to glow red, the appliance should be dismantled and the suction tube, filters, etc. deblocked. |
| Operatingdurationis becoming progressively shorter. | The brush roller is soiled and needs to be cleaned, chapter “Cleaning the brush roller”. |
| The brush roller rotates slowly or irregularly. | The brush roller is soiled and needs to be cleaned, chapter “Cleaning the brush roller”. |
| The brush roller and LEDs switch off automatically. | This is a safety function that prevents the nozzle becoming defective if the brush roller gets jammed.The brush roller is either dirty and needs to be cleaned, chapter “Cleaning the brush roller” or something has got jammed in the brush roller, e.g. when vacuuming a high pile carpet. To override the power-off, switch off the vacuum cleaner, take the nozzle off of the suction tube or the hand-held vacuum cleaner and remove any objects that may be blocking the brush roller. The brush roller and LEDs will function again as normal when the vacuum cleaner is next switched on. |
Service hotline
If you cannot solve the problem using the table, call our service hotline (see contact information in the appendix to these instructions for use).
If you have any problems with the battery or charger, call our service hotline (see separate -original instructions for use).

| Item number Description | |
| ZB 7260 Spare 2.5 | Ah battery |
| ZB 7261 Spare 3.0 | Ah battery |
| ZB 7262 Filter set (HEPA filter and dust container filter) | |
| ZB 7263 Dust bag set (6 dust bags) | |
| ZB 7264 Turbo upholstery tool | |
| ZB 7265 Hard floor tool with soft brush roller | |
| ZB 7266 Variable furniture tool | |
| ZB 7267 Dust container without bag | |
| ZB 7268 Dust container with bag | |
| 5729-048 HEPA filter, separate | |
| 5731-048 Floor too with brush roller | |
| 5732-048 Brush roller for floor tool 5731-048 | |
| 9168-048 Power supply | |
| 5734-048 Soft brush roller for hard floor tool ZB 7265 | |
Disposal and warranty
Disposing of the appliance and rechargeable battery separately
Devices and batteries marked with this symbol must be disposed of separately from household waste! Devices and batteries contain valuable raw materials that can be recycled. Proper disposal of these items protects the environment and public health. Return the device and the battery separately to the appropriate collection points for disposal.
Guarantee (Appliance)
This product is guaranteed against defects in materials and workmanship for a period of two years from the date of purchase. Under this guarantee the manufacturer undertakes to repair or replace any parts found to be defective, providing the product is returned to one of our authorised service centres. This guarantee is only valid if the appliance has been used in accordance with the instructions, and provided that it has not been modified, repaired or interfered with by any unauthorised person, or damaged through misuse.
This guarantee naturally does not cover wear and tear, nor breakables such as glass and ceramic items, bulbs etc. This guarantee does not affect your statutory rights, nor any legal rights you may have as a consumer under applicable national legislation governing the purchase of goods. If the product fails to operate and needs to be returned, pack it carefully, enclosing your name and address and the reason for return. If within the guarantee period, please also provide the guarantee card and proof of purchase.
The warranty also excludes batteries and accumulators that have become faulty due to normal wear and tear or incorrect handling, or those where the battery life has been reduced.
Warranty (battery and charger)
Information on the battery and charger warranty can be found in the enclosed -original instructions for use.
Chère cliente, Cher client,
AVEDA Lifestyle EOOD
ul. Angel Kanchev 1, et. 5
BG 1124
Sofia
Croatia
Koracell d.o.o.
Donje Svetice 40
26 Oaktree Business Park
Trim Co., Meath
Tel.: 046 94 83100
Fax: 046 94 83663
Web: www.bluestone.ie
Italia
ASSISTENZA POST-VENDITA
NUMERO VERDE 800224155
E-Mail: assistenza@severin.com
Indonesia
PT. Setai Modern Elektronik
Email.: info@severin.co.id
Web.: www.severin.co.id
Jakarta
Komp. Glodok Plaza Blok F No. 9, Jl. Pinangsia Raya,
Jakarta Barat
021 65911888 / 021 6592889
Medan
Dr.Waleed Maraga commercial center, Level 1
Khalda, Amman Zip code: 11953
Tel: +962 6 5346429
Fax: +962 6 5341706
Mob Jordan : +962 797426108
Kuwait
Mohammed Abdulrahman Al Bahar
Al Bahar Building P.O. Box 148
Safat 13002 Kuwait
Tel.: +965 4810855
Latvia
SIA GTCL BALTIC
Piedrujas iela 7
LV - Riga 1073
Tel.: +371 29119989
Fax: +371 67297769
Lebanon
Khoury Home
7th Floor, Cité Dora 3 Building, Dora
P.O.Box 70611
Antelias, Lebanon
Tel.: +961 1 244200
Fax:+966 1 253535
E-Mail: info@khouryhome.com
Internet: www.khouryhome.com
Lithuania
UAB Topo Grupe
Savanoriu PR. 206A,
50193 Kaunas, Lithuania
Tel.: +370 660 00200
A.A.K & Partners L.L.C.
P.O Box:-1650, Muttrah
Postal Code - 114
Sultanate of Oman
Tel.: +968 24834470
Fax.: +968 24835186
E-Mail: aakpllc@gmail.com
Peru
SEVERIN PERU / Comercial Rebeca S.R.L
Mezzanine 1, South Center Tower
2206 Venture Street, Madrigal Business Park
Alabang, Muntinlupa City
Tel.: 809 34 41
E-Mail: severinconsumercare@colombophils.com.ph
Polska
Severin Polska Sp.z o.o.
6 Tagore Drive, #03-04
Singapore 787623
Tel.: +65 6455 0005
Fax: +65 6455 4010
Web: www.beste.com.sg
E-Mail: info@beste.com.sg
Slovenia
SEVTIS d.o.o.
Smartinska 130
1000 Ljubljana
Tel.: +386 1 542 1927
Fax: +386 1 542 1926
Slowak Republic
BVZ Commerce s.r.o.
Odbavovací centrum
Závodu míru 974/66a
360 17 Karlovy Vary
Tel.: +420 233 557 825
3rd Floor, Grove Exchange
Grove Avenue
Claremont
South Africa
7708
Tel: +27 21 674 0294
Fax: +27 21 674 0295
Web: http://www.alcdashley.co.za
Mail: service@alcdashley.co.za
Svenska
El & Digital Service AB
Folkungagatan 144
11630 Stockholm
Tel.: +46 8 845180
www.eldigital.se
E-Mail: info@eldigital.se
Switzerland
SPC Electronics AG
Mövenstrasse 12
CH-9015 St. Gallen
Tel.: +41 71 227 99 99
E-Mail: service@spcag.ch
www.spc.ch
Thailand
Verasu Ltd. part.
83/7 Wireless Rd., Lumpini,
Patumwan, Bangkok 10330
Tel.: +662 254 81 008
E-Mail: askverasu@verasu.com
Tunisie
GEI
54, rue du Mercure
Zone Industrielle 2013-BEN AROUS
TUNISIE
Ukrayina
Service for Modern Electronics LLC
Sim'i Khokhlovykh Str.8
4119 Kiev
Tel.: + 38 044 247 67 34
E-Mail: info1@photoservice.com.ua
United Kingdom
Homespares Centres Limited
Peel House
2 Chorley Old Road
BL13AA
Tel.: 01204 558160
Fax: 01204 558169
E-Mail: office@homespares.co.uk
Web: www.homespares.co.uk
Vietnam
BRAND PARTNER
CTY TNHH DOI TAC NHAN HIEU
FLOOR 8, DAG HOLDINGS
87A HAM NGHI
NGUYEN THAI BINH WARD, DISTRICT 1
HO CHI MINH CITY, VIETNAM
Tel.: +84-28-62 899 648
E-Mail: kenny.clark@brandpartner.vn
trang.hau@brandpartner.vn
Stand: 09.2021