PMXCAN - Digital Audio Receiver Rockford Fosgate - Free user manual and instructions
Find the device manual for free PMXCAN Rockford Fosgate in PDF.
| Product Type | Digital audio receiver |
| Brand | Rockford Fosgate |
| Model | PMXCAN |
| Power Supply | 12 V DC (vehicle or boat) |
| Mounting Diameter | 77 mm |
| Dimensions (approximate) | Diameter 77 mm, depth 50 mm |
| Weight (approximate) | 0.5 kg |
| Operating Voltage Range | 10.5 to 16 V |
| Fuse | Not specified, check unit's fuse |
| Audio Sources | FM, AM, Weather (WB), USB, AUX, Bluetooth, Pandora, SiriusXM |
| Equalizer | 7 band with presets (Flat, Rock, Classic, Acoustic, Dance, Electronic, Hip-Hop, Custom) |
| High-Pass / Low-Pass Filter | Adjustable crossover (60 Hz, 80 Hz, 120 Hz, APF) for front, rear, subwoofer |
| Punch EQ | Boost up to +18 dB at 45 Hz and +12 dB at 12.5 kHz |
| RCA Outputs | Rear configurable as Line Out or Subwoofer |
| Internal Amplifier | Enable/Disable (ON/OFF) |
| Bluetooth | Version not specified, pairing with customizable name |
| SiriusXM | Compatible with SiriusXM Connect tuner (sold separately) |
| Display | Adjustable brightness (2 levels) |
| Camera Input | Yes, for external rear view camera |
| Manual Languages | FR, DE, EN, ES, IT |
| Maintenance and Cleaning | Clean with a soft, dry cloth. Avoid liquids. |
| Safety | Disconnect battery before installation. Use appropriate fuses. |
| Spare Parts and Repairability | Not specified. Contact a qualified Rockford technician. |
Frequently Asked Questions - PMXCAN Rockford Fosgate
User questions about PMXCAN Rockford Fosgate
0 question about this device. Answer the ones you know or ask your own.
Ask a new question about this device
Download the instructions for your Digital Audio Receiver in PDF format for free! Find your manual PMXCAN - Rockford Fosgate and take your electronic device back in hand. On this page are published all the documents necessary for the use of your device. PMXCAN by Rockford Fosgate.
USER MANUAL PMXCAN Rockford Fosgate
Congratulations on your purchase of the world's finest brand of audio products. At Rockford Fosgate we are fanatics about musical reproduction at its best, and we are pleased you chose our product. Through years of engineering expertise, hand craftsmanship and critical testing procedures, we have created a wide range of products that reproduce music with all the clarity and richness you deserve.
For maximum performance we recommend you have your new Rockford Fosgate product installed by an Authorized Rockford Fosgate Dealer, as we provide specialized training through Rockford Technical Training Institute (RTTI). Please read your warranty and retain your receipt and original carton for possible future use.
Great product and competent installations are only a piece of the puzzle when it comes to your system. Make sure that your installer is using 100% authentic installation accessories from Rockford Fosgate in your installation. Rockford Fosgate has everything from RCA cables and speaker wire to power wire and battery connectors. Insist on it! After all, your new system deserves nothing but the best.
To add the finishing touch to your new Rockford Fosgate image, order your Rockford accessories, which include everything from T-shirts to hats.
Visit our web site for the latest information on all Rockford products;
www.rockfordfosgate.com
or, in the U.S. call 1-800-669-9899 or FAX 1-800-398-3985. For all other
countries, call +001-480-967-3565 or FAX +001-480-966-3983.
Table of Contents
2 Introduction
3 Specifications
4 Design Features
5 Wiring
6 Installation/Mounting
7-11 Operation
Settings
Tuner (AM/FM/WB)
USB-iPod
AUX (Auxiliary Input)
Bluetooth®
Pandora
SiriusXM
13 Troubleshooting
14-41 French, Spanish, German and Italian
44 Limited Warranty Information
If, after reading your manual, you still have questions regarding this product, we recommend that you see your Rockford Fosgate dealer. If you need further assistance, you can call us direct at 1-800-669-9899. Be sure to have your serial number, model number and date of purchase available when you call.
PRACTICE SAFE SOUND
Continuous exposure to sound pressure levels over 100dB may cause permanent hearing loss. High powered auto sound systems may produce sound pressure levels well over 130dB. Use common sense and practice safe sound.
Safety
This symbol with "WARNING" is intended to alert the user to the presence of important instructions. Failure to heed the instructions will result in severe injury or death.
This symbol with "CAUTION" is intended to alert the user to the presence of important instructions. Failure to heed the instructions can result in injury or unit damage.

WARNING

CAUTION
To prevent injury and damage to the unit, please read and follow the instructions in this manual. We want you to enjoy this system, not get a headache.
If you feel unsure about installing this system yourself, have it installed by a qualified Rockford Fosgate technician.
Before installation, disconnect the battery negative (-) terminal to prevent damage to the unit, fire and/or possible injury.
FCC Compliance Statement
This equipment has been tested and found to comply with the limits for a Class B digital device, pursuant to part 15 of the FCC Rules. These limits are designed to provide more reasonable protection against harmful interference in a residential installation.
Operation is subjected to the following two conditions: (1) This device may not cause harmful interference, and (2) the device must accept any interference received, including interference that may cause undesired operation.
This equipment generates, uses, and can radiate radio frequency energy and, if not installed and used in accordance with the instructions, may cause harmful interference to radio communications. However, there is no guarantee that interference will not occur in a particular installation. If this equipment does cause harmful interference to radio or television reception, which can be determined by turning the equipment off and on, you are encouraged to try to correct the interference by one of the following measures:
- Reorient or relocate the receiving antenna.
- Increase the separation between the equipment and receiver.
- Connect the equipment into an outlet on a circuit different from that to which the receiver is connected.
- Consult the dealer or an experienced radio/TV technician for help
| Model | PMX-3 |
| Operating Voltage | 10.5V - 16V |
| Fuse Rating | 20A |
| Power Output | 25 W x 4 @ 4 Ohms RMS 50 W x 4 @ 2 Ohms Peak |
| Max. RCA Output Voltage | 4V |
| Output Impedance | 500Ω |
| Frequency Response | 20 - 20kHz |
| FM Frequency Range | 87.5MHz - 107.9MHz |
| AM Frequency Range | 30kHz - 1710kHz |
| WB Frequency Range | 162.40 - 162.55 (US & Canada) |
| Source Presets | 18 FM / 12 AM / 6 WB / 18 SXM |
| Clock No Clock | |
| Display | 2.7" Color TFT |
| Bluetooth | 3.0+EDR, A2DP 1.3 |
| USB Compatibility | 2.0 |
| USB Capacity | 32 GB max, 255 Folders max, 999 Songs max |
| USB Output | 1A |
| Made for iPhone Model Names- | iPhone 6 Plus iPhone 6 iPhone 5S iPhone 5C iPhone 5 iPhone 4S iPhone 4 iPhone 3GS |
| Made for iPod Model Names | iPod Touch (5th generation) iPod Touch (4th generation) iPod Nano (7th generation) iPod Nano (6th generation) |
| Android Compatibility | Bluetooth® Only |
| Audio File Compatibility | MP3, WMA |
| Compatible Wired Remotes | PMX-1R, PMX-OR (3 Remote Limit, 100 ft Total Wired Distance) |
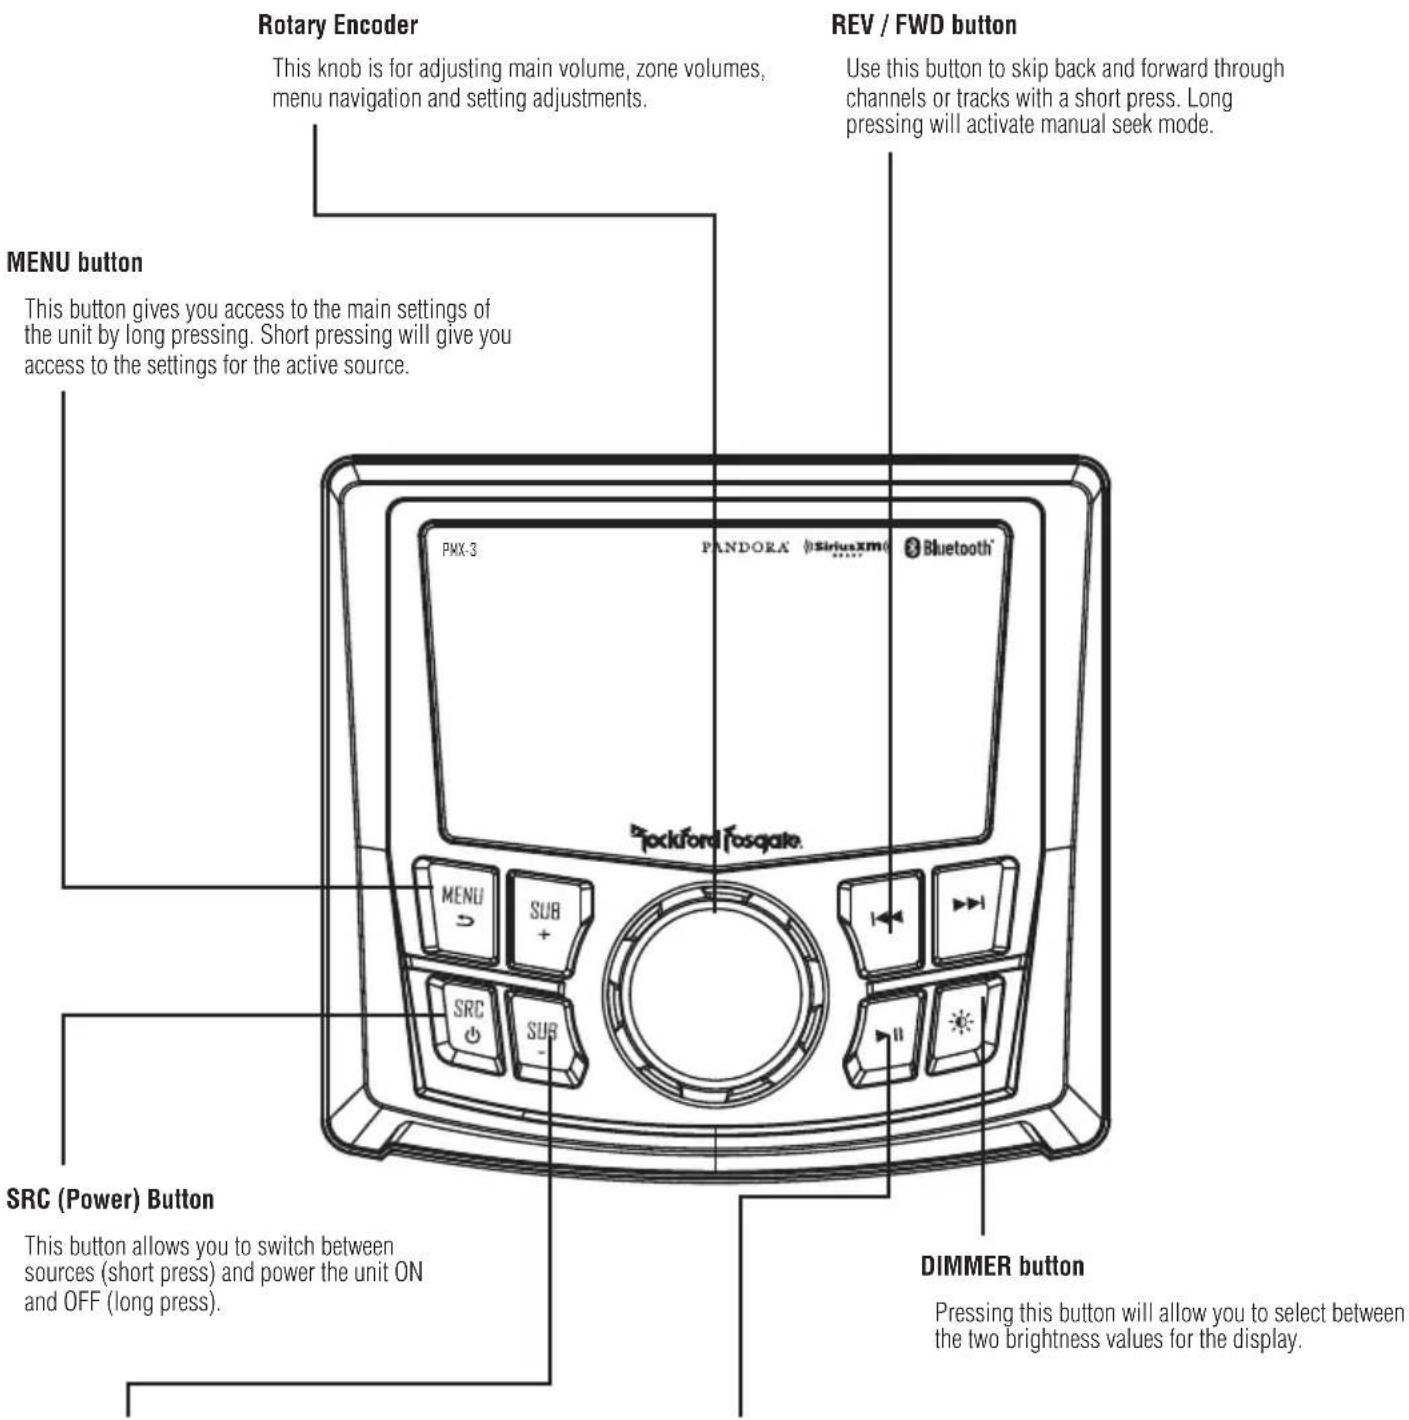
Fig.1
SUB Buttons
These buttons allow you to adjust the subwoofer output or rear line out UP or DOWN (0-20).
PLAY / PAUSE button
Press this button to play or pause your music. This button also acts as a MUTE when the source is in AUX & TUNER mode.
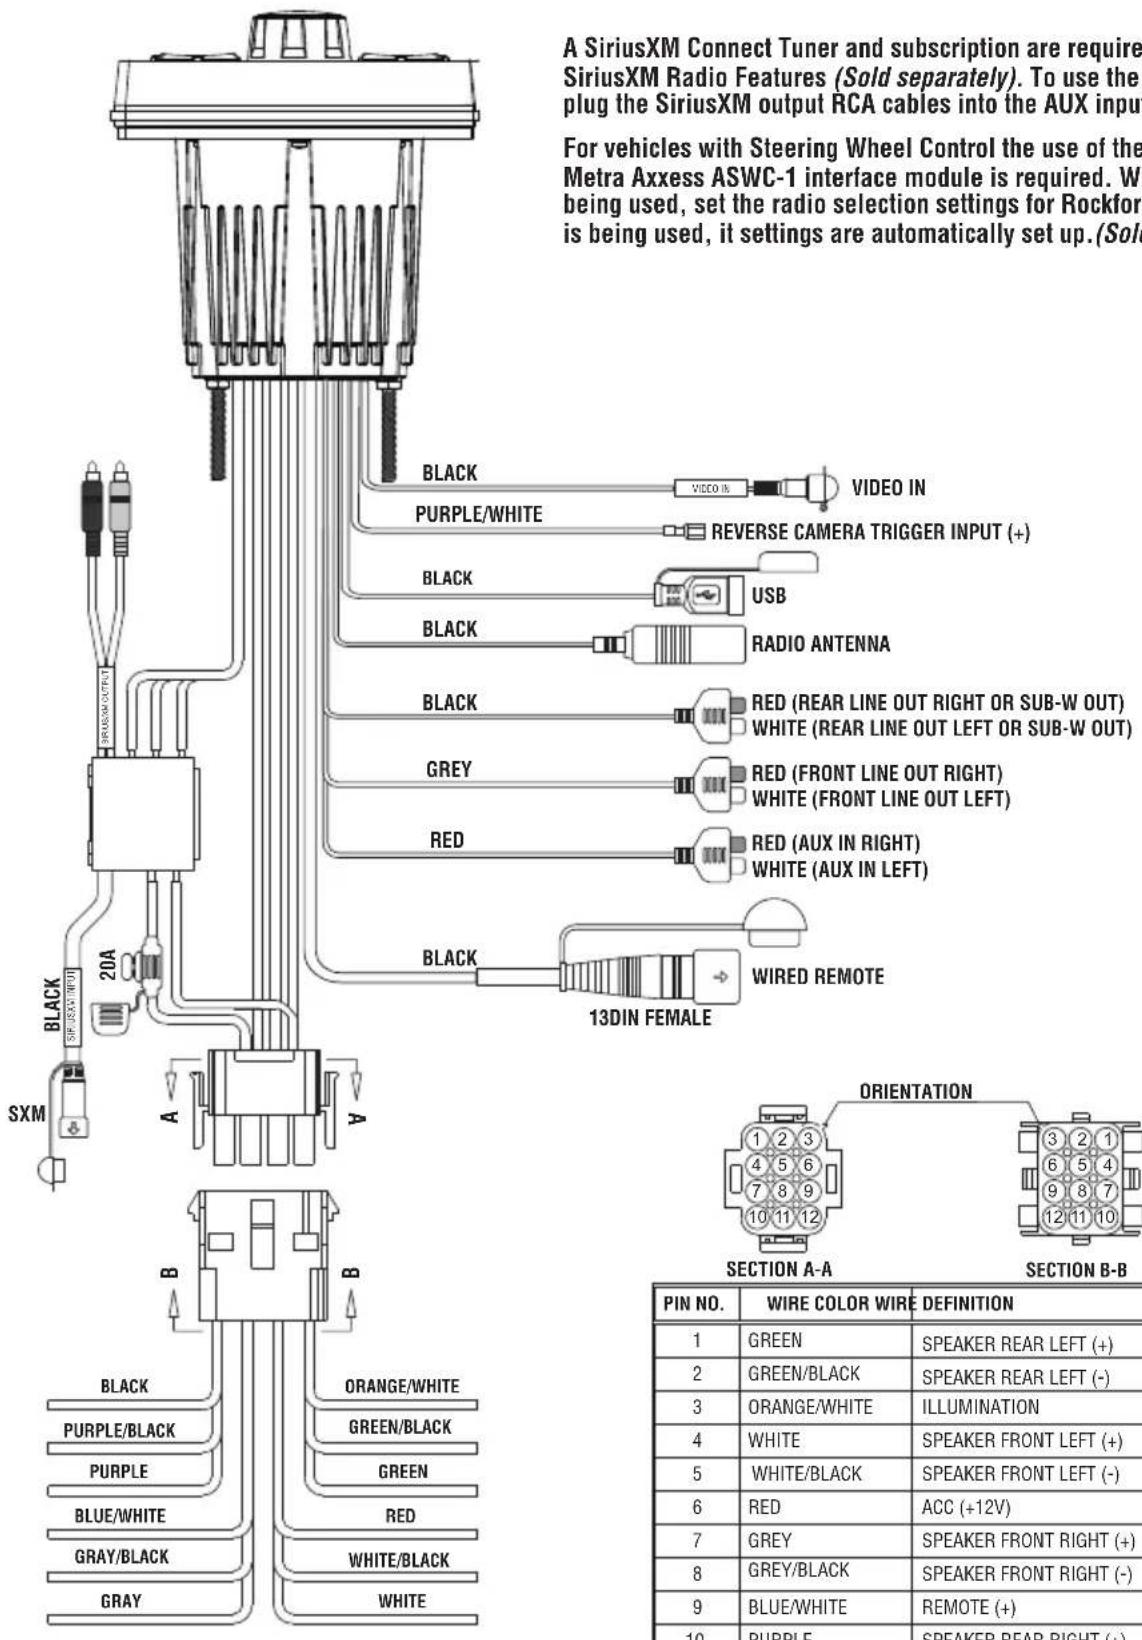
A SiriusXM Connect Tuner and subscription are required to access SiriusXM Radio Features (Sold separately). To use the SiriusXM feature, plug the SiriusXM output RCA cables into the AUX input RCA.
For vehicles with Steering Wheel Control the use of the PAC SWI-RC or Metra Axxess ASWC-1 interface module is required. When the PAC unit is being used, set the radio selection settings for Rockford. If the Metra unit is being used, it settings are automatically set up.(Sold separately)

Fig. 2
| PIN NO. | WIRE COLOR WIRE | DEFINITION | AWG |
| 1 | GREEN | SPEAKER REAR LEFT (+) | 20 |
| 2 | GREEN/BLACK | SPEAKER REAR LEFT (-) | 20 |
| 3 | ORANGE/WHITE | ILLUMINATION | 20 |
| 4 | WHITE | SPEAKER FRONT LEFT (+) | 20 |
| 5 | WHITE/BLACK | SPEAKER FRONT LEFT (-) | 20 |
| 6 | RED | ACC (+12V) | 16 |
| 7 | GREY | SPEAKER FRONT RIGHT (+) | 20 |
| 8 | GREY/BLACK | SPEAKER FRONT RIGHT (-) | 20 |
| 9 | BLUE/WHITE | REMOTE (+) | 20 |
| 10 | PURPLE | SPEAKER REAR RIGHT (+) | 20 |
| 11 | PURPLE/BLACK | SPEAKER REAR RIGHT (-) | 20 |
| 12 | BLACK GROUND (-) | 16 |
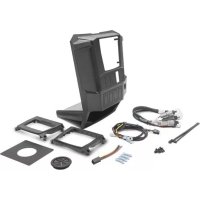
Contents
-
Source Unit
-
Screws
-
Trim Bezel
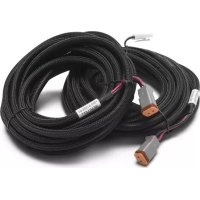
Power / Speaker Harness
-
Mounting Plate
-
Installation & Operation Manual
U Bracket
Installation Considerations
The following is a basic list of tools needed for installation:
Volt/Ohm meter
- Heat shrink tubing
Wire strippers
- Soldering iron
Wire crimpers
Solder
- Wire cutters
- Heat gun
- #2 Phillips screwdriver
- 7mm wrench
Battery post wrench
- Hand held drill w/ assorted bits
This section focuses on some of the vehicle considerations for installing your new source unit. Pre-planning your system layout and best wiring routes will save installation time. When deciding on the layout of your new system, be sure that each component will be easily accessible for making adjustments.
If you feel unsure about installing this system yourself, have it installed by a qualified Rockford Audio technician.
Before installation, disconnect the battery negative (-) terminal to prevent damage to the unit, fire and/or possible injury.
Before beginning any installation, follow these simple rules:
- Be sure to carefully read and understand the instructions before attempting to install the unit.
- For safety, disconnect the negative lead from the battery prior to beginning the installation.
- For easier assembly, we suggest you run all wires prior to mounting your unit in place.
- Route all of the RCA cables close together and away from any high current wires.
- Use high quality connectors for a reliable installation and to minimize signal or power loss.
- Think before you drill! Be careful not to cut or drill into gas tanks, fuel lines, brake or hydraulic lines, vacuum lines or electrical wiring when working on any vehicle.
- Never run wires underneath the vehicle. Running the wires inside the vehicle provides the best protection.
- Avoid running wires over or through sharp edges. Use rubber or plastic grommets to protect any wires routed through metal, especially the firewall.
- ALWAYS protect the battery and electrical system from damage with proper fusing. Install the appropriate fuse holder and fuse on the +12V power wire within 18^ (45.7 cm) of the battery terminal.
- When grounding to the chassis of the vehicle, scrape all paint from the metal to ensure a good, clean ground connection. Grounding connections should be as short as possible and always be connected to metal that is welded to the main body, or chassis, of the vehicle. Seatbelt bolts should never be used for connecting to ground.
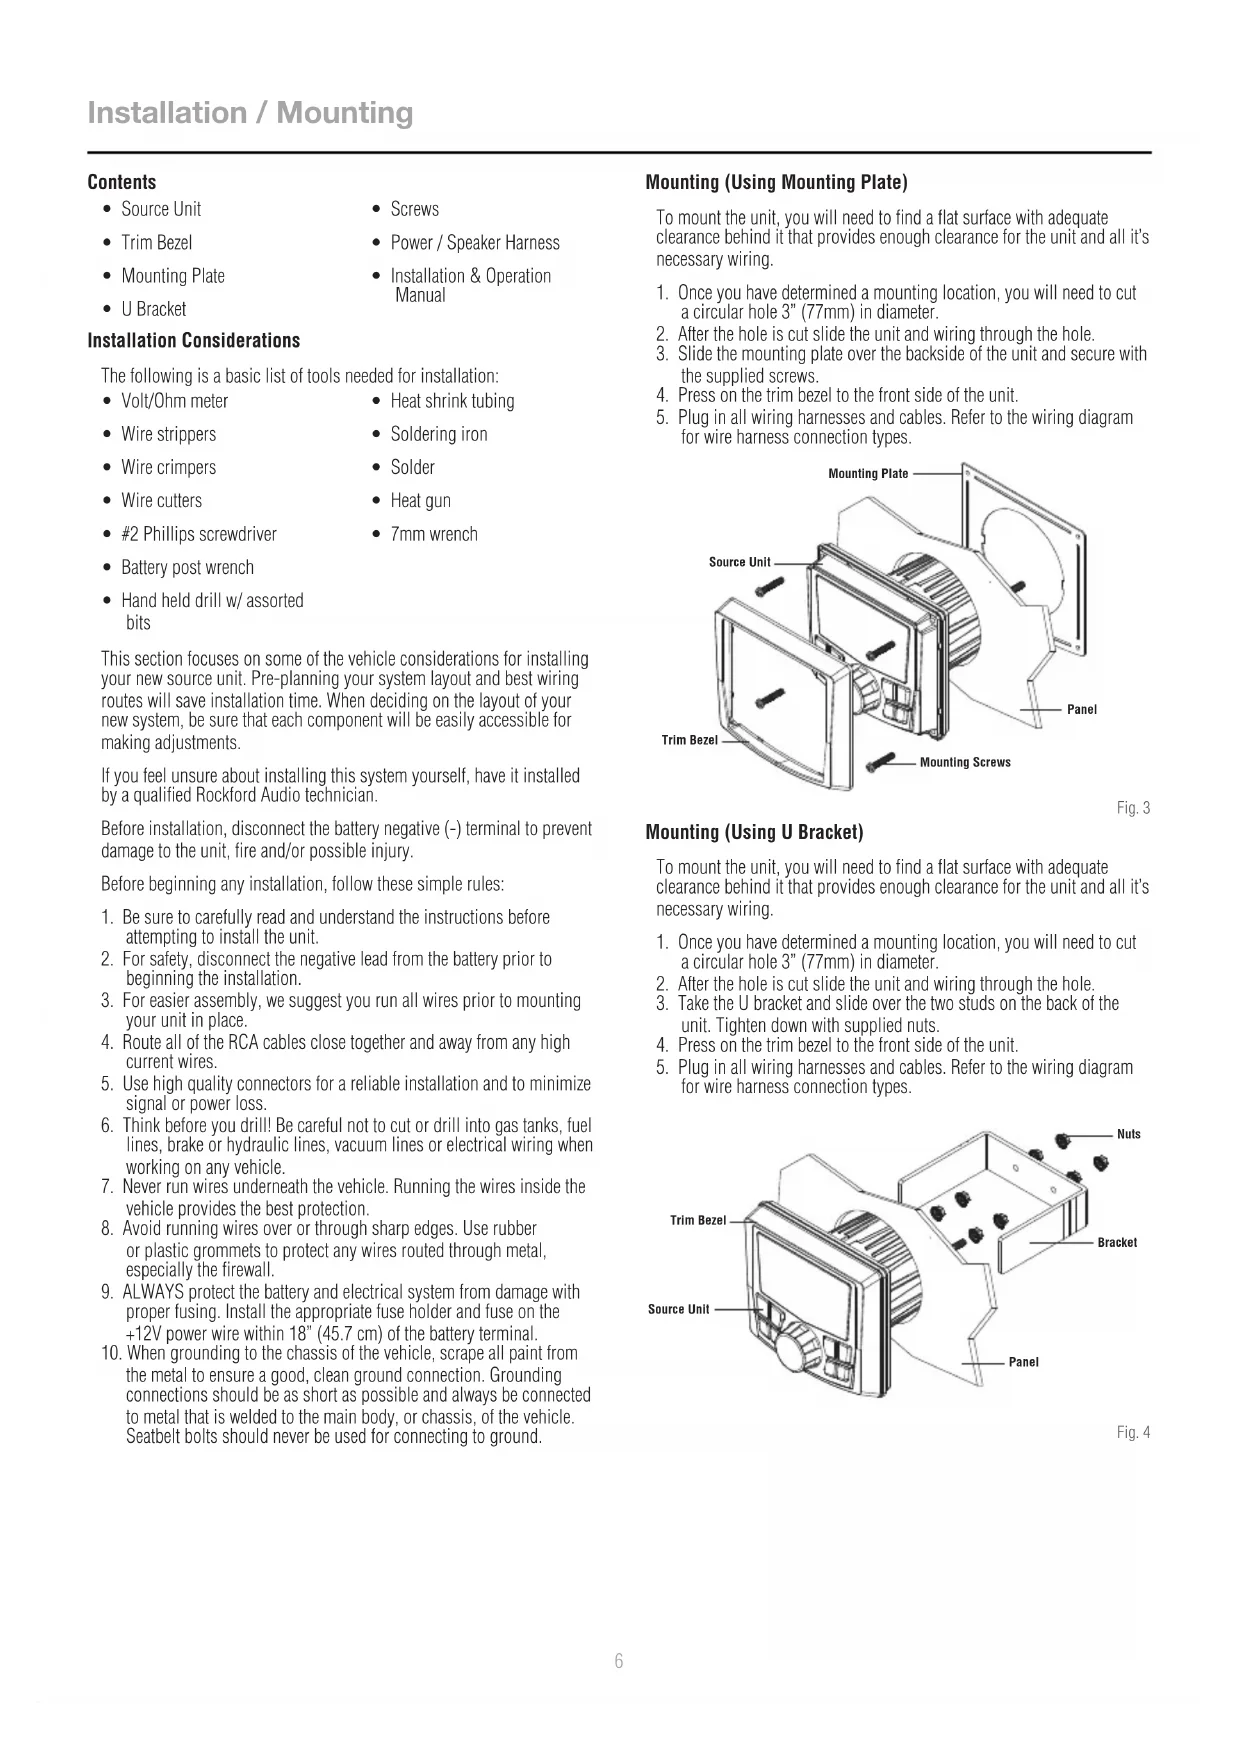
Mounting (Using Mounting Plate)
To mount the unit, you will need to find a flat surface with adequate clearance behind it that provides enough clearance for the unit and all it's necessary wiring.
- Once you have determined a mounting location, you will need to cut a circular hole 3^ (77mm) in diameter.
- After the hole is cut slide the unit and wiring through the hole.
- Slide the mounting plate over the backside of the unit and secure with the supplied screws.
- Press on the trim bezel to the front side of the unit.
- Plug in all wiring harnesses and cables. Refer to the wiring diagram for wire harness connection types.
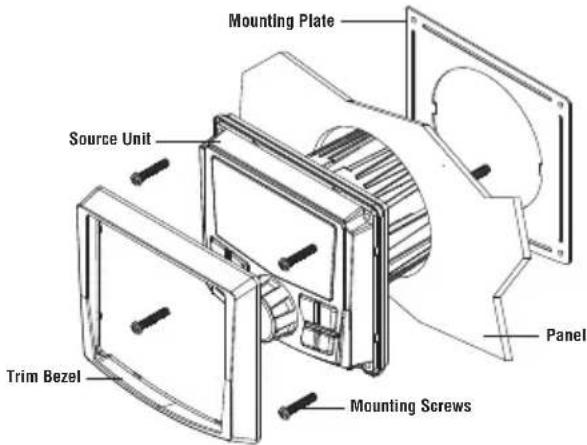
Fig. 3
Mounting (Using U Bracket)
To mount the unit, you will need to find a flat surface with adequate clearance behind it that provides enough clearance for the unit and all it's necessary wiring.
- Once you have determined a mounting location, you will need to cut a circular hole 3" (77mm) in diameter.
- After the hole is cut slide the unit and wiring through the hole.
- Take the U bracket and slide over the two studs on the back of the unit. Tighten down with supplied nuts.
- Press on the trim bezel to the front side of the unit.
- Plug in all wiring harnesses and cables. Refer to the wiring diagram for wire harness connection types.
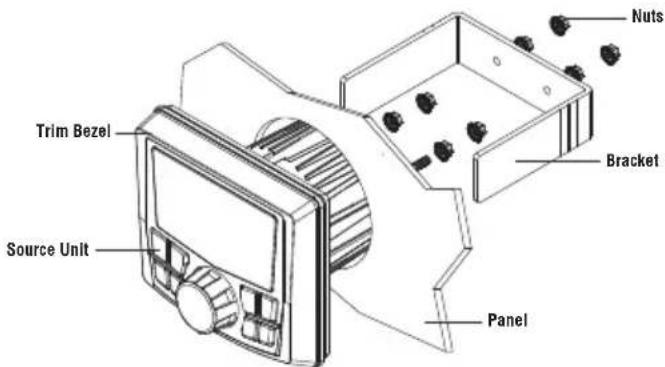
Fig. 4
| SETTING | |
| BALANCE | > |
| FADE | > |
| AUDIO | > |
| VOLTAGE GAUGE | 11V |
| BT DEVICE PAIRING | > |
Source Unit Settings
To access the source unit's settings, long press the MENU button until the options appear. Rotate the encoder to scroll through the list of settings and short press the encoder button to select the setting you wish to change. (BALANCE>FADER>AUDIO>VOLTAGE GAUGE>BT PAIRING>BEEP>TUNER REGION>SOFTWARE>FACTORY DEFAULT)
This source unit has a zero current draw when turned off. All of your settings and presets will be saved along with your boat's battery during storage.
BALANCE
Short press the encoder button to access BALANCE adjustment settings. Rotate the encoder button to set output BALANCE.
FADER
Short press the encoder button to access FADER adjustment settings. Rotate the encoder button to set output FADER.
AUDIO
To access the AUDIO settings, short press the AUDIO option from the MENU screen. Rotate the encoder to scroll through the list of settings and short press the encoder button to select the setting you wish to change. (7 BAND EQ>CROSSOVER>PEQ>REAR RCA>AUX INPUT>SOURCE GAIN>INTERNAL AMPLIFIER)
7 BAND EQ
Short press the encoder button to access the 7 BAND EQ settings. Use the rotary encoder to scroll through the EQ settings. (FLAT > ROCK > CLASSIC > ACQUSTIC > DANCE > ELECTRONIC > HIP-HOP > CUSTOM) When setting up the CUSTOM EQ, short press the encoder button to set the first frequency. Once active, rotate the encoder to adjust the frequency settings. Short press encoder button again to access the next frequency. Repeat until all EQ settings are complete. Short press the MENU button to exit and go back up one level.
CROSSOVER
Short press to access the CROSSOVER settings. Use the rotary encoder to select the crossover zone options (FRONT>REAR>SUB). Short press the encoder to adjust the frequency of the crossover (60Hz > 80Hz > 120Hz > APF) . Short press MENU to exit and go back up one level.
REAR RCA
Short press to access the REAR RCA options. Use the rotary encoder to select options (LINE OUT>SUBWOOFER).
PUNCH EQ
Short press to access the PUNCH EQ settings. Use the rotary encoder to adjust the gain output (0-12). Short press MENU to exit and go back up one level.
Punch EQ is an onboard equalizer with up to +18dB @ 45Hz and/or up to +12dB boost at 12.5kHz
AUX INPUT
RENAME - To rename AUX, short press the encoder button to set the first letter of the new name. Once active, rotate encoder to adjust letters. Short press the encoder button again to set the next letter. Repeat until AUX has been renamed. Short press MENU to exit and go back up one level.
ENABLE - The PMX-3 comes with SXM enabled, to change to AUX you will need to short press the encoder button to access options. Rotate the encoder button to select AUX instead of SXM. (SXM > AUX)
SOURCE GAIN
To adjust the level of device input gain, scroll through the inputs (FM TUNER>AM TUNER>WB TUNER>USB>AUX>BLUETOOTH>PANDORA) to the device you want to adjust, short press the encoder button to access the gain settings. Rotate the encoder button to set the level of gain. (-3dB > -2dB > -1dB > 0dB > +1dB > +2dB > +3dB)
INTERNAL AMPLIFIER
Short press to access the INTERNAL AMPLIFIER options. Use the rotary encoder to select options (ON>OFF). When using an amplifier to power your speakers, select OFF. If you are powering your speakers directly from the source unit, select the INTERNAL AMPLIFIER to ON.
VOLTAGE GAUGE
To display the vehicle voltage, short press the encoder button on the VOLTAGE GAUGE option.
BT DEVICE PAIRING
Short press the encoder button to access options (DISCOVERABLE > DEVICE).
DISCOVERABLE
Rotate the encoder button to select if unit is discoverable for pairing. (ENABLE > DISABLE) Once enabled, the source unit is now discoverable and ready for pairing to your device. Open the Bluetooth settings on your device to find the source unit labeled "Rockford PMX" and select.
DEVICE
Selecting DEVICE by short pressing the encoder button will allow you to rename the source unit with up to 16 characters. This gives you the ability to have a unique name for easy identification during device pairing. Short press the encoder button to select the letter to be changed and rotate the knob to change the value. Repeat process until desired name is reached.
BEEP
Short press the encoder button to access the BEEP options. Rotate the encoder button to turn system beep ON/OFF.
TUNER REGION
To adjust, short press the encoder button to access. Rotate the encoder button to select the TUNER REGION of your preference. (EUROPE > USA > RUSSIA > LATIN > ASIA > JAPAN > MIDEAST > AUSTRALIA)
SOFTWARE
VERSION - Short press the encoder button to display the current firmware version of the unit.
UPDATE - Short press the encoder button to update the firmware. Follow the instructions on the screen when updating.
THEME
To adjust the THEMEShort press the encoder to access the feature. Rotate the encoder button to select the desired THEMES DAY, NIGHT, AUTO)
FACTORY DEFAULT
AUDIO - Short press the encoder button to access. Rotate the encoder button to select YES/NO. Selecting YES will reset your unit back to factory default settings.
SYSTEM - Short press the encoder button to access. Rotate the encoder button to select YES/NO. Selecting YES will reset your unit back to factory default settings.
NOTE: Resetting the SYSTEM settings will also reset any SiriusXM user data.
Basic Operation
Long press the SRC (Power) button to turn the unit ON or OFF
ADJUSTING THE VOLUME
Rotate encoder knob left or right to desired volume level (0-40). The current volume level will be displayed during adjustment.
ADJUSTING THE SUBWOOFER OUTPUT
Press the SUB + or SUB- buttons to adjust the output level (0-20).
Short press the SCREEN BRIGHTNESS button to adjust the brightness level. There are two brightness levels.
SELECTING A SOURCE TO PLAY
Short press the SRC button to show the different source options (FM TUNER>AM TUNER>WB TUNER>USB>AUX>BLUETOOTH>PANDORA>S IRIUSXM). Use the rotary encoder or short press the SRC button to scroll through sources.

Tuner Operation (FM/AM/WB)
To operate, use the rotary encoder to select the tuner source you want to listen to (FM>AM>WB).
To AUTO SEEK stations, short press the FWD and REV buttons. To MANUAL SEEK stations, long press the FWD and REV buttons to tune to the desired frequency.
To MUTE the TUNER, short press the PLAY/PAUSE button.
FM BAND SETTINGS
To access the FM BAND SETTINGS, short press the MENU when using the FM TUNER source. This will give you access to the settings specific to the FM TUNER (FM>PRESETS>ADD PRESETS>REMOVE PRESETS>AUTO STORE>LOCAL).
PRESETS
Short press the encoder button to access the PRESETS list. Using this feature allows you to see what PRESETS are saved on the unit.
ADD PRESETS
Short press the encoder button on the ADD PRESETS option. You will need to be on both the station and PRESET group you want to add first (FM1 > FM2 > FM3) . Using this feature allows you to save stations to the unit.Once selected, use the rotary encoder to select the PRESET number (1-6) you want the station saved to.
REMOVE PRESETS
Short press the encoder button on the REMOVE PRESETS option. You will need to be under the PRESET group you want to adjust first (FM1>FM2>FM3). Using this feature allows you to remove saved stations on the unit. Once selected, use the rotary encoder to select the PRESET number (1-6) of the station you want removed.
FM
Short press the encoder button to access the FM PRESET options (FM1>FM2>FM3). Using this feature allows you to have separate tuner preset groups to choose from. Use the rotary encoder button to scroll through the TUNER groups and short press to select the group.
AUTO STORE
Short press the encoder button to access the AUTO STORE function. You will need to be under the PRESET group you want to adjust first (FM1>FM2>FM3). This feature automatically stores presets on the unit. It will stop when presets 1-6 are set. Select the next PRESET group and repeat to fill next set.
LOCAL
Short press the encoder button to access the LOCAL options. Once selected, use the rotary encoder to select ON or OFF. The local option tunes to nearby radio stations with sufficiently strong signals for good reception. In areas where reception is poor, switching to distance tuning enables the unit to tune in to more distant stations. Distance tuning is the default.
AM BAND SETTINGS
To access the AM BAND SETTINGS, short press the MENU when using the AM TUNER source. This will give you access to the settings specific to the AM TUNER (AM>PRESETS>ADD PRESETS>REMOVE PRESETS>AUTO STORE>LOCAL).
PRESETS
Short press the encoder button to access the PRESETS list. Using this feature allows you to see what PRESETS are saved on the unit.
ADD PRESETS
Short press the encoder button on the ADD PRESETS option. You will need to be on both the station and PRESET group you want to add first (AM1 > AM2) . Using this feature allows you to save stations to the unit. Once selected, use the rotary encoder to select the PRESET number (1-6) you want the station saved to.
REMOVE PRESETS
Short press the encoder button on the REMOVE PRESETS option. You will need to be under the PRESET group you want to adjust first (AM1>AM2). Using this feature allows you to remove saved stations on the unit. Once selected, use the rotary encoder to select the PRESET number (1-6) of the station you want removed.
AM
Short press the encoder button to access the FM PRESET options (AM1>AM2). Using this feature allows you to have separate tuner preset groups to choose from. Use the rotary encoder button to scroll through the TUNER groups and short press to select the group.
AUTO STORE
Short press the encoder button to access the AUTO STORE function. You will need to be under the PRESET group you want to adjust first (AM1>AM2). This feature automatically stores presets on the unit. It will stop when presets 1-6 are set. Select the next PRESET group and repeat to fill next set.
LOCAL
Short press the encoder button to access the LOCAL options. Once selected, use the rotary encoder to select ON or OFF. The local option tunes to nearby radio stations with sufficiently strong signals for good reception. In areas where reception is poor, switching to distance tuning enables the unit to tune in to more distant stations. Distance tuning is the default.
WB BAND SETTINGS
To access the WB BAND SETTINGS, short press the MENU when using the WB TUNER source. This will give you access to the settings specific to the WB TUNER (PRESETS>ADD PRESETS>REMOVE PRESETS).
PRESETS
Short press the encoder button to access the PRESETS list. Using this feature allows you to see what PRESETS are saved on the unit.
ADD PRESETS
Short press the encoder button on the ADD PRESETS option. You will need to be on both the station you want to add first. Using this feature allows you to save stations to the unit. Once selected, use the rotary encoder to select the PRESET number (1-6) you want the station saved to.
REMOVE PRESETS
Short press the encoder button on the REMOVE PRESETS option. You will need to be under the PRESET group you want to adjust first (AM1>AM2). Using this feature allows you to remove saved stations on the unit. Once selected, use the rotary encoder to select the PRESET number (1-6) of the station you want removed.

USB (iPod) Operation
After your device is connected to the source unit, this feature allows you to control playback from your device directly from the unit. Select the USB source option on the source unit.
To play or pause a song, short press the PLAY/PAUSE button.
To skip a track forward, short press the FWD button. To skip a track backwards, short press the REV button.
To access USB specific settings, short press the MENU button for the list of settings (BROWSER>REPEAT>SHUFFLE). Use the encoder to select the option to change.
BROWSER
Short press the encoder button to access the BROWSER options (PLAY LISTS>ARTISTS>ALBUMS>GENRES>SONGS>COMPOSERS>AUDIOBO OKS>PODCASTS). Using this feature allows you to search for tracks or songs by different types of categories.
REPEAT
Short press the encoder button to access the REPEAT feature options (OFF>ONE>ALL).
SHUFFLE
Short press the encoder button to access the SHUFFLE feature options (OFF>ALL). This feature allows you to set your preference on shuffling tracks or songs.
NOTE: When using a USB extension cable, it must be a Rockford Fosgate powered extension cable. The maximum distance for the cable is 33 feet (10 meters).
AUX Operation
After your device is plugged into the source unit, this feature allows you to play music from your device. Select the AUX source option on the source unit and use your plugged in device to control song/track selection, play/pause and track skip FWD/REV.
Note: AUX is not ON from default, to turn on AUX feature see page 7 for ENABLE AUX INPUT
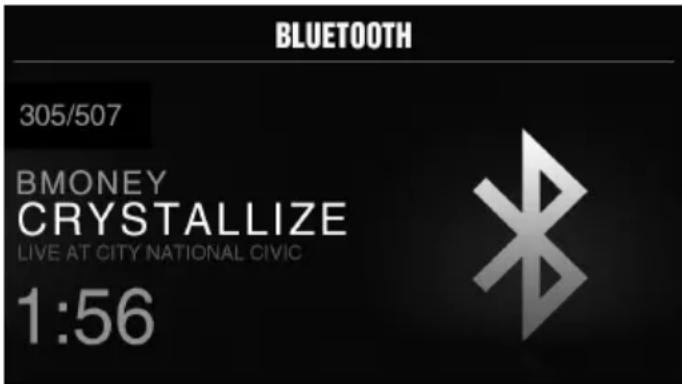
Bluetooth® Operation
After your device is paired to the source unit, this feature allows you to control playback from your device directly from the unit. Select the BLUETOOTH source option on the source unit.
To play or pause a song, short press the PLAY/PAUSE button.
To skip a track forward, short press the FWD button. To skip a track backwards, short press the REV button.
To access BLUETOOTH specific settings, short press the MENU button for the list of settings (BROWSER>REPEAT>SHUFFLE). Use the encoder to select the option to change.
BROWSER
Short press the encoder button to access the BROWSER options (PLAY LISTS>ARTISTS>ALBUMS>GENRES>SONGS>COMPOSERS>AUDIOBO OKS>PODCASTS). Using this feature allows you to search for tracks or songs by different types of categories.
REPEAT
Short press the encoder button to access the REPEAT feature options (OFF>ONE>ALL). This feature allows you to set your preference on the amount of times a track or song will repeat.
SHUFFLE
Short press the encoder button to access the SHUFFLE feature options (OFF>ALL). This feature allows you to set your preference on shuffling tracks or songs.

Pandora®
This feature allows you to control the Pandora® app from the source unit directly (Android users will have to use Bluetooth only, iOS users can use both USB and Bluetooth). You will need to start the Pandora® app on your device first, then select the Pandora® source option on the source unit. To use the "Thumbs Up" feature, long press the SUB+ button. To use the "Thumbs down" feature, long press the SUB - button.
To play or pause a song, short press the PLAY/PAUSE button.
To skip a track forward, short press the FWD button.
To access Pandora specific settings, short press the MENU button for the list of settings (STATIONS>BOOKMARKS>STATIONS MANAGE). Use the encoder to select the option to change.
STATIONS
To adjust, short press the encoder button to access. Rotate the encoder button to select your options (SHUFFLE>SORT DATE/A-Z>STATIONS). Selecting the SHUFFLE option will shuffle your stations and selecting the SORT feature will sort your stations by date added or alphabetically. You can also select your saved stations directly from this list.
BOOKMARKS
To BOOKMARK an artist or track that is playing, short press the encoder button to display your BOOKMARK options (ARTIST>TRACK). Select the option you wish to use for bookmarking.
STATIONS MANAGE
To create stations, short press the encoder button to display your STATION MANAGE options (CREATE FROM ARTIST> CREATE FROM TRACK> CREATE FROM GENRE>DELETE). Selecting the CREATE FROM ARTIST OPTION allows you to create a station from the artist that you are currently listening to. CREATE FROM TRACK works similarly by creating a station from the current track being played. If you create a station by selecting CREATE FROM GENRE, this will give you music genres to select from to create your station. Selecting DELETE will delete the now playing station.
Pandora, the Pandora logo, and the Pandora trade dress are trademarks or registered trademarks of Pandora Media, Inc. Used with permission. Pandora is only available in certain countries. Please visit http://www.pandora.com/legal for more information.
SiriusXM
Only SiriusXM® brings you more of what you love to listen to, all in one place. Get over 140 channels, including commercial-free music plus the best sports, news, talk, comedy and entertainment. Welcome to the world of satellite radio. A SiriusXM Connect Tuner and Subscription are required. For more information, visit www.siriusxm.com
ACTIVATING YOUR SiriusXM SUBSCRIPTION
After installing your SiriusXM Connect Tuner and antenna, power on your source unit and select SiriusXM mode. You should be able to hear the SiriusXM Preview channel on Channel 1. If you cannot hear the preview channels, please check the installation instructions to make sure your SiriusXM Connect tuner is properly installed.
After you can hear the Preview channel, tune to Channel 0 to find the Radio ID of your tuner. In addition, the Radio ID is located on the bottom of the SiriusXM Connect Tuner and its packaging. You will need this number to activate your subscription. Write the number down for reference.
Note: the SiriusXM Radio ID does not include the letters I, O, S or F.
In the USA, you can activate online or by calling SiriusXM Listener care:
- Visit www.siriusxm.com/activatenow
- Call SiriusXM Listener Care at 1-866-635-2349
For Canadian Subscriptions, please contact:
- Visit www.siriusxm.ca/activatemx
Call XM Customer Care at 1-877-438-9677
As part of the activation process, the SiriusXM satellites will send an activation message to your tuner. When your radio detects that the tuner has received the activation message, your radio will display: "Subscription Updated". Once subscribed, you can tune to channels in your subscription plan. Note, the activation process usually takes 10 to 15 minutes, but may take up to an hour. Your radio will need to be powered on and receiving the SiriusXM signal to receive the activation message.
SETTINGS
To access the SiriusXM SETTINGS, short press the MENU when using the SiriusXM source. This will give you access to the settings specific to SiriusXM (SXM>PRESETS>ADD PRESETS>REMOVE PRESETS>CHANNELS>CATEGORY).
SiriusXM PRESET BANDS (SXM)
Short press the encoder button to access the SiriusXM PRESET options (SXM1>SXM2>SXM3). Using this feature allows you to have separate satellite preset groups to choose from. Use the FWD and REV buttons to scroll through the TUNER groups.
PRESETS
Short press the encoder button to access the PRESETS list. Using this feature allows you to see what PRESETS are saved on the unit.
ADD PRESETS
Short press the encoder button on the ADD PRESETS option. You will need to be on both the channel and PRESET group you want to add first (SXM1>SXM2>SXM3). Using this feature allows you to save channels to the unit. Once selected, use the rotary encoder to select the PRESET number (1-6) you want the channel saved to.
REMOVE PRESETS
Short press the encoder button on the REMOVE PRESETS option. You will need to be under the PRESET group you want to adjust first (SXM1>SXM2>SXM3). Using this feature allows you to remove saved channels on the unit. Once selected, use the rotary encoder to select the PRESET number (1-6) of the channel you want removed.
CHANNEL
Short press the encoder button on the CHANNEL option to select this feature. This feature displays a complete listing of channels.
CATEGORY
Short press the encoder button on the CATEGORY option to select this feature. This feature allows you to search channels based on their CATEGORY type.
DIRECT TUNING
Short press the encoder button on the DIRECT TUNING option to select this feature. This feature allows you to directly tune to a channel if you already know the channel number. Rotate the encoder until you reach the desired numeral and press to enter your selection. Repeat until the channel number is completed.
PARENTAL CONTROLS
Short press the encoder button on the PARENTAL CONTROL option to select this feature. This feature allows you to easily lock and unlock channels with mature content. To turn this feature on, short press the encoder on PARENTAL CONTROLS to select. You will be asked to enter a code to activate it. Enter "1111" for your code. Once the code is entered correctly, this will give you access to the PARENTAL CONTROL features (LOCK CHANNELS>CHANGE MY CODE). Use the encoder knob to scroll through the options and short press to select.
LOCK CHANNELS
Short press the encoder button on the LOCK CHANNELS option to select this feature. This feature allows you to select certain channels to be locked out for listening. When trying to listen to locked channels, you will need to enter the correct code to listen to them. Use the rotary encoder to input code.
CHANGE MY CODE
Short press the encoder button on the CHANGE MY CODE option to reset the PARENTAL CONTROL code. Use the rotary encoder to input the code.
Camera Operation
This feature allows you to connect an external camera and view it through the PMX-3. A reverse trigger is provided to activate the camera when putting the vehicle in reverse or you may select the camera from the source menu.
Symptom Diagnosis Remedy
| Basic | ||
| Source unit does not turn on. | Blown fuse Check fuse of the unit, replace with correct rating. | |
| Vehicle's ignition is off | If connected following the instructions, the unit will not operate with ignition off. | |
| Voltage applied to Red wire is not between 10.5 & 16 volts or there is no voltage present | Check battery, connections and fuses and repair or replace as necessary. If voltage is above +16 volts, have the electrical system inspected by an authorized service center. | |
| Unit is not properly grounded Check wiring and repair as necessary. | ||
| Radio Tuner | ||
| Tuner fails to tune any stations | No antenna or disconnected or open connection in cable | Check all connections and repair as necessary. |
| Unable to tune stations in seek mode | You are in a weak signal area Make sure the tuner LOC mode is off. | |
| USB Devices | ||
| USB device cannot be inserted | The USB device has been inserted in the wrong direction | Reversing the connection direction of the USB device, try reinserting. |
| The USB device connector is broken Replace with a new USB device. | ||
| USB device is not recognized | The USB device is damaged | Disconnect USB device and reconnect. If the device is still not recognized, try replacing with a different USB device. USB does not work with Android devices. |
| Connectors are loose | ||
| No sound heard with the display "No File" shown | No MP3/WMA files are stored on the USB device | Store these files properly on the USB device. USB does not work with Android devices. |
| Sound skips or is noisy | MP3/WMA files are not created properly | Use MP3/WMA files that are encoded correctly. |
| AUX | ||
| MP3 is not playing back | Writing error occurred. The MP3 format is not compatible. | Make sure MP3 has been written in a supported format |
| SiriusXM | ||
| Check Antenna | The radio has detected a fault with the SiriusXM antenna. The antenna cable may be either disconnected or damaged. | Verify that the antenna cable is connected to the SiriusXM Connect TunerInspect the antenna cable for damage and kinks. Replace the antenna if the cable is damaged.SiriusXM products are available at your local car audio retailer or online at www.shop.siriusxm.com |
| Check Tuner | The radio is having difficulty communicating with the SiriusXM Connect Tuner. The tuner may be disconnected or damaged. | Verify that the SiriusXM Connect Tuner cable is securely connected to the radio |
| No Signal | The SiriusXM Connect Tuner is having difficulty receiving the SiriusXM satellite signal. | Verify that your vehicle is outdoors with a clear view of the sky.Verify that the SiriusXM magnetic mount antenna is mounted on a metal surface on the outside of the vehicle.Move the SiriusXM antenna away from any obstructions.Inspect the antenna cable for damage and kinks.Consult the SiriusXM Connect Tuner installation manual for more information on antenna installation. Replace the antenna if the cable is damaged. SiriusXM products are available at your local car audio retailer or online at www.shop.siriusxm.com. |
| Subscription Updated | The radio has detected a change in your SiriusXM subscription status. Press the encoder button to clear the message. | In the U.S.A., visit www.siriusxm.com or call 1-866-635-2349 if you have questions about your subscription. In Canada, visit www.siriusxm.ca or call 1-877-438-9677 if you have questions about your subscription. |
| Channel Not Available | The channel that you have requested is not a valid SiriusXM channel or the channel that you were listening to is no longer available. You may also see this message briefly when first connecting a new SiriusXM Connect Tuner. | Visit www.siriusxm.com for more information about the SiriusXM channel lineup. |
| Channel Not Subscribed | The channel that you have requested is not included in your SiriusXM subscription package or the channel that you were listening to is no longer included in your SiriusXM subscription package. | In the U.S.A., visit www.siriusxm.com or call 1-866-635-2349 if you have questions about your subscription package or would like to subscribe to this channel. In Canada, visit www.siriusxm.ca or call 1-877-438-9677. |
| Channel Locked | The channel that you have requested is Locked by the radio Parental Control feature. | See page 10 for more information on the Parental Control feature and how to access locked channels. |
\section*{CharACTERISTiques de conception (Fig. 1)}
Encodeur rotatif
Bouton SRC (Alimentation)
SETTINGS (IMPOSTAZIONI)
LOCK CHANNELS (BLOCCA CANALI)
Rockford Corporation offers a limited warranty on Rockford Fosgate products on the following terms:
Length of Warranty
POWER Amplifiers - 2 Years
BMW® Direct Fit Speakers - 2 Years
PUNCH® & PRIME® Amplifiers - 1 Year
Speakers, Signal Processors, Accessories and Capacitors - 1 Year
All marine, motorcycle, motorsport products - 2 Years
Any Factory Refurbished Product - 90 Days (receipt required)
What is Covered
This warranty applies only to Rockford Fosgate products sold to consumers by authorized Rockford Fosgate dealers in the United States of America. Products purchased by consumers from an Authorized Rockford Fosgate Dealer in another country are covered only by that country's Distributor and not by Rockford Corporation.
Who is Covered
This warranty covers only the original purchaser of Rockford product purchased from an authorized Rockford Fosgate dealer in the United States. In order to receive service, the purchaser must provide Rockford with a copy of the receipt stating the customer name, dealer name, product purchased and date of purchase.
Products found to be defective during the warranty period will be repaired or replaced (with a product deemed to be equivalent) at Rockford's discretion.
What is Not Covered
- Damage caused by accident, abuse, improper installation, operations, theft, water (on non-Element Ready products).
- Any cost or expense related to the removal or reinstallation of product.
- Service performed by anyone other than Rockford or an authorized Rockford Fosgate service center.
- Any product which has had the serial number defaced, altered, or removed.
- Subsequent damage to other components.
- Any product purchased outside the U.S.
- Any product not purchased from an authorized Rockford Fosgate dealer. Refer to rockfordfosgate.com dealer locator for more detail.
Limit on Implied Warranties
Any implied warranties including warranties of fitness for use and merchantability are limited in duration to the period of the express warranty set forth above. Some states do not allow limitations on the length of an implied warranty, so this limitation may not apply. No person is authorized to assume for Rockford Fosgate any other liability in connection with the sale of the product.
How to Obtain Service
Please call 1-800-669-9899 for Rockford Customer Service. You must obtain an RA# (Return Authorization number) to return any product to Rockford Fosgate. You are responsible for shipment of product to Rockford.
EU Warranty
This product meets the current EU warranty requirements, see your Authorized dealer for details.