1312 - Coffee machine ARIETE - Free user manual and instructions
Find the device manual for free 1312 ARIETE in PDF.
| Product Type | Coffee machine with integrated bean grinder |
| Brand | Ariete |
| Model | 1312 |
| Power Supply | 220-240 V ~ 50/60 Hz |
| Power | Approx. 1450 W (estimation) |
| Pump Pressure | 15 bar (estimation) |
| Water Tank Capacity | 1.8 L (estimation) |
| Coffee Bean Container Capacity | 250 g (estimation) |
| Dimensions (W x D x H) | Approx. 28 x 40 x 35 cm |
| Weight | Approx. 9 kg |
| Main Functions | Espresso, coffee cream, americano, cappuccino, latte macchiato, flat white, hot milk, tea |
| Type of Coffee Usable | Beans, E.S.E. pods, ground coffee |
| Integrated Grinder | Yes, with grind adjustment (11 levels) |
| Included Filters | Single wall 1 and 2 cups, double wall 1 and 2 cups, filter for pods |
| Frothing System | Swivel steam wand for frothing milk |
| Display | LCD screen with menus, settings, recipes |
| Auto Shut-Off | Yes, after 30 minutes of inactivity |
| Anti-Descaling Function | Integrated descaling program |
| Water Softener Filter | De'Longhi "Walter" filter included |
| Child Safety | Adult supervision recommended for children under 8 |
| Cleaning | Automatic cleaning and descaling cycles, parts washable with water |
| Spare Parts Available | Ariete authorized service centers |
| General Information | Manual available in multiple languages, online support |
Frequently Asked Questions - 1312 ARIETE
User questions about 1312 ARIETE
0 question about this device. Answer the ones you know or ask your own.
Ask a new question about this device
Download the instructions for your Coffee machine in PDF format for free! Find your manual 1312 - ARIETE and take your electronic device back in hand. On this page are published all the documents necessary for the use of your device. 1312 by ARIETE.
USER MANUAL 1312 ARIETE
natural_image
Exterior view of a modern stainless steel coffee maker with digital display and control panel (no visible text or symbols)Macchina da caffè
Coffee maker
Machine à café
Kaffeemaschine
Cafetera
Koffiemachine
Кафетиера
القهوة آلة
Ekspres do kawy
800-809065
-Ariete
Del Longy Appliances Ed
Va 850 Q 12 p. 302
text_image
Labeled diagram of a coffee maker with parts numbered A through M, showing internal components and parts like teapot, tray, and cup.
text_image
Illustration of a coffee machine setup with labeled steps from preparation to finishing, showing step-by-step processing and mixing.
text_image
Fig. 2 Fig. 3 Fig. 4 0,5 L Fig. 5 Fig. 6 Fig. 7
text_image
Fig. 17 Fig. 19 Fig. 18 Fig. 20 Fig. 21 Fig. 22
natural_image
Illustration of a hand placing a small container into a container with a tool (no text or symbols visible)
natural_image
Illustration of a hand using a pressure tool to press a mechanical component (no text or symbols visible)
natural_image
Close-up of a precision machine tool dispensing liquid into a bottle onto a metal tray (no text or symbols visible)Fig. 24 Fig. 23
Fig. 25

natural_image
Illustration of a light bulb and its internal component (no text or symbols)
natural_image
Close-up of a hand cleaning a mechanical component with a circular dial (no text or symbols visible)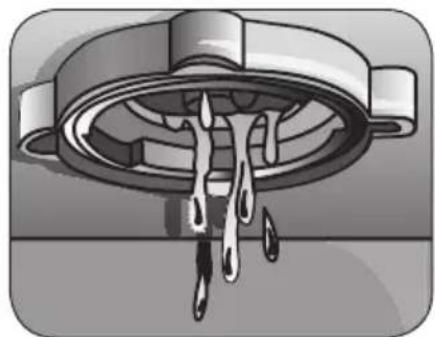
natural_image
Illustration of a mechanical component with liquid dripping through it (no text or symbols)Fig. 28 Fig. 26 F
natural_image
Illustration of a kitchen appliance with a lid and internal components, showing a close-up of the lid mechanism (no text or symbols present)
natural_image
Illustration of a medical procedure involving a tool interacting with a patient's ear canal (no text or symbols visible)Fig. 30
Fig. 29
https://www.ariete.net/assistance.
• CONSERVARE SEMPRE QUESTE ISTRUZIONI
text_image
Select your language Italy UK Germany Spain France Poland Netherlands Greece Saudi Arabiatext_image
Coffee Beverages Milk-Based Beverages Tea Guide and Setting
text_image
Maintenance Guide & Info Settingtext_image
Grinding Amount Size itext_image
Select grinding amount of your Espresso Maximumtext_image
Select size of your Espresso Extra Longtext_image
Grinding Amount Size Froth Amounttext_image
Select size of your Cappuccino Extra Long
text_image
Select froth amount of your Cappuccino Maximum (Suggested)text_image
Grinding Stop
text_image
Brewing Coffee Brewing is in progress Stop
Attenzione!
text_image
Froathing is in progress Stoptext_image
White Tea Green Tea Oolong Tea Black Tea
natural_image
Illustration of a glass cup with a red liquid, displayed in a rounded square frame (no text or symbols on the cup itself)text_image
Save as default Save as MyProfile
text_image
Save as MyProfiletext_image
Place the cleaning disc and tablet into the portafilter. Next
text_image
Clean Cycle Touch to pause or exit to cancel Pause Exittext_image
Descaling Cycle Descaling your MCE34 when prompted ensures a smooth running machine. It takes around 60 mins to complete, you will need a large bowl and descaling solution. Start Dismiss
text_image
Descaling Cycle 2/2 Touch to pause or exit to cancel Pause Exit三
text_image
The system is purging hot water. The steam wand is purging. Start
text_image
Steam Wand Cleaning Touch to pause or exit to cancel Pause ExitDurezza dell'acqua
text_image
Water hardness Test Strip Dip the water hardness test strip into cold water for one second. Next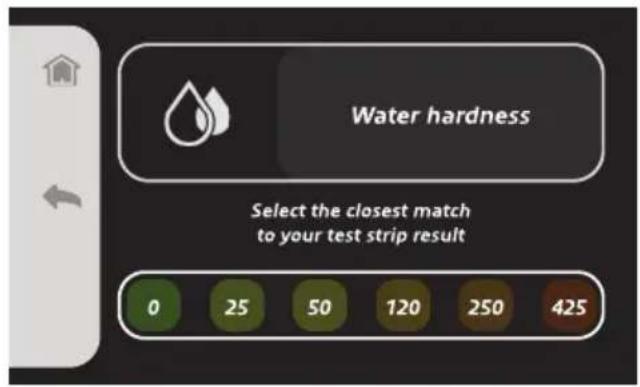
text_image
Water hardness Select the closest match to your test strip result 0 25 50 120 250 425This appliance is made in conformity with appropriate European Regulations in force, to protect the user wherever possible from potential hazards. Even if you are familiar with this type of appliance, carefully read this manual before use. Only use this appliance for the purpose it is designed for in order to prevent accidents and damage. Keep this manual close by for future consultation. If you should decide to give this appliance to other people, remember to also include these instructions.
The information provided in this manual is marked with the following symbols indicating:

Danger for children

Danger due to electricity

Danger of damage originating from other causes

Warning of burns

Warning – material damage
INTENDED USE
The coffee maker (“appliance” from now on) can be used to make coffee beverages, milk-based beverages and tea, through the hot water distribution function.
This appliance must not be used for commercial or industrial purposes.
Any other use of the appliance is not intended by the Manufacturer who does not accept any responsibility for damages of any kind caused by improper use of the appliance itself. Improper use also results in any form of warranty being forfeited.
RESIDUAL RISKS
The constructive characteristics of the appliance, covered by this publication, do not allow to protect the user from direct jet of steam or hot water.

Warning!
Danger of burns. When hot water or steam are dispensed, never direct the jets towards others or towards yourself. Only touch the steam/hot water wand on the rubber part.

Use only containers made of material "for foods".
IMPORTANT SAFEGUARDS
READ THESE INSTRUCTIONS CAREFULLY.
- The appliance is designed for home use or similar, such as:
- in cooking areas used by personnel of shops, offices and other environments
- on farms
- hotels, motels, bed and breakfasts and other types of residential structures (for use by its guests).
- We decline any responsibility resulting from misuse or any use other than those covered in this booklet.
- We suggest you keep the original box and packaging, as our free-of-charge service does not cover any damage resulting from inadequate packaging of the product when this is sent back to an Authorised Service Centre.
⚠️ Danger for children
- This appliance can be used by children aged from 8 years and above and persons with reduced physical, sensory or mental capabilities or lack of experience and knowledge if they have been given supervision or instruction concerning use of the appliance in a safe way and understand the hazards involved.
- Children shall not play with the appliance or its components.
- Cleaning and maintenance by the user must not be carried out by children unless they are older than 8 years and are monitored during the operation.
- Do not leave the packaging near children because it is potentially dangerous.
- Keep the appliance and its cord out of the reach of children aged less than 8 years.
- In the event that this appliance is to be disposed of, it is suggested that the power cord is cut off. It is also recommended that all potentially dangerous components including the power cord are rendered harmless to prevent personal injury. Do not let children play with the appliance or its components.
- Keep the needle for the nozzle cleaning out of the reach of children and store it in a safe place: danger of swallowing and injury.
Danger due to electricity
- Before plugging the appliance into the power supply, check that the voltage shown on the appliance rating plate matches the local voltage supply.
- The use of extensions not approved by the manufacturer can result in damage to property and personal injury.
- If the power cord is damaged, it must be replaced by the manufacturer or its Technical Service Centre or, in any case, by a person with similar expertise, in order to avoid any possible risk.
- Never put live parts into contact with water: It can cause a short circuit!
- Do not immerse the appliance in water or other liquids.
⚠️ Danger of damage originating from other causes
- Do not grasp the water tank or the drip tray to move the appliance. Always grasp the appliance by its body.
- Place the appliance in an adequately illuminated and clean room with an easily accessible power outlet.
- Do not pour an excessive amount of water into the tank.
- Never leave the appliance unattended when it is connected to the power supply.
- The appliance must be used and left at rest on a stable surface.
- The appliance must not be used if it has been dropped, if there are visible signs of damage or leaks of water. Do not use the appliance if the power cord or the plug are damaged, or if the appliance is faulty. To prevent any accident, all repairs, including the replacement of the power cord, must be carried out by an Authorised Service Centre or by suitably qualified personnel.

Warning of burns
- Never direct steam or hot water towards parts of the body.
- Handle the steam/hot water wand with caution: Burns hazard!
- The external metallic parts of the appliance and the filter holder must not be touched with the equipment in operation, as it could cause burns.
- Remove and disconnect the filter holder slowly because any remaining pressure could cause splashes or sprays.

Warning - material damage
- Place the appliance on a stable surface where it can not tip over.
- Do not use the appliance without water, as the pump would burn out.
- Never fill the water tank with hot or boiling water.
- Do not position the appliance on very hot surfaces or close to open flames to prevent the casing from being damaged.
- The power supply cable must not touch the hot parts of the appliance.
- Do not use sparkling (carbonated) water.
- Never put substances other than coffee powder in the filter. This could cause serious damage.
- Never introduce ground coffee into the coffee grinder. Only use coffee beans.
- Do not let the appliance exposed to temperatures lower than 0^ , as water deposits into the boiler might get frozen and damage the appliance.
- Do not use the appliance outdoors.
- Do not leave the appliance exposed to weathering (such as rain or sun).
- After disconnecting the plug and when hot parts have cooled down, the appliance shall be cleaned only using a non-abrasive cloth.
- Never use solvents that may damage plastic parts.
- This manual can be downloaded from the following website:
https://www.ariete.net/assistance.
• ALWAYS KEEP THESE INSTRUCTIONS
A - Water tank lid
B - Water tank
C - Power cord
D - Single wall filter for 1 cup and 2 cups
E - Double wall filter for 1 cup and 2 cups
F - Pod filter
G - Filter holder
H - Milk container
I - Nozzle
J - Steam/hot water wand
K - Filter holder seat
L - Coffee grinder
M - Drip tray
N - Float
O - Cup-resting grill
P - Bezel for adjusting the grinding level
Q - Delonghi water softener filter
R - Needle for the nozzle cleaning
S - Brush for the grinder mills cleaning
T - Coffee presser
U - ON/OFF button with operation indicator
V - Coffee beans container lid
W - Coffee beans container
X - Display
DESCRIPTION OF THE DISPLAY BUTTONS
 | Home Allows the user to return to the home page. |
 | Back Allows the user to return to the previous page. |
 | Personalization Allows the user to enter the personalization menu to save previously configured settings. |
 | Configuration Allows the user to enter the configuration menu to adjust the customizable settings for the beverages preparation. |
 | Info Allows the user to enter the information page. |
Identification data
On the label under the base of the appliance are reported the following identifications data of the appliance:
• manufacturer and CE marking
- model (Mod.)
- serial number (SN)
• electrical supply voltage (V) and frequency (Hz)
• electrical power consumption (W)
• assistance toll-free phone number
When ordering at Authorized Service Centers, indicate the model and serial number.
Starting the appliance
Remove the packaging materials and make sure all components are present.
Place the appliance on a flat and stable surface.
First start-up

text_image
Select your language Italy UK Germany Spain France Poland Greece 韩国Check that the domestic mains voltage is the same as the voltage indicated on the label of the device.
Plug the appliance into the outlet (Fig. 2).
Press the on/off button ( ⏻ ) to turn ON the appliance (Fig. 3).
When first turned on, the appliance will guide the user through the configuration process.
Select the language from the appliance display.
Parts washing
Wash the filter holder (G), the single wall filter for 1 cup and 2 cups (D), the double wall filter for 1 cup and 2 cups (E), the pod filter (F), the tank (B) and the coffee beans container lid (V) in cold water.
How to perform the water hardness test
- Dip the water hardness test strip into cold water for one second.
- Pull out the strip.
- Remove any residual water.
- Wait for about 15 seconds for the result.
- Select on the display the closest match to your test strip result.
Installing the water softener filter
- Remove the water softener filter (Q) from its box.
- Turn the date disk so as to display the next two months of use (Fig. 4).
NOTE: the water softener filter has a lifetime of two months in case of ordinary use of the appliance. However, if the appliance is not used with the water softener filter installed, the latter has a lifetime of three weeks at the most.
Only use Delonghi "Water filter", available at authorised Assistance Centres.
- To activate the water softener filter, let at least 500 ml of tap water run into the hole on the filter until water comes out of lateral openings (Fig. 5).
- Remove the water tank from the appliance (Fig. 6).
- Place the water softener filter into its seat located at the bottom of the tank (Fig. 7). Press fully.
- Fill the water tank with fresh water up to the MAX level (Fig. 8).
- Insert the water tank into its seat (Fig. 9). Properly install the tank in its seat for the proper operation of the appliance.
Flushing
- Install the filter holder (G) in its seat without inserting any filter (Fig. 10).
- Place the provided milk container (H) under the filter holder (Fig. 11).

Warning!
Danger of burns. When hot water or steam are dispensed, never direct the jets towards others or towards yourself. Only touch the steam/hot water wand on the rubber part.
- Move the steam/hot water wand (J) inwards and direct it towards the drip tray (M) (Fig. 12).
- Wait until water runs through the filter holder seat and through the steam/hot water wand.
NOTE: if the hydraulic circuit runs out of water, an error message will be displayed on the display. To restore the appliance operation, follow the instructions given on the display.
When flushing is completed, the appliance is ready to use.
Home page
When the configuration process is completed, the home page screen will appear on the display.
From the home page, you can select the beverage you want to make or enter the "Guide and Setting" page.

text_image
Coffee Beverages Milk-Based Beverages Tea Guide and Setting
text_image
Maintenance Guide & Info SettingThere are three different types of beverages:
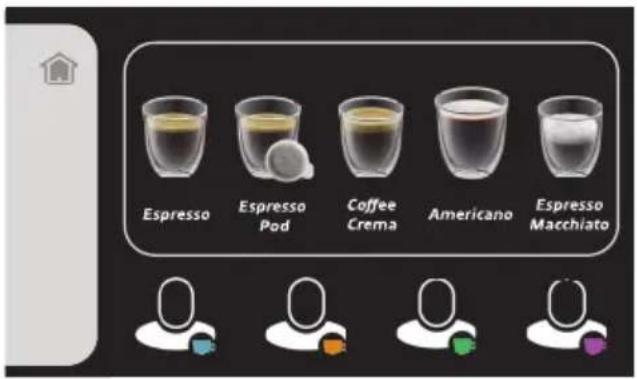
- "Coffee Beverages" (Espresso, Espresso Pod, Coffee Crema, Americano, Espresso Macchiato)
- "Milk-Based Beverages" (Hot Milk, Cappuccino, Latte Macchiato, Caffellatte, Flat White)
- "Tea" (White Tea, Green Tea, Oolong Tea, Black Tea)
Press the "Guide and Setting" button (💡) to enter the "Guide and Setting" page.
The page featuring "Maintenance", "Guide and Info" and "Setting" sections will appear on the display.
- Select "Maintenance" (☐) to see the maintenance operations for the appliance.
| “Maintenance” (Menu) | |
| “Cleaning cycle” Press to perform the filters cleaning cycle. | |
| “Descaling cycle” | Press to perform descaling and cleaning cycle of the appliance internal circuits. |
| “Steam wand cleaning” | Press to see and display the steam/hot water wand cleaning procedure. |
| “Water hardness” Press to perform the water hardness test. | |
- Select "Guide and Info" (C) to enter the guide and information page concerning beverages preparation.
| “Guide and Info” (i)menu | |
| “Grinding guide” Allows | the user to get information about proper coffee grinding and to know which filter to be used for the selected beverage. |
| “Brewing guide” Allows | the user to get information about the correct coffee brewing and dispensing. |
| “Tips” Allows the user | to get information about manual selection of the grinding amount,about coffee brewing and about how to remove the filter correctly. |
| “Statistic” Allows the user | to enter the page about statistics. |
- Select "Setting" (☐) to configure and set up the appliance operation settings.
| “Setting” ( ☐ menu | |
| “Language” Allows the user to change the selected language. | |
| “Brightness” Allows the user to adjust the display brightness settings. | |
| “Audio volume” | Allows the user to adjust the display audio volume. |
| “Time” Allows the user to set up and modify the time displayed on the display. | |
| “Coffee temperature” Allows the user to adjust the coffee temperature for the distribution. | |
| “Factory reset” | Allows the user to reset the appliance factory settings. The factory reset implies the loss of the previously saved configurations and settings. |
- Press the Home button ( ) to return to the home page.
PRELIMINARY PHASES
Fill the water tank with fresh water up to the MAX level (Fig. 8).
Insert the water tank into its seat (Fig. 9). Properly install the tank in its seat for the proper operation of the appliance.
Insert coffee beans into the coffee beans container (W) (Fig. 13).
Do not use an excessive amount of coffee beans. The coffee beans container lid must be properly installed on the container.
NOTE: by using a smaller quantity of coffee beans at a time, coffee will always be fresh.
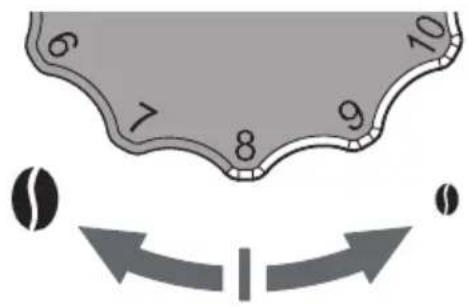
Adjusting the grinding level
The grinding level affects coffee taste as well as the quality of the cream.
A scale ranging from 1 to 11 is placed on the bezel for adjusting the grinding level. Higher numbers indicate a coarser grinding. Lower numbers indicate a finer grinding. Try making coffee after selecting a grinding level equal to 8. Then change the grinding level to find the coffee taste you like the most.
text_image
6 7 8 9 10Turn the bezel for adjusting the grinding level (P) on the left for a coarse grinding (◀), or turn it on the right for a fine grinding (▶(Fig. 14)).
The standard grinding level is 8.
To make a strong coffee (bitter taste), choose a grinding level ranging from 5 to 8.
To make a light and mild coffee, choose a grinding level ranging from 8 to 10.
NOTE: in order to preserve the appliance, do not set a grind-
ing level below the level 5 or above the level 10. Levels below 5 should be used at least after two years of use of the appliance, due to the possible wear of the coffee grinder mills.
NOTE: ground coffee with the chosen grinding level is not immediately distributed due to residual coffee powder stuck into the duct. Distribute ground coffee for at least 5 times before adjusting the grinding level again.

Warning!
This operation must be carried out when the appliance is turned on, while the coffee beans grinding is going on, so as to facilitate the grinding level adjustment.
HOW TO MAKE COFFEE BEVERAGES
1 From the home page, select the "Coffee Beverages" page. A screen from which you can select the type of coffee beverage you want to make will appear on the display.
From the coffee beverages screen, you can select the following types of beverage: Espresso, Espresso Pod, Coffee Crema, Americano, Espresso Macchiato.
2 Select the coffee beverage you want to make. A screen will appear on the display from which you can select the number of cups to be dispensed.
After selecting the number of cups, a screen will appear on the display from which you can select the grinding amount and the size of the beverage.
text_image
Espresso Espresso Pod Coffee Crema Americano Espresso Macchiato
text_image
Grinding Amount SizePress the Info button (i) to know which is the correct filter to be used according to the number of cups selection made earlier.
Grinding amount set up
1 Press the Configuration button (💡) from the "Grinding amount" page to set the grinding amount to be dispensed for your coffee.
You can select "Minimum", "Standard", "Maximum", and "Manual".

text_image
Select grinding amount of your Espresso Maximum2 Press the - () or () buttons to scroll among the available options.
You can adjust the coffee grinding level (fine grinding, medium grinding or coarse grinding) through the bezel for adjusting the grinding level (P) (see paragraph "Adjusting the grinding level").
When manually setting the grinding amount and the grinding level, follow the settings reported in the following table.
| Coffee amount | Grinding level | Type of grinding |
| Minimum | 9 - 11 | Coarse grinding |
| Normal 6 - 9 Medium grinding | ||
| Maximum 5 - 6 Fine grinding |
Coffee size set up
1 Press the Configuration button (💡) from the "Size" page to set the desired coffee size.
You can select "Short", "Medium", "Long", and "Extra Long".
2 Press the (−) or (+) buttons to scroll among the available options.
NOTE: To make an Espresso Macchiato, select the "Espresso Macchiato" beverage and follow the instructions given in the paragraph "How to make milk-based beverages".

text_image
Select size of your Espresso Extra LongFor each beverage selection, you can save the configured settings as default or as My Profile (see paragraph "Settings personalization").
HOW TO MAKE MILK-BASED BEVERAGES
1 From the home page, select the "Milk-Based Beverages" page. A screen from which you can select the type of milk-based beverage you want to make will appear on the display.
From the milk-based beverages screen, you can select the following types of beverage: Hot Milk, Cappuccino, Latte Macchiato, Caffellatte, Flat White.
2 Select the milk-based beverage you want to make. A screen will appear on the display from which you can select the number of cups to be dispensed.
After selecting the number of cups, a screen will appear on the display from which you can select the grinding amount, the size and the froth amount of the beverage.

text_image
Hot Milk Cappuccino Latte Macchiato Caffellatte Fiat White
text_image
Grinding Amount Size Froth AmountPress the Info button (i) to know which is the correct filter to be used according to the number of cups selection made earlier.
Grinding amount set up
1 Press the Configuration button (☐) from the "Grinding amount" page to set the grinding amount to be dispensed for your coffee.

text_image
Select grinding amount of your Cappuccino MaximumYou can select "Minimum", "Standard", "Maximum", and "Manual".
2 Press the -() or () buttons to scroll among the available options.
To correctly set the grinding amount and the grinding level, follow the instructions given in paragraph "Grinding amount set up" of the chapter "How to make coffee beverages".
Coffee size set up
1 Press the Configuration button (💡) from the "Size" page to set the desired coffee size.
You can select "Short", "Medium", "Long", and "Extra Long".
2 Press the -() or () buttons to scroll among the available options.
Froth amount set up
1 Press the Configuration button (☐) from the "Froth Amount" page to set the desired froth amount.
You can select "Minimum", "Medium" and "Maximum".
2 Press the -() or () buttons to scroll among the available options.

text_image
Select size of your Cappuccino Extra Long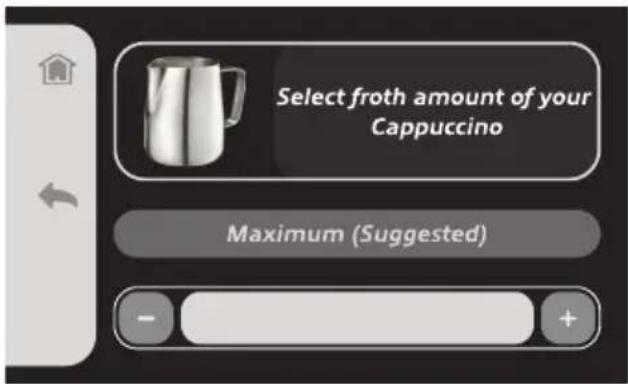
text_image
Select froth amount of your Cappuccino Maximum (Suggested)NOTE: when selecting the "Hot Milk" beverage, you will be able to only adjust the settings for the milk froth amount.
For each beverage selection, you can save the configured settings as default or as My Profile (see paragraph "Settings personalization").
HOW TO DISTRIBUTE COFFEE FOR COFFEE AND MILKBASED BEVERAGES
Once you have selected the type of beverage to brew from the main screen and adjusted the grinding amount, the size and the froth amount settings, follow the steps below.
1 Choose the single wall filter for 1 cup or 2 cups (D) or the double wall filter for 1 cup or 2 cups (E) depending on the amount of coffee you wish to make or according to the information provided for the selected type of beverage.
 | Single wall filter for 1 cup | The single wall filter is perfect if you are already familiar with the preparation of espresso coffee.When using this filter, the grinding level, the quantity and the pressing level of the coffee must be properly balanced with each other. Otherwise, coffee will flow too quickly (in case of a too-coarse grinding and if coffee powder has not been sufficiently pressed) or too slowly (if coffee grinding is too fine and if coffee powder is too pressed) through the filter.Single wall filter inserts are suitable only for freshly ground coffee. |
 | Single wall filter for 2 cups | |
 | Double wall filter for 1 cup | Thanks to the double wall filter inserts, water flows more slowly through coffee grounds during the preparation process.The double wall filter allows you to pay less attention to the correct pressing level and to the grinding level of the coffee. For this reason, the double wall filter is ideal for the less experienced. It makes it easier to prepare espresso coffee and guarantees a perfect cream. |
 | Double wall filter for 2 cups | |
 | Pod filter | Use the pod filter only with coffee pods that bear the E.S.E. compatibility mark. |
2 Insert the filter into the filter holder (Fig. 15).
3 Place the filter holder under the coffee grinder (Fig. 16). Insert the filter holder flaps into the specific support under the coffee grinder.
4 Press the coffee bean button in the "Grinding amount" page to start grinding according to the previously configured settings.
If needed, manually adjust the grinding level as previously described.
The appliance automatically stops grinding when the default or the previously selected amount of ground coffee is reached.
When selecting “Manual” for the grinding amount, press the coffee bean button again once you reach the desired amount.
5 Remove the filter holder from the coffee grinder seat (L).
6 Press the ground coffee into the filter holder using the coffee presser (T) (Fig. 17).
7 Remove any coffee residue from the filter holder.
8 Insert the filter holder into its seat (K) (Fig. 18).

Warning!
Tighten the filter holder well and make sure it is properly screwed to the flange.
If too much ground coffee is put inside the filter, turning the filter holder may prove difficult and/or you may get leaks from the filter holder when the coffee is being dispensed.
9 Place a suitable cup for the type of beverage selected on the cup-resting grill (Fig. 19).
10 Press the button of the previously selected beverage to start coffee brewing.
The appliance automatically stops brewing coffee when the default or the previously selected size is reached. To stop brewing before the process is over, press the "Stop" button.
To make the first coffee at the proper hot temperature, fasten the filter holder to its seat keeping the filter installed (without introducing ground coffee). Distribute 1 cup of coffee so that hot water can clean and heat up the filter. This will not be necessary for the following coffees.
NOTE: when selecting the “Americano” beverage, place the cup with coffee under the steam/hot water dispensing spout and dispense hot water.

text_image
Grinding Stop
text_image
Brewing Coffee Brewing is in progress Stop
Warning!
Slowly turn the filter holder from right to left to remove it so as to avoid splashing water or coffee.
11 Remove the filter holder (Fig. 20).
Removing the filter
Remove the filter from the filter holder by means of the handle of a teaspoon: lift the edge of the filter to remove it.
How to make froth for milk-based beverages
1 Make coffee as previously described.
Before making the froth, make sure the filter holder has been removed from its seat.

Warning!
Danger of burns. Only touch the steam/hot water wand on the rubber part.
2 Pour milk to be frothed into the milk container.
3 Place the steam/hot water wand into the milk container (Fig. 21).
4 Press the milk container button in the "Froth Amount" page to start froth distribution according to the previously configured settings.

text_image
Froathing is in progress StopThe appliance automatically stops frothing milk when the default or the previously selected amount is reached.
To stop brewing before the process is over, press the "Stop" button.
First a small quantity of water will come out, then a strong steam jet. Deeply introduce the steam/hot water wand into milk. In a few minutes a thick and creamy froth will appear, which you can pour on the coffee made before to complete preparation of the selected beverage.
When warming up, your appliance may release small puffs of steam from the filter holder; this is perfectly normal.
After each use, distribute steam for a few seconds so as to free the nozzle from any milk residue.
To make coffee with pods, use the provided pod filter (F) (Fig. 22):
1 Place the pod in the filter ring (Fig. 23).
2 Insert the pod into the filter. The pod must be well centred and placed inside the filter.
3 To prevent water leakage, fold and place inside the filter the external paper parts of the pod which might stick out from the filter holder (Fig. 24).
4 Insert the filter holder into its seat (K) (Fig. 18).

Warning!
Tighten the filter holder well and make sure it is properly screwed to the flange so as to avoid splashing water or coffee.
5 Select the "Espresso Pod" beverage and follow the instructions given on the display.
NOTE: when selecting the “Espresso Pod” beverage, you can not adjust settings for the grinding amount.
After making coffee, the pod might get stuck in the filter holder seat while removing the filter holder. To remove it, slightly tilt the filter holder so as to let the pod fall into it.

Warning!
Danger of burns. Do not touch the metal parts of the appliance.
To always make an excellent coffee, buy pods presenting the E.S.E. compatibility mark.
If the pod is not inserted well, or if the filter holder is not tightened firmly, a few drops of water could leak from the filter holder.
MAKING FURTHER CUPS OF COFFEE
No specific operation needs to be carried out to start distributing coffee after distributing steam. The appliance is provided with an electronic system which makes it possible to always distribute coffee at the optimal temperature.
HOW TO MAKE TEA
1 From the home page, select the "Tea" page. A screen from which you can select the type of tea you want to make will appear on the display.
From the tea beverages screen, you can select the following types of beverage: White Tea, Green Tea, Oolong Tea, Black Tea.
2 Select the type of tea you want to make. A screen from which you can select the size of the beverage will appear on the display.

text_image
White Tea Green Tea Oolong Tea Black Tea
natural_image
3D rendered image of a glass teacup with a dark liquid, displayed in a small interface panel (no text or symbols on the image itself)- Press the Configuration button (💡) from the "Size" page to set the desired tea size. You can select "Short", "Medium", "Long", and "Extra Long".
- Press the () or () buttons to scroll among the available options.
3 Place a cup under the steam/hot water wand.
4 Press the button of the previously selected tea beverage to start brewing.
The appliance automatically stops brewing when the default or the previously selected size is reached.
To stop brewing before the process is over, press the "Stop" button.
For each beverage selection, you can save the configured settings as default or as My Profile (see paragraph "Settings personalization").
SETTINGS PERSONALIZATION
From the main screen of each type of beverage, press the Customization button (⊕) to enter the customization page and to save the configured settings about the grinding amount, the size or the froth amount as default or as My Profile.
You can configure up to four profiles for each beverage type (for a total of 12 customized beverages).
NOTE: To modify the settings saved as default, it is necessary to reset the appliance factory setting from the "Setting" menu of the "Guide and Setting" page.

text_image
Save as default Save as MyProfile
text_image
Save as MyProfileUSEFUL TIPS FOR OBTAINING A GOOD ITALIAN ESPRESSO
The grinding level, the quantity of ground coffee, the pressing of coffee into the filter holder and the time spent extracting water affect coffee taste, making it more or less strong, as well as the quality of the cream.
Try changing one of these parameters to find the coffee taste you like the most.
When selecting a finer grinding, remember to introduce a larger quantity of coffee into the filter holder and not to excessively press using the coffee presser, otherwise coffee might get watery. Conversely, a coarser grinding requires a smaller quantity of coffee used into the filter holder which should be more pressed with the coffee presser.
Store coffee beans into a closed container, in a cool environment protecting it from moisture.
Preferably, store coffee vacuum-packed and buy coffee in small quantities so as to always have it fresh to be ground.
From the “Brewing guide” menu of the “Guide and Info” page (from the home page, “Guide and Setting”), you can read on the display the information provided to always make a balanced coffee.
| Grinding | Measuring out coffee | Using the presser | Required brewing time | |
| Balanced coffee Optimal | 8-10 g (1 cup)15-18 g (2 cups) | Well pressed | Proper distribution (4-7 seconds) | |
| Watery coffeeMild taste | Too coarse grinding | Too little coffee powder into the filter holder | Coffee is notpressed enough | Distribution is too fast (1-3 seconds) |
| Strong coffeeBitter tasteSmall quantity | Too fine grinding | Too much coffee powder into the filter holder | Coffee is toopressed into thefilter | Distribution is too slow (7-8 seconds) |
| Pressure OK Low pressure | ||
| Coffee is distributed after 4-7 secondsDistribution is slow and temperature is hotCream has a brown colour and a rich textureCoffee has a dark brown colour | Coffee is distributed after 1-3 secondsDistribution is fast and wateryCream has a lighter colour and a fine textureCoffee has a light brown colour, the taste is bitter but light | Coffee is distributed after 7-8 secondsDistribution is slow and incompleteCream is darker or absentCoffee has a dark brown colour, the taste is bitter and scorched |
 |  |  |
| After distributing coffee, let some water run through the filter holder seat while the filter holder is not installed, so as to clean the internal circuit and avoid scale formation. | Select a finer grind size. Increase the amount of coffee to be ground. Press coffee harder into the filter. | Select a coarser grind size.Reduce the amount of coffee to be ground. Press coffee into the filter using less pressure. |
AUTO-OFF FUNCTION
The appliance is equipped with an automatic shut-off system in accordance with the new regulations concerning energy consumption. The appliance turns off when not in use for 30 minutes. To make a new beverage, press the ON/OFF button ( ⏻ ) to turn off the appliance again.
FILLING THE WATER TANK DURING USE
Always check the water level in the tank.
In the event the water tank is completely empty, the appliance will emit a vibration and a loud noise and a warning message will appear on the display.
Turn off and unplug the appliance.
Remove the filter holder. Fill in the tank until reaching the indicated level, then turn on the appliance again.
MAINTENANCE OF THE APPLIANCE
Regular maintenance and cleaning preserve and keep the appliance efficient for a longer period of time. Enter the "Maintenance" menu (from the home page, "Guide and Setting") to display and start the maintenance and cleaning operations available for the appliance.

Warning!
Never wash the appliance components in the dishwasher. Do not use direct jets of water.
Cleaning cycle
Make sure that filter holes are not clogged.
If needed, let hot water run through the filter holder in place, without inserting coffee powder, to remove any coffee residue or other impurities.

Warning!
Remove and disconnect the filter holder slowly because any remaining pressure could cause splashes or sprays.
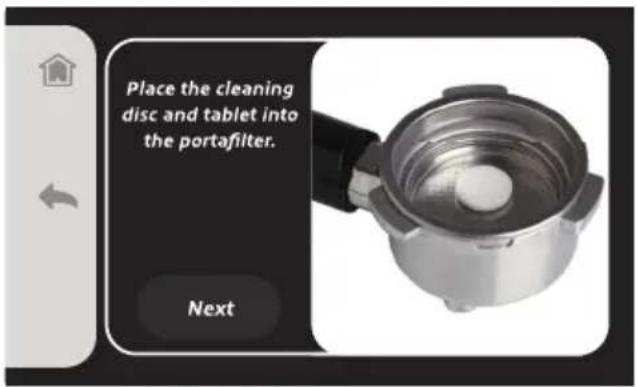
Use cleaning tablets and discs available on the market to carefully clean filters approximately every 3 months. Start the "Cleaning cycle" from the display and follow the instructions given on the display.
- Place a filter cleaning tablet and a cleaning disc into the filter holder (without coffee).
- Insert the filter holder into its seat (K) (Fig. 18).
- Fill the water tank with fresh water up to the MAX level (Fig. 8).
- Insert the water tank into its seat (Fig. 9). Properly install the tank in its seat for the proper operation of the appliance.
- Press the "Start" button on the display.
text_image
Place the cleaning disc and tablet into the portafilter. Next
text_image
Clean Cycle Touch to pause or exit to cancel Pause Exit- Remove the filter holder from its seat, remove the filter from the filter holder and rinse all parts under running tap water.
- Clean the internal parts using a soft sponge to remove any detergent residue (Fig. 27).
Repeat the operation for all filters.
Descaling cycle

Warning!
Do not use vinegar or other descaling agents not authorised by the Manufacturer.
Regular maintenance and cleaning preserve and keep the appliance efficient for a longer period of time, significantly reducing possible scale formation in the appliance. If despite this, after some time, the appliance operation is compromised, due to constant use of hard and very calcareous water, the appliance can be decalcified to eliminate the malfunction.
For this purpose, only use a citric acid-based decalcifying product. The product can be easily found at Technical Assistance centres.
The Manufacturer does not accept any responsibility for damage to internal components caused by the use of non-conforming products due to the presence of chemical additives.
Enter the "Maintenance" menu (from the home page, "Guide and Setting") to display and start the descaling cycle of the appliance.
When a message demanding descaling appears on the display, a descaling cycle must be carried out.
Start the "Descaling cycle" from the display and follow the instructions given on the display.
- Slowly turn the filter holder from right to left to remove it so as to avoid splashing water or coffee (Fig. 20).
- Remove the water softener filter from the water tank.
- Fill the water tank with fresh water up to the MAX level (Fig. 8).
• Pour the descaling solution into the water tank. - Place a container under the filter holder seat, which shall be larger enough to collect the water of the tank.
- Place the steam/hot water wand into the container.
The descaling process begins and the solution into the tank starts running through the filter holder seat and through the steam/hot water wand.
Limescale deposits will thus be removed from the internal circuit of the appliance.
After several washing cycles and breaks, the descaling process is over.
- Remove the water tank and rinse it with fresh water.
- Fill the water tank with fresh water up to the MAX level (Fig. 8).

text_image
Descaling Cycle Descaling your MCE34 when prompted ensures a smooth running machine. It takes around 60 mins to complete, you will need a large bowl and descaling solution. Start Dismiss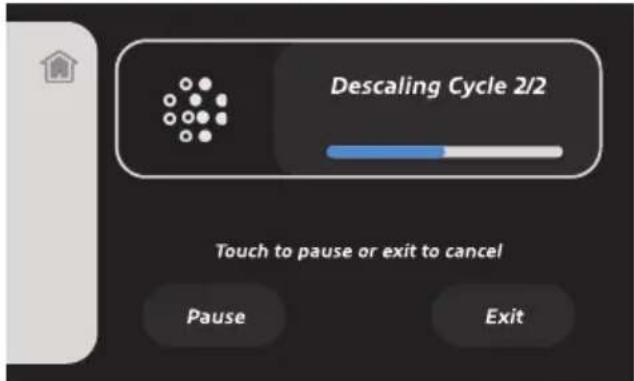
text_image
Descaling Cycle 2/2 Touch to pause or exit to cancel Pause ExitSteam wand cleaning

Warning!
The procedure must be carried out when the steam/hot water wand has cooled down to avoid burns.
Start the "Steam wand cleaning" from the display and follow the instructions given on the display.
- Remove the nozzle from the steam/hot water wand (Fig. 25) and rinse it under running water.
You can clean the steam/hot water wand using a non-abrasive cloth.
If needed, clean the hole of the nozzle by using the provided needle (Fig. 26).
- Fasten the steam nozzle until it is locked in place.
After each use, distribute steam for a few seconds so as to clean the hole from any residue.

text_image
The system is purging hot water. The steam wand is purging. Start
text_image
Steam Wand Cleaning Touch to pause or exit to cancel Pause ExitWater hardness
- Dip the water hardness test strip into cold water for one second.
- Pull out the strip.
- Remove the excess water drops.
• Wait for about 15 seconds for the result. - Select on the display the closest match to your test strip result.

text_image
Water hardness Test Strip Dip the water hardness test strip into cold water for one second. Next
text_image
Water hardness Select the closest match to your test strip result 0 25 50 120 250 425Cleaning of components
- Wash the milk container (H), the filter holder (G) and the filters (D-E-F) in soapy water.
- Rinse and dry all parts thoroughly.
Cleaning the filter holder seat
If the appliance is used daily, it may occur that in the filter holder seat there is a sedimentation of coffee grounds. Remove any residue using a toothpick, a sponge or letting water run through the seat without installing the filter holder (Fig. 27-28).

Warning!
The filter holder is not dishwasher-safe.
Tank cleaning

Warning!
Cleaning must be carried out with the appliance switched off and with the plug disconnected from the outlet.
Regularly clean the inside of the water tank by using a sponge or a damp cloth.
Cleaning of the cup-resting grill (O) and of the drip tray (M)

Warning!
Cleaning must be carried out with the appliance switched off and with the plug disconnected from the outlet.
• Occasionally empty the drip tray (M).
The drip tray is provided with a float (N). When the float is visible from the cup-resting grill, the drip tray is full of water and needs to be emptied.
- Remove the cup resting grill (O).
- Pull off the drip tray from the appliance. Empty and wash the drip tray under running water.
- Follow the same procedure to clean the cup-resting grill as well.
Cleaning the appliance body

Warning!
This cleaning operation must be carried out when the appliance's hot parts have cooled down to room temperature.

Warning!
Do not use abrasive detergents.
Clean the fixed parts of the appliance using a non-abrasive damp cloth to prevent damaging the body.
Unlocking the coffee grinder
In the event the coffee grinder gets blocked, this might be due to impurities among coffee beans which have caused the grinder to get blocked.
The mills of the grinder are completely removable. To remove the mills, proceed as follows.
- Turn off the appliance.
• Unplug it from the electric outlet.
- Remove residual coffee powder from the filter holder (G).
- Turn the bezel for adjusting the grinding level (P) to the left (◀) in order to select the coarsest grinding level (9, 10, 11) (Fig. 14). Impurities having caused the appliance to block will thus fall into the compartment for coffee powder.
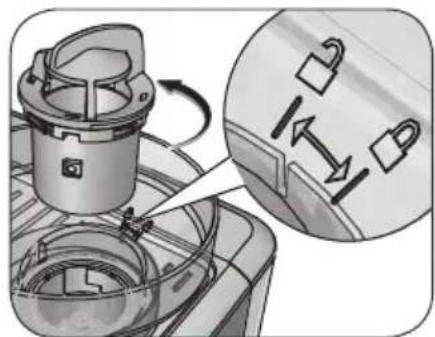
- Remove the lid from the coffee beans container.
- Turn the grinder protection to the symbol ( ☐).
• Pull out the protection with the mills (Fig. 29-30).
- Clean the grinder mills and the coffee grinder seat using the provided brush for the grinder mills cleaning (S).

Warning!
Do not wash the mills under running tap water or in the dishwasher.
- Insert the mills together with the protection into its seat and lock it again turning it towards the symbol ( 🔒 ). If the mills are not inserted properly in the coffee grinder seat, an error message will appear on the display.
- Plug the appliance into the outlet (Fig. 2).
- Press the on/off button ( ⏻ ) to turn ON the appliance (Fig. 3).
- Restore the proper grinding level (see paragraph "Adjusting the grinding level").
- Place a container under the coffee grinder.
• From the beverage selection home page, select a coffee beverage.
- Press the coffee bean button and start the grinding (for detailed information, see paragraphs "How to make coffee beverages" and "How to distribute coffee for coffee and milk-based beverages").
- Let ground coffee fall into the container.
- Throw away the ground coffee to remove impurities.
The coffee grinder is unlocked and the appliance is ready to make new beverages.
Distribute ground coffee for at least 5 times to correctly restore the proper grinding level.
If the coffee grinder fails to start again and remains blocked, press the On/Off button (⏻) to turn off the appliance.
Repeatedly turn the bezel for adjusting the grinding level (P) left and right (Fig. 14).
Repeat the procedure as previously described to try to restore proper operation of the coffee grinder.
If the operation is not successful after several attempts, contact the closest Authorised Service Centre.
SETTING THE MACHINE OUT OF SERVICE
When setting the appliance out of service, unplug the power cord from the power outlet, empty and clean the water tank as well as the drip tray (see paragraph "Maintenance of the appliance").
In case of scrapping you will be required to separate the various materials used in the construction of the appliance and dispose of them according to their composition and to the applicable laws in the country of use.

Warning!
In case of dysfunctions, immediately turn off the appliance and unplug the power cord from the outlet.
| PROBLEMS CAUSES REMEDIES | ||
| The appliance is not dispensing hot water and/or steam. | Air has probably entered the circuit and deactivated the pump. | Check that the water tank is properly inserted and that the level does not drop below the minimum level indicated on the tank. |
| The hole of the steam/hot water wand is clogged. | Remove possible scale deposits from the nozzle hole by using the provided needle. | |
| There is little water and the pump does not suck. | Turn off the appliance.Remove the tank. Check the tank water level is correct. If needed, fill the water tank with fresh water up to the MAX level. Insert the water tank into its seat (Fig. 9). Switch on the appliance.If problem persists, call the Service Centre. | |
| Coffee overflowing from the filter edges. | Probably too much ground coffee has been put into the filter holder that has prevented to fully tighten the filter holder in its housing. | Remove and disconnect the filter holder slowly because any remaining pressure could cause splashes or sprays. Clean the coupling seat with a sponge (Fig. 27). Reduce the amount of ground coffee and repeat the procedure. |
| Ground coffee has remained on the filter holder connection seat. | Clean the gasket again with a sponge (Fig. 27). | |
| The spouts of the filter containing coffee powder are clogged. | Remove and disconnect the filter holder slowly because any remaining pressure could cause splashes or sprays. Clean the filter spouts by means of a brush or the provided needle. Clean the filter as described in paragraph “Cleaning cycle”. | |
| The coffee is too watery and cold. | Coffee grinding is too coarse. To obtain | a more concentrated and hotter coffee, you must use a more finely grounded blend.Try using a finer grinding level. |
| If this is the first coffee you are making, the filter might be cold. | Try to heat up the filter before making coffee as described in paragraph “How to distribute coffee for coffee and milk-based beverages”. | |
| The coffee grinder is blocked or noisy. | Impurities among coffee beans have caused the grinder to get blocked. | Read paragraph “Unlocking the coffee grinder”. |
| Excessive amount of distributed coffee. | The amount of distributed coffee for 1 or 2 cups has not been properly adjusted. | Reduce the amount of distributed coffee. |
| Excessive amount of ground coffee in the filter. | The amount of ground coffee for 1 or 2 cups has not been properly adjusted. | Reduce the amount of ground coffee. |
| During steam distribution, the appliance makes noise. | The noise is due to the water pump which is working at higher pressures during steam distribution. | No intervention needed. Proper operation. |
| During coffee distribution, the appliance makes an unusual noise. | There is little water and the pump does not suck. | Turn off the appliance.Remove the tank. Check the tank water level is correct. If needed, fill the water tank with fresh water up to the MAX level. Insert the water tank into its seat (Fig. 9). Switch on the appliance.If problem persists, call the Service Centre. |
| The appliance is not distributing hot water and steam. | The nozzle hole is clogged. Remove possible scale deposits from the steam/hot water dispensing spout hole by using the provided needle (Fig. 26). | |
| Milk is not frothed enough. | Not enough steam. Remove possible scale deposits from the steam/hot water dispensing spout hole by using the provided needle (Fig. 26). | |
| The appliance has stopped working. | The internal protection of the coffee grinder electric motor has started. | Turn off the appliance and let it cool down for about 60 minutes. |
| The coffee grinder is blocked or makes a loud noise. | Impurities among coffee beans have caused the grinder to get blocked. | Read paragraph “Unlocking the coffee grinder”. |
| Coffee is not dispensed or is dispensed too slowly. | The perforated disc located in the coupling seat of the filter holder has the holes clogged. | Start the appliance without inserting the filter holder letting some water run. If water keeps running unevenly through the holes, carry out the descaling procedure as described in paragraph “Descaling cycle”. |
| The spouts of the filter containing coffee powder are clogged. | Remove and disconnect the filter holder slowly because any remaining pressure could cause splashes or sprays. Clean the filter spouts by means of a brush or the provided needle. Clean the filter as described in paragraph “Cleaning cycle”. | |
| Coffee grinding is too fine. | Try using a coarser grinding level. | |
| Coffee powder is too pressed. Press the coffee inside the filter using less pressure. | ||
| The amount of distributed water is scarce. | Try increasing the amount of distributed water. | |
| The tank is not fully inserted. Properly install the tank. | ||
| There is little water and the pump does not suck. | Turn off the appliance.Remove the tank. Check the tank water level is correct. If needed, fill the water tank with fresh water up to the MAX level. Insert the water tank into its seat (Fig. 9). Switch on the appliance.If problem persists, call the Service Centre. | |
| Empty water tank. | Fill the water tank with fresh water up to the MAX level (Fig. 8). | |
LISEZ ATTENTIVEMENT CES INSTRUCTIONS.
text_image
Select your language Italy UK Germany Spain France Poland Greece Saudi Arabiatext_image
Coffee Beverages Milk-Based Beverages Tea Guide and Setting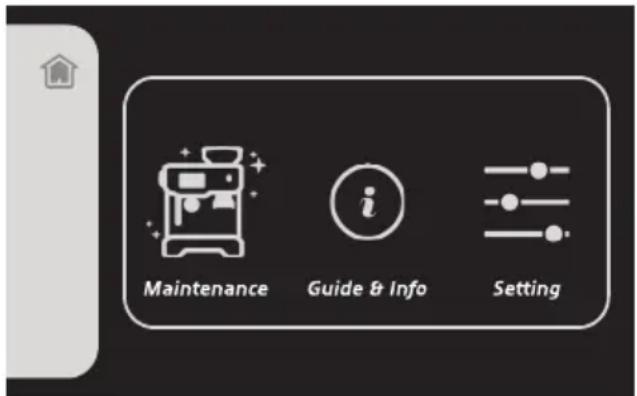
text_image
Maintenance Guide & Info Settingtext_image
Grinding Amount Sizetext_image
Select grinding amount of your Espresso Maximumtext_image
Select size of your Espresso Extra Longtext_image
Grinding Amount Size Froth Amounttext_image
Select grinding amount of your Cappuccino Maximumtext_image
Select size of your Cappuccino Extra Long
text_image
Select froth amount of your Cappuccino Maximum (Suggested)text_image
Grinding Stop
text_image
Brewing Coffee Brewing is in progress Stop
Attention!
text_image
Froathing is in progress StopCOMMENT FAIRE LE CAFÉ AVEC LA DOSETTE
text_image
White Tea Green Tea Oolong Tea Black Tea
natural_image
Illustration of a glass of dark beverage with a small 'Size' button, no text or symbols present.text_image
Save as default Save as MyProfile
text_image
Save as MyProfileCONSEILS UTILES POUR OBTENIR UN BON EXPRESSO ITALIEN
text_image
Place the cleaning disc and tablet into the portafilter. Next
text_image
Clean Cycle Touch to pause or exit to cancel Pause Exittext_image
Descaling Cycle Descaling your MCE34 when prompted ensures a smooth running machine. It takes around 60 mins to complete, you will need a large bowl and descaling solution. Start Dismiss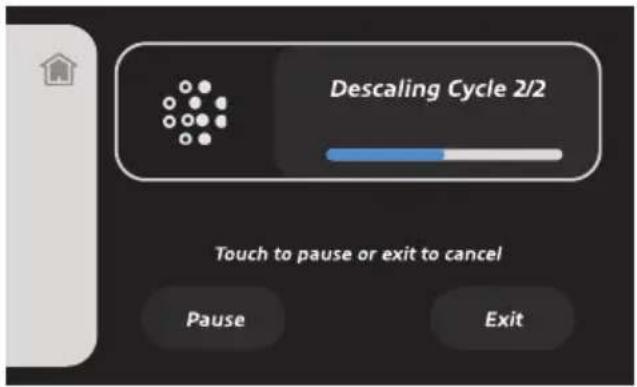
text_image
Descaling Cycle 2/2 Touch to pause or exit to cancel Pause Exittext_image
The system is purging hot water. The steam wand is purging. Start
text_image
Steam Wand Cleaning Touch to pause or exit to cancel Pause ExitDureté de l'eau
text_image
Water hardness Test Strip Dip the water hardness test strip into cold water for one second. Next
text_image
Water hardness Select the closest match to your test strip result 0 25 50 120 250 425text_image
Select your language Italy UK Germany Spain France Poland Greece 西班牙text_image
Coffee Beverages Milk-Based Beverages Tea Guide and Setting
text_image
Maintenance Guide & Info Settingtext_image
Grinding Amount Sizetext_image
Select grinding amount of your Espresso Maximumtext_image
Grinding Amount Size Froth Amounttext_image
Select grinding amount of your Cappuccino Maximumtext_image
Select size of your Cappuccino Extra Long
text_image
Select froth amount of your Cappuccino Maximum (Suggested)text_image
Grinding Stop
text_image
Brewing Coffee Brewing is in progress Stop
Achtung!
text_image
Froathing is in progress Stoptext_image
White Tea Green Tea Oolong Tea Black Tea
natural_image
Illustration of a glass teacup with a red liquid, displayed in a rounded square frame (no text or symbols on the image itself)text_image
Save as default Save as MyProfile
text_image
Save as MyProfiletext_image
Place the cleaning disc and tablet into the portafilter. Next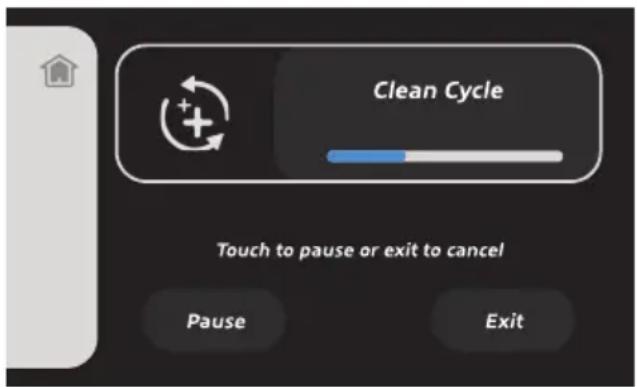
text_image
Clean Cycle Touch to pause or exit to cancel Pause Exittext_image
Descaling Cycle Descaling your MCE34 when prompted ensures a smooth running machine. It takes around 60 mins to complete, you will need a large bowl and descaling solution. Start Dismiss
text_image
Descaling Cycle 2/2 Touch to pause or exit to cancel Pause Exittext_image
The system is purging hot water. The steam wand is purging. Start
text_image
Steam Wand Cleaning Touch to pause or exit to cancel Pause ExitWasserhärte
text_image
Water hardness Test Strip Dip the water hardness test strip into cold water for one second. Next
text_image
Water hardness Select the closest match to your test strip result 0 25 50 120 250 425
text_image
Select your language Italy UK Germany Spain France Poland Greece Saudi Arabiatext_image
Coffee Beverages Milk-Based Beverages Tea Guide and Setting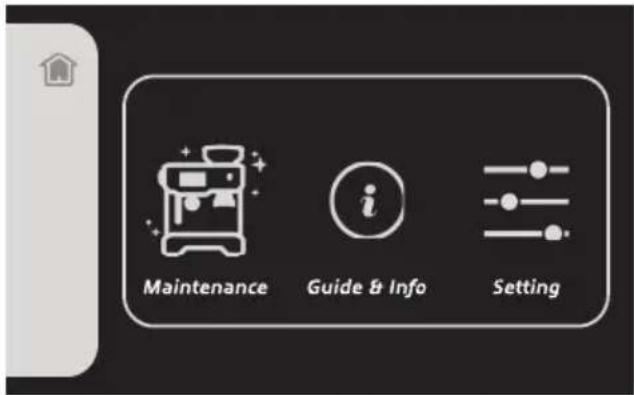
text_image
Maintenance Guide & Info Settingtext_image
Grinding Amount Sizetext_image
Select grinding amount of your Espresso Maximumtext_image
Select size of your Espresso Extra Longtext_image
Grinding Amount Size Froth Amounttext_image
Select grinding amount of your Cappuccino Maximumcafé molido a erogar.
text_image
Select size of your Cappuccino Extra Long
text_image
Select froth amount of your Cappuccino Maximum (Suggested)text_image
Grinding Stop
text_image
Brewing Coffee Brewing is in progress Stop
¡Atención!
text_image
Froathing is in progress StopCÓMO HACER EL CAFÉ CON PASTILLA
text_image
White Tea Green Tea Oolong Tea Black Tea
natural_image
Illustration of a glass cup with amber liquid inside, displayed in a rounded square frame (no text or symbols on the cup itself)text_image
Save as default Save as MyProfile
text_image
Save as MyProfileCONSEJOS ÚTILES PARA OBTENER UN BUEN EXPRESO ITALIANO
text_image
Place the cleaning disc and tablet into the portafilter. Next
text_image
Clean Cycle Touch to pause or exit to cancel Pause Exittext_image
Descaling Cycle Descaling your MCE34 when prompted ensures a smooth running machine. It takes around 60 mins to complete, you will need a large bowl and descaling solution. Start Dismiss
text_image
Descaling Cycle 2/2 Touch to pause or exit to cancel Pause Exittext_image
The system is purging hot water. The steam wand is purging. Start
text_image
Steam Wand Cleaning Touch to pause or exit to cancel Pause ExitDureza del agua
text_image
Water hardness Test Strip Dip the water hardness test strip into cold water for one second. Next
text_image
Water hardness Select the closest match to your test strip result 0 25 50 120 250 425text_image
Select your language Italy UK Germany Spain France Poland Greece Saudi Arabiatext_image
Coffee Beverages Milk-Based Beverages Tea Guide and Setting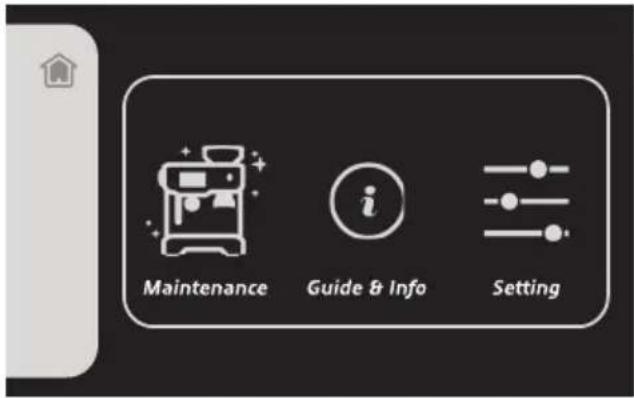
text_image
Maintenance Guide & Info Setting- "Thee" (witte thee, groene thee, Oolong-thee, zwarte thee)
text_image
Grinding Amount Sizetext_image
Select grinding amount of your Espresso Maximumtext_image
Select size of your Espresso Extra Longtext_image
Grinding Amount Size Froth Amounttext_image
Select grinding amount of your Cappuccino Maximumtext_image
Select size of your Cappuccino Extra Long
text_image
Select froth amount of your Cappuccino Maximum (Suggested)text_image
Grinding Stop Brewing Coffee Brewing is in progress Stop
Let op!
text_image
Froathing is in progress Stoptext_image
White Tea Green Tea Oolong Tea Black Tea
natural_image
Illustration of a teacup with a glass, displayed in a rounded square frame (no text or symbols on the cup itself)text_image
Save as default Save as MyProfile
text_image
Save as MyProfileHANDIGE TIPS OM EEN GOEDE ITALIAANSE ESPRESSO TE ZETTEN
text_image
Place the cleaning disc and tablet into the portafilter. Next
text_image
Clean Cycle Touch to pause or exit to cancel Pause Exittext_image
Descaling Cycle Descaling your MCE34 when prompted ensures a smooth running machine. It takes around 60 mins to complete, you will need a large bowl and descaling solution. Start Dismiss
text_image
Descaling Cycle 2/2 Touch to pause or exit to cancel Pause Exit
text_image
The system is purging hot water. The steam wand is purging. Start
text_image
Steam Wand Cleaning Touch to pause or exit to cancel Pause ExitWaterhardheid
text_image
Water hardness Test Strip Dip the water hardness test strip into cold water for one second. Next
text_image
Water hardness Select the closest match to your test strip result 0 25 50 120 250 425https://www.ariete.net/assistance.
text_image
Select your language Italy UK Spain France Poland Greece Greece/Saudi...text_image
Coffee Beverages Milk-Based Beverages Tea Guide and Setting
text_image
Maintenance Guide & Info Settingtext_image
Grinding Amount Sizetext_image
Select grinding amount of your Espresso Maximumtext_image
Select size of your Espresso Extra Longtext_image
Grinding Amount Size Froth Amounttext_image
Select grinding amount of your Cappuccino Maximumtext_image
Select size of your Cappuccino Extra Long
text_image
Select froth amount of your Cappuccino Maximum (Suggested)text_image
Grinding Stop
text_image
Brewing Coffee Brewing is in progress Stop
Προσοχή!
text_image
Froathing is in progress Stoptext_image
White Tea Green Tea Oolong Tea Black Tea
natural_image
3D rendered image of a glass cup with amber liquid, displayed in a rounded square frame (no text or symbols on the cup itself)text_image
Save as default Save as MyProfile
text_image
Save as MyProfiletext_image
Place the cleaning disc and tablet into the portafilter. Next
text_image
Clean Cycle Touch to pause or exit to cancel Pause Exittext_image
Descaling Cycle Descaling your MCE34 when prompted ensures a smooth running machine. It takes around 60 mins to complete, you will need a large bowl and descaling solution. Start Dismiss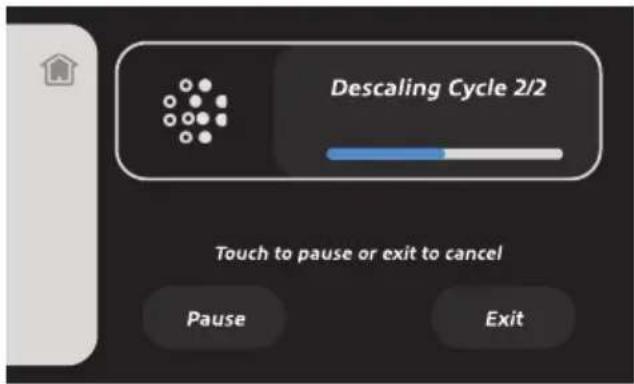
text_image
Descaling Cycle 2/2 Touch to pause or exit to cancel Pause Exittext_image
The system is purging hot water. The steam wand is purging. Start
text_image
Steam Wand Cleaning Touch to pause or exit to cancel Pause Exittext_image
Water hardness Test Strip Dip the water hardness test strip into cold water for one second. Next
text_image
Water hardness Select the closest match to your test strip result 0 25 50 120 250 425text_image
Select your language Italy UK Germany Spain France Poland Netherlands Greece Saudi Arabiaغسل المكونات
text_image
Coffee Beverages Milk-Based Beverages Tea Guide and Setting| "الصيانة قسم" | |
| ", " Resource Management, " " | ", " Resource Management, " " |
| ", " Resource Management, " " | ", " Resource Management, " " |
| ", " Resource Management, " " | ", " Resource Management, " " |
| ", " Resource Management, " " | ", " Resource Management, " " |
text_image
Grinding Amount Size i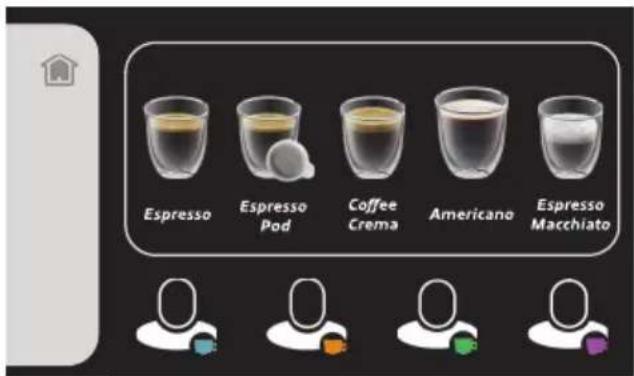
text_image
Espresso Espresso Pod Coffee Crema Americano Espresso Macchiatotext_image
Select grinding amount of your Espresso Maximumtext_image
Select size of your Espresso Extra Longtext_image
Grinding Amount Size Froth Amount
text_image
Hot Milk Cappuccino Latte Macchiato Caffellatte Flat Whitetext_image
Select grinding amount of your Cappuccino Maximumtext_image
Select froth amount of your Cappuccino Maximum (Suggested)
text_image
Select size of your Cappuccino Extra Longtext_image
Brewing Coffee Brewing is in progress Stop
text_image
Grinding Stopتنبيه!

text_image
Froathing is in progress Stopnatural_image
Illustration of a glass cup filled with dark liquid, labeled 'Size' (no other text or symbols)
text_image
White Tea Green Tea Oolong Tea Black Teatext_image
Save as MyProfile
text_image
Save as default Save as MyProfiletext_image
Clean Cycle Touch to pause or exit to cancel Pause Exit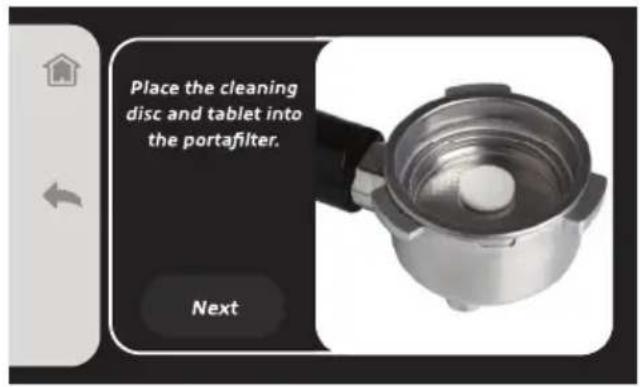
text_image
Place the cleaning disc and tablet into the portafilter. Nexttext_image
Descaling Cycle 2/2 Touch to pause or exit to cancel Pause Exit
text_image
Descaling Cycle Descaling your MCE34 when prompted ensures a smooth running machine. It takes around 60 mins to complete, you will need a large bowl and descaling solution. Start Dismisstext_image
Steam Wand Cleaning Touch to pause or exit to cancel Pause Exit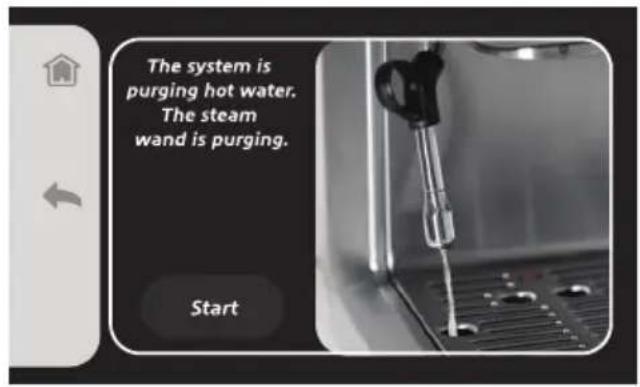
text_image
The system is purging hot water. The steam wand is purging. Startعسر ال habits
text_image
AR Water hardness Select the closest match to your test strip result 0 25 50 120 250 425
text_image
Water hardness Test Strip Dip the water hardness test strip into cold water for one second. Nextتنظيف امرگبات
https://www.ariete.net/assistance.
- NALEŻY ZAWSZE ZACHOWAĆ TE INSTRUKCJE
text_image
Select your language Italy UK Germany Spain France Poland Greece Saudi Arabiatext_image
Coffee Beverages Milk-Based Beverages Tea Guide and Setting
text_image
Maintenance Guide & Info Settingtext_image
Grinding Amount Sizetext_image
Select grinding amount of your Espresso Maximumtext_image
Select size of your Espresso Extra Longtext_image
Grinding Amount Size Froth Amounttext_image
Select grinding amount of your Cappuccino Maximumtext_image
Select size of your Cappuccino Extra Long
text_image
Select froth amount of your Cappuccino Maximum (Suggested)text_image
Grinding Stop
text_image
Brewing Coffee Brewing is in progress Stop
Uwaga!
text_image
Froathing is in progress Stoptext_image
White Tea Green Tea Oolong Tea Black Tea
natural_image
Illustration of a glass cup with liquid inside, displayed in a rounded square frame (no text or symbols on the cup itself)text_image
Save as default Save as MyProfile
text_image
Save as MyProfilePOŻYTECZNE RADY, W JAKI SPOSÓB PRZYGOTOWAĆ DOBRE WŁOSKIE ESPRESSO
text_image
Place the cleaning disc and tablet into the portafilter. Next
text_image
Clean Cycle Touch to pause or exit to cancel Pause Exittext_image
Descaling Cycle Descaling your MCE34 when prompted ensures a smooth running machine. It takes around 60 mins to complete, you will need a large bowl and descaling solution. Start Dismiss
text_image
Descaling Cycle 2/2 Touch to pause or exit to cancel Pause Exittext_image
The system is purging hot water. The steam wand is purging. Start
text_image
Steam Wand Cleaning Touch to pause or exit to cancel Pause ExitTwardość wody
text_image
Water hardness Test Strip Dip the water hardness test strip into cold water for one second. Next