
KlimaLogg Pro - Temperature Controller TFA - Free user manual and instructions
Find the device manual for free KlimaLogg Pro TFA in PDF.

| Product type | Temperature and humidity recorder (temperature controller) |
| Brand | TFA |
| Model | KlimaLogg Pro (Cat. No. 30.3039.IT) |
| Approximate dimensions | 130 x 80 x 30 mm |
| Approximate weight | 200 g (without batteries) |
| Power supply | 3 x 1.5V AA LR6 batteries (not included) |
| Display | LCD screen with adjustable contrast (0-7) |
| Temperature measurement range | 0 °C to +50 °C (32 °F to 122 °F), resolution 0.1 °C |
| Temperature accuracy | ±1 °C |
| Humidity measurement range | 1% to 99% RH, resolution 1% |
| Humidity accuracy | ±3% RH (between 35% and 75% RH), otherwise ±5% RH |
| Measuring interval | Every 15 seconds (temperature and humidity) |
| Recording interval | 1, 5, 10, 15, 30 minutes or 1, 2, 3, 6 hours |
| Memory capacity | Up to 50,000 records (circular memory) |
| Number of channels | 1 indoor channel + up to 8 outdoor channels (optional transmitters) |
| Radio-controlled clock reception | DCF-77 (77.5 kHz), range ~1500 km |
| Alarm functions | High and low limits for temperature and humidity, visual and audible (2 min) |
| Min/Max values display | With date and time, resettable |
| Dew point display | Yes |
| PC connection | Wireless via USB receiver (30.3175, sold separately), free PC software to download |
| Open collector output | 3.5 mm jack socket, 24 V DC max, 400 mA, for alarm on channel 1 |
| Outdoor transmitter transmission frequency | 868 MHz, power < 25 mW |
| Radio range | 100 m in open field (transmitters), 10 m (USB receiver) |
| Care and cleaning | Soft damp cloth, no solvents or abrasives |
| Safety | Keep out of reach of children, do not open or repair yourself, recycle used batteries |
| Spare parts and repairability | Outdoor transmitters (30.3180.IT, 30.3181.IT) and USB receiver (30.3175) available separately. No internal spare parts. |
| General information | EU compliant (2014/53/EU). Full manual available at www.tfa-dostmann.de |
Frequently Asked Questions - KlimaLogg Pro TFA
User questions about KlimaLogg Pro TFA
0 question about this device. Answer the ones you know or ask your own.
Ask a new question about this device
Download the instructions for your Temperature Controller in PDF format for free! Find your manual KlimaLogg Pro - TFA and take your electronic device back in hand. On this page are published all the documents necessary for the use of your device. KlimaLogg Pro by TFA.
USER MANUAL KlimaLogg Pro TFA
Temperature and Humidity Logger
KlimaLogg Pro
Art.nr. 30.3039.IT
ALARMEVENT-DATENSATZ-FUNKION:
OPEN-COLLECTOR-HARDWARE AUSGANG:
Temperature and Humidity Logger
INTRODUCTION:
Thank you for choosing this this professional temperature and humidity data logger from TFA.
BEFORE YOU USE IT
Please be sure to read the instruction manual carefully.
This information will help you to familiarise yourself with your new device, learn all of its functions and parts, find out important details about its first use and how to operate it, and get advice in the event of faults.
Following the instruction manual for use will prevent damage to the device and loss of your statutory rights arising from defects due to incorrect use. We shall not be liable for any damage occurring as a result of not following these instructions. As well we shall not be liable for any incorrect readings and any consequences that occur should an inaccurate reading take place.
Please take particular note of the safety advice!
Please look after this manual for future reference.
FIELD OF OPERATION
This device allows you to make detailed recordings of the temperature and humidity and to actively monitor them. Recorded data can be transferred to a computer using a USB transceiver for easy analysis. The supplied software can also be used for managing the logger and can be used purely as windows service to provide datasets to your own software application. The logger is able to use up to eight outdoor transmitters.
For your safety:
- The product is exclusively intended for the field of application described above. The product should only be used as described within these instructions.
- Unauthorised repairs, modifications or changes to the product are prohibited.

Caution! Risk of injury:
- Keep this instrument and the batteries out of reach of children.
- Batteries must not be thrown into the fire, short-circuited, taken apart or recharged. Risk of explosion!
- Batteries contain harmful acids. Low batteries should be changed as soon as possible to prevent damage caused by a leaking battery. Never use a combination of old and new batteries together or batteries of different types. Wear chemical-resistant protective gloves and glasses when handling leaked batteries.
! Important information on product safety!
- Extreme temperatures, vibration and shock should be avoided as these may cause damage to the units and give inaccurate readings.
- Protect from moisture. Do not submerge the units in water
- Avoid placing the instrument near interference sources/metal frames such as computer or TV sets.
CONTENTS:
Chapter:
Page:
Features 30
Additional transmitters 31
Installation and replacement of the batteries 31
First installation 32
DCF radio controlled time reception 32
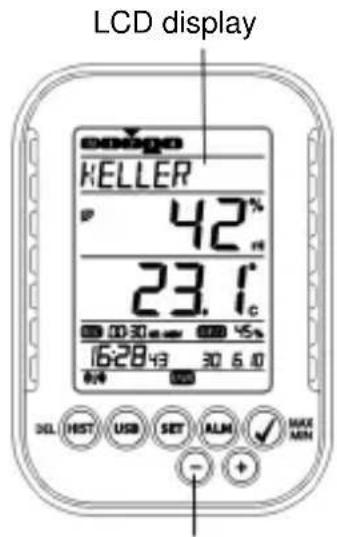
LCD display 34
34
Function of the buttons 35
Basic settings 35
Transmitters 38
Learning-Mode 39
Recording interval setting 40
Max.Min.-values and current dew point 41
Alarm-setting mode 41
Alarmevent-data set-function 43
History mode 43
PC-connection 44
Open-collector hardware output 45
Troubleshooting 47
Positioning of the logger 48
Care and maintenance
Battery replacement 49
Waste disposal 49
Specifications 50
FEATURES:
Buttons
Battery compartment
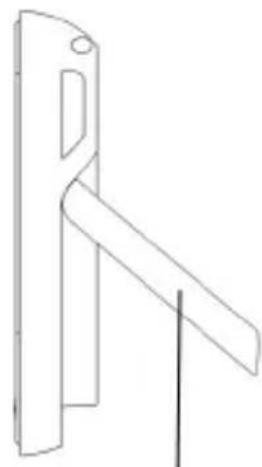
Stand (fold out)
- Indication of the current temperature and humidity
- DCF radio controlled time and date
MIN/MAX values and time of reception - Indication of the current dew point
- Temperature display in ^ C / ^ F
12 or 24 hour time mode
Time zone option ± 12 hours
LCD contrast selectable - Low battery indicator
Data logging function - up to 50000 data records - Logging intervals 1, 5, 10, 15, 30 minutes or 1, 2, 3, 6 hours
Data sets can be called up either directly on the device or using a PC - Display of the data sets that have not yet been read out in %
- Up to 8 transmitters receivable (temperature and humidity transmitter or only temperature transmitter with external cable sensor)
- Text display with predefined serial number or individual name assignment for transmitters that have been received
- Manual learning function for all transmitters or individual transmitters
-
Status display upon loss of transmitter signals
Data transfer via USB wireless transceiver -
Individual alarm limits for all channels can be set with visual and/or acoustic alarm
Additional generat of "AlarmEvent" data sets when an alarm is triggered - Switching output for alarm output to external hardware
- Table standing or wall mounting
- Including easy-to-use Windows software
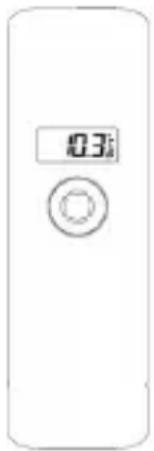
ADDITIONAL TRANSMITTER (purchased separately)
You have the possibility to receive up to eight additional external transmitters with your KlimaLogg Pro. These are separately available in specialist shops.

Temperature & Humidity Kat. No.: 30.3180.IT
Temperature with external cable Kat. No.: 30.3181.IT
INSTALLATION AND REPLACEMENT OF THE BATTERIES:
Note:
If you have purchased external transmitters, you should insert the batteries into the transmitters just before into the KlimaLogg Pro. For more information, please have a look at the chapter "transmitters" of this manual or refer the instruction manual of the transmitter.
The instrument operates with three 1,5 V batteries Type Mignon AA. For installation and replacement of the batteries, please follow the steps below:
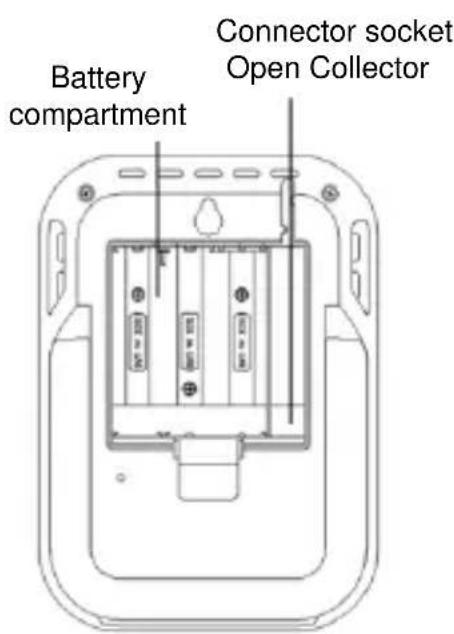
- Insert finger or other solid object in the space at the bottom center of the battery compartment and lift up to remove the cover.
- Insert the batteries, pay attention to their correct polarity.
- Insert compartment cover and close it.
FIRST INSTALLATION:
When the KlimaLogg Pro is powered up, a short beep will sound and all LCD segments will light up.
The KlimaLogg Pro shows the current temperature and humidity values. "INDOOR" is displayed in the text field, and 00:00:00 and 01.01.10 are displayed in the time and date area (the device counts up the time until the DCF signal has been received or the time and date are manually set).
After the KlimaLogg Pro has been started up, it searches for external transmitters for three minutes. After a battery change, the transmitters that were entered previously are once again assigned the channel that had previously been assigned to them. External transmitters that had not been previously detected are automatically entered on a available channel.
DCF RADIO CONTROLLED TIME RECEPTION
-
After the KlimaLogg Pro has searched for external transmitters for three minutes, the device begins to search for the DCF signal (german radio-controlled clock signal), and the DCF reception indicator flashes. If the time code has been received after 5-10 minutes, the radio-controlled time is displayed and the DCF reception indicator remains on the LCD.
-
In case the clock cannot detect the DCF-signal (for example due to disturbances, transmitting distance, etc.), the time can be set manually.
- The clock will then work as a normal quartz clock. (see: Basic settings/Time and calendar).
- The radio controlled clock receives the signals at 2:00 and 3:00 o'clock in the morning.
- As soon as the clock has received the DCF signal, the manually set time will be overwritten by the DCF time.
Note that during reception of the radio-controlled clock signal, no communication with the USB wireless transceiver is possible or may be briefly interrupted.
Note for Radio Controlled Time DCF:
The base for the radio controlled time is a Caesium Atomic Clock operated by the Physikalisch Technische Bundesanstalt Braunschweig which has a time deviation of less than one second in one million years. The time is coded and transmitted from Mainflingen near Frankfurt via frequency signal DCF-77 (77.5 kHz) and has a transmitting range of approximately 1500 km. Your Logger receives this signal and converts it to show the precise time in summer or wintertime. The quality of the reception depends greatly on the geographic location. In normal cases, there should be no reception problems within a 1,500 km radius around Frankfurt.
Recommended distance to any interfering sources like computer monitors or TV sets is a minimum of 1.5 - 2 metres.
Within ferro-concrete rooms (basements, superstructures), the received signal is naturally weakened. In extreme cases, please place the unit close to a window and/or point its front or back towards the Frankfurt transmitter.
During night-time, the atmospheric disturbances are usually less severe and reception is possible in most cases. A single daily reception is adequate to keep the accuracy deviation below 1 second.
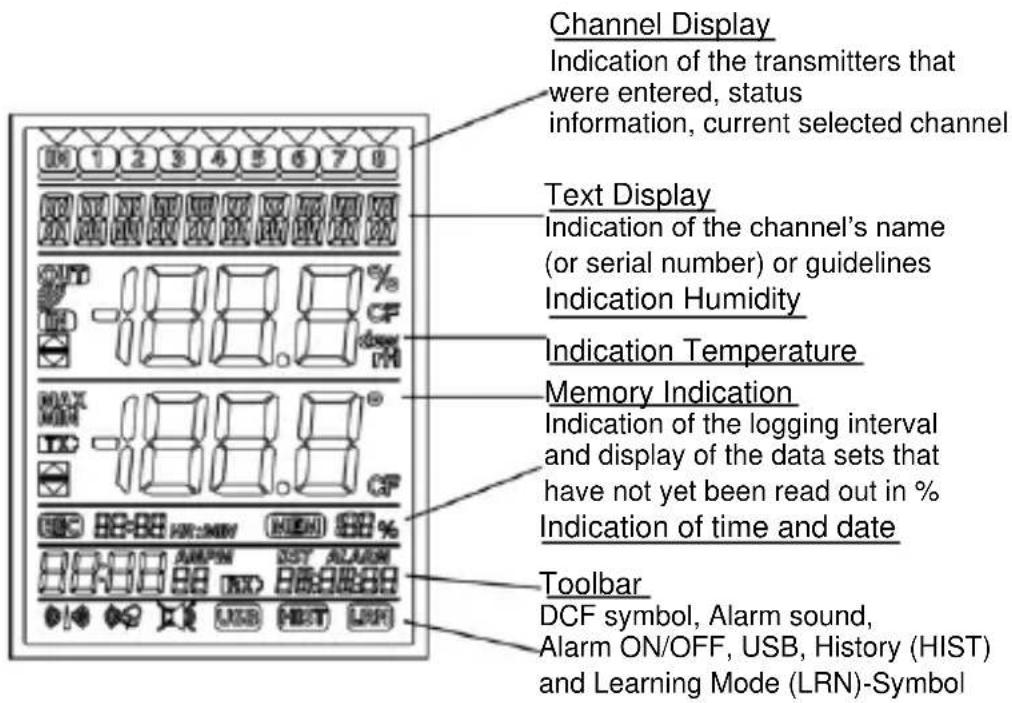
LCD DISPLAY:
The LCD display is split into 7 sections.
The designation of each section can be found on the following figure:
BUTTONS:
The logger is equipped with 7 function buttons:
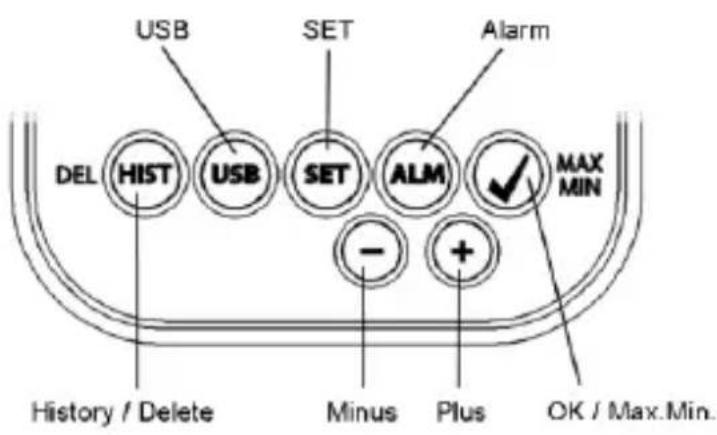
FUNCTIONS OF THE BUTTONS IN THE NORMAL VIEW:
History / Delete go to the history-mode of the recorded data sets
USB (single press)
initiate the contact with the known USB transceiver
(press and hold for three seconds)
Synchronization to an USB transceiver
SET (single press)
go to the setting mode of the transmitter (Learn mode).
With a further press you go to the record interval setting.
(press and hold for three seconds)
go to the basic setting mode of the logger
Alarm (single press)
deactivate active alarm sound if an alarm is happen
(press and hold for three seconds)
go to the alarm setting mode of the currently displayed channel.
OK / Max.Min. call up the Max.Min. values and the current dew point of the selected channel
Plus Scroll up through the available channels
Minus Scroll down through the available channels
BASIC SETTINGS:
In normal mode, press and hold the SET button for 3 seconds to enter the manual setting mode for the following functions:
- LCD contrast
- Time zone
-
Alarm sound ON/OFF
-
Radio-controlled time reception ON/ OFF
Automatic USB-connection ON/OFF - 12/24 hour format
- Temperature unit (^ / ^)
- Manual time setting
- Manual date setting
- Main reset
After you press and hold the SET button for three seconds, you are automatically taken to the first setting option for basic settings, the contrast setting. Pressing the SET button once again takes you to the next setting option.
If no button is pressed for 20 seconds, the KlimaLogg Pro automatically switches back to the normal view. You can return to the normal view at any time by pressing the "HIST/DEL", the "USB" or the "ALM" button.
Note:
Changes at the setting-mode require no additional confirmation and are automatically saved when you leave or go further to the next setting.
If you press and hold the "+" or "-" button, you are quickly taken through the possible settings (time, date and time zone settings).
LCD-contrast:
"CONTRAST" appears on the text display and the default "5" starts flashing. With the + or - button you can select between 0 until 7 as the LCD contrast.
Time zone:
"TIMEZONE" appears on the text display and the default ,0" starts flashing.
With the + or - button you can set the time zone (-12 until +12 hours).
Alarm sound ON/OFF:
"ALERTSOUND" appears on the text display and the default "ON" starts flashing. With the + or - button you can deactivate (OFF) or activate (ON) the alarm sound. If the alarm sound is activated, the alarm symbol will appear (bell) in the toolbar. If the alarm sound is deactivated, the alarm symbol does not appear.
Note:
This setting is related to the alarm sound only. Alarms that have been set, continue to be registered. Also they are shown on the display as well. Only the sound is activated or inactivated by this setting in case of an alarm.
Time reception ON/OFF:
"DCF" appears on the text display and the default "On" starts flashing.
With the + or - button you can deactivate (OFF) or activate (On) the DCF time reception.
Automatic USB-connection ON/OFF:
"AUTO USB" appears on the text display and the default "On" starts flashing.
With the + or - button you can deactivate (OFF) or activate (On) the automatic USB-connection.
Activated the device tries to connect at every full hour.
12/24-Hour format:
"TIMEFORMAT" appears on the text display and the default 24h " starts flashing. Also the current time will be shown in the display. With the + or - button you can select between 12 hr or 24 hr time format. If you select the 12 hr time format, AM or PM appears in the display additionally.
Temperature unit (^ / ^)
"TEMP UNIT" appears on the text display and the default ^ C^ starts flashing. With the + or - button you can select between ^ C^ or ^ F^ as the temperature unit.
Manual time setting:
"TIME SET" appears on the text display and the hour digits start flashing. With the + or - button you can set the hours.
Press SET button again and set the minutes by the same way.
Manual date setting:
"DATE SET" appears on the text display and the year starts flashing. With the + or - button you can set the year.
Press SET button again and the month starts flashing. With the + or - button you can set the month.
Press SET button again and the day starts flashing. With the + or - button you can set the day.
Main reset (resetting back to factory settings):
"MAIN RESET" appears on the text display. If the "OK/MAX.MIN." button is now pressed and held for three seconds, the KlimaLogg Pro deletes all settings and recorded data. The KlimaLogg Pro is reset to factory settings. After the "OK/MAX.MIN." button has been pressed and held for three seconds, the progress of the reset is shown in % on the memory display. The KlimaLogg Pro automatically restarts when the reset is complete.
Note:
Note that through the main reset also all recorded data will be deleted. If necessary, please ensure that there is no relevant data on the KlimaLogg Pro that has not yet been retrieved or transferred to the PC.
If the device shows a malfunction, we recommend that you firstly check the batteries and try a normal reboot of the unit. If this does not help, we recommend that you do the main reset.
TRANSMITTERS:
If you use your logger with additional transmitters that were entered into the logger during startup or via the learning mode, you see a number in the channel display for every assigned channel.
After inserting the batteries in to the transmitter, the transmitter automatically starts transferring the outdoor values.
-
After successful start up of the transmitter close the battery compartment carefully.
-
In the normal view and as well as in history mode, you can scroll up and down through the existing channels by pressing the + or - button. A triangle is displayed above the currently selected channel symbol, and the current channel values are displayed in the temperature and humidity display area.
-
The compatible external transmitters (Kat.N° 30.3180.IT and 30.3181.IT) each have their own predefined serial numbers (four-digit, alphanumeric). This serial number is printed on the respective transmitter and is also briefly displayed on the transmitter's display when it is started up. The serial number is also displayed on the text display (if the transmitter has been selected as the current one on the KlimaLogg Pro). The PC software allows you to assign an
individual name to each channel (except for the logger's own measured values. The name "INDOOR" is always displayed with these values.)
Note:
If you do not know for certain which transmitter is entered for which channel in your individual channel designations, you can call up this information in learning mode. In learning mode, the serial number of the entered channel is always displayed for the corresponding channel.
In the channel display, a status information symbol can be displayed for every transmitter. It is a bar that is displayed under the channel number. If the bar flashes, the batteries of the corresponding transmitter are weak and should be replaced (in this case, a "TX" symbol also appears in the temperature display area when the corresponding channel is selected/displayed). If a bar is displayed constantly, radio contact to the corresponding transmitter has been interrupted.
Note:
After the batteries of a transmitter are changed, we recommend activating the comprehensive transmitter search in learning mode in order to re-establish contact as quickly as possible.
A transmitter can be entered into a receiving device for only three hours after it is started up. The transmitter then only transmits its current measured values and can no longer be entered on a receiving device.
LEARNING MODE:
Learning mode allows you to manually start a transmitter search. It is possible to enter a transmitter individually on every channel. Furthermore a transmitter that was already entered can be removed.
- Press SET button to enter setting mode.
- CH1-8 and LRN appear in the display.
- The channel numbers start flashing.
- If a transmitter is already entered on a channel, a triangle is displayed above the corresponding channel number.
Comprehensive channel search
- Press and hold the OK/MAX/MIN button for 3 seconds to start a comprehensive transmitter search. Drucken um eine übergereifende Sendersuche zu starten.
- LEARNING and the channel numbers appear on the display
with a black bar.
-
The KlimaLogg Pro searches for transmitter signals for three minutes.
-
If a transmitter signal is received, the bar under the corresponding channel number disappears.
-
Transmitters that have already been entered remain, and transmitters that were previously unknown are successively assigned.
Transmitter search for a certain channel
-
Press + or - button during CH 1-8 appears in the display.
-
You can select now any channel.
-
The chosen channel number starts flashing.
After the desired channel is selected, CH x appears on the display.
-
--- appears on the display if no transmitter is found, or the serial number of a transmitter appears if a transmitter is already entered on that channel.
-
Press and hold the OK/MAX/MIN button for 3 seconds to start a transmitter search for that channel. Drucken um eine Sendersuche für den ausgewählten Kanal zu starten
-
LEARNING and the channel numbers appear on the display with a black bar.
-
The KlimaLogg Pro searches for transmitter signals for three minutes.
Delete transmitter:
-
Press and hold the HIST/DEL button for 3 seconds during CH1-8 appears in the display. Drucken, während CH1-8 im Display erscheint.
-
All entered transmitters will be deleted.
-
DELETED appears in the display.
-
You can also delete single transmitters with the HIST/DEL button.
RECORDING INTERVAL SETTING:
-
Press SET button twice in normal mode.
-
INTERVAL appears on the text display.
-
The recording interval indication next to symbol REC starts flashing.
Default interval 0:15 HR:MIN correspond 15 minutes.
- The "+" or the "-" button allows you to select the recording intervals listed below:
This function allows you to set the interval in which the KlimaLogg Pro records the data sets. The KlimaLogg Pro automatically creates a data set in the corresponding interval. A data record is a snapshot of all temperature and humidity values of all channels as well as the current time and date.
The recorded data sets can be called up in history mode or transferred to a PC using the USB wireless transceiver.
MAX./MIN VALUES AND THE CURRENT DEW POINT in the selected channel:
- Press OK/MAX/MIN button in normal mode.
- MAX appears in the display and the highest humidity is displayed.
- Press the button again.
- The highest temperature is displayed.
- Press OK/MAX/MIN button again.
MIN appears in the display and the lowest humidity is displayed. - Press the button again.
- The lowest temperature is displayed
- Press the button again.
- DEW appears in the display.
- The current dew point is displayed.
- The time and date when the respective value was determined are also displayed.
- The corresponding channel number is shown on the channel display, and the assigned name or the serial number of an entered transmitter is displayed.
- To clear the recorded max.min.-values, please press and hold OK/MAX/MIN button for three seconds in any mode.
- The max./min. values will be deleted for all channels.
- The display shows the current temperature and humidity at all channels.
Note:
Max./min. values are not recorded in a data set.
Only the current max./min. values are displayed in the PC software.
ALARM SETTING MODE:
- Press and hold the ALM button for the three seconds.
- HIGH AL RH for the selected channel appears in the display.
- The upper alarm limit for the humidity is flashing.
-
With the ALM button you can select one possible alarm limit after the other:
-
High limit humidity ("HIGH AL RH", default 70%)
- Low limit humidity (LOW AL RH ^4 , default 20%)
High limit temperature ("HIGH AL ^ C default 40^ - Low limit temperature (LOW AL ^ C , default 0^ C )
- When displayed, the limit value can be changed by pressing the "+" or "-" button.
- In order to activate an alarm limit, the "OK/MAX.MIN." button must be pressed while the corresponding limit value is displayed.
- If the alarm limit is activated, the alarm on/off symbol is displayed as active on the toolbar (not crossed out).
- If the alarm limit is not activated, the alarm on/off symbol is displayed as inactive on the toolbar (crossed out).
- Press and hold + or - button in setting mode, you will enter fast mode.
- To enter normal mode again, press either ALM button again or press for at least 20 seconds no button.
Alarm function:
- In case of an alarm, Symbol ALARM (above the date) and the corresponding channel number flashes. Also the Hi or Lo Symbol is flashing if the corresponding channel is shown.
- If the alarm sound is activated, the symbol (bell) flashes and the acoustic alarm will sound for 2 minutes.
Press ALM button to stop the alarm sound. - The corresponding "Hi" or "Lo" Symbol and ALARM continue to flash until the corresponding value is again within the alarm limit or the alarm limit is deactivated in alarm setting mode.
Note:
If any alarm limit is activated (no matter which alarm limit or which channel), "ALARM" is displayed permanently in normal mode (in the time and date display area).
The alarm sound can be deactivated in the basic settings of the KlimaLogg Pro if desired.
You can use the USB wireless transceiver and the PC software to easily make all alarm settings on the PC and transfer those to the KlimaLogg Pro.
ALARM EVENT DATA SET FUNCTION:
- If an alarm is triggered, your KlimaLogg Pro automatically creates a special AlarmEvent data set.
- Like a normal data record, this data record contains a snapshot of all temperature and humidity values of all channels as well as the current time and date.
- Also he channel and the value that triggered the alarm are marked in this AlarmEvent data set.
- The AlarmEvent data sets are recorded in addition to the normal data sets and are automatically listed in the history of normal data sets.
Note:
The AlarmEvent data records can be displayed in the history mode on the KlimaLogg Pro and also in the PC software separately.
HISTORY MODE:
You also have the option to read the data sets and the AlarmEvent data sets on the KlimaLogg Pro itself.
- Press HIST/DEL button in normal mode.
- HIST appears in the display.
The memory indication is hidden. - The values of the latest data set as well as the time and date when this data set was recorded will be shown.
Use the button as follows to navigate in history mode:
"HIST / DEL" next/older record
"OK / MAX.MIN." ---- previous / recent record
"Minus," Channel change within the selected data set (to the left)
"Plus" Channel change within the selected data set (to the right)
ALM separation of the Alarm Event-data sets
"SET" Back to normal mode
- To enter the latest AlarmEvent data set, please press ALM button in HISTORY-MODE.
- The channel and the value that triggered the alarm and the corresponding upper or lower limit are also shown.
- With the HIST / DEL or OK / MAX.MIN. button you can toggle through the different AlarmEvent-records (if available).
- If you press the "ALM" button again, you return to the position of the last showing AlarmEvent data set in the normal HISTORY MODE.
- Press and hold the "HIST/DEL" or "OK/MAX.MIN." button for fast forward scrolling through the data sets (steps of 50).
- To enter normal mode again, press either SET button in HISTORY-MODE or press no button for at least 2 minutes.
PC CONNECTION:
Note:
The required PC software can be downloaded free from the download page of the TFA homepage (www.tfa-dostmann.de).
Note:
Please pay attention about pc-connection:
It must be distinguished between "synchronize" and "contact"
"Synchronize"
= introduce the hardware to each other
"Contact"
= push the wireless connection for transfer of new data
The KlimaLogg Pro can record up to 50,000 data sets and can also transfer them to a PC using the included USB wireless transceiver (Kat.No 30.3175).
A ring memory is used. That means that when all data sets have been written, the oldest existing data sets is automatically overwritten by the next new data set. On the memory indication, the logger displays the amount of data sets that has not yet been transferred to a PC (in percentage).
Synchronisation:
The KlimaLogg Pro has a USB button. When the PC software requests that synchronization be started, please press and hold the USB button on the KlimaLogg Pro for three seconds until a brief beep is heard and the USB symbol on the toolbar flashes. The synchronization must then be confirmed in the PC software.
If the synchronization is successful, another beep sounds and the USB symbol is displayed steadily. The KlimaLogg Pro starts to transfer his datas to the PC.
Initiate contact:
Synchronization is only required once in order to assign the logger to the software. In order to initiate contact to the software during the next start, it is only necessary to press the USB button once. The KlimaLogg Pro then attempts to establish the connection for 5 seconds and displays the assignment received from the software on the text display.
For information about the operating of the PC software, we recommend that you use the manual (which is available as PDF file at the installation folder of the software) or use the help function in the PC software.
Note:
You can activate an automatic USB-connection (every full hour) in the Set-mode.
The data sets that have been recorded are wirelessly transferred to the PC using the USB transceiver. The average transfer speed is 20 data sets per second. In extreme cases, it can take almost 45 minutes until all data sets have been downloaded (when the memory is completely filled).
During radio-clock reception, communication with the USB receiver is not possible and is interrupted. When reception is successful, communication is automatically restored again.
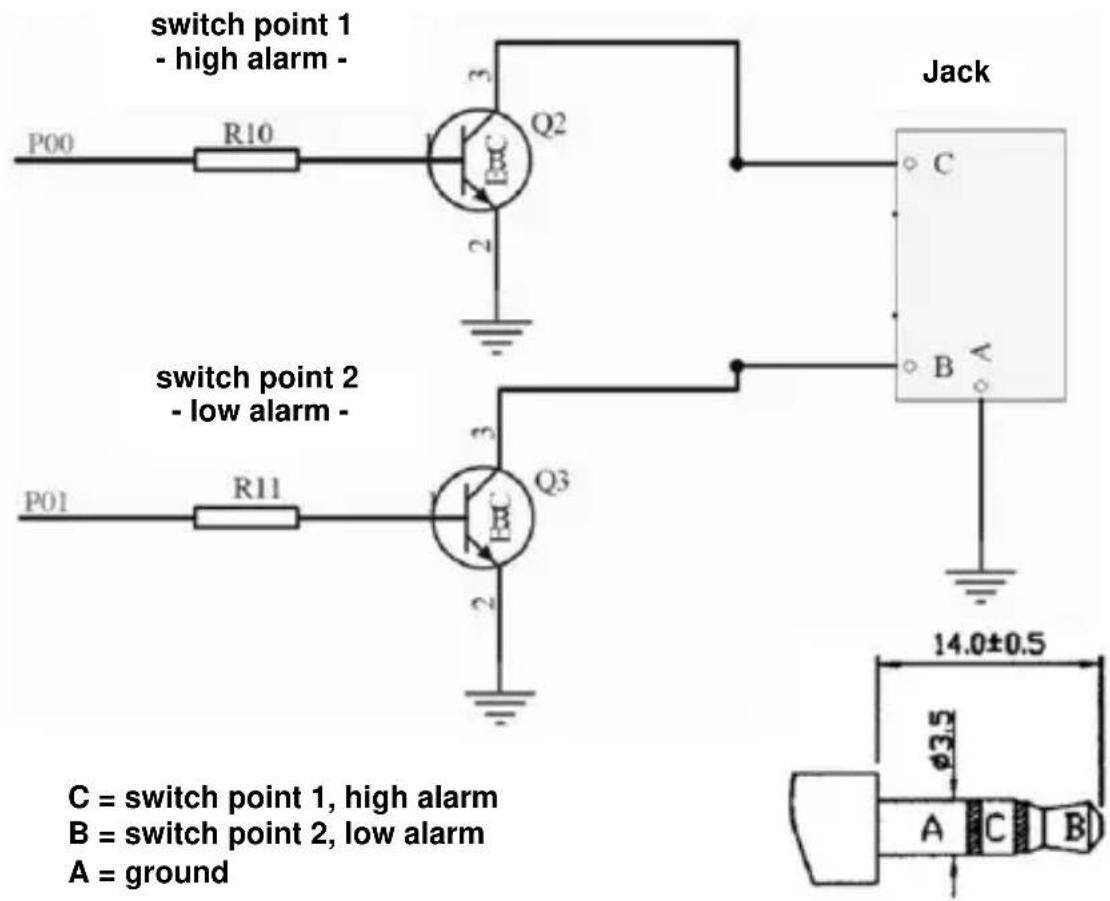
OPEN COLLECTOR HARDWARE OUTPUT:
The KlimaLogg Pro has an open collector hardware output.
This output has two switching outputs that react as follows in case of an alarm on channel 1.
Switch point 1, active when the temp. or rH is exceeded on channel 1.
Switch point 2, active when the temp. or rH is undershot on channel 1.
A switch point is active as long as the alarm limit is triggered and deactivated again as soon as the respective value is again within the standard range or the respective alarm setting is deactivated.
The open collector output has a jack for a 3.5 mm jack plug. The following drawing shows the configuration.
Technical specifications:
Maximum switching voltage: 24V. DC Maximum switching current: 400mA
Note: Comply with the technical specifications.
Please get sure, while you plug in any external hardware that this unit is not under electrical power.
We assume no liability for damage to the KlimaLogg Pro due to incorrect use of the hardware output or for external devices that are connected.
TROUBLESHOOTING:
If problems occur, we recommend that you read the corresponding section of the instruction manual in order to become familiar with the precise function and principle of operation of the device.
Logger:
When the logger malfunctions, check the batteries and reboot the device if necessary.
We recommend that you allow the KlimaLogg Pro to rest for several minutes and then insert the batteries again.
Do not use rechargeable batteries. 1.5 V batteries should be used for proper function of the KlimaLogg Pro.
Radio transmission problems:
Radio transmission problems can be occurred between the KlimaLogg Pro and a transmitter or between the KlimaLogg Pro and the USB transceiver if local conditions influence the radio signal.
A maximum transmission range of up to 100 meters to a transmitter and up to 10 meters to the USB transceiver is possible (free field in each case). In practice, the maximum possible range is reduced to the actual range due to local conditions.
Conditions that reduce the range are:
Batteries:
Weak or malfunctioning batteries can decrease the ideal transmission.
Visible obstacles:
Each visible obstacle has a corresponding negative effect on reception depending on its thickness, structure and material properties. Large metal and steel surfaces should be avoided if possible (including coated/dampened window panes).
Invisible obstacles:
The most common cause of problems is interference due to electronic factors. In this regard, some distance should be maintained to large electronic devices (1-2 meters) in order to avoid electromagnetic influences as far as possible. Any other wireless products that operate within the range of the device can also have a negative influence on the transmission contact.
When loss of radio contact occurs, consult the corresponding section of the instruction manual in order to re-establish contact. If contact cannot be re-established, or if it should be repeatedly interrupted, check the general function of your devices when they are placed immediately next to each other. If the function of the devices is generally possible, but the transmission at the desired location(s) is not reliable, we recommend changing the location of the logger and/or the transmitter/receiver in order to optimize the connection.
PC-Software:
Note that there is a help function within the PC software and that an instruction manual is included as a PDF-File within the installation folder of the software.
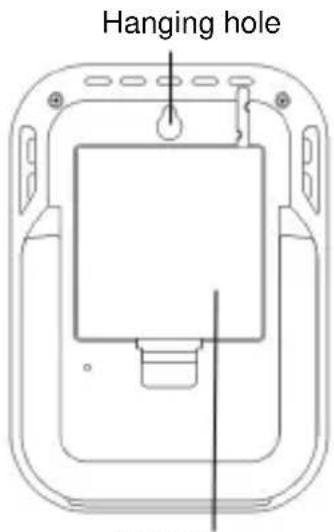
POSITIONING OF THE LOGGER
The KlimaLogg Pro can be placed on a table or mounted on a wall. Before mounting it on a wall, ensure that any transmitters in use can be correctly received at the desired mounting location.
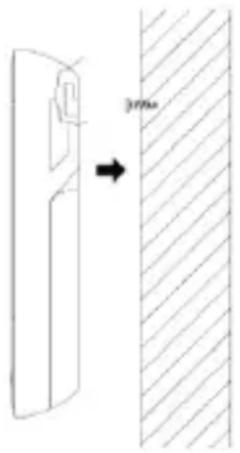
- Attach an appropriate screw (not included in the scope of delivery) to the wall and ensure that its head is approx. 5mm from the wall.
- Fold in the logger's table stand and hang it on the screw using the eyelet on its back. Ensure that the device is securely engaged with the screw before letting go.
CARE AND MAINTENANCE
-
Clean the instrument and the transmitter with a soft damp cloth. Do not use solvents or scouring agents. Protect from moisture.
-
Remove the batteries if you do not use the product for a lengthy period.
- Keep the instrument in a dry place.
BATTERY REPLACEMENT:
The user should change the batteries of the logger as soon as possible after the "battery low" indicator appears (symbol "RX" in the time and date display area). The device may malfunction if the batteries are not changed.
Note:
After the batteries are changed, it is not necessary to re-install the logger. It will automatically maintain all of the transmitters and settings that were originally entered. However, it is necessary to receive the DCF time signal again. The receipt of the entered transmitters and the radio clock signal usually occurs on a fully automatic basis.
WASTE DISPOSAL
This product has been manufactured using high-grade materials and components which can be recycled and reused.
Never throw flat batteries and rechargeable batteries in household waste.
As a consumer, you are legally required to take them to your retail store or to appropriate collection sites according to national or local regulations in order to protect the environment.
The symbols for the heavy metals contained are: Cd=cadmium, Hg=mercury, Pb=lead
This instrument is labelled in accordance with the EU Waste Electrical and Electronic Equipment Directive (WEEE). Please do not dispose of this product with other household waste. The user is obligated to take end-of-life devices to a designated collection point for the disposal of electrical and electronic equipment, in order to ensure environmentally-
compatible disposal.
SPECIFICATIONS:
Temperature:
Accuracy: +- 1°C
Measuring range: 0^ C + 50^ C with 0,1^ C resolution 32^ F + 122^ F with 0,2^ F resolution
Humidity:
Accuracy: +-3% rH (35...75% rH), otherwise +-5% rH
Measuring range : 1% .... 99% with 1% resolution
Indoor temperature checking intervals: Every 15 seconds
Indoor humidity checking intervals: Every 15 seconds
Outdoor transmitter checking interval: Every 10 seconds
Transmission range transmitter: up to 100 meters (free field)
Transmission range USB transceiver: up to 10 meters (free field)
Maximum number of data sets: 50.000
Maximum number of transmitters that can be used: 8
Transmission frequency: 868Mhz
Maximum radio frequency power: < 25mW
Power consumption: (alkaline batteries recommended)
3 × 1,5 V-Batterie Typ Mignon AA, LR6
Dimensions (H x W x D): 137 x 98 x 26 mm
Weight (without batteries): 150 gram
No part of this manual may be reproduced without written consent of TFA Dostmann. The technical data are correct at the time of going to print and may change without prior notice.
The latest technical data and information about your product can be found by entering your product number on our homepage.
EU declaration of conformity
Hereby, TFA Dostmann declares that the radio equipment type 30.3039 is in compliance with Directive 2014/53/EU.
The full text of the EU declaration of conformity is available at the
following internet address: www.tfa-dostmann.de
VOOR U MET HET APPARAAT GAAT WERKEN.
INSTALLATION ET REMPLACEMENT DES PILES:
Note:
RéGLAGES DES ALARMES:
Alimentation (piles alkalines recommendees)
3 x 1,5 V Piles Typ Mignon AA
Dimensions (H x B x T): 137 x 98 x 26 mm
Poids: (sans piles): 150 grammes
Dimensoes (A x L x P):
137 × 98 × 26 ~mm