
Citee Power - Electric scooter ARCHOS - Free user manual and instructions
Find the device manual for free Citee Power ARCHOS in PDF.
| Type of product | Electric scooter |
| Brand | ARCHOS |
| Model | Citee Power |
| Dimensions (unfolded) | 1000 × 405 × 920 mm |
| Dimensions (folded) | 1000 × 405 × 235 mm |
| Weight | 13 kg |
| Maximum load | 100 kg |
| Recommended age | 14 years and older |
| Maximum speed | 25 km/h |
| Motor | 250 W (nominal), 350 W (peak) |
| Range | 15 to 18 km |
| Battery type | Lithium-ion (Li-ion) |
| Battery capacity | 6.0 Ah (216 Wh) |
| Removable battery | No |
| Charging time | 2 to 3 hours |
| Charger | 42 V / 1.5 A |
| Charger input voltage | 90-240 V, 50-60 Hz |
| Tires | 8.5 inches, inflatable |
| Kickstand | Yes |
| Frame material | Aluminum alloy |
| Protection rating | IP20 |
| Lighting | LED |
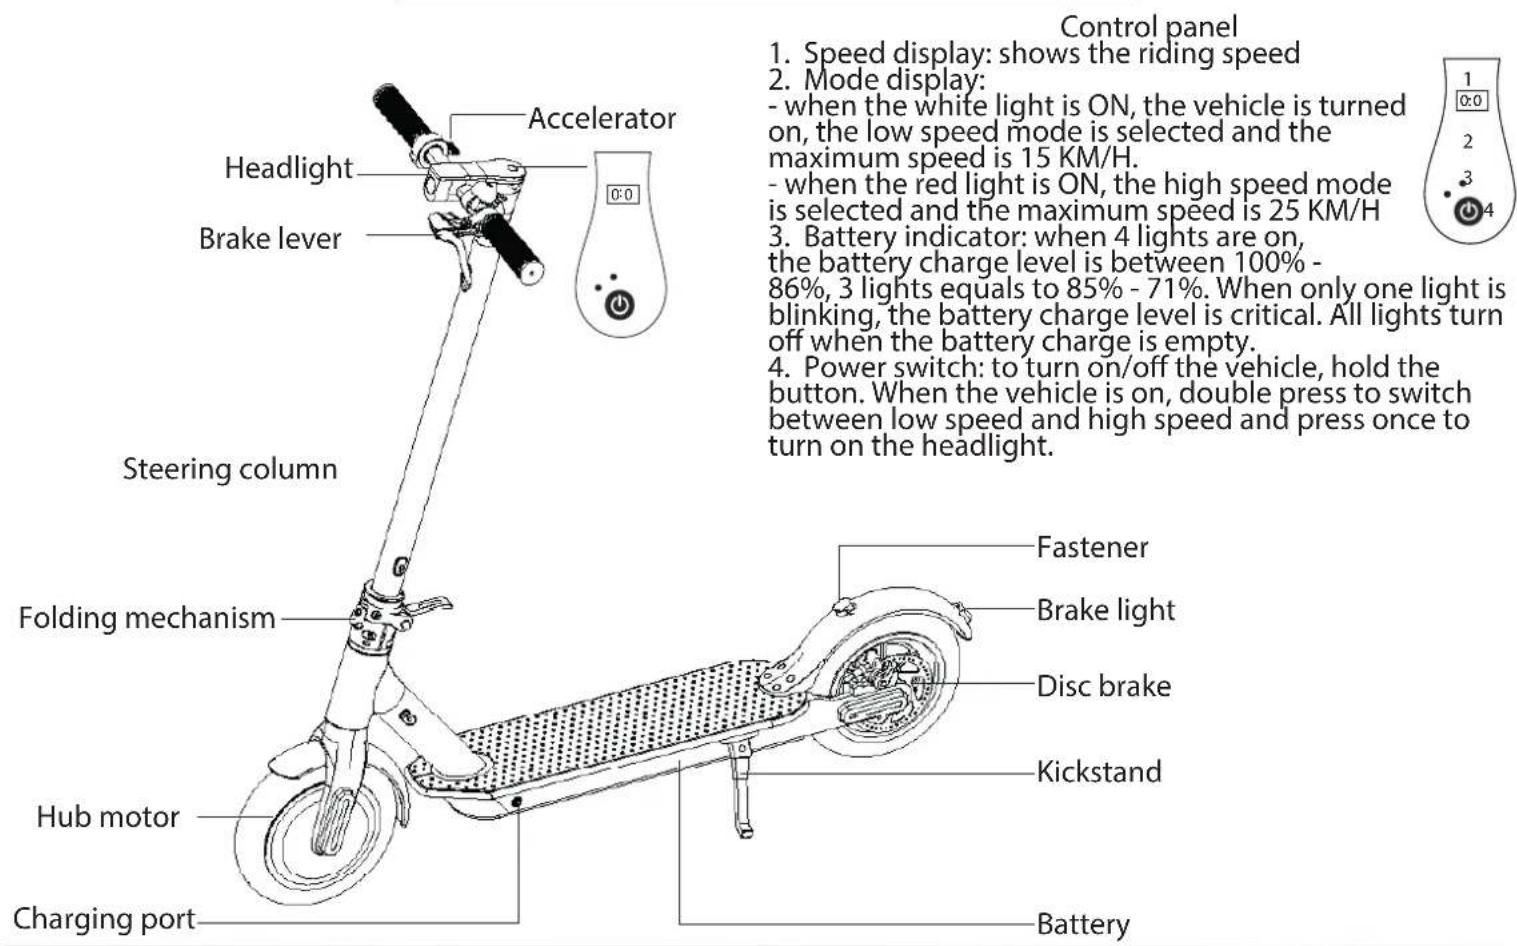
| Display | LED screen: speed and energy |
| Speed modes | 2 modes |
| Climbing angle | Approximately 15° |
| Cleaning | Soft cloth and water |
Frequently Asked Questions - Citee Power ARCHOS
User questions about Citee Power ARCHOS
0 question about this device. Answer the ones you know or ask your own.
Ask a new question about this device
Download the instructions for your Electric scooter in PDF format for free! Find your manual Citee Power - ARCHOS and take your electronic device back in hand. On this page are published all the documents necessary for the use of your device. Citee Power by ARCHOS.
USER MANUAL Citee Power ARCHOS
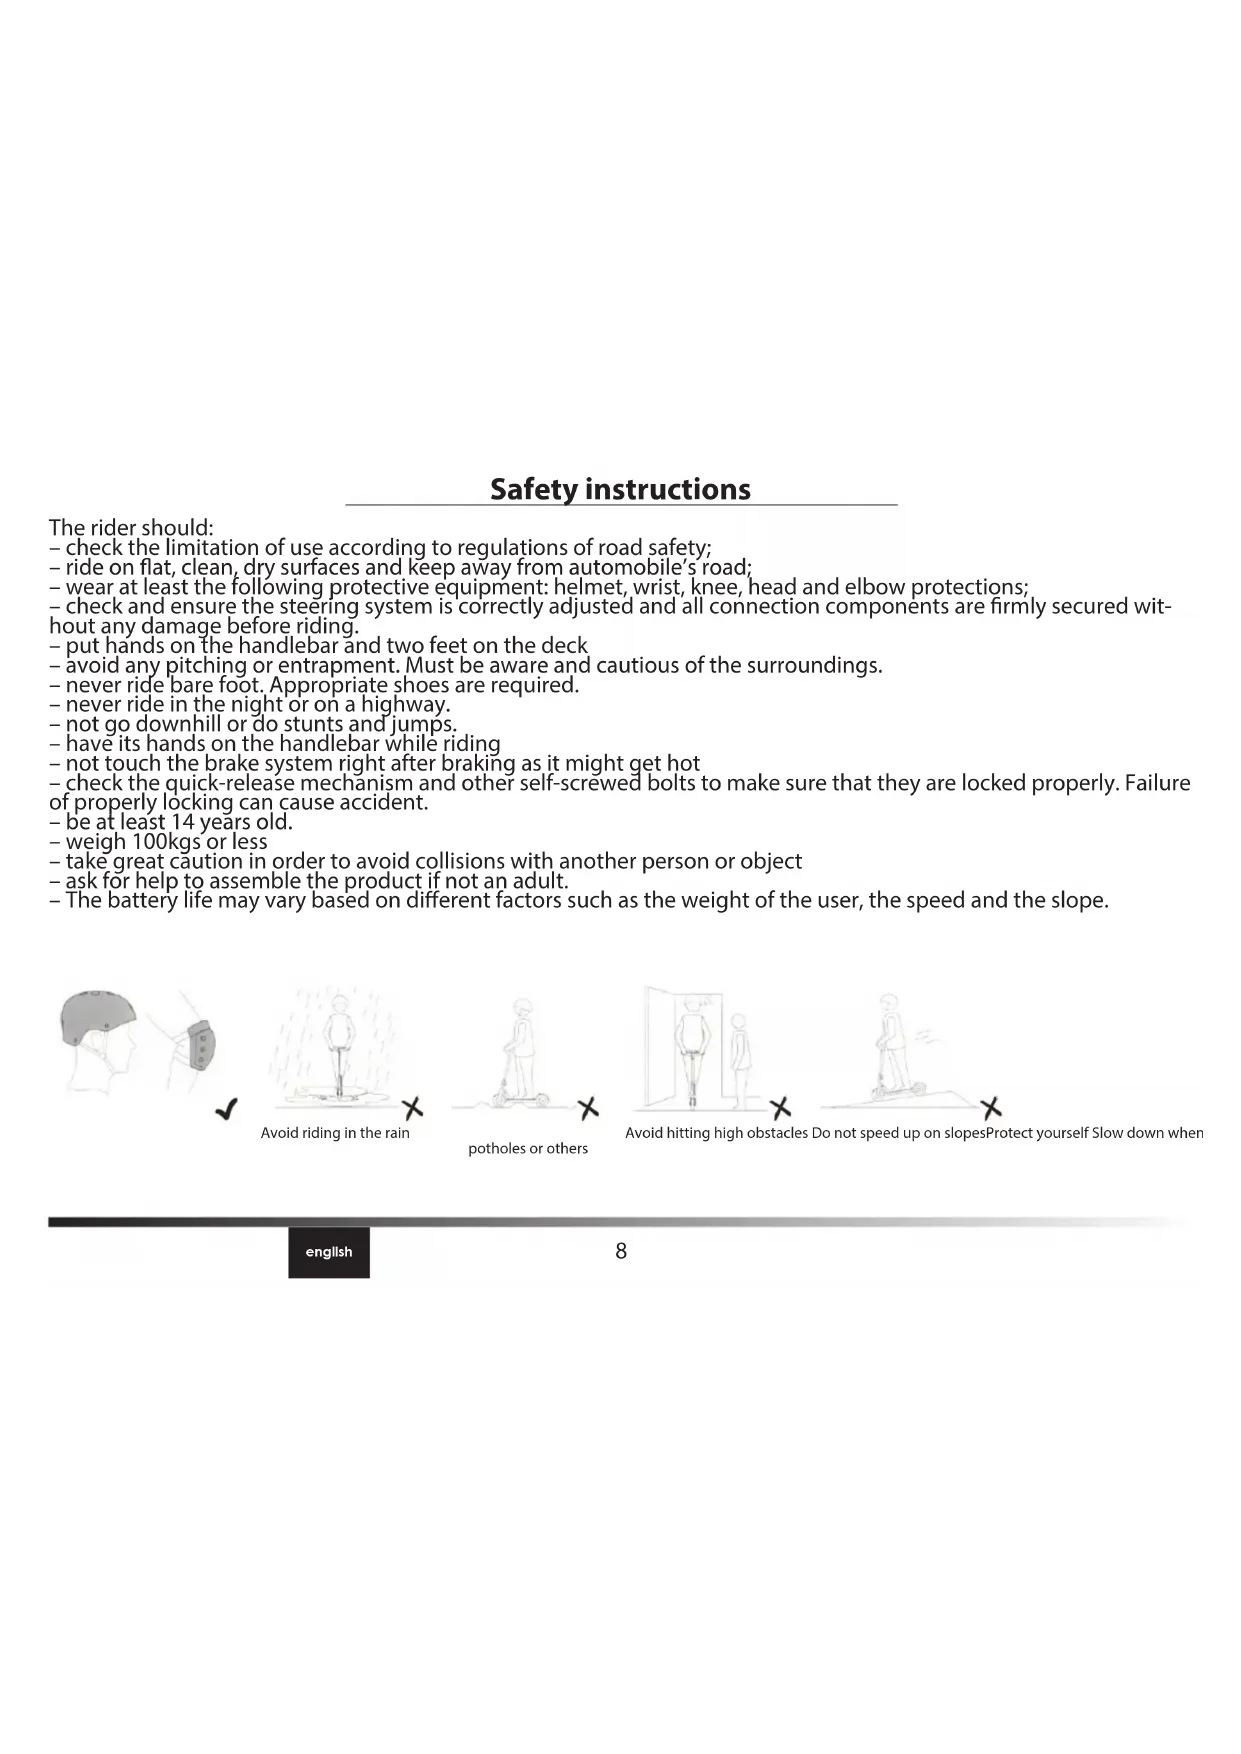
- check the limitation of use according to regulations of road safety;
- ride on flat, clean, dry surfaces and keep away from automobile's road;
- wear at least the following protective equipment: helmet, wrist, knee, head and elbow protections;
- check and ensure the steering system is correctly adjusted and all connection components are firmly secured without any damage before riding.
- put hands on the handlebar and two feet on the deck
- avoid any pitching or entrapment. Must be aware and cautious of the surroundings.
- never ride bare foot. Appropriate shoes are required.
- never ride in the night or on a highway.
not go downhill or do stunts and jumps. - have its hands on the handlebar while riding
- not touch the brake system right after braking as it might get hot
- check the quick-release mechanism and other self-screwed bolts to make sure that they are locked properly. Failure of properly locking can cause accident.
- be at least 14 years old.
- weigh 100kgs or less
- take great caution in order to avoid collisions with another person or object
- ask for help to assemble the product if not an adult.
- The battery life may vary based on different factors such as the weight of the user, the speed and the slope.

ARCHOS Citee Power
Assembling
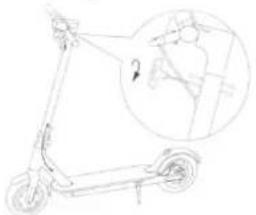

- Fix the steering column and open the kickstand.
-
Install the handlebar on the steering column.
-
Use the hexagon spanner which is in the packing box to lock the screws on both sides.
- Test the power on/off after the installation.
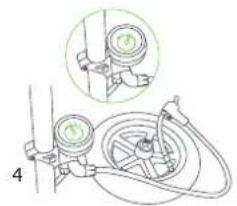
Charging
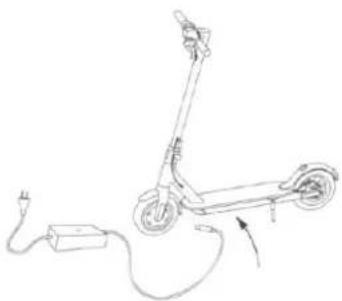

Only use the charger that was included with your product
- Connect the charger to a power supply first.
- Then connect the charger to the DC-IN Port of the vehicle.
Please, strictly follow this order to charge your device.
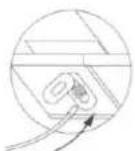
During the charging process: - The red light means charging.
- The green light means that the device is charged.
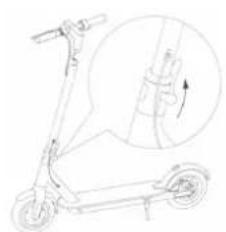
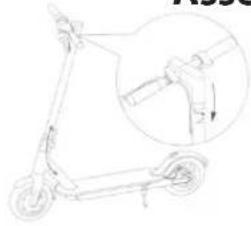
Folding & Unfolding
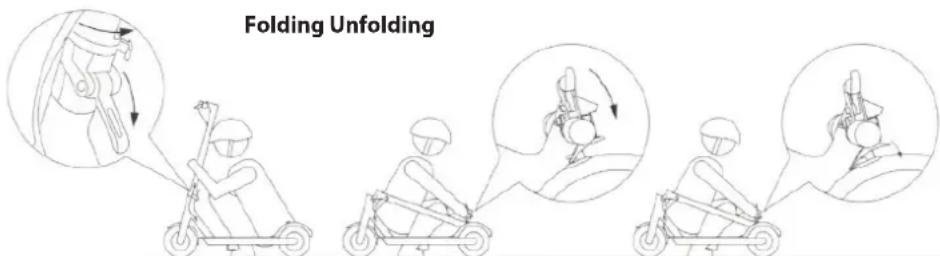
To fold, lower the hook and hold the handlebar while putting down the bar and attach it through the hook system on the back wheel.
To unfold, remove the hook system and put up the bar while holding the handlebar. Once the bar is straight, use the hook to fasten it.
Maintenance & Troubleshooting
- If dirt appears on the scooter, use a soft cloth soaked in water.
- Check for abnormalities in the wheels, break, motor and light each time you want to ride in order to prevent any accident.
If it is necessary to change wheels, select certified wheels recommended by the manufacturer or its representative and replace them according to the instructions. - No modifications other than to the manufacturer's instructions shall be made, otherwise it can impair safety.
- Check the locking hinge system and make sure that it is well locked and firmly secured before each use. Riding with a loose self-locking hinge is risky and can alter its effectiveness
- Any repair must be made by a certified staff.
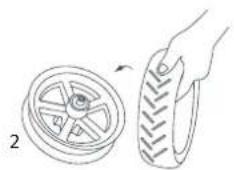
Remove the outer and inner tires
Note: Crowbars not included, and should be purchased separately.

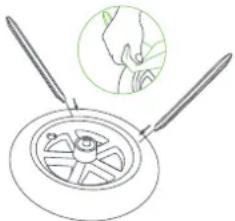
- Deflate the inner tire first. Use a tool to press the core rod in the air valve so that air is discharged from the inner tire, and use another hand to forcibly pinch the tire at different places to discharge more air.
- Select a position far from the air valve on the outer tire, use two crowbars to prize up the outer tire by about 1/6 of the circumference, and forcibly separate one side of the outer tire from the hub.
- Find the air valve, and pull the air valve out of the air valve hole of hub. To pull out the air valve more conveniently, hold the air valve of the inner tire, and pull the outer tire outwards slowly, lest the inner tire would be damaged. Remove the inner tire from the position of air valve in sequence, and separate the inner tire finally.
Note: Wrap the pointed end of the crowbar with fiber cloth so that it will not damage the inner tire and coating of the hub.
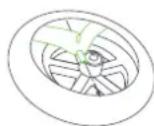
Install the inner and outer tires

- Fill a small amount of air into the deflated inner tire till the inner tire is just bulged to look round.
- Put the hub on the top of a desk. Pay attention to the direction when installing the outer tire. There is an arrow on the outer tire, and it must be consistent with the forward direction of the wheel. Use one hand to hold the hub, and use the other hand to insert one side of the outer tire in the hub groove.
- Insert the air valve of the inner tire into the air valve hole. Insert the inner tire in the outer tire clockwise and in sequence. Make sure that the air valve does not tilt. Then, insert the other side of the outer tire in the hub groove. Finally use a crowbar to install the remaining tire lips in the hub groove. After installation, pinch the outer tire to check if the inner tire is pressed by the tire lips of outer tire.
- Inflate the inner tire to 15-20 PSI, and check the safety lines at two sides of the outer tire. Make sure that the distances from the safety lines to the hub edge are consistent.
- Finally inflate the inner tire to 45-50 PSI. Tighten the air valve cap. Then, the tire assembly is completed. Note: Wrap the pointed end of the crowbar with fiber cloth so that it will not damage the inner tire and coating of the hub.
Join us
If you have more questions concerning the use of your device, visit us at:

twitter.com/archos

www.facebook.com/archos
Blog https://blog.archos.com/

http://faq.archos.com/

www.archos.com, click Support > After-sales support

www.archos.com, click Support > Downloads > Declaration of conformity
This version comes from the French translation.
Sicherheitshinweise
www.archos.com, click Support > After-sales support

www.archos.com, click Support > Downloads > Konformitätserklärng
www.archos.com, click Support > After-sales support

www.archos.com, click Support > Downloads > Declaration of conformity
www.archos.com,HaTncHtBPiTpumKa>PiCnInpoJaXHe 06cnyroByBaHHa

www.archos.com,HaTncHtBPiIka3Ka>3aBaHTaKeHHA> Deknapaia BIDNOBIDHOCTI
LcBepci noxOuNTb BiD ppaHcy3bKOro nepeKnay.
www.archos.com, click Support > After-sales support

www.archos.com, click Support > Downloads > Declaration of conformity
www.archos.com, click Support > After-sales support

www.archos.com, click Support > Downloads > Declaration of conformity
www.archos.com, clic pe Support > After-sales support

www.archos.com, clipe Support > Downloads > Declaration of conformity
The Declaration of conformity can be downloaded on our website.
https://www.archos.com/products/conformity.html
This product follows the EN 14619:2015 regulation.(Class A): 100kg max. Model: ACCITEEP
Declaration of Conformity
We, the undersigned (Manufacturer / The manufacturers authorized representative established within EEA).
| Company | ARCHOS S.A. | |||
| Address | 12 rue Ampere 91430 Igny | |||
| Country | France | |||
| Telephone number | +(33)1 89 33 16 90 | |||
| Telefax number | +(33)1 89 33 16 99 | |||
| wu@archos.com | ||||
| Certify and declare under our responsibility that the following product: | ||||
| Product Description | Kick scupper | |||
| Manufacturer | ARCHOS S.A. | |||
| Brand Name | ARCHOS | |||
| Model/Type | ACCITEEP | |||
| Is tested to and conforms with the essential test suites included in the following standards, which are in force within the EEA: | ||||
| Standard | Issue date | Reference to report/file | ||
| EN ISO 12100 | 2010 | Re-HE-OJ17122301 | ||
| EN 14619 | 2015 | Re-HE-OJ17122301 | ||
| EN 60335-1 | 2012 + A11:2014 | ATS2017781 | ||
| EN 55014-1 | 2017 | ATE20172597 | ||
| EN 55014-2 | 2015 | ATE20172597 | ||
| EN 61000-3-2 | 2014 | ATE20172597 | ||
| EN 61000-3-3 | 2013 | ATE20172597 | ||
| And therefore complies with the essential requirements of the following directives: | ||||
| Directive Name | Directive number | Further identification | ||
| Machinery Directive | 2006/42/EC | |||
| EMC Directive | 2014/30/EU | |||
| LVD Directive 2014/35/EU | Year of affixing the CE Marking: 2018 | |||
| RoHS Directive | 2011/65/EU | |||
| Gallery Directive 2006/68/EC | ||||
| The device utilizes a Lithium-ion Battery, Brand Longting, Model LT-MI-02, Capacity 216Wh | ||||
| The technical documentation as required by the conformity assessment procedure is kept at the following address for a period ending at least 10 years after the last product has been manufactured at the disposal of the relevant national authorities of any Member State for inspection: | ||||
| Company | ARCHOS S.A. | |||
| Address | 12 rue Ampere 91430 Igny | |||
| Country | France | |||
| Telephone number | +(86)755-83734678 | |||
| Telefax number | +(86)755-83734621 | |||
| wugarchos.com | ||||
| Product is CE-marked in | Europe | |||
| CE | Name of authorized officer: | Jacky Wu | Title of authorized officer | General Manager |
| Drawn up in Date | ||||
| 2018.02.02 | ||||
| ARCHOS SA | ||||
| Signature and Company Stamp | ||||
Warranty card
Warranty
Please properly keep the warranty card and purchase invoices as after-sales credential.
ARCHOS will provide the following warranty on your product providing that it has not been damaged by the user.
Warranty duration
-
Your product will be guaranteed for 2 years after purchase date, except for following components:
-
The batteries and charger are warranted for 6 months only after purchase date
-
Consumable components -like wheels- are warranted for 1 month after purchase date
Warranty will not be granted in following cases:
- Malfunction caused by use not in accordance with the provisions of the operation
instruction handbook in regards to the use, maintenance and adjustment of the scooter.
-
Damage and failure caused by users' self-refit, self-repair or manipulations (or the same actions by unauthorized third parties).
-
Failure caused by user's improper safekeeping or accidents.
4.Damage is caused by using your product in humid areas and/or damages caused by water
5.Misuse is not taken into account.