
IB7 - Coffee machine Iberital - Free user manual and instructions
Find the device manual for free IB7 Iberital in PDF.
| Product type | Professional espresso coffee machine |
| Brand | Iberital |
| Model | IB7 |
| Number of groups | 1, 2 or 3 (depending on version) |
| Dimensions (W x D x H) - 2-group model | 508 x 460 x 695 mm |
| Approximate weight | 60 kg |
| Power supply | 220-240 V / 110 V (depending on version) |
| Maximum power | 1800-6000 W (depending on configuration) |
| Boiler capacity | 6.5 L (1 group), 11 L (2 groups), 18 L (3 groups) |
| Pump pressure | 0.8-0.9 MPa |
| Boiler pressure | 0.08-0.1 MPa |
| Dosing type | Electronic, 4 programmable doses + continuous |
| Main functions | Espresso, long coffee, double, continuous, hot water, steam |
| Pre-infusion | Electronically programmable (ON/OFF time) |
| Display | Optional: non-touch LCD or touch TFT |
| Timer programming | Automatic weekly on/off |
| Nozzles | 2 steam nozzles + hot water nozzle in stainless steel |
| LED lighting | Yes, work area lighting |
| Daily maintenance | Cleaning filters, portafilters, groups and nozzles |
| Automatic wash cycle | Yes (on models with display) |
| Safety | Safety valve, safety thermostat, overheat protection |
| Water supply | Direct connection to mains (fixed) or tank (portable version) |
| Standards | CE, ETL depending on version |
| Usage | Professional (cafés, hotels, restaurants) |
Frequently Asked Questions - IB7 Iberital
User questions about IB7 Iberital
0 question about this device. Answer the ones you know or ask your own.
Ask a new question about this device
Download the instructions for your Coffee machine in PDF format for free! Find your manual IB7 - Iberital and take your electronic device back in hand. On this page are published all the documents necessary for the use of your device. IB7 by Iberital.
USER MANUAL IB7 Iberital
ESPRESSO COFFEE MACHINE
EN Installation and operation manual
¿Tienes un smartphone? Do you have a smartphone?
-
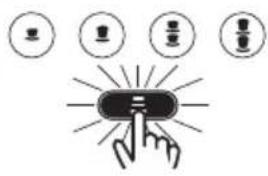
Sonda de nivel
-
Electroválvula
-
Bomba
-
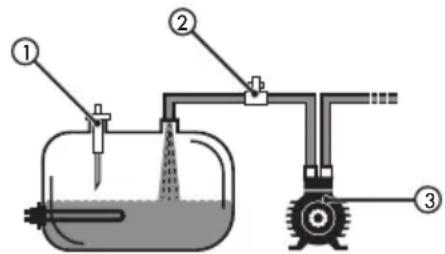
Sonda de nivel
-
Electroválvula
-
Bomba
IBERITAL
Iberital IB7 Iberital Intenz Iberital Tandem New Iberital / Expression Pro


NOTA
Iberital IB7 Iberital Intenz Iberital Tandem New: Iberital / Expression Pro


Iberital IB7 Iberital Intenz Iberital Tandem New Iberital / Expression Pro


三


flowchart
graph TD
    A["Activity 1"] --> C["Process 1"]
    B["Activity 2"] --> C["Process 1"]
    D["Activity 3"] --> C["Process 1"]
flowchart
graph LR
    A["Iberital IB7 Iberital"] --> B["Intenz Iberital Tandem New"]
    B --> C["Iberital / Expression Pro"]
New Iberital / Expression Pro

xxxxxx: Pressure Switch, ON/OFF, PID
xxxxxx: Pressure Switch | ON/OFF | PID
natural_image
Five white circular icons representing media control and playback controls (clock, power button, timer, clock icon, droplet, play button) on black background.Hora/Fecha Auto ON/OFF Contadores Auto lavado Cancelar o Volver
NOTA
natural_image
Five white circular icons representing different control and alert symbols on a black background (no text or labels)Display config. Config. Máq. y Cald. Dosis Config. Alarmas Config. Cancelar o Volver
flowchart
graph LR
    A["Iberital IB7"] --> B["Lightbulb icon"]
    B --> C["Lightbulb icon with warning symbol"]
    C --> D["Lightbulb icon with warning symbol"]
    D --> E["Lightbulb icon with warning symbol"]
    E --> F["Lightbulb icon with warning symbol"]
    F --> G["Lightbulb icon with warning symbol"]
    G --> H["Iberital Tandem New"]
    H --> I["Lightbulb icon with warning symbol"]
    I --> J["Lightbulb icon with warning symbol"]
    J --> K["Lightbulb icon with warning symbol"]
    K --> L["Iberital Tandem New"]
    L --> M["Iberital Tandem New"]
    M --> N["Iberital Tandem New"]
    N --> O["Iberital Tandem New"]
    O --> P["Iberital Tandem New"]
1.1.1. Electronic coffee machines
1.1.2. Semi-automatic coffee machines
1.2. DIMENSIONS
2. INSTRUCTIONS FOR THE USER
2.1. DESCRIPTION
2.2. PREPARATION AND START-UP
2.2.1. Stationary coffee machines
2.2.2. Portable coffee machines
2.3.1. Programming the dose on the control unit
2.3.2. Programming electronic pre-brew
2.3.3. Alarm signals
2.3.4. Programming hot water
2.3.5. Programming automatic steam
2.4. HOT WATER DISPENSER
2.5. STEAM DISPENSER
2.6. DAILY CLEANING OPERATIONS
2.6.1. Cleaning the filters and filter holders
2.6.2. Cleaning the groups
2.6.3. Cleaning the machine exterior
2.7. CHANGING THE BOILER WATER
2.8. WATER SOFTENING
2.9. DISPLAY OPERATION
2.9.1. New Iberital display
2.9.2. TFT display screen (touchscreen)
2.9.3. Display features
2.9.3.1. LCD display screen (non-touchscreen)
2.9.3.1.1. User menu display
2.9.3.1.2. Technical menu display
2.9.3.1.3. Display alarm signals
2.9.3.2. TFT display screen (touchscreen)
2.9.3.2.1. User menu display
2.9.3.2.2. Technical menu display
2.9.3.2.3. Display alarm signals
2.10. CONTROL UNIT RESET
2.11. LED LIGHTING
3. INSTRUCTIONS FOR THE TECHNICIAN
3.1. DESCRIPTION OF INTERNAL COMPONENTS
3.1.1. Iberital IB7
3.1.2. Iberital Intenz
3.1.3. Iberital Tandem
3.1.4. New Iberital
3.1.5. Iberital Expression Pro
3.2. WATER SUPPLY CONNECTION
3.3. CONNECTION TO POWER SUPPLY
3.3.1. Coffee machines with the CE marking
3.3.2. Coffee machines with the ETL mark
3.4. CONNECTION TO DRAIN
3.5. FEED GROUP
3.6. BOILER
3.6.1. Electrical resistance
3.6.2. Spring-loaded safety valve
3.6.3. Pressure relief valve
3.6.4. Automatic water filling device
3.6.5. Visual level
3.6.6. Flow control valves
3.7. PUMP/MOTOR
3.8. CONTROL PANEL
4. LIFE CYCLE MANAGEMENT
4.1. PACKAGING
4.2. EFFICIENT USE OF THE MACHINE
4.3. END OF THE APPLIANCE CYCLE
PRODUCT CERTIFICATIONS
IMPORTANT
Read the instructions in this manual carefully. It contains important safety information regarding the installation, use and maintenance of the appliance.
Read this manual before turning on the machine.
- Keep this manual in a safe place for future reference.
- After unpacking the machine, check that there are no missing components.
The packaging (plastic bags, cardboard boxes, staples, etc.) must not be left within the reach of children, as it consists of potentially dangerous items.
- Before plugging the machine in, check that the values indicated on the rating plate (16) match those of the power supply.
The installation must comply with local safety standards and must be carried out according to the manufacturer's instructions by a qualified technician who is authorized by IBERITAL DE RECAMBIOS, S.A.
The manufacturer will accept no liability for loss or damage caused through the incorrect installation of the machine.
The safety of the machine can only be assured if it is correctly earthed in accordance with the local standards in force.
In case of doubt, it is important that these basic safety measures are checked by a person who is technically qualified.
The manufacturer will accept no liability for damage caused due to a deficient or non-existent earth connection.
Check that the permitted current value for the electrical installation is sufficient for the maximum power of the machine, which is indicated on the rating plate.
In case of doubt, contact a technically qualified person in order to check if the cables in the electrical installation
are sufficient for the current consumed by the machine at full power.
There must be a fixed socket connection to the power supply for the machine. Adapters must not be used.
If extension cords are used, they must comply with local safety standards, taking special care not exceed the maximum permitted current for the same.
- This machine must be used exclusively for the purpose for which it was manufactured, that is, the preparation of coffee and the supply of hot water and steam to heat drinks. Any other use would be considered misuse, and therefore dangerous. The manufacturer will accept no liability for damage caused due to misuse of the machine.
- When using the machine, some basic safety measures must be observed:
-do not touch the machine with wet or damp feet or hands.
-do not use the machine when barefoot.
-do not install the machine in places where cleaning using water jets takes place.
-do not pull the power supply cable to unplug the machine from the socket.
-do not allow the machine to be exposed to the elements (rain, ice, sand, etc.).
-do not expose the machine to temperatures of below 0^ C without having previously emptied the contents of the boiler and the pipes. If the water in the interior freezes, disconnect the machine from the water supply and let the water in the boiler and pipes melt.
-do not expose the machine as a whole to temperatures above 70^ C.
-do not allow the machine to be manipulated by children or untrained persons, or any person who has not read this manual.
- do not remove the machine side panels in order to reset the high-limit thermostat. Only official technicians authorized by the manufacturer may remove the side panels and reset the thermostat.
- Before carrying out maintenance operations, you must ensure that the machine is disconnected from the power grid via the switch on the power distribution system.
- For cleaning operations, follow the instructions contained in this manual.
- In the case of anomalies or irregular operation, disconnect the machine prior to carrying out any maintenance work. Contact the technical personnel authorized by the manufacturer.
Repairs to the machine will be carried out by the manufacturer or an authorized after-sales service centre, using only original spare parts.
If these conditions are not met, the machine will pose a danger.
The connection to the power supply must be made via a switch which meets local safety standards.
-
The electrical supply cable for the machine must be connected to a switch with a minimum separation between contacts of 3 mm. This switch must be covered by an omnipolar circuit breaker.
-
In order to keep the power supply cable from overheating, ensure that it is totally extended.
-
The mains water pressure to which the coffee machine must be connected must be between 0.6 and 0.8 MPa.
-
The machine is only suitable for installation in places where its use and maintenance are restricted to qualified personnel.
-
The machine must be installed in a horizontal position, and must NEVER be submerged in water or any other liquid.
-
The power supply cable must not be repaired or replaced by the user. Should the cable become damaged, disconnect the machine from the power supply and
contact qualified technical personnel authorized by the manufacturer.
- Disconnect the machine from the power supply when it is not going to be used for an extended period of time.
- The average level of surface sound pressure is 71dB ± 7dB and the average sound power is 86dB ± 9 dB.
- The machine must be installed so that its highest surface is no less than 1.5 metres from floor level.
- In order to access the maintenance section of the machine, no access or unlocking tools are required. The steps to follow are:
-Remove the cup tray.
-Remove the main drainage tray.
Access to the service area of the machine is only permitted for people with practical experience and knowledge of the appliance, and in particular with regard to aspects of hygiene and safety.
-
This appliance is not designed to be used by persons (including children) whose physical, sensory or mental capacities are reduced, or who lack experience or knowledge, except when they have had supervision or instructions related to the use of the appliance by a person responsible for their safety.
-
Children must be supervised to ensure that they do not play with the appliance.
-
In order to guarantee that the machine works correctly, it is essential to respect the manufacturer's instructions and make sure that authorized personnel carry out maintenance work. In particular, safety devices should be checked periodically.
-
Do not go near the metal parts of the hot water and steam dispensers and the feed groups with bare hands or other parts of the body.
-
The water and steam emitted by the ejectors is extremely hot and can scald.
- The metal parts of the water and steam ejectors, together with the feed groups, are extremely hot under normal working conditions. They must be used with care and held only by the protected parts or with the handle or hand grip.
- Make sure that the coffee cups are completely dry before placing them on the cup warmer. Only crockery specific to this machine may be used with the cup warmer. For any queries, contact your sales centre. The heating of any other object is thus unsuitable and dangerous.
- This appliance is designed for domestic and similar use, such as:
-staff break areas in shops, offices, and other work environments; environments.
-cafes.
-staff break areas in shops, offices, and other work environments;
-bed and breakfasts.
- This appliance can be used by children aged 8 and over, if they have been properly instructed on the safe use of the appliance and understand the dangers involved. The cleaning and maintenance to be carried out by the user must not be performed by children unless they are over 8 years of age and under adult supervision. Keep the appliance and its cable out of the reach of children under 8.
- The connection to the water supply:
-Must be connected fixedly and not by movable hoses.
-Should be made through new hoses (s. steel flexible hose) supplied with the machine.
-Do not use "used" hoses.
- The appliance should not be cleaned using water jets.
1. SPECIFICATIONS
1.1. TECHNICAL SPECIFICATIONS
1.1.1. Electronic coffee machines
IBERITAL IB7 MODEL (PORTABLE)
* Electronic dosage (four programmable doses + non-stop).
* Automatic boiler water filling.
* Motor and rotary pump pressure.
* Gauge for the boiler pressure.
* Steam and hot water dispensers in stainless steel.
* Resistance of
1800-3000 W-220-240 V
1800-2400 W - 110 V
* Easy access to the boiler drainage tap.
* 16/32 A starter relay.
* Water deposit maximum and minimum level indicators.
IBERITAL IB7 MODEL
* Electronic dosage (four programmable doses + non-stop).
* Automatic boiler water filling.
* Motor and rotary pump pressure.
* Gauge for the pump and boiler pressure.
* Control of the temperature safety limit of heating elements.
* Two stainless steel steam dispensers.
* One hot water dispenser tap.
* Resistances of
1800-3000-3500-5000-6000 W - 220-240 V
1800-2400 W - 110 V
* Easy access to the boiler drainage tap.
* Electronic control unit.
* 20/32 A starter relay (Optional).
IBERITAL INTENZ MODEL
* Electronic dosage (four programmable doses + non-stop).
* Automatic boiler water filling.
* Motor and rotary pump pressure.
* Gauge for the pump and boiler pressure.
* Control of temperature safety limit for heating elements.
* Two stainless steel steam dispensers.
* Resistances of
1800-2400-3000-3500-3800-5000-6000 W - 220-240 V
1800-2400 W - 110 V
* Easy access to the boiler drainage tap.
* Electronic control unit.
* 20/32 A starter relay (Optional).
NEW IBERITAL MODEL
* Electronic dosage (four programmable doses + non-stop).
* Automatic boiler water filling.
* Motor and rotary pump pressure.
* Gauge for the pump and boiler pressure.
* Control of temperature safety limit for heating elements.
* Two stainless steel steam dispensers.
* Resistances of 3000-3500-3800-5000-6000 W - 220-240 V
* Easy access to the boiler drainage tap.
* Electronic control unit.
* 20/32 A starter relay.
* Electronic dosage (four programmable doses + non-stop).
* Automatic steam/hot water boiler filling.
* Motor and rotary pump pressure.
* Gauge for the pump and steam/hot water boiler pressure.
* Control of temperature safety limit for heating elements.
* Two stainless steel steam dispensers.
* 2 and 3 Groups:
Resistances of 3000 W (steam/hot water boiler) + 1000 W (water boiler for coffee) - 220-240 V.
* Easy access to the boiler drainage tap.
* Electronic control unit.
* 20/32 A starter relay.
1.1.2. Semi-automatic coffee machines
NEW IBERITAL MODEL
* Automatic boiler water filling (Optional).
* Motor and rotary pump pressure.
* Gauge for the pump and boiler pressure.
* Control of temperature safety limit for heating elements.
* Two stainless steel steam dispensers (Optional).
* Resistances of
3000-3500-3800-5000-6000 W - 220-240 V
2400 W - 110 V
* Easy access to the boiler drainage tap.
* 20/32 A starter relay (Optional).
1.2. DIMENSIONS
| DIMENSIONS | ||||
| Model N° Groups Width (mm) Height (mm) Length (mm) | ||||
| IBERITAL IB7 Portable 1 508 460 445 | ||||
| IBERITAL IB7 | 1 508 460 | 445 | ||
| 2 compact 508 | 460 540 | |||
| 2 508 460 | 695 | |||
| 3 508 460 | 870 | |||
| IBERITAL INTENZ | 1 585 415 | 476 | ||
| 2 585 415 | 790 | |||
| 3 585 415 | 964 | |||
| IBERITAL TANDEM | 2 595 575 | 785 | ||
| 3 595 575 | 959 | |||
| NEW IBERITAL | 2 568 455 | 783 | ||
| 3 568 455 | 953 | |||
| IBERITAL EXPRESSION PRO | 2 602 455 | 845 | ||
| 3 602 455 | 1016 | |||
IMPORTANT
Specifications may be subject to change without prior notice.
2. INSTRUCTIONS FOR THE USER
2.1. DESCRIPTION
1) Coffee feed control buttons (CPU)
2) One-cup espresso feed
3) Two-cup espresso feed
4) Non-stop coffee feed
5) One-cup coffee feed
6) Two-cup coffee feed
7) Steam tap
8) Hot water dispenser
9) Steam dispenser
10) Pump gauge
11) Boiler pressure gauge
12) Three-position switch
13) Red ON/OFF indicator light
14) Green ELEMENTS indicator light
15) Tray
16) Rating plate
17) Removable side panels
18) Hot water control knob
21b) Filter holder for two coffees
21c) Filter for one coffee
21d) Filter for two coffees
21e) Cleaning filter
22) Permanent thermo-magnetic switch
(Not included. Must be installed by a local authorized technician)
(Not included. Must be installed by a local authorized technician)
24) Display
25) Drain valve
26) Deposit water inlet (Iberital IB7 Portable)
27) LED lighting
28) USB cable
29) Auto-frother steam outlet (optional)
30) Hot milk button
31) Frother button
2.2. PREPARATION AND START-UP
2.2.1. Stationary coffee machines
a) Open the water stopcock (23).
b) Connect the permanent thermo-magnetic switch (22).
c) Machines with single boilers: Press the switch of the machine (12) and wait until the automatic level control finishes filling the steam/hot water boiler with water.
d) Machines with two boilers: Press the switch of the machine (12) and wait until the automatic level control finishes filling the steam/hot water boiler with water. The coffee boiler will fill thanks to the mains pressure (it is recommended that the non-stop coffee buttons (4) are pressed until water comes out of the groups).
e) Set switch (12) to position 2 and the heating elements will begin to heat the water in the boiler. (Only necessary on models with 3-position main switch. On models with 2-position main switches, the machine will begin to heat when the level sensor is covered with water).
Wait until the working pressure is reached. The green indicator light (14) will go out. The boiler pressure gauge will indicate the desired working pressure (0.08 - 0.1 MPa). In the case of the Iberital Expression Pro machine, the desired working pressure is (0.1-0.12 MPa).
IBERITAL
2.2.2. Portable coffee machines
a) Fill the water deposit with 3 litres of water.
b) Connect the machine to the power supply.
c) Set the switch (12) to position 1. The red indicator light (13) will come on. This is followed by the automatic filling of the boiler.
d) Set the switch (12) to position 2. The green indicator light (14) will come on.
Wait about 10 minutes until the working pressure is reached, as indicated by the green range on the gauge (10, 11). The green indicator light (13) will go out.
General warnings
It is recommended that, once the working temperature has been reached, water is made to flow through the groups for a moment in order to induce the thermosyphon current, thus enabling the system to reach the ideal temperature to begin working.
It is also of the utmost importance that the filter holder structures are fitted to the groups, so that the metal on the filter holders also reaches the necessary temperature to dispense correctly the first coffees.
When turning on the main switch, it must be put into position 1 before moving on to position 2.
While there is no pressure in the machine boiler or, similarly, if it is not yet hot, do not press the hot water button. If it were pressed, cold water would be obtained.
It is important to remember that the buttons and control units receive signals in the two main switch supply positions on the machine.
Position 1
- Level sensor
- Solenoid valve
- Pump
In the first position, the switch will only operate the automatic water filling, but not the heating elements.
Position 2
- Level sensor
- Solenoid valve
- Pump
In the second position, the switch receives a signal from the starter relay (optional) and this allows the machine to be heated and dispense coffee. It is recommended that this be done when the machine is hot and the working pressure in the boiler(s) has been reached, as indicated by the green range on the gauge (11), and/or shown on the display, if the machine has one.
NOTE
If our model only has a 2-position main switch (ON-OFF), when it is switched on the boiler will begin to fill, if not already full. When the machine detects that the minimum level of water has been reached, it will begin to heat the water to make the coffee.
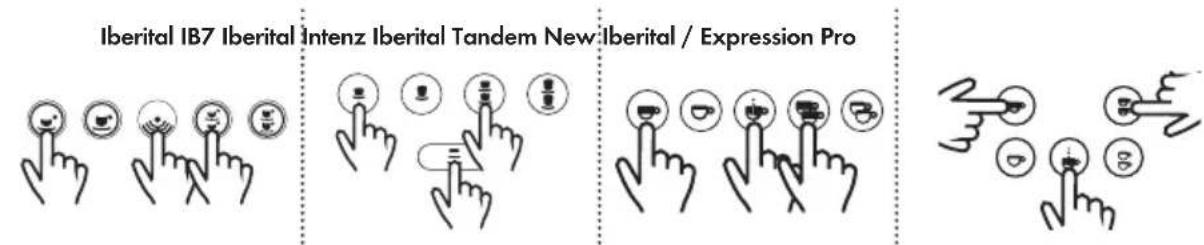
2.3.1. Programming dose on the control unit (not available on semi-automatic versions)
In order to program the dose you must press the 'non-stop' button on the left button pad (group 1) for 5 seconds, and the non-stop coffee LED will come on (*).
Iberital IB7 Iberital Intenz Iberital Tandem New Iberital / Expression Pro

NOTE
If you have already entered programming mode and do not press any button to indicate a dose within 30 seconds, the button pad will go to stand-by position.
At this point programming can be started for the four coffee selections. When the desired quantity of coffee is obtained, press the selection once again and the dosing will stop. The same operation will have to be followed for all buttons.
By carrying out this process all the groups will be programmed automatically.
NOTE
If we wish, we can operate in the same way for other groups, in order to set a customised dose for each of the groups.
Iberital IB7 Iberital Intenz Iberital Tandem New Iberital / Expression Pro

The selections that are already programmed will appear with their LEDs off. When this happens it is still possible to modify the dose in the same manner as indicated above.
Iberital IB7 Iberital Intenz Iberital Tandem New Iberital / Expression Pro


三


flowchart
graph TD
    A["Start"] --> B["Process Step 1"]
    B --> C["Process Step 2"]
    C --> D["End"]
If the LED for the selection set is flashing during the programming of the dose, it means that the volume counter is not sending a signal to the control unit, and at the end of the dosing the dose will be zero. Programming without water. It is recommended that the flow meters be checked.
NOTE
If your model has a Display, you can see a screen indicating that it is in the programming menu.
Non-touchscreen display.
Doses setting
Select within 30 s
Touchscreen display.

Manual doses programming activated.
NOTE
If your model has a touchscreen display, then it is possible to program the dose, by directly modifying the volume of water through the display itself.
2.3.2. Programming the electronic pre-brew (not available on all models)
The control unit has a function called 'pre-brew'. Pre-brew can be enabled or disabled. If your machine has a visual display, it will be possible to carry out this action via an option on the display. If it does not have a display, the function is performed in the following manner:

To enable pre-brew, switch off the machine's main switch and press the button 1 espresso on the left button pad (group 1), keep it pressed and set the main switch to position 1 or 2, either will do, and the 1 espresso LED will light up.
Release the button and set the switch to zero (OFF) and then set it in the working position (position 2).
To disable pre-brew, set the machine's main switch to zero (OFF) and press the button 1 coffee, keep it pressed and set the main switch to position 1 or 2, either will do, and the 1 coffee LED will light up.
Release the button and set the switch to zero (OFF) and then to position 2.
2.3.3. Alarm signals
A. EXCESS BOILER WATER FILLING TIME
The control unit has a waiting time for when the boiler is filling with water.
If the level sensor is not covered with water within one minute (two minutes Expression Pro), the control unit safety control will stop the water filling process and the motor.
The signal for the control unit alarm is the five LEDs flashing simultaneously. (In all groups).
This alarm signal could be caused by a lack of mains water supply to the machine, an obstruction of the water inlet or a problem with the control unit that is preventing the signal for automatic water filling from being sent.
Warning
This alarm signal is always activated during the filling process when this immediately follows machine installation. This is due to the fact that it takes more than 1 minute to fill the boiler. When this happens, set the switch to zero and return it to the filling position in order to continue filling the boiler.

flowchart
graph LR
    A["Iberital IB7 Iberital"] --> B["Intenz Iberital Tandem New"]
    B --> C["Iberital / Expression Pro"]
B. NO IMPULSES FROM THE FLOW METER (5 seconds)
If during feed there are no impulses from the flow meter, the control unit will detect it and the LED for the selection being dispensed at that moment will light up and flash, but dispensing will not stop.
This alarm signal is produced due to a bypass of the signal from the flow meter cover, or due to a poor connection, or lastly due to some internal problem in the control unit. If this occurs contact the after-sales service.
C. EXCESS FEED FROM THE FLOW METER
If the coffee feed time is over 2 minutes (3 minutes Expression Pro), the control unit detects an excess in the normal coffee feed time.
Coffee feed will be stopped automatically and the LED for the chosen selection will remain flashing.
This alarm signal is either due to an obstruction to the flow of water, and the control unit receives slower and more drawn out impulses than during the normal feed time, or because the coffee is ground very finely or packed in the filter too tightly, causing excess weight, thus preventing the water from flowing with suitable fluidity.
D. DEPOSIT LEVEL INDICATORS (only portables machines)
This machine has a system for indicating both minimum and maximum levels, which works as follows:
Minimum Level - When the water tank reaches its minimum level, the control unit cuts the current to the button pad and the heating element, in order to prevent damage to both the element and the pump due to a lack of water. At that moment the LEDs on the button pad will begin to flash, advising the user that the deposit must be filled.
IBERITAL
When we begin to fill the deposit manually and the water covers the minimum level sensor, the LEDs will turn off and the control unit will once more allow the electrical current to reach the element and pump.
Maximum Level - When we are filling the tank manually with water and reach the maximum level, the LED on the non-stop button lights up, indicating that we must stop adding water to the deposit. This LED will remain lit until the water level is below the maximum level sensor.
GENERAL WARNING
If your machine has a visual display, the respective alarm will be shown on the screen based on the incident (see the section on visual display operation).
2.3.4. Programming hot water (only available on Iberital Expression Pro model and optional in New Iberital)
Enter programming mode, pressing the "non-stop" button for 5 seconds on the button pad for any group; the "nonstop" LED will light up.
- If the option 'NO' MIXED TEA is selected on the visual display or for machines without visual display:
- Press the hot water button. At that moment hot water will begin to come from the boiler.
- When the desired dose has been obtained, press the hot water button again.
- The hot water setting has been programmed.
- If the option MIXED TEA is selected on the visual display or for machines without visual display:
- Press the hot water button. At that moment mixed water (hot/cold) will begin to come from the boiler.
- Press the hot water button. At that moment hot water will begin to come from the boiler.
- When the desired dose has been obtained (first press + second press), press the hot water button again.
- The final hot water setting has been programmed.
NOTE (versions with visual display and miscellaneous solenoid valve)
At the same time there is a manual regulator found on the side of the water mixing solenoid valve.
2.3.5. Automatic steam programming (optional, only available on some models)
When our model has automatic steam (which will always be located on the left), on going through the technical menu we will see the option to change various temperatures:
- LCD display screen (non-touchscreen): on going through the technical menu, we will see the option to change two temperatures:
- Temperature 1: This is the final temperature of the milk, whether hot milk or frothy milk.
- Temperature 2: This is the temperature from which air begins to be injected together with the steam, in order to improve the froth of the milk.
NOTE
Iberital recommends setting the following temperatures:
• Temperature 1 not above 80°C (176°F).
• Temperature 2 between 30°C (86°F) and 40°C (104°F).
- TFT display screen (touchscreen): In the technical menu we can modify the setting of automatic steam by going to the option "Frother temperature", which can be found in the technical menu, under the first option "Display config." (see section 2.9.3.2.2 of this manual).
- Hot milk: This is the final temperature of the hot milk.
- Frothy milk: This is the final temperature of the frothy milk.
- Air with steam: This is the temperature from which air begins to be injected together with the steam, in order to improve the froth of the milk.
- Compensation for the real temperature of the milk: This is the variation in temperature between the centre of the volume of milk in the jug, and the real temperature acquired by all the milk. This is due to the fact that the temperature sensor is positioned in the centre, exactly where the steam is released.
NOTE
Iberital recommends setting the following temperatures:
• Hot milk not above 80°C (176°F).
• Frothy milk not above 70°C (158°F).
- Change of steam to water between 30^ (86°F) and 40^ (104°F).
- Compensation for the real temperature of the milk, approximately 10^ (50°F).
2.4. HOT WATER DISPENSER
Place the cup or any other recipient under the hot water dispenser (8). Turn the hot water knob (18) in order to begin dispensing water and turn it back again to stop it, or press the hot water dosage button if your machine features one.
2.5. STEAM DISPENSER
a) Twist the steam dispenser (9) towards the tray (15).
b) Open the steam tap (7), and in order to remove condensation let the steam flow out until no water droplets accompany it.
c) Position the steam dispenser (9) inside the liquid recipient you wish to heat. Turn the knob (7) to release the steam. In order to obtain a frothy cappuccino, keep the mouth of the steam ejector close to the surface of the milk. This will create an abundance of foam/froth.
d) When the liquid has reached the desired temperature, close the steam tap.
e) Move the recipient containing the liquid, removing the steam dispenser (9) and aiming it at the tray (15).
f) Open the steam tap (7) for a moment, in order to remove residue stuck to the steam dispenser (9). Clean the steam dispenser (9) with a damp cloth or sponge.
2.6. DAILY CLEANING OPERATIONS
Daily maintenance is recommended to increase the useful life of the machine and reduce its environmental impact.
2.6.1. Cleaning the filters and filter holders
Rinse the filters and filter holders in hot water. Leave them in hot water overnight in order to dissolve the grease left by the coffee.
2.6.2. Cleaning the groups
- Machines without visual display
a) Substitute the normal filter (21c) or (21d) for the cleaning filter (blind) (21e).
b) Add two spoonfuls of detergent (special for group cleaning) to the cleaning filter (21e).
c) Insert the filter holder in the feed group.
d) Press the non-stop feed button and let it run for 15 seconds (as with the automatic cycle).
e) Stop the dispensing by pressing the button again; during the decompression of the unit, the hot water and the detergent will clean the dispensing group interior.
f) Pause it for 2 seconds.
g) Repeat points (d), (e) and (f) until 7 wash cycles have been completed
h) Rinse the unit having removed the filter-holder by pressing any of the dispensing buttons for 5 - 10 seconds to remove detergent residue.
- Machines with visual display (automatic washing):
This function has to be carried out when the coffee machine is in the working position (hot machine). This option will make the machine perform the cleaning function for the groups 7 times consecutively:
- 15 seconds of feed
- 2 seconds at rest
New Iberital / Expression Pro

Press (on any button pad of any group) the "non-stop" button, and the "2 espressos" button at the same time; the LEDs for "1 coffee" and "2 espressos" will light up.
• LCD display screen (non-touchscreen):
Once the combination of buttons has been pressed on any control panel, the display will show:
Rinsing
At the end of the cleaning cycle the machine will return to the start MENU.
The cleaning cycle procedure can be carried out on all groups at the same time.
- TFT display screen (touchscreen):
In addition, we can perform this function by initiating the auto-wash function from the user menu (section 2.9.3.2.1). The system will keep us informed regarding the status of the process. Once completed, it will notify us via a message, and we will have to confirm it in order to quit the option.
2.6.3. Cleaning the machine exterior
The machine's exterior panels should be cleaned with hot, soapy water (not boiling) and completely rinsed using a soft cloth or sponge. Do not use abrasive products, as the panels could be scratched.
2.7. CHANGING THE BOILER WATER
- Disconnect the machine by setting the switch (12) to the off position.
- Open the steam knobs (7) until no more steam comes out. (Use the steam dispensers (9) with care, as during normal operations they are extremely hot).
- Close the steam knobs (7).
- Open the drain valve (25) until the boiler is completely empty.
- Close the drain valve (25).
- Connect the machine, setting the switch (12) to position 1 (or switch (22) to ON) and wait until the automatic control system completes the filling of the boiler from the mains water supply.
2.8. WATER SOFTENING (NOT INCLUDED)
The water softener removes lime from the water supply, preventing the formation of deposits and scale.
The water softener deteriorates with continuous use, and must be cleaned periodically or replaced. This process must return the softener to its original condition. The presence of lime scale in the boiler due to an oversight of this process will render any manufacturer's guarantee void. (The water softener is not included.)
2.9. DISPLAY OPERATION (OPTIONAL)
2.9.1. New Iberital display

2.9.3. Display features
2.9.3.1. LCD display screen (non-touchscreen)
The display versions have two lines with 16 characters on each.
IBERITAL
- OFF position:
- When the display is in the OFF position, it will show OFF and the time. In order to access the OFF mode, press the I/O button.
OFF
hh:mm
- ON position:
- Press the I/O button and the display will show the boiler temperature in °C, the time and the name entered.
XXXX ^0 C
hh:mm
User MENU display: When the coffee machine switch is in position 2 and the display in the ON position (on the screen the name entered will be shown), press the MENU for at least 5 seconds, and enter the user level programming mode.
Technical MENU display: When the coffee machine switch is in position 2 and the display in the OFF position (on the screen the word OFF will be shown), press the MENU for at least 10 seconds, and enter the technical level programming mode.
IMPORTANT
Once inside the MENU, pressing on the MENU allows you to move through the display functions. Pressing the OK will confirm the chosen function and confirm the changes.
To change between two functions, the UP button moves you up an option, and the DOWN will drop you down an option. (See image in sections 2.9.1.)
2.9.3.1.1. User menu display
- Programming the TIME and weekly ON/OFF for the machine:
When the words SET CLOCK appear, confirm the selection by pressing the OK button. The programming of the time and day of the week is very important, because this information will be used by the control unit for the weekly ON/OFF activation of the machine.
Set clock
HH.MM.XXXXXXXXXX
HH: Hours
mm: Minutes
xxxxxxx: Day of the week
Press the UP/DOWN buttons to change the HOURS and press OK to confirm and move on to the MINUTES and the day of the week. After confirming the day of the week, it will automatically go into the weekly ON/OFF programming mode.
Auto: ON/OFF AAR:hh.mm
AAA: ON/OFF
hh: ON/OFF hours
mm: ON/OFF minutes
Pressing the UP/DOWN buttons will vary the HOURS until the desired hour is found, and then you must press the OK button to confirm the selection and move on to the option of MINUTES (mm), carrying out the same operation when the word OFF appears and the rest day.
IMPORTANT
So that the machine does not come on automatically, enter (--) hyphens in the selection of HOURS (hh.mm) for ON and OFF and the rest day.
- Visualization of the counters:
Counters
In this section all consumption levels may be read.
- Press the OK button and the display will show:
Litres
showing the number of litres of water consumed to date.
- Press the MENU button and the display will show:
Service XXXXXXXXXXXX
Showing the number of cycles to date. (Activations for any of the dose selections.)
- Press the MENU button and the display will show:
Coffees total
showing the total number of coffees dispensed to date.
IMPORTANT
In order to erase the total number of coffees and reset the counter to zero for the total number of coffees, press the "2 coffees" and "2 espressos" buttons on GROUP 1 (on the left).
the display will then show:
Coffees total Total reset
NOTE
Erasing the total coffee count does not erase the reading for the litres of water consumed. To eliminate the alarm for CHANGE/REPLACE FILTER for the litres of water consumed, see the section WATER FILTER CHANGE/REPLACEMENT ALARM.
- Press the MENU button and the display will show:
zzzzz GR: HHHHHH
zzzzz:1 espresso, 1 coffee, etc.
GR: Group 1/2/3
xxxxxxx: N° of coffees
showing the number of coffees by dose and by group.
Continuing to press the MENU button will show the number of coffees by selection.
2.9.3.1.2. Technical menu display
Remember that to access the Technical MENU, the display must be in the OFF position (the display will show the word OFF). If it is in the ON position (the display will show the name entered), in order to access the OFF mode, press the I/O (ON/OFF).
Once in OFF mode, in order to access the technical menu, you must press the the MENU button for around 10-15 seconds (based on the display used) and go into technical level programming mode.
- The first option which appears is:
Language
XXXXXXX
Where you can select the language (English, French, German, Spanish, Italian) via the UP/DOWN buttons. Once the desired language has been selected, press the MENU button and move on to the following option:
Temperature/Hora Vis.
ENABLED/DISABLED
The display will give you the option of showing the rest position of the machine, the TIME and the TEMPERATURE on the top line of the display.
Using the UP/DOWN buttons, select "ENABLED" or "DISABLED" from this option.
- If "ENABLED" is selected, press the MENU button to move on to the following option:
Name 2
H
On the display, Name 2 (the bottom line on the display) will appear, with the cursor situated in position 1 (of the 16 characters on the line). With the UP/DOWN buttons, select the letter or number required (BLANK SPACE! " # \$ % &...).
Pressing OK confirms the character and the cursor advances to the following character.
Continue this process until all the characters on the line are completed.
Once this procedure is completed, press the MENU button to move on to the following option:
Line rotation 2
ENABLED/DISABLED
On the display the name on Line 2 will either move about or remain static; with the UP/DOWN buttons, select "ENABLED" or "DISABLED" and press the MENU button to move on to the following option:
- If "DISABLED" is selected, press the MENU button to move on to the following option:
Name 1
XXXXXX
The name appearing on Line 1 (upper) of the display can be programmed, with the cursor in position 1 (of the 16 characters on each line) and using the "+" "-" keys to select the different letter or number
(BLANK SPACE! " # \$ % &...). On finding the desired character, press the OK button to confirm and move on to the following character. Continue the process until all the characters are done.
Once this procedure is completed, press the MENU button to move on to the following option:
Line rotation 1 ENABLED/DISABLED
On the display the name on Line 1 will either move about or remain static; with the UP/DOWN buttons, select "ENABLED" or "DISABLED" and press the MENU button to move on to the following option:
Name 2 HHHHH
The name appearing on Line 2 (lower) of the display can be programmed, with the cursor in position 1 (of the 16 characters on each line) and using the +/- keys to select the different letter or number (BLANK SPACE!" # \$ % &...). On finding the desired character, press the OK button to confirm and move on to the following character. Continue the process until all the characters are done.
Once this procedure is completed, press the MENU button to move on to the following option:
Line rotation 2 ENABLED/DISABLED
On the display the name on Line 2 will either move about or remain static; with the UP/DOWN buttons, select "ENABLED" or "DISABLED" and press the MENU button to move on to the following option:
Crono Function ENABLED/DISABLED
The display will show the "CRONO FUNCTION" for each group; use the UP/DOWN buttons to ENABLED or DISABLE the function.
The feed time will appear each time we make a coffee; if it is DISABLED the selected option will appear on the display. Once this procedure is completed, press the MENU button to move on to the following option:
Doses setting ENABLED/DISABLED
The display will show the dose setting mode. If it is ENABLED, then the dose can be programmed for the various options (1 espresso, 1 coffee, etc.); if it is DISABLED, the dose cannot be programmed and the dose entered prior to this selection will remain.
Press the UP/DOWN buttons to ENABLE/DISABLE the dose setting mode.
Once this procedure is completed, press the MENU button to move on to the following option:
Continuous key ENABLED/DISABLED
The display will show the "CONTINUOUS" (NON-STOP) programming mode. The CONTINUOUS dose will only function if it is ENABLED.
Once this procedure is completed, press the MENU button to move on to the following option:
Mixed tea with pump / without pump
The display will show the "MIXED TEA" option, to select water for tea that is either hot water only "without pump" option or hot water mixed with cold water "with pump" option.
Once this procedure is completed, press the MENU button to move on to the following option:
Steam Boiler Gr. 0/1/2
Option is not available
* The "STEAM BOILER" OPTION IS NOT AVAILABLE and will always leave the factory set at "O" (NOT AVAILABLE).
Once this procedure is completed, press the MENU button to move on to the following option:
PreBrewing ENABLED/DISABLED
The display will give the option of ENABLING or DISABLING the "PRE-BREW" function using the UP/DOWN buttons. ACTIVATING the "PRE-BREW" function and pressing the MENU button, the display will show:
PreBrew. ON 1 espresso XXXX sec
The display will show the timer option for 'PRE-BREW ON' for each coffee selection (1 espresso, 1 coffee, etc.). Pressing the UP/DOWN buttons, the desired time in seconds (from 0.1 sec. to 5 sec. in jumps of 0.1 sec.) can be selected. Press the MENU button to select the 'ON' times for the rest of the selections.
Once this procedure is completed, press the MENU button to move on to the following option:
PreBrew. OFF 1 espresso xxxx sec
The display will show the 'PRE-BREW' timer 'OFF' option for each coffee selection (1 espresso, 1 coffee, etc.). Pressing the UP/DOWN buttons, the desired time in seconds (from 0.1 sec. to 5 sec. in jumps of 0.1 sec.) can be selected. Press the MENU button to select the 'ON' times for the rest of the selections.
Once this procedure is completed, press the MENU button to move on to the following option:
ProbeSensitivity LOW/MID/HIGH
The display will show the "PROBE SENSITIVITY" option for the level of water in the boiler. Press the UP/DOWN buttons to select low (150KΩ), medium (400KΩ) or high (1 MΩ) sensitivity.
Once this procedure is completed, press the MENU button to move on to the following option:
Service Cycles HHHHHH
The display will show the 'SERVICE CYCLES' option when the machine reaches the number of cycles selected. It will send a visual alarm on the display as notification. Pressing the UP/DOWN keys selects the number of cycles.
Once this procedure is completed, press the MENU button to move on to the following option:
Heating Type XXXXXXXXX
xxxxxx: Pressure Switch, ON/OFF, PID
The display will show the machine heating control system option.
Press the UP/DOWN buttons to select "Pressure Switch", "ON/OFF" or "PID" and confirm by pressing OK.
- Pressure Switch: boiler temperature controlled via pressure switch.
IMPORTANT
ANY MACHINE MODEL WITH TWO BOILERS MUST NEVER HAVE THE "Pressure Switch" OPTION SELECTED, AS THE MACHINE WORKS WITH A TEMPERATURE SENSOR IN ORDER TO CONTROL THE COFFEE BOILER TEMPERATURE.
ANY MACHINE MODEL WITH A SINGLE BOILER MUST NEVER HAVE THE "Pressure Switch" OPTION SELECTED.
- ON/OFF: coffee boiler temperature controlled via temperature sensor with hysteresis (the oscillation temperature interval for the boiler) of 0.5°C, 1°C or 2°C.
IMPORTANT
ANY MACHINE MODEL WITH TWO BOILERS MUST NEVER HAVE THE "ON/OFF" OPTION SELECTED.
ANY MACHINE MODEL WITH A SINGLE BOILER AND WITH PRESSURE SWITCH MUST NEVER HAVE THE "ON/OFF" OPTION SELECTED.
- PID: coffee boiler temperature controlled via temperature sensor, with variations in an algorithm of three constants Kp, Ki and Kd. (RECOMMENDED BY THE MANUFACTURER)
IMPORTANT
ANY MACHINE MODEL WITH A SINGLE BOILER MUST NEVER HAVE THE OPTIONS "PID" SELECTED.
In this position the machine will control the temperature according to its working conditions, adapting itself at all times to the internal and external contour conditions.
The values for these constants will depend on the power of the element, the size of the boiler and the degree of heat dispersion in the boiler.
WARNING
In order for the machine to work correctly, the values of the said constants should not be altered.
- If "ON/OFF" is selected, press the MENU button to confirm, and the display will show:
Temperature
OC / OF
With the UP/DOWN buttons, select the unit of measurement for temperature, in Celsius (°C) or in Fahrenheit (°F).
Confirm by pressing OK and immediately the display will show:
Histe. Temp. XXXXXXXXX
xxxxxx: 0,5°C | 1°C | 2°C
Press the UP/DOWN buttons to select the desired hysteresis (the variation in degrees for the temperature in the specific boiler).
Confirm by pressing OK key and immediately the display will show:
Press the UP/DOWN buttons to select the desired hysteresis (the variation in degrees for the temperature in the specific boiler).
- If "PID" is selected, press the MENU button to confirm, and the display will show:
BC / BF
With the UP/DOWN buttons, select the unit of measurement for temperature, in Celsius (°C) or in Fahrenheit (°F).
Confirm by pressing OK and immediately the display will show:
Press the UP/DOWN buttons to select the desired boiler temperature, and confirm the selection by pressing OK.
The visual display will show:
Using the UP/DOWN buttons, select the value for each constant and confirm by pressing OK. (IT IS RECOMMENDED THAT THOSE VALUES ESTABLISHED BY THE MANUFACTURER BE MAINTAINED.)
The visual display will show:
PID setting
Initial regulation temperature for the algorithm for the three constants. (It could have a value of "2°C/ Up to 20°C" or "3°F / Up to 36°F"). (IT IS RECOMMENDED THAT THOSE VALUES ESTABLISHED BY THE MANUFACTURER BE MAINTAINED.)
Press the UP/DOWN buttons to select the desired temperature, and confirm by pressing OK.
Once this procedure is completed, press the MENU button to move on to the following option:
Water filter XXXXXXXXX
The display will show the 'WATER FILTER' option, to select the number of litres of water consumed before the WATER FILTER CHANGE/REPLACEMENT ALARM activates. Press the UP/DOWN buttons to select the quantity of water in litres.
ATTENTION
If the water quantity is left at zero "0" litres, the option will be DISABLED.
Lastly, press the MENU button to exit the TECHNICAL MENU.
Off hh.mm
2.9.3.1.3. Display alarm signals
A. MAXIMUM FILLING TIME FOR BOILER WATER
When a time set by the manufacturer is exceeded, the display will show:
Time-out alarm Boiler fillingUp
at the same time, the button LEDs begin to flash.
To cancel the alarm, the main switch must be set to O and then to 1.
B. MAXIMUM BOILER TEMPERATURE
The display will show the boiler temperature alarm when it exceeds 140°C for more than 5 seconds.
Alarm Boiler temperature
The alarm will disappear when the boiler temperature returns to its normal values.
C. INTERRUPTED TEMPERATURE SENSOR
- When the sensor detects a temperature of 0^ C for 5 seconds, the LEDs on the button pads will flash and the display will show:
T.ProbeUnconnect
The alarm will disappear when the boiler temperature is once again at an acceptable value.
- In the case of the control unit being replaced, a machine with a display and pressure switch will display:
T.ProbeUnconnect
This situation is due to an incorrect selection on the heating menu (reprogram the control unit). (SEE PROGRAMMING IN SECTION 2.9.3.2.3., HEATING MENU OPTION.)
In order to eliminate this alarm:
Press the MENU button until the following appears (even if the message 'Probe Unconnect') appears, do not stop pressing MENU):
Language
H
Press the MENU button repeatedly to go through various options until you see the following on the display:
Mixed tea with pump / without pump
The value shown on the display must be "without pump"; if necessary, change the value by pressing the UP/DOWN buttons.
Confirm by pressing OK.
Continue pressing the MENU button repeatedly until you can see on the display:
Heating Type
XXXXXXX
xxxxxx: Pressure Switch | ON/OFF | PID
The value shown on the display must be "Pressure Switch"; if necessary, change the value by pressing the UP/DOWN buttons.
Confirm by pressing OK.
Press the MENU button various times until the display shows the "OFF" message.
Press the "I/O" or "Non-Stop" button in order to turn on the machine.
ATTENTION
It is absolutely necessary that the values of the parameters "MIXED TEA" and "HEATING TYPE" are "without pump" and "Pressure Switch", respectively, for machines with a display and boiler temperature controlled by pressure switch.
NOTE
It is possible to auto-configure the heating by resetting the machine
D. LACK OF IMPULSES FROM THE FLOW METER
When the flow meter is not dosing correctly or the necessary impulses do not arrive for longer than 5 continuous seconds, the used dose selection LED will flash and the display will indicate the flow meter and the group.
Alarm Flow meter GR x
To eliminate this alarm, check the flow meters; this alarm signal is produced due to a bypass of the signal from the meter cover, or due to a poor connection, or lastly due to and internal problem with the control unit.
It can also be caused by an unusually long feed time due to the water not flowing at an adequate speed during dispensing.
IBERITAL
E. CHANGE/REPLACE water filter
When the number of litres of water set in the TECHNICAL MENU is exceeded, the display will show:
Change Water Filt.
with the number of litres of water previously selected to set off the alarm.
To eliminate this alarm, set the main switch to position 0. Press the dose buttons "2 coffees and 2 espressos" from GROUP 1 (on the left) simultaneously. Keep them pressed while we switch on the machine by setting the main switch to position 1.
The display will then show:
Filter Reset
F. MAINTENANCE ALARM
When the display shows:
Service
It means that the number of cycles set in the TECHNICAL MENU has been exceeded (doses carried out in all the machine groups).
To eliminate this alarm, set the main switch to position 0. Press the dose buttons "1 coffee and 1 espresso" from GROUP 1 (on the left) simultaneously. Keep them pressed while we switch on the machine by setting the main switch to position 1.

The display will then show:
Service Reset
G. BOILER WATER MINIMUM LEVEL WARNING
When the machine is switched on (position 1 on the main switch) the boiler begins filling with water.
- IN THE CASE OF MACHINE START-UP: When the level sensor does not detect the presence of water for longer than 6 seconds, it will disconnect the heating element and the machine will not heat; at the same time, the display will show the alarm signal:
Boiler
Empty
- IF THE MACHINE IS BEING WORKED WITH and the level sensor does not detect the presence of water for longer than 3 seconds, it will disconnect the heating element and the machine will not heat.
To ELIMINATE this alarm the boiler water must be filled; the level sensor, on detecting water for more than 3 seconds, will clnnect the element and the machine will once more begin to heat.
2.9.3.2. TFT display screen (touchscreen)
Once the machine is on, the display screen will remain lit.
NOTE
Initially, if no customised image or text has been inserted, what we will see on the screen is the Iberital logo. In the TECHNICAL MENU - Display config is an explanation of how we can customise the display.
- ON position: When the main switch on the coffee machine is activated and the display is in the ON position (the screen shows Temp. Boiler | Time | Logo).

In order to set it to ON: when the display is in the OFF position, press the icon ⏻ on the screen.
- OFF position: When the main switch on the coffee machine is activated and the display is in the OFF position (the screen shows OFF | Time).

In order to set it to OFF: when the display is in the ON position, press the icon ☑ on the screen.
The display screen during service, the normal operation of the machine, will vary based on the number of groups on the model, whether or not it has a frother, and the type of services we have selected at any given time.
NOTE
The display backlight brightness will dim after 5 minutes of inactivity, that is after the last change of status. The display will return to standard brightness after a change: pressing the display itself, pressing any feed button or due to machine programming.
SERVICE ICONS:

Short coffee

Large coffee

2 Short coffees

2 Large coffees

Continuous

Hot water

Hot milk

Frothed milk

Boiler temp.

Hour
NOTE
On the upper part of the service icons, we will see additional information: a clock for the service icons, or the temperature on the boiler icon.
- 2 groups machine:
WITHOUT FROTHER FUNCTION WITH FROTHER FUNCTION
Boiler Hot water GR1 GR2 Boiler Hot milk Hot water GR1 GR2

POSSIBLE IMAGES POSSIBLE IMAGES
Boiler Hot water GR1 GR2 Boiler Hot milk Hot water GR1 GR2


- 3 groups machine:
WITHOUT FROTHER FUNCTION WITH FROTHER FUNCTION
Boiler Hot water GR1 GR2 GR3 Hot milk Hot water GR1 GR2 GR3
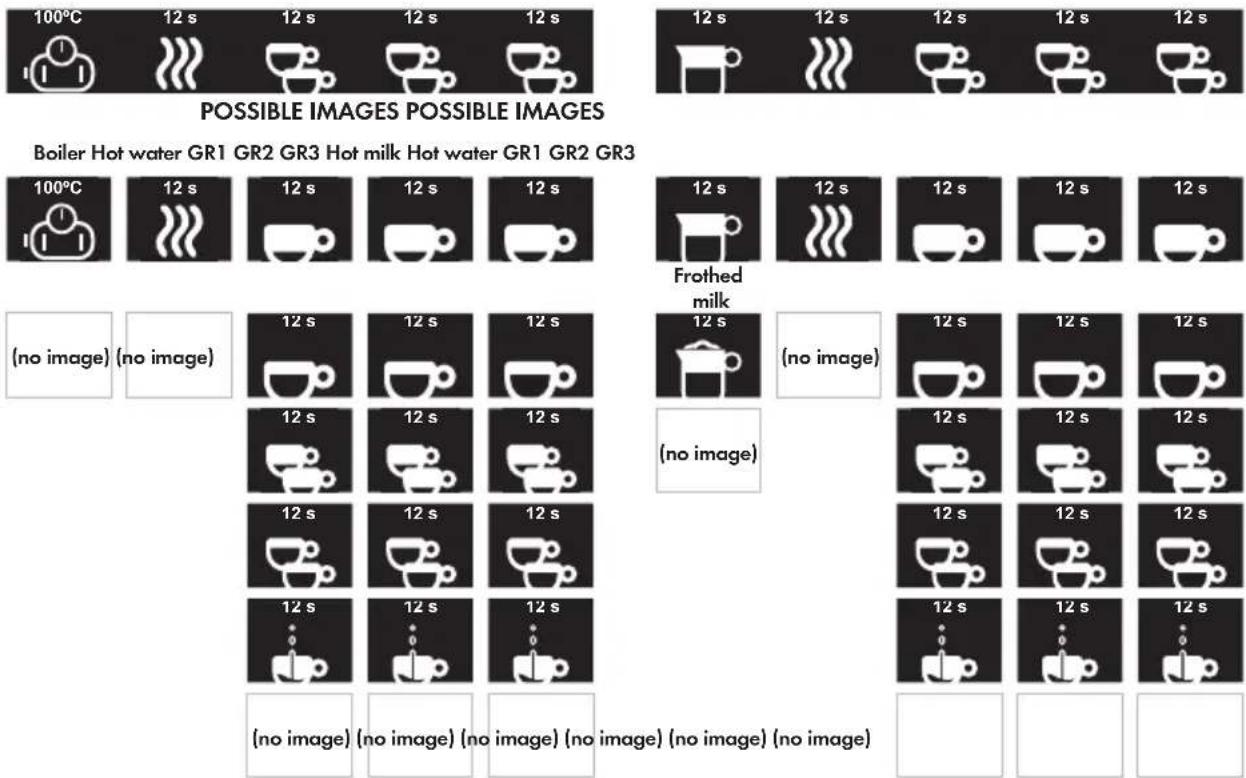
Boiler Hot water GR1 GR2 GR3 Hot milk Hot water GR1 GR2 GR3
GENERIC ICONS:

Cancel o Go back

Change selection next value

Increase value Decrease value Edit option Accept value


NOTE
When we press the "+" or "-" icons, we increase or reduce the set value respectively. This will occur in single steps, depending on the minimum resolution value for each value we are going to change. If the button is pressed for 1.5 seconds, the steps will advance more rapidly, until the button is released.
- User MENU display: With the machine in either the ON or OFF position, press the Ⓔ icon, and we go into the user menu.
- Technical MENU display: In the OFF position, press the Ⓔ icon for 5 seconds, and we go into the technical level settings.
IMPORTANT
The options available will be different, depending on the MENU we access.
IBERITAL
2.9.3.2.1. User menu display
Once we are in the user menu, we can select any of the options shown on the screen. by pressing any of the icons.

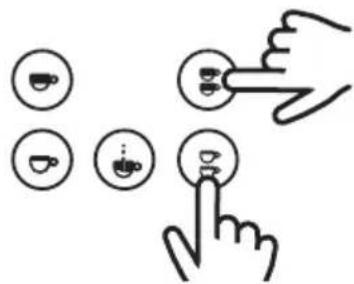
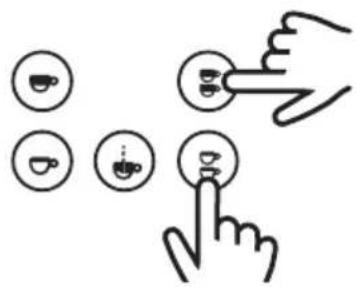
natural_image
Five white circular icons representing media control and playback controls (clock, power button, 00:40, particles, play), no text or symbols present.Hour/Data Auto ON/OFF Counters Auto wash Cancel o Go back
NOTE
If the machine is in the OFF position, the auto-wash option will not appear on the display. In that position the machine will not be sufficiently hot to perform that function.
- DATE-TIME: Through this menu we can change the settings for the time and date, and the way this information is displayed.

By pressing the icon, we can move through the various menu options. By pressing the icon, we can enter the various sub-menus.
Set the day of the week.
Set the time format as either 12 or 24 hour, according to our preferences.
Set the time.
- AUTO ON/OFF: Through this menu we can set the settings for switching the machine on and off automatically.

By pressing the icon we can change the day of the week. By pressing the icon, we access the settings for the selected day. The first option is "every day". By setting this option we erase any individual setting, and the machine will behave in the same way every day of the week.
Once a day of the week is selected, we can enable or disable it independently of the other days.
When a day of the week is enabled, we can set the time for switching the machine on and off automatically.
- COUNTERS: Through this menu we can see all the counters.

By pressing the ☐, we can select the group for which we wish to see the counters.
Once a group is selected, we will see all the count values for the group, by service type.
If we select the "Other" value, we can see all the general counters.
This screen shows us that we have reset the partial counters on our machine.
IMPORTANT
The partial counters are all those relating to the making of coffee, and hot water for infusions. To erase them, press the buttons for "2 coffees and 2 espressos" for GROUP 1 (on the left) simultaneously, when in any counter menu screen. (The number of cycles and water consumed will be reset by the technician after the service resets and/or filter regeneration).
- AUTO-WASH: Through this menu we can see the service counters.
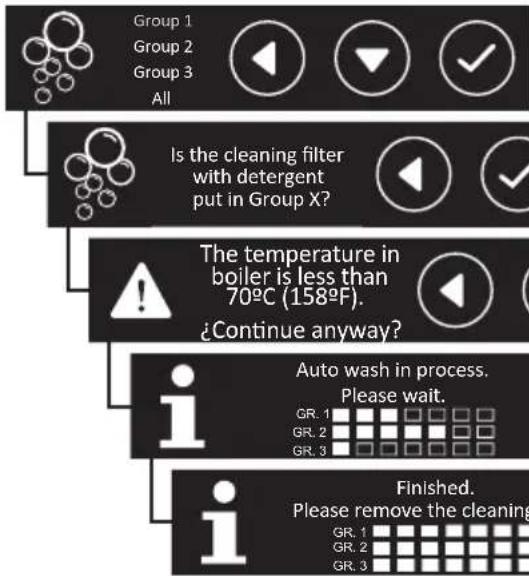
By pressing the icon we can select a group, or all of them, in order to perform an individual or collective auto-wash.
With the group or groups selected, we need to confirm the auto-wash, having previously fitted the blind filters.
When the temperature is insufficient, we will be informed via a message. We can continue, or go back and perform this function, having increased the system temperature.
Auto-wash in progress notification message.
Once the process is complete, change the filter basket(s), and press √ to quit.
2.9.3.2.2. Technical menu display

natural_image
Five white circular icons representing status, navigation, coffee cup, warning sign, and play button (no text or symbols)Display config.
Machine & Boiler
Config.
Doses Config. Alarms Config. Cancel o Go Back
- DISPLAY CONFIG: Through this menu we can edit display visualisation settings such as language, the customised visualisation for our company, technical services, and the current software version.

Select the highlighted language to change the general display language. As we go down the menu, new options will appear.
Select the highlighted option to change the text and/or image for the client's company.
Increasing or decreasing, we pass through all the characters, in the highlighted position. On confirmation, we move on to the next character, until the last is confirmed.
Once the text is edited, we confirm it if correct, or cancel the new text without saving.
Having connected a USB storage device, containing an image to load. On going into the menu, we are shown a file search screen.
If the loading has been successful, the screen will show the correctly loaded image.
Error message if USB device is not detected. (It must be 8 Gb or smaller).
Error message. USB device not detected, or the image name or format cannot be read. (The image must be called "logo.bmp" and must be 24 bits, and 180x100px or lower).
Confirmation or cancellation of elimination of customised text and image.
Elimination process satisfactorily completed.
Select the desired option to add technical services contact data.
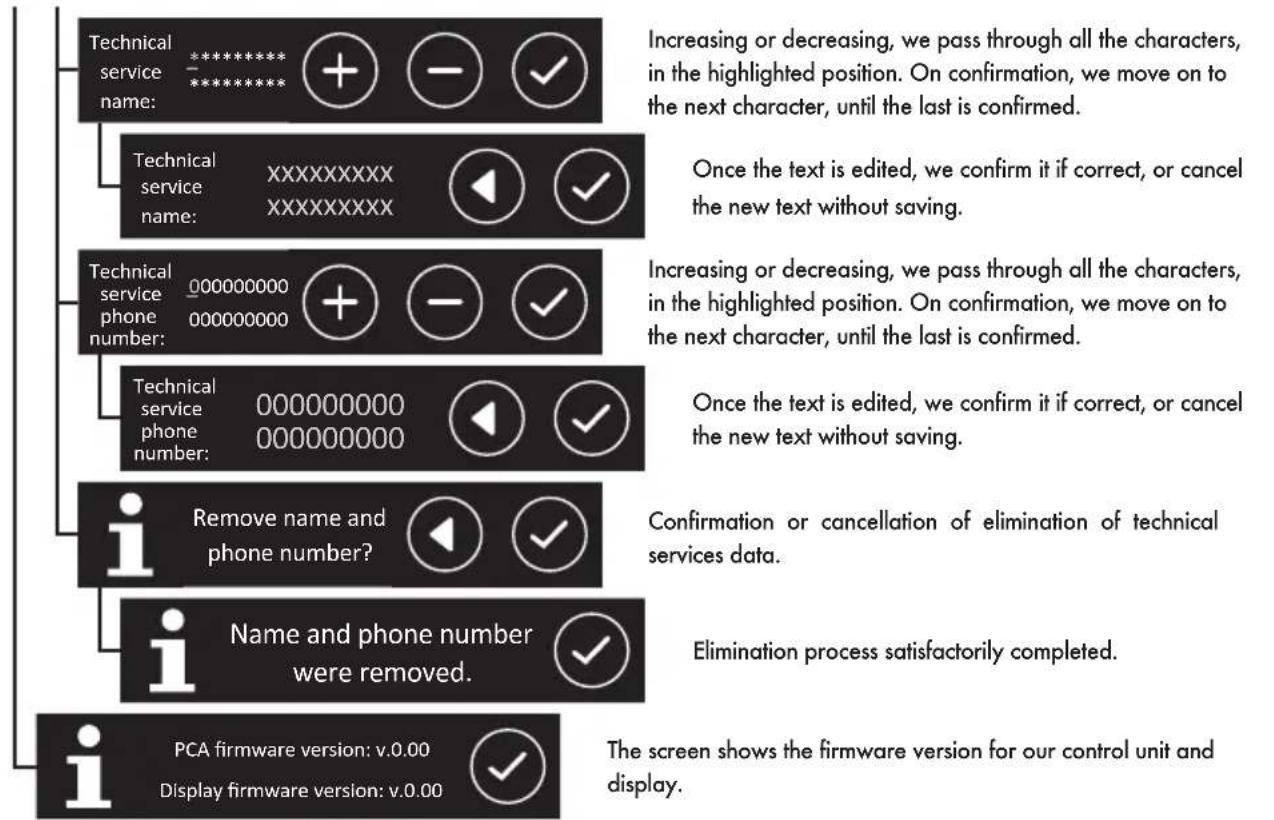
flowchart
graph TD
    A["Technical service name: *******"] --> B["Increasing or decreasing, we pass through all the characters, in the highlighted position. On confirmation, we move on to the next character, until the last is confirmed."]
    C["Technical service name: XXXXXXXXXX"] --> D["Once the text is edited, we confirm it if correct, or cancel the new text without saving."]
    E["Technical service phone number: 000000000 000000000"] --> F["Increasing or decreasing, we pass through all the characters, in the highlighted position. On confirmation, we move on to the next character, until the last is confirmed."]
    G["Technical service phone number: 000000000 000000000"] --> H["Once the text is edited, we confirm it if correct, or cancel the new text without saving."]
    I["Remove name and phone number?"] --> J["Confirmation or cancellation of elimination of technical services data."]
    K["Name and phone number were removed."] --> L["Elimination process satisfactorily completed."]
    M["PCA firmware version: v.0.00"] --> N["The screen shows the firmware version for our control unit and display."]
    O["Display firmware version: v.0.00"] --> P["The screen shows the firmware version for our control unit and display."]
- COFFEE BOILER CONFIG: Through this menu we can edit the settings and visualisation for all data related to the temperature, and sensitivity of the level sensor.

Select and modify the number of groups available for our machine.
Through this screen we can enable or disable the frother function, if our machine has an automatic frother.
Through this screen we can go into the various functions of the frother to change the temperatures.
Select the maximum temperature the milk will acquire when heated.
Select the maximum temperature the milk will acquire when frothed.
Select the temperature from which air, mixed with steam, is to be injected, to froth the milk.
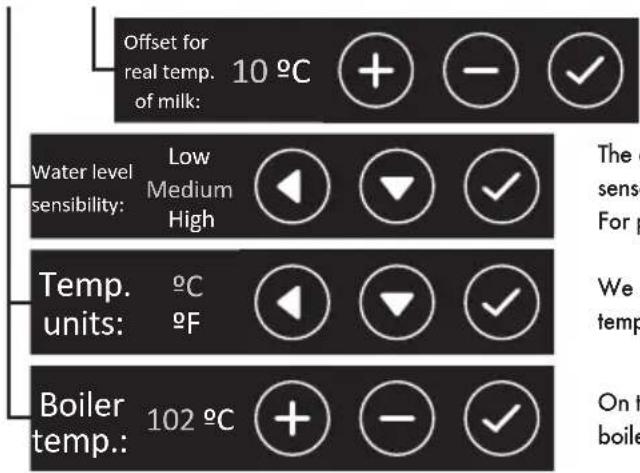
Selection of the difference between wand temperature and real temperature of the milk.
The display will highlight the selected sensitivity so that the level sensor in the steam boiler correctly detects the water it contains. For purer (soft) waters we need to increase the sensitivity.
We can change the temperature units, to see the various temperatures in °C (Centigrade) or °F (Fahrenheit).
On this screen we can change the set temperature for the coffee boiler.
IMPORTANT
Compensation for the real temperature of the milk: It is necessary to apply a difference to the real temperature of the milk, as the temperature sensor, located inside the steam wand, always registers a higher temperature than the real temperature of the milk in the jug.
- DOSE CONFIG: Through this menu we can edit all the settings related to making coffee, dosing, pre-brewing, and hot water.
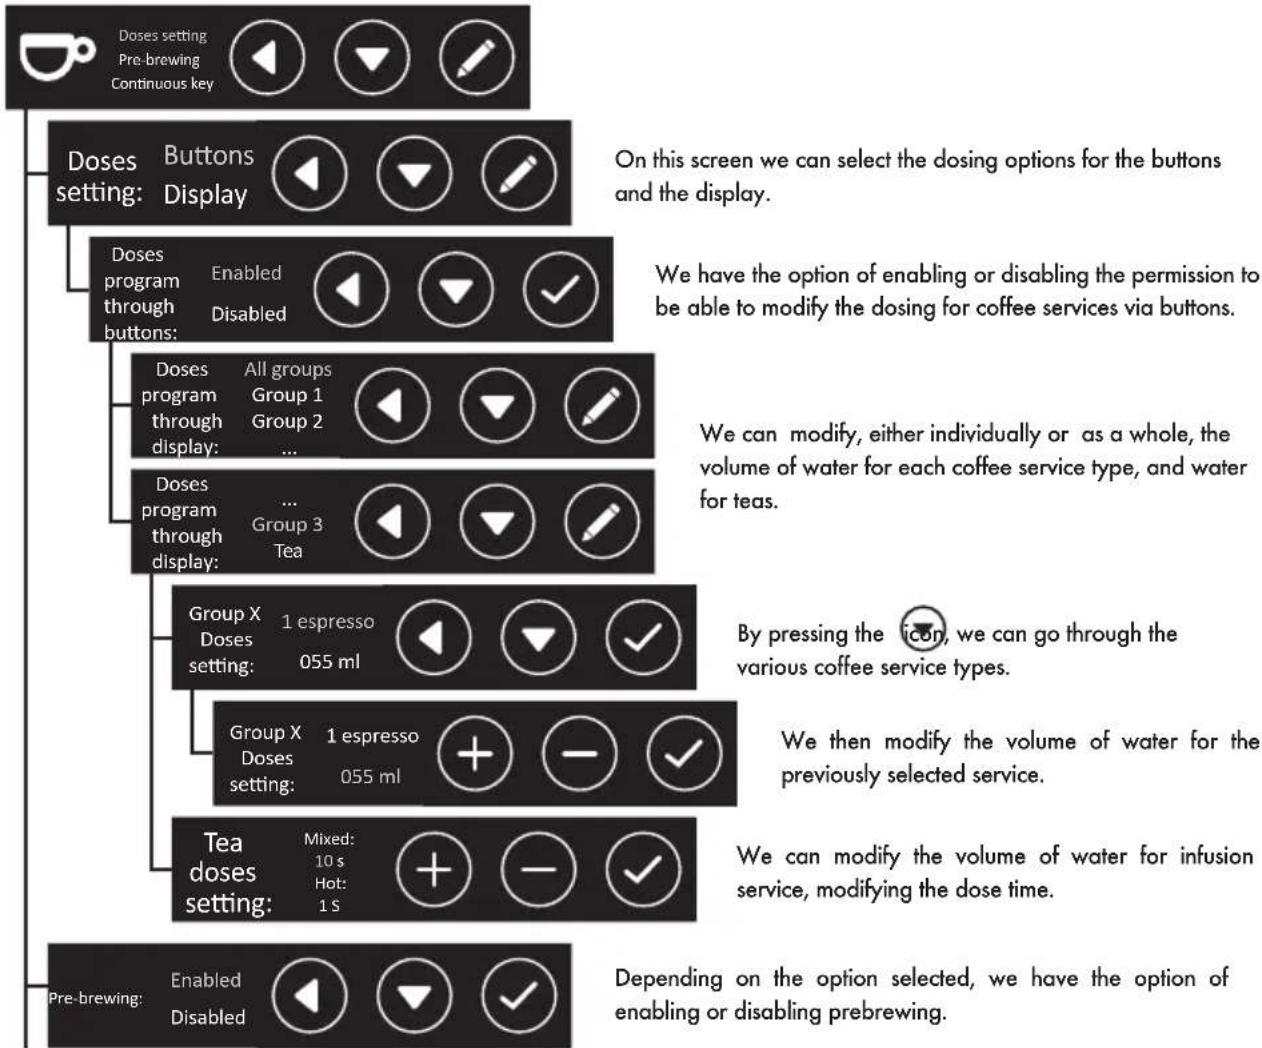
flowchart
graph TD
    A["Pre-brewing: Enabled"] --> B["Group X Doses setting: 1 espresso 055 ml"]
    B --> C["Tea doses setting: Mixed: 10 s Hot: 1 s"]
    C --> D["Doses program through display: All groups Group 1 Group 2 ... Group 3 Tea"]
    D --> E["Doses setting: Buttons Display: Enabled Disabled"]
    E --> F["On this screen we can select the dosing options for the buttons and the display."]
    F --> G["We have the option of enabling or disabling the permission to be able to modify the dosing for coffee services via buttons."]
    G --> H["By pressing the icon, we can go through the various coffee service types."]
    H --> I["We then modify the volume of water for the previously selected service."]
    I --> J["Depending on the option selected, we have the option of enabling or disabling prebrewing."]
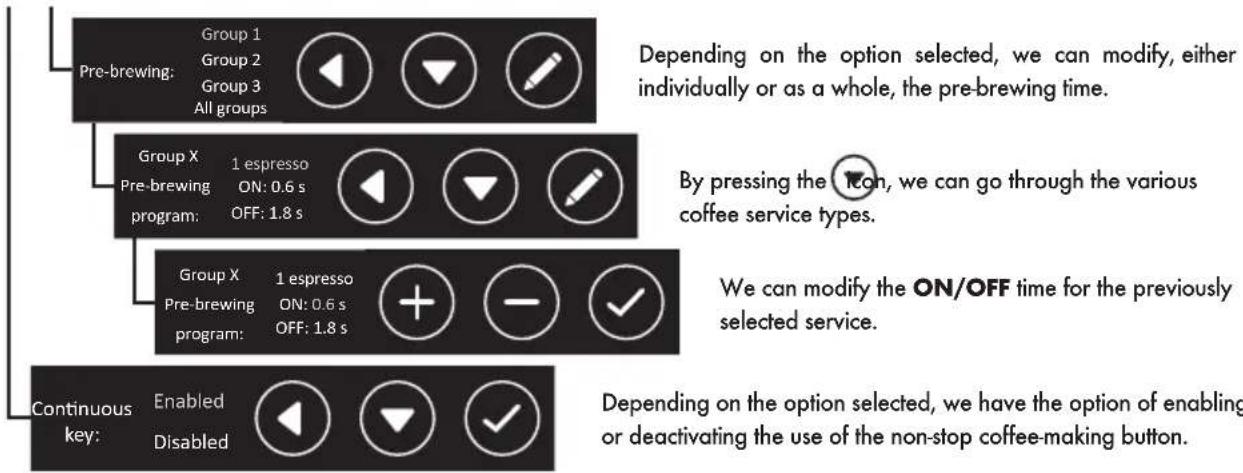
flowchart
graph TD
    A["Pre-brewing: Group 1<br>Group 2<br>Group 3<br>All groups"] --> B["Group X<br>Pre-brewing program: 1 espresso ON: 0.6 s OFF: 1.8 s"]
    B --> C["Group X<br>Pre-brewing program: 1 espresso ON: 0.6 s OFF: 1.8 s"]
    C --> D["Continuous key: Enabled Disabled"]

    style A fill:#f9f,stroke:#333
    style B fill:#ccf,stroke:#333
    style C fill:#cfc,stroke:#333
    style D fill:#fcc,stroke:#333

    note1["Depending on the option selected, we can modify, either individually or as a whole, the pre-brewing time."] --> A
    note2["By pressing the Icon, we can go through the various coffee service types."] --> B
    note3["We can modify the ON/OFF time for the previously selected service."] --> C
    note4["Depending on the option selected, we have the option of enabling or deactivating the use of the non-stop coffee-making button."] --> D
- ALARM CONFIG: Through this menu, we can edit the alarm notifications related to machine maintenance and filters.
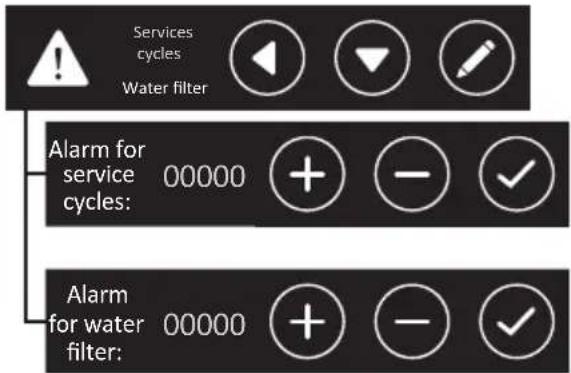
We can modify the number of services after which an alarm notification will appear, reminding us to carry out the appropriate maintenance every "x" number of services.
We can modify the number of services after which an alarm notification will appear, reminding us to carry out the regeneration or change of the descaler filter.
2.9.3.2.3. Display alarm signals
A. MAXIMUM FILLING TIME FOR BOILER WATER
When a time set by the manufacturer is exceeded, the display will show:

To cancel the alarm, the main switch must be set to O and then to 1
B. MAXIMUM BOILER TEMPERATURE
The display will show the boiler temperature alarm when it exceeds 140°C for more than 5 seconds.

The alarm will disappear when the boiler temperature returns to its normal values.
C. INTERRUPTED TEMPERATURE SENSOR
When the sensor detects a temperature of 0^ C for 5 seconds, the LEDs on the button pads will flash and the display will show:

The alarm will disappear when the boiler temperature is once again at an acceptable value.
IBERITAL
D. LACK OF IMPULSES FROM THE FLOW METER
When the flow meter is not dosing correctly or the necessary impulses do not arrive for longer than 5 continuous seconds, the used dose selection LED will flash and the display will indicate the flow meter and the group.

To eliminate this alarm, check the flow meters; this alarm signal is produced due to a bypass of the signal from the meter cover, or due to a poor connection, or lastly due to and internal problem with the control unit.
It can also be caused by an unusually long feed time due to the water not flowing at an adequate speed during dispensing.
E. CHANGE/REPLACE water filter
When the number of litres of water set in the TECHNICAL MENU is exceeded, the display will show:

In order to eliminate this alarm, turn off the machine using the main switch, and press the dose buttons "2 coffees and 2 espressos" from GROUP 1 (on the left) simultaneously.
Keep them pressed and switch on the machine using the main switch.
The display will then show:

It will be necessary to turn off and turn on the machine, in order to eliminate the reset message.
F. MAINTENANCE ALARM
When the display shows:

It means that the number of cycles set in the TECHNICAL MENU has been exceeded (doses carried out in all the machine groups).
In order to eliminate this alarm, turn off the machine using the main switch, and press the dose buttons "1 coffee and 1 espresso" from GROUP 1 (on the left) simultaneously.

Keep them pressed and switch on the machine using the main switch.
The display will then show:

It will be necessary to turn off and turn on the machine, in order to eliminate the reset message.
G. BOILER WATER MINIMUM LEVEL WARNING
When the machine is switched on the boiler begins filling with water.
When the level sensor cannot detect the presence of water for more than 6 seconds (during start-up) or 3 seconds (in the case of it operating normally), it will disconnect the element, and the machine will not heat. at the same time, the display will show the alarm signal:

To ELIMINATE this alarm, it is necessary for the level sensor to be in contact with water in the boiler; on detecting the presence of water for more than 3 seconds, it will connect the element and the machine will once more begin to heat.
H. WARNING FROM CONTROL UNIT NOT DETECTED
When there is no communication between the control unit and the display, the display will show the alarm signal:

NOTE (GENERIC FOR ALL ALARMS)
When the display on our machine shows a warning, we have to press the confirmation icon, and thus indicate to the machine that we are aware that there is a problem. A screen will appear, warning us that it is advisable to notify the technical service.
Our technical service data will appear on the display, provided the configuration in the Technical Service Menu section of "Display Config" has been carried out, as explained in section 2.9.3.1.2.

Generic screen
Custom screen
The user can accept the alarm, in order to continue to see the display in the usual manner. When the machine is turned off and on again, the error will once again be displayed, if it has not yet been corrected.
2.10. CONTROL UNIT RESET
The control unit can be reset with the initial factory settings. To do this, switch off the machine using the main switch. Once the machine is switched off, press the 1 espresso, 2 espressos and non-stop buttons, simultaneously of group 1 (left).
flowchart
graph TD
    A["Iberital IB7"] --> B["Icon 1"]
    C["Iberital Iberital Tandem New"] --> D["Icon 2"]
    E["Iberital / Expression Pro"] --> F["Icon 3"]
    G["Device Icon"] --> H["Button 1"]
    I["Device Icon"] --> J["Button 2"]
    K["Device Icon"] --> L["Button 3"]
Keep them pressed and switch on the machine using the main switch.
IBERITAL
- Machines with display:
Once the machine is switched on, and without having released the 3 buttons, keep them pressed for a few seconds, until the following message appears on the display screen:
New Iberital
Preset reset complete
Expression Pro

Water filter reset completed. Please switch off the machine.
- Machines without visual display:
Iberital IB7 Iberital [ntenz Iberital Tandem New]berital

flowchart
graph TD
    A["Lighting System"] --> B["Lighting System"]
    B --> C["Lighting System"]
    C --> D["Lighting System"]
    D --> E["Lighting System"]
The buttons that were pressed to reset the device will stay lit.
NOTE
Perform this action means losing any customization done on the machine, both in the technical menu and the user menu. Accountants, visualizations, dosages, date / time and settings, climate control,...
WARNING
If the machine has a touchscreen, it will be necessary to re-enter the number of groups, and whether or not the machine has an auto-frother.
NOTE
It is possible to auto-configure the heating by resetting the machine
A reset will detect if your machine is operated via pressure switch or temperature probe and adapt the heating option to suit.
If you want the "Mixed tea" option, it needs to be configured since by default it is deactivated (follow the steps shown in section 2.9.3.1.2.).
2.11. LED LIGHTING
Iberital machines have LED lighting in the work area. The format varies according to the machine model.
- Machines without visual display:
This lighting will remain lit when the machine has an electrical connection, that is to say, while the main switch is in position 1 or 2. - Machines with display:
On machines with a display and 3-position main switch (0-1-2), it will only be lit in position 2.
On machines with a display and 2-position main switch (0-1), it will only be lit in position 1.
NOTE
We also have the option of switching the machine on or off via the display (ON-OFF position), independently of whether the change of the ON-OFF position is made manually or via automatic on-off programming.
In the ON position, the LED lighting will always remain on.
In the OFF position, the LED lighting will remain off.
3. INSTRUCTIONS FOR THE TECHNICIAN
3.1. DESCRIPTION OF INTERNAL COMPONENTS
3.1.1. Iberital IB7
a) Pump + motor: feed the hydraulic system.
b) Boiler:
- Simple boiler:
- 1 group 6.5 litres.
- 2 groups 11 litres.
- 3 groups 18 litres.
c) Spring-loaded safety valve.
d) Pressure relief valve.
e) Boiler heating elements: heat the hot water in the boiler.
f) Pressure switch: controls the boiler pressure.
g) Expansion/check valve: controls the pressure of the hydraulic system.
3.1.2. Iberital Intenz
a) Pump + motor: feed the hydraulic system.
b) Boiler:
- Simple boiler:
- 1 group 6.5itres.
- 2 groups 11 litres or 14 litres.
- 3 groups 18 litres.
IBERITAL
c) Spring-loaded safety valve on the steam boiler.
d) Pressure relief valve on the steam boiler.
e) Boiler heating elements: heat the hot water in the boilers.
f) Expansion/check valve: controls the pressure of the hydraulic system.
3.1.3. Iberital Tandem
a) Pump + motor: feed the hydraulic system.
b) Boiler:
- Simple boiler:
- 1 group 6.5itres.
- 2 groups 11 litres or 14 litres.
- 3 groups 18 litres.
c) Spring-loaded safety valve on the steam boiler.
d) Pressure relief valve on the steam boiler.
e) Boiler heating elements: heat the hot water in the boilers.
f) Expansion/check valve: controls the pressure of the hydraulic system.
3.1.4. New Iberital
a) Pump + motor: feed the hydraulic system.
b) Boiler:
- Simple boiler:
- 2 groups 11 litres or 14 litres.
- 3 groups 18 litres.
c) Spring-loaded safety valve.
d) Pressure relief valve.
e) Boiler heating elements: heat the hot water in the boiler.
f) Pressure switch: controls the boiler pressure.
g) Expansion/check valve: controls the pressure of the hydraulic system.
3.1.5. Iberital Expression Pro
a) Pump + motor: feed the hydraulic system.
b) Boiler:
- Double boiler:
- 2 groups 3 litres (coffee) / 8.3 litres (steam/hot water).
- 3 groups 4 litres (coffee) / 11.5 litres (steam/hot water).
c) Spring-loaded safety valve on the steam boiler.
d) Pressure relief valve on the steam boiler.
e) Boiler heating elements: heat the hot water in the boilers.
f) Expansion/check valve: controls the pressure of the hydraulic system.
NOTE
On all machines there is a high-limit thermostat to control the temperature of the heating elements electrically: this thermostat limits the elements' temperature. When the temperature is above the maximum level, the electrical power supply to the elements is cut. When this happens, the thermostat must be reset by pushing the button located on it, once the element is cold. (The thermostat can be accessed by removing the right panel on the machine.) In the case of machines with two boilers, there is one for each element.
NOTE
All machines have a boiler level sensor. For machines with two boilers, the sensor is in the steam/hot water boiler.
3.2. WATER SUPPLY CONNECTION
IMPORTANT
This equipment must be installed in accordance with applicable federal, state or local regulations.
The machine has a 3/8" water inlet for the water supply. The said inlet incorporates a stop tap to open or close the flow of water (optional). Likewise, hoses are included. To be correctly installed, the mains water supply stop tap will have to be connected to the previously mentioned inlet on the machine using one of these hoses, or similar.
3.3. CONNECTION TO THE POWER SUPPLY
IMPORTANT
This equipment must be permanently connected to the power supply.
The machine is equipped with elements and other electrical parts at 110 V, 220 V - 240 V depending on the version. A switch must be installed, of a suitable calibre, between the permanent installation and the machine. The maximum electricity consumption is indicated on the rating plate.
The earth cable must be connected to an efficient earth.
IMPORTANT
The machines can only be connected to 110 V, 220 V - 240 V depending on the version of the machine.
3.3.1. Coffee machines with the CE marking
5-core machines
220 V - 240 V SINGLE PHASE WITH NEUTRAL WIRE (1-2-3 GROUP MACHINES)
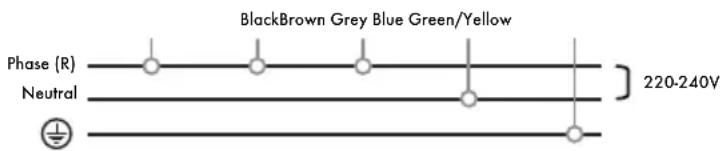
The machine can be connected to power supplies with a single phase of 220-240 V. In this case, all the cables phase must be joined Black, Brown and Grey, and then connected to the phase within the permanent electrical installation. The Blue cable must be connected to the neutral wire. The Green/Yellow cable must be connected to the earth.
400 V THREE PHASE WITH NEUTRAL WIRE (1-2-3 GROUP MACHINES)
The machine can be connected to power supplies with three phases and a neutral wire of 400 V. In this case, the Black, Brown and Grey cable must be connected one by one at each of the three different phases, and the Blue cable to the neutral wire. The Green/Yellow cable must be connected to the earth.
4-core machines
220 V - 240 V SINGLE PHASE WITH NEUTRAL WIRE (1-2-3 GROUP MACHINES)
The machine can be connected to power supplies with a single phase of 220-240 V. In this case, the Black cable must be joined to the Brown cable, and then connected to the phase within the permanent electrical installation. The Blue or Grey cable must be connected to the neutral wire. The Green/Yellow cable must be connected to the earth.
400 V SINGLE PHASE WITH NEUTRAL WIRE (1-2-3 GROUP MACHINES)
The machine can be connected to power supplies with three phases and a neutral wire of 400 V. In this case, the Black cable must be connected to one of the three phases, the Brown cable to the same, and the Blue or Grey cable to the neutral wire. The Green/Yellow cable must be connected to the earth.
400 V TWO PHASE WITH NEUTRAL WIRE (1-2-3 GROUP MACHINES)
The machine can be connected to power supplies with three phases and a neutral wire of 400 V. In this case, the Black cable must be connected to one of the three phases, the Brown cable to a different phase, and the Blue or Grey cable to the neutral wire. The Green/Yellow cable must be connected to the earth.
110 V SINGLE PHASE WITH NEUTRAL WIRE (1-2 GROUP MACHINES)
IMPORTANT
The machines manufactured for use at electrical voltages of 110 V have been manufactured with electrical elements specifically for that voltage. They can thus only be installed at a voltage of 110 V, as indicated on the specific electrical diagram for these voltages.
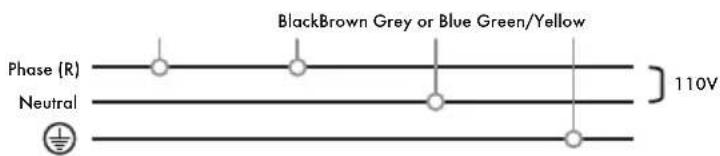
The machine can be connected to power supplies with a single phase of 110 V. In this case, the Black cable must be connected to the permanent electrical installation phase, the Brown cable must be connected to the same phase as the Black cable, and the Blue or Grey cable to the neutral wire. The Green/Yellow cable must be connected to the earth.
3-core machines
220 V - 240 V SINGLE PHASE WITH NEUTRAL WIRE (1-2-3 GROUP MACHINES)

The machine can be connected to supplies with a single phase of 220-240 V. In this case the Brown cable must be joined to the phase in the permanent installation. The Blue or Grey cable must be connected to the neutral wire. The Green/Yellow cable must be connected to the earth.
110 V SINGLE PHASE WITH NEUTRAL WIRE (1-2 GROUP MACHINES)
IMPORTANT
The machines manufactured for use with electrical voltages of 110 V have been manufactured with electrical elements specifically for that voltage. They can thus only be installed at a voltage of 110 V, as indicated on the specific electrical diagram for these voltages.
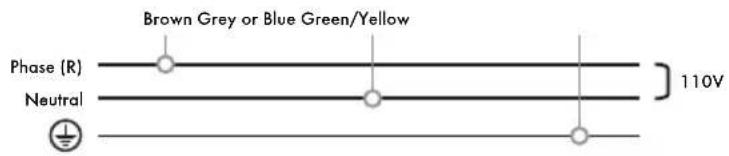
The machine can be connected to power supplies with a single phase of 110 V. In this case the Brown cable must be connected to this phase, and the Blue or Grey cable to the neutral wire. The Green/Yellow cable must be connected to the earth.
3.3.2. Coffee machines with the ETL mark
4-core machines
220 V - 240 V SINGLE PHASE WITH NEUTRAL WIRE (1-2-3 GROUP MACHINES)

The machine can be connected to power supplies with a single phase of 220-240 V. In this case, the Black cable must be joined to the Red cable, and then connected to the phase in the permanent electrical installation. The White/Black cable must be connected to the neutral wire. The Green cable must be connected to the earth.
400 V SINGLE PHASE WITH NEUTRAL WIRE (1-2-3 GROUP MACHINES)
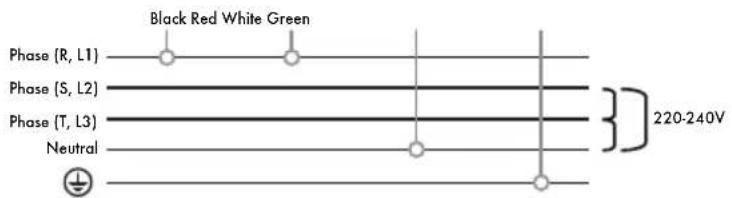
The machine can be connected to power supplies with three phases and a neutral wire of 400 V. In this case, the Black cable must be connected to one of the three phases, the Red cable to the same, and the White/Black cable to the neutral wire. The Green cable must be connected to the earth.
400 V TWO PHASE WITH NEUTRAL WIRE (1-2-3 GROUP MACHINES)
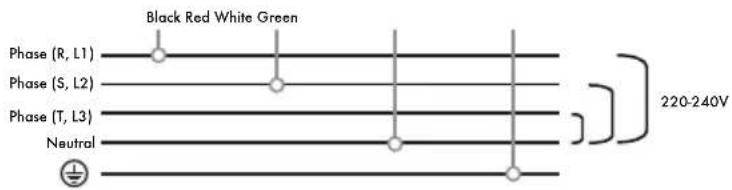
The machine can be connected to power supplies with three phases and a neutral wire of 400 V. In this case, the Black cable must be connected to one of the three phases, the Red cable to a different phase, and the White/Black cable to the neutral wire. The Green cable must be connected to the earth.
110 V SINGLE PHASE WITH NEUTRAL WIRE (1-2 GROUP MACHINES)
IMPORTANT
The machines manufactured for use with electrical voltages of 110 V have been manufactured with electrical elements specifically for that voltage. They can thus only be installed at a voltage of 110 V, as indicated on the specific electrical diagram for these voltages.
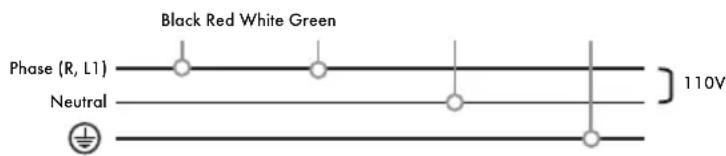
The machine can be connected to power supplies with a single phase of 110 V. In this case, the Black cable must be connected to the permanent electrical installation phase, the Red cable must be connected to the same phase as the Black cable, and the Black/White cable to the neutral wire. The Green cable must be connected to the earth.
3-core machines
220 V - 240 V SINGLE PHASE WITH NEUTRAL WIRE (1-2-3 GROUP MACHINES)

The machine can be connected to supplies with a single phase of 220-240 V. In this case, the Black cable must be joined to the phase in the permanent electrical installation. The White/Black cable must be connected to the neutral wire. The Green cable must be connected to the earth.
110 V SINGLE PHASE WITH NEUTRAL WIRE (1-2 GROUP MACHINES)
IMPORTANT
The machines manufactured for use with electrical voltages of 110 V have been manufactured with electrical elements specifically for that voltage. They can thus only be installed at a voltage of 110 V, as indicated on the specific electrical diagram for these voltages.
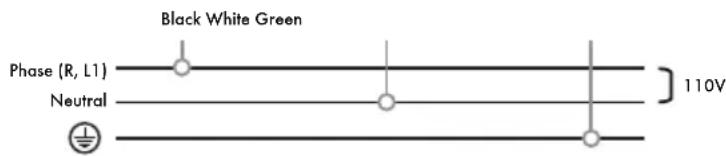
The machine can be connected to power supplies with a single phase of 110V . In this case, the Black cable must be connected to that phase, and the White/Black cable to the neutral wire. The Green cable must be connected to the earth.
NOTE
We recommend checking the electrical installation and making the appropriate changes, depending on the type of line (single-phase or three-phase) to which the machine is to be connected, always following the indications of the regulations in force in the country where the machine will be installed.
3.4. CONNECTION TO DRAIN
A drain pipe is supplied with the machine and must be connected to the drain pan, which is the element where all the wastewater is collected during the normal operation of the machine.
A drain outlet is therefore required to be able to cleanly evacuate these wastewater.
3.5. FEED GROUP
a) Gasket: facilitates the adjustment of the filter holder in the group.
b) Showerhead: where the water is in contact with the coffee.
c) Drainage device.
d) Solenoid valve: it allows the passage of water to the unit when a button on the button pad is pressed.
The feed group is a pressed brass block in which there is a brewing chamber. When any button on the button pad is pressed, the pump is started and the solenoid valve is ENABLED.
3.6. BOILER
a) Feed group.
b) Injector.
c) Heat exchanger.
This boiler is manufactured in copper and a heat exchanger connected to the power supply unit passes through it.
During a supply cycle, cold water is pumped to the coffee boiler through the injector. In turn, the water inside the coffee boiler is taken to the feed group. Under rest conditions there is permanent flow of water between the feed group and the coffee boiler, which keeps the equipment at the optimum temperature for coffee preparation.
The temperature of the heating elements within the boilers is limited by thermostats. Should the element temperature exceed that established by the thermostat, the machine will cut the power supply. In order to connect the elements once more, push the reset button located on the thermostat.
3.6.1. Electrical resistance
| MACHINE N° of Boilers Groups Resistance | |||
| IBERITAL IB7 1 | 1 | 1800 W 220-240 V1800 W 110 V | |
| 2 | 3000-3500 W 220-240 V2400 W 110 V | ||
| 3 5000-6000 W 220-240 V | |||
| IBERITAL INTENZ 1 | 1 | 1800 W 110-220 V2400 W 110 V | |
| 2 | 3000-3500-3800-5000 W 220-240 V2400 W 110 V | ||
| 3 5000-6000 W 220-240 V | |||
| IBERITAL TANDEM 1 | 2 | 3000-3500-3800-5000 W 220-240 V2400 W 110 V | |
| 3 5000-6000 W 220-240 V | |||
| NEW IBERITAL 1 | 2 | 3000-3500-3800-5000 W 220-240 V2400 W 110 V | |
| 3 5000-6000 W 220-240 V | |||
| IBERITAL EXPRESSION PRO 2 | 2 3000 W + 1000 W 220-240 V | ||
| 3 3000 W + 1000 W 220-240 V | |||
3.6.2. Spring-loaded safety valve
In the case of irregular operation in the control of heating elements, the safety valves guarantee the integrity of the boiler, releasing excess pressure and keeping it from going over 0.18 MPa.
The safety valves are manufactured under strict quality control standards and following very demanding technical criteria. Once checked by the manufacturer, they are immediately sealed.
3.6.3. Pressure relief valve (anti-vacuum valve)
This valve, located on the boiler, prevents the depressurization of the boiler interior, keeping liquids from being sucked in through the steam ejectors.
3.6.4. Automatic water filling device
a) Solenoid valve.
The machine has a level sensor (a stainless steel strip that is in contact with the water inside the boiler). The sensor is connected to a control processing unit (CPU) which permanently indicates the water level. When the level is low, the CPU activates the pump and the solenoid valve, allowing water to be fed in until the sensor indicates that it has reached the optimum level.
3.6.5. Visual level (Optional)
a) Level (visualization of max. and min. levels for the boiler water).
The water level can be checked at any time via the water level viewer.
3.6.6. Flow control valves
a) Expansion valve (crucible for opening to 1.2 MPa ±0.1).
3.7. PUMP/MOTOR
a) Lock nut.
b) Adjustment screw.
The pump/motor starts up when any button on the button pad is pressed, increasing the pressure up to the 0.8/0.9 MPa necessary to prepare the coffee. The pump/motor are also controlled by the automatic level control device, which keeps the boiler filled with water.
In order to regulate the pump pressure, proceed in the following manner: loosen the lock nut, which holds the adjustment screw. Loosen the screw to reduce the pressure, or tighten it to increase it. When the operation is complete, make sure the lock nut is tightened once more.
3.8. CONTROL PANEL
It is the control centre of the machine. It controls all the sensors and operation elements for the correct functioning of the machine
WARNING
On machines with displays, it is necessary that certain display configuration parameters match the characteristics of the machine.
New Iberital
Mixed tea ENABLED/DISABLED
Heating Type Pressure switch ON/OFF
Expression Pro
Number 2 groups of groups: 3 groups


NOTE
A machine reset will force the detection of the temperature control element used. So, it will set itself up, positioning the heating option as needed, depending on whether the machine is operated with a pressure switch or temperature probe.
4. LIFE CYCLE MANAGEMENT
4.1. PACKAGING
For the good of the environment, separate the waste from the packaging for recycling or reuse.
Cardboard, wooden parts, plastic bags and polystyrene blocks can be recycled.
Dispose of the protection foam and take them to the nearest waste disposal point.
4.2. EFFICIENT USE OF THE MACHINE
It is recommended that the user keep the machine turned off during long periods of inactivity, such as at night, and public holidays and vacation periods.
4.3. END OF THE APPLIANCE CYCLE
The elimination of this device is regulated by Royal Decree 110/2015 of Spain based on European Directive 2012/19/EU. Find out about disposal routes from your distributor and/or manufacturer.
SOMMAIRE
AVERTISSEMENTS IMPORTANTS
1. SPÉCIFICATIONS
1.1. SPÉCIFICATIONS TECHNIQUES
CERTIFICATIONS DU PRODUIT
IMPORTANT
Iberital IB7 Iberital Intenz Iberital Tandem New Iberital / Expression Pro

REMARQUE
Iberital IB7 Iberital Intenz Iberital Tandem New: Iberital / Expression Pro

Iberital IB7 Iberital Intenz Iberital Tandem New: Iberital / Expression Pro

flowchart
graph TD
    A["Social Activity Icon"] --> B["Media Icon"]
    B --> C["Food Icon"]
    C --> D["Tea Icon"]
    D --> E["Tea & Food Icon"]
    style A fill:#f9f,stroke:#333
    style B fill:#ccf,stroke:#333
    style C fill:#cfc,stroke:#333
    style D fill:#fcc,stroke:#333
    style E fill:#cff,stroke:#333
New Iberital / Expression Pro

L'écran affichera:
Total cafés
Total reset
REMARQUE
xxxxxx: Pressure Switch, ON/OFF, PID
xxxxxx: Pressure Switch | ON/OFF | PID
L'écran affichera:
Reset filtre
F. ALARME DE MAINTENANCE
L'écran affiche:
Entretien
L'écran affichera:
Reset entretien
G. AVIS DE NIVEAU D'EAU MINIMUM DANS LA CHAUDIÈRE
natural_image
Five white circular icons representing media control and playback controls (clock, power, timer, clock icon, bubbles, play button) on black backgroundIberital IB7 Iberital Intenz Iberital Tandem New Iberital / Expression Pro

natural_image
Illustration of two hand icons with circular buttons, no text or symbols present


natural_image
Abstract icon set with three circular symbols resembling stylized faces or icons, radiating from each other (no text or symbols)Iberital IB7 Iberital Intenz Iberital Tandem New Iberital / Expression Pro

NOTA
Iberital IB7 Iberital Intenz Iberital Tandem New Iberital / Expression Pro

Iberital IB7 Iberital Intenz Iberital Tandem New Iberital / Expression Pro


三

flowchart
graph TD
    A["Start"] --> B["Process Step 1"]
    B --> C["Process Step 2"]
    C --> D["End"]
flowchart
graph LR
    A["Iberital IB7 Iberital"] --> B["Lightbulb"]
    C["Intenz Iberital Tandem New"] --> D["Lightbulb with E2"]
    E["Iberital / Expression Pro"] --> F["Lightbulb with Eye"]
    G["Lightbulb with Eye"] --> H["Lightbulb with Skin"]
New Iberital / Expression Pro

xxxxxx: Pressure Switch, ON/OFF, PID
xxxxxx: Pressure Switch | ON/OFF | PID
natural_image
Five white circular icons representing different control and warning symbols on a black background (no text or labels)Display config.
Config. Macch.
e cald.
Config. Dose Config. Allarmi Annulla o indietro
Iberital IB7 Iberital Intenz Iberital Tandem New Iberital / Expression Pro

Iberital IB7 Iberital Intenz Iberital Tandem New Iberital


natural_image
Abstract icon set with sun rays and circular symbols (no text or labels)Iberital IB7 Iberital Intenz Iberital Tandem New Iberital / Expression Pro

natural_image
Illustration of a hand pointing at a circular icon with icons for coffee, beer, and beer (no text or symbols)


HINWEIS
Iberital IB7 Iberital Intenz Iberital Tandem New: Iberital / Expression Pro

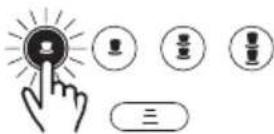


Iberital IB7 Iberital Intenz Iberital Tandem New Iberital / Expression Pro

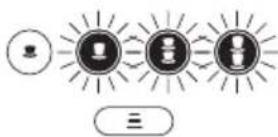


flowchart
graph TD
    A["Top Left Node"] --> B["Left Left Node"]
    B --> C["Right Right Node"]
    C --> D["Bottom Right Node"]
Touchscreen-Display.

New Iberital / Expression Pro

Pre-inf. ON 1 espresso xxxx sek
Pre-inf. OFF 1 espresso xxxx sek
xxxxxx: Pressure Switch, ON/OFF, PID
Time-out Alarm Kessel Buffuel.
xxxxxx: Pressure Switch | ON/OFF | PID
natural_image
Five white circular icons representing different digital and media control functions (clock, power button, timer, clock icon, bubble, play button) on a black background.natural_image
Five white circular icons on black background: slider, alarm, coffee mug, warning triangle, and play button (no text or symbols)Display config.
Config. Máq. y Cald.
Dosis Config.
Alarmas Config.
Cancelar o Volver
Iberital IB7 Iberital Intenz Iberital Tandem New Iberital

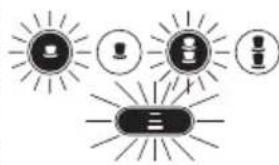


natural_image
Abstract diagram with three sun-like shapes containing icons (no text or symbols)ПРИМЕЧАНИЕ
Iberital IB7 Iberital Intenz Iberital Tandem New Iberital / Expression Pro


flowchart
graph LR
    A["●"] --> B["○"]
    B --> C["○"]
    C --> D["○"]
    D --> E["○"]
    E --> F["三"]
berital / Expression Pro


flowchart
graph TD
    A["Start"] --> B["Process Step 1"]
    B --> C["Process Step 2"]
    C --> D["End"]
Doses setting Select within 30s
Дисплей (сенсорный)

Manual doses programming activated.
ПРИМЕЧАНИЕ
Iberital IB7 Iberital [ntenz Iberital Tandem New Iberital / Expression Pro

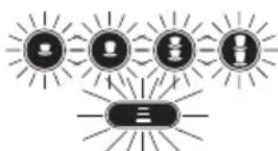
natural_image
Abstract graphic with three circular icons and radiating lines, no text or symbols present

natural_image
Abstract icon set with four circular symbols resembling cups, a bowl, and a gear, radiating from each other (no text or labels)New Iberital / Expression Pro

Service XXXXXXXXXXXXXX
Coffees total Total reset
ПРИМЕЧАНИЕ
Line rotation 2 ENABLED/DISABLED
Line rotation 1 ENABLED/DISABLED
Line rotation 2 ENABLED/DISABLED
Doses setting ENABLED/DISABLED
Continuous key ENABLED/DISABLEDO
Mixed tea with pump / without pump
PreBrewing ENABLED/DISABLED
PreBrew. OFF 1 espresso xxxx sec
Service Cycles XXXXXXXXX
xxxxxx: Pressure Switch, ON/OFF, PID
Mixed tea with pump / without pump
Heating Type XXXXXXXXX
xxxxxx: Pressure Switch | ON/OFF | PID
natural_image
Five white circular icons representing media control and playback controls (clock, power button, timer, refresh, gear, play), no text or symbols present.natural_image
Five white circular icons representing a control panel, alarm, coffee cup, warning sign, and play button (no text or symbols)Water filter reset completed. Please switch off the machine.
Alarm: Services cycles.

Services cycles reset completed. Please switch off the machine.
Water filter reset completed. Please switch off the machine.
Iberital IB7 Iberital Intenz Iberital Tandem New Iberital

flowchart
graph TD
    A["User"] --> B["Social Media"]
    B --> C["Media"]
    C --> D["Content"]
    D --> E["User"]
    F["User"] --> G["Social Media"]
    G --> H["Media"]
    H --> I["Content"]
    I --> J["User"]
    K["User"] --> L["Social Media"]
    L --> M["Media"]
    M --> N["Content"]
    N --> O["User"]
Mixed tea ENABLED/DISABLED
Heating Type Pressure switch ON/OFF
Expression Pro
Number 2 groups of groups: 3 groups


ПРИМЕЧАНИЕ
-
水平传感器
-
电磁阀
-
泵
- 水平传感器
- 电磁阀
- 泵
Iberital IB7 Iberital Intenz Iberital Tandem New: Iberital / Expression Pro

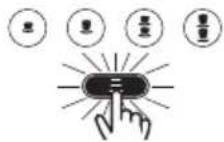


注意
Iberital IB7 Iberital Intenz Iberital Tandem New Iberital / Expression Pro

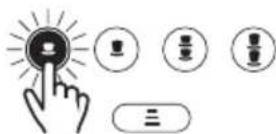


natural_image
Abstract icon set with coffee cups and sunburst lines, no text or symbols presentDoses setting Select within 30 s
设有触摸屏的显示器。

手动计量设定激舌。
注意
New Iberital / Expression Pro

Service
XXXXXXXXXXXXXX
接下来显示屏显示:
Coffees total
Total reset
注明
Temperature/Hora Vis.
ENABLED/DISABLED
Line rotation 2
ENABLED/DISABLED
Line rotation 1 ENABLED/DISABLED
Line rotation 2 ENABLED/DISABLED
Crone Function ENABLED/DISABLED
Doses setting ENABLED/DISABLED
Continuous key ENABLED/DISABLED
Mixed tea
with pump / without pump
PreBrewing
ENABLED/DISABLED
PreBrew. ON
1 espresso xxxx sec
PreBrew. OFF
1 espresso xxxx sec
Service Cycles
XXXXXXXXN
xxxxxx: Pressure Switch, ON/OFF, PID
显示屏显示控制咖啡机加热系统选项。
Water filter
XXXXXXXXX
Alarm Boiler temperature
当锅炉温度恢复到正常值时,警报解除。
C. 温度传感器中断
Mixed tea
with pump / without pump
Heating Type
XXXXXXXX
xxxxxx: Pressure Switch | ON/OFF | PID
Change Water Filt. XXXXXXXX
带有之前所选择的公升数,警报出现。
接下来显示屏显示:
Filter Reset
F. 维修警报
当显示屏显示:
Service
接下来显示屏显示:
Service Reset
G. 锅炉水的最低水位通知
natural_image
Five white circular icons representing media control and playback controls (no text or symbols)natural_image
Five white circular icons representing different control and warning symbols on a black background (no text or labels)按住不放的同时用总开关开启咖啡机。
接下来显示屏显示:

按住不放的同时用总开关开启咖啡机。
接下来显示屏显示:

flowchart
graph TD
    A["Iberital IB7"] --> B["Icon 1"]
    C["Iberital"] --> D["Icon 2"]
    E["Intenz"] --> F["Icon 3"]
    G["Iberital Tandem New"] --> H["Icon 4"]
    I["Iberital / Expression Pro"] --> J["Icon 5"]
    K["Hand Icon"] --> L["Arrow to Iberital/Expression Pro Icon"]
    M["Hand Icon"] --> N["Arrow to Iberital/Expression Pro Icon"]
按住这些按钮并用总开关启动咖啡机。
IBERITAL
- 带显示屏的咖啡机:
Iberital IB7 Iberital Intenz Iberital Tandem New Iberital

flowchart
graph TD
    A["Start"] --> B["Step 1: Product Development"]
    B --> C["Step 2: Quality Control"]
    C --> D["Step 3: Production & Quality Control"]
    D --> E["End"]
重启时,被按下的按钮会持续亮起。
注意
Mixed tea ENABLED/DISABLED
Heating Type Pressure switch ON/OFF
Expression Pro
组号:
2组3组


注意
- 수위 센서
- 전자밸브
- 펌프
- 수위 센서
- 전자밸브
- 펌프
flowchart
graph LR
    A["Iberital IB7"] --> B["Hand Click Icon"]
    B --> C["Lightbulb Icon"]
    C --> D["Lightbulb Icon with Button"]
    D --> E["Pro with Light Bulb Icon"]
    F["Intenz Iberital Tandem"] --> G["Hand Click Icon"]
    G --> H["Lightbulb Icon"]
    H --> I["Lightbulb Icon with Button"]
    I --> J["Pro with Coffee Cup Icon"]
Doses setting Select within 30 s
터치 스크린

수동 도징 설정 활성화됨.
참고
flowchart
graph LR
    A["Iberital IB7 Iberital"] --> B["Intenz Iberital Tandem New"]
    B --> C["Iberital / Expression Pro"]
New Iberital / Expression Pro

Line rotation 1 ENABLED/DISABLED
Line rotation 2 ENABLED/DISABLED
Doses setting ENABLED/DISABLED
Continuous key ENABLED/DISABLED
Mixed tea with pump / without pump
PreBrewing ENABLED/DISABLED
Service Cycles XXXXXXXX
Water filter
XXXXXXXXX
Alarm Boiler temperature
Mixed tea with pump / without pump
그러면 디스플레이에 다음과
Filter Reset
F. 유지 관리 알람
natural_image
Five white circular icons representing media control and playback controls (no text or symbols)natural_image
Five white circular icons representing different control and warning symbols on a black background (no text or labels)Iberital IB7 Iberital Intenz Iberital Tandem New Iberital / Expression Pro

Mixed tea ENABLED/DISABLED
Heating Type Pressure switch ON/OFF
Expression Pro

We hereby declare that the coffee machines bearing the brand names and the types indicated below comply with the applicable EC Directives, in accordance with the relevant European Standards.
This declaration will be rendered null and void if any type of modification to the appliance that has not been explicitly authorized by the company is carried out.
ELECTRONIC | SEMI-AUTOMATIC | MANUAL | PORTABLE (1, 2 and 3 group models)
CE: European Declaration of Conformity

Intertek

Intertek
ETL(UL + NSF): Product Approval for USA and Canada

EAC: Product Approval for Eurasian Customs Union

IFBQ: Product Approval for Brasil
KSA R-ESB01352-0100 Verified by INTERTEK
KSA: Product Approval for Kingdom of Saudi Arabia

KC: Product Approval for South Korea

ACCREDITED BY ENAC

ACCREDITED BY ENAC
Fecha / Date:
Date /Data:
Datum / Data / 日期: /날짜: 19/04/2018
Firmado por / Signed by:
Director Técnico (Technical Director)
IBERITAL
- ESPRESSO COFFEE MACHINE
- IBERITAL
- NOTA
- DIMENSIONS
- INSTRUCTIONS FOR THE USER
- DESCRIPTION
- PREPARATION AND START-UP
- HOT WATER DISPENSER
- STEAM DISPENSER
- DAILY CLEANING OPERATIONS
- CHANGING THE BOILER WATER
- WATER SOFTENING
- DISPLAY OPERATION
- INSTRUCTIONS FOR THE TECHNICIAN
- LIFE CYCLE MANAGEMENT
- PRODUCT CERTIFICATIONS
- IMPORTANT
- SPECIFICATIONS
- TECHNICAL SPECIFICATIONS
- Electronic coffee machines
- IBERITAL IB7 MODEL (PORTABLE)
- IBERITAL IB7 MODEL
- IBERITAL INTENZ MODEL
- NEW IBERITAL MODEL
- Semi-automatic coffee machines
- Stationary coffee machines
- Portable coffee machines
- General warnings
- NOTE
- Programming dose on the control unit (not available on semi-automatic versions)
- Programming the electronic pre-brew (not available on all models)
- Alarm signals
- EXCESS BOILER WATER FILLING TIME
- Warning
- NO IMPULSES FROM THE FLOW METER (5 seconds)
- EXCESS FEED FROM THE FLOW METER
- DEPOSIT LEVEL INDICATORS (only portables machines)
- GENERAL WARNING
- Programming hot water (only available on Iberital Expression Pro model and optional in New Iberital)
- NOTE (versions with visual display and miscellaneous solenoid valve)
- Automatic steam programming (optional, only available on some models)
- Cleaning the filters and filter holders
- Cleaning the groups
- Cleaning the machine exterior
- WATER SOFTENING (NOT INCLUDED)
- DISPLAY OPERATION (OPTIONAL)
- New Iberital display
- Display features
- LCD display screen (non-touchscreen)
- User menu display
- Technical menu display
- Line rotation 1 ENABLED/DISABLED
- Name 2 HHHHH
- Line rotation 2 ENABLED/DISABLED
- Crono Function ENABLED/DISABLED
- Doses setting ENABLED/DISABLED
- Continuous key ENABLED/DISABLED
- Mixed tea with pump / without pump
- ATTENTION
- Display alarm signals
- MAXIMUM FILLING TIME FOR BOILER WATER
- MAXIMUM BOILER TEMPERATURE
- INTERRUPTED TEMPERATURE SENSOR
- LACK OF IMPULSES FROM THE FLOW METER
- CHANGE/REPLACE water filter
- MAINTENANCE ALARM
- BOILER WATER MINIMUM LEVEL WARNING
- TFT display screen (touchscreen)
- SERVICE ICONS:
- - 2 groups machine:
- WITHOUT FROTHER FUNCTION WITH FROTHER FUNCTION
- - 3 groups machine:
- GENERIC ICONS:
- User menu display
- - COUNTERS: Through this menu we can see all the counters.
- - AUTO-WASH: Through this menu we can see the service counters.
- Technical menu display
- Display alarm signals
- WARNING FROM CONTROL UNIT NOT DETECTED
- NOTE (GENERIC FOR ALL ALARMS)
- CONTROL UNIT RESET
- LED LIGHTING
- DESCRIPTION OF INTERNAL COMPONENTS
- Iberital IB7
- Iberital Intenz
- Iberital Tandem
- New Iberital
- Iberital Expression Pro
- WATER SUPPLY CONNECTION
- CONNECTION TO THE POWER SUPPLY
- Coffee machines with the CE marking
- V THREE PHASE WITH NEUTRAL WIRE (1-2-3 GROUP MACHINES)
- 4-core machines
- V - 240 V SINGLE PHASE WITH NEUTRAL WIRE (1-2-3 GROUP MACHINES)
- V SINGLE PHASE WITH NEUTRAL WIRE (1-2-3 GROUP MACHINES)
- V TWO PHASE WITH NEUTRAL WIRE (1-2-3 GROUP MACHINES)
- V SINGLE PHASE WITH NEUTRAL WIRE (1-2 GROUP MACHINES)
- 3-core machines
- Coffee machines with the ETL mark
- CONNECTION TO DRAIN
- FEED GROUP
- BOILER
- Electrical resistance
- Spring-loaded safety valve
- Pressure relief valve (anti-vacuum valve)
- Automatic water filling device
- Visual level (Optional)
- Flow control valves
- PUMP/MOTOR
- CONTROL PANEL
- PACKAGING
- EFFICIENT USE OF THE MACHINE
- END OF THE APPLIANCE CYCLE
- SOMMAIRE
- AVERTISSEMENTS IMPORTANTS
- SPÉCIFICATIONS
- SPÉCIFICATIONS TECHNIQUES
- CERTIFICATIONS DU PRODUIT
- REMARQUE
- ALARME DE MAINTENANCE
- AVIS DE NIVEAU D'EAU MINIMUM DANS LA CHAUDIÈRE
- HINWEIS
- ПРИМЕЧАНИЕ
- Continuous key ENABLED/DISABLEDO
- PreBrewing ENABLED/DISABLED
- 注意
- 手动计量设定激舌。
- 注明
- 温度传感器中断
- 维修警报
- 锅炉水的最低水位通知
- 참고
- New Iberital / Expression Pro
- Service Cycles XXXXXXXX
- Alarm Boiler temperature
- 유지 관리 알람
- KSA R-ESB01352-0100 Verified by INTERTEK
Brand : Iberital
Model : IB7
Category : Coffee machine