
NR961 - Radio Soundmaster - Free user manual and instructions
Find the device manual for free NR961 Soundmaster in PDF.
| Product type | Clock radio with CD player, Bluetooth, USB, DAB+ and FM |
| Brand | Soundmaster |
| Model | NR961 |
| Power supply | Mains adapter (DC) included; button cell for remote control |
| Power consumption | Standby: < 0.5 W (estimated) |
| Radio functions | DAB+ (band III) and FM (RDS) with 20 presets each |
| CD player | CD, CD-R/RW, CD MP3; functions: play, pause, skip, repeat, shuffle, program |
| Bluetooth | Version unspecified, range < 10 m, reception only (no transmission) |
| USB port | Play audio files from USB flash drive |
| AUX input | 3.5 mm jack socket at the rear |
| Headphone output | 3.5 mm jack socket on the front |
| Speaker | 1 built-in speaker |
| Display | LCD with adjustable backlight |
| Alarms | 2 independent alarms with source selection (beep, DAB, FM) and repeat (once, daily, weekend, weekdays) |
| Sleep function | Timer of 15, 30, 45, 60 or 90 minutes |
| Equalizer | Presets: Normal, Classic, Jazz, Pop, Rock, Voice, Custom (treble/bass) |
| ERP energy management | Auto shut-off after 30 min in standby without audio signal |
| Included accessories | Remote control, mains adapter, instruction manual |
| Maintenance | Clean with a dry cloth; do not use abrasive products |
| Safety instructions | Do not open, risk of electric shock; keep batteries out of reach of children; use in dry indoor environment |
Frequently Asked Questions - NR961 Soundmaster
User questions about NR961 Soundmaster
0 question about this device. Answer the ones you know or ask your own.
Ask a new question about this device
Download the instructions for your Radio in PDF format for free! Find your manual NR961 - Soundmaster and take your electronic device back in hand. On this page are published all the documents necessary for the use of your device. NR961 by Soundmaster.
USER MANUAL NR961 Soundmaster
DRC (Dynamic Range Compression)
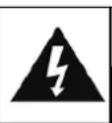
Do not dispose of this product with the normal household waste at the end of its life cycle. Return it to a collection point for the recycling of electrical and electronic devices. This is indicated by the symbol on the product, user manual or packaging
The materials are recyclable according to their labeling. By reusing materials or other forms of recycling old devices and packaging, you are making an important contribution to protecting our environment. If necessary, remove batteries and personal data before disposal free of charge and ask your local authority about the responsible disposal point
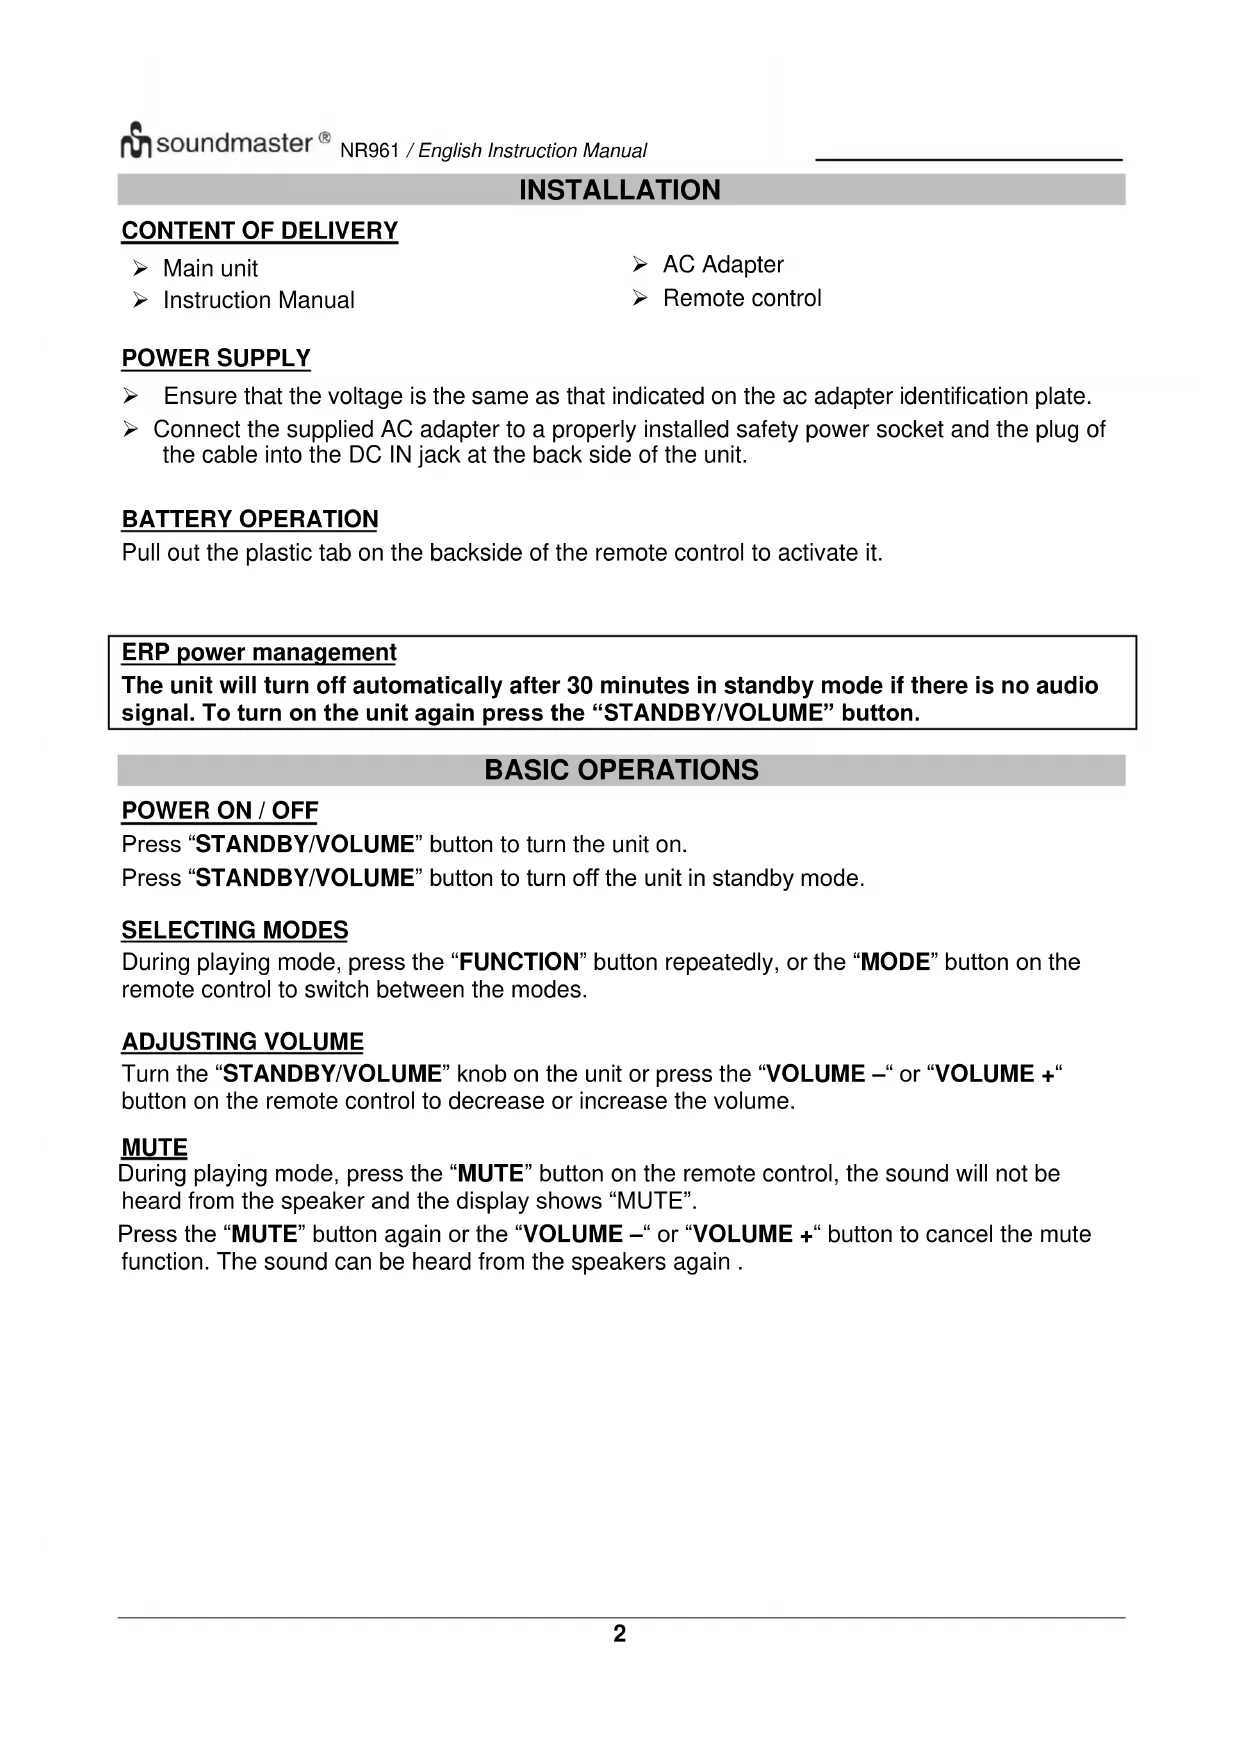
WARNING
Risk of electric shock
Do not open!

Caution: To reduce the risk of electric shock, do not remove the cover (or back). There are no user serviceable parts inside. Refer servicing to qualified service personnel.

This symbol indicates the presence of dangerous voltage inside the enclosure, sufficient enough to cause electric shock.

This symbol indicates the presence of important operating and maintenance instructions for the device
Used batteries are hazardous waste and NOT to be disposed of with the household waste! As a consumer you are legally obligated to return all batteries for environmentally responsible recycling - no matter whether or not the batteries contain harmful substances*)
Return batteries free of charge to public collection points in your community or shops selling batteries of the respective kind. Only return fully discharged batteries *) marked Cd = cadmium, Hg = mercury, Pb = lead
- Only use mercury and cadmium-free batteries.
- Used batteries are hazardous waste and NOT to be disposed of with the household waste!!!
- Keep batteries away from children. Children might swallow batteries.
- Contact a physician immediately if a battery was swallowed.
- Check your batteries regularly to avoid battery leakage.
- Batteries shall not be exposed to excessive heat such as sunshine, fire or the like.
- CAUTION: Danger of explosion if battery is incorrectly replaced
- Replace only with the same or equivalent type

WARNING
DO NOT INGEST BATTERY, CHEMICAL BURN HAZARD
This product contains a coin/button cell battery. If the coin/button cell battery is swallowed, it can cause severe internal burns in just 2 hours and can lead to death. Keep new and used batteries away from children. If the battery compartment does not close securely, stop using the product and keep it away from children. If you think batteries might have been swallowed or placed inside any part of the body, seek immediate medical attention.
CAUTION - INVISIBLE LASER RADIATION WHEN OPENING THE COVER OR PRESSING THE SAFETY INTERLOCK. AVOID EXPOSURE TO THE LASER BEAM.

To prevent possible hearing damage, do not listen at high volume levels for long periods
Safety, Environmental and Setup Instructions
- Use the device in dry indoor environments only.
- Protect the device from humidity.
- This apparatus is for moderate climates areas use, not suitable for use in tropical climates countries.
- No objects filled with liquids, such as vases, shall be placed on the apparatus.
- The mains plug or an appliance coupler is used as the disconnect device, the disconnect devices shall remain readily operable.
- Connect this device to a properly installed and earthed wall outlet only. Make sure the mains voltage corresponds with the specifications on the rating plate.
- Make sure the mains cable stays dry during operation. Do not pinch or damage the mains cable in any way.
- A damaged mains cable or plug must immediately be replaced by an authorized service center.
- In case of lightning, immediately disconnect the device from the mains supply.
Children should be supervised by parents when using the device. - Clean the device with a dry cloth only.
- Do NOT use CLEANING AGENTS or ABRASIVE CLOTHS!
- Do not expose the device to direct sunlight or other heat sources.
- Install the device at a location with sufficient ventilation in order to prevent heat accumulation.
- Do not cover the ventilation openings!
- Install the device at a safe and vibration-free location.
- Install the device as far away as possible from computers and microwave units; otherwise radio reception may be disturbed.
- Do not open or repair the enclosure. It is not safe to do so and will void your warranty. Repairs only by authorized service/ customer center.
- No naked flame sources, such as lighted candles, should be placed on the unit.
- When you are necessary to ship the unit store it in its original package. Save the package for this purpose.
- In case of malfunction due to electrostatic discharge or fast transient (burst), remove and reconnect the power supply.
- If the unit is not using for a long period of time, disconnect it from the power supply by unplugging the power plug. This is to avoid the risk of fire.
- The device is equipped with a "Class 1 Laser". Avoid exposure to the laser beam as this could cause eye injuries.
LOCATION OF CONTROLS
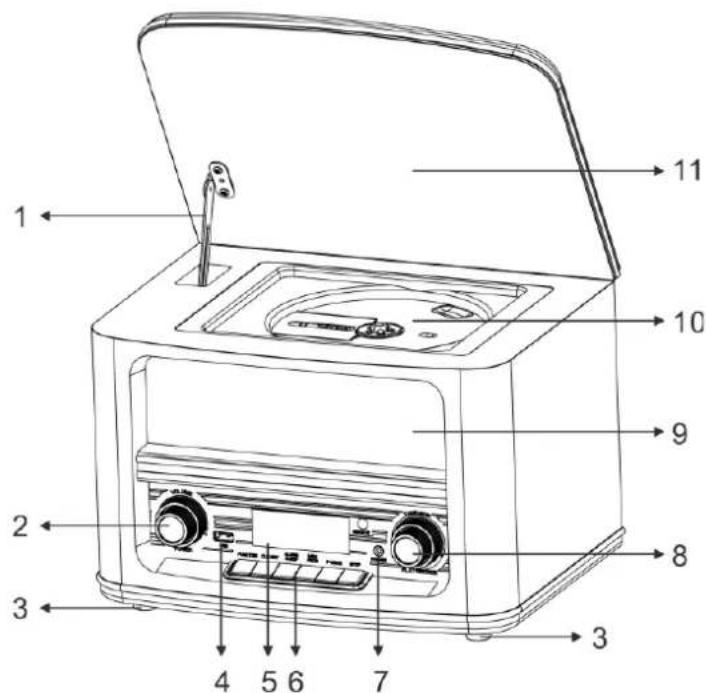

1 CD-Door Support bracket
9 Speaker
2 STANDBY/VOLUME
10 CD Tray
3 Rubber feet
11 CD Door
4 USB Slot
12 Antenna
5 LCD Display
13 AUX IN jack
6 Function Buttons (FUNCTION; ALARM/SLEEP; SCAN/PLAY/PAUSE; PAIR/STOP; PRESET/P-MOD; MENU/INFO)
14 DCIN
7 Headphone jack
8 TUNE/SKIP/SELECT/SNOOZE
REMOTE CONTROL

1 Standby
9 Menu/Info
2 Alarm
10 Preset
3 Sleep
11 Enter
4 Skip Back
12 Play/Pause
5 Volume -
13 Skip Forward
6 Mode
14 Pair/Scan
7 Mute
15 Volume +
8 Snooze
INSTALLATION
CONTENT OF DELIVERY
Main unit
AC Adapter
Instruction Manual
Remote control
POWER SUPPLY
Ensure that the voltage is the same as that indicated on the ac adapter identification plate.
Connect the supplied AC adapter to a properly installed safety power socket and the plug of the cable into the DC IN jack at the back side of the unit.
BATTERY OPERATION
Pull out the plastic tab on the backside of the remote control to activate it.
ERP power management
The unit will turn off automatically after 30 minutes in standby mode if there is no audio signal. To turn on the unit again press the "STANDBY/VOLUME" button.
BASIC OPERATIONS
POWER ON/OFF
Press "STANDBY/VOLUME" button to turn the unit on.
Press "STANDBY/VOLUME" button to turn off the unit in standby mode.
SELECTING MODES
During playing mode, press the "FUNCTION" button repeatedly, or the "MODE" button on the remote control to switch between the modes.
ADJUSTING VOLUME
Turn the "STANDBY/VOLUME" knob on the unit or press the "VOLUME -" or "VOLUME +" button on the remote control to decrease or increase the volume.
MUTE
During playing mode, press the "MUTE" button on the remote control, the sound will not be heard from the speaker and the display shows "MUTE".
Press the "MUTE" button again or the "VOLUME -" or "VOLUME +" button to cancel the mute function. The sound can be heard from the speakers again.
DAB
- Press the "FUNCTION" button repeatedly, or the "MODE" button on the remote control to select the DAB mode.
- At the first start the unit will automatically start the scan function and search all available stations.
- During the scan the display will show "Scanning ..." together with a slide bar that indicate the progress of the scan and the number of stations that have been found.
- After the scan has finished, the unit will select the first alphanumericly found station.
- To explore the found stations, rotate the "TUNE/SKIP/SELECT/SNOOZE" knob and press the "TUNE/SKIP/SELECT/SNOOZE" knob to confirm the selected station.
- You can also select the found station by pressing "SKIP BACK" or "SKIP FORWARD" and confirm with the "ENTER" button.
Note: If no stations are found after auto scan, the unit will enter back into the Tune Select Menu.
DAB FULL SCAN
The full scan will search for the entire DAB Band III channels. After the scan has finished, the first alphabetically found station will be automatically selected.
- Press "SCAN/PLAY/PAUSE" button to activate full scan or press and hold the "MENU/INFO" button to enter into the menu.
- Rotate the "TUNE/SKIP/SELECT/SNOOZE" button to select "Station Scan" and press the "TUNE/SKIP/SELECT/SNOOZE"
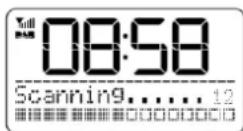
button to confirm. Select "Full Scan" and confirm with "TUNE/SKIP/SELECT/SNOOZE". The display will show "Scanning ......" together with a slide bar that indicates the progress of the scan and the number stations that have been found so far.
- All the stations that have been found will be stored automatically.
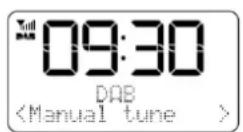
DAB MANUAL TUNE
As well as the full scan function, you can manually tune the radio. This can help if you know your radio has missed stations.
- Press and hold the "MENU/INFO" button to enter the menu and choose with the "TUNE/SKIP/SELECT/SNOOZE" knob "Station Scan" and press the "TUNE/SKIP/SELECT/SNOOZE" knob to confirm and choose "Manual Tune" confirm again.
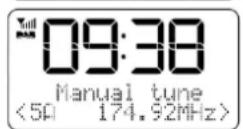
- Choose with the "TUNE/SKIP/SELECT/SNOOZE" knob the DAB channel from 5A to 13F.
- After your desired DAB channel number is selected, press the "TUNE/SKIP/SELECT/SNOOZE" button to enter the current multiplex. Now the display will show the multiplex and below you will see the signal strength.
- You will not see any new radio stations or hearing anything while in manual tune. To find the newly tuned in stations search through the station list.
STORE RADIO STATIONS
In either DAB or FM, you can store up to 20 of your favorite stations to the memory. This will enable you to access your favorite stations quickly and easily.
- To store a station select the desired station with the "TUNE/SKIP/SELECT/SNOOZE" knob and press the "TUNE/SKIP/SELECT/SNOOZE" knob to confirm. Press the "PRESET/P-MODE" button.
- Now the display will show the Preset stations from 1-20 < 1 (Empty)
- Choose the desired Preset Station number by using the "TUNE/SKIP/SELECT/SNOOZE" knob. Press and hold the "TUNE/SKIP/SELECT/SNOOZE" to store the station as a preset. Display shows: "Preset (x) Stored"
Note: If there is a station that already stored, it will show the stored "Station name/ frequency and P#" you can overwrite the stored station the same as an empty preset station number.
- Repeat step 1 to 3 to store further stations.
RECALL STORED RADIO STATIONS
- To recall a stored station, press the "PRESET/P-MODE" button. Choose with the "TUNE/SKIP/SELECT/SNOOZE" knob the desired station and press the "TUNE/SKIP/SELECT/SNOOZE" knob to confirm.
- If you choose a preset station number that has not been allocated a station, "Preset Empty" will be displayed.
DAB DISPLAY INFORMATION
Press the "MENU/INFO" button repeatedly to cycle through the information modes. The information is displayed on the lower segment of the display.
DRC (Dynamic range compression)
This function reduces the difference between the loudest and quietest audio being broadcast. Effectively, this makes quiet sounds comparatively louder, and loud sounds comparatively quieter.
Note: DRC only works if it is enabled by the broadcaster for a specific station.
- Press and hold the "MENU/INFO" button and rotate the "TUNE/SKIP/SELECT/SNOOZE" knob to select "System", press the "TUNE/SKIP/SELECT/SNOOZE" knob to confirm.
- Rotate the "TUNE/SKIP/SELECT/SNOOZE" knob to select "DRC" and confirm with "TUNE/SKIP/SELECT/SNOOZE."
- Now choose between "Off/Low/High" and confirm with "TUNE/SKIP/SELECT/SNOOZE"
PRUNE INVALID
You may remove all unavailable stations from the list.
- Press and hold the "MENU/INFO" button and rotate the "TUNE/SKIP/SELECT/SNOOZE" knob to select "System", press the "TUNE/SKIP/SELECT/SNOOZE" knob to confirm.
- Rotate the "TUNE/SKIP/SELECT/SNOOZE" knob to select "Prune" and confirm with "TUNE/SKIP/SELECT/SNOOZE."
- Now choose between "No" and "Yes", confirm your selection with "TUNE/SKIP/SELECT/SNOOZE".
FM
Press the "FUNCTION" button repeatedly, or "MODE" button on the remote control, to select the FM mode.
AUTOMATIC STATION SEARCH
-
Rotate the "TUNE/SKIP/SELECT/SNOOZE" knob clockwise and press the "SCAN/PLAY/PAUSE" button. You can also use the "PAIR/SCAN" button and then the "SKIP FORWARD" button on the remote control. The radio begins to search forward and will automatically stop when a station is found.
-
Rotate the "TUNE/SKIP/SELECT/SNOOZE" knob counter-clockwise and press the "SCAN/PLAY/PAUSE" knob. The radio begins to search backward and will automatically stop when a station is found.
MANUAL STATION SEARCH
Rotate the "TUNE/SKIP/SELECT/SNOOZE" knob, or press "SKIP BACK" or "SKIP FORWARD" until the desired radio station is found.
Note: In order to get a better reception, please adjust the antenna position. Under the "Audio setting mode", choose the mono mode, the FM reception effect will be better.
STORE RADIO STATIONS
To store radio stations is the same as in DAB mode.
RECALL STORED RADIO STATIONS
To recall radio stations is the same as in DAB mode.
FM DISPLAY INFORMATION
Press the "MENU/INFO" button repeatedly to cycle through the information modes. The information is displayed on the lower segment of the display.
ANNOUNCEMENT
Announcement allows your unit to interrupt your radio playback, change the station if there is an traffic or emergency announcement broadcasted from another station.
To activate announcement function:
-
Press and hold the "MENU/INFO" button and rotate the "TUNE/SKIP/SELECT/SNOOZE" knob to select "System", press the "TUNE/SKIP/SELECT/SNOOZE" knob to confirm.
-
Rotate the "TUNE/SKIP/SELECT/SNOOZE" knob to select "Announcement" and confirm with "TUNE/SKIP/SELECT/SNOOZE"
-
Now choose between "On" and "Off", confirm your selection with "TUNE/SKIP/SELECT/SNOOZE"
AUDIO SETTING (Stereo allowed/ Forced mono)
-
Press and hold the "MENU/INFO" button to enter into the menu. Rotate the "TUNE/SKIP/SELECT/SNOOZE" to select "Audio Setting" and press the "TUNE/SKIP/SELECT/SNOOZE" knob to confirm.
-
Rotate the "TUNE/SKIP/SELECT/SNOOZE" knob to select the desired audio setting "Stereo allowed" or "Forced mono". Press the "TUNE/SKIP/SELECT/SNOOZE" knob to confirm.
USB
- USB: Plug the USB device at the front side of the unit.
- Press the "FUNCTION" or "MODE" button repeatedly to select the USB mode.
- Press the "SCAN/PLAY/PAUSE" or "PLAY/PAUSE" to start or interrupt the playback.
- Rotate the "TUNE/SKIP/SELECT/SNOOZE" knob or press the "SKIP BACK" or "SKIP FORWARD" button to choose the previous or next track.
- Press the "PAIR/STOP" button to stop the playback.
- Press the "PRESET/P-MODE" button repeatedly, to select between following Play modes:
ONE: The current track will be repeated
FOL: The completely folder will be repeated
ALL: All tracks will be repeated
RAN:Playback will be played randomly
OFF
CD
- CD: Open the CD Door and lock it with the CD-door bracket. Insert a CD and close the CD-door by holding the CD-door with one hand and pull the CD door bracket slightly to the front of the radio. Now its unlocked and you can close the CD-door
- Press the "FUNCTION" or "MODE" button repeatedly to select the CD mode.
- Press the "SCAN/PLAY/PAUSE" or "PLAY/PAUSE" to start or interrupt the playback.
- Rotate the "TUNE/SKIP/SELECT/SNOOZE" knob or press the "SKIP BACK" or "SKIP FORWARD" button to choose the previous or next track
- Press the "PAIR/STOP" button to stop the playback.
- Press the "PRESET/P-MODE" button repeatedly, to select between following Play modes:
ONE: The current track will be repeated
FOL: The completely folder will be repeated (Only with MP3 CD)
ALL: All tracks will be repeated
RAN:Playback will be played randomly
OFF
AUDIOBOOK FUNCTION (RESUME)
If you change the mode or turn off the unit and come back to the CD mode, the unit starts the playback from the last heard point.
CD Program
- Set the unit in Stop mode
- Press the "PRESET/P-MODE" button on the remote control. The display will show "T01 P01" and "T001" flash.
- Choose with "TUNE/SKIP/SELECT/SNOOZE" the track which should be programmed and confirm the track by pressing the "PRESET/P-MODE" button on the remote control. The display changes to "P02".
- To choose more tracks do step 3 again.
- If all tracks are programmed press the "▶" button on the unit or remote control to start the programmed playback.
AUX
- Plug the AUX cable at the back of the unit (not included)
- Press the "FUNCTION" or "MODE" button on the remote control repeatedly to select the AUX mode.
- Start the playback of your external device.
BLUETOOTH
If you are using a Bluetooth audio device, make sure the working distance is within 10 meters. Different environment may have effect on the working distance.
- Press the "FUNCTION" button, or "MODE" on remote control repeatedly to select the Bluetooth mode ("Bluetooth mode" will flash in the display).
- Turn on the Bluetooth function on your audio device and choose "NR961". After your audio device is paired successfully, the "Bluetooth mode" will stay on.
- Press the "PLAY/PAUSE/MUTE/SCAN" to start or interrupt the playback.
- Rotate the "PLAY/PAUSE/MUTE/SCAN" knob to choose the previous or next track.
CAUTION: This unit only contains a Bluetooth receiver. You cannot pair a Bluetooth Headset or speakers.
SLEEP
- Turn the radio on and press the "ALARM/SLEEP" button to active the sleep function.
- Rotate the "TUNE/SKIP/SELECT/SNOOZE" knob or press the "SKIP BACK" / "SKIP FORWARD" button repeatedly to choose the sleep time OFF/15/30/45/60/90 The unit will power off after the time which you choose.
Note:
If you want to reset the sleep function, press the "ALARM/SLEEP" button and rotate the "TUNE/SKIP/SELECT/SNOOZE" until "Sleep off" is shown in the display.
ALARM
You have the option of setting 2 different alarm times.
- Press and hold the "ALARM/SLEEP" button to get into the alarm setting.
-
Use the "TUNE/SKIP/SELECT/SNOOZE" button to choose between "Alarm 1" or "Alarm 2" and press to confirm. Now you can set up the following options. Cycle through the options by turning the "TUNE/SKIP/SELECT/SNOOZE" knob and press the "TUNE/SKIP/SELECT/SNOOZE" knob to edit. After editing, press the "TUNE/SKIP/SELECT/SNOOZE" knob to confirm and cycle through the other options.
-
Alarm: ON/OFF
- Time: Set the desired alarm time.
3.Mode: Choose between Buzzer, DAB and FM - Source: When chosen FM/DAB select between last listened and a desired preset station
- Repeat: Choose between Once, Daily, Weekend, Workdays
- Volume: Set your desired alarm volume
- Save: Save your alarm settings
Turn off the alarm sound by pressing the "STANDBY/VOLUME" button.
SETTINGS
Set the unit in DAB/FM mode and press and hold the "MENU/INFO" button. Rotate the
"TUNE/SKIP/SELECT/SNOOZE" knob to "System" and press the
"TUNE/SKIP/SELECT/SNOOZE" button to confirm. To choose the desired adjustment, rotate
the "TUNE/SKIP/SELECT/SNOOZE" knob and press the "TUNE/SKIP/SELECT/SNOOZE"
knob to confirm.
- Equalizer
Choose the desired mode of the equalizer:
Custom EQ/Normal/Classic/Jazz/Pop/Rock/Speech
If you choose "Custom", select with the "TUNE/SKIP/SELECT/SNOOZE" knob the desired
EQ: Treble/Bass. Press the "TUNE/SKIP/SELECT/SNOOZE" knob to confirm the desired
EQ mode. Set the desired EQ value by rotating the "TUNE/SKIP/SELECT/SNOOZE" knob
and press them to confirm.
Note: When choose the customize EQ, please choose the suitable data, different music will have different effect. If the sound is distorted, please adjust the EQ data.
- Time
Set manual time/date, set 12/24 hour, set Auto update
-Backlight
Set the backlight for "On level" and "Timeout"
- Language
Choose the desired language
Factory Reset
Rotate the "TUNE/SKIP/SELECT/SNOOZE" knob to "Yes" and press the
"TUNE/SKIP/SELECT/SNOOZE" knob to confirm the reset. All stations and adjustments will be deleted!
Select "No" to cancel the factory reset.
Note: If there is any system error or the unit cannot be operated normally, unplug the power adaptor first. After several minutes, press and hold the "ALARM 2" and the "PRESET
MEMORY" button and plug the power adaptor at the same time. Then the unit will be restarted.
- SW Version
You can see the installed software version.
The current version of the manual can be downloaded from www.soundmaster.de
Technical changes and misprints reserved.
Copyright by Woerlein GmbH, 90556 Cadolzburg, www.soundmaster.de
Duplication only with the permission of Woerlein GmbH
CE

PROTECTION DE L'ENVIRONNEMENT

CLASS 1 LASER PRODUCT
KLASSE 1 LASER PRODUKT
LUOKAN 1 LASER LAITE
KCLASS 1 LASER APPARAT
PRODUCTO LASER CLASE 1
ATTENTION - RADIATION LASER INVISIBLE LORSQUE VOUS OUVREZ LE COUVERCLE OU APPUYEZ SUR L'ENCLENCHEMENT DE SECURITE. EVITEZ TOUTE EXPOSITION AU RAYON LASER

CLASS 1 LASER PRODUCT
KLASSE 1 LASER PRODUKT
LUOKAN 1 LASER LAITE
KCLASS 1 LASER APPARAT
PRODUCTO LASER CLASE 1
WAARSCHUWING-ONZICTBARE LASERSTRALING WANNEER DE BEHUIZING GEOPEND WORDT OF DE INTERNE BEVEILIGING UITGESCHAKELD. VERMIJD BLOOTSTELLING AAN DE LASERSTRAAL.

HANDMATIGE DAB-AFSTEMMING
RADIOSTATIONS OPSLAAN
DAB-INFORMATIE WEERGEVEN
RADIOSTATIONS OPSLAAN
FM DISPLAY INFORMATIE
INFORMACE DAB NA DISPLEJI
INFORMACE FM NA DISPLEJI
Cadolzburg, www.soundmaster.de
INFORMACIE FM NA DISPLEJI
FUNKCIA ZVUKOVEJ KNIHY (OBNOVI)
D 90556 Cadolzburg, Germany
Tel: +49 9103 71 67 0
Fax: +49 9103 71 67 12
E-Mail: info@soundmaster.de
Internet: www.soundmaster.de
Hereby, Wörlein GmbH declares that this device is in compliance with the essential requirements and other relevant provisions of Directive 2014/53/EU.
A copy of the declaration of conformity can be obtained from the above address.
