
IAN 280564 - Light therapy Livarno Lux - Free user manual and instructions
Find the device manual for free IAN 280564 Livarno Lux in PDF.
User questions about IAN 280564 Livarno Lux
0 question about this device. Answer the ones you know or ask your own.
Ask a new question about this device
Download the instructions for your Light therapy in PDF format for free! Find your manual IAN 280564 - Livarno Lux and take your electronic device back in hand. On this page are published all the documents necessary for the use of your device. IAN 280564 by Livarno Lux.
USER MANUAL IAN 280564 Livarno Lux
GD 电
Operating instructions and safety instructions
N
Hardleaking on vefbeisbogewtungen
IAN 280564
IAN 280564
()()
Deutsch 2
English 15
Francais 27
Nederlands 42
Cesky 54
Espanol. 66
Portugues 78
Inhalt
6.1.Placement/wall mounting 20
- Initial use 22
7.1. Operating modes 22
7.1.1. Timer mode: 22
7.1.2. Continuous mode: 23
- Maintenance/cleaning 23
8.1.Maintenance 23
8.2.Cleaning 23
8.3.Storing the device when not in use 23
- Environmental and waste disposal information 24
- Compliance 24
- Warranty information 25
Congratulations!
By purchasing the LivarnoLux Sunrise LTLS 10 A1 sun lamp, hereinafter referred to as sun lamp, you have opted for a high quality product.
Familiarise yourself with the sun lamp before using it for the first time and read these operating instructions carefully. Observe the safety instructions and only use the sun lamp in the manner described in these operating instructions and for the indicated fields of application.
Keep these operating instructions in a safe place. Hand over all documents in the event that you pass on the sun lamp to a third party.
1. Intended use
The sun lamp is not intended for commercial use. It is only suitable for indoor use, in dry and closed rooms. Always ensure that the sun lamp is firmly positioned on the surface. The device meets the requirements of all relevant standards related to CE conformity. Compliance with these standards is no longer guaranteed if a change is made to the device without the authorisation of the manufacturer.
2. Package contents
Unpack the sun lamp and all of the accessories. Remove all packaging materials and check all of the components for completeness and signs of damage. If any parts are missing or damaged, please contact the manufacturer.
LIVARNOLUX Sunrise LTLS 10 A1 sun lamp
- Mains adapter
Assembly materials (two screws and two raw plugs)
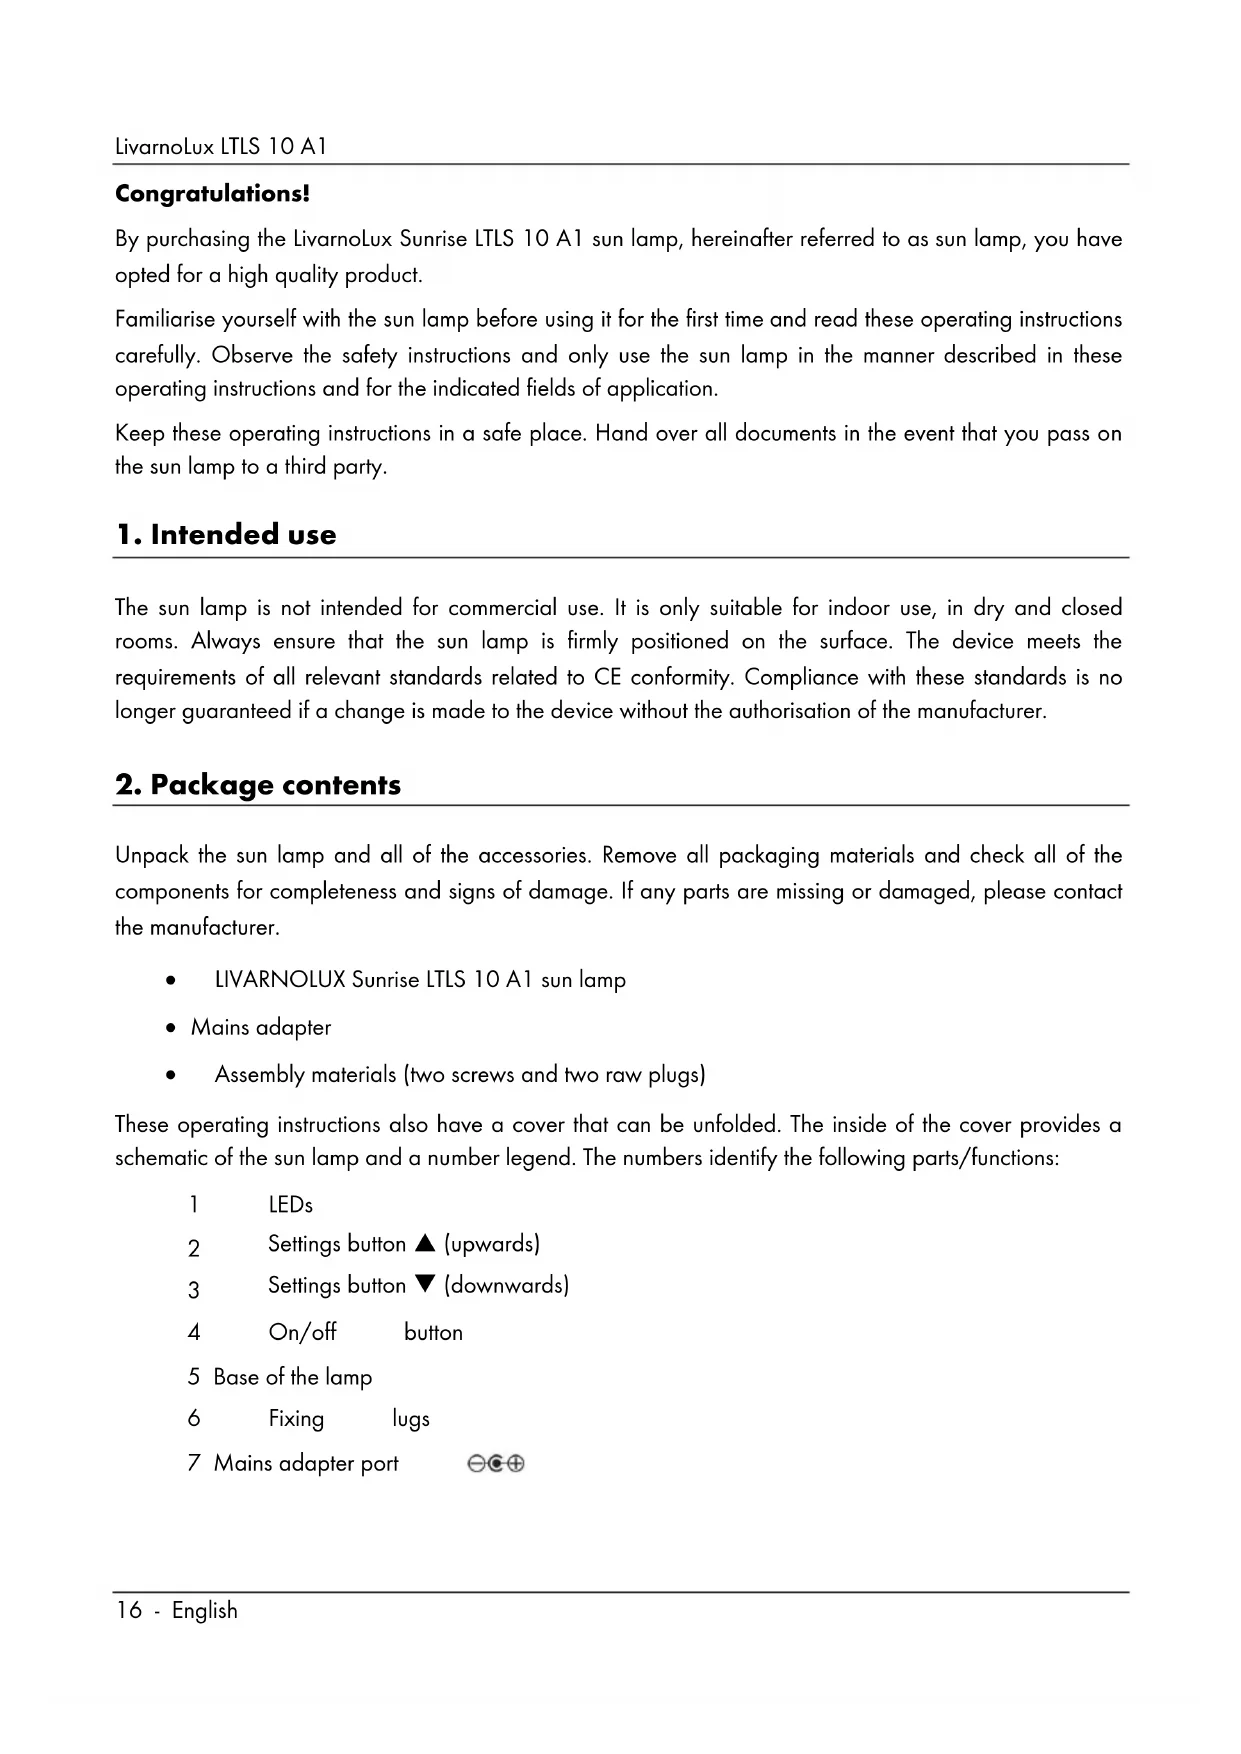
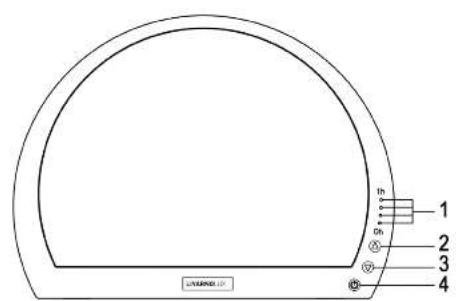
These operating instructions also have a cover that can be unfolded. The inside of the cover provides a schematic of the sun lamp and a number legend. The numbers identify the following parts/functions:
1 LEDs
2 Settings button (upwards)
3 Settings button (downwards)
4 On/off button
5 Base of the lamp
6 Fixing lugs
7 Mains adapter port
3. Technical data
Sun lamp
| Manufacturer LIVARNOLUX | |
| Model name LTLS 10 A1 | |
| Input voltage/current 24 V (direct voltage), 1000 mA | 1000 mA |
| Protection class | III, III |
| Max. illuminance Approx. 10,000 lux from a distance of 15 cm | |
| Colour temperature Approx. 5000 K | |
| Operating temperature | 5°C to 35°C |
| Storage conditions 0°C to 50°C | |
| Dimensions (W x H x D) | Approx. 40.5 x 30 x 3.9 cm |
| Weight Approx. 1,800 g | |
Mains adapter
| Manufacturer Aurolite Electrical (Panyu Guangzhou) limited | |
| Model name HG-T16C240100A | |
| Input voltage/current/frequency | 100 V - 240 V (alternating voltage); max. 0.6 A; 50/60 Hz |
| Output voltage, output current | 24 V (direct voltage), 1000 mA Polarity: ∅∅ |
| Protection class | II, ☑ |
| Length of power cable | Approx. 200 cm |
4. Safety instructions
Before using the sun lamp for the first time, please read the following instructions carefully and observe all warnings, even if you are familiar with using electronic devices. Keep these operating instructions in a safe place for future reference. If you give away the sun lamp or sell it, please ensure that you also pass on this manual.

DANGER! This icon, together with the word 'Danger', indicates an impending dangerous situation which, if not prevented, can lead to serious injuries or even death.

WARNING! This icon, with the word 'Warning', indicates important information for the safe operation of the device and user safety.

This icon on the device or mains adapter indicates that you need to observe the operating instructions.

The mains adapter is only suitable for use in dry, indoor rooms.
Short circuit-proof isolation transformer

Safety extra-low voltage with special protection against electrical shock

Ballast unit separate from the lamp. No additional cover necessary

This icon indicates that further information on the topic is available.

DANGER! Electrical devices must be kept out of the reach of children. Never leave children unattended with electrical devices. Children may not be able to recognise hazards. Also keep the packaging film away from children. There is a risk of suffocation.

DANGER! The device must only be used with the power supply provided.

DANGER! If you notice any smoke, unusual noises or smells, switch off the sun lamp immediately and remove the mains adapter from the socket. If this happens, you must stop using the sun lamp until it has been checked by a specialist. Do not inhale smoke possibly caused by a burning device. If you have inhaled smoke, consult a physician. Inhaling smoke can be harmful to your health.

DANGER! The housing for the sun lamp and mains adapter must not be damaged. Never replace a damaged cable. Instead, stop using the sun lamp. If the housing or mains adapter is damaged, there is a risk of electric shock.

DANGER! Never open the housing of the sun lamp, as this does not contain any parts to be maintained. If the housing is open, there is a risk of electric shock.

WARNING! Make sure that the sun lamp is not exposed to excessive shocks, as this may damage the electronic components in the sun lamp.

DANGER! Do not hang any objects on the sun lamp. The plastic body is not designed to bear heavy weights. Make sure that no flammable materials are in contact with or behind

the lamp, as this can damage the sun lamp or start a fire.
DANGER! Do not look into the light beam with an optical instrument such as a magnifying glass, as this can damage your eyes. If you think you have damaged your eyes, consult a physician.

DANGER! Cable
Always take hold of the cable by the plug and do not pull on the cable itself. Do not place the device, items of furniture or other heavy objects on the cable, and make sure that the cable is not bent. Never make a knot in the cable and do not connect it with other cables. All cables should be laid in such a way that no one steps on them or is obstructed by them. Do not use an adapter plug or extension cable that does not meet the relevant safety standards and do not perform any procedures on the cable yourself. A damaged cable may only be replaced by the manufacturer or authorised service department.
5. Copyright
All contents of these operating instructions are subject to copyright law and are provided to the user solely as a source of information. Any form of copying or reproduction of data and information without the express written permission of the author is prohibited. This also concerns commercial use of the content and data. The text and illustrations correspond to the technical standards at the time of printing. Subject to alterations.
6. Before initial use
6.1. Placement/wall mounting
You can either place the sun lamp on a flat, horizontal surface or use the assembly materials provided to mount it on the wall.
- If you want to place the sun lamp on a flat surface, unfold the base of the lamp (5) on the back side. The base of the lamp (5) can be unfolded in a continuous manner, allowing you to adjust the tilt of the sun lamp exactly as you wish. Please note that the tilt angle may not exceed 30 degrees. This is to ensure that the sun lamp is positioned securely.
-
You can use the assembly materials provided to mount the lamp on a wall. Please find out in advance which assembly materials are suitable for the location you have chosen to mount the lamp. Assembly materials suitable for wall mounting on concrete are provided with the sun lamp.
-
Measure the distance between the two required drill holes between the two fixing lugs (6), as shown in the following diagram.
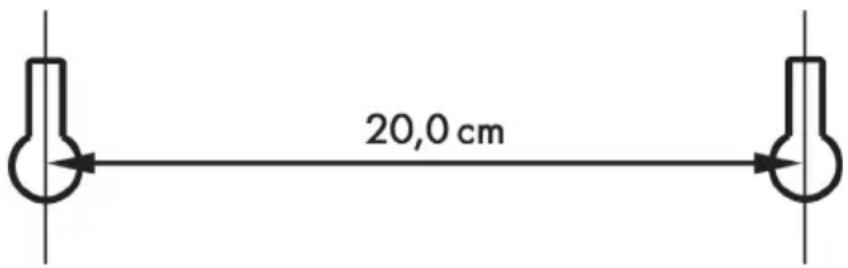
- Mark the positions of the drill holes on the wall. The holes must be placed on a horizontal line.
- Use the suitable tool to drill holes that suit the assembly materials used.
- Insert the raw plugs if this is required for the assembly materials you are using. Screw in the screws until approximately 5mm of the screw heads are protruding.
- Insert the small plug of the mains adapter into the mains adapter port (7) before you continue. This step will not be possible later.
- Fold the base of the lamp (5) upwards and press firmly near the hinge a second time in order to fit the base of the lamp (5) flatly against the back wall.
- Mount the sun lamp on the screws so that the screw heads poke through the round openings on the lower side of the fixing lugs (6).
- Finally, slide the sun lamp evenly downwards by approx. 10 - 12mm . The screw heads should now be positioned behind the narrow ends of the fixing lugs (6), keeping the sun lamp securely in place. Check whether the sun lamp is fixed securely by gently pulling it towards you. If the sun lamp is not properly fixed, repeat the steps above. You may have screwed the screws too far into the wall. If this is the case, unscrew them slightly and try again.
- Insert the mains adapter into an easily accessible, live power socket.
Raw plugs may not be necessary for some walls, such as walls made of wood. If this is the case, you can screw the screws directly into the wall. If you don't have any experience working with tools or feel unsure which assembly materials are suitable for your wall, find someone who has the right skills to help you.
7. Initial use
The sun lamp is operated via a touch switch. You do not need to fully press the buttons. You can simply tap them gently. Your finger does not need to cover each button fully. It is usually enough to tap the edge. Each button (2, 3, 4) will briefly flash each time it registers your tap.
7.1. Operating modes
The sun lamp features two operating modes that you can choose from according to your needs.

Artificial sun light can also have a positive effect on your mood. To this end, 30 to 60 minutes of the light is enough each day. This is why the sun lamp features LEDs (1) that can let you know once the sun lamp has stayed on for an hour.
You can dim the intensity of the sun lamp in five steps at all times. You can change the intensity of the light by tapping the button (2) or the button (3). Each button (2, 3) will briefly flash each time it registers your tap. Please note that you need to continue tapping each button to change the intensity of the light by several levels. Keeping your finger on each button (2, 3) will not change the intensity of the light by more than one level.
7.1.1. Timer mode:
Briefly tap the on/off button (4) in order to enter the timer mode. In this mode, you can switch on the sun lamp for a maximum of one hour. The LEDs (1) will display how much time is left by switching off one at a time from top to bottom.
Each illuminated LED (1) corresponds to a full 15-minute period. A slowly blinking LED (1) corresponds to a 15-minute period that has begun to elapse.
Sample diagram on the right:
The top two LEDs (1) are switched off, the third LED (1) from the top is blinking and the fourth LED (1) is illuminated. This means that the sun lamp will switch off in 16 to 30 minutes.
The sun lamp will switch off automatically after 60 minutes unless you manually change the remaining time.

You can change the remaining time in units of 15 minutes at all times according to your needs. You can change the remaining time by 15 minutes by tapping the button (2) or the button (3) for approximately 2 seconds each time. Each button (2, 3) will briefly flash each time it registers your tap. You can increase the remaining time to a maximum of 60 minutes and decrease the remaining time to a minimum of 15 minutes.
Briefly tap the on/off button (4) in order to switch off the sun lamp before the remaining time has elapsed.
7.1.2. Continuous mode:
Tap the on/off button (4) for approximately 2 seconds in order to enter the continuous mode. In this mode, the LEDs (1) will tell you how long it has been since the sun lamp was switched on by switching on one at a time from bottom to top.
Each illuminated LED (1) corresponds to a full 15-minute period. A slowly blinking LED (1) corresponds to a 15-minute period that has begun to elapse.
Sample diagram on the right:
The bottom two LEDs (1) are illuminated and the third LED (1) from the bottom is blinking. This means that the sun lamp has been switched on for 31 to 45 minutes.
All four LEDs (1) will be illuminated after 60 minutes.
Briefly tap the on/off button (4) in order to switch off the sun lamp after use.

8. Maintenance/cleaning
8.1. Maintenance

Maintenance work is required if the sun lamp has been damaged, liquids or objects have got inside the housing, the sun lamp has been exposed to rain or moisture or if the sun lamp is not functioning properly or has been dropped. If you notice any smoke, unusual noises or smells, switch off the sun lamp immediately and remove the mains adapter from the socket. If this happens, you must stop using the sun lamp until it has been checked by a specialist. All maintenance work should only be carried out by qualified specialists. Never open the housing of the sun lamp.
8.2. Cleaning

Let the sun lamp cool down fully before you clean it.
Use a dry cloth to clean the sun lamp and never use cleaning agents or solvents that react with plastics. Ensure that no liquids enter the housing. If the sun lamp is heavily soiled, use a very slightly moistened cloth.
8.3. Storing the device when not in use
If you don't plan to use the sun lamp for a long period of time, remove the mains adapter from the socket and store the sun lamp in a clean, dry place, away from direct sunlight.
9. Environmental and waste disposal information
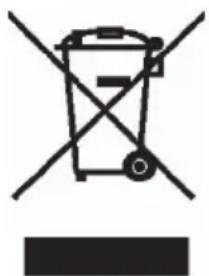
If a product features this icon of a crossed-through waste bin, the product is subject to European Directive 2012/19/EU. Electrical and electronic equipment must not be put in the household waste, but must be disposed of via designated public disposal centres. The lamps also need to be disposed of properly.
The device may not be disposed of with household or bulk waste. You can find information on collection points or collection dates from your local authorities or your
local waste management companies.
Make sure the packaging is disposed of in an environmentally friendly manner. Cardboard packaging can be put out for waste-paper collection or taken to public collection points for recycling. The plastic packaging used for your device is collected by your local waste management company and disposed of in an environmentally-friendly manner.
10. Compliance

This device complies with the fundamental requirements and other relevant regulations of the EMC Directive 2014/30/EU, the Low-Voltage Directive 2014/35/EU, the ErP Directive 2009/125/EC and the RoHS Directive 2011/65/EU.
In order to obtain the full EU Declaration of Conformity, send an e-mail to the following email address:
ce@targa.de
11. Warranty information
Warranty of TARGA GmbH
Dear Customer,
This device is sold with three years warranty from the date of purchase. In the event of product defects, you have legal rights towards the seller. These statutory rights are not restricted by our warranty as described below.
Warranty conditions
The warranty period commences upon the date of purchase. Please keep the original receipt in a safe place as it is required as proof of purchase. If any material or manufacturing faults occur within three years of purchase of this product, we will repair or replace the product free of charge as we deem appropriate.
Warranty period and legal warranty rights
The warranty period is not extended in the event of a warranty claim. This also applies to replaced and repaired parts. Any damage or defects discovered upon purchase must be reported immediately when the product has been unpacked. Any repairs required after the warranty period will be subject to charge.
Scope of warranty
The device was carefully manufactured in compliance with stringent quality guidelines and subjected to thorough testing before it left the works. The warranty applies to material and manufacturing faults. This warranty does not cover product components which are subject to normal wear and which can therefore be regarded as wearing parts, or damage to fragile components such as switches, rechargeable batteries or components made of glass. This warranty is void if the product is damaged, incorrectly used or serviced. To ensure correct use of the product, always comply fully with all instructions contained in the user manual. The warnings and recommendations in the user manual regarding correct and incorrect use and handling of the product must always be observed and complied with. The product is solely designed for private use and is not suitable for commercial applications. The warranty is rendered void in the event of incorrect handling and misuse, if it is subjected to force, and also if any person other than our authorised service technicians interfere with the device. No new warranty period commences if the product is repaired or replaced.
Submitting warranty claims
To ensure speedy handling of your complaint, please note the following:
Before using your product for the first time, please read the enclosed documentation carefully. Should any problems arise which cannot be solved in this way, please call our hotline.
- Always have your receipt, the product article number as well as the serial number (if available) to hand as proof of purchase.
- If it is not possible to solve the problem on the phone, our hotline support staff will initiate further servicing procedures depending on the fault.

Service
Phone: 020-70490403
E-Mail: service.GB@targa-online.com

Phone: 01-4370121
E-Mail: service.IE@targa-online.com

Phone: 027781103
E-Mail: service.MT@targa-online.com

Phone: 02-2009025
E-Mail: service.CY@targa-online.com

Manufacturer
Please note that the following address is not a service address. First contact the service point stated above.
TARGA
GmbH
Coesterweg 45
59494 SOEST
GERMANY
Contenu
Cher client, chere clientele,
Cher client, chere clientele,