
CK 1940 - Alarm Clock ADE - Free user manual and instructions
Find the device manual for free CK 1940 ADE in PDF.
| Brand | ADE |
| Model | CK 1940 |
| Product type | DCF radio-controlled alarm clock |
| Power supply | 2 LR/R6 (AA) 1.5 V batteries |
| Rated current | < 40 mA |
| Temperature measurement range | Approximately -10 °C to 60 °C (14 °F - 140 °F) |
| Time reception | DCF77 signal (77.5 kHz) |
| Display | Time, date, day of the week, room temperature (°C/°F) |
| Alarm function | Audible alarm with progressive amplification |
| Snooze | 5 minutes, repeatable |
| Automatic alarm shut-off | After 2 minutes without intervention |
| Backlight | Approximately 5 seconds via SNOOZE/LIGHT button |
| Time formats | 12h/24h, manually adjustable |
| Daylight saving time switch | Automatic (via DCF) with DST indicator |
| Day display language | Adjustable (not specified) |
| Maintenance | Clean with a soft, dry cloth or slightly damp cloth |
| Safety | Keep batteries out of reach of children, observe polarity, do not recharge batteries |
| Intended use | Private use, indoors, dry environment |
| Warranty | 2 years (material or manufacturing defects) |
| Distributor | Waagen-Schmitt GmbH, Hamburg, Germany |
Frequently Asked Questions - CK 1940 ADE
User questions about CK 1940 ADE
0 question about this device. Answer the ones you know or ask your own.
Ask a new question about this device
Download the instructions for your Alarm Clock in PDF format for free! Find your manual CK 1940 - ADE and take your electronic device back in hand. On this page are published all the documents necessary for the use of your device. CK 1940 by ADE.
USER MANUAL CK 1940 ADE
natural_image
Icon of a person using a laptop inside a circle (no text or symbols)natural_image
Warning symbol with exclamation mark inside a triangle (no text or numbers)natural_image
Warning symbol with exclamation mark inside a triangle (no text or numbers)natural_image
Warning symbol with exclamation mark inside a triangle (no text or numbers)6 Bedientasten SET, ALARM, ▲, ▼WAVE
7 Batteriefach, 2x LR/R6 (AA)
Inbetriebnahme
natural_image
Symbol of a trash bin crossed with no text or numbers, representing environmental restriction (no text present)natural_image
Simple line drawing of a trash bin with crossed x-bracing (no text or symbols)You have chosen to purchase a high-quality product from the brand ADE, which combines intelligent functions with an exceptional design. With this radio-controlled alarm clock, you always have the exact time in view.
The many years of experience of the brand ADE ensures a high technical standard and proven quality.
We wish you easy timing at any time!
Your ADE Team
Scope of Delivery
- DCF Radio-controlled alarm clock
- 2 batteries type LR/R6 (AA), 1.5 ¥
- Operating Manual
About this manual

natural_image
Icon of a person using a laptop inside a circle (no text or symbols)This operating manual describes how to safely use and care for your products. Keep this operating manual in a safe place in case you would like to refer to it later.
If you pass this item on to someone else, pass on this manual as well. Failure to observe the recommendations in this operating manual can lead to injuries or damage to your product.
Explanation of symbols

natural_image
Warning symbol with exclamation mark inside a triangle (no text or numbers)This symbol, combined with the word DANGER, warns against serious injury.

natural_image
Warning symbol with exclamation mark inside a triangle (no text or numbers)This symbol, combined with the word WARNING, warns against moderate and mild injuries.

natural_image
Warning symbol with exclamation mark inside a triangle (no text or numbers)This symbol, combined with the word NOTE, warns against material damage.

natural_image
Simple black lowercase 'i' inside a circle, no text or symbols presentThis symbol signifies additional information and general advice.
Technical Data
Model: DCF Radio-controlled alarm clock CK 1940
Battery: 2x LR/R6 (AA)/1.5 V
Rated current: < 40 mA
Measuring range: approx. -10 °C - 60 °C
approx. 14^ F - 140^ F
Distributor (no service address): Waagen-Schmitt GmbH Hammer Steindamm 27-29 22089 Hamburg, Germany
Our products are constantly being developed and improved. For this reason, design and technical modifications are possible at any time.
Table of Contents
Scope of Delivery ......24
General information......25
Technical Data 26
Intended Use....28
Safety....28
Overview 31
Start-up 32
Receiving the time signal ....33
About the time signal transmitter
DCF77 38
Alarm....39
Other functions......40
Cleaning......41
Fault/Remedy 41
Declaration of Conformity ......42
Guarantee 43
Disposal 43
Intended Use
This DCF radio-controlled alarm clock is used to display the time, the date and the room temperature. The item is designed for private use and for use in dry areas.
Safety
This item can be used by children 8 years of age and above, as well as by persons with reduced physical, sensory, or mental capacities or lacking experience and knowledge, if they are supervised or have been instructed in the safe use of the item and understand the dangers that may arise.
- Children must not play with the item.
- Cleaning and user maintenance must not be carried out by children, unless they are 8 years of age or older and are being
supervised.
- Batteries, when swallowed, can be life-threatening. You should therefore keep the item and batteries out of reach of children. If a battery is swallowed, medical assistance must be sought immediately.
DANGER for children
- Keep children away from packaging material. Risk of choking if swallowed.
RISK of fire/burning and/or explosion
- Risk of explosion if batteries are improperly exchanged. Replace batteries only with the same or an equivalent battery type. Observe the “Technical Data”.
- Batteries must not be recharged, reactivated by other means, dismantled, thrown into fire, or short-circuited. Otherwise there is an increased risk of explosion and of leakage; furthermore, gases may escape.
- Avoid contact of the battery fluid with skin, eyes, and mucosa. In case of contact, rinse the affected areas right away with plenty of clean water and consult a doctor immediately.
BEWARE of material damage
- Protect the alarm clock from strong shocks and vibrations.
- Remove the batteries from the clock when they are exhausted or if you will not use the clock for an extended period of time. You will thus avoid damage that may result from the leakage of battery acid.
- When inserting and changing batteries, pay attention to the correct polarity (+/-).
- Do not expose batteries to extreme conditions, for example, by storing them on radiators or under direct sunlight. Increased risk of leakage!
- Clean the battery and device contacts, as needed, before inserting the battery.
- Do not make any changes to the item. Only allow repairs to be carried out at a specialist workshop. Repairs carried out incorrectly can considerably endanger the user.
English
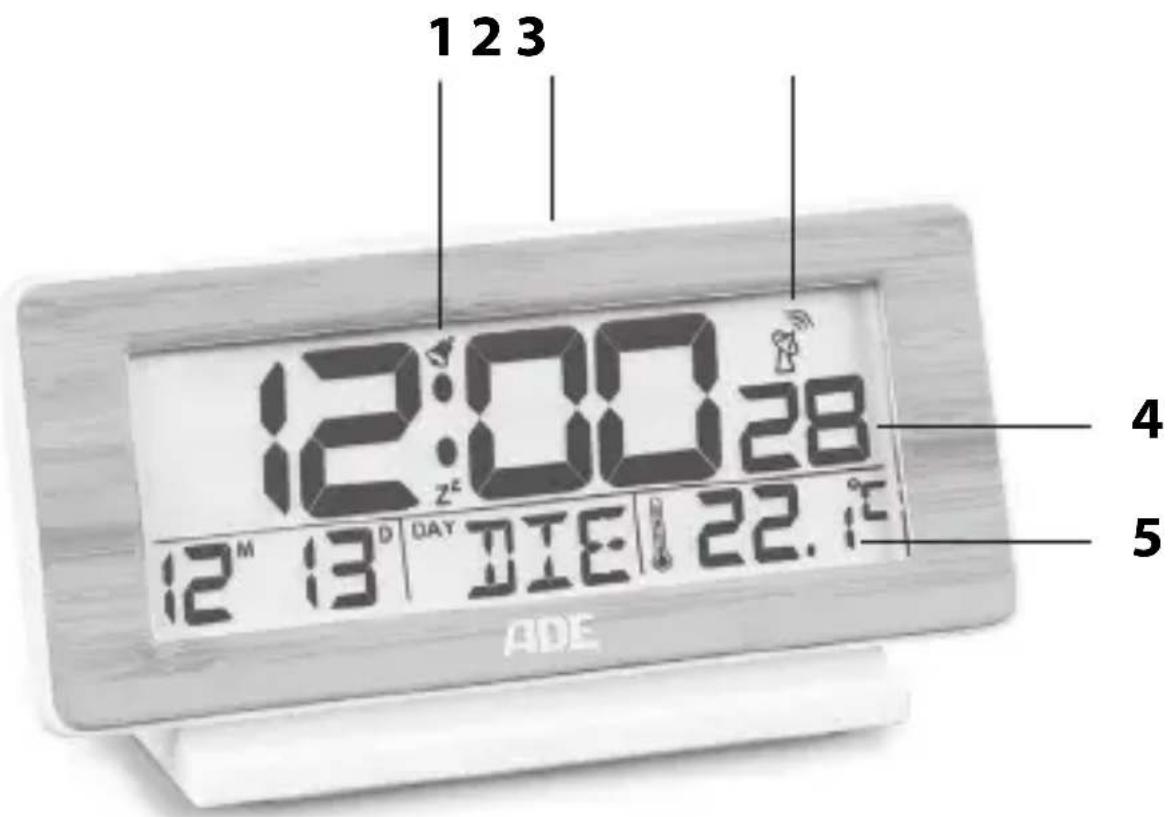
1 Symbol for active alarm function
2 SNOOZE/LIGHT button
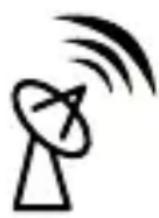
3 Symbol for radio reception for time signal transmitter DCF77
4 Time (hours, minutes, seconds)
5 Date/day of the week/room temperature (in °C or °F)
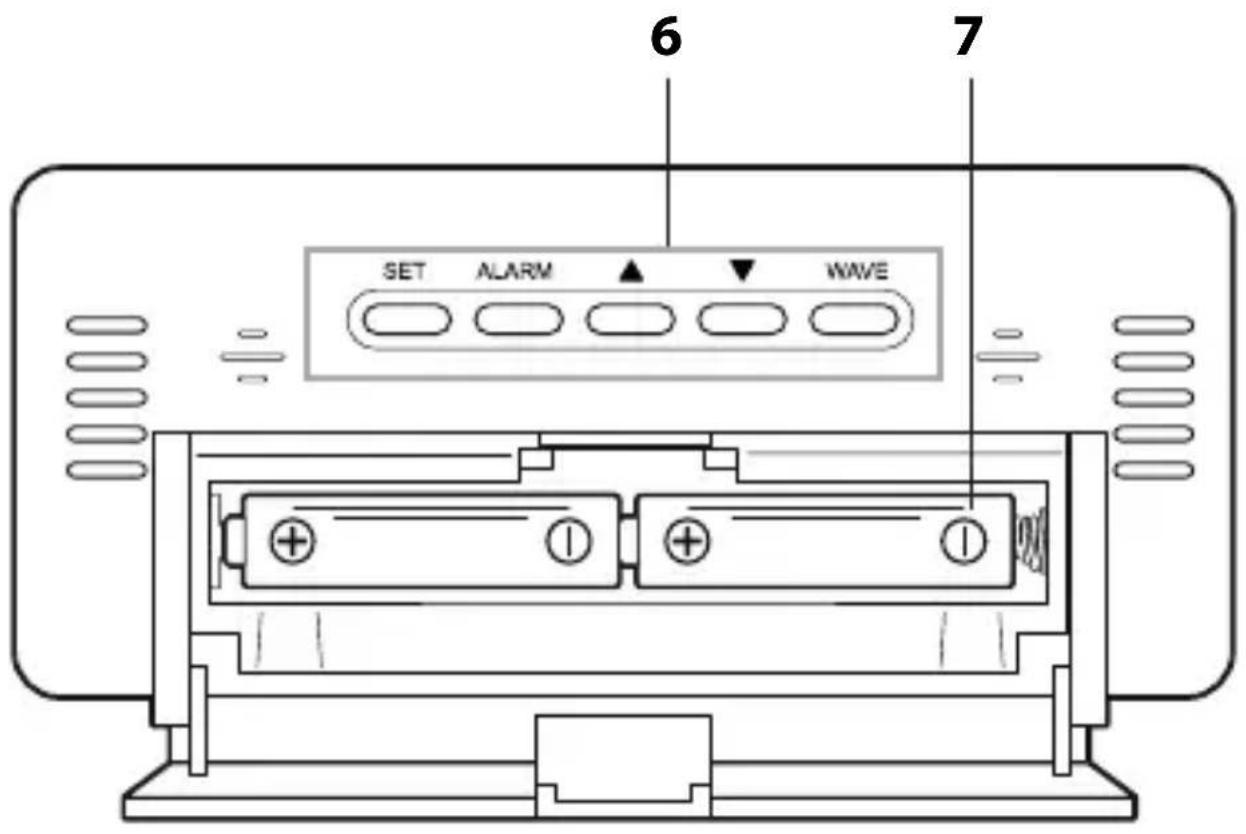
6 SET, ALARM, ▲, ▼WAVE control buttons
7 Battery compartment, 2x LR/R6 (AA)
Start-up
For use, you will need two LR/R6 (AA), 1.5V batteries.
- Push the locking tab downwards and fold down the battery compartment cover.
- Insert the batteries as shown on the bottom of the battery compartment. Pay attention to the correct polarity (+/-).
- Fold the battery compartment cover back up. The locking tab must audibly engage.
As soon as the batteries are inserted, the alarm clock switches to reception, see next chapter.
Notes on changing the battery:
- Only use the battery type specified in the "Technical Data".
- Always exchange all of the batteries at the same time.
- Dispose of old batteries in an environmentally friendly manner, see “Disposal”.
Receiving the time signal
When the batteries are inserted, all displays are shown for a brief moment and the display is illuminated.
The measured room temperature is displayed shortly afterwards.
The device then switches to receiving-mode, during which the number of radio waves indicates the quality of the reception: The more radio waves shown on the display, the better is the reception.
As soon as the time signal has been received in sufficient strength, the time is displayed. The radio-controlled alarm clock automatically switches to reception several times every night. During this process, the displayed time is compared with that received from the time signal transmitter and, if necessary, corrected.
If a sufficiently strong signal has not been received, the radio-controlled alarm clock will cancel the receiving process after a few minutes and the radio tower symbol goes out.
The receiving process is started again at a later point in time. In this case, the time proceeds as usual (beginning with the start time of "00:00").
Checklist when data is missing in the display
| 1. Check whether the location of the alarm clock is suitable, see “Choosing a location”. | |
| 2. Manually restart the receiving process, see “Starting signal reception manually”. | |
| 3. Wait until the alarm clock automatically switches back to receiving mode at a later time. | |
| 4. Manually perform settings if reception is not possible at your location, see “Setting the time manually”. |
Setting the time manually

- If there is more than approx. 30 seconds between two pushes of a button, the setting process automatically ends and you will have to repeat it.
-
Each push of a button is confirmed with a beep.
-
Press and hold the SET button until the indicator for the 12 and 24 hour time format flashes in the display.
-
Use the ▲ or ▼ buttons to select the desired time format ("12H" or "24H").
-
Press SET to save the setting.
"00" flashes in the display for the time zone you are in ("00" is the default setting for the European mainland).
- Proceed as described:
-Press the ▲ or ▼ button to set the desired value.
-Press SET each time to save a setting.
- Perform the following settings one after the other:
-Hours
-Minutes
-Year
-Month
-Day
-Language (relates exclusively to the weekday indicator)
- Finally, press SET to exit.
Starting signal reception manually
If the radio signal symbol to the left is no longer displayed, the radio signals from the time signal transmitter are no longer being received. The time indicator nevertheless continues precisely.
-Press the WAVE button 1x to start the radio reception.
Pay attention to the following:
- If the reception was not successful, the reception symbol fades out after a few minutes and the time on the display continues normally.
- Upon successful signal reception, the radio-controlled alarm clock adjusts itself to the time of the time signal transmitter. If you have already carried out manual time and date settings, these will be automatically adjusted.
Choosing a location

NOTE on material damage
- Protect the radio-controlled alarm clock from dust, shocks, extreme temperatures, direct sunlight and moisture. Only place it in a dry, closed room.
- Maintain a distance from TV sets, computers and monitors. Base stations of cordless telephones should also not be in the immediate vicinity of the radio-controlled alarm clock.
- Depending on the location, it may occur in rare individual cases that the alarm clock receives signals from another time signal transmitter or even alternately from two time signal transmitters. This is not a fault in the device. In this case, change the location of the alarm clock.
- The weather, e.g. a heavy storm, can cause interference with the reception.
- Temporary shutoffs of the transmitter can sometimes happen, e.g. because of maintenance work.
Setting up the radio-controlled alarm clock
- Set up the radio-controlled alarm clock as close to a window as possible. Here, the reception will generally be best.
About the time signal transmitter DCF77
This radio-controlled alarm clock receives its radio signals from the time signal transmitter DCF77. This broadcasts the precise and official time of the Federal Republic of Germany on the long-wave frequency of 77.5 kHz. The transmitter is located in Mainflingen near Frankfurt am Main and, with its range of up to 2000 km, supplies the majority of radio-controlled clocks in western Europe with the necessary radio signals.
As soon as the radio-controlled alarm clock is supplied with power, it switches to reception and searches for the signal from the transmitter DCF77. If the time signal is received in sufficient strength, the time is displayed.
The radio-controlled alarm clock switches on several times a day and synchronises the time with the radio signal from the transmitter DCF77. In the event the signal is not received, e.g. during a strong storm, the clock continues to run precisely and then switches to receiving mode again at the next scheduled time.
Setting the alarm time
- Press and hold the ALARM button until the alarm hour flashes in the display and "AL" is displayed.
- Use ▼ or ▲ to set the alarm hour.
- Press ALARM.
- Use ▼ or ▲o set the alarm minute.
- Press ALARM to save the alarm time.
- Press ALARM again.
The display shows 🔍, the alarm function is activated.
Being awakened
At the set time you will be woken by an alarm signal, which will become more intense as the waking time increases.
Interrupting the alarm for 24 hours
-Press any button (except SNOOZE/LIGHT) to interrupt the alarm. After 24 hours, the alarm will be triggered again.
Auto-stop function
If you do not press a button, the alarm switches off automatically after 2 minutes.
After 24 hours, the alarm will be triggered again.
Repeat alarm (snooze function)
-Press the SNOOZE/LIGHT button 1x when the alarm sounds. 🙏 and z ^z flash in the display.
After 5 minutes, the device switches on again and wakes you up again. This procedure can be repeated multiple times.
Switching the alarm function on/off
-Press ALARM 1x to switch off the alarm function, 🔔 goes out. Pressing ALARM again reactivates the alarm function.
Other functions
Illuminating the display
-Press the SNOOZE/LIGHT button to illuminate the display for approx. 5 seconds.
Change temperature unit
-Press the button to display the temperature in °Celsius or °Fahrenheit.
Switching between summer and winter time
Switching between summer and winter time, or vice versa, takes place automatically with good time signal reception.
When daylight saving time is active, the display shows "DST" (Daylight Saving Time).
Resetting the radio-controlled alarm clock to factory setting
Reset the radio-controlled alarm clock to its factory setting if the display shows unusual or obviously incorrect values.
- Remove the batteries from the battery compartment and wait a while.
- Reinsert the batteries. Observe the correct polarity (+/-).
- Proceed as described in the chapter "Receiving the time signal".
Cleaning
-If necessary, dust the item with a soft, dry cloth or wipe it with a slightly moistened cloth.
Fault/Remedy
DCF77 signal is not received.
- Check the location.
- If necessary, start the radio reception manually.
- Set the time manually.
Temperature indication appears too high.
- Check whether the alarm clock is exposed to direct sunlight.
Display is illegible, function is unclear or values are obviously incorrect.
- Reset the alarm clock to the original factory setting.
Declaration of Conformity
Waagen-Schmitt GmbH hereby declares that the radio-controlled alarm clock CK 1940 is in compliance with EU directives 2014/53/EU and 2011/65/EU.
The full text of the EU declaration of conformity is available at the following internet address: www.ade-germany.de/doc
This declaration loses its validity if any modification is made to the alarm clock that has not been agreed with us in advance.
Hamburg, September 2019
Waagen-Schmitt GmbH
CE
Guarantee
The company Waagen-Schmitt GmbH guarantees for 2 years from the purchase date the cost-free rectification of defects on the basis of material or fabrication errors through repair or exchange. In the event of a guarantee claim, please return the product with the proof of purchase (stipulating the reason for claim) to your dealer.
Disposal
Disposing of the packaging

Dispose of the packaging with similar materials. Put cardboard with waste paper, films with recyclable materials.
Disposing of the product
Dispose of the product in accordance with the regulations that apply in your country.
natural_image
Symbol of a trash bin crossed with no text or labels, accompanied by a black rectangle below (no readable text or symbols)Devices must not be disposed of in normal household waste
At the end of its life, the product must be disposed of in an appropriate way.
In this way, valuable materials contained in the device will be recycled and the burden on the environment avoided. Hand in the old device at a collection point for electronic waste or at a recycling depot. For more information, contact your local waste disposal firm or your local administrative body.
natural_image
Simple line drawing of a trash bin with crossed x-bracing (no text or symbols)Recyclable and disposable batteries do not belong in household waste
All batteries must be handed in at a collection point in your community, suburb, or at the retailer.
Such batteries can thus be disposed of in an environmentally friendly way.
natural_image
Icon of a person using a laptop inside a circle (no text or symbols)natural_image
Warning symbol with exclamation mark inside a triangle (no text or numbers)natural_image
Warning symbol with exclamation mark inside a triangle (no text or numbers)6 Botones de control SET, ALARM, ▲, ▼, WAVE
7 Compartimento para pilas, 2x LR/R6 (AA)
natural_image
Symbol of a trash bin with crossed lines indicating no waste or restriction, and a solid black rectangle below (no text or symbols)natural_image
Simple line drawing of a trash bin with two crossed lines indicating no waste or restriction (no text or symbols)natural_image
Icon of a person using a laptop inside a circle (no text or symbols)natural_image
Warning symbol with exclamation mark inside a triangle (no text or numbers)natural_image
Warning symbol with exclamation mark inside a triangle (no text or numbers)natural_image
Warning symbol with exclamation mark inside a triangle (no text or numbers)natural_image
Simple black lowercase 'i' inside a circle, no text or symbols present6 Touches de commande SET, ALARM, ▲, ▼, WAVE
natural_image
Symbol of a trash bin crossed with no text or numbers, representing environmental restriction (no text present)natural_image
Simple line drawing of a trash bin with two crossed x-axes (no text or symbols)natural_image
Icon of a person using a laptop inside a circle (no text or symbols)natural_image
Warning symbol with exclamation mark inside a triangle (no text or numbers)natural_image
Warning symbol with exclamation mark inside a triangle (no text or numbers)natural_image
Warning symbol with exclamation mark inside a triangle (no text or numbers)natural_image
Simple line drawing of a trash bin with crossed lines indicating no waste or restriction (no text or symbols)natural_image
Warning symbol with exclamation mark inside a triangle (no text or numbers)natural_image
Warning symbol with exclamation mark inside a triangle (no text or numbers)natural_image
Warning symbol with exclamation mark inside a triangle (no text or numbers)natural_image
Simple black lowercase 'i' inside a circle, no text or symbols present22089 Hamburg, Germany
natural_image
Symbol of a trash bin with crossed lines indicating no waste, and a solid black rectangle below (no text or labels)natural_image
Simple line drawing of a trash bin with crossed lines indicating no waste or restriction (no text or symbols)- Inbetriebnahme
- Scope of Delivery
- About this manual
- Explanation of symbols
- This symbol signifies additional information and general advice.
- Technical Data
- Table of Contents
- Intended Use
- Safety
- DANGER for children
- RISK of fire/burning and/or explosion
- BEWARE of material damage
- Start-up
- Receiving the time signal
- Checklist when data is missing in the display
- Setting the time manually
- Starting signal reception manually
- Choosing a location
- NOTE on material damage
- Setting up the radio-controlled alarm clock
- About the time signal transmitter DCF77
- Setting the alarm time
- Being awakened
- Interrupting the alarm for 24 hours
- Auto-stop function
- Repeat alarm (snooze function)
- Switching the alarm function on/off
- Other functions
- Illuminating the display
- Change temperature unit
- Switching between summer and winter time
- Resetting the radio-controlled alarm clock to factory setting
- Cleaning
- Fault/Remedy
- DCF77 signal is not received.
- Temperature indication appears too high.
- Display is illegible, function is unclear or values are obviously incorrect.
- Declaration of Conformity
- Guarantee
- Disposal
- Disposing of the packaging
- Disposing of the product
- Devices must not be disposed of in normal household waste
- Recyclable and disposable batteries do not belong in household waste
Brand : ADE
Model : CK 1940
Category : Alarm Clock