SA130DMP - Receiver Monacor - Free user manual and instructions
Find the device manual for free SA130DMP Monacor in PDF.
| Product type | Stereo amplifier receiver |
| Brand | Monacor |
| Model | SA130DMP |
| RMS output power | 2 x 70 W at 4 Ω |
| Frequency response | 20 - 20,000 Hz |
| Signal-to-noise ratio | 90 dB |
| Distortion rate | 0.1% |
| Microphone inputs | 1 x combo XLR/6.35 mm jack (balanced mono, sensitivity 1.3 mV/500 Ω) |
| AUX input | 1 x 3.5 mm stereo jack (190 mV/10 kΩ) |
| LINE IN input | 2 x RCA (L/R) (480 mV/20 kΩ) |
| AMP IN input | 2 x RCA (L/R) (580 mV/22 kΩ) |
| PRE OUT output | 2 x RCA (L/R) |
| Speaker outputs | 2 x binding posts/4 mm banana plugs (min. impedance 4 Ω) |
| Wireless connectivity | Bluetooth, FM radio |
| Integrated media player | MP3 (USB, SD/SDHC up to 32 GB) |
| Equalizer | Bass ±12 dB/100 Hz, Treble ±10 dB/10 kHz |
| Power supply | 230 V ~ / 50 Hz |
| Fuse | Replace with fuse of same type |
| Dimensions (rack) | 19" (482 mm) x 1U (44.45 mm) x depth (not specified) |
| Permissible ambient temperature | 0 - 40 °C |
| Maintenance and cleaning | Dry soft cloth, no chemicals |
| Safety | Disconnect if visible damage, fall or malfunction; repair by qualified technician |
| Intended use | Bars, conference rooms, offices |
| Compliance | Directive 2014/53/EU (declaration of conformity at www.monacor.com) |
Frequently Asked Questions - SA130DMP Monacor
User questions about SA130DMP Monacor
0 question about this device. Answer the ones you know or ask your own.
Ask a new question about this device
Download the instructions for your Receiver in PDF format for free! Find your manual SA130DMP - Monacor and take your electronic device back in hand. On this page are published all the documents necessary for the use of your device. SA130DMP by Monacor.
USER MANUAL SA130DMP Monacor
Stereo Mixing Amplifier with MP3 Player/Bluetooth Receiver/FM Radio


SA-130DMP
Stereo Mixing Amplifier
These instructions are intended for users without specific technical knowledge. Please read the instructions carefully prior to operating the unit and keep them for later reference.
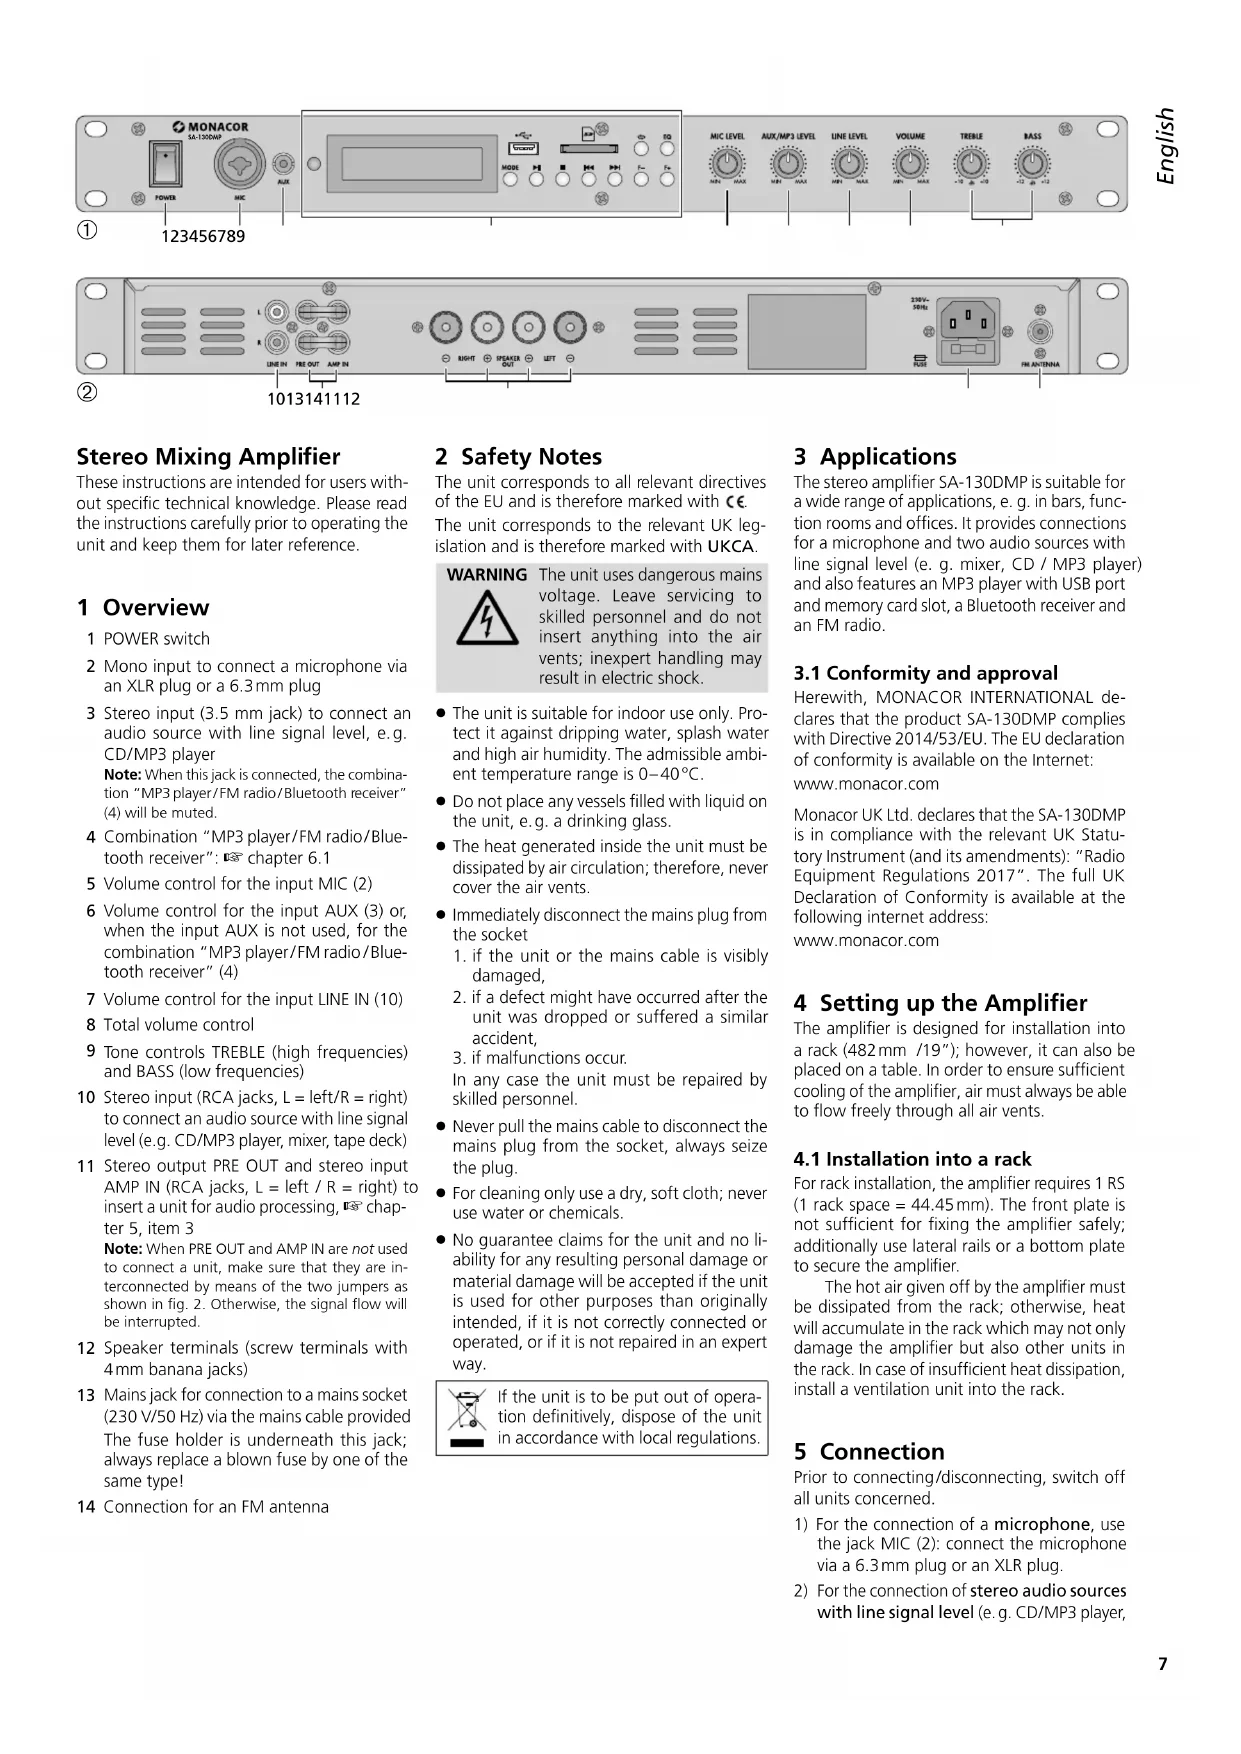
1 Overview
1 POWER switch
2 Mono input to connect a microphone via an XLR plug or a 6.3mm plug
3 Stereo input (3.5 mm jack) to connect an audio source with line signal level, e.g. CD/MP3 player
Note: When this jack is connected, the combination "MP3 player/FM radio/Bluetooth receiver" (4) will be muted.
4 Combination "MP3 player/FM radio/Bluetooth receiver": chapter 6.1
5 Volume control for the input MIC (2)
6 Volume control for the input AUX (3) or, when the input AUX is not used, for the combination "MP3 player/FM radio/Bluetooth receiver" (4)
7 Volume control for the input LINE IN (10)
8 Total volume control
9 Tone controls TREBLE (high frequencies) and BASS (low frequencies)
10 Stereo input (RCA jacks, L = left/R = right ) to connect an audio source with line signal level (e.g. CD/MP3 player, mixer, tape deck)
11 Stereo output PRE OUT and stereo input AMP IN (RCA jacks, L = left / R = right) to insert a unit for audio processing, chapter 5, item 3
Note: When PRE OUT and AMP IN are not used to connect a unit, make sure that they are interconnected by means of the two jumpers as shown in fig. 2. Otherwise, the signal flow will be interrupted.
12 Speaker terminals (screw terminals with 4mm banana jacks)
13 Mains jack for connection to a mains socket (230V / 50Hz) via the mains cable provided The fuse holder is underneath this jack; always replace a blown fuse by one of the same type!
14 Connection for an FM antenna
2 Safety Notes
The unit corresponds to all relevant directives of the EU and is therefore marked with CC. The unit corresponds to the relevant UK legislation and is therefore marked with UKCA.
WARNING

The unit uses dangerous mains voltage. Leave servicing to skilled personnel and do not insert anything into the air vents; inexpert handling may result in electric shock.
The unit is suitable for indoor use only. Protect it against dripping water, splash water and high air humidity. The admissible ambient temperature range is 0 - 40^
- Do not place any vessels filled with liquid on the unit, e.g. a drinking glass.
The heat generated inside the unit must be dissipated by air circulation; therefore, never cover the air vents.
- Immediately disconnect the mains plug from the socket
- if the unit or the mains cable is visibly damaged,
- if a defect might have occurred after the unit was dropped or suffered a similar accident,
- if malfunctions occur.
In any case the unit must be repaired by skilled personnel.
- Never pull the mains cable to disconnect the mains plug from the socket, always seize the plug.
For cleaning only use a dry, soft cloth; never use water or chemicals. - No guarantee claims for the unit and no liability for any resulting personal damage or material damage will be accepted if the unit is used for other purposes than originally intended, if it is not correctly connected or operated, or if it is not repaired in an expert way.

If the unit is to be put out of operation definitively, dispose of the unit in accordance with local regulations.
3 Applications
The stereo amplifier SA-130DMP is suitable for a wide range of applications, e.g. in bars, function rooms and offices. It provides connections for a microphone and two audio sources with line signal level (e.g. mixer, CD / MP3 player) and also features an MP3 player with USB port and memory card slot, a Bluetooth receiver and an FM radio.
3.1 Conformity and approval
Herewith, MONACOR INTERNATIONAL declares that the product SA-130DMP complies with Directive 2014/53/EU. The EU declaration of conformity is available on the Internet:
www.monacor.com
Monacor UK Ltd. declares that the SA-130DMP is in compliance with the relevant UK Statutory Instrument (and its amendments): "Radio Equipment Regulations 2017". The full UK Declaration of Conformity is available at the following internet address:
www.monacor.com
4 Setting up the Amplifier
The amplifier is designed for installation into a rack (482 mm /19"); however, it can also be placed on a table. In order to ensure sufficient cooling of the amplifier, air must always be able to flow freely through all air vents.
4.1 Installation into a rack
For rack installation, the amplifier requires 1 RS (1 rack space = 44.45mm ). The front plate is not sufficient for fixing the amplifier safely; additionally use lateral rails or a bottom plate to secure the amplifier.
The hot air given off by the amplifier must be dissipated from the rack; otherwise, heat will accumulate in the rack which may not only damage the amplifier but also other units in the rack. In case of insufficient heat dissipation, install a ventilation unit into the rack.
5 Connection
Prior to connecting/disconnecting, switch off all units concerned.
1) For the connection of a microphone, use the jack MIC (2): connect the microphone via a 6.3 mm plug or an XLR plug.
2) For the connection of stereo audio sources with line signal level (e.g. CD/MP3 player,


tape deck, radio, mixer, PC), two inputs are available:
-
3.5 mm jack AUX (3); when this jack is connected, the combination "MP3 player/FM radio/Bluetooth receiver" will be muted.
-
RCA jacks LINE IN (10); L (white) = left, R (red) = right
3) The stereo connections PRE OUT and AMP IN (11) can be used to insert an audio processing unit (e.g. equalizer, effect unit): The signal, after the control VOLUME (8), will be routed to the audio processing unit via the output PRE OUT and returned to the power amplifier of the SA-130DMP via the input AMP IN.
a) Remove the two jumpers (one each for the left channel and the right channel) that interconnect the output PRE OUT and the input AMP IN.
b) Connect the input of the unit to be inserted to the output PRE OUT.
c) Connect the output of the unit to be inserted to the input AMP IN.
4) Connect two speakers (minimum impedance: 4 to the terminals SPEAKER OUT (12): Connect one speaker to the channel RIGHT and the other to the channel LEFT. Observe the polarity (connect the marked core of the respective speaker cable to " + " ). Use either the screw terminals or the banana jacks to make the connections. Note: When connecting more than two speakers, make sure that the total speaker impedance per channel is at least 4 otherwise, the amplifier may be damaged. Contact an expert if you have any questions.
5) When the integrated FM radio is used, connect an FM antenna to the jack FM ANTENNA (14).
6) For power supply, connect the mains cable provided to the mains jack (13) first and then to a mains socket (230V / 50Hz)
6 Operation
CAUTION

Never adjust the amplifier to a very high volume. Permanent high volumes may damage your hearing!
To prevent switching noise, always switch on the units connected before switching on the amplifier and always switch off the amplifier before switching off the other units.
1) Before switching on the amplifier for the first time, turn the total volume control VOLUME (8) to the left stop.
2) Use the POWER switch (1) to switch on the amplifier.
3) Turn up the control VOLUME (8) to adjust the total volume desired; for each audio source to be heard, adjust the volume by means of the appropriate control:
control MIC LEVEL (5) for the microphone connected to the input MIC (2)
- control LINE LEVEL (7) for the unit connected to the input LINE IN (10)
control AUX / MP3 LEVEL (6) for the connected to the input AUX (3) or, when the input AUX is not used, for the combination "MP3 player/FM radio/Bluetooth receiver" (4)
Note: The basic volume of the combination "MP3 player/FM radio/Bluetooth receiver" can be additionally adjusted: see chapter 6.1.3.
4) Use the controls TREBLE and BASS (9) to adjust the tone.
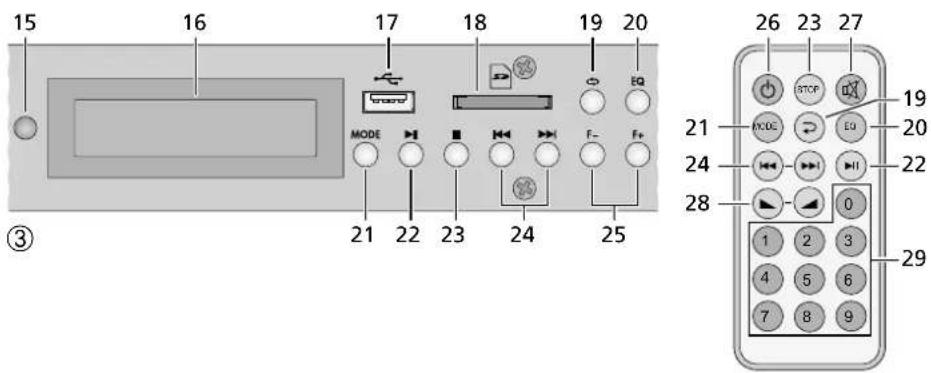
6.1 MP3 player/FM radio/ Bluetooth receiver (fig.
When the SA-130DMP is switched on, the combination "MP3 player/FM radio/Bluetooth receiver" will automatically be activated and go to the mode "Player". When no storage medium is connected, NOSOURCE will appear on the display (16). When a storage medium is already connected, it will be read and then reproduced. When two storage media are connected, the USB medium will be selected after the SA-130DMP has been switched on.
The infrared remote control is operated with a battery. If a battery is already inserted in the remote control, remove the insulating film (to protect the battery from being discharged) from the battery holder. After that, the remote control is ready for operation. When pressing a button, always point the remote control to the infrared sensor (15). Make sure that there are no obstacles between the remote control and the sensor.
If the remote control is not used for a longer period of time, remove the battery as a precaution so that the remote control will not be damaged in case the battery should leak.
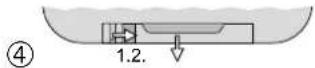
Inserting/Replacing the battery:
1) Push the latch of the battery holder to the right (first arrow in figure 4) and pull out the holder (second arrow).
2) To replace a battery, remove the discharged battery.
3) Insert a new battery (3 V button cell, type CR 2025) in the holder, positive pole facing upwards. Push the holder back into the remote control.

Never put batteries in the household waste. Always dispose of the batteries in accordance with local regulations.
6.1.1 Standby
To set the combination "MP3 player / FM radio / Bluetooth receiver" to the standby mode and to switch it on again, either use the button (26) on the remote control or keep the button MODE (21) at the unit pressed for more than a second. After switch-on, the mode "Player" will be active.
6.1.2 Selecting the operating mode
Use the button MODE (21) to switch over between the operating modes:
"Player" "Bluetooth" "Radio"
When two storage media are connected in the mode "Player": The first press of the button MODE will switch to the storage medium currently not selected; the next press of the button will switch to the mode "Bluetooth".
6.1.3 Adjusting the basic volume / Muting
To adjust the basic volume (adjustment range 0 to 31), use the buttons and (28) on the remote control or keep the button or (24) at the unit pressed.
To mute the sound, press the button (27); MUTE will appear on the display. To unmute the sound, press the button again.
Note: When the mute function is activated, it will be deactivated after the next switch-on or when the operating mode is changed.
6.1.4 Operating mode "Player"
The player can be used to reproduce MP3 files from SD / SDHC memory cards and USB storage media (USB flash drive or USB hard disk with separate power supply). The reproduction of WMA files and WAV files is also supported.
- Connect a USB storage medium to the USB port (17).
Insert a memory card (FAT16 / FAT32, 32 GB max.), notched corner facing to the right and
towards the unit, into the card slot (18) until it engages. To remove the card, push the card into the slot until it disengages.
Note: Due to the large number of storage device manufacturers and device drivers, it cannot be guaranteed that all storage media are compatible with the player.
Selecting the storage medium:
Once a storage medium is connected, it will be selected and reproduced (even when the mode "Bluetooth" or "Radio" has been activated). If two media are connected in the mode "Player" and the medium selected is then removed, the player will automatically switch to the medium still connected. To switch over between the media, the button MODE (21) can also be used (see chapter 6.1.2).
The display will show:
- U for USB medium,
$ for memory card
the letter is preceded by the respective symbol for replay, pause or stop
the time already played of the title
- the replay mode (ALL, FOLDER, SINGLE or RANDOM): see below
the number of the title and the file name
To set the replay to pause, press the button II (22); to stop the replay and to return to the beginning of the title, press the button (23) at the unit or STOP (23) on the remote control. To continue the replay, press the button II.
To select a title, either use the buttons and (24) or enter the title number by means of the numeric keys (29).
Note: In the replay mode RANDOM, it is not possible to go back to the previous title or to select titles by means of the numeric keys. In the replay mode FOLDER, only the titles of the current folder can be selected.
To select a folder, use the buttons F- and F+ (25). To select a title in the folder by means of the button or first wait for the name of the folder to disappear from the display; otherwise, you will go to the previous / next folder when you press or
For fast reverse and fast forward (functions only available during replay), keep the button
or (24) on the remote control pressed. Fast forward will go beyond the current title; fast reverse will stop at the beginning of the current title.
Use the button EQ (20) to select the equalizer setting desired (function only available during replay). It is possible to switch over between: HORMAL, ROCK, POP, CLASSIC, JAZZ, COUNTRY.
Note: After each switch-on or change to the mode "Player", the equalizer setting will be reset to NORMAL.
To select the replay mode (function only available during replay), use the button (19) at the unit or the button (19) on the remote control. It is possible to switch over between:
PALL = all titles continuously replayed one after the other
FOLDER = all titles of the current folder continuously replayed one after the other
SINGLE = current title continuously replayed RANDOM = all titles continuously replayed in random order
Note: After each switch-on or change to the mode "Player", the replay mode will be reset to RIL. This reset will also be made when the button F- or F+ (25) is pressed to select a folder.
6.1.5 Operating mode "Bluetooth"
The Bluetooth receiver can be used to establish a wireless connection to a Bluetooth signal source (e.g. smartphone, tablet PC, notebook) and thus to replay the audio files stored on the signal source via the SA-130DMP.
Establishing a Bluetooth connection:
1) Use the button MODE (21) to select the operating mode "Bluetooth" (Bluetooth shown on the display): The display will show Initializing... and then Disconnected! to indicate that no Bluetooth connection is established
2) At the Bluetooth source, switch on the Bluetooth function.
3) On the display of the Bluetooth source, the Bluetooth receiver will be indicated as "Bluetooth". Pair the Bluetooth source with the Bluetooth receiver (please refer to the instruction manual of the Bluetooth source, if required).
4) Once the Bluetooth connection has been established, the display will show Connected!.
5) Use the buttons of the Bluetooth source for operation (replay, pause, title selection) or the button (22) for replay / pause and the buttons and (24) on the remote control for title selection.
6.1.6 Operating mode "Radio"
Use the button MODE (21) to select the operating mode "Radio". The display will show:
the FM frequency adjusted (in MHz)
-FM:01 ... the station number under which the FM frequency has been stored by means of the scan function (also see notes at the end of this chapter)
the basic volume adjusted (VOL) (see chapter 6.1.3)
To store stations, press the button II (22): The station scan will start. The transmission frequencies found will be automatically stored as station numbers. When the station scan is completed, the frequency of station number 1 will be selected.
To cancel the scan function at any time, press the button again.
To call up a stored station, either select the appropriate station number with the button or enter it by means of the numeric keys (29).
To manually set a station (in steps of 0.1 MHz), use the buttons F- and F+ (25).
Notes with regard to station number indication:
After manual frequency setting, the display will show F1:00
when the frequency set has not been stored as a station number
when the frequency set has already been stored as a station number via station scan and the reception quality is poor
The next time you switch to the mode "Radio", the display will not show Fri: 0, but the station number whose frequency is close to the frequency set, or, if no station number is found, station number 1.
7 Specifications
RMS output power: 2 × 70 W at 4Ω
Frequency range: 20-20000 Hz
S/N ratio: 90 dB
THD: 0.1%
Inputs (connection,
sensitivity/impedance)
MIC, mono, balanced: ... combined
XLR/6.3mmjack,
1.3mV/500Ω
AUX, stereo: 3.5mm jack
190mV/10kΩ
LINE IN, stereo: .RCA jacks, 480 mV/20 kΩ
AMP IN, stereo: .RCA jacks, 580 mV/22 kΩ
Tone control
Low frequencies: . . . ±12 dB/ 100 Hz
High frequencies: .±10dB/10kHz
Power supply: 230V/50Hz
Power consumption: 350 VA
Ambient temperature: .0-40°C
Dimensions: (W× H× D):482× 44× 245mm 1 RS
Weight: 4.9 kg
Subject to technical modification.


Alimentation: 230V/50Hz
Consommation: 350 VA
Temperature fonc. 0-40°C
Dimensions (L× H× P): 482× 44× 245mm, 1U
Poids: 4,9kg