
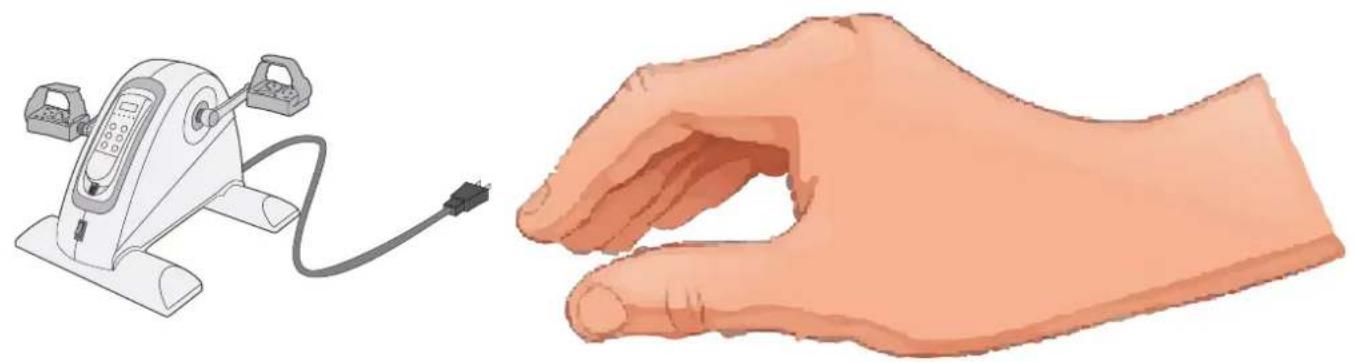
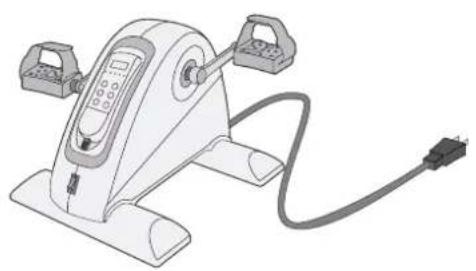
Cardio Fit M50 - Elliptical bike TUNTURI - Free user manual and instructions
Find the device manual for free Cardio Fit M50 TUNTURI in PDF.

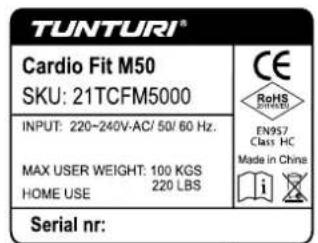
| Product type | Elliptical trainer |
| Brand | Tunturi |
| Model | Cardio Fit M50 |
| Use | Home, indoor |
| Maximum user weight | 100 kg (220 lbs) |
| Dimensions (L x W x H) | 42.0 x 40.0 x 29.0 cm |
| Power supply | 210-240 V~, 50-60 Hz |
| Speed levels | 12 levels (35-80 RPM) |
| Programs | Manual + 5 preset (P1-P5) |
| Display | Speed, time, distance, calories |
| Heart rate | Hand sensors + Bluetooth/ANT+ |
| Removable control | Yes, with coiled cable (1.2 m) |
| Pedals | Right (R) and left (L) with wrench |
| Safety | Main switch, detachable cable |
| Cleaning | Soft, absorbent cloth, no liquid |
| Maintenance | Check fasteners, lubricate joints |
| Operating temperature | 10°C to 35°C |
| Maximum humidity | 80% |
| Warranty | According to legislation, contact retailer |
| Repairability | Spare parts available through retailer |
Frequently Asked Questions - Cardio Fit M50 TUNTURI
User questions about Cardio Fit M50 TUNTURI
0 question about this device. Answer the ones you know or ask your own.
Ask a new question about this device
Download the instructions for your Elliptical bike in PDF format for free! Find your manual Cardio Fit M50 - TUNTURI and take your electronic device back in hand. On this page are published all the documents necessary for the use of your device. Cardio Fit M50 by TUNTURI.
USER MANUAL Cardio Fit M50 TUNTURI
Cardio Fit M50 Minibike Motorized
GB User manual 09-13
DE Benutzerhandbuch 14-19
FR Manuel de l'utilisateur 20-25
NL Gebruikershandleiding 26-31
IT Manuale d'uso 32-37
ES Manual del usuario 38-43
SV Bruksanvising 44-48
SU Käyttoohje 49-53

Attention, Achtung, Attention, Attentie, Attenzione, Atencion, Giv akt, Huomio
- Please read this user manual carefully prior to using this product.
- Lesen Sie sich vor dem Gebrauch des Produkts diese Bedienungsanleitung sorgfältig durch.
- Veuillez dire attentivement le present manuel de l'utiliser avant d'utiliser ce produit.
- Lees deze gebruikershandleiding zorgvuldig voordat u dit product gaat gebruiken.
- Leggere attendamente quello manuale dell'utente prima di utilizzato il prodotto.
- Antes de utiliser este producto, lea atentamente este manual de usuario.
- Läs den här användarhandboken noggrant före användning av den härprodukten.
-Lue tama kayttoohje huolellisesti ennen tamn tuotteen kayttoa.

A
B


D-1
D-2A

D-2B

Left hand crank
Make sure to use Left hand pedal

Right hand crank
Make sure to use Right hand pedal
E-A

Index
Welcome. 9
Safety warnings. 9
Electrical safety 10
Assembly instructions. 10
Description illustration A. 10
Description illustration B. 10
Description illustration D. 10
Additional assembly information 10
Use 10
Take out controller 10
Stow controller 11
Use without motor support. 11
Master power switch (fig. E-A) 11
Controller (fig. E-1) 11
Explanation of display items 11
Buttons 11
Programs 12
Manual mode 12
Preset Programs (P1~P5) 12
Warranty. 12
Cleaning and maintenance. 13
Defects and malfunctions. 13
Troubleshooting. 13
Transport and storage 13
Additional information 13
Technical data 13
Declaration of the manufacturer 13
Disclaimer 13
Welcome
Welcome to the world of Tunturi!
Thank you for purchasing this piece of Tunturi equipment.
Tunturi offers a wide range of home fitness equipment, including crosstrainers, treadmills, exercise bikes, rowers, strength benches and multi stations. The Tunturi equipment is suitable for the entire family, no matter what fitness level. For more information, please visit our website www.tunturi.com
Important Safety Instructions
This manual is an essential part of your training equipment please read all instructions in this manual before you start using this equipment. The following precautions must always be followed:
Safety warnings
WARNING
- Read the safety warnings and the instructions. Failure to follow the safety warnings and the instructions can cause personal injury or damage to the equipment. Keep the safety warnings and the instructions for future reference.
WARNING
- Heart rate monitoring systems may be inaccurate. Over exercise may result in serious injury or death. If you feel faint stop exercising immediately.
- The equipment is suitable for domestic use only.
The equipment is not suitable for commercial use. - Max. usage is limited to 2 hrs a day.
- The use of this equipment by children or persons with a physical, sensory, mental or motorial disability, or lack of experience and knowledge can give cause to hazards. Persons responsible for their safety must give explicit instructions or supervise the use of the equipment.
- Before starting your workout, consult a physician to check your health.
- If you experience nausea, dizziness or other abnormal symptoms, immediately stop your workout and consult a physician.
- To avoid muscular pain and strain, start each workout by warming up and finish each workout by cooling down. Remember to stretch at the end of the workout.
- The equipment is suitable for indoor use only. The equipment is not suitable for outdoor use.
- Only use the equipment in environments with adequate ventilation. Do not use the equipment in draughty environments in order not to catch a cold.
- Only use the equipment in environments with ambient temperatures between 10^ 35^ . Only store the equipment in environments with ambient temperatures between 5^ 45^ .
- Do not use or store the equipment in humid surroundings. The air humidity must never be more than 80% .
- Only use the equipment for its intended purpose. Do not use the equipment for other purposes than described in the manual.
- Do not use the equipment if any part is damaged or defective. If a part is damaged or defective, contact your dealer.
- Keep your hands, feet and other body parts away from the moving parts.
- Keep your hair away from the moving parts.
- Wear appropriate clothing and shoes.
-
Keep clothing, jewellery and other objects away from the moving parts.
-
Make sure that only one person uses the equipment at a time.
- The equipment must not be used by persons weighing more than 100kg (220 lbs).
- Do not open equipment without consulting your dealer.
Electrical safety
- Before use, always check that the mains voltage is the same as the voltage on the rating plate of the equipment.
- Do not use an extension cable.
- Keep the mains cable away from heat, oil and sharp edges.
- Do not alter or modify the mains cable or the mains plug.
- Do not use the equipment if the mains cable or the mains plug is damaged or defective. If the mains cable or the mains plug is damaged or defective, contact your dealer.
- Always fully unwind the mains cable.
- Do not run the mains cable underneath the equipment. Do not run the mains cable underneath a carpet. Do not place any objects on the mains cable.
- Make sure that the mains cable does not hang over the edge of a table.
- Make sure that the mains cable cannot be caught accidentally or tripped over.
- Do not leave the equipment unattended when the mains plug is inserted into the wall socket.
- Do not pull the mains cable to remove the mains plug from the wall socket.
- Remove the mains plug from the wall socket when the equipment is not in use, before assembly or disassembly and before cleaning and maintenance.
WARNING
- Never use water or any other liquid directly on or near the equipment, but only via a damp cloth if moist is required to clean the machine.
- Using liquid directly is harmful for the equipment's components, and may result in an electric shock caused by a short cut circuit. This could result in serious personal injury or even death.
Assembly instructions
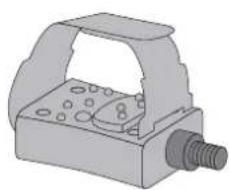
Description illustration A
The illustration shows what the trainer will looks like after the assembly is completed.
You can use this as a reference during your assembly, but do follow the assembly steps always in the correct sequence as showed in the illustrations.
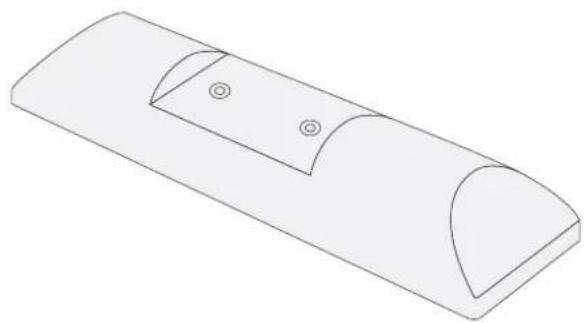
Description illustration B
The illustration shows what components and parts you should find when un-boxing your product.
NOTE
- Small parts can be hidden/ packed in hollow spaces in the Styrofoam product protection
If a part is missing, contact your dealer.
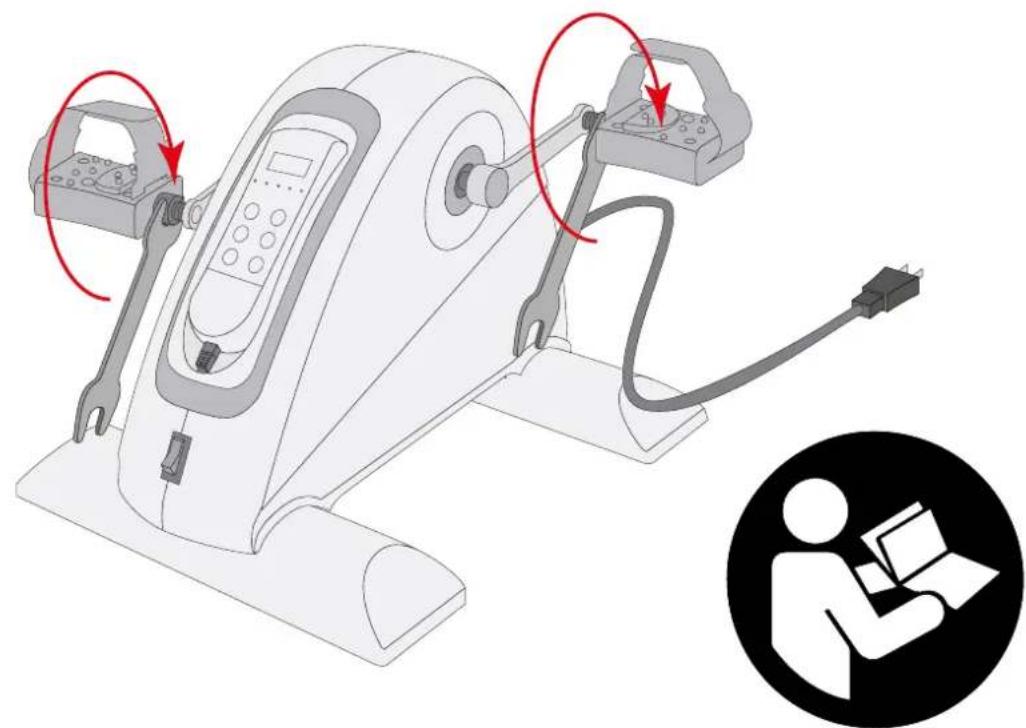
Description illustration D
The illustrations show you in the correct following order how to assembly your trainer best.
NOTE
- Part numbers shown in the assembly steps are commencing with the spare part drawing that can be found in the online version user manual.
WARNING
- Assemble the equipment in the given order.
- Carry and move the equipment with at least two persons.
CAUTION
- Place the equipment on a firm, level surface.
- Place the equipment on a protective base to prevent damage to the floor surface.
- Allow at least 100cm of clearance around the equipment.
Refer to the illustrations for the correct assembly of the equipment.
Additional assembly information
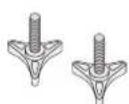
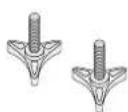
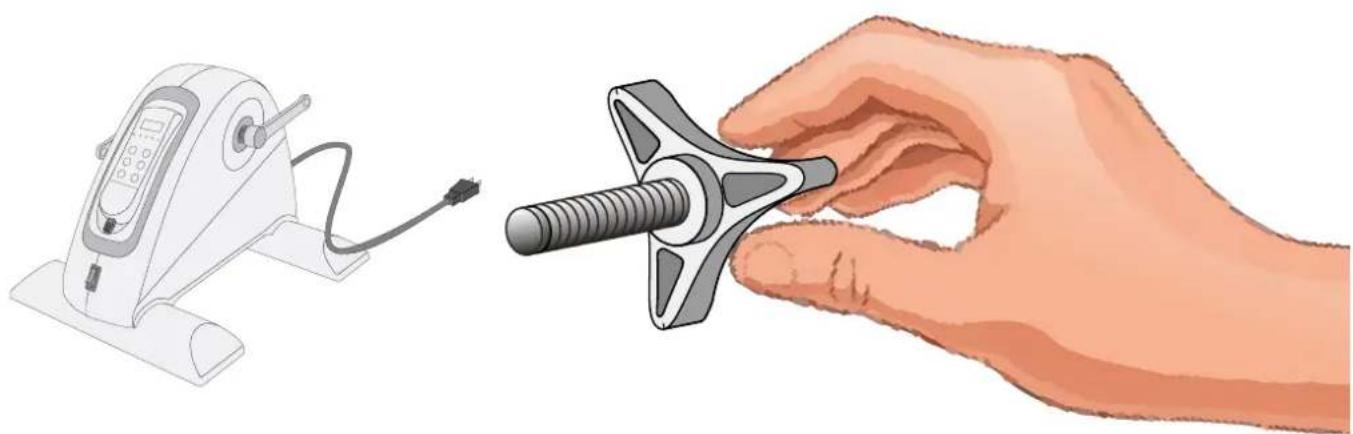
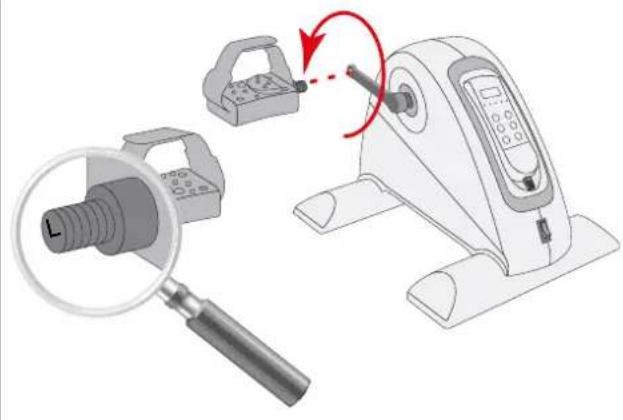
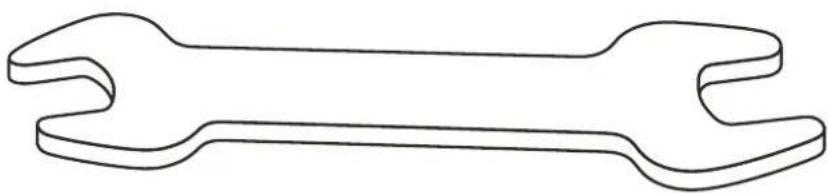
D2 How to fit the pedals correctly.
NOTE
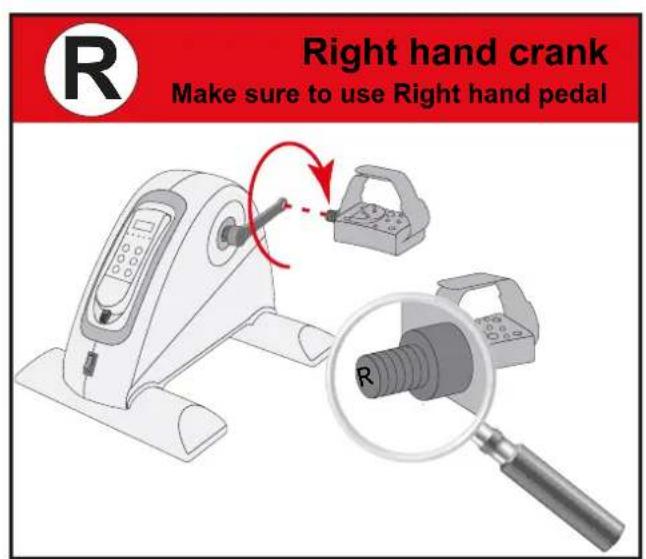
- Right and left side are determined from an exercising positions perspective.
Right hand pedal
Find the "R" or "L" mark on the pedal axle
- Fit the right hand pedal "R" into the right hand crank.
- Firstly turn the pedal axle in clockwise direction by hand.
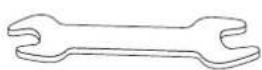
- Use the wrench to fully tighten the pedal.
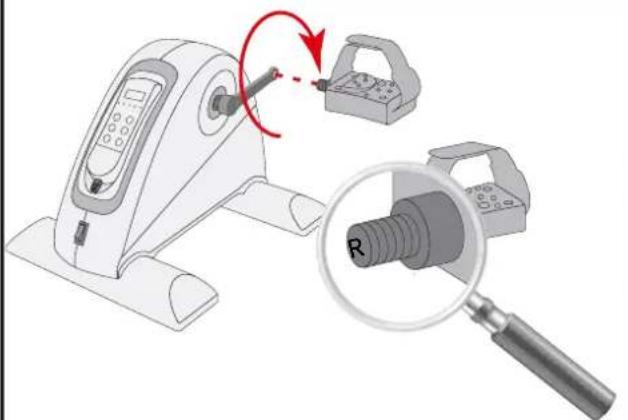
Left hand pedal
- Fit the left hand pedal "L" into the left hand crank.
- Firstly turn the pedal axle in counter-clockwise direction by hand.
- Use the wrench to fully tighten the pedal.
NOTE
- Save the tools provided with this product, after you completed the product assembly, for future service purposes.
Use
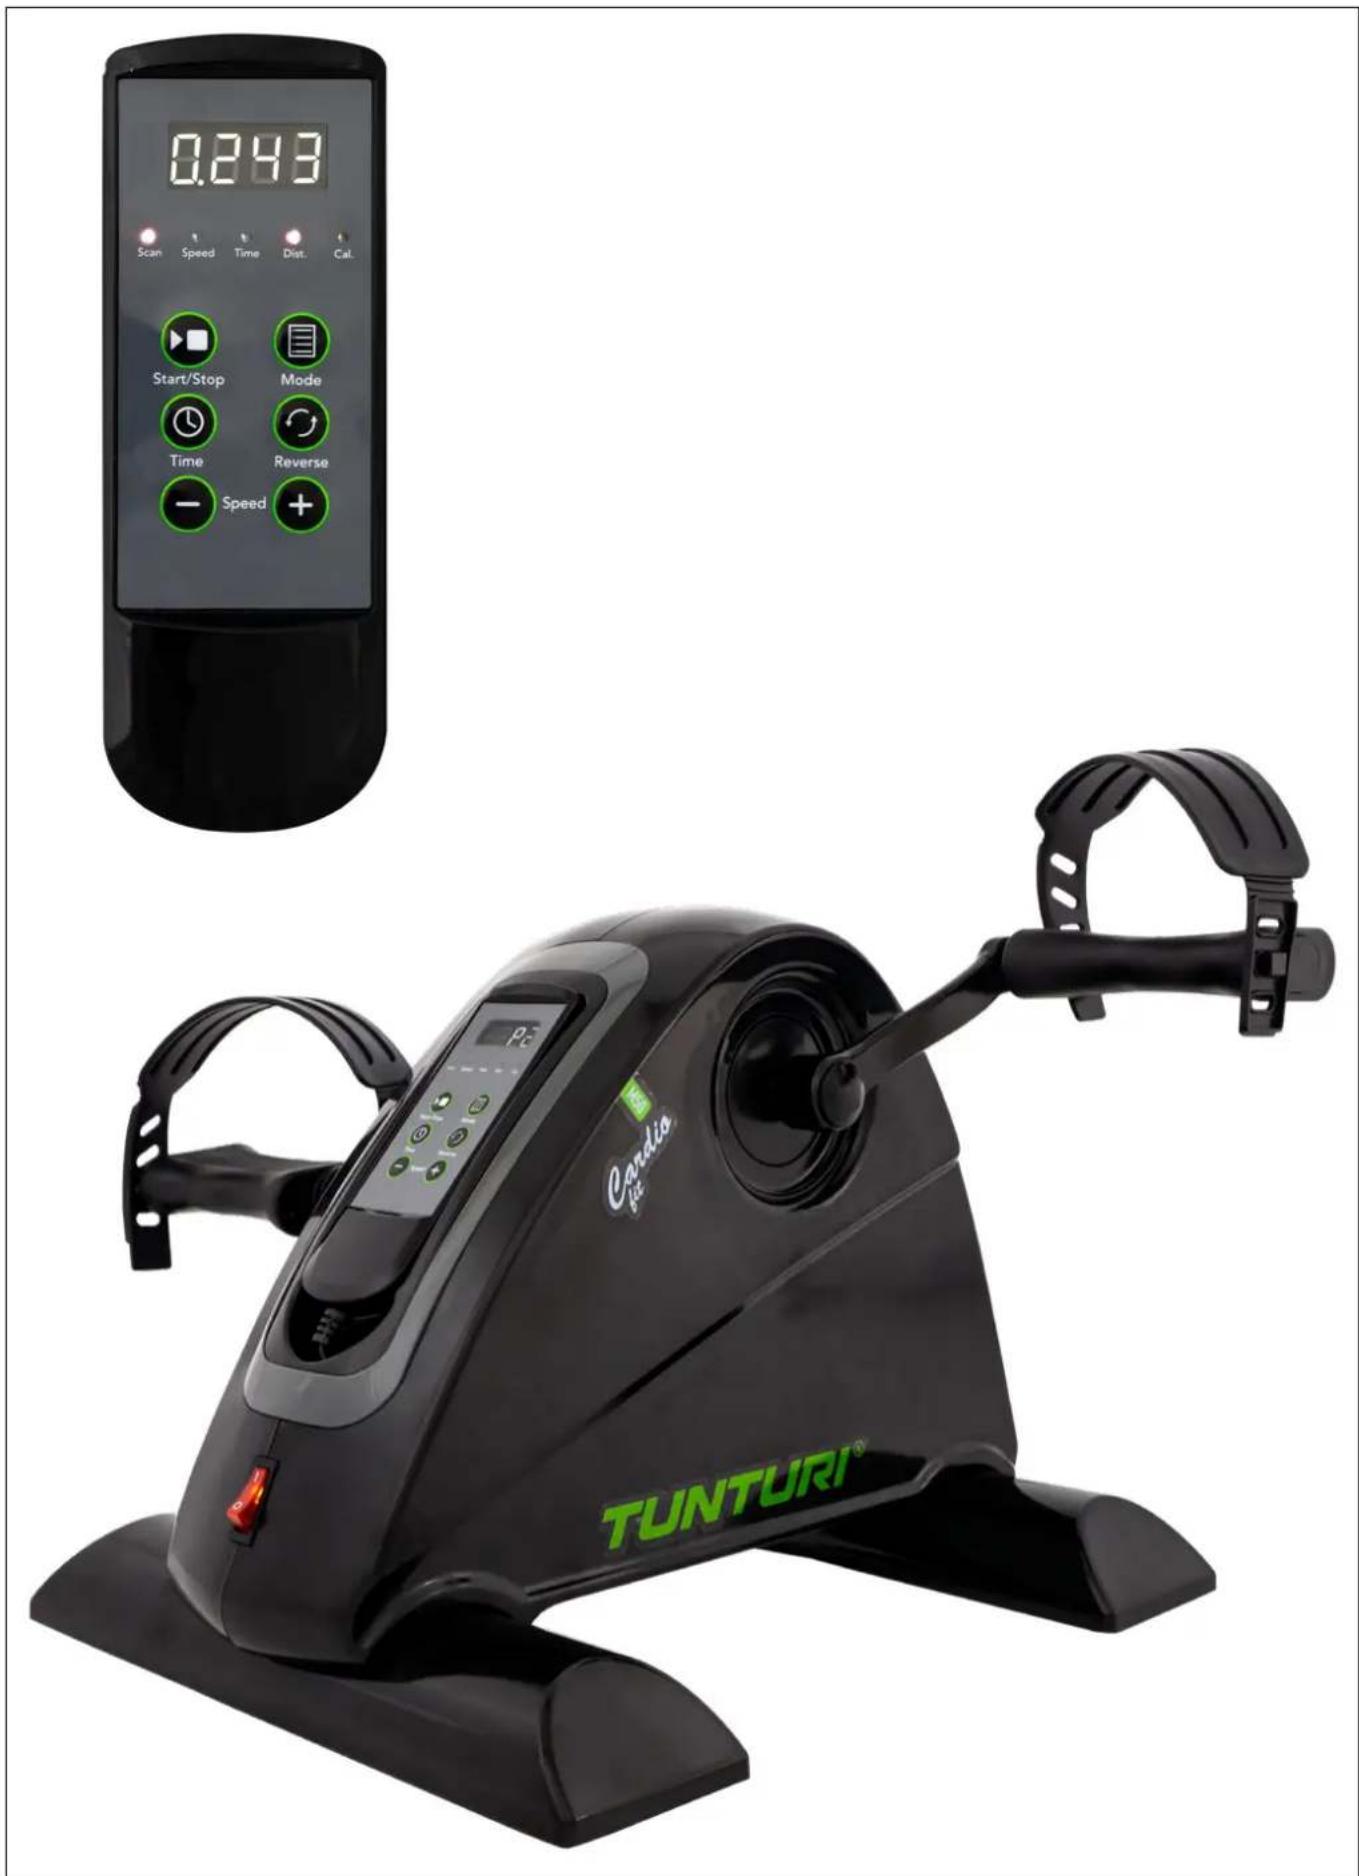
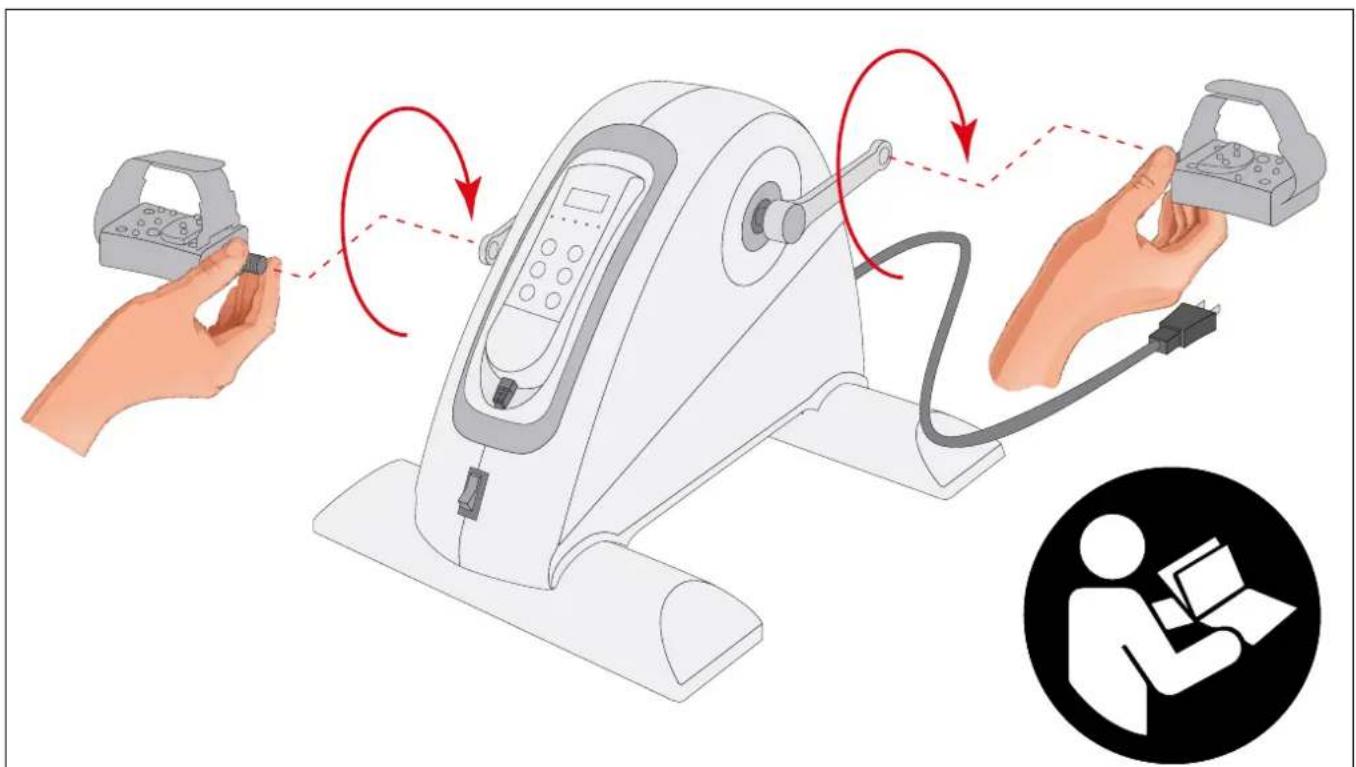
Take out controller
The equipment controller can be taken from the stowage and held in your hands during workout to make workout changes during workout for your convenience.
- Lift out with your finger tip at the bottom of the controller.
- Gently pull out the controller staying connected with a curled telephone wire with the equipment. (± 1.2 mtr cable length).
- Controller can be held in hands and used for workout adjustments during workout.
WARNING
- Avoid the curled telephone wire can be caught by the moving parts of the equipment during workout.
Stow controller
After you finished your workout it is recommended to stow the controller again
- Bring the controller back towards the stowage of the equipment, orientated wired end of the controller first, in a smooth movement.
- Wire will rewind again and will be pulled back into the stowage, some guidance might be needed.
- Click the controller back in place to ensure it stays in place.
WARNING
- The controller should fit into the stowage easily without too much effort. If too much effort is required, check if the curled telephone wire is stowed correctly and is not preventing the controller from fitting into the stowage.
Use without motor support
The equipment can be used without danger for internal damages freely. It require the power main switch being in off mode, means there is no speed display and no movement support.
The natural resistance of the moving parts inside the machine cannot be changed nor set to other level
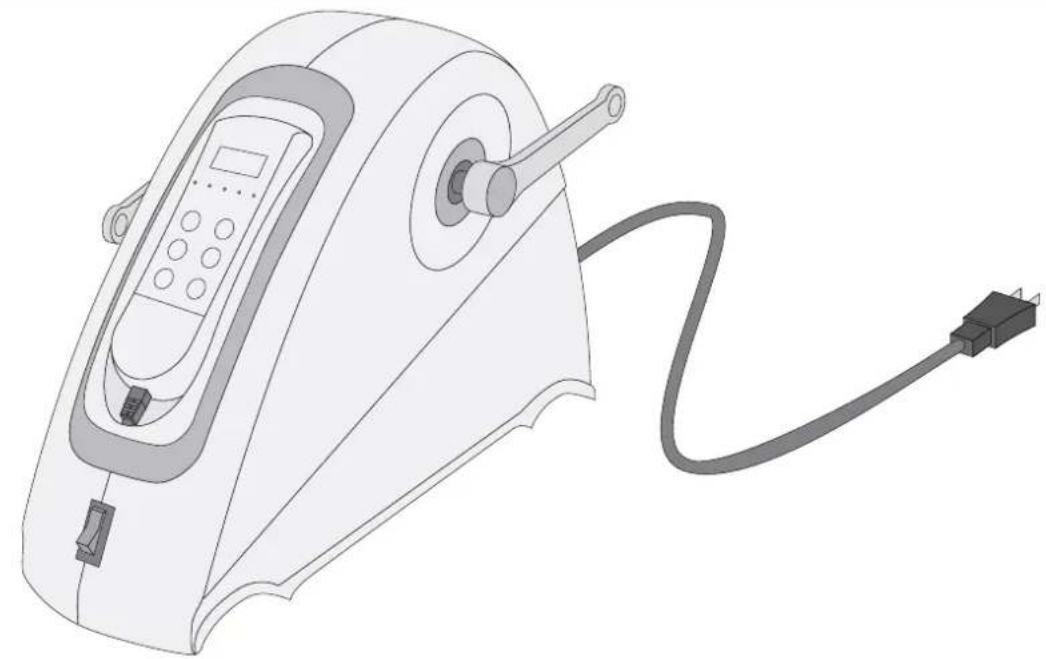
Master power switch (fig. E-A)
The equipment is equipped with a master power switch to shut down the equipment completely.
To start the equipment:
- Insert the mains plug into the wall socket.
- Set the master power switch to the on position.
To stop the equipment:
- Set the mains power switch to the off position.
- Remove the mains plug from the wall socket.
Controller (fig. E-1)
CAUTION
- Keep the controller away from direct sunlight.
- Dry the surface of the controller when it is covered with drops of sweat.
- Do not lean on the controller.
- Only touch the buttons of the controller with the tip of your finger. Make sure that your nails or sharp objects do not touch the display.
NOTE
- The console will not switch in standby mode but remains in on mode.
- Please switch the machine in "Off" mode when not being in use.
Explanation of display items
Scan
- Automatically scan parameter display's for : Speed, Time, Dist. & Cal.
Each display will be hold 4 seconds. - Scan LED will light up, when scan function is active.
Speed
- Shows the speed in setting level 1~12.
- Speed LED will light up, when speed parameter is shown.
Time
- Shows the ran time in workout mode.
- Shows the target time when being in programming mode.
Display parameter units: 00:00 Minutes.:Seconds
- Time LED will light up, when Time parameter is shown.
Dist. (Distance)
- Shows the remaining workout time in countdown mode.
Display parameter units: 0.000 KM.Meters. - Dist. LED will light up, when Distance parameter is shown.
Cal. (Calories)
- Shows the consumed calories in workout mode.
Display parameter units: 000.0 Calories. - Cal. LED will light up, when Calorie parameter is shown.
NOTE
- This data is a rough guide for comparison of different exercise sessions which cannot be used in medical treatment
Buttons
Start/Stop
- Start the selected workout in stop mode.
- Stop active workout when being in workout mode.
Mode
- Select program mode in idle mode.
- Confirm setting to enter next step in programming mode.
- Switch display modes when being in workout mode.
Time
- Set time for workout (1 ~ 15 min. ± 1 minute)
- Press once to increase one minute, press and hold to speed up the input
NOTE
- In programming mode, the time can only count up with one minute each button press. When reaching 15 minutes, the setting will start at 1 minute again to repeat the up counting cycle again.
Reverse
- Set pedal rotation direction in backwards movement when being in forward setting.
- Set pedal rotation direction in forward movement when being in backward setting.
- Pressing "Reverse" button in operational mode will bring the equipment to a smooth stop, keep stop for about 2 seconds, before motor can the reverse mode can be activated.
NOTE
- When equipment is in direction reverse mode, all buttons are not operational, until machine is set into motion again.
Speed + Speed -
- Press "Speed +"to increase speed for desired motorize speed support level mode.
- Press "Speed -" to decrease speed for the desired motorize speed support level mode.
- Press once to increase/ decrease one level, press and hold to speed up the input
- Below the table showing each level representing the commencing RPM (Rotations per Minute)
| Speed 1 | 2 | 3 | 4 | 5 | 6 | 7 | 8 | 9 | 10 | 1 | 1 | 12 | |||||||
| RPM 35 | 39 | 4 | 3 | 48 | 52 | 56 | 60 | 64 | 68 | 73 | 77 | 80 |
Programs
Manual mode
The equipment has a manual mode, where the user is free to select and adjust the speed level at all times. To select this mode:
- Press "Mode" button to open programming mode, display will show P1.
- Press "Mode" button until ".-.-. ." is shown, as being manual mode.
- Press "Speed +/-" buttons to set your desired speed support mode. Default speed setting is 1.
- Press "Time" button to set your desired workout time within range of 1~15 minutes. Default workout time setting is 10 minutes.
-
Press "Start/Stop" button to start your workout.
-
Press "Speed +/-" button as you desire to set your support speed to your desired speed at all times.
- Press "Reverse" button as you desire to set your support motion direction at all times.
- When reached your pre set workout time, the machine will come to a smooth stop.
Preset Programs (P1~P5)
The equipment has 5 pre-set programs with different profiles.
Each profile has a pre set profile in speed and direction variations.
- Below the table showing each pre programmed profile.
Each segment will last for 30 seconds and keeps cycling till workout time has reached the end and machine stops smoothly.
Direction U U U U U U U U
| P1 | Speed 1 2 3 4 | 5 1 | 2 3 4 | 5 | ||||||
| P2 | Speed 2 3 4 5 | 6 2 | 3 4 5 | 6 | ||||||
| P3 | Speed 3 5 7 9 | 11 3 | 5 7 | 9 11 | ||||||
| P4 | Speed 4 6 8 10 | 10 12 | 4 6 8 | 10 12 | ||||||
| P5 | Speed 5 10 5 | 10 - | - 5 10 | 5 10 - |
To select your preferred profile:
- Press "Mode" button to open programming mode, display will show P1.
- Press "Mode" button until desired profile mode is shown.
- Press "Time" button to set your desired workout time within range of 1~15 minutes. Default workout time setting is 10 minutes.
-
Press "Start/Stop" button to start your workout.
-
Press "Level +/-" button as you desire to set your support speed to your desired speed at all times.
- Press "Reverse" button as you desire to set your support motion direction at all times.
NOTE
- When changing the speed, or running direction when being in a pre programmed profile it will only apply the change for the active segment you are in, and will maintain following the pre set profile when shift to next profile segment.
- When reached your pre set workout time, the machine will come to a smooth stop.
Warranty
Tunturi purchaser's warranty
Warranty terms
The consumer is entitled to the applicable legal rights stated in the national legislation concerning the commerce of consumer goods. This warranty does not restrict these rights. The Purchaser's Warranty is only valid if the item is used in an environment approved by Tunturi New Fitness BV, and is maintained as instructed for that particular equipment. The product-specific approved environment and maintenance instructions are stated in the "user manual" of the product. The "user manual" can be downloaded from our website. http://manuals.tunturi.com
Warranty conditions
The warranty conditions commence from the date of purchase. Warranty conditions may vary per country, so please consult your local dealer for the warranty conditions.
Warranty coverage
Under no circumstances shall Tunturi New Fitness BV or the Tunturi Distributor be liable by virtue of this warranty or otherwise for any special, indirect, secondary or consequential damages of any nature arising out of any use or inability to use this equipment.
Warranty limitations
This warranty covers manufacturing defects in the fitness equipment as originally packed by Tunturi New Fitness BV. The warranty shall apply only under conditions of normal, recommended use of the product as described in the Owner's Manual and providing that Tunturi New Fitness BV's instructions for installation, maintenance and use have been complied with. Neither Tunturi New Fitness BV's nor the Tunturi Distributors' obligations apply to defects due to reasons beyond their control. The warranty applies only to the original purchaser and is valid only in countries where Tunturi New Fitness BV has an authorised importer. The warranty does not extend to fitness equipment or components that have been modified without the consent of Tunturi New Fitness BV. Defects resulting from normal wear, misuse, abuse, corrosion, or damage incurred during loading or transportation are not covered.
The warranty does not cover sounds or noises emitted during use where these do not substantially impede the use of the equipment and where they are not caused by a fault in the equipment.
The warranty does not cover defects arising from the failure to carry periodic maintenance as outlined within the Owner's Manual for the product. Furthermore, the warranty does not cover defects arising from usage and storage within an unsuitable environment as described within the Owner's Manual which should be indoors, dry, dust and grit free and within a temperature range of +15^ to +35^ . The warranty does not cover maintenance activities, such as cleaning, lubricating, and normal part adjustments, nor installation
procedures that customers can accomplish themselves, such as changing uncomplicated meters, pedals and other similar parts not requiring any dismantling/reassembling of the fitness equipment. Warranty repairs carried out by other than authorised Tunturi representatives are not covered.
Failure to follow the instructions given in the Owner's Manual will invalidate the product's warranty.
Cleaning and maintenance
The equipment does not require special maintenance. The equipment does not require recalibration when it is assembled, used and serviced according to the instructions.
WARNING
- Before cleaning and maintenance, remove the mains plug from the wall socket.
-
Do not use solvents to clean the equipment.
-
Clean the equipment with a soft, absorbent cloth after each use.
- Regularly check that all screws and nuts are tight.
Defects and malfunctions
Despite continuous quality control, defects and malfunctions caused by individual parts can occur in the equipment. In most cases, it will be sufficient to replace the defective part.
- If the equipment does not function properly, immediately contact the dealer.
- Provide the model number and the serial number of the equipment to the dealer. State the nature of the problem, conditions of use and purchase date.
Troubleshooting
Despite continuous quality control, defects and malfunctions caused by individual components may occur in the equipment. In most cases it's unnecessary to take the whole device in for repair, as it's usually sufficient to replace the defective part.
If the equipment does not function properly during use, contact your Tunturi dealer immediately. Always give the model and serial number of your equipment. Please state also the nature of the problem, conditions of use and purchase date.
If you require spare parts, always give the model, serial number of your equipment and the spare part number for the part you need. The spare part list is at the back of this manual. Use only spare parts mentioned in the spare part list.
Error codes
If the display shows an error code (marked with "E" + number), restart the equipment and check whether the display still shows the error code. If the display still shows the error code, immediately contact the dealer.
Transport and storage
WARNING
- Carry and move the equipment with care.
- Move the equipment and carefully put the equipment down.
- Place the equipment on a protective base to prevent damage to the floor surface.
- Move and lift the equipment carefully over uneven surfaces.
- Do not move the equipment by grabbing the pedals, but use the assigned handle on top of the housing.
- Store the equipment in a dry place with as little temperature variation as possible.
Additional information
Packaging disposal
Government guidelines ask that we reduce the amount of waste material disposed of in land fill sites. We therefore ask that you dispose of all packaging waste responsibly at public recycling centres.
End of life disposal
We at Tunturi hope you enjoy many years of enjoyable use from your fitness trainer. However, a Time will come when your fitness trainer will come to the end of its useful life. Under 'European WEEE Legislation you are responsible for the appropriate disposal of your fitness trainer to a recognised public collection facility.
Technical data
| Parameter Unit of mea | measurement Value | |
| Mains voltage VAC 210 | ~ 240 | |
| Mains frequency HZ 50 | ~ 60 | |
| Speed Levels 1 ~ 15 | ||
| Length | Cm | 42.0 |
| Width | Cm | 40.0 |
| Height | Cm | 29.0 |
| Weight | Kg | 4.5 |
| Heartrate measurement available via: | hand-grip contact5.3~ 5.4 Khz.Bluetooth (BLE)ANT+ | ☑☑☑ |
Declaration of the manufacturer
Tunturi New Fitness BV declares that the product is in conformity with the following standards and directives: EN 957 (HC), 2014/30/EU. The product therefore carries the CE label.
08-2021
Tunturi New Fitness BV
Purmerweg 1
1311 XE Almere
The Netherlands
Disclaimer
© 2021 Tunturi New Fitness BV
All rights reserved.
- The product and the manual are subject to change.
- Specifications can be changed without further notice.
- Check our website for the latest user manual version.
Deutsch
Tunturi New Fitness BV
Purmerweg 1
1311 XE Almere
The Netherlands
Haftungsausschluss
© 2021 Tunturi New Fitness BV
Tunturi New Fitness BV
Purmerweg 1
1311 XE Almere
Pays-Bas
© 2021 Tunturi New Fitness BV
Tunturi New Fitness BV
Purmerweq 1
1311 XE Almere
The Netherlands
Disclaimer
© 2021 Tunturi New Fitness BV
Tunturi New Fitness BV
Pumperweg 1
1311 XE Almere
Paesi Bassi
© 2021 Tunturi New Fitness BV
Este manuel español es una traducción del texto ingles. No seSEOSEOSEOSEOSEOSEOSEOSEOSEOSEOSEOSEOSEOSEOSEOSEOSEOSEOSEOSEOSEOSEOSEOSEOSEOSEOSEOSEOSEOSEOSEOSEOSEOSEOSEOSEOSEOSEOSEOSEOSEOSEOSEOSEOSEOSEOSEOSEOSEOSEOSEOSEOSEOSEOSEOSEOSEOSEOSEOSEOSEOSEOSEOSEOSEOSEOSEOSEOSEOSEOSEOSEOSEOSEOSEOSEOSEOSEOSEOSEOSEOSEOSEOSEOSEOSEOSEOSEOSEOSEOSEOSEOSEOSEOSEOSEOSEOSEOSEOSEO SEOEEOSE
Indices
Bienvenido 38
Tunturi New Fitness BV
Purmerweg 1
1311 XE Almere
The Netherlands
© 2021 Tunturi New Fitness BV
Programs [Program] 46
Manual mode [Manuellt lage] 46
Forinstalda program (P1~P5). 47
Garanti. 47
Dist. Distance [Avstand]
Start/Stop [Starta/stoppa]
Forinstallda program (P1~P5)
Tunturi New Fitness BV
Purmerweg 1
1311 XE Almere
Nederländerna
Friskrivning
© 2021 Tunturi New Fitness BV
Allarattigheterforbehalla.
Reverse (Taaksepain)
Tunturi New Fitness BV
Purmerweg 1
1311 XE Almere
Alankomaat
Vastuuvapauslaseke
© 2021 Tunturi New Fitness BV
| NR | Description | specs | Qty |
| 1 Hand control unit 2 | |||
| 2 Hand control unit storage box rim 1 | |||
| 3 Hand control unit storage box 1 | |||
| 4 Main body cover (LH) 1 | |||
| 5 Main body cover (RH) 1 | |||
| 6 Motor assembly unit 220 Volt 1 | |||
| 7 Circuit board (PCB) 220 volt 2 | |||
| 8 Frame support foot fixing plate 90x30x3 mm 1 | |||
| 9 Frame support foot 1 | |||
| 10 Support foot footpad 1 | |||
| 11 Flat washer Ø6x Ø25x1.5T | |||
| 12 Screw | M6 | 1 | |
| 13 Power switch | (white) | 1 | |
| 14 Power main cable | 1800mm | 1 | |
| 15 Main cover crank insert cover | ABS | 1 | |
| 16 Pedal fixing bold | 4 | ||
| 17 RH Crank | 9/16 inch | 4 | |
| 18 RH Pedal | 9/16 inch | 4 | |
| 19 LH Pedal | 9/16 inch | 6 | |
| 20 LH Crank | 9/16 inch | 9 | |
| 21 Crank fixing bolt socket cover | 2 | ||
| 22 Crank fixing bolt (LH) | M6x 16-L | 4 | |
| 23 Shoulder bold | M6x16 | 6 | |
| 24 Spring washer | Ø6 | 6 | |
| 25 Flat washer Ø6x Ø14x1.5T | |||
| 26 Tapping screw (PH) | ST4x16 | 2 | |
| 27 Crank fixing bolt (RH) | M6x 16-L | 2 | |
| 28 Tapping screw | ST3x12 | 2 | |
| 29 Protective sinc plate & screw assy | ST3x8 | 1 | |
TUNTURI
FEEL BETTER EVERY DAY
TUNTURI NEW FITNESS B.V.
Purmerweg 1
1311 XE Almere
The Netherlands
P.O.Box 60001
1320 AA Almere
The Netherlands
info@tunturi.com
www.tunturi.com

/TunturiNLBE
/TunturiFitness

/Tunturi NLBE
/Tunturi_Fitness

Tunturi
Tunturi Service