KVLBE08T - Electric oven ELECTROLUX - Free user manual and instructions
Find the device manual for free KVLBE08T ELECTROLUX in PDF.
| Brand | Electrolux |
| Model | KVLBE08T |
| Product type | Built-in electric oven with microwave |
| Dimensions (H x W x D) | 455 x 595 x 567 mm |
| Recess dimensions (H x W x D) | 444-460 x 560 x 550 mm |
| Depth with open door | 882 mm |
| Power supply | 230 V - 50 Hz, cable 1.5 m |
| Cooking modes | Convection, Top/Bottom Heat, Grill, Turbo Grill, Pizza Function, Bottom Heat, Frozen Dishes, Low-temperature cooking, Keep Warm, plus microwave functions |
| Microwave functions | Microwave only, Defrost, Reheat, Liquids, combined modes (Convection + Microwave, etc.) |
| Microwave power | 100 - 1000 W |
| Included accessories | Metal rack, baking tray, roasting dish, glass turntable for microwave |
| Capacity | Approx 70 L (not specified, estimate) |
| Safety | Child lock, key lock, automatic shut-off, cooling fan |
| Interior lighting | Halogen bulb (class G), user-replaceable |
| Cleaning | Manual cleaning, removable shelf supports, no automatic steam cleaning |
| Materials | Enamel and stainless steel |
| Repairability index | Not communicated, spare parts available via www.electrolux.com/shop |
Frequently Asked Questions - KVLBE08T ELECTROLUX
User questions about KVLBE08T ELECTROLUX
0 question about this device. Answer the ones you know or ask your own.
Ask a new question about this device
Download the instructions for your Electric oven in PDF format for free! Find your manual KVLBE08T - ELECTROLUX and take your electronic device back in hand. On this page are published all the documents necessary for the use of your device. KVLBE08T by ELECTROLUX.
USER MANUAL KVLBE08T ELECTROLUX
WE'RE THINKING OF YOU
Thank you for purchasing an Electrolux appliance. You've chosen a product that brings with it decades of professional experience and innovation. Ingenious and stylish, it has been designed with you in mind. So whenever you use it, you can be safe in the knowledge that you'll get great results every time.
Welcome to Electrolux.
Visit our website to:

Get usage advice, brochures, trouble shooter, service and repair information:
www.electrolux.com/support

Register your product for better service:
www.registerelectrolux.com

Buy Accessories, Consumables and Original spare parts for your appliance:
www.electrolux.com/shop
CUSTOMER CARE AND SERVICE
Always use original spare parts.
When contacting our Authorised Service Centre, ensure that you have the following data available: Model, PNC, Serial Number.
The information can be found on the rating plate.
Warning / Caution-Safety information
i General information and tips
Environmental information
Subject to change without notice.
CONTENTS
1.SAFETY INFORMATION. 40
1.1 Children and vulnerable people safety. 40
1.2 General Safety. 41
2.SAFETYINSTRUCTIONS. 43
2.1 Installation 43
2.2 Electrical connection 44
2.3 Use 45
2.4 Care and cleaning.. 46
2.5 Glassware use. 46
2.6 Internal lighting 46
2.7 Service 47
2.8 Disposal. 47
3.PRODUCT DESCRIPTION 47
3.1 General overview 47
3.2 Accessories 47
- HOW TO TURN APPLIANCE ON AND
OFF 48
4.1 Control panel 48
4.2 Display 49
- BEFORE FIRST USE 50
5.1 Initial Cleaning 50
5.2 First connection.. 50
6.DAILYUSE. 50
6.1 How to set: Heating functions....51
6.2 How to set: Microwave functions... 51
6.3 How to use: Microwave quick start 52
6.4 How to set: Assisted Cooking....52
6.5 Heating functions.. 53
- CLOCK FUNCTIONS 56
7.1 Clock functions description..56
7.2 How to set: Clock functions.. 56
- HOW TO USE: ACCESSORIES 58
8.1 Inserting accessories.. 58
- ADDITIONAL FUNCTIONS 59
9.1 How to save: Favourites.. 59
9.2 Function lock.. 59
9.3 Automatic switch-off 60
9.4 Cooling fan 60
- HINTS AND TIPS 60
10.1 Cooking recommendations..60
10.2 Microwave recommendations ....61
10.3 Microwave suitable cookware and materials 61
10.4 Recommended power settings for different kinds of food 62
10.5 Cooking tables for test institutes..63
- CARE AND CLEANING 65
11.1 Notes on cleaning.. 65
11.2 How to remove: Shelf supports ...65
11.3 How to replace: Lamp.. 66
- TROUBLESHOOTING 66
12.1 What to do if 66
12.2 How to manage: Error codes.....67
12.3 Service data.. 68
- ENERGY EFFICIENCY 68
13.1 Energy saving.. 68
14.MENUSTRUCTURE. 69
14.1 Menu 69
14.2 Submenu for: Options.. 69
14.3 Submenu for: Setup.. 70
14.4 Submenu for: Service 70
- IT'S EASY! 70
- TAKE A SHORTCUT! 71
- ENVIRONMENTAL CONCERNS. 72
1. SAFETY INFORMATION
Before the installation and use of the appliance, carefully read the supplied instructions. The manufacturer is not responsible for any injuries or damage that are the result of incorrect installation or usage. Always keep the instructions in a safe and accessible location for future reference.
1.1 Children and vulnerable people safety
- This appliance can be used by children aged from 8 years and above and persons with reduced physical, sensory or mental capabilities or lack of experience and knowledge if they have been given supervision or instruction concerning the use of the appliance in a safe way and understand the hazards involved. Children of less than 8 years of age and persons with very extensive and complex disabilities shall
be kept away from the appliance unless continuously supervised.
- Children should be supervised to ensure that they do not play with the appliance.
- Keep all packaging away from children and dispose of it appropriately.
- WARNING: The appliance and its accessible parts become hot during use. Keep children and pets away from the appliance when in use and when cooling down.
- If the appliance has a child safety device, it should be activated.
- Children shall not carry out cleaning and user maintenance of the appliance without supervision.
1.2 General Safety
- This appliance is for cooking purposes only.
- This appliance is designed for single household domestic use in an indoor environment.
- This appliance may be used in, offices, hotel guest rooms, bed & breakfast guest rooms, farm guest houses and other similar accommodation where such use does not exceed (average) domestic usage levels.
- Only a qualified person must install this appliance and replace the cable.
- Do not use the appliance before installing it in the built-in structure.
- Disconnect the appliance from the power supply before carrying out any maintenance.
- If the mains power supply cable is damaged, it must be replaced by the manufacturer, its Authorised Service Centre or similarly qualified persons to avoid an electrical hazard.
-
WARNING: Ensure that the appliance is switched off before replacing the lamp to avoid the possibility of electric shock.
-
WARNING: The appliance and its accessible parts become hot during use. Care should be taken to avoid touching heating elements or the surface of the appliance cavity.
- Always use oven gloves to remove or insert accessories or ovenware.
- Do not activate the microwave function when the appliance is empty. Metal parts inside the cavity can create electric arcing.
- Metallic containers for food and beverages are not allowed during microwave cooking. This requirement is not applicable if the manufacturer specifies size and shape of metallic containers suitable for microwave cooking.
- WARNING: If the door or door seals are damaged, the appliance must not be operated until it has been repaired by a qualified person.
- WARNING: Only a qualified person can carry out any service or repair operation that involves the removal of a cover which gives protection against exposure to microwave energy.
- WARNING: Do not heat liquids and other foods in sealed containers. They are liable to explode.
- Use only utensils that are suitable for use in microwave ovens.
- When heating food in plastic or paper containers, observe the appliance due to the possibility of ignition.
- The appliance is intended for heating food and beverages. Drying of food or clothing and heating of warming pads, slippers, sponges, damp cloth and similar may lead to risk of injury, ignition or fire.
- If smoke is emitted, switch off or unplug the appliance and keep the door closed in order to stifle any flames.
-
Microwave heating of beverages can result in delayed eruptive boiling. Care must be taken when handling the container.
-
The contents of feeding bottles and baby food jars shall be stirred or shaken and the temperature checked before consumption, in order to avoid burns.
- Eggs in their shell and whole hard-boiled eggs should not be heated in the appliance since they may explode, even after microwave heating has ended.
- To remove the shelf supports first pull the front of the shelf support and then the rear end away from the side walls. Install the shelf supports in the opposite sequence.
- The appliance should be cleaned regularly and any food deposits removed.
- Do not use a steam cleaner to clean the appliance.
- Do not use harsh abrasive cleaners or sharp metal scrapers to clean the glass door since they can scratch the surface, which may result in shattering of the glass.
- Failure to maintain the appliance in a clean condition could lead to deterioration of the surface that could adversely affect the life of the appliance and possibly result in a hazardous situation.
2. SAFETY INSTRUCTIONS
2.1 Installation

WARNING!
Only a qualified person must install this appliance.
- Remove all the packaging.
- Do not install or use a damaged appliance.
- Follow the installation instructions supplied with the appliance.
- Always take care when moving the appliance as it is heavy. Always use safety gloves and enclosed footwear.
- Do not pull the appliance by the handle.
- Install the appliance in a safe and suitable place that meets installation requirements.
- Keep the minimum distance from other appliances and units.
- Before mounting the appliance, check if the appliance door opens without restraint.
- The appliance is equipped with an electric cooling system. It must be operated with the electric power supply.
- The built-in unit must meet the stability requirements of DIN 68930.
| Cabinet minimum height (Cabinet under the work-top minimum height) | 444 (460) mm |
| Cabinet width 560 mm | |
| Cabinet depth 550 (550) mm | |
| Height of the front of the appliance 455 mm | |
| Height of the back of the appliance 440 mm | |
| Width of the front of the appliance 595 mm | |
| Width of the back of the appliance 559 mm | |
| Depth of the appliance 567 mm | |
| Built in depth of the appliance 546 mm | |
| Depth with open door 882 mm | |
| Ventilation opening minimum size. Opening placed on the bottom rear side | 560x20 mm |
| Mains supply cable length. Cable is placed in the right corner of the back side | 1500 mm |
| Mounting screws 3.5x25 mm |
2.2 Electrical connection

WARNING!
Risk of fire and electric shock.
- All electrical connections should be made by a qualified electrician.
- The appliance must be earthed.
- Make sure that the parameters on the rating plate are compatible with the electrical ratings of the mains power supply.
Always use a correctly installed shockproof socket. - Do not use multi-plug adapters and extension cables.
- Make sure not to cause damage to the mains plug and to the mains cable. Should the mains cable need to be replaced, this must be carried out by our Authorised Service Centre.
- Do not let mains cables touch or come near the appliance door or the niche below the appliance, especially when it operates or the door is hot.
-
The shock protection of live and insulated parts must be fastened in such a way that it cannot be removed without tools.
-
Connect the mains plug to the mains socket only at the end of the installation. Make sure that there is access to the mains plug after the installation.
- If the mains socket is loose, do not connect the mains plug.
- Do not pull the mains cable to disconnect the appliance. Always pull the mains plug.
- Use only correct isolation devices: line protecting cut-outs, fuses (screw type fuses removed from the holder), earth leakage trips and contactors.
- The electrical installation must have an isolation device which lets you disconnect the appliance from the mains at all poles. The isolation device must have a contact opening width of minimum 3 mm.
- This appliance is supplied with a main plug and a main cable.
2.3 Use

WARNING!
Risk of injury, burns and electric shock or explosion.
- Do not change the specification of this appliance.
- Make sure that the ventilation openings are not blocked.
- Do not let the appliance stay unattended during operation.
- Deactivate the appliance after each use.
- Be careful when you open the appliance door while the appliance is in operation. Hot air can release.
- Do not operate the appliance with wet hands or when it has contact with water.
- Do not apply pressure on the open door.
- Do not use the appliance as a work surface or as a storage surface.
- Open the appliance door carefully. The use of ingredients with alcohol can cause a mixture of alcohol and air.
- Do not let sparks or open flames to come in contact with the appliance when you open the door.
- Do not put flammable products or items that are wet with flammable products in, near or on the appliance.
- Do not use microwave function to preheat the appliance.

WARNING!
Risk of damage to the appliance.
- To prevent damage or discoloration to the enamel:
- do not put aluminium foil directly on the bottom of cavity of the appliance.
- do not put water directly into the hot appliance.
- do not keep moist dishes and food in the appliance after you finish the cooking.
- be careful when you remove or install the accessories.
- Discoloration of the enamel or stainless steel has no effect on the performance of the appliance.
- Use a deep pan for moist cakes. Fruit juices cause stains that can be permanent.
- Always cook with the appliance door closed.
- If the appliance is installed behind a furniture panel (e.g. a door) make sure the door is never closed when the appliance operates. Heat and moisture can build up behind a closed furniture panel and cause subsequent damage to the appliance, the housing unit or the floor. Do not close the furniture panel until the appliance has cooled down completely after use.
2.4 Care and cleaning

WARNING!
Risk of injury, fire, or damage to the appliance.
- Before maintenance, deactivate the appliance and disconnect the mains plug from the mains socket.
- Make sure the appliance is cold. There is the risk that the glass panels can break.
- Replace immediately the door glass panels when they are damaged. Contact the Authorised Service Centre.
- Be careful when you remove the door from the appliance. The door is heavy!
- Make sure the cavity and the door are wiped dry after each use. Steam produced during the operation of the appliance condensates on cavity walls and can cause corrosion.
- Clean regularly the appliance to prevent the deterioration of the surface material.
- Fat and food remaining in the appliance can cause fire and electric arcing when the microwave function operates.
- Clean the appliance with a moist soft cloth. Use only neutral detergents. Do not use abrasive products, abrasive cleaning pads, solvents or metal objects.
- If you use an oven spray, follow the safety instructions on its packaging.
2.5 Glassware use
Handling your glassware without an appropriate degree of care could result in breakage, chipping, cracking or severe scratching:
- Do not spill cold water or other liquids on the glassware because a sudden temperature drop may cause immediate breakage of the glass. Broken glass pieces may be extremely sharp and difficult to locate.
- Do not place hot glassware on a wet or cool surface, directly on countertop or metal surface, or in sink; or handle hot glassware with wet cloth.
- Do not use or repair any glassware that is chipped, cracked or severely scratched.
- Do not drop or hit glassware against a hard object or strike utensils against it.
- Do not heat empty or nearly empty glassware in microwave, or overheat oil or butter in microwave (use minimum amount of cooking time).
Allow hot glassware to cool on a cooling rack, a potholder or a dry cloth. Make sure that the glassware is cool enough before washing, refrigerating or freezing.
Avoid handling hot glassware (including ware with silicone gripping surfaces) without dry potholders.
Avoid microwave misuse (i.e. running the oven without any load or small load).
2.6 Internal lighting

WARNING!
Risk of electric shock.
- Concerning the lamp(s) inside this product and spare part lamps sold separately: These lamps are intended to withstand extreme physical conditions in household appliances, such as temperature, vibration, humidity, or are intended to signal information about the operational status of the appliance. They are not intended to be used in other applications and are not suitable for household room illumination.
- This product contains a light source of energy efficiency class G.
- Use only lamps with the same specifications.
2.7 Service
- To repair the appliance contact the Authorised Service Centre.
- Use original spare parts only.
2.8 Disposal

WARNING!
Risk of injury or suffocation.
- Contact your municipal authority for information on how to dispose of the appliance.
- Disconnect the appliance from the mains supply.
- Cut off the mains electrical cable close to the appliance and dispose of it.
- Remove the door catch to prevent children or pets from becoming trapped in the appliance.
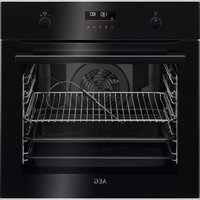
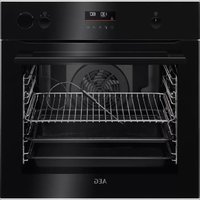
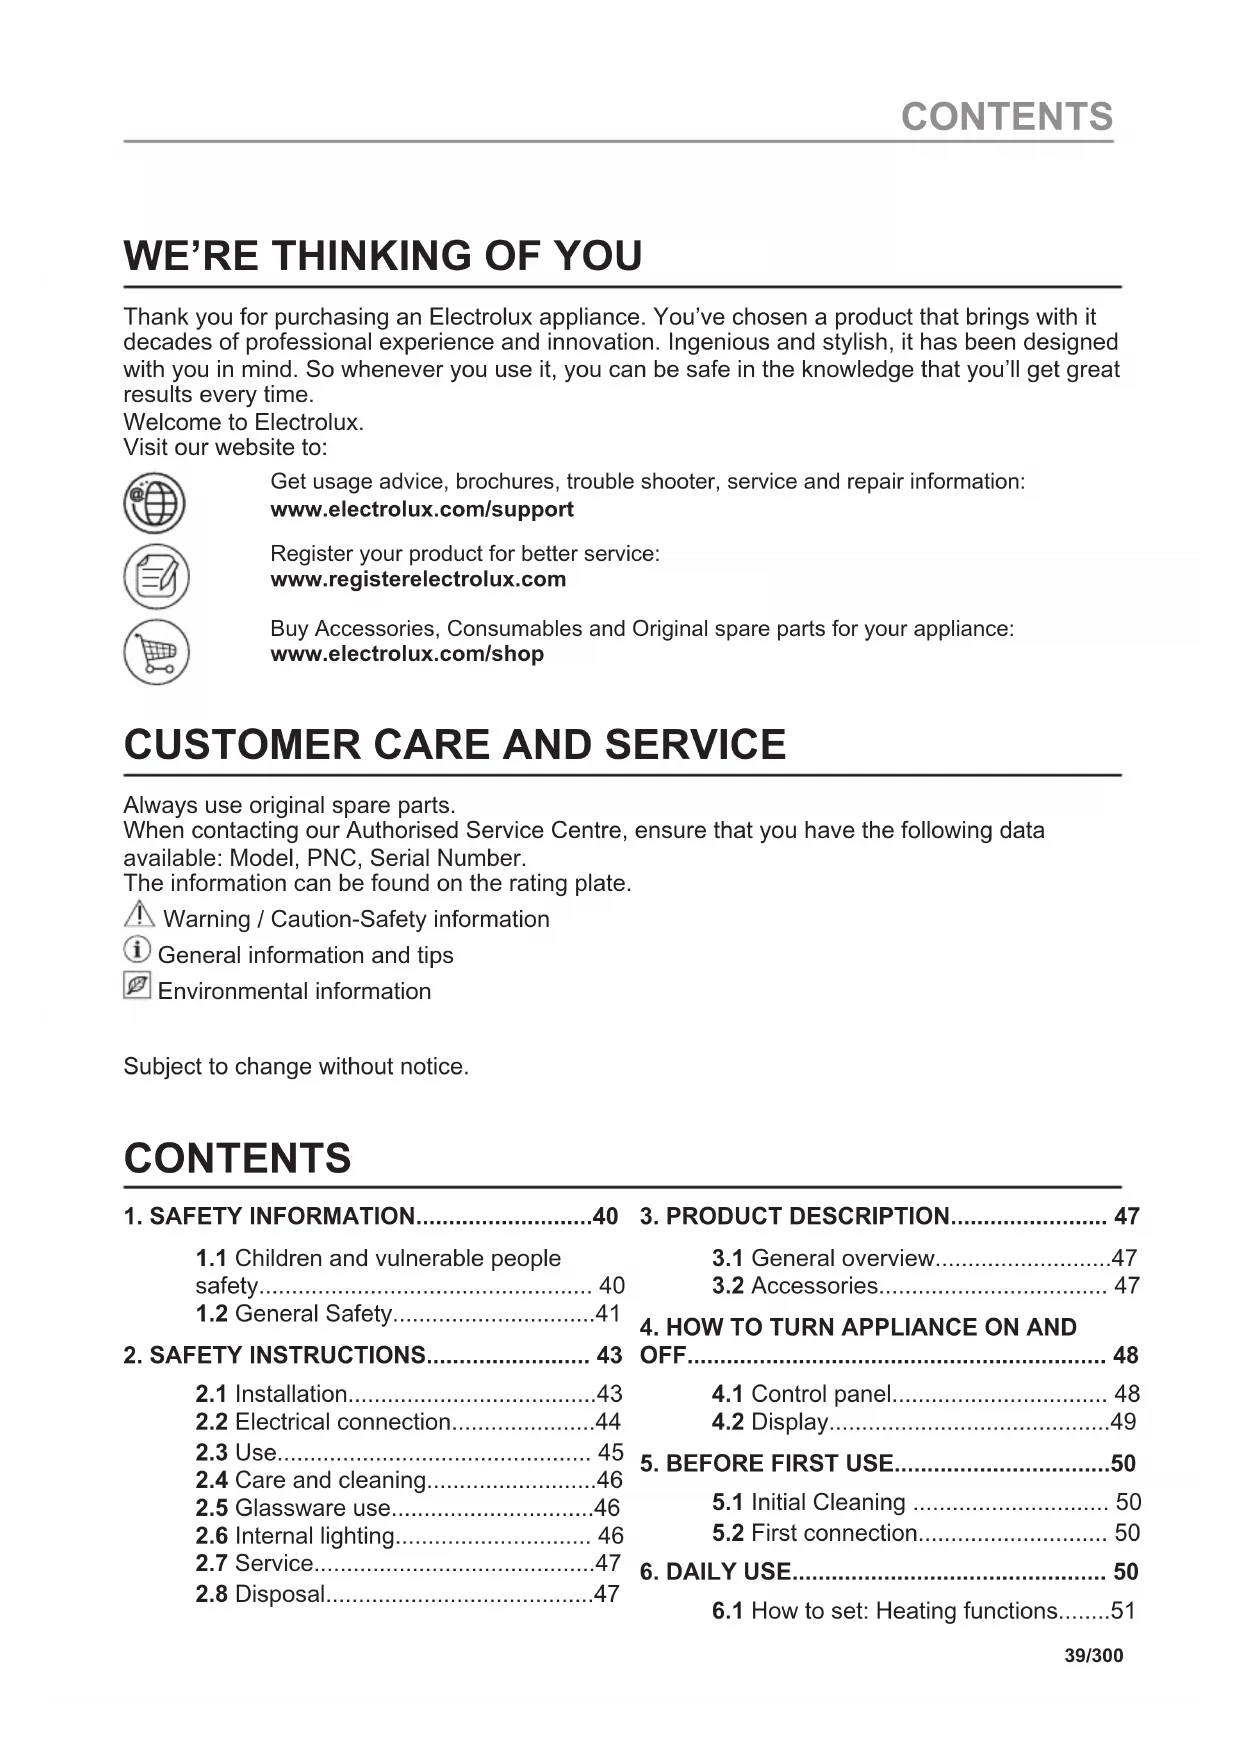
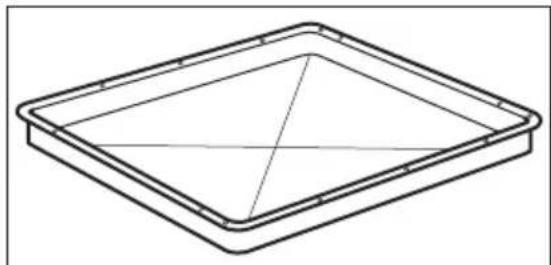
3.PRODUCT DESCRIPTION
3.1 General overview
Control panel
Display
Heating element
Microwave generator
Lamp
Fan
Shelf support, removable
Shelf positions
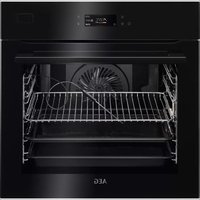
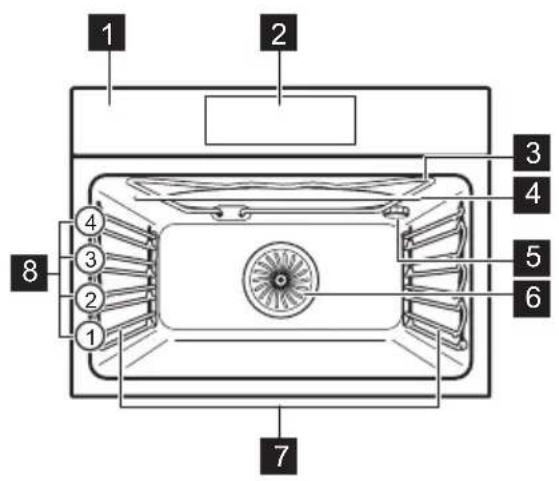
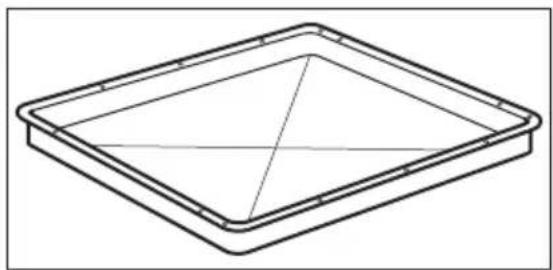
3.2 Accessories
Wire shelf
For cookware, cake tins, roasts.
Baking tray
For cakes and biscuits.
Grill-/Roasting pan
To bake and roast or as a pan to collect fat.
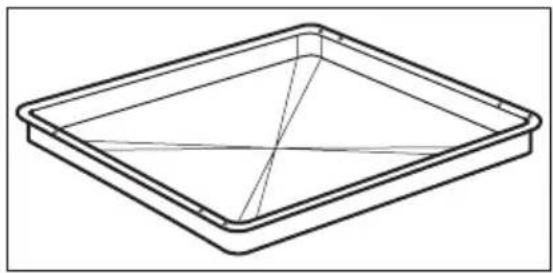
Microwave bottom glass plate
To prepare food in microwave mode.

4. HOW TO TURN APPLIANCE ON AND OFF
4.1 Control panel
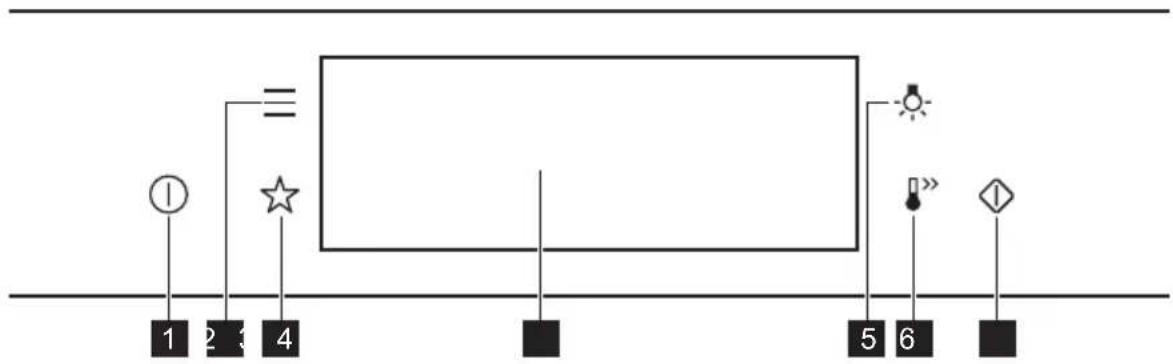
| 1 | ON / OFF Press and | hold to turn the appliance on and off. |
| 2 | Menu Lists the appliance functions. | |
| 3 | Favourites Lists the favourite settings. | |
| 4 | Display Shows the current settings of the appliance. | |
| 5 | Lamp switch To turn the lamp on and off. | |
| 6 | Fast Heat Up To turn on and off the function: Fast Heat Up. | |
| 7 | Microwave quick start | To turn on microwave function (1000 W and 30 seconds). |
| Press Move | Press and hold | |
| Touch the surface with finger-tip. | Slide fingertip over the surface. | Touch the surface for 3 seconds. |
4.2 Display
| 12:301 150°C STARTS | After turning on, the display shows the main screen with the heating function and the default temperature. |
| 12:34 | If you do not use the appliance for 2 minutes, the display switches to standby. |
| 12:301 150°C 11min·STOP | When you cook, the display shows the set functions and other available options. |
| A 12:30 150°C START E D C B | Display with key functions set. A. Time of day B. START/STOP C. Temperature / Microwave timer D. Heating functions E. Timer |
| Display indicators | |
| Basic indicators - to navigate on the display. | |
| OK To confirm the selection / setting. | < To go one level back in the menu. | To undo the last action. | To turn the options on and off. |
| Sound alarm function indicators - when the set time of cooking ends, the signal sounds. | |||
| The function is on. | STOP The function is on. Cooking stops automatically. | Sound alarm is off. | |
| Timer indicators | |||
| To set the function: Delayed start. | To cancel the setting. | ||
5. BEFORE FIRST USE

WARNING!
Refer to Safety chapters.
5.1 Initial Cleaning
| Step 1 Step 2 Step 3 | ||
| Remove all accessories and removable shelf supports from the appliance. | Clean the appliance and the accessories only with a micro-fibre cloth, warm water and a mild detergent. | Place the accessories and the removable shelf supports in the appliance. |
5.2 First connection
The display shows welcome message after the first connection.
You have to set: Language, Display brightness, Key tones, Buzzer volume, Time of day.
6. DAILY USE

WARNING!
Refer to Safety chapters.
6.1 How to set: Heating functions
| Step 1 Turn | on the oven. The display shows the default heating function. |
| Step 2 Press | the symbol of the heating function to enter the submenu. |
| Step 3 | Select the heating function and press OK the display shows: temperature. |
| Step 4 | Set: temperature. Press OK |
| Step 5 | Press: START |
| STOP - press to turn off the heating function. | |
| Step 6 Turn | off the oven. |
Take a shortcut!

6.2 How to set: Microwave functions
| Step 1 Remove all accessories and turn on the appliance. Insert microwave bottom glass plate. | |
| Step 2 Press the symbol of the heating function to enter the submenu. | |
| Step 3 | Select the microwave heating function and press OK The display shows: microwave power. |
| Step 4 | Set: microwave power. Press OK |
| Step 5 | Press: START |
| STOP - press to turn off the function. | |
| Step 6 Turn off the appliance. | |
The maximum time of microwave functions depends on microwave power you set:
| MICROWAVE POWER MAXIMUM TIME | |
| 100 - 600 W 59 minutes | |
| More than 600 W 7 minutes | |
| If you open the door, the function stops. To start it again, press START | |
Take a shortcut!

6.3 How to use: Microwave quick start
| Step 1 | Press and hold: The microwave runs for 30 s. | |
| Step 2 To | extend the cooking time: | |
| Press on the running time value to go to the time settings. Set the cooking time. | Press +30 s. | |
| The microwave can be switched on at any time with: Microwave quick start. | ||
6.4 How to set: Assisted Cooking
Every dish in this submenu has a recommended function and temperature. You can adjust the time and the temperature.
For some of the dishes you can also cook with:
Weight Automatic
| Step 1 Turn on the oven. |
| Step 2 Press: |
| Step 3 Press:×Enter: Assisted Cooking. |
| Step 4 Choose a dish or a food type. |
| Step 5 Press: START |
Take a shortcut!

6.5 Heating functions
STANDARD
| Heating function Application | |
| Grill | To grill thin pieces of food and to toast bread. |
| Turbo Grilling | To roast large meat joints or poultry with bones on one shelf position. To make gratins and to brown. |
| True Fan Cooking | To bake on up to two shelf positions at the same time and to dry food. Set the temperature 20 - 40 °C lower than for Conventional Cooking. |
| Frozen Foods | To make convenience food (e.g., french fries, potato wedges or spring rolls) crispy. |
| Conventional Cooking | To bake and roast food on one shelf position. |
| Pizza Function | To bake pizza. To make intensive browning and a crispy bottom. |
| Bottom Heat | To bake cakes with crispy bottom and to preserve food. |
SPECIALS
MICROWAVE
| Heating function Application | |
| Preserving | To preserve vegetables (e.g., pickles). |
| Dehydrating | To dry sliced fruit, vegetables and mushrooms. |
| Plate Warming | To preheat plates for serving. |
| Dough Proving | To speed up the rising of the yeast dough. It prevents dough surface from drying and keeps the dough elastic. |
| Au Gratin | For dishes such as lasagna or potato gratin. To make gratins and to brown. |
| Slow Cooking | To prepare tender, succulent roasts. |
| Keep Warm | To keep food warm. |
| Bread Baking | Use this function to prepare bread and bread rolls with a very good professional-like result in terms of crispiness, colour and crust gloss. |
| Heating function Application | |
| Microwave | Heating up, cooking, power range: 100 - 1000 W |
| Defrost | Defrosting meat, fish, cakes, power range: 100 - 200 W |
| Reheat | Heating up pre-prepared meals and delicate food, power range: 300 - 700 W |
| Liquid | Heating up drinks and soups, power range: 800 - 1000 W |
| Heating function Application | |
| True Fan Cooking + MW | Baking on one shelf position. The function with MW boost. |
| Conventional Cooking + MW | Baking and roasting food on one shelf position. The function with MW boost. |
| Grill + MW | To cook food in a short time and to brown it. The function with MW boost. |
| Turbo Grilling + MW | To roast large pieces of meat on one level. To make gratins and to brown. The function with MW boost. |
7. CLOCK FUNCTIONS
7.1 Clock functions description
| Clock function Application | |
| Cooking time To set the length of cooking. Maximum is 23 h 59 min. Maximum for combined functions (microwave + standard) is: 23 h 59 min. | |
| End action To set what happens when the timer ends counting. | |
| Delayed start To postpone the start and / or end of cooking. | |
| Time extension To extend cooking time. | |
| Reminder To set a count down. Maximum is 23 h 59 min. This function has no effect on the operation of the appliance. | |
| Uptimer Monitors how long the function operates. Uptimer - you can turn it on and off. |
End action and Delayed start are not available for microwave functions.
7.2 How to set: Clock functions
| How to set the clock | |
| Step 1 Press: Time of day. | |
| Step 2 | Set the time. Press: OK |
| How to set cooking time | |
| Step 1 Chose the heating function and set the temperature. | |
| Step 2 | Press: ⋒ |
| Step 3 | Set the time. Press: OK |

Take a shortcut!
| How to choose end option | |
| Step 1 Choose the heating function and set the temperature. | |
| Step 2 | Press: |
| Step 3 Set the cooking time. | |
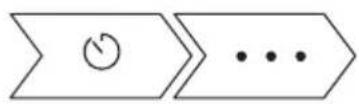
| Step 4 | Press: • • • |
| Step 5 Press: End action. | |
| Step 6 Choose the preferred: End action. | |
| Step 7 | Press: OK Repeat the action until the display shows the main screen. |
| How to delay start of cooking | |
| Step 1 Set the heating function and the temperature. | |
| Step 2 | Press: |
| Step 3 Set the cooking time. | |
| Step 4 | Press: • • • |
| Step 5 Press: Delayed start. | |
| Step 6 Choose the value. | |
| Step 7 | Press: OK Repeat the action until the display shows the main screen. |
| How to extend cooking time |
| When 10% of cooking time is left and the food seems not to be ready, you can extend cooking time. You can also change the heating function. |
| Press +1min to extend the cooking time. |
| How to change timer settings | |
| Step 1 | Press: ⋒ |
| Step 2 Set the timer value. | |
| Step 3 | Press: OK |
| You can change the set time during cooking at any time. | |
8. HOW TO USE: ACCESSORIES
8.1 Inserting accessories
Use only suitable cookware and material. Refer to "Hints and tips" chapter, Microwave suitable cookware and materials.
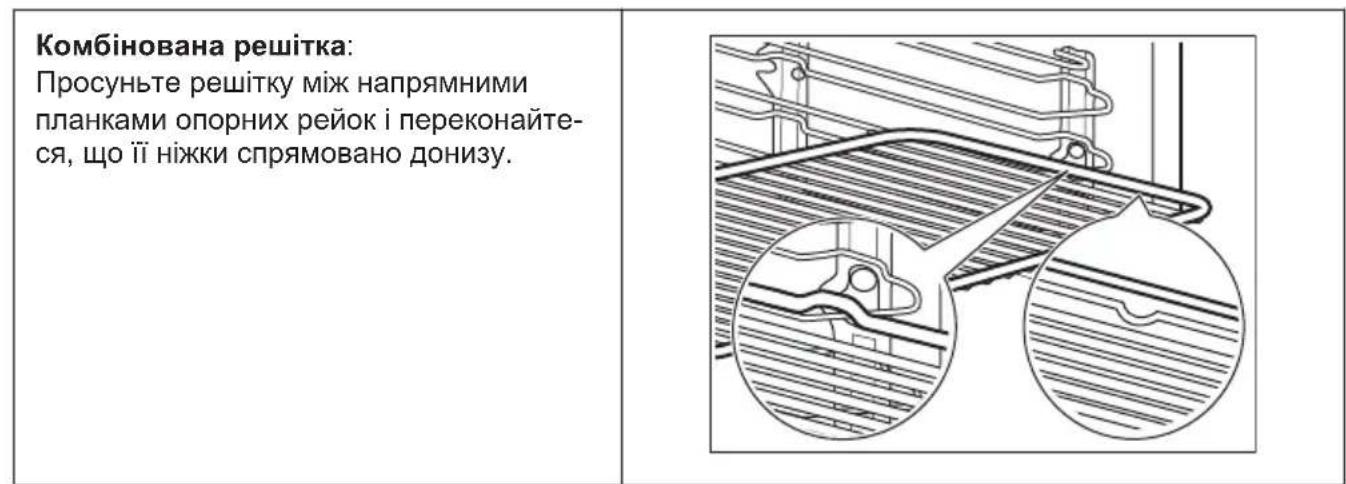
A small indentation at the top increases safety. The indentations are also anti-tip devices. The high rim around the shelf prevents cookware from slipping of the shelf.
| Wire shelf: Push the shelf between the guide bars of the shelf support and make sure that the feet point down. | |
| Baking tray / Deep pan: Push the tray between the guide bars of the shelf support. | |
| Wire shelf, Baking tray / Deep pan: Push the tray between the guide bars of the shelf support and the wire shelf on the guide bars above. | |
| Microwave bottom glass plate: Use the microwave bottom glass plate only with microwave function. It is not suitable for combined microwave function (e.g. microwave grilling). Put the accessory on the bottom of the cavity. You can put the food directly on the microwave bottom glass plate. |
9. ADDITIONAL FUNCTIONS
9.1 How to save: Favourites
You can save your favourite settings, such as the heating function, the cooking time, the temperature or the cleaning function. You can save 3 favourite settings.
| Step 1 Turn on the appliance. |
| Step 2 Select the preferred setting. |
| Step 3 Press: Select: Favourites. |
| Step 4 Select: Save current settings. |
| Step 5 Press + to add the setting to the list of: Favourites. Press OK |
| - press to reset the setting. - press to cancel the setting. |
9.2 Function lock
This function prevents an accidental change of the heating function.
| Step 1 Turn on the appliance. |
| Step 2 Set a heating function. |
| Step 3 ☆,press at the same time to turn on the function. |
| To turn off the function repeat step 3. |
9.3 Automatic switch-off
For safety reasons the oven turns off after some time, if a heating function works and you do not change any settings.
| (℃) (h) | 1 |
| 30 - 115 12.5 | |
| 120 - 195 8.5 | |
| 200 - 230 5.5 |
The Automatic switch-off does not work with the functions: Light, End time, Slow Cooking.
9.4 Cooling fan
When the appliance operates, the cooling fan turns on automatically to keep the surfaces of the appliance cool. If you turn off the appliance, the cooling fan can continue to operate until the appliance cools down.
10. HINTS AND TIPS
10.1 Cooking recommendations
| i |
| The temperature and cooking times in the tables are guidelines only. They depend on the recipes and the quality and quantity of the ingredients used.Your appliance may bake or roast differently to the appliance you had before. The hints below show recommended settings for temperature, cooking time and shelf position for specific types of the food.If you cannot find the settings for a special recipe, look for the similar one.For more cooking recommendations refer to cooking tables on our website. To find the Cooking Hints check the PNC number on the rating plate on the front frame of the appliance cavity. |
10.2 Microwave recommendations
① Let's cook!
Place the food on the microwave bottom glass plate on the bottom of the cavity.
Place the food on a plate on the bottom of the cavity.
Turn or stir the food halfway through the defrosting and cooking time.
Stir liquid dishes from time to time.
Stir the food before serving.
Cover the food for cooking and reheating.
Put the spoon to the bottle or glass when heating drinks to ensure better heat distribution.
Put the food into the appliance without packaging. The packaged ready meals can be put into the appliance only when the packaging is microwave safe (check information on the packaging).
Microwave cooking
Cook food covered. If you want to keep a crust cook food without a cover.
Do not overcook the dishes by setting the power and time too high. The food can dry out, burn or cause fire.
Do not use the appliance to cook eggs or snails in their shells, because they can burst. Pierce the yolk of fried egg before reheating it.
Pierce food with skin or peel several times before cooking.
Cut vegetables into similar-sized pieces.
After you turn off the appliance, take the food out and let it stand for a few minutes to allow the heat distribute evenly.
Microwave defrosting
Put the frozen, unwrapped food on a small upturned plate with a container below it, or on a defrosting rack or plastic sieve so that the defrosting liquid can leak out.
Remove defrosted pieces subsequently.
To cook fruit and vegetables without defrosting them first, you can use a higher microwave power.
10.3 Microwave suitable cookware and materials
For the microwave use only suitable cookware and materials. Use below table as a reference. Check the cookware / material specification before use.
| Cookware / Material | ※ | 图鉴 | |
| Ovenproof glass and porcelain with no metal components, e.g. heat-proof glass | √ | √ | √ |
| Non-ovenproof glass and porcelain without any silver, gold, platinum or other metal decorations | √ | × | × |
| Glass and glass ceramic made of ovenproof / frost-proof material | √ | √ | √ |
| Cookware / Material | ※ | 国語 | |
| Ovenproof ceramic and earthen-ware without any quartz or metal components and glazes which contain metal | √ | √ | √ |
| Ceramic, porcelain and earthen-ware with unglazed bottom or with small holes, e.g. on handles | XXXX | ||
| Heat-resistant plastic up to 200℃ | √ | √ | X |
| Cardboard, paper XX | √ | ||
| Clingfilm XX | √ | ||
| Microwave clingfilm X | √ | √ | |
| Roasting dishes made of metal, e.g. enamel, cast iron | XXXX | ||
| Baking tins, black lacquer or silicon-coated | XXXX | ||
| Baking tray XXX | |||
| Wire shelf XX | √ | ||
| Microwave glass bottom plate X | √ | √ | |
| Cookware for microwave use, e.g. crisp pan | X | √ | X |
10.4 Recommended power settings for different kinds of food
The data in the table is for guidance only.
| 700 - 1000 W | |
| Searing at the start of the cooking process Heating liquids | |
| 500 - 600 W | ||||
| Cooking vegetables | Cooking egg dishes | Simmering stews | Heating one-plate meals | Defrosting and heating frozen meals |
| 300 - 400 W | ||||
| Melting cheese, chocolate, butter | Simmering rice | Heating baby food | Cooking / Heating delicate food | Continuing cooking |
| 100 - 200 W | |||
| Defrosting bread | Defrosting fruit and cakes | Defrosting cheese, cream, butter | Defrosting meat, fish |
10.5 Cooking tables for test institutes
Information for test institutes
Tests according to IEC 60705.
| Use wire shelf unless otherwise specified. | |||||
| MICROWAVE FUNCTION | POWER (W) | (kg) | (min) | ||
| Sponge cake 600 0.475 Bottom 7 | -9 Turn container | around by 1/4, half-way through the cooking time. | |||
| Meatloaf 400 0.9 2 25 | -32 Turn container | around by 1/4, half-way through the cooking time. | |||
| Egg custard 500 1 Bottom 18 - | |||||
| Meat defrosting 200 | 0.5 Bottom 7 | -8 Turn the meat up- | side down halfway through the cooking time. | ||
| Use the wire shelf. | ||||||
| MICRO-WAVE COMBI FUNC-TION | POWER(W) (°C) (min) | |||||
| Cake, 0.7kg | Conven-tional Cooking + MW | 100 200 2 | 23 | - 27 | Turn container | around by 1/4, halfway through the cooking time. |
| Potato gratin, 1.1 kg | True Fan Cooking + MW | 300 180 2 | 38 | - 42 | Turn container | around by 1/4, halfway through the cooking time. |
| Chicken, 1.1 kg | Turbo Grill-ing + MW | 400 230 1 | 35 | - 40 | Put the meat in | round glass con-tainer and turn it upside down half-way through the cooking time. |
11. CARE AND CLEANING

WARNING!
Refer to Safety chapters.
11.1 Notes on cleaning
| Cleaning Agents | Clean the front of the appliance only with a microfibre cloth with warm water and a mild detergent. |
| Use a cleaning solution to clean metal surfaces. | |
| Clean stains with a mild detergent. |
| Clean the cavity after each use. Fat accumulation or other residue may cause fire. Clean the appliance ceiling carefully from residue and fat. |
| Do not store the food in the appliance for longer than 20 minutes. Dry the cavity only with a microfibre cloth after each use. |
| Accessories | Clean all accessories after each use and let them dry. Use only a microfibre cloth with warm water and a mild detergent. Do not clean the accessories in a dishwasher. |
| Do not clean the non-stick accessories using abrasive cleaner or sharp-edged objects. |
11.2 How to remove: Shelf supports
Remove the shelf supports to clean the oven.
| Step 1 Turn off the oven and wait until it is cold. | ||
| Step 2 Carefully pull the shelf supports up and out of the front catch. | ||
| Step 3 Pull the front end of the shelf support away from the side wall. | ||
| Step 4 Pull the supports out of the rear catch. | ||
Install the shelf supports in the opposite sequence.
11.3 How to replace: Lamp

WARNING!
Risk of electric shock.
The lamp can be hot.
Always hold the halogen lamp with a cloth to prevent grease residue from burning on the lamp.
| Before you replace the lamp: | ||
| Step 1 Step 2 Step | 3 | |
| Turn off the oven. Wait until the oven is cold. | Disconnect the oven from the mains. | Put a cloth on the bottom of the cavity. |
Top lamp
| Step 1 Turn the glass cover to remove it. |
| Step 2 Clean the glass cover. |
| Step 3 Replace the lamp with a suitable 300 °C heat-resistant lamp. |
| Step 4 Install the glass cover. |
12. TROUBLESHOOTING

WARNING!
Refer to Safety chapters.
12.1 What to do if...
| The appliance does not turn on or does not heat up | |
| ?Possible cause | Remedy |
| The appliance is not connected to an electrical supply or it is connected incorrectly. | Check if the appliance is correctly connected to the electrical supply. |
| ?Possible cause | ?Remedy |
| The clock is not set. Set the clock, for details refer to Clock functions chapter, How to set: Clock functions. | |
| The door is not closed correctly. Fully close the door. | |
| The fuse is blown. Make sure the fuse is the cause of the problem. If the problem recurs, contact a qualified electrician. | |
| The appliance Child Lock is on. Refer to "Menu" chapter, Submenu for: Options. | |
| Components | |
| ?Description | ?Remedy |
| The lamp is burnt out. Replace the lamp, for details refer to "Care and Cleaning" chapter, How to replace: Lamp. | |
12.2 How to manage: Error codes
When the software error occurs, the display shows error message.
In this section, you will find the list of the problems that you can handle on your own.
| Code and description Remedy | |
| F240, F439 - the touch fields on the display do not work properly. | Clean the surface of the display. Make sure there is no dirt on the touch fields. |
| F908 - the appliance system cannot connect with the control panel. | Turn the appliance off and on. |
When one of these error messages continues to appear on the display, it means a faulty subsystem may have been disabled. In such a case contact your dealer or an Authorized Service Centre. If one of these errors occurs, the rest of the appliance functions will continue to work as usually.
| Code and description Remedy | |
| F131 - the temperature of magnetron sensor is too high. | Turn the appliance off and wait until it cools down. Turn the appliance on again. |
12.3 Service data
If you cannot find a solution to the problem yourself, contact your dealer or an Authorised Service Centre.
The necessary data for the service centre is on the rating plate. The rating plate is on the front frame of the appliance cavity. Do not remove the rating plate from the appliance cavity.
| We recommend that you write the data here: | |
| Model (MOD.) | |
| Product number (PNC) | |
| Serial number (S.N.) | |
13. ENERGY EFFICIENCY
13.1 Energy saving
Make sure that the appliance door is closed when the appliance operates. Do not open the appliance door too often during cooking. Keep the door gasket clean and make sure it is well fixed in its position.
Use metal cookware to improve energy saving (only when you use a non-microwave function). When possible, do not preheat the appliance before cooking.
Keep breaks between baking as short as possible when you prepare a few dishes at one time.
Cooking with fan
When possible, use the cooking functions with fan to save energy.
Residual heat
If a programme with Duration is activated and the cooking time is longer than 30min , the heating elements automatically turn off earlier in some appliance functions.
The fan and lamp continue to operate. When you turn off the appliance, the display shows the residual heat. You can use that heat to keep the food warm.
When the cooking duration is longer than 30min , reduce the appliance temperature to minimum 3 - 10 min before the end of cooking. The residual heat inside the appliance will continue to cook.
Use the residual heat to warm up other dishes.
Keep food warm
Choose the lowest possible temperature setting to use residual heat and keep a meal warm.
The residual heat indicator or temperature appears on the display.
Cooking with the lamp off
Turn off the lamp during cooking. Turn it on only when you need it.
14. MENU STRUCTURE
14.1 Menu
| Menu item Application | ||
| Assisted Cooking Lists automatic programmes. | ||
| Favourites Lists the favourite settings. | ||
| Options To set the appliance configuration. | ||
| Settings Setup To set the appliance configuration. | ||
| Service Shows the software version and configuration. | ||
14.2 Submenu for: Options
| Submenu Application | |
| Light Turns the lamp on and off. | |
| Child Lock Prevents accidental activation of the appliance. When the option is on, the text Child Lock appears in the display when you turn on the appliance. To enable the appliance use, choose the code letters in the alphabetical order. Access to the timer, the remote operation and the lamp is available with the option on. | |
| Fast Heat Up Shortens the heat up time. It is available only for some of the appliance functions. | |
| Time indication Turns the clock on and off. | |
| Digital clock style Changes the format of the displayed time indication. | |
14.3 Submenu for: Setup
| Submenu Description | |
| Language Sets the appliance language. | |
| Display brightness Sets the display brightness. | |
| Key tones Turns the tone of the touch fields on and off. It is not possi-ble to mute the tone for: ① | |
| Buzzer volume Sets the volume of key tones and signals. | |
| Time of day Sets the current time and date. | |
14.4 Submenu for: Service
| Submenu Description | |
| Demo mode Activation / deactivation | code: 2468 |
| Software version Information about software version. | |
| Reset all settings Restores factory settings. | |
15. IT'S EASY!
| Before first use you have to set: | ||||
| Language | Display brightness | Key tones Buzzer volume Time of day | ||
| Familiarize yourself with the basic icons on the control panel and the display: | ||||
| ① ON / OFF Menu | = Favourites | ☆ | ○ Timer | START / STOP |
| Start using the appliance | ||||
| Quick start Turn on the appliance and start cooking with the default temperature and time of the function. | Step 1 Step 2 Step 3 | |||
| Press and hold: ☐. | ☐... - select the preferred function. | Press: START | ||
| Quick Off Turn off the appliance, any screen or message at any time. | ☐ - press and hold until the appliance turns off. | |||
| MW quick start Start Microwave at any time with default settings: 30 sec / 1000W. | Press: ☑ | |||
| Start cooking | ||||
| Step 1 Step 2 | Step 3 Step 4 Step 5 | |||
| ① - press to turn on the appliance. | □… - select the heating function. | °C - set the temperature. | OK - press to confirm. | START - press to start cooking. |
| Get to know how to cook quickly | ||||
| Use the automatic programmes to prepare a dish quickly with the default settings: | ||||
| Assisted Cooking | Step 1 Step 2 Step | 3 Step 4 | ||
| Press: Press: . Press: Assist- | Press: Assist- | ted Cooking. | Choose the dish. | |
| Use quick functions to set the cooking time | |
| 10% Finish assist Use 10% Finish assist to add extra time when 10% of the cooking time is left. | To extend the cooking time press +1min. |
16. TAKE A SHORTCUT!
Here you can see all the useful shortcuts. You can also find them in the dedicated chapters in the user manual.
How to set: Heating functions

How to set: Assisted cooking

How to set: Cooking time

How to delay: Start and end of cooking
How to cancel: Set Timer
17. ENVIRONMENTAL CONCERNS
Recycle materials with the symbol .Put the packaging in relevant containers to recycle it. Help protect the environment and human health by recycling waste of electrical and electronic appliances. Do not dispose of appliances marked with the symbol 与 with the household waste. Return the product to your local recycling facility or contact your municipal office.
PENSAMOS EN USTED
11.3 Comoonian: Bombilla

ADVERTENCIA!
8.1 YcTaHOBka npHaJnEJxHocTei....242
1.1 Be3oNaChOcTb DeTei N IInC OrpaHnueHHbIMN BO3MOxHOCTaMn
-3TOT npi6op moKet nCNoIb3OBaTbcra DeTbMn cTapWe BOCbMn IET n IINzamN C OrpaHnueHHbIMN Qn3nueckmN, CEHCOPHbIMN IIN yMCTBeHHbIMN CnOCo6HOCTaMn N C HeIOCTaTOUHbIM ONbITOM IIN 3HaHHaMM TOJbKO pRn YCNOBn HAXOxJeHnRA NOI prncmOTpom IINca, OTBeuaIOseRo 3a INX 6e3ONaChOcTB, IIN IOcJIe NOlyeHnRA COOTBETCTByIOuNX INHCTpyKcN, PO3BOJIAOUsNX IM 6e3OpaCHO 3KcPnyaTnpOBaTB n3DeJIne IN DaIOUx IN M PpeIcTaBLeHnE o6 ONaChOCTn, CBa3aHHOJ C erO 3KcPnyaTaUne. JeTAM MnaDwe 8 Iet n IINzamCЯrko BbIPaJKeHHbIMN IN KOMPiEKCbIMN HApUSeHnA M N 3dOpOBbY 3aPpeUaTeCn HaxOOnTbcra Pardom C npi6Opom 6e3 NoCToAHHO rprncmOTpa.
-Дети должнынховпся по прсмOTpOM Дд He donnyшени ngc npnbopom.
XpaHnte BCE ynaKOBOHyIe MaTePnAJIbI BHe DoCraEMocTn DeTei n yTInn3npyIte Ix NaIeJaxuM o6pa30M.
BHIMAHHE! Pn6op n erO OTKpbItbIe 3JIeMeHbI CnIbHO HArpeBaHTcB BO BpemJ 3KcNpyaTcuN. He noDnyckaiTe DeTei N DoMaShHIX XINBOTbIX K np60py Bo BpeMЯ erO INCNoJIb3OBaHnA, a TaKKe KOrda Pn60p eIe He ycpeI OCTbITb.
- Ecπn npnbop ochauεhen yctpočTBOM 3auntbI deTei, ero cneodyet BKJIouHTb.
OuNTka I DoCTyHoe NOIb3OBaTeJIIO TexHnueCKoe 6cnyKbAHne np6opa He dOJIxHbIBBbINOJHrTbcra DeTbMn 6e3 npncMOtpa.
3MaHnPOBaHHbI npOTNBeHb
Для npriroTOBHeHЯ KOHdntepcknx n3deJnI neueHb.
Tny6okn 3MaHnpOBaHHbI npOTnBeHb dIra rpnna
8.1 YcTaHOBKa npHaJexKHOCTeI
Icnoj3ynte TOnbKO IoXOJyU NocuDy n MaTePnAJIb. Cm. rnaBy «Yka3aHnra n peKOMeHdaun》,pa3dEIN «IoXoJzAЯ dIЯ MInKpOBoJHOBOI o6pa6OTKn KxOHnAЯ nocya n MaTePnAJIb|.
He6oBbOu BbIcTyn HabePxy NOBbIaet 6e3oNaChocTb. BbIcTynbI TaKke cnyKaT 3aunToi OT onpOKnDbIBaHn. BbICOKn o6oDok no nepmEtpy peWeTk n Cnyknt dnn ppeDoTBpaueHn COCKaJIb3bIBaHn NocyDbI C peWeTkN.
ABTOMaTnueckoe BbIKIooHne He pa6oTaet co cNeyUOuMM yHKzmaM: OcBeueHne, OkOHuaHne, Hn3KOTempePaTyphoe npiroToBJIeHne.
9.4 BeHTnJIaTOp oxJaXdEHHa
Bo Bpemra pabotb npnbopa BeHTnJrTop aBTOMaTneckn BKJIouaetcra, YTO6bl OxJaXdaTb NOBepxHocTn npnbopa. Pn BbIKJIIOueHnn npnbopa BeHTnJrTop npoJoNkaeT pa60TaTb Do Tex nop, Noka npnbop He OCTbIHET.
10. NOJE3HbIE COBETbl
10.1 PeKoMeHdaaun no npnroToBJIeHHIO
①
PpUBeHeHbIe B Ta6nucax 3HaueHnra TempeaTypb I BpeMeH npiroTOBneHnaBnIOCTcOpneHTnoBOuHbIMN. OHI 3aBnCrt OT peCenTa, a TAKKe OT KaueCTBa N KOJIuYeCTBa NCNOJb3yEmbIX HrpeDIneHTOB.
Bau npnbop moxet OTnuaTbcx xapaKTePOM npiroTOBneHna BbineKn N xapko O T npdeIy- zero. B pekomehdaunx Hnke npboaTcrapekomehdyemble hactpoKn TemnepaTypbl, BpeMeH npiroTOBneHna I noLoXeHna npotNBHe dJa onpeDeJeHHbIX BINOB npOdykTOB.
EcnHauTn yctaHOKn dIy KOHKpeTHoro peeNTa He ydaetc, nonuTe noxokn peeent.
Bonee noopnbIe peKOMHdaunno npiroTOBHeHb Bb HauTe B Ta6nucax npiroTOBHeHn
PiunHa Hauem Be6caute. Iy Bb6opa KHNr peceTob npOBepbTe KoI n3denn Ha Ta6nue C
Texnueckm DaHHbIMn Ha nepeDne pamKe BHytpHHeKamepbl np6opa.
10.2 PeKoMeHdaци no nCnoJIb3OBAHHIO MnKpOBoJH
①ДаВаTe roTOBNTb!
BbINOxHte npOdyKtI Ha cTeKnraHHoe oCHOBaHne dJa MmKpOBoJHOBOo 6pa60TKn, yCTaHOBLeHHoe Ha dHe BHyTppeHHe KaMepbl.
BbINOxNte npOdyKtI Ha cTeKNyHHoe OCHOBaHne IJRA MmKpOBoJHOBOI o6pa6oTKn, yCTaHOBJIeHHoe Ha dHe BHyTppeHHe KamepbI.
IpeBopaunBaTe nIIN nepeMeunBaTe npOyKtBI NO nCTeueHn IIOBnHbIBpeMeHn npriTOBJIeHn IIN pa3MOpaxkUbaHn.
Bpemr oT BpemHn nomeunBaIe XnKne 6JIOda.
PepemeunBaTe nIu nepeI noaue K cToIy.
BoBpMa npuroToBneHnna pa3OrpeBa hakpbBaIte nIu.
Ipn HarpBe HannKOB dny yNyUweHn paCnpeDeneHn TeNla NOnOxNte B 6yTbIKy nIN CTaKaH NOxOJaUyIO dny MKNPOBOJHOBOI neu IoXKy.
IomeCTHTe npOdyKtBI B npu6op 6e3 ynaKOBKn. TOTOBbIE 6nOda MOxHO nOmeUaTb B npu6op BVyakOBKe TOIbKO ecnn ynaKOBka npuroHa dIra NcNoIb3ObaHnB pN6ope (CM. CBeDeHnHa ynaKOBke).

PnroTOBJeHne B MnkpoBOJHOBOI neu
HaKpbIbAaTe npOdyktb I B xOJe npriroTOBneHn. Ecn Tpe6yETc8 co3daTb KOpOky, roToBbTe, He HaKpbIbAa.
He neperpebaTe 6JIIOda, yCTaHaBJIbBa CnIshKOM BbICOKyIO MOUHOCTB N BpeM. PpOdykTbIMoYr NotepaTb BnaIg, cropeTb nIIN CTaTb npuHNOH noXapa.
He nCnoIb3yIte np6op dIJI npIroTOBneHnA R CCKOpIyNe I MOJIIOCKOB/yIHTOK, TAK KaK OHN MOrYT B3PbIBaTbcra. Npepe pa3oRpeBOM npOtkaTe JeNTKN B rUHNcE.
Ipepe npirotoBneHnem cdeNaTe B KOxNcE nIN Koxype npOdyKTOB HeCKoJbKO OTBepCTNI.
HapeaTe OBOUn Ha KycOuKn CXoHOro pa3Mepa.
Iocne BbIKIOueHn np6opaa BbIHbTe npOdyKtbi n OCTaBbTe Ha HeCKoJIbKO MmHyT dna paBHOMePHoro pacnpedeJeHn Tenna.

Pa3mopaxnBaHne B MnkpoBOnHOBOI neu
IonoXnTe 3amOpoxeHHbHepa3BepHytbI npOdyKT B He6oJbwo IpeBepHyTo TapeJIke B KOHTeHep,Ha NODHoc dJa pa3MopaxKBaHnN NIN B PAnCTNKOBoe CNTO, YTO6bl Obpa3yUozaCra np PA3MopaxKBAHN XnDKoCTb MOJa CBO6oDHO CTeKaTb.
I3BnekaaTe n3 np6opa pa3Mop03NBwnece npOdyKtbl.
Дя пiroTOBneHnO OBOUe n ΦpyKToB 6e3 npedBaPntbHOro pa3MopaxuBaHnMoXHO 3aTaB 6OJIe BblCOkyo MOsHOCt b MmKpOBJHOBOI o6pa6OTKn.
10.3 Kyxohna nocya n MaTePnaIbI, NOxOJaune nIe NcNoJIb3OBaHnB MmKpOBoJHOBOI neu
Дляnpи�OTOBнЯ C MнКрОВЛнамИ NCNoJIb3yIte TOJbKO NOxOДЯуTO NocUdY MaTePnAbl. BocNoJIb3yIteCb ДЯ спразКТаБЛицЕНХKe.
IpeepncnoB3OBAHnem KxohHOJ nocybl/MaTepeNaIOB CbepaTecb cnx CneuΦnKaun.
10.5 Ta6nucbl npiroTOBJIeHnaI TeCTnpyoUx opraHn3aun.
HΦopMaçnIЯ nCnblTaTeIbHbIX opraHn3aIy
IcnbitaHncaJNaCHOIEC60705.
Pn BO3MOXHOCTn He npOn3BOJnte npeBapNTbHbI pa3OrpeB np60pa nepeD npuroTOBJIeHNEM.
Bo Bpem npiroToBnEnH HeckoJbKnx 6JIIO3a pa3 CBOJTe nepepbIbI MeKdy BblneYKOJ/
Japko K MUNHMMy.
PnroTOBJIeHne C nCNoJIb3OBAHHem BeHTNJrTopa
IIO BO3MOXHOCTN BbIBpaIte yHKcIN npnroTOBHeHna, B KOTOpbIX NcNoJIb3yeTcBaHTNJrTop, UTo6bl c6epey 3JleKtpo3HeprnIO.
OctaToUHoe TenJIO
Ecn nporpamma c PpOdoJx. aKTHBnpoBaHa, a BpeM nprirotOBneHn npebblaaet 30 MnHyT, HarpeBaTeJIbHbIe 3JeMeHTbI aBTOMaTuYeCKN BBIKJIQUaOTcra paHbWe B HeKOTOpbIX yHKunx np6opa.
BeHTnIaTOp n lamna ocBeueHn npoOJIkaIoT pa6oTaB. Iocne BbIKIOUeHn npi6opa Ha dinCIIee oTo6paXaETcA OCTaTOUHoe TEnNo. 3To TEIno MoXHO NcNOJb3OBaTb dIpy NoDepKahn 6JIouB TEINOM COCTOAHN.
Ecnn dnttebnoctb npurotoBneHn npebbiwaet 30 mHyT, ymeNbTe TeMnpaTy np6opa do MNImaIbHO 3a 3-10 mHyT do OKOHuaHn npuroToBneHn. PpOdoJXITc npuroTOBneHne OCTaToCHoro TepNa BHyTp n np6opa.
IcnoJb3yIte octaToHoe tenNo IJpa pa3orpeBa pyrnx 6nIO.
CoxpaHHe NnB TeNlOM COCTOHN
Дя И споньзовая OCTаTOчHOrO TeПа ДЯ COхpaHЕнЯ ПИСиВ TЕПOM COCTОHIN Bыбраite МAKсIMмьHo Hn3Koe 3HAчЕнe Tempepatypы I COxpaHЯITE 6JIIO Do B TePNe. Ha DIncPnee 6Byet OTo6paXaTbCS INHdNkaCuaNЯ OCTaTOчHOrO TeПа ИЛ NTeKуSЯ Tempepatya.
PnroTOBJIeHne C BbIKJIIOueHHoJ lamnoi
BbIKIouHte IaMny Ha BpeMa npiroToBLeHn. BkIouaYTe ee ToIbKO npn Heo6XoIMocTn.
14. CTPYKTYPEA MEHIO
14.1 MeHIO
12. UCYHEHHIPIOBJEM 290
12.1 II B pa3i BuHnKHeHHn npo6Jem 290
12.2 RaK KepyBaTn: KoDi n nomnloK..... 291
12.3Данi 丢oToTexHiuHoro
obcnyroByBaHHra 291
13.EHEPFOEΦEKTBHICTb. 292
13.1 Ehepro36pekeHHra 292
14. CTPYKTPA MEHIO 292
14.1 MeHoo 292
14.2Пдменидя:Опц.. 293
14.3ПiДмeHIOДЯ:УctaHOBka...293
14.4ПiДмeHIOДЯ:CepBic.. 294
15. L'ELKOI 294
16. OBEPIb HAIJIeIeIcNcOcIb!.....296
17. OXOPOHA IOBkIIJIa 297
1. HΦOPMAUJI 3 TEXHIK N E3NEKN
Ipeed yctaHOIO Ta ekCnpyaTaCiEIO npilaNy cIiD yBaJHo npoHTATNIHCtpyKciIO KOpNCtYBaA. BInpo6HnK He Hece BiINOBiDaJIbHOCTI 3a TpaBMn abO 36NTKN Upe3 HEnpABnJIbHe BCTaHOBJIeHNr Abo BNkOpNCtAHNr.IHCtpyKciI 3 ekCnpyaTaCi CIId 36epirATN B 6e3neuHOMy i DoCTynHOMy Miczi 3 MeTOHO KOpNCtYBaHnR B MaIByTHbOMy.
1.1 Be3neka diTei i Bpa3JIbNx oci6
·ДiTиВiД 8 pOKiB Ta OcO6n 3 O6mExKeHIMN φi3nUHMN, ceHCOPHIMn a6o nCXiUHMN MOxJIINBOCTaMn qn HeIOCTaTHiM DoCBiIDom i 3HaHHaMn MOxTyb KOpNCtYBaTnCra
cIM npIaOM IiWe iD HargJdOM, a6o 3a yMOBn
PonepeHbOro OTPmHaHH iNCTpyKcii 3 6e3neuHoro
KOpNCtUBaHNr npIaOM Ta PO3yMiHHr NOB'3aHnx 3 cIM
pN3NKIB. DITn Do 8 pOKIB Ta OCO6n 3 BaxkoIO Ta
KOMnJIekCHOU HeIpaue3daTHicTIO MOxTyb Pepe6yBatn
Pi6IIN3y npIaNy IiWe 3a yMOBn, kIoo 3NaXoJaTbcra Ni
6e3nepePBHM cNoCTepexEHHaM.
CπiDkyIte 3a Tm, a6n DiTn He 6abNlncs3 npnaadom.
- TpmaTe yci naKyBaIbHi MaTepiAni noaJI BiD iTei Ta yTnI3yIte ix HaneJHm YInHom.
- ПОПЕДЖЕHHЯ! Рплад i为其о Вдкрпті поверхни HarpiBaIOTbCS nID quac BnKOpNCTaHня. He Донускай Te dITEЯ Ta дOMaшнIX TBapIN Do рпладу пID quac为其о BnKOpNCTaHня Ta OXOЛODжЕня.
-Якwo npnilad ochaueho 3acobamn 3axncty BiD doctny ditei,ix Heo6xidno aKTHByBaTn.
-Чишени abo obcnyrobybaHHЯ пиладу DiTbMn Do3BOJЯETbcra Лше пid HaIJaDOM.
1.2 3araJIbHa 6e3neKa
- LcEi npnlaI npn3NaueHO BnKJIuHNO IJy npnroTyBaHnI iXi.
- Zei npnilad npn3naueHni dIy BIKOPncTaHHB DOMaunix yMObax y npimiiuHHi.
- Léen πριπaɪd можнавикористовытп в офicax, roTeьнх Homepax, Haniv-roteяx, рримiшених дя Фермерського ТуризMy та iHux падих рримiшених, De 3actocybaHHЯ сьOTO ррладу He nepeBVnUye (cepeДи) pIBehnb no6yTOBOrO KOPINCTyBaHHra.
- YctaHOBJIIOBAtN uei npuaia 3amIHOBaTn Ka6eIb IOBHeH IINSe KBaJIiΦIKOBaHni φaxiBeCb.
He KopnctyItec npilaom,doKn noTo He 6yde BCTaHOBJIeHO y B6yIDOBaHy KOHCTpyKciIO. -
Перш, Нix ВиконыВати Onepaцii 3 ТхниHoro обслуroyвання, Вд'еднаite пилад Вд джерета ЖИВЛЕHЯ.
-
Y pa3i NOsKOJxHNe eJeKTPnHOro Ka6eIIO NoRo Ma€ 3aMInTu BnO6HnK, Ioro aBToPn3OBaHn CepBicHn ZeHTp abo iHsi aHaIorIyHo KBaJIiΦIKOBaHi ocO6n 3aIJa yHnKHeHHa YpaXeHHa eJeKTPnHm CTpyMOM.
-ПОПЕДЖЕHHЯ: ункуту уражени щелктунистсгом, пош понати мягтлamny, посянайпеся, по палд ВIMКоно. - NOPEДЖЕHHЯ: Пплад i为其о Вдкрnti nobepxhi HarpiBaHTbCS nID qac BnKOpncTaHnry. CnID 6yTu obepexHnMI, uO6 He TOpKaTnCS HaarpiBaJIbHnX eIemEHTiB abo nobepxHi BHyTpiiHbOi KaMepn prnilady.
3aBxdi KOpNCTyITeCk KyXOHnMn pyKaBnIaMn, KOJI BNTraTe Ta BCTaBnIeTe akcecyapn nn nocyd.
He BMnkaIte yHKciIO mIKPOXBnIbOBoI neu, KOJI npIJaI npOxHi. MetaneBi deTani BCEpeDnHi kAmePn MOxTyb CnpuHHTn yTBOpEHHa eJeKTpNHyOi dYrN. - MetaJIeBI KOHTeHepn IJy iJxI Ta HanoiB 3a6OpOHeHO BnKOpNCTOBYBaTn NiD Yac rOtYBaHHra B MIKPOXBnIbOBoi NeuI. Zra BmOra He Die B TOMy pa3i, JaKIo BnPo6HnK 3a3HaunB po3Mip i fOpMy MeTaJIeBHX KOHTeHepiB, Jki MoXHa BnKOpNCTOBYBaTn NiD Yac rOtYBaHHra B MIKPOXBnIbOBoi NeuI.
- ПОПЕДЖЕHHЯ! У рази пошковенья деверцгт abo ушьнювача деверцгт пиладом He можна Корисувашия, дOKи ИOrо He погдь KBаліфікован спецIANICT.
-ПОЕРДЖЕHHЯ! Лише Кваліфіковані спеціаіст може ВИКонувати 6удь-яke obсclуговывання aбо ремonthi onepaцii, уо передачаHTь 3нrayтя Кршк, яka 3axица\'e BID влNBBy mikpoxbnboBOoi eheprii. - ПОПЕДЖЕHHЯ! He harpiBaIte piDInH ta iHwi npOdyKTH y rePMeTnUHnx KOHTeINHepaX. BOH moJxTyb Bn6yXHyTN.
KopncTyIeTcA InIe Tm Nocydom, kN iXoDntb dJa MIKPOXBnIbOBnx neeu.
-Пд часногрьання поюктв у пл actикову спалерову контейнера на за щ рпладом у 3В'ЯЗКУ 3 можлNBICTU 3a rgрян.
- Пплад пиз nauseй дя награваньixi ta hanoiv. Cyшиня подуктivчн odя, a takoxн награваня рілok, Kaцiv, спонжiv, BOIOrnx raHupyOK toso може пи3Bectndo ТраВМ, 3aRopaHЯ abo noxeki.
- Y pa3i BnRABHeHNa IIMy BnMKHiTb npIaI i BnTgHiTb BnIKy 3 pO3eTKn, 5o6 nOracHTn nOlym'ra.
HarpiBaHHaNoB y MikpoXBnIbOBI neyi MoKe npNBecTu Do Bn6yXOBOro 3aknpanHna i3 3anI3HeHnM. ByTe obepexHi niD qac nobODJKeHHa 3 KOHTeHepom.
- Ymict пяшевok Та баночok i3 ДИТЯЧМ ХарчуВаHHЯн Heo6xIDNo 3бOBТаTN a60 поремiшати, a takox поревіптNiIoro Temпepaтуpy, nepш НIXдаваTNДNTINHi, abn yHnKHyTN onIKiB.
-Яцу y shkapanyi ta zi i KpyTo 3BapeHi pyHe MoxHa Harpibatn y npnaDi, ockijbKn BOHn MOxTyb BNoyXHyTn HabITb nicra 3aBepWeHHa MIKPOXBnIbOBOrO HarpiBaHHa.
- Κоби 3няти onopи полчok, сноаTkу NotягнiTь передну части hy onopи полчкn, a NOTIM II 3aДню части hy всторны вд бiчнх сTiHOK. Κоби Встановити onopи полчok, ВИКОнай Te HabeDEHy BИше пpoцeДуpy y 3ВОрOTий полдIDOBHOCti.
- Пплад сдд рergyларно очицувати та вдалNTи 3алшки iж.
- He BnKOpNcTObyIe napOoUuSyBaay dIa OUnIeHnI npIpaIy.
He BnKOpNCToBvIe IJIa OUnIeHnckJHOIO NOBepxHi DBePcT JopCTKI a6pa3NVBHI 3acO6N cN MeTaJIeBI Wkpe6Kn, OCKJIbKn Ie MoKe IprN3BeCTN Do NOrBn TpIuIN Ha cKJI, IIO MoKe CnpUHHITn pyHyBaHHra CKJa.
- HeidotpmaHHa YnCTOTn npJaMy MoKe PpN3BecTn Do noripseHn BnactnBOcTei NOBepxHi, 0 HeRaTnBHO
No3HaunTbcra Ha TepmiHcIyXbI npnlaNy Ta MoKe cnpruHHHTn He6e3neuHi cITyaucii.
2. IHCTPYKl3 TEXHIKN E3NEKN
2.1 BctaHOBJIeHHJ

NONEPEDXEHHRA
YcTaHOBNIOBaTn cei npnaI IOBnHeN IInse KBaJIicIKOBaHm faxIBEb.
- NobHicTIO 3HIMiTb ynaKOBky.
- He BCTAHOBNIouTe N He BnKOpNCTOByTe NOxKOJKeHn npNJa.
- DotpmytecHCTpyKz3i BCTaHOBHeHH, 0o nOCTaHaOTbcpa3OM i3 npnlaom.
- Bydte o6epejhi niç ac nepemieHn npuady, ockibkn Bih BaKkni. BnkopncToByTe 3axnchi pykabuyn Ta B3yTTa, 10 noctaaybcrB kOMnnekti.
- He TārHīt b āpūnlaɪd 3a pyuKy.
BCTaHOBnIOHe npnaI y 6e3neHOMy nIXoJIoMMy Micci, 0o BiINOBiJaE BImoram 3i BCTaHOBNeHHra. - DToPmUyTeCBAHOrIooMiHimaJIbHOi BiDCTaHI Do IUnx npnJaID YI npedMetIB.
- IpepeBCTaHOBHeHnM npuadny nepekoHaTeC8, 0o Noro DBePraTa BiKpBaHOb6e3 nepekoD.
- PpnilaOcHauSeHO eNEKtpnUHO CnCTeMOIO OxOnoJxHeHH. BIn nobHEn npaObaTn BiD JKepeJa KINBJIeHH.
B6ydoBaHn npnnaD noBHeN BiNbOiDaTu BmOram 0do cta6inbHocti DIN 68930.
| MiHimaiha Bincota shaΦn (MiHimaiha Bincota shaΦn πiδ pobochou nobepxheu) | 444 (460) MM |
| ШирINA shaΦn 560 MM | |
| Глбина shaΦn 550 (550) MM | |
| Висота пeredнbosочстени р�ладу 455 MM | |
| Висота заимьочauthени р�ладу 440 MM | |
| ШирINA пeredнbosочauthени р�ладу 595 MM | |
| ШирINA заимьочauthени р�ладу 559 MM | |
| Глбина р�ладу 567 MM | |
| Вбудована Глбина р�ладу 546 MM | |
| Глбина 3 Відкрптими дwerцятами 882 MM | |
| Mihimaihni po3mip BeHTnlaizHoro OTbOpy. OT-Bip po3TaIooBHO BHN3y 3aIhbOi CTOpOHN | 560x20 MM |
| Довжina Ka6eIIOЖИВLEHЯ. Ka6eIb po3MiuεTb-Ca в правOMу kTuTi 3aIhbOi CTOpOHN | 1500 MM |
| KpɪπiJIbNi rBnHTn 3.5x25 MM |
2.2ПiД'сdHaHЯdo eIeKTpOmepeksi

NONEPEDJXEHHRA
IChy p3nK 3aMmaHH Ta ypaXeHH eNeKtpnHm CTpyMOM.
- Yci po60tN 3 NiD'EdHaHHaNo eJNeKtpomepeXi MaOTb BnKOHyBaTncr KbaniΦiKOBaHm EneKtpNKOM.
- PpIpaI NOBInHeN 6yTu 3a3EmJeHIM.
-ПepekoHaItecB TOMy,цо napametprn Ha TabInuCi 3 TexHicHNMn daHIMN cyMiChi 3 eNeKtpnHmNnapaMeTpAmn eNeKtpOxNbIeHHra BiMpejXi.
3abXdn BnKOpncToByTe npaBnIbHO BCTaHOBnHy npOTnydApHy po3ETky. - He BnKopncToBvIe po3raJyKyBaUi, nepexiHnKi n noDobKByBaUi.
-Будъе obepexhi, abn He nookodnt wTeNCelbHy Bnky Ta Ka6enb.Якso Ka6eIb XnBneHnnoTpe6yec 3amHn, 3BepHiTbcrdo HaWOrO cepBicHoro ueHTpy.
-ПильнуITE,цб KaбьжИВпeнг He TopKaBcA abo He 6yB NaTO Ha6nIXeHn Do DBepaT npuady abo HiSi NiD npuAdom,oc6bNo BO KOn BIn npaOe abo DBePraTa rapaYi. - ElenemEn 3axncty BiD ypaXeHHa eIekTpHm Ctpymom Ta i3oJauia MaOTb 6ytN 3akpinHei TAK, abn ix He moxHa 6yNo 3HrTn 6e3 cneuaJIbHorO IHCTpyMeHTa.
BCTABJnTe wTencelbHy Bnky B po3eKy eNEKtpoxNBHeHnA nIwe nicna 3akInueHHn yctaHOKn. IpekoHaIteCra, 0o nicna yCTaHOKn E BiNbHn DoCTyn Do po3eTKn eNEKTPoXKNBHeHHn.
He BCTabIyTe BNILky B po3eTKy, rka HeHaDiiHo 3aKpInJpeHa.
He TareHitb 3a Ka6eIb KINBLeHHra, 0o6 BiKIOuHTn npnaad 3 MepeXi. 3aBXdN BmMkaTe, BNTraOOn uTencelbHy BNkY.
BukopucToByTe Inue HaneJhi 3oIIOUoi npncTpoi, a came: NiHHi po3'edHyBaui, 3anobixHHKn (rBnHTOBI 3anobixHHKn CnID BnKpyTNTn 3 naTPOHa), pene 3axNCTy BiD 3AMKaHHa Ha 3eMJIHO Ta KOHTaKTOpN. - EneKtpo06laHaHnHaMa 6byT OChaueHMM i3OIOUOUM npncTpOeM dIy NOBHO BIDKnHueHHBaI eNeKtpomepeXi. 3aOp mix KOHTaAMN i3OIOUOro npncTpOu Ma cTAHOBTn He MeHwe 3 MM.
- Léen npinada ochauneo eineKtpnHm Kaebem i3 BnIkoHO.
2.3 KopncTyBaHHa

PONEPEDEXEHHRA
IcHye He6e3neKa TpaBMyBaHHra, onikIB, ypaXeHHra eJeKTpUHm CtpymOM i Bn6yxy.
- He 3mHIOIe TexHiCyIcneuΦikauii IbOro npnlaNy.
- IpekehainTecB TOMy, 10 BEHTnIaHHi OTbOpn He 3a6loKoBaHO.
-Пдчасpo6otn npnaJy He 3aIIuMaIte Ioro 6e3 Hargny.
Bumkaite npnaicnKoKHO BkOpncTAHH.
- Bydbte o6epeXhi, BiDnHryuOy DBepcraTa npJlady niD yac noRo po6oTn. MoKnbe BnBilbHeHHraPruO rOBiTp#.
- He npaioTe 3 npiaom, kso Bawi pykn Mokpi a6o kso Bih KOHTaKTy e 3 BOHO.
He hatnckaIte Ha BiDUnHei DBePcraTa.
- He BnKOpncToBvTe npuJa k pOboCy nobepxHIO a6o k nobepxHIO dJIy 36epiraHHpeeu.
- ObepexHo BiDyHnIe DBePcTa npJlady. BkOpncTAnHn iHrpeiEHTi 3i cnpToM moKe npn3BecTu Do yTBOpEHn CymiSi cnNpTy n Nobitpr.
BIDHnHIOUy DBePcTa, NIIbHyIe, 06n npa i3 npicPoem He 6yno dKepey TBOpHH icKop Ta BiDkPntoro BOrHIO.
- He klaɪdɪt b ycepeɪnHy npɪnlaɪy, nopər i3 Hɪm abo Ha hɒrO Ieɪk03aɪMncti peʊOBɪnɪ qɪnpɛdmetn, 3moʊeHi B Ieɪk03aɪMnctnx peʊOBɪnʌx.
He BnKOpncToBvIe yHKciIO mikpoxBnIbOBoI nei dny nonepedhboOr nporpiBaHna npuady.

NONEPEDJXEHHRA
IcHye p3nk nozkOJKeHH npnlaNy.
- 3aoobirn nookjkeHHo a6o 3he6apBJeHHIO emani, dOpymyTeaKnx pekomehdaui:
-He KnaIb aIOMHcBy fObnby 6e3nocepEnbO Ha dHo KaMepn npuJaY;
- He cTaBTe nocyd i3 BoDoIo 6e3nOcepeHbO B po3irpiTni npJna;
- He 3aannuaiTe B npuiaji CtpaBn i npOdykTu 3 BucOKM BMICTOM BOJOrn nicjra 3abepweHH npiroTyBaHHi;
-6yDbTe o6epeKHi, BnMaIOuN a6o BcTaHOBIOUOuN akcecyapn.
3ne6apBneHnemani a6o HepXaBIOOcTani He BnINBaE Ha eΦeKTHBHCb po60tn npnady.
BukopncToByTe rIn6oke DeKe InBunikaHr TopTb i3 BeJIHKIM BmicTom BOJOrn. Cik, 0u BnDIneTbcra i3 pkykTB, MoKe 3aIIuWATn CTiKi PnA Mn.
3aBxDn roTyTe i3 3aunHeHmN DBePcTaMn npnnaNy.
-Якшо пилад розміцени no3аду мблевоі панелi (hanpknla, DBepzt), nepekoнaitecя, zuDBepztata BiDkpnto nid yac poBOTn npinady. Kap i BOIora MOKytb yTBOPUBaTncia no3ady zakpntoi Me6neBoi naheJI, cnpuHryuO nuJaIbwe noWKOJKeHHa npinady, Kopnycy abo nIDnOrn. He zakpBaIte Me6neBy naHeNb, doKN npinad nobHicTuo He oxolone nicna BVKOpuctanHra.
2.4 Dorigla i uuueHna

NONEPEDKEHHRA!
IcHye p3nK OTpMaHHaTpaBm, noXeXi a6o noXkoJKeHHa npnaNy.
- Ipeed noatakom pemonty npnaad tpe6a BiD'EDHaTn BiD eJeKtpomepexi, 3HBAH 3anobixHK a6o BNTaRHyBwN uHyp KINBHeHHa 3 po3eTKn.
-Даитпиаду oxonoHyTN. Ichye ринк toro, со ckляни панeелю можутб TrichyTN. - Y pa3i noшкоженя скларны панелей дерцгт сдд орразу заимпту панeti. 3berhiьсдdo abTOpn3ObaHOro cepBICHORO ueHTpy.
- Bynbte o6epekhi, 3Himaoun DbepuTa 3 npunaIy. DbepuTa Baxki!
- O6OB'3KOBO BnTpItb KaMepy I DBepa Ta Hacyxo nicna KOKHORO BnKOpncTahnn. Napa, yTBOPUBaHa Ni d Yac po6OTn npnlaNy, KOHdEHCyETbcra Ha cTIHKax KaMepn, 1o MoKe npn3BecTN Do KOp03ii.
-
Perynayrho ouuuyte npna, 06 3ao6irtn nookdoxehno matepiany nobepxhi.
-
3aunukn iki ta knp, 3naopraTbca y npunaDi, moKyTB npn3BecTu DO BUNKHeHH naKei neektpnuHoi dyu n iD uac yBIMKHeHOI cyHKci MikpoxBnJBOOi neyi.
- PpOtpiB npnnaB ONoRoIO M'koIO raHupKOIO. 3actocobyTe Jnue HeNtpaIbHI MNouhi 3ac06n. He BnKOpncTOByte a6pa3NBHi 3aco6n, KOpCTKi cepBeTKn dIra OUnIeHHN, po3uHHNKn a6o MeTaeBi npedmetn.
- RaKIO Bn KOpNCTyeTecra aepo30JMaM NJIa YUeHHA DyXOBHX waΦ, O6OB'3KOBO DTpIMyTEcra IHCTpyKu i3 6e3neKn, HabeJeHx Ha ynaKOBui.
2.5 BnKOpncTaHnckJnHO nocydy
HeobepexKHe NOBOKeHHa 3i cKJIHN MOCyOM MOKe npN3BeCTn Do Ioro N0sKOJKeHHa, NOBn BiKoJIb, TpiuH a6o rIboknx noDpnnH.
HeOnyckaIte npOINBaHHXoJIOHOI BOi YHINHa CKJIHN NOCyd, OCKIbKn paTobN Iepenad Tempepatyp MOKe pIn3BecTN Do MMTeBOrO pyHyBaHHcKJa. YlanKMn cKa MoKyTb 6Ty HAD3BnuAHIo TocTpMn, KpIM TORO IX BaxKO 3HaHTN.
He po3miuye cKnaHn noSyd Ha MOKpi a6o npoxoOnHi nobepxHi, 6e3nocepEnbOHa ctIbHnCi nn MetaJIeBn nobepxHi a6o B paKOBnHi. He nepemiuTe rapAun CkJHn nocyd, TpmaUOn Ioro MOKPOU raHupkoHO.
He BnKOpNCTOByIe I He HamaraTecra BiDpemOHTyBaTH cKnHm Nocyd, 0Ma BIKoJI, TpiuHN a6o cnIbHi nOdpaHH.
He KndaTe cKnaHn nocyd i He 6nTe Ioro o6 TbePdi npedmetn. He 6nTe Ioro cToJOBm npuaIaIam.
He harpibaTe npoxhni a6o MaJxpe npoxhni cKJHn Nocyd y mikpoxBnboBni nei Ta He neperpibaTe onIO a6o MacNo B mikpoxBnboBni neci (HamaraTeCn pnproTyBaTu iKy B MAkCmMaJIbHO KOpOTKn Yac).
DaIte rapryomy cKJHOMy nocdy oxoohutyHa CTiui dJe OXoJOnOJxehn, KxOHHi pykabuCi a6o Ha cyxih raHupci. Ipeed MHTTm, OxoJOnOJxehnAm a6o 3amOpoxyBaHHaM nocdy nepekoHaTeecB TOMy, 0o BiH DoCTaTHbO OxOJOnHyB.
Ipeep nepemieHnraquro cKnaHoro nocdy (BKnIOaOuN nocyd i3 cnJIIOHOBNM BCTaBkAm) oJraTe cyxI KxOHHi pyKaBnUKN.
He donyckaite He npabnIbHoro BkOpncTaanMikpOxBnIbOBoi nevi (To6To 3anyck nevi 6e3 HabaHTaKeHH a6o 3 HeBeJIHKIM HabaHTaKeHHaM).
2.6 BnTypiHn iicBitka

PONEPEDJXEHHRA
He6e3neKa BpaKeHH eNeKtpnHm CtpymOM.
- CTOCOBHO IaMn BCEpeHNI cIbOro BInpO6y Ta 3anachnx lamn, 10 npOdaHTbcra OkpEmo: Li IaMnn npu3HaueHi dIy BnKOpNCtAHN y NObYTOBx npuJaax 3 ekCTpeMaJIbHMn i3H uH m yMOBaMn, TAKIMN k TemnepaTypa, Bi6paiz, BONorictb, a6o npu3HaueHi dIy HadaHHI INfopMaui IIpo CTah pO6OTn npuJaNy. BOHn He npu3HaueHi dIy BnKOpNCtAHN 3 IHWOIO MeTOIO Ta He npuaTHi dJIr OCBITNeHH nO6yTOBx npmIeHb.
- Y cIbOMy Bnpo6i e IxkepeNo cbITJa KJacy eHeproepeKTHBHOCTi G.
BukopncToByTe JINIe NaMNoUcK 3 TaKIMN K TexHiUHmXapaKTepNCtIKaMn.
2.7 CepBic
IinCnJIe i3 BCTaHOBJIeHIMM OCHOBHIMN yHKuIaMI.
A. Yacdo6n
B. NOYATOK/3YUNHKA
C. TemnepaType / TaImep yHKciMikpoXBnB
D. ΦyHKiHarpiby
E. Taɪmep
Ihdkatopn dncnne
Ba30bi iHdkaTopn - nra Habiraui Ha dncnnei.
OK
ПиТВерджени Вибору/Hana-штуваимя.

IpepexiHa OoINH pIBeHb Ha3aD y MeHIO.

CkacybaHHOCTaHHbOI dii.

BumKHeHH Ta BBIMKHeHH onui.
3BykoBn CnHan iHnKaTOpn FyHKui — nicra 3aKiHcHHeB BCTaHOBJeHOrO yacy roTyBaHHa NyHaC CnHaJ.

ΦyHKJIIO BBIMKHeHO.

STOP

ФункцIO BBIMKHeHO.
ГOTуВаHHЯ ппИнHЯсься abToMAtNCHO.
3ByKOBn CnRHaB BmKHeHO.
IIndkaTopn TaMepa

Uo6 yctahOBHTI cyHKciIO: BiKlaedeHn 3anyck.

CkacyBaHHHaJaWtYBaHH.
8.1 BcTaHOBJIeHHaKceCyapiB
BnKopncToByte nIwe BiIDNoBIDHn Nocyd i MaTepiAn. DnB. po3diN «Nocyd i MaTepiAn, 1o NiJxOJaTb dIra MIKPOXBnIb» rnaBn «IopaI Na peKOMeHdaJIi|.
HeBEnka 3aRn6bHa Bropi nokpaUc 6e3neKy. Kpim Toro, 3arN6Hn 3anO6iraTb nepeKnDaHHIO. BncOKn obIDOK HABKpyr nONuKn He dae nocydy 3icKOB3HyTN 3 NOINuKN.
9.3 ABTomatnue He BmNKaHHa
3 mipkybaHb 6e3neKn nepeD6aueHo, 0o dYXOBa 7aΦa BmNkAcTbc8Yepe3 DeKn Yac y pa3i, kIoo cyHKzI HarpiBy aKTtBOBaHa, aIe HanaSTyBaHHr He 3MiHIOITbcra.
| (°C) (roД.) | 1. |
| 30 - 115 12.5 | |
| 120 - 195 8.5 | |
| 200 - 230 5.5 |
ABTOMaTnHe BmNkaHnHe CnpaObYe npn HacTyNHx pexImax:PiicBtKa,TaMep 3akInHcHn, NobilbHe roTyBaHH.
9.4 BeHTnJIaTOp OxOJIoJXeHHe
i DaaBaiTe roTyBaTu!
Poklaɪt b ṅxy Ha cksny Tapinky dən MikpoxbNbBoOi neu Ha dhi KaMepn.
PoknaTb kky Ha tapinky Ha dHi KaMepn.
IpeBepHitb abo nepemiiawte ctpaby nicna 3aBepweHHn noOBHH nuCy po3MopoxyBaHHn roTyBaHH.
PomiuyIte piDHHuac BiD yacy.
Pomiiatae ctpaBy nepeid nodaueo.
HakpinaTe ctpaby nID yac npiroTyBaHHn po3irpiBaHHn.
IocTaBTe loxky y nlaHky a6o cKnHky npn niirpibaHHi HanoiB dIra 3a6e3neueHHKpaUoro po3noidy tenna.
Ioknaditb npodyktn B npunad 6e3 ynaKOBKn. Facobahi roTObi cTpaBN MOxHa cTaBnT B npunad, nIiue kio ixHry ynaKOBka nIXoNDtB dner BnKOpNCaHHy y MIKPOXBnBoBni neci (nepeBipte iHopMaucio Ha ynaKOBci).
ToTyBaHHa 3 BnKOpNCTaHHaM MiKpOxBnJIb
Tpynte ctpaBn nD KpUkoIO. JaKIO Bn XoOte 36epertn ckOpHky, roTyIte ctpaby 6e3 KpUKN.
He neperpiBaIte cTpaBn, BCTaHOBbUH 3aHaJTo BnCOky notyKHiCt b i lac. Ika MoKe MiczMn nepecoxHyTu, NiIropiTu a6o 3aropitncra.
He BnKOpncToBnyTe npnlaD nI pynroTyBaHHraeCb y ukapanyni a6o paBnKIB y MyuJnx, ockIbKn icHyc 3arpo3a ix po3pnuBaHH. PpOKoJItB KOBTOK reChi nepei ii niirpiBaHHm.
Nepsh hix roTybaTn npOdykTn 3i uKipkoH, cnid kInbka pa3IB npOKoJIoTn ix.
Oboui cnid Hapi3aTu Ha oDHaKoBi 3a po3Mipom LMaTkn.
Pnicra BmKHeHn npnaNy BnMiTb ctpaBy Ta daIte IIN NOCTOHTN DeKiNbKa XBUNH, 0o6 TeNPO3noiInIOsc pIBHomipHo.
Po3MopoOxyBaHHa 3 BnKOpNCTaHHaM MikpoXBnJIb
IoknadiTb 3amopoxeHy ctpaby 6e3 ynaKOBKn Ha MaIeHbky nepeBepHyTu TapiIky, po3MiueHy HAD KOHTeHepom, a6o Ha niDCTaBky dIy po3MOpoxeHHy uN INaCTIKOBe CnTO, 0o6 pIDnHa, 1o YTBOPIOEbCpN pO3MOpoxyBaHHi, MOrJa CTikatN.
Notim BnIMiTb po3MopOKeHi 1MaToUKN.
10.4 PekomeHdoBahi HanaStTyBaHHn NotyxHocTi IJI pI3Hnx BnDIB CTpaB
IaHI B Ta6JnCi e opiEHTOBHmM.
KoJI MoxJnBO, He po3irpiBaIte npnilaI nepeI roTyBaHnM.
KuO BV nociIOBHO roTyTe KJIbKa CtpaB, 3BeiITb nepepBN mix HmN do MiHIMyMy.
TotyBaHH 3 BnKOpNCtAHHm BeHTnJIrToPa
KoJI MoxKnBO, BnKOpNCToBvIe 9yHKciI roTyBaHn3 BeHTUNrTOPOM dIra 36epexeHHa eJIekTpoEHeprii.
3aIIuKOBe TeNo
Kpo nporpamy 3 TpuBaictb akTUBoBaHO Ta yac roTyBaHHnepeBnUye 30 XBUNH, y deKaX cyHKciX npuady harpiBaIbHi eJeMeHTn ABTomaTHNO BUMNKAOTbcpaHiwe.
BentnIaTOp I naMna npoobkyotb npaObaTu. Pnp BmKHeHHi npuNaDy dinCpNei noka3ye 3aIIuKOBe TepNo. 3aIIuKOBe TepNo MOxHa BnKOpNCTOByBaTu dIra NiTpMaHHc TpaBN TePNOJ.
KIO TpBAnicb roTyBaHnnepeBnue 30 XbnH, onyctitb TemnepaTpy npnady do Minimmy 3a 3-10 XbnH Do 3aBepWeHHraTyBaHH. OtaHHi eTannr roTyBaHHc TpaBN ByuTB BnKOHaHI 3a paxyHOK 3aJIINkoBOrO TeNna.
BnKOpncToByTe 3aIIuKObe TeNNo dIy po3irpiBaHH IUnx cTpaB.
IiTpmyBaHHcTpaBn Tenoio
Bn6epitb haHnKy TemnepaTyp 3 MoKInBux, o6 BnKOpncTaTn 3aNtKOBe TenIIO dIg 36epexeHH yixi TeNoIO. Ha dinPnei 3'YBnEcbr iHnKaTOp 3aNtKOBoro Tenn a6o TemnepaTypn.
ToryBaHH3 BUMKHeHOJ NaMNOIO
BmKHiTb Iamny nIac roTybaHH. BMnKaIte II IInse 3a notpe6n.
14. CTPYKTYPEA MEHIO
14.1 MeHIO
HanaTyBaHHa: Donomora npn roTyBaHHi

HanauTyBaHHa: TpBbIcIb npnroTyBaHHa

KbDknaCTn:NoaTOK Ta 3aBepweHHr roTybaHHr
KcacyBaTn:BcTaHOBJIeHn TaMep
17. OXOPOHA IOBkIIJIЯ
3dabaiTe Ha nobtopHy nepepo6ky MaTeiA, no3HaueHi BiDnOBiDnHm CnMBOJOM BnKnJaTe ynaKOBky y BiNobiHi KOHeiHepn IJIa BTOpHHOc HcPOBHN. DOnomoxitb 3axnCTHTn HABKOINHc cepeOBuIe Ta 3OpOB'Y INHX JIOJe i 3a6e3neHTn BTOpHHy nepepo6ky eEeKtpuHnx i eEeKTPoHnx npuaIb. He BnKnJaTe npuaIaI, no3NaueHi BiNobiDnHm CnMBONOM pa30m 3 IHsIM DomauHim cMIITAM. NobepHtB npodyKT do 3aBOdy i3 BTOpHHOi nepepo6kny BaWi MicceBOcTi a6o 3BepHITbcrdo MlCueBX MyHicnIaNbHex oprAHIB BlnaI.