
18255L18 - Fitness Equipment CRIVIT - Free user manual and instructions
Find the device manual for free 18255L18 CRIVIT in PDF.
| Product type | Kettlebell (bell-shaped dumbbell) |
| Brand | Crivit |
| Model | 18255L18 |
| Weight | 10 kg |
| Material | Steel with rubber or vinyl coating |
| Usage | Muscle and strength training at home |
| Number of users | 1 |
| Recommended surface | Flat and horizontal floor, safety distance of at least 1.5 m around |
| Safety | Medical consultation before any training program; do not use by children; stop exercise if pain or discomfort |
| Maintenance and cleaning | Clean with warm water, dry with a cloth; do not use abrasive detergents |
| Storage | Store in a dry and clean, temperate room |
| Warranty | 3 years from date of purchase |
| After-sales service | Contact Lidl customer service (www.lidl-service.com) |
| Included accessories | User manual |
Frequently Asked Questions - 18255L18 CRIVIT
User questions about 18255L18 CRIVIT
0 question about this device. Answer the ones you know or ask your own.
Ask a new question about this device
Download the instructions for your Fitness Equipment in PDF format for free! Find your manual 18255L18 - CRIVIT and take your electronic device back in hand. On this page are published all the documents necessary for the use of your device. 18255L18 by CRIVIT.
USER MANUAL 18255L18 CRIVIT
7 (GB) Instruction manual 8
8 Important safety information 8
9 Training notes 8
9.1 General Training Notes 8
9.2 Exercise notes 9
9.3 Exercises 9
10 Maintenance & care 9
II Warranty 9
12 Service 10
TABLE DES MATIERESABLE DES MATIERES
Das TrainingDas Training
Name: ISM Service Center
E-Mail: SERVICE@LA-SPORTS.DE
7 (CBB)(GB)RUCION MANUALNSTRUCTION MANUAL
ability of the joints is increased - reducing the risk of injury.
Congratulations!
With your purchase you have decided on a high-quality product. Get to know the product before you start to use it. Carefully read the following assembly instructions. Use the product only as described and only for the given areas of application. Keep these instructions safe. When passing the product on to a third party, always make sure that the documentation is included
Your blood pressure, your cholesterol, your blood sugar, your motivation and even your mood can be greatly improved by a little sport. You can change your character in moderation. In conjunction with proper diet will reduce your body fat and improve your silhouette.
9.1 General Training Notes
Each exercise should consist of the following three parts:

8 | IMPORTANT SAFETY INFORMASTRONSAHEMINFO
a) Please read this manual and retain it!
b) Read and follow the instruction manual and any other information before assembling and using the appliance. A safe use of the device can be achieved only if it was properly assembled and used properly. It is your responsibility that all users of the device are aware of the warnings.
c) Always seek your GP to detect possible health risks and prevent before beginning any exercise program. Notice your body signals. Incorrect or excessive exercise can damage your health. If you ever feel during exercise pain, tightness in the chest, irregular heartbeat, extreme shortness of breath, dizziness or lightheadedness, stop exercising immediately and consult your physician.
d) Keep children and pets away from the equipment. This device is intended for use by adults.
e) Use the set on a stable, flat, horizontal surface with a protective covering for the floor or carpet. The safety distance around should be at least 1.5 m. Compensate for uneven floors.
f) Check and make sure before each time of use that all screws and nuts are properly tightened. The reliability can be maintained only if it is checked regularly.
g) The device is particularly suitable for training the upper body and arm muscles, and improves overall endurance and fat burning.
9 T TRAINING NOTES
With your interest in strength training you have taken an important step towards mobility and health - because strength training strengthens the muscles. Strength training not only prevents the loss of muscle mass and strength, but improves on this even. The mo
- Warm Up
- Cardio or weight exercise
- Cool Down & stretching
Warm Up
This stage helps get the blood flowing around the body and the muscles working properly. It will also reduce the risk of cramp and muscle injury. It is advisable to do a few stretching exercises. Each stretch should be held for approximately 30 seconds, do not force or jerk your muscles into a stretch - if it hurts, STOP.
The Training
The start of endurance (often also called cardiovascular or cardio training because of the positive effects on the cardiovascular system) or a force or muscle training is the first step in the fight against civilization infectious diseases and physical symptoms, especially with advancing age.
Cool Down
Just as a warm-up should be performed before each training session, a cool-down should take place after a unit. A Cool Down starts the relaxation phase; the operating temperature of the body will come back down and shows the transition of stress relaxation.
The cool-down should last at least 10 minutes (as the Warm Up) and is controlled slowly dropping down to the lowest level. The pulse rate should drop as low as possible.
Stretching
As already mentioned, you can stretch before/during the warm-up your muscles easily. After the training you should definitely stretch your muscles. A stretching afterwards returns the muscle to its original length, thus preventing muscle shortening. The more strenuous the training has been, the more important is the stretching afterwards.
Particularly important is the stretching for the exercised muscle groups. Stretching should be noticeable for the muscle addressed, but it should never hurt. Stretching should take 20 to 30 seconds per muscle.
9.29ExeiseExesnes
Start your training with about 7 - 8 reps per exercise set. Increase the number of repetitions according to your individual preferences slowly to 11 - 12 reps per set. If you notice that your muscles are tired, reduce the scope of your training. Ideally train 3 - 4 times a week. However, be sure that between individual exercises one day of rest is inserted so that the muscles and the body are able to recover sufficiently.
Also, perform all exercises with a stable body centre. The spine (particularly the lumbar spine) must be kept straight, so that the individual vertebrae are held in the biomechanically correct position, e.g. to protect the disc against faulty loads.
Do not train with momentum and / or jerkily. Perform all exercises in a smooth and controlled manner. Note that in case of improper or excessive training negative effects on your health are possible.
9.39Exercises Exercises
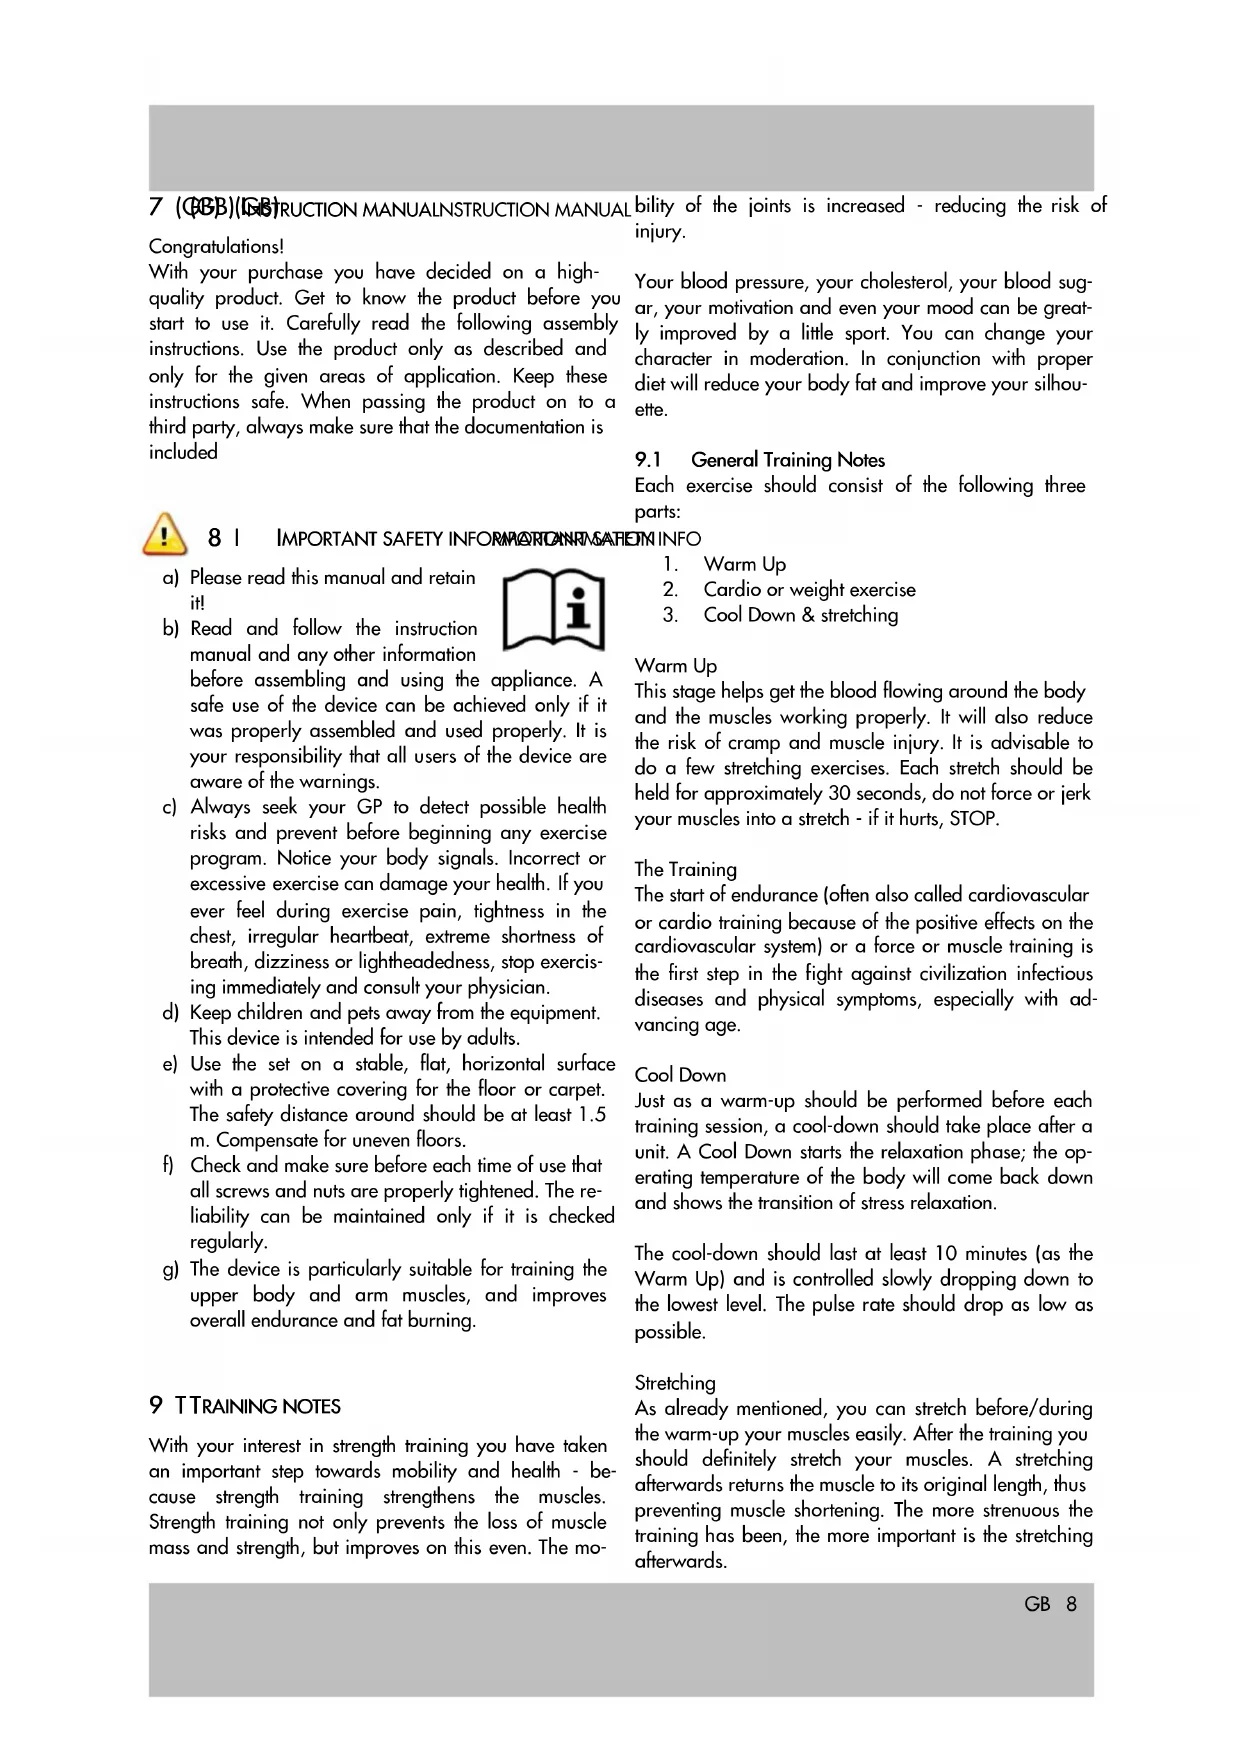
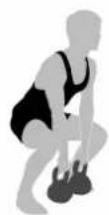
(A) "Lunge"(A) "Lunge"
Go into a crouch. Keep the weight on the side of the back leg. Press now out of the slight lunge upward and move the arm with the dumbbell over the shoulder and the head (see sketch). Then return to the starting position.
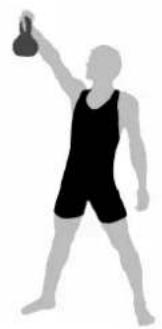
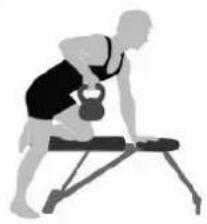
(B)Rowing(B)Rowing
Place one knee and the hand on the same side on a chair or bench. Keep the free arm with the dumbbell next to the body. Bend your arm and lift the elbow. Hold this position for 1-2 seconds and then return to the starting position.
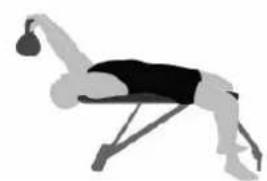
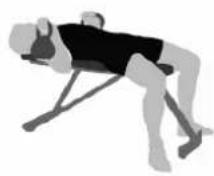
(C) Triceps 1
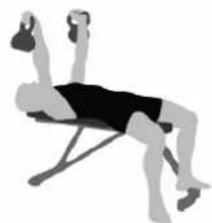
Lie down with your back on a bench. Take the dumbbell in both hands. Raise the dumbbell with flexed elbows above and over your head (see illustration). Bend your elbows. Raise the dumbbell up and stretch the arms. Hold this position for 1-2 seconds and then return to the starting position.
(D) Triceps 2
Stand upright with your feet shoulder width apart. Take the dumbbell in both hands. Raise the dumbbell with flexed elbows over your head (see illustration). Lower
your arms downward behind your shoulders. Lift the dumbbell now up over your head and stretch your arms. Hold this position for 1-2 seconds and then return to the starting position.
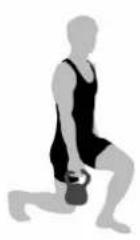
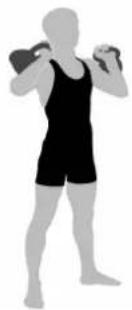
(E) Biceps
Stand upright with your feet shoulder width apart. Hold the arm with the dumbbell next to the body. Slowly bend your arms up to shoulder height. The upper arm and the elbow remain stable next to the body. Hold this position for 1-2 seconds and then return to the starting position.
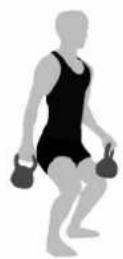
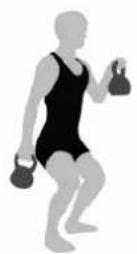
(F) Arm & Squat
Stand upright with your feet shoulder width apart. Go into a crouch. Keep your arms with the dumbbell between your legs. Now stretch your legs, straighten up and bend your arms up to shoulder height. Hold this position for 1-2 seconds and then return to the starting position.
(G) Chest press (with 2 dumbbells)
Lie on your back on a bench. Hold your arms out with the dumbbells close to the body about shoulder level. Move your arms up and together over the chest. Make sure that you firmly grasp the dumbbells so they do not fall. Then return to the starting position.
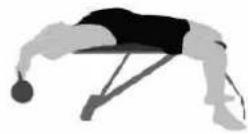
(H) Pushups (with 2 dumbbells)
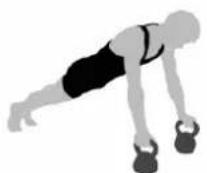
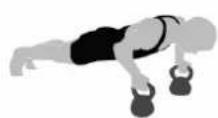
Support yourself on the floor and with each hand on a dumbbell. Lower the upper body (push-ups). Make sure that you firmly grasp the dumbbells and do not slip. Hold this position for 1-2 seconds and then return to the starting position.
10 MAINTENANCE & CARE
Never use abrasive or caustic cleaning agents. The product will otherwise be damaged. Only clean the product with lukewarm water and dry well with a cloth. Always store the product dry and clean, in a temperate room.
11 WARRANTY
The product was produced with great care and under constant supervision. You receive a three-year warranty for this product from the date of purchase. Please retain your receipt. The warranty applies only to material and workmanship and does not apply to misuse or improper handling. Your statutory rights, especially the warranty rights, are not affected by this warranty.
With regard to complaints, please contact the following service hotline or contact us by e-mail. Our service employees will advise as to the subsequent procedure as quickly as possible. We will be personally available to discuss the situation with you.
Any repairs under the warranty, statutory guarantees or through goodwill do not extend the warranty period. This also applies to replaced and repaired parts. Repairs after the warranty are subject to a charge.
12 SERVICESERVICE
Name: ISM Service Center
E-Mail: SERVICE@LA-SPORTS.DE
Tel: ++800 52776787 (free of charge)
Corporate Address:
I.S.M. GmbH, Rathenaustr. 4, D-51427 Berg. Gladbach, Germany
13 (FR/BE)(FRABEL D'ARTIESADITIONUTILISATION
15 INSTRUCTIONS D'ENTRAJEMENT
Chere cliente, cher client,
Nom: ISM Service Center
E-Mail: SERVICE@LA-SPORTS.DE
Telephone: ++800 52776787 (gravitation)
Siège: I.S.M. GmbH, Rathenaustr. 4,
D-51427 Berg. Gladbach, Deutschland
Name: ISM Service Center
E-Mail: SERVICE@LA-SPORTS.DE
Tel: ++800 52776787 (free of charge)
Corporate Address:
I.S.M. GmbH, Rathenaustr. 4,
D-51427 Berg. Gladbach, Germany
24 (CZ) INSTRUKCE
Name: ISM Service Center
E-Mail: service@la-sports.de
Tel: ^ + + 800 52776787 (free of charge)
Corporate Address:
I.S.M. GmbH, Rathenaustr. 4,
D-51427 Berg. Gladbach, Germany
29 (ES)(ESTRUCCIONES DE USONSTRUCCIONES DE USO 31 INSTRUCCIONES DE ENTRENAMIENTO
Name: ISM Service Center
E-Mail: service@la-sports.de
Tel: ++800 52776787 (free of charge)
Corporate Address:
I.S.M. GmbH, Rathenaustr. 4,
D-51427 Berg. Gladbach, Germany
34 (PT)MANUAL DE INSTRUÇÉSANUAL DE INSTRUÇÉS 36 INDICAÇÉS DE TREINO
Name: ISM Service Center
E-Mail: service@la-sports.de
Tel: ++800 52776787 (free of charge)
Corporate Address:
I.S.M. GmbH, Rathenaustr. 4,
D-51427 Berg. Gladbach, Germany
(A)
(B)
(1)
②
①
②
(C) (D)
①
②
①


②
(E) (F)
①
②
①
②
(G) (H)
①
②
①
②
I.S.M. Import Service Management GmbH. I.S.M. Import Service Management GmbH
Rathenaustrasse 4
D-51427 Bergisch Gladbach
Germany
Model 18255L-18
Stand der Informationen - Version of the information - Version des informations
Stan informaci - Informaciok allasa - Stanje informacij - Stav informaci - Stav informaci
Stand van de informatie - Estado de las informaciones


- TABLE DES MATIERESABLE DES MATIERES
- Das TrainingDas Training
- General Training Notes
- | IMPORTANT SAFETY INFORMASTRONSAHEMINFO
- T TRAINING NOTES
- Warm Up
- The Training
- Cool Down
- Stretching
- 9.29ExeiseExesnes
- 9.39Exercises Exercises
- MAINTENANCE & CARE
- WARRANTY
- SERVICESERVICE
- (FR/BE)(FRABEL D'ARTIESADITIONUTILISATION
- INSTRUCTIONS D'ENTRAJEMENT
- (CZ) INSTRUKCE
- (ES)(ESTRUCCIONES DE USONSTRUCCIONES DE USO 31 INSTRUCCIONES DE ENTRENAMIENTO
- (PT)MANUAL DE INSTRUÇÉSANUAL DE INSTRUÇÉS 36 INDICAÇÉS DE TREINO
Brand : CRIVIT
Model : 18255L18
Category : Fitness Equipment