HG03847 - LED Spotlight Livarno Lux - Free user manual and instructions
Find the device manual for free HG03847 Livarno Lux in PDF.
User questions about HG03847 Livarno Lux
0 question about this device. Answer the ones you know or ask your own.
Ask a new question about this device
Download the instructions for your LED Spotlight in PDF format for free! Find your manual HG03847 - Livarno Lux and take your electronic device back in hand. On this page are published all the documents necessary for the use of your device. HG03847 by Livarno Lux.
USER MANUAL HG03847 Livarno Lux
Assembly, operating and safety instructions
NL BE
LED-SCHIJNWERPER 18W
$$ 4 \min + / - 1 \min $$
List of pictograms used
Introduction
Intended use Page 14
Parts description.
Technical data.. 15
Scope of delivery.. 15
General safety instructions.. 15
Before installation.. 16
Installation
Start-up Page 17
Adjusting the motion detector.. 17
Setting the lighting duration.. Page 18
Setting the daylight level . 18
Aligning the motion detector. Page 18
Cleaning and Care
Disposal
Warranty
| List of pictograms used | |||
| ~ | Alternating current | ca./env.180° | Detection angle of motion detector: approx. 180° |
| IP44 | Splash-proof (IP44) | ca./env.10m | Motion detector detection range: approx.10m |
| LED lifespan Protection class I | |||
| Power consumption per LED | |||
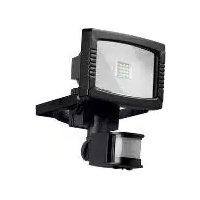
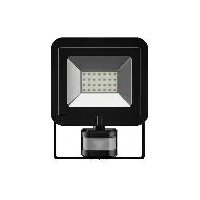
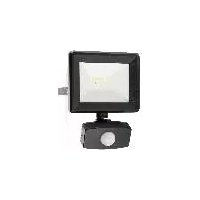
LED spotlight 18 W
private use and is not suitable for commercial use or for use in other applications.
Introduction
We congratulate you on the purchase of your new product. You have chosen a high quality product. The instructions for use are part of the product. They contain important information concerning safety, use and disposal. Before using the product, please familiarise yourself with all of the safety information and instructions for use. Only use the product as described and for the specified applications. If you pass the product on to anyone else, please ensure that you also pass on all the documentation with it.
Intendeduse
The product is intended to illuminate indoor and outdoor areas. This product is only intended for
-Partsdescription
| 1 | Screw |
| 2 | Mounting bracket |
| 3 | Wall plug |
| 4 | Tooth lock washer |
| 5 | Flat washer |
| 6 | Spring washer |
| 7 | Locking screw (mounting bracket) |
| 8 | Spotlight |
| 9 | Locking screw (motion detector) |
| 10 | Motion detector |
| 11 | Insulation strip |
| 12 | Terminal block |
| 13 | Connection box |
| 14 | Cord anchorage |
| 15 | Translucent seal ring |
| 16 | Cable gland |
| 17 | Fixing screw (connection box) |
18
Seal ring
19
TIME rotary control
20
LUX rotary control
-Technicaldata
Operatingvoltage:230V~50Hz
Total power consumption: 18 W
Illuminant: 30 × 0.5 W LED
Twilight-switch:adjustablebetween
$$ 1 0 \mid x - 2 0, 0 0 0 \mid x $$
Lighting duration: adjustable between
approx. 10s +/- 5s -
4 min +/- 1 min
Coverage angle of
motion detector: approx. 180^
horizontal
Reach of the
motion detector: maximum 10m
Protection class:
Degree of protection: IP44 (splash-proof)
Overall dimension: 15.5 × 17.5 × 14.5 ~cm
Weight: approx. 460g
(includes accessories)
Projected area: max. 15.5× 17.5cm
Mounting height: approx. 1.8 - 2.5m
TÜV SÜD / GS certified.
- Scope of delivery
Check immediately after unpacking that the parts are complete and that the product is in proper condition.
1 LED spotlight with motion detector
2 Wall plugs (0 8 mm)
2 Screws ( 5mm× 50mm)
1 Mounting bracket
1 Cord anchorage
2 Tooth lock washers
2 Flat washers
2 Spring washers
2 Locking screws
1 Instructions for use

Generalsafety instructions
BEFORE USING THE PRODUCT, PLEASE FAMILIARISE YOURSELF WITH ALL OF THE SAFETY INFORMATION AND INSTRUCTIONS FOR USE! WHEN PASSING THIS PRODUCT ON TO OTHERS, PLEASE ALSO INCLUDE ALL THE DOCUMENTS!


DANGER TO LIFE AND ACCIDENT HAZARD FOR TODDLERS AND SMALL
CHILDREN! Never leave children unattended with the packaging material. The packaging material represents a danger of suffocation. Children frequently underestimate the dangers. Please keep the product out of the reach of children at all times.
This product may be used by children age 8 years and up, as well as by persons with reduced physical, sensory or mental capacities, or lacking experience and/or knowledge, so long as they are supervised or instructed
in the safe use of the product and understand the associated risks. Children should not be allowed to play with the product. Cleaning and user maintenance should not be performed by children without supervision.
DANGER OF SUFFOCATION! Children could swallow and choke on small included parts (e.g. screws). Keep children away from the work area during assembly.
This product does not contain any parts that can be serviced by the user. The LEDs cannot be replaced by end user.
If the LEDs fail at the end of their lives, they must be repaired by qualified electrician or the entire product must be replaced.
Danger to life by electric shock
Always check the product for damage before connecting it to the mains. Never use the product if it shows any signs of damage.
Prior to installation, verify that the mains voltage on site corresponds with the operating voltage required for the product (230 V~ 50 Hz). Otherwise do not install the product.
CAUTION! DANGER OF BURN INJURIES! To prevent burns, verify the product is switched off and has cooled down for at least 15 min before touching it. The product can become very hot.
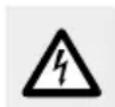
FIRE HAZARD! Fit the product so that it is at least 1.0m away from the material to be illuminated.
Excessive heat can result in a fire.
The product is only suited for use with the built-in LED control gear.
The product continues to draw a small amount of power even if the product is off as long as product is connected to supply mains. To switch the device off completely, the mains switch should be switched off.
- Before installation
Note: Remove all packaging materials from the product.
Important: The electrical connection must be established by a qualified electrician or a person trained to perform electrical installations. This person must be familiar with the properties of the product and the connection regulations.
Before installation ensure that the circuit, to which the product will be connected, is not energised. To do so, remove the fuse or switch off the circuit breaker in the fuse box (0 position).
Use a voltage tester to verify the de-energised status.
The included mounting material (screw and wall plugs 3) is suitable for ordinary solid concrete or masonry construction. Check which mounting material is suitable for your chosen mounting surface. If necessary, seek expert advice.
- Installation
Make sure you will not be drilling into electrical, gas or water lines inside the wall. Use a power drill to drill the holes into the brick wall. Always observe all safety instructions for the power drill in the manual for the power drill. Death or injury due to electric shock may otherwise result.
When selecting the mounting location, pay attention to the following:
Make sure that the spotlight illuminates the desired area. You can move the spotlight vertically.
Make sure the motion detector covers the desired area. The motion detector has a maximum coverage range of max. 10 m, with a coverage angle of about 180^ (depending on the mounting height - a height of 1.80-2.50 m is ideal) (Fig. D, E, F).
Make sure the motion detect is not illuminated at night by street lighting. This can influence its functioning.
Use the mounting bracket as a pattern to mark the drilling holes onto the wall. Ensure that there are no cables or wires in this area in the wall. Drill two holes (Ø 8 mm) and insert the wall plugs 3. Screw the mounting bracket 2 with the help of the screws 1 and check the tight fit.
Open the connection box by using a crosshead screw driver to loosen the fixing screws of the connection box (Fig. B).
The cable gland has to be loosened, then run the flexible supply line, e. g. type H05RN-F 3G1.0mm^2 through the cable gland [16] and into the connection box [13]. Open the
terminal block 12 by using a slot head screw driver to loosen the screws.
Attach ferrules to the wires of the supply line. Also attach the cord anchorage 14 to the supply line and use pliers to tighten it on the supply line (Fig.B). Connect them with the terminal block 12 in the connection box 13. Pay attention to the markings on the terminal block 12 (L for live, N for neutral and for the earth wire) (Fig.B). Close the terminal block 12 again by fastening the screws.
Important: if the external flexible cable or cord of this luminaire is damaged, it shall be exclusively replaced by the manufacturer or his service agent or a similar qualified person in order to avoid a hazard.
Close the connection b again by fastening the fixing screws 17.
Now attach the spotlight to the mounting bracket 2 using the included locking screws 7, spring washers 6, flat washers 5 and tooth lock washers 4 (Fig. A).
Re-install the fuse for this circuit or switch on at the circuit breaker (I position) in the fuse box.
Start-up
Adjusting the motion detector
Depending on the pre-adjustments of the motion detector [10], the product will switch itself on for a certain period of time as soon as the motion detector [10] detects movement. These
pre-adjustments are made using the two controllers on the underside of the motion detector [10] (Fig. C).
- Setting the lighting duration
Turn the TIME rotary control on the bottom side of the motion detector 10 clockwise to increase the duration of illumination. The lighting duration can be adjusted within a time window of approx. 10s + / - 5s - 4min + / - 1min
- Setting the daylight level
Turn the LUX rotary cont on the bottom side of the motion detector 10 clockwise to increase the daylight level: In the position, the motion detector only reacts at night (at approx. 20 lx). In the position, the motion detector also responds at daylight levels, as long as about 20,000 lx are not exceeded.
Aligning the motion detector
Note: Perform this adjustment at twilight.
Loosen the locking screw (motion detector).
Turn the LUX rotary conto position
Align the motion detect into the central region of the desired coverage area.
Move about through the coverage area until you are satisfied with the response
characteristics of the motion detector10. To find the proper orientation, change the orientation of the motion detector 10
When you have aligned the motion detector 10 satisfactorily, re-tighten the locking screw 9 to fix the adjustment.
- Cleaning and Care
Before cleaning, remove the fuse or switch off the circuit breaker at the fuse box.
Never immerse the product in water or other liquids. Otherwise the product can be damaged.
Clean the product with a lint-free, slightly moist cloth and mild cleaning agent.
Re-install the fuse for this circuit or switch on at the circuit breaker (I position) in the fuse box.
Disposal
The packaging is made entirely of recyclable materials, which you may dispose of at local recycling facilities.

Observe the marking of the packaging materials for waste separation, which are marked with abbreviations (a) and numbers (b) with following meaning: 1-7: plastics / 20-22: paper and fibreboard / 80-98: composite materials.

The product and packaging materials are recyclable, dispose of it separately for better waste treatment. The Triman logo is valid in France only.

Contact your local refuse disposal authority for more details of how to dispose of your worn-out product.

To help protect the environment, please dispose of the product properly when it has reached the end of its useful life and not in the household waste. Information on collection points and their opening hours can be obtained from your local authority.
proof of purchase. This warranty becomes void if the product has been damaged, or used or maintained improperly.
The warranty applies to defects in material or manufacture. This warranty does not cover product parts subject to normal wear, thus possibly considered consumables (e.g. batteries) or for damage to fragile parts, e.g. switches, rechargeable batteries or glass parts.
C∈IP44
Warranty
The product has been manufactured to strict quality guidelines and meticulously examined before delivery. In the event of product defects you have legal rights against the retailer of this product. Your legal rights are not limited in any way by our warranty detailed below.
The warranty for this product is 3 years from the date of purchase. Should this product show any fault in materials or manufacture within 3 years from the date of purchase, we will repair or replace it - at our choice - free of charge to you.
The warranty period begins on the date of purchase. Please keep the original sales receipt in a safe location. This document is required as your
Legendede sptogrammesutilis e..
Introduction
$$ 1 0 \mid x - 2 0. 0 0 0 \mid x $$
$$ 4 \min + / - 1 \min $$
Uhel dosahu
$$ 1 0 \mid x - 2 0. 0 0 0 \mid x $$