
IAN 340668 - Strength Equipment CRIVIT - Free user manual and instructions
Find the device manual for free IAN 340668 CRIVIT in PDF.

| Product type | Arm and leg exercise machine |
| Brand | Crivit |
| Model | IAN 340668 |
| Dimensions (L x H x W) | Approx. 41 x 31 x 39 cm |
| Weight | Approx. 4.9 kg |
| Maximum user weight | 100 kg |
| Power supply | 1 x 1.5 V R03 / AAA battery (included) |
| Training type | Speed-independent, adjustable resistance |
| Display functions | Speed (km/h), time, distance, rpm, calories, ODO, SCAN |
| Material | Steel and plastic |
| Appliance classes | HC (domestic, accuracy C) |
| Intended use | Arm and leg training, non-therapeutic |
| Assembly required | Yes, feet and pedals need to be attached |
| Tools provided | Allen key, wrench |
| Floor fixation | Suction cups for smooth surfaces (tiles) |
| Resistance adjustment | Adjustment screw with + and - symbols |
| Maintenance | Damp cloth and mild detergent, avoid moisture entering the display |
| Storage | Dry place |
| Warranty period | 3 years from date of purchase |
| After-sales service | Hotline: 0800 919270 (FR), 070 270 171 (BE) |
| Wear parts | Drive belt (replace device if worn) |
Frequently Asked Questions - IAN 340668 CRIVIT
User questions about IAN 340668 CRIVIT
0 question about this device. Answer the ones you know or ask your own.
Ask a new question about this device
Download the instructions for your Strength Equipment in PDF format for free! Find your manual IAN 340668 - CRIVIT and take your electronic device back in hand. On this page are published all the documents necessary for the use of your device. IAN 340668 by CRIVIT.
USER MANUAL IAN 340668 CRIVIT
natural_image
White and black exercise machine with adjustable legs and control buttons (no visible text or symbols)
D: 10 Spod N: A76245
无法识别
DE AT CH
Instructions for use
M
ARM- EN BEENTRAINER
Gebruiksaanwijzing
@
POSILOVAČ RUKOU A NOHOU
Návod k použití

IAN 340668_1910
8
IAN 340668_1910
DE AT CH GB B BR
M M P S K

M. M. M.
Before reading, fold out the illustrative page and get to know all of the functions of your unit.
图 8
GB/IE Usage and safety Information Page 15

[Non-Text]
[Non-Text]
[Non-Text]
[Non-Text]
[Non-Text]
[Non-Text]
[Non-Text]
[Non-Text]
[Non-Text]
[Non-Text]
[Non-Text]
[Non-Text]
[Non-Text]
[Non-Text]
[Non-Text]
[Non-Text]
[Non-Text]
[Non-Text]
[Non-Text]
[Non-Text]
[Non-Text]
[Non-Text]
[Non-Text]
[Non-Text]
[Non-Text]
[Non-Text]
[Non-Text]
DE AT CH
Pedal strap adjustment 18
Reducing/increasing resistance 18
Notes for suction cup attachment 18
Replacing the battery 18
Training instructions 18
Use 19
Leg training 19
Arm training 19
Display functions 19
Troubleshooting 19
Storage, cleaning 19
Disposal 19-20
Notes on the guarantee and
service handling 20
NL BE
You have chosen to purchase a high-quality product. Familiarise yourself with the product before using it for the first time.

Read the following instructions for use carefully.
Use the product only as described and only for the given areas of application. Store these instructions for use carefully. When passing the product on to third parties, please also hand over all accompanying documents.
Package contents/parts list (Fig. A)
1 x arm and leg trainer with resistance screw and display, includes 1 x battery (1.5V=±R03, AAA) (1)
1 x foot, small (2)
1 x foot, large (3)
2 x pedal (4)
4 x screw (5)
4 x washer (6)
1 x allen key (7)
1 x spanner (8)
1 x instructions for use
Technical data
Dimensions: approx. 41 x 31 x 39cm (W x H x D)
Weight: approx. 4.9kg

Max. user weight: 100kg

Date of manufacture (month/year): 06/2020

Symbol for DC voltage
Device class: HC (for home use, precision C)/not suitable for therapeutic purposes; speed-independent training device.
WARNING! This stationary training device
is not suitable for high-precision requirements.
Speed-independent training device.
The resistance can be set independently of the speed.
Battery power supply:
1.5V === LRO3, AAA
Intended use
The product is not intended for commercial use. The product allows the user to train arms and legs; fitted with a resistance screw to increase and maintain mobility. An integrated display shows the training progress.
Safety information Important: read these in- structions for use carefully and keep them in a safe place!
- The product is not suitable for therapeutic purposes.
- Sit relaxed and upright during exercise, with a straight back.
- Replace defective parts on the product immediately and do not use them until repaired.
- Note that improper training or excessive training can be injurious to health.
- Place the product on a horizon, level, smooth surface such as tiles, to ensure optimal grip of the suction cups. Avoid delicate surfaces, as these can be damaged.
- Check for wear on the parts. If the product no longer has pedal resistance, the drive belt is worn out and the product must be replaced.
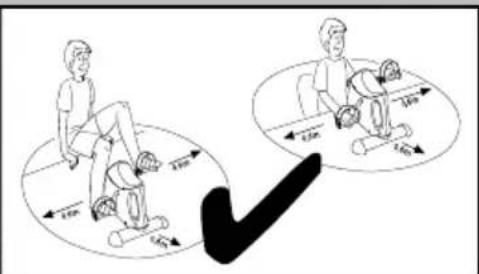
- The training area must have approx. 0.6m of space around it (Fig. J and K).
• Cleaning and maintenance may not be carried out by children without supervision.

Life-threatening hazard!
- Never leave children unattended with the packaging materials. There is a risk of suffocation.
- The product is not a toy! Ensure that persons, especially children, do not pull themselves up on the product or lean against it. The product can topple over.
• Children may not play with the apparatus.
• The product is not designed to carry your full body weight.
- This apparatus may be used by children from 14 years of age upwards, as well as by persons with diminished physical, sensory or mental abilities, or those with little experience and knowledge, if they are supervised or instructed with regard to its safe use, provided they also understand the potential risks of such use.
- Consult your doctor before starting to use the device, or if you become unwell.

Risk of injury!
- Do not rest your full body weight on the product. It may only be used as described in the instructions for use.
• Make sure the product is properly stabilised before using it!
- Check the product for damage or wear before each use. Replace damaged or worn parts on the product immediately, otherwise its function and safety can be compromised.
- The product may only be employed for its intended use.
- Do not touch the metal parts of the product after use (especially not the pedal arms), as they become hot during use.

Warnings on batteries!
- Remove the batteries if they are empty or if the product is not going to be used for an extended period.
- Do not use different battery types or brands, new and used batteries in combination, or batteries with different capacities, as they leak and can thus cause damage.
- Observe the polarity (+/-) when inserting batteries.
- Change all batteries at the same time and dispose of the old batteries properly.
- Warning! Batteries may not be charged or reactivated in any way. They may not be dismantled, thrown into fire, or short-circuited.
• Always keep batteries out of the reach of children. - Do not use rechargeable batteries!
- The cleaning and user-maintenance may not be carried out by children without supervision.
- Clean the batteries and the device contacts as necessary and before inserting the batteries.
- Do not expose the batteries to extreme conditions (e.g. radiators or direct sunlight). Otherwise there is an increased risk of leaks.
- Batteries can endanger life if swallowed. Keep batteries out of the reach of small children for this reason. Seek medical help immediately if a battery is swallowed.
Danger!
- Handle a damaged or leaking battery with extreme care and dispose of it properly and immediately. Wear gloves to handle the battery.
- If you come into contact with battery acid then wash the affected area with soap and water. If battery acid gets in your eye rinse it out with water and seek medical help immediately!
- Do not short-circuit the terminals.
Assembly
Feet assembly (Fig. B)
- Remove the packaging materials.
- Turn the product over, so that the underside is facing up.
- Screw the small foot (2) onto the product with two screws (5) and washers (6) using the Allen key (7).
Note: the small foot must be mounted on the front, where the resistance screw (1a) and the display (1b) can be found.
- Screw the large foot (3) onto the product with two screws and washers.
Pedal assembly (Fig. C)
When assembling the pedals please ensure that the right pedal is mounted on the right pedal crank and the left pedal on the left pedal crank. For orientation, you will find the letter R on the right pedal and the right pedal arm, and the letter L on the left pedal and left pedal arm.
Note: to make pedal assembly easier, turn the pedal to point upwards.
- Place the product onto the feet.
- Insert the threaded end into the threaded hole on the pedal arm.
- Hold the pedal securely in the threaded hole with one hand and turn the spanner with the other hand to secure the pedal onto the pedal arm.
Warning! Turn the right pedal to the right to tighten, and the left pedal to the left.
Pedal strap adjustment (Fig. D)
The pedal straps (4b) are preassembled. You have the option of adjusting the straps to various widths.
- Loosen the screw cap (4c) on the end of the pedal (4a) by turning it to the left.
- Adjust the pedal straps (4b) by pushing them up or down to the desired width.
- Secure the adjustment by turning the screw cap (4c) to the right.
Reducing/increasing resistance (Fig. E)
Stand the product in front of you and turn the resistance screw (1a) to the right to increase resistance and to the left to reduce resistance.
Note: on the resistance screw you will find the adjustment symbols + and -. The + indicates increased resistance and the - indicates reduced resistance.
Notes for suction cup attachment (Fig. I)
Choose a smooth surface such as tiles, free of dust and grease. Avoid delicate surfaces, as these can be damaged. Slightly moisten the suction cups before pressing them down.
To release the suction cups, proceed as follows: pull up the hooks (1f) on the front suction cups. Gently lift the product. Release the rear suction cups on at a time by pulling on the hooks (1f).
Replacing the battery
WARNING! Observe the following instructions to avoid mechanical and electrical damage.
After battery replacement, training data is lost.

Danger!
There is one battery in the product.
You can replace the battery if it stops working.
- Lift up the display (1b) with your fingers and carefully remove it (Fig. F). The battery can be found on the back of the display (Fig. G).
- Carefully remove the empty battery from the battery holder (1c) and replace it with a new battery (Fig. G).
Note: pay attention to the plus/minus poles on the battery and the correct position. The battery must be completely fitted into the battery holder.
Warning! Check that the sensor (1d) is sitting correctly in the sensor holder (1e) (Fig. H). If necessary, insert the sensor into the sensor holder.
- Insert the bottom edge of the display into the product and carefully press the display into place (Fig. F).
Note: make sure the button is not pointing down when you replace the display.
Training instructions
- Consult a doctor before using the product.
- If you feel unwell during training, stop immediately.
- Start the training slowly and increase the intensity according to your needs.
• We recommend 30 minutes of leg and arm training per day.
- When using the product, wear comfortable clothing. Make sure, however, that the legs or sleeves are not too wide, as they can get caught in the pedals.
- Before each use, do some light stretches and begin with slow, gentle movements.
Gradually increase until you reach the desired speed.
• Gradually increase the resistance.
- Finish each use by reducing the speed.
Use
Stand the product in front of you to begin training. Begin with gentle training and resistance. To do this, release the resistance screw. The tighter the resistance screw is turned, the more difficult it is to turn the pedals. Warm up before each training session with stretching and warm-up exercises. Relax after each training session.
Leg training (Fig. J)
- Place the product on a level, stable and smooth floor and sit relaxed and upright in front of the product on a chair, with a straight back.
Note: make sure the chair is stable and comfortable.
-
Place your feet on the pedals, so that the pedal straps go over your feet.
-
"Cycle" with your feet.
-
You can pedal backwards as well as forwards.
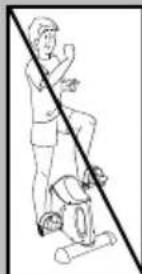
Arm training (Fig. K)
-
Place the product in front of you on a level, stable and smooth surface (e.g. at table height) and sit relaxed and upright on a chair, with a straight back.
-
Lay your palms on the pedals, so that the pedal straps go over your hands.
-
"Cycle" with your hands.
-
You can pedal backwards as well as forwards.
Display functions
The two-line display has different modes. The top line shows the speed (km/h) and by pressing the button, the bottom line can display the following functions:
- TIME: in this mode the length of your actual training is displayed in minutes and seconds.
- Speed: in this mode your speed (km/h) is displayed.
- ODO: in this mode your total distance (km) since inserting the battery is displayed.
- RPM: in this mode the pedal rotations per minute are shown.
- DISTANCE: in this mode the distance covered in kilometres since the start of the training session is shown.
- CAL: in this mode the actual number of calories you have used during training are shown.
- SCAN: in this mode the various display modes are alternately displayed.
Note: the calorie use is only an approximate guide.
Note: when not in use the display automatically turns itself off after approx. four minutes.
Resetting the value to zero
Press the button for approx. four seconds in order to reset the value to 0.
Troubleshooting
Defects
Display does not show measurement despite pedal movement.
Possible cause
The sensor is not placed correctly in the sensor mount.
Solution
Check that the sensor is positioned correctly if the display does not show anything even though the pedals are moving (Fig. H).
-
Open the display as for battery replacement and carefully remove it.
-
Insert the sensor carefully into the sensor holder, if it's not correctly seated.
-
Replace the display on the product, making sure the display button is pointing down.
Storage, cleaning
Clean the product with a damp cloth and a mild detergent.
Warning! Do not let any moisture enter the display.
Store the product in a dry place.
Parts prone to wear: if the product no longer has pedal resistance, the drive belt is worn out. The product must be replaced.
Disposal

In the interest of protecting the environment, do not throw your product into the household waste once you are finished
with it, but rather take it to a specialty disposal facility. Find out about collection sites and their hours of operation from your local authority.
Defective or used batteries must be recycled pursuant to Directive 2006/66/EC and changes to it. Return batteries and/or the product via the collecting sites provided. Packaging materials, such as plastic bags, must be kept away from children. Keep the packaging materials out of reach of children.

Environmental damage caused by improper disposal of batteries! Batteries may not be disposed of with household waste. They may contain toxic heavy metals and are subject to hazardous waste treatment. The chemical symbols of the heavy metals are as follows: Cd = cadmium, Hg = mercury, Pb = lead. Dispose of used batteries at a municipal collection site.

Dispose of the product and packaging in an environmentally friendly manner.

Note the label on the packaging materials when separating waste, as these are labelled with abbreviations (a) and numbers (b) with the following meaning: 1-7: plastics/20-22: paper and cardboard/80-98: composite materials.
The product and the packaging materials can be recycled, dispose of them separately for better treatment of waste. The Triman logo only applies to France. Find out how to dispose of the used product from your municipal or city administration.
Notes on the guarantee and service handling
The product was produced with great care and under constant supervision. You receive a three-year warranty for this product from the date of purchase. Please retain your receipt.
The warranty applies only to material and workmanship and does not apply to misuse or improper handling. Your statutory rights, especially the warranty rights, are not affected by this warranty.
With regard to complaints, please contact the following service hotline or contact us by e-mail. Our service employees will advise as to the subsequent procedure as quickly as possible.
We will be personally available to discuss the situation with you.
Any repairs under the warranty, statutory guarantees or through goodwill do not extend the warranty period. This also applies to replaced and repaired parts. Repairs after the warranty are subject to a charge.
IAN: 340668_1910

Service Great Britain
Tel.: 0800 404 7657
E-Mail: deltasport@lidl.co.uk

Service Ireland
Tel.: 1890 930 034
(0,08 EUR/Min., (peak))
(0,06 EUR/Min., (off peak))
E-Mail: deltasport@lidl.ie
Félicitations!
Pedalen monteren (afb. C)


- DE AT CH
- NL BE
- Read the following instructions for use carefully.
- Package contents/parts list (Fig. A)
- Technical data
- Intended use
- Safety information Important: read these in- structions for use carefully and keep them in a safe place!
- Life-threatening hazard!
- Risk of injury!
- Warnings on batteries!
- Danger!
- Assembly
- Feet assembly (Fig. B)
- Pedal assembly (Fig. C)
- Pedal strap adjustment (Fig. D)
- Reducing/increasing resistance (Fig. E)
- Notes for suction cup attachment (Fig. I)
- Replacing the battery
- WARNING! Observe the following instructions to avoid mechanical and electrical damage.
- Training instructions
- Use
- Leg training (Fig. J)
- Arm training (Fig. K)
- Display functions
- Resetting the value to zero
- Troubleshooting
- Defects
- Possible cause
- Solution
- Storage, cleaning
- Disposal
- Notes on the guarantee and service handling
- Pedalen monteren (afb. C)
Brand : CRIVIT
Model : IAN 340668
Category : Strength Equipment