
HR10T16 - Heating THOMSON - Free user manual and instructions
Find the device manual for free HR10T16 THOMSON in PDF.
| Brand | Thomson |
| Model | HR10T16 |
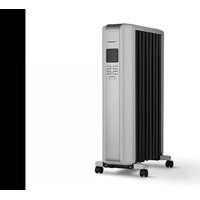
| Product type | Electric radiator gentle heat |
| Rated power | 1000 W (model HR10T16) |
| Power supply | 230 V ~ 50 Hz |
| Protection class | II |
| IP protection rating | IPX4 |
| WiFi function | Yes, via TuyaSmart or Smart Life apps (2.4 GHz) |
| Operating modes | Comfort, ECO, Frost-free, Programs P1/P2/P3/PRG, Pilot wire P |
| Temperature range | 7°C to 32°C (Comfort mode) |
| Weekly programming | Yes, customizable (PRG) or presets (P1, P2, P3) |
| Window opening detection function | Yes, automatic switch to Frost-free |
| Key lock | Yes, PIN code 025 |
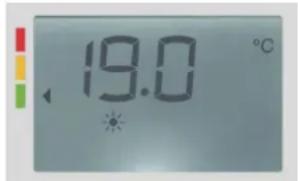
| Energy behavior indicator | Green (≤19°C), Orange (19-24°C), Red (>24°C) |
| Display | LCD screen with backlight |
| Pilot wire | 6 orders |
| Standby consumption | 0.48 W |
| Network standby consumption | 0.89 W |
| Seasonal efficiency | 94.0% |
| Maintenance | Clean with a damp cloth and vacuum the grilles |
| Safety | Automatic shutdown after 300 days of continuous operation, overheat protection |
| Installation in bathroom | Authorized outside volume and volume 2 (according to NF C 15-100) |
Frequently Asked Questions - HR10T16 THOMSON
User questions about HR10T16 THOMSON
0 question about this device. Answer the ones you know or ask your own.
Ask a new question about this device
Download the instructions for your Heating in PDF format for free! Find your manual HR10T16 - THOMSON and take your electronic device back in hand. On this page are published all the documents necessary for the use of your device. HR10T16 by THOMSON.
USER MANUAL HR10T16 THOMSON
MANUEL D'INSTRUCTIONS MOLY
4.1.Temperature Adjustment 9
4.2. Operating Mode Selection 9
4.3.Settings Menu - M 11
4.4.Time Setting (td) 12
4.5.Custom Program (PRG) Settings 12
4.6.Temperature Calibration Setting 13
4.7.ECO Mode Setpoint Adjustment 13
4.8. Window Open Detection Function 13
4.9. Heating Icon 13
4.10.Child lock 14
4.11. Energy Behavior Indicator 14
4.12. Auto Screen Dimming Function 15
4.13. Connect WiFi by TuyaSmart 15
4.14. Connect WiFi by Smart Life 17
4.15. Electricity consumption function 19
- IN CASE OF PROBLEMS 20
5.1.Troubleshooting 20
5.2. Reset 21
5.3. In case of power failure 21
5.4. Thermostat Replacement 22
- TECHNICAL SPECIFICATIONS 22
7.CARE AND CLEANING 25 - RECYCLING (DISPOSAL OF THE PRODUCT AT THE END OF ITS LIFE) 26
1. SAFETY INSTRUCTIONS
WARNING
- A means of disconnection must be incorporated in the wiring attachment according to the wiring rules.
- A means of disconnection from the power supply having a contact opening distance of all poles must be included in the fixed wiring in accordance with the installation requirements.

-
WARNING: To avoid overheating, do not cover the heater.
-
The appliance should not be placed immediately below a socket.
- The unit must not be exposed to dripping or splashing water.
- The appliance must not be used in the volume 0 or 1 of a bathroom.
the paragraph INSTALLATION IN THE BATHROOM) - The device must not be used outdoors.
- The device should not be removed to avoid the risk of electric shock.
- The device is only intended for domestic use.
- Do not apply pressure to the front of the unit or on the sides or on top
- If the power cord is damaged, it must be replaced by the manufacture of its service agent or similarly qualified persons in order to avoid a hazard.
- Move away the appliance from infants and people with physical, mental or sensory impaired. The device should not be used by these people.
- Place the unit at a minimum safe distance of one meter from any flammable materials (curtains, furniture ...).
- Do not install the unit near a stove, oven, gas flame or flammable liquid
- Clean the unit with a slightly damp cloth after disconnecting the circuit
breaker that supplies power.
- Do not use chemical solvents or abrasives to clean the surface of the appliance may scratch, damaged or even deformed.
-Children under 3 years must be kept away unless constantly monitored.
-Children aged between 3 and 8 years must only turn on or off the unit provided it has placed or installed in its normal operating position expected and were trained and supervised in instructions for using the machine safely and understand the potential hazards.
-Children aged between 3 and 8 years must not connect, adjust or clear the heater or perform user maintenance.
WARNING - Some parts of this product may become hot and cause burns. Particular attention must pay in presence of children and vulnerable people.
-
The heater must be installed so that switches and other control devices can not be touched by a person in the bath or shower.
-
The appliance must be supplied through a residual current device (RCD) having a rated residual operating current not exceeding 30mA .
-This product has the European EU conformity being compliant EN60335-1, EN60335-2-30 and Directive 2014/30/EU limiting radio interference.
-Regarding the instructions for the heater intended to be fixed by screws on the method of fixing and how to install the appliance, thanks to refer the section "INSTALLATION".
- This appliance can be used by children aged from 8 years and above c persons with reduced physical, sensory or mental capabilities or lack of experience and knowledge if they have been given supervision or instruction concerning use of the appliance in a safe way and understand the hazards involved.
-Children shall not play with the appliance.
-Cleaning and user maintenance shall not be made by children without supervision.
2. INSTALLATION
RECOMMENDATIONS IMPORTANT READ BEFORE INSTALLATION
- Do not install the unit directly below a socket.
-
Do not install the unit in a damp room or near a water source.
-
Do not use the appliance outdoors.
- Do not install the unit in an air current that could disrupt its regulation.
- Do not place the unit near a barrier limiting the airflow around it.
- Attach the heater vertically to the wall as described below.
- Choose screws and plugs suitable for the wall material and weight of the unit.
2.1. FIXTURE
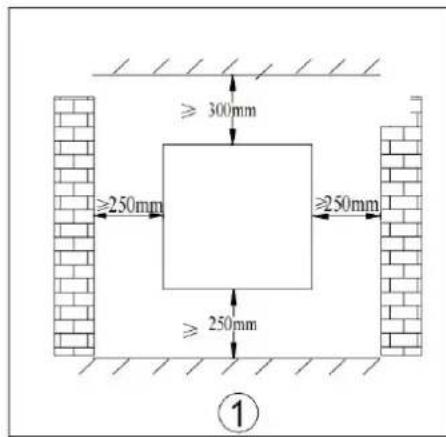
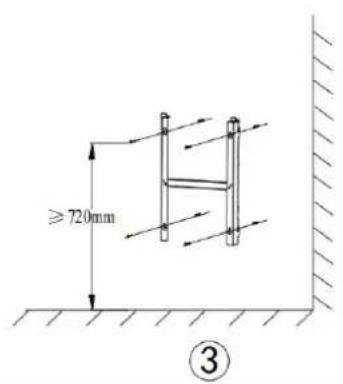
- Choose a suitable installation location for the heater. (Fig 1)
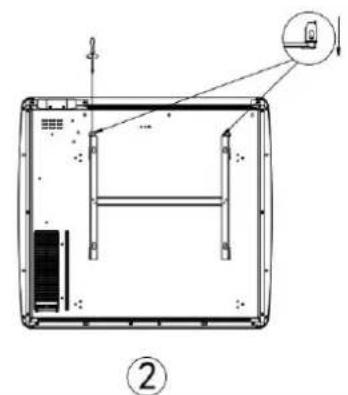
- Disassemble the wall bracket by loosening the screw (do not remove, only loosen) and pulling the metal plates out of the holes. Take out the bracket by pulling down. 2)
- Verify that the bracket is horizontal with a spirit level and mark the location of 4 hole on the wall. Drill 4 holes in the wall using a drill adapted to the diameter of wall plug. Insert the wall plug into the holes, then screw securely wall mount bracket onto the wall (Fig 3)
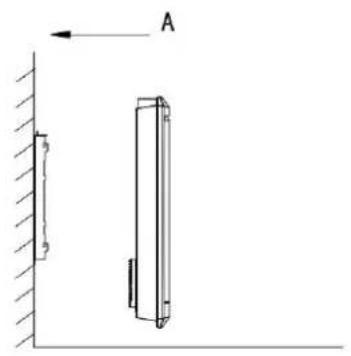
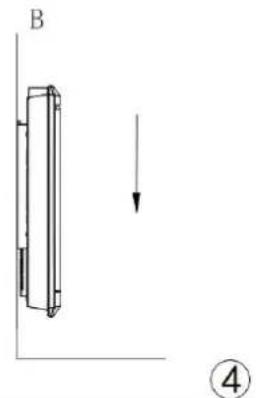
- Place the heater onto the bracket (Fig 4):
A:Align the heater on 4 hooks.
B:Pull the heater down.
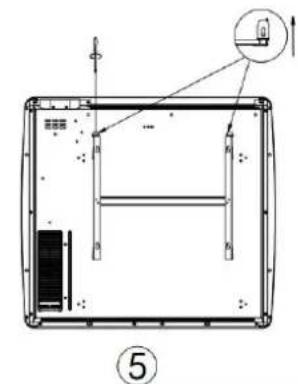
5. Push the metal plates into the holes, and fasten the screws to lock the wall mount bracket. (Fig 5)
2.2. INSTALLATION IN THE BATHROOM
Warning: This appliance must be only installed in the volume 2 or out of volume of the bathroom, as stated in the French standard NF C 15-100 for electrical installation inside the house.

Note: The drawing is for reference only.
We suggest that you to contact a professional electrician for assistance.
2.3. ELECTRICAL CONNECTION
CAUTION: Before working, turn off the electricity at the main circuit breaker.
- The installation must be carried out in the rules of the art and meet the standards in force in the country (NF C15-100 in France).
- The unit must be connected to a standard wall box placed at least 25 from the floor.
- The appliance must not be connected to an outlet with a power plug.
-In the case of residential premises, premises receiving a bathtub or shower
and electrical outlets less than or equal to 32 A the corresponding circuit must be protected by a residual current device (RCD) less than or equal 30mA
- The appliance must not be connected to the earth wire (yellow and green wire).
ELECTRICAL CONNECTION
Blue or light gray wire connect to Neutral (230V)
Brown or red wire connect to Phase (230V)
Black wire connect to pilot wire. Optional function to use in case of cont by pilot wire box (do not connect to ground).
- In the absence of pilot wire, insulate the bare end of the black wire to prevent electrical contact with the other wires or ground.
3. USING THE HEATER
3.1. LCD display
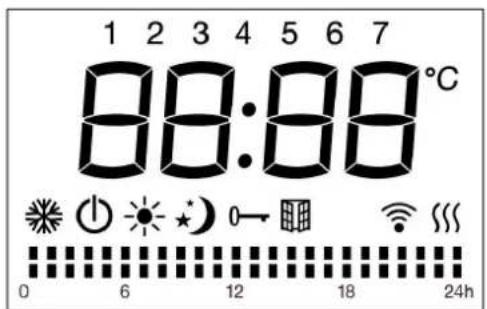
| Symbol | Function |
| Stand-by mode (the appliance will not work but will receive power) | |
| Anti-freeze mode (the appliance maintains a temperature of around | |
| Comfort mode (desired set temperature) | |
| ECO mode: The device maintains a temperature 3°C (default) lower the temperature of the Comfort mode, you can change the set poi 2°C or 4°C. | |
| P | Pilot wire mode (to set the programs via pilot wire programmer) |
| Window detector function | |
| ○ | Child lock |
| ※ | Wifi |
| XXX | Heating indicator (When appliance is heating up, this icon will be displayed at the screen. The icon will disappear when the room temperature reaches the selected temperature) |
| °C | Temperature (centigrade) |
| Weekly personalized modes | |
| ■ | Mode Comfort active |
| ■ | Mode ECO active |
3.2. Control panel
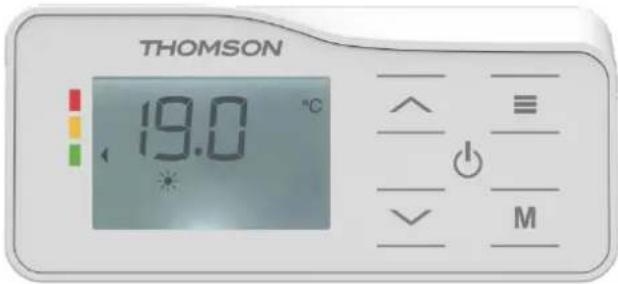
| Symbol | Function |
| Stand-by | |
| Button for validation or Select from the following modes: Comfort Mode Eco Mode Frost Protection Mode P1/P2/P3/PRG(Custom Program)/Pilot Wire Mode | |
| M | Enter the settings menu to adjust time (td), customize Custom Program (Pr), calibrate temperature(C), or modify the ECO setpoint (EC). |
| Touch /^/^ | Adjust time, day of the week, temperature Choose between Comfort or Eco Mode during custor program settings. Set temperature from 7°C to 32°C, increasing/decreas by 0.5°C per press. |
4. OPERATION
Upon initial power-on, please configure the time as prompted by the system to proper use the P1/P2/P3/Pr modes. The time-setting method is detailed in the "Time Adjustment section below. If no action is taken within 10 seconds, the default factory time (Monday 12:00) will be automatically confirmed.
During the first power-on, the device automatically initializes in Comfort Mode with a default temperature of 19^ .
In case of a power outage, after power is restored, the heater will resume operation in the same mode and temperature set before the interruption.
4.1. Temperature Adjustment
In Comfort or ECO mode (excluding Anti-Freeze mode), the temperature is adjustable. Press the "or" buttons to select the desired temperature between 7^ and 32^ in Comfort mode, in 0.5^ increments. The default temperature difference between ECO mode and Comfort mode is 3^ , and the default temperature range for ECO mode is 4^ to 29^ . Press any other button besides "or" to confirm the setting; otherwise, the device will automatically save the changes after 5 seconds. When the room temperature exceeds the set temperature, the heater stops heating.
4.2. Operating Mode Selection
Briefly press the button to cycle through the following modes:
Comfort Mode / Eco Mode / Frost Protection Mode / P1 / P2 / P3 / PRG (Custom Program) / Pilot Wire Mode P. After blinking for 5 seconds, the display will show the set temperature (except in P mode).
COMFORT MODE: The icon will light up, and the display will show the set temperature. Briefly press " " or " " to adjust the temperature.
ECO MODE: The icon will light up, and the display will show the set temperature.
Briefly press " or " to adjust the temperature.
Anti-freeze mode: The icon will light up, and the device will maintain a temperature of approximately 7^ .
P1/P2/P3 MODES: Default programs are listed below.
3 Predefined Programs (P1/P2/P3)
| PROGRAM P1 | HOUR | MODE |
| MONDAY TO FRIDAY | 0:00-6:00 | ECO |
| 6:00-9:00 | COMFORT | |
| 9:00-16:00 | ECO | |
| 16:00-23:00 | COMFORT | |
| 23:00-0:00 | ECO | |
| SATURDAY AND SUNDAY | 0:00-7:00 | ECO |
| 7:00-23:00 | COMFORT | |
| 23:00-0:00 | ECO |
| PROGRAM P2 | HOUR | MODE |
| MONDAY TO SUNDAY | 0:00-7:00 | ECO |
| 7:00-23:00 | COMFORT | |
| 23:00-0:00 | ECO |
| PROGRAM P3 | HOUR | MODE |
| MONDAY TO FRIDAY | 0:00-6:00 | ECO |
| 6:00-9:00 | COMFORT | |
| 9:00-13:00 | ECO | |
| 13:00-23:00 | COMFORT | |
| 23:00-0:00 | ECO | |
| SATURDAY AND SUNDAY | 0:00-7:00 | ECO |
| 7:00-23:00 | COMFORT | |
| 23:00-0:00 | ECO |
The time slots for P1/P2/P3 programs are fixed (non-adjustable) — only the setpoint temperature can be modified.
Eco Mode maintains a temperature 3^ lower than Comfort Mode by default. To customize the temperature difference between Comfort/Eco, refer to the "4.5 Custom Program (PRG) Settings". If you wish to define specific time slots, use the Custom Program (PRG).
PRG MODE
PRG mode is a freely customizable weekly program.
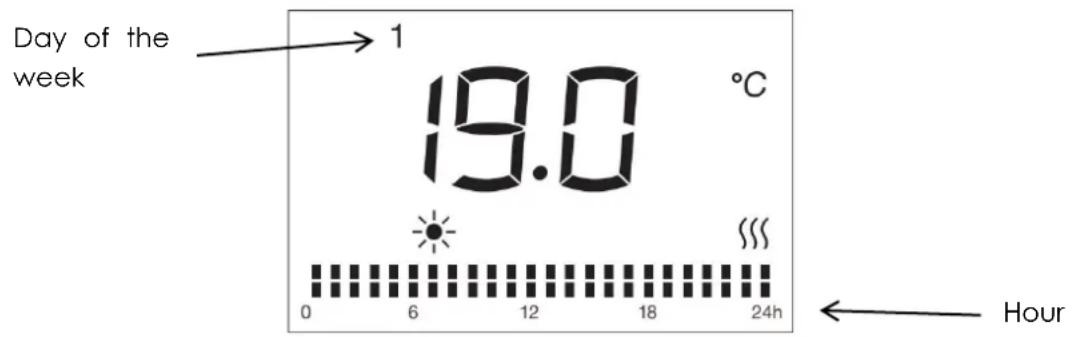
When the PRG mode is selected, the icon lights up on the screen, and the current temperature value is displayed in the center.
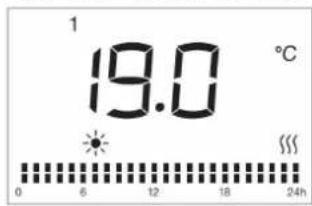
The PRG mode is configured by default to operate 24/7 in Comfort mode (predefined comfort temperature). During PRG mode operation, the screen displays the icon corresponding to the current mode: Comfort mode and ECO mode.
PILOT WIRE MODE P:
In Pilot Wire Mode P, heating is controlled by an external timer. When the external program is set to another mode, the display will show the corresponding mode icon a follows:
| External Mode Setting | Icon Displayed |
| COMFORT MODE | P● |
| COMFORT MODE -1 | P-1● |
| COMFORT MODE -2 | P-2● |
| Eco Mode | P● |
| Anti-freeze mode | P● |
| Stand by Mode | P● |
4.3. Settings Menu - M
Press and hold the "M" button to enter or exit the settings menu. The settings menu displays the device's functional options :
td : Time setting
Pr : Weekly custom program
C:Temperature calibration
EC : Eco mode temperature differential setting
Use the "^" button to scroll through options (fd Pr C EC) clockwise, or "√" to go backward (counterclockwise). The selected icon will blink.
4.4. Time Setting (td)
After entering the settings menu, press "^" or "√" to select "td", then briefly press "≡" to enter the time-setting interface.
Adjust the hour (00-23) using / , then press to confirm and proceed to minute setting (00-59).
Set the minutes (00-59) with " / ", then press " " to confirm and proceed to day of the week (1-7).
Press " " or " " to set the day of week (choose from d1 to d7, d1=Monday, d7=Sunday).
Press to finalize. If no action is taken within 10 seconds, the device will auto save and return to the main interface.
Note: You must set the time/day before accessing other settings.
4.5.Custom Program (PRG) Settings
The default setting icon lights up, and the number representing the day of the week « 1 » (1=Monday) flashes.
Adjust the day of the week using the button (1=MONDAY, 2=TUESDAY,... 7=SUNDAY), then validate by pressing the button.
Press to select the hour (1-24). For each hour, there are 2 alternate modes: Comfort mode and ECO mode. The Custom Program mode icon for the hour will flash.
Press to choose between Comfort mode and ECO mode
To validate the selected program for day 1 (MONDAY): press the button.
To complete the adjustment up to day 7 (SUNDAY): repeat the same operation multiple times.
Press the M button to confirm after all adjustments; otherwise, the device will
automatically save the settings after 30 seconds and return to the operational interface.
With this mode, you can customize your heating programs according to your preferences.
4.6. Temperature Calibration Setting
In the settings menu, press " " or " " to select "C", then briefly press " " to enter the
temperature calibration setting interface. "0" will be displayed on the screen by default. Press / to adjust the temperature compensation within ± 6 .
For example, if your radiator's set temperature is 24^ but your thermometer shows only 22^ , select a calibration value of -2^ .
4.7. ECO Mode Setpoint Adjustment
The default temperature difference between COMFORT and ECO modes is 3^ . You can change the setpoint to 2^ or 4^ , in 1^ increments.
Press the button M to enter the settings menu interface, then press / to select "Ec". Press the button to enter the parameter setting interface.
Press to adjust the setpoint. Press the button to confirm, otherwise the device will automatically save after 5 seconds and return to the operational interface.
4.8. Window Open Detection Function
Press for 3 seconds to access the window open detection setting with " " blinking.
The screen will display "on" or "oF". Press " " or " " to select.
If "on" is selected, the window open detection is activated (icon " " will display). When a 5^ temperature drop is detected, the device switches to Anti-freeze mode (screen displays 7^ with " blinking). It returns to the previous mode when temperature rises by 2^ . If the temperature does not rise by more than 2^ , press any button to exit Anti-freeze mode. Default factory setting is "oF" (disabled).
4.9. Heating Icon
1) When it is detected that the ambient temperature is below the set temperature and the radiator needs to start operating, the heating icon lights up. If the ambient temperature is detected as being higher than the set temperature, the heating icon will turn off.
2) In standby mode, the heating icon is not displayed.
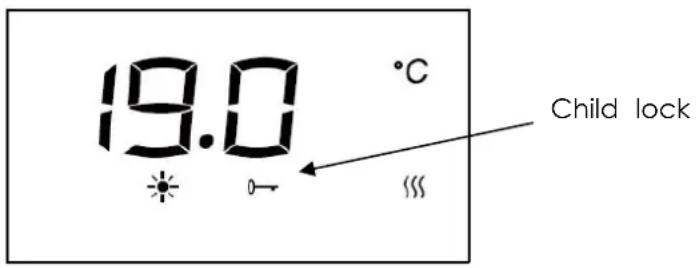
4.10. Child lock
Activation :
Press and hold the "M" and "=" button simultaneously for 5 seconds until the display shows "- - -". Input the 3-digit preset password (025) to activate child lock function : Press the "-" to select the first digit 0 and press " " to confirm.
Press the "~"/"~" to select the second digit 2 and press "=" to confirm.
Press the "\/" to select the third digit 5 and press " " to finalize. The lock icon " " will illuminate, indicating activation.
Deactivation :
Repeat the process : Hold the "M" key and " " for 5 seconds to enter PINLOCK mode. Re-enter the matching 3-digit password (025) using the keys.
Press " to confirm deactivation. The lock icon will turn off.
Notes:
The 3-digit password (025) is unchangeable.
The keypad lock does not disable the standby button, which remains functional when locked.
The lock automatically deactivates when the appliance suffers power disconnection. To re-enable, press "M" and "F" for 5 seconds and repeat the activation steps after power restoration.
4.11. Energy Behavior Indicator
In all operating modes:
1) Temperature setting ≤ 19^ : Green label is displayed.
2) Temperature setting 19^ < T ≤ 24^ : Orange label is displayed.
3) Temperature setting >24^ : Red label is displayed.
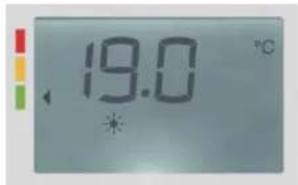
The recommended temperature by ADEME (French Agency for Ecological Transition) is 19^ . This indication serves as a preventive measure for the user.
Higher setpoint temperatures will result in increased energy consumption.
Notes:
1) Standby Mode: No energy-saving indication is displayed when the device is in standby.
2) Submenu Navigation: Energy-saving indications are not shown in Setting Menu.
4.12. Auto Screen Dimming Function
After 1 minute of inactivity, the screen backlight will automatically turn off. Press any k to reactivate the display backlight at full 100% brightness.
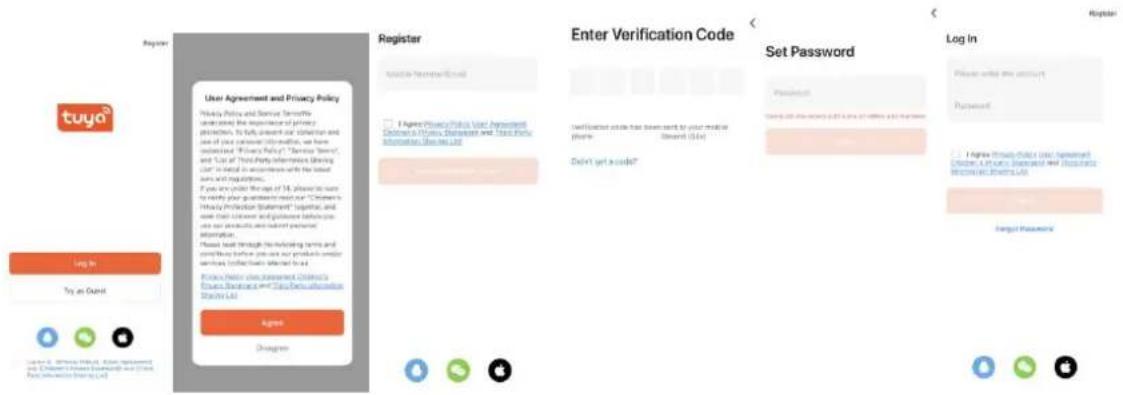
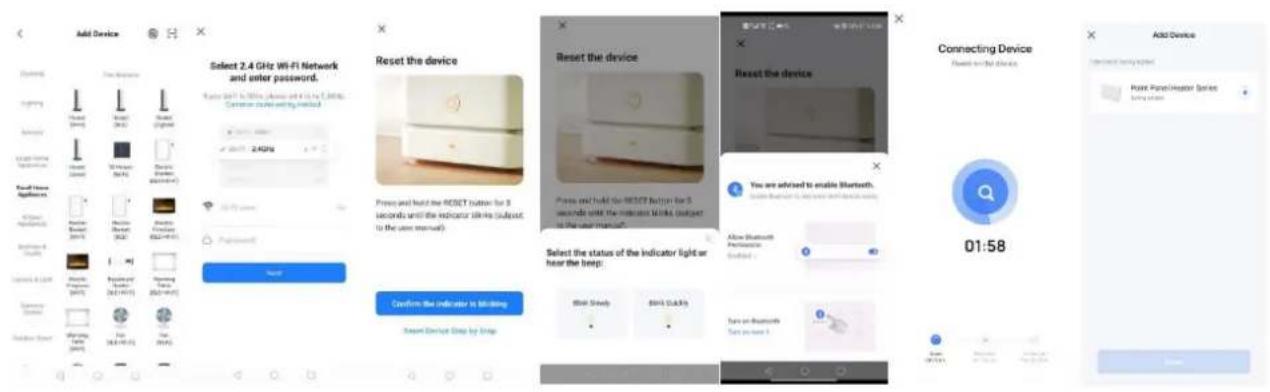
4.13. Connect WiFi by TuyaSmart
1) Download APP
You can download the app by searching for "TuyaSmart" App in your app store or bscanning the following QR code.


successfully installed)
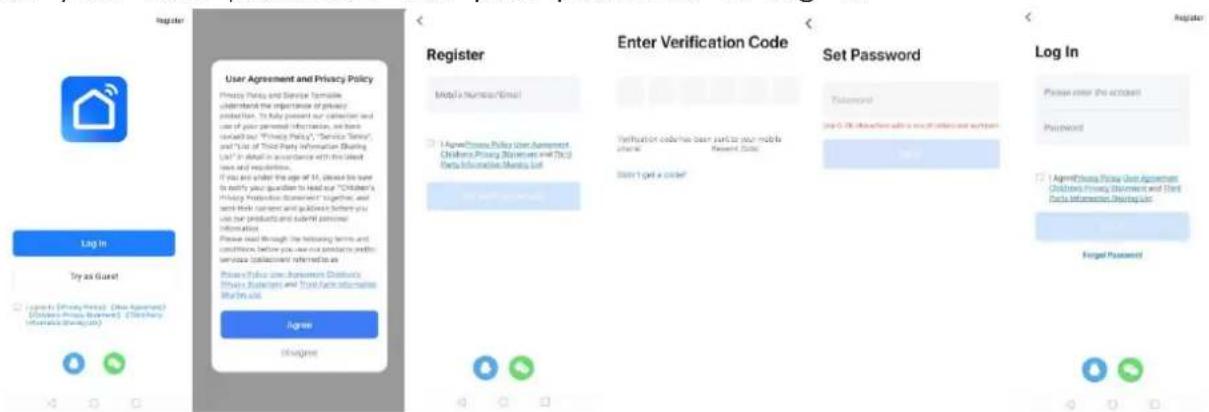
2) Registration
Open the "TuyaSmart" App, register an account: you can use either phone no. or email address to register. You will get a verification code. Enter the verification code and set your own password. Use your password to log in.
3) Add and connect device
Insert the power plug and turn on the power switch. Choose "Stand by" mode by pushing the button until the "Stand by" symbol is displayed. Keep pressing " " for more than 5 seconds and the icon " " will flash.
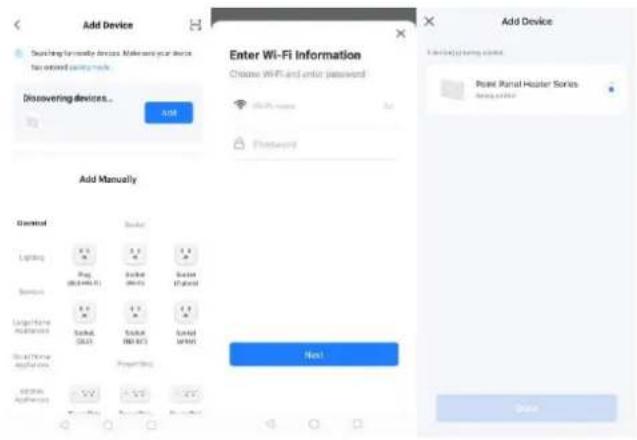
Press "+" icon on right top page or the "Add Device" button in the middle page to adding device.

There are 2 methods to connect the service:
Method 1: Press "Add" button in the middle page. Then enter the Wi-Fi password. P "next" to start connecting. (In this case, you need to keep your phone bluetooth on and Wi-Fi on, please also noted that for now only 2.4G Wi-Fi is supported. Please make sure your Wi-Fi is 2.4.)
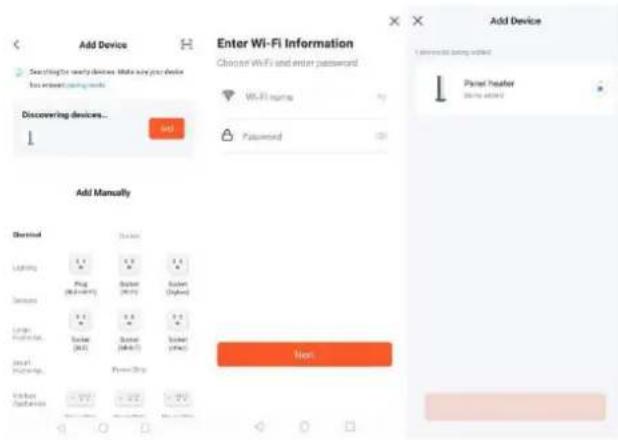
Method 2: Choose "Small Home appliance" under "Add Manually" and then choose "Heater". Then enter the Wi-Fi password. Press "next" to and choose your preferred indicator status to the start connecting. (In this case, you need to keep your phone bluetooth on and Wi-Fi on, please also noted that for now only 2.4G Wi-Fi is supported. Please make sure your Wi-Fi is 2.4.)
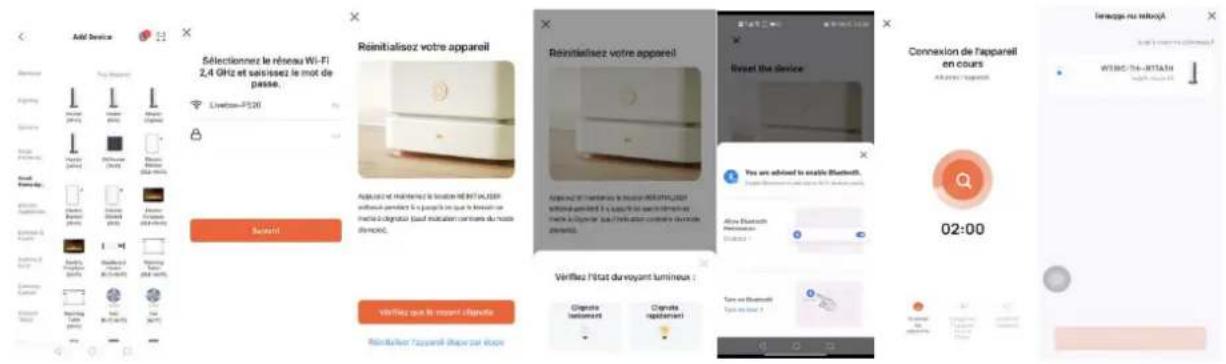
4) Connect successfully
When it's successfully connected, the Wi-Fi icon will stop flashing and keep (including Stand by mode). And the App will show "Device added successfully".
Press "done" to start your operation for the appliance over your phone

Notes:
If there is no operation in 3 minutes after pressing " " for more than 5 seconds, then the WiFi function will stop flashing and disappear from the screen.
If you need to re-connect your WiFi for the appliance, repeat step 3.
4.14. Connect WiFi by Smart Life
1) Download APP
You can download the app by searching for "Smart Life" App in your app store or by scanning the following QR code.


successfully installed)
2) Registration
Open the "Smart Life" App, register an account: you can use either phone no. or er address to register. You will get a verification code. Enter the verification code and th set your own password. Use your password to log in.
3) Add and connect device
Insert the power plug and turn on the power switch. Choose "Stand mode by pushing the button until the "Stand by" symbol is displayed. Keep pressing for more than 5 seconds and the ice will flash.
Press "+" icon on right top page or the "Add Device" button in the page to start adding device.

There are 2 methods to connect the service:
Method 1: Press "Add" button in the middle page. Then enter the Wi-Fi password. Press "next" to start connecting. (In this case, you need to keep your phone bluetooth on and Wi-Fi on, Now only 2.4G Wi-Fi is supported. Please make sure your Wi-Fi is 2.4.
Method 2: Choose "Small Home appliance" under "Add Manually" and then choose "Heater". Then enter the Wi-Fi password. Press "next" to and choose your preferred indicator status to the start connecting. (In this case, you need to keep your phone bluetooth on and Wi-Fi on, please also noted that for now only 2.4G Wi-Fi is supported. Please make sure your Wi-Fi is 2.4.)
4) Connect successfully
When it's successfully connected, the Wi-Fi icon will stop flashing and keep (including Stand by mode). And the App will show "Device added success Press "done" to start your operation for the appliance over your phone.

Notes:
If there is no operation in 3 minutes after pressing " " for more than 5 seconds, then the WiFi function will stop flashing and disappear from the screen. If you need to re-connect your WiFi for the appliance, repeat step 3.
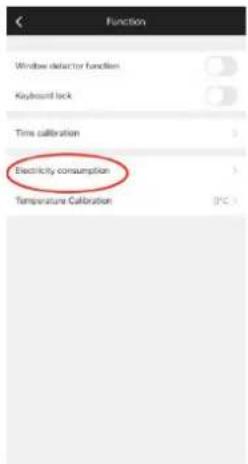
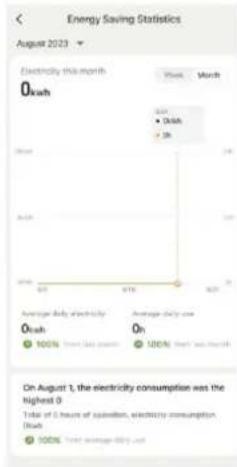
4.15. Electricity consommation function
You can check energy consumption and heating time from APP.

5. IN CASE OF PROBLEMS
5.1. Troubleshooting
| The device does not heat | ·Ensure the device is properly connected to the mains electricity and powered on. ·Check the position of the main installation switch. ·Increase the set temperature on the regulator. ·Make sure no clothing is covering the control unit. ·If the problem persists, contact an authorized dealer qualified professional. |
| The device heats continuously | ·Lower the programmed temperature on the device's regulator. ·Verify that no clothing is covering the command device. ·If it continues to heat, contact the seller or a qualified professional. ·You can adjust the compensation settings by ±5°C; for details, refer to "Adjustment of the Set Temperature Point (C)". |
| The room remains co | ·Ensure the device's power matches the room size. ·During initial use: Allow approximately 2 hours to reach programmed temperature (maximum setting does not accelerate heating). |
| Device does not respond correctly to commands from the Pilot Wire box | • Disconnect the device. • Ensure the connection is correct and the box is functioning properly. • Contact a qualified professional. |
| Device continues heating even though the window is open with "Open Window" mode active | • A few minutes may be required for the function to activate. • The temperature difference between outside and inside may be insufficient for the function to work. • Verify no obstacles are around the Command Unit and device. • If the problem persists, contact the seller or a qualified professional. |
| Device does not rest after closing the window with "Open Window" mode active | • A few minutes may be required for the sensor to detect window closure. • The temperature probe is damaged. Turn off the device and contact your seller. • Verify no obstacles are around the Command Unit and device. • Disable and reactivate the function. • If the function's response delay is excessive, you can manually restart the device. • If the problem persists, contact the seller or a qualified professional. |
5.2. Reset
After powering on:
Within 10 seconds, press " " and "M" simultaneously for more than 2 seconds. The target temperature will revert to factory settings (19°C). All programs and custom modifications will be permanently deleted.
5.3. In case of power failure
All the above settings for temperature / time / date of the week / programs remain valid until the power is removed.
After a power failure, when power is restored, the device will revert to the mode and temperature that were selected prior to the power failure.
In the event of a power failure, the device only retains the following parameters:
temperature and operating mode. Upon power restoration, the date and time must be reset in order to ensure the proper functioning of the various programs.
Note: For safety reasons, the device will automatically shut off after 300 consecutive days of operation.
5.4. Thermostat Replacement
Disconnect the heating system before replacing the thermostat.
6. TECHNICAL SPECIFICATIONS
| Model | HR10-T15FBW | HR15-T15FBW | HR20-T15FBW |
| Voltage | 230 V ~ | 230 V ~ | 230 V ~ |
| Frequency | 50 Hz | 50 Hz | 50 Hz |
| Rated power | 1000 W | 1500 W | 2000W |
| Protection class | II | II | II |
| IP Protection | IPX4 | IPX4 | IPX4 |
| Pilot wire | 6 orders | 6 orders | 6 orders |
Operating frequency:WiFi2.4GHz (2412-2472MHz)
Max. radio-frequency power transmitted: 17.91 dBm
Information requirements for electric local space heaters
| Model identifier(s): HR10-T15FBW | |||||
| Item | Symbol | Value | Unit | Item | Value |
| Heat output | Type of heat output/room temperature co (select one) | ||||
| Nominal heat output | P nom | 1.000 | kW | Single stage heat output and no room temperature control | No |
| Minimum heat output (indicative) | P min | N/A | kW | Two or more manual stages, no room temperature control | No |
| Maximum continuous heat output | P max,c | 1.000 | kW | With mechanic thermostat room temperature control | No |
| Power consumption | With electronic room temperature control | No | |||
| In off mode | P o | 0.00 | W | Electronic room temperature control plus day timer | No |
| In standby mode | Psm | 0.48 | W | Electronic room temperature control plus week timer | Yes |
| In idle mode | P idle | 0.89 | W | Other control options (multiple selections possible) | |
| In network standby | P nsm | 0.89 | W | Room temperature control, with presence detection | No |
| Standby mode with display of information or status | Yes | Room temperature control, with open window detection | Yes | ||
| Seasonal space heating energy efficiency in active mode | η S,on | 94.0 | % | Distance control option | Yes |
| Adaptive start control | No | ||||
| Working time limitation | No | ||||
| Black bulb sensor | No | ||||
| Self-learning functionality | No | ||||
| Control accuracy | No | ||||
| Contact details | HOM'Y SAS, GREEN PARK - Bat A, 61 rue de la cimaise, 59650 Villeneuve, d'Ascq | ||||
| Model identifier(s): HR15-T15FBW | |||||
| Item | Symbol | Value | Unit | Item | Value |
| Heat output | Type of heat output/room temperature coil (select one) | ||||
| Nominal heat output | P nom | 1.500 | kW | Single stage heat output and no room temperature control | No |
| Minimum heat output (indicative) | P min | N/A | kW | Two or more manual stages, no room temperature control | No |
| Maximum continuous heat output | P max,c | 1.500 | kW | With mechanic thermostat room temperature control | No |
| Power consumption | With electronic room temperature control | No | |||
| In off mode | P o | 0.00 | W | Electronic room temperature control plus day timer | No |
| In standby mode | Psm | 0.48 | W | Electronic room temperature control plus week timer | Yes |
| In idle mode | P idle | 0.89 | W | Other control options (multiple selections possible) | |
| In network standby | P nsm | 0.89 | W | Room temperature control, with presence detection | No |
| Standby mode with display of information or status | Yes | Room temperature control, with open window detection | Yes | ||
| Seasonal space heating energy efficiency in active mode | η S,on | 94.0 | % | Distance control option | Yes |
| Adaptive start control | No | ||||
| Working time limitation | No | ||||
| Black bulb sensor | No | ||||
| Self-learning functionality | No | ||||
| Control accuracy | No | ||||
| Contact details | HOM'Y SAS, GREEN PARK - Bat A, 61 rue de la cimaise, 59650 Villeneuve, d'Ascq, F | ||||
| Model identifier(s): HR20-T15FBW | |||||
| Item | Symbol | Value | Unit | Item | Value |
| Heat output | Type of heat output/room temperature cor (select one) | ||||
| Nominal heat output | P nom | 2.000 | kW | Single stage heat output and no room temperature control | No |
| Minimum heat output (indicative) | P min | N/A | kW | Two or more manual stages, no room temperature control | No |
| Maximum continuous heat output | P max,c | 2.000 | kW | With mechanic thermostat room temperature control | No |
| Power consumption | With electronic room temperature control | No | |||
| In off mode | Po | 0.00 | W | Electronic room temperature control plus day timer | No |
| In standby mode | Psm | 0.48 | W | Electronic room temperature control plus week timer | Yes |
| In idle mode | P idle | 0.89 | W | Other control options (multiple selections possible) | |
| In network standby | P nsm | 0.89 | W | Room temperature control, with presence detection | No |
| Standby mode with display of information or status | Yes | Room temperature control, with open window detection | Yes | ||
| Seasonal space heating energy efficiency in active mode | η S,on | 94.0 | % | Distance control option | Yes |
| Adaptive start control | No | ||||
| Working time limitation | No | ||||
| Black bulb sensor | No | ||||
| Self-learning functionality | No | ||||
| Control accuracy | No | ||||
| Contact details | HOM'Y SAS,GREEN PARK - Bat A, 61 rue de la cimaise, 59650 Villeneuve, d'Ascq, FR | ||||
7. CARE AND CLEANING
- Before cleaning the appliance, switch off the appliance from the power supply and wait until it is completely cold.
- Use a damp cloth to clean the casing of the device.
- Clean grill and air outlet regularly. Never immerse the appliance in water or allow water to enter the appliance.
8. RECYCLING (DISPOSAL OF THE PRODUCT AT THE
END OF ITS LIFE)

The crossed-out wheeled bin symbol indicates that the item should be
disposed of separately from household waste. The item should be handed in for recycling in accordance with local environmental regulations for waste disposal. By separating a marked item from household waste, you will help
reduce the volume of waste sent to incinerators or landfill and minimize any potential negative impact on human health and the environment.
This product has been manufactured and distributed under the responsibility of Hom'y. THOMSON and the THOMSON logo are trademarks licensed to Hom'y. For further detail visit www.thomson-brand.com or scan the QR code to check our video on Youtube.

All other products, services, companies, trademarks, trade or product names, and logos referenced herein remain the exclusive property of their respective owners.


Imported by: HOM'Y SAS
3 Predefined Programs (P1/P2/P3)
| Programa P1 | Hora | Modo |
| Lun-Vie | 0:00-6:00 | ECO |
| 6:00-9:00 | CONFORT | |
| 9:00-16:00 | ECO | |
| 16:00-23:00 | CONFORT | |
| 23:00-0:00 | ECO | |
| Sáb-Dom | 0:00-7:00 | ECO |
| 7:00-23:00 | CONFORT | |
| 23:00-0:00 | ECO |
| Programa P2 | Hora | Modo |
| Lun - Dom | 0:00-7:00 | ECO |
| 7:00-23:00 | CONFORT | |
| 23:00-0:00 | ECO |
| Programa P3 | Hora | Modo |
| Lun-Vie | 0:00-6:00 | ECO |
| 6:00-9:00 | CONFORT | |
| 9:00-13:00 | ECO | |
| 13:00-23:00 | CONFORT | |
| 23:00-0:00 | ECO | |
| Sáb-Dom | 0:00-7:00 | ECO |
| 7:00-23:00 | CONFORT | |
| 23:00-0:00 | ECO |
The recommended temperature by ADEME (French Agency for Ecological Transition) is 19^ . This indication serves as a preventive measure for the user.
Higher setpoint temperatures will result in increased energy consumption.
Default factory setting is "oF" (disabled).
3 Predefined Programs (P1/P2/P3)
4.14. Connect WiFi by Smart Life
5. W PRZYPADKU PROBLEMÓW
temperature calibration setting interface. "0" will be displayed on the screen by default. Press " / " to adjust the temperature compensation within ± 5^ .
For example, if your radiator's set temperature is 24^ but your thermometer shows only 22^ , select a calibration value of -2^ .
No menu de configurações, pressione « » ou « » para選擇ar "C",deois pressione brevemente « » para acessar a interface de calibracao. O visor做不到 "0" por padrão. Use « »/« » para compensacaoTERMICA (±5C).
EMC directive 2014 30 EU (for EU) :
EN IEC 55014-1:2021
EN IEC 55014-2:2021
ENIEC61000-3-2:2019+A1:2021+A2:2024
EN 61000-3-3:2013+A1:2019+A2:2021
RoHS directive 2015/863/EU
2011/65/EU+ (EU) 2015/863
ErP directive 2009 125 EC
(EU) 2015/1188
(EU) 2016/2282
EU DECLARATION OF CONFORMITY
Model: HR10-T15FBW/HR15-T15FBW/ HR20-T15FBW
Type of product : Electric heater
Enterprise:HOM'Y SAS, GREEN PARK-Bat A,61 rue de la cimaise,59650 Villeneuve, d'Ascq, FRANCE
This declaration of conformity is drawn up under the sole responsibility of the manufacturer.
Product image
The subject matter of the declaration described above is in accordance with the applicable Union harmonisation legislation:
Applicable standards:
LVD directive 2014/35/EU
EN 60335-1:2012+A11:2014+A13:2017+A1:2019+A14:2019+A2:2019+A15:2021+A16:2023
EN 60335-2-30:2009+A11:2012+A1:2020+A12:2020+A2 :2022+A13 :2022
EN 62233:2008
EMC directive 2014 30 EU (for EU):_
EN IEC 55014-1:2021
EN IEC 55014-2:2021
EN IEC 61000-3-2:2019+A1:2021+A2:2024
EN 61000-3-3:2013+A1:2019+A2:2021
RoHS directive 2015/863/EU
2011/65/EU+ (EU) 2015/863
ErP directive 2009 125 EC: ...
(EU) 2015/1188
(EU) 2016/2282
(EU) 2024/1103(with corrigendum 2024/90295)
RED Directive 2014/53/EU
EN 301 489-1 V2.2.3(2019-11)
ENIEC61000-3-2:2019+A1:2021+A2:2024
EN 61000-3-3:2013+A1 :2019+A2:2021
EN 301 489-17 V3.3.1(2024-09)
EN 300 328 V2.2.2(2019-07)
EN IEC 62311:2020
EN 50665:2017
EN 18031-1:2024
HOMY
61 rue de la Cimaise 59650 Villeneuve d'Ascq Siret:89330555700017

Signature and Stamp
EU-CONFORMITEETSVERKLARING
Model: HR10-T15FBW/HR15-T15FBW/HR20-T15FBW
Soot product: Bektrische kachel
Ondememing: HOM'Y SAS, GREEN PARK - Bat A,61 rue de la cimaise, 59650 Villeneuve, d'Ascq, FRANCE
Directiva EMC 2014_30_EU (for EU):
ENIEC55014-1:2021
EN IEC 55014-2:2021
EN IEC 61000-3-2:2019+A1:2021+A2:2024
EN 61000-3-3:2013+A1:2019+A2:2021
Directiva RoHS 2015/863/EU
2011/65/EU+ (EU) 2015/863
Directiva ErP 2009_125_EC:....
(EU)2015/1188
(EU)2016/2282
(EU)2024/1103(corrigendum 2024/90295)
Directiva RED 2014/53/EU
EN 301 489-1 V2.2.3(2019-11)
EN IEC 61000-3-2:2019+A1:2021+A2:2024
EN 61000-3-3:2013+A1:2019+A2:2021
EN 301 489-17 V3.3.1(2024-09)
EN 300 328 V2.2.2(2019-07)
EN IEC 62311:2020
EN 50665:2017
EN 18031-1:2024
HOM'Y 61 rue de la Cimaise 59650 Villeneuve dAscq Siret:89330555700017

DECLARATION UDECONFORMIDADE
Modelo : HR10-T15FBW/ HR15-T15FBW/ HR20-T15FBW


- MANUEL D'INSTRUCTIONS MOLY
- SAFETY INSTRUCTIONS
- WARNING
- WARNING - Some parts of this product may become hot and cause burns. Particular attention must pay in presence of children and vulnerable people.
- INSTALLATION
- RECOMMENDATIONS IMPORTANT READ BEFORE INSTALLATION
- FIXTURE
- INSTALLATION IN THE BATHROOM
- ELECTRICAL CONNECTION
- ELECTRICAL CONNECTION
- USING THE HEATER
- LCD display
- Control panel
- OPERATION
- Temperature Adjustment
- Operating Mode Selection
- PRG MODE
- PILOT WIRE MODE P:
- Settings Menu - M
- Time Setting (td)
- 4.5.Custom Program (PRG) Settings
- Temperature Calibration Setting
- ECO Mode Setpoint Adjustment
- Window Open Detection Function
- Heating Icon
- Child lock
- Activation :
- Deactivation :
- Notes:
- Energy Behavior Indicator
- Auto Screen Dimming Function
- Connect WiFi by TuyaSmart
- 1) Download APP
- 2) Registration
- 3) Add and connect device
- There are 2 methods to connect the service:
- 4) Connect successfully
- Connect WiFi by Smart Life
- Electricity consommation function
- IN CASE OF PROBLEMS
- Troubleshooting
- Reset
- In case of power failure
- Thermostat Replacement
- TECHNICAL SPECIFICATIONS
- CARE AND CLEANING
- RECYCLING (DISPOSAL OF THE PRODUCT AT THE
- END OF ITS LIFE)
- Predefined Programs (P1/P2/P3)
- W PRZYPADKU PROBLEMÓW
- EU DECLARATION OF CONFORMITY
- Applicable standards:
- EU-CONFORMITEETSVERKLARING
- DECLARATION UDECONFORMIDADE
Brand : THOMSON
Model : HR10T16
Category : Heating