
K128 - Cooker Wamsler - Free user manual and instructions
Find the device manual for free K128 Wamsler in PDF.
| Product type | Solid fuel cooker |
| Brand | Wamsler |
| Model | K128 |
| Approved fuels | Natural wood logs (max. 33 cm, humidity < 20 %), lignite briquettes |
| Nominal power | 7 kW |
| Required draft | 12 Pa |
| Nozzle diameter | 120 mm |
| Flue gas temperature | 250 °C (K128), 270 °C (K128F) |
| Main functions | Cooking, grilling, baking, heating |
| Included accessories | Chrome grill, baking sheet, multifunction lever, soot scraper |
| Maintenance | Clean the firebox regularly, empty the ash pan, check after each heating season |
| Safety | Minimum distances to flammable materials: front 50 cm, sides 30-40 cm, top 70 cm; floor in front made of non-combustible material |
| Spare parts | Use only genuine Wamsler parts; indicate Article No. and Serial-Nr. |
| General information | 116-page manual available in several languages (FR, DE, EN, HU, IT, etc.) |
Frequently Asked Questions - K128 Wamsler
User questions about K128 Wamsler
0 question about this device. Answer the ones you know or ask your own.
Ask a new question about this device
Download the instructions for your Cooker in PDF format for free! Find your manual K128 - Wamsler and take your electronic device back in hand. On this page are published all the documents necessary for the use of your device. K128 by Wamsler.
USER MANUAL K128 Wamsler
K 118
K 128
K 128 F
K 138
K 138 F
Account held with: MKB Bank Zr. SWIFT Code (BIC): MKKB HUHB Account No.: 16300002-20383008-00003285
Court Registry No.:01-09-464076 Registered by the Court of Registration, E. Tax No.: 12072112-2-41 EU Tax No.HU12072112
E-mail:info@kemai.hu www.kemai.hu
TOV SDD KERMI Ltd. Tel: +36 1210-9570 Fax: +36 3134-3820 H-1043 Budapest, Dugancos u.11.

K128/K138/K128F/K138F
Account held with: MKB Bank Zit.
SWIFT Code (BIC): MKKB HUHB
Account No.:
10300002-20183008-00093285
Court Registry No.:01-09-454076
Registered by the Court of Registration, Bp.
Tax No.: 12072112-2-41
EU Tax No.HU12072112
E-mail:info@chemlu.com
www.kormi.hu
TUV SOD KERM LIM.
Tel: +36 1210-9570
Fax: +35 1314-3820
H-1043 Budspent, Duganics u.11.
Geprüfter Typ:
K128/K138/K128F/K138F
Festbrennstoffherd
Braunkohlebriketts: Dauerbrand; Scheitholz: Zeitbrand
Vizsgelt tipus:
K128/K138/K128F/K138F
Congratulations on your purchase of our solid fuel stove. You have made a good choice. Because this product guarantees you:
- High Quality thanks to use of top quality, proven materials
- Safe Running thanks to mature technology which has been tested for strict adherence to German and European standards
- Long Life thanks to durable construction methods.
This solid fuel stove provides you with a contemporary compact unit to provide your
- Cooking
- Baking and Roasting
Heating
These stoves save energy, are environmentally friendly and really simple to use. You will find everything you need to know as well as some useful hints in this manual.
Please note that the stove must only be installed by a qualified professional, who will also be available to help you should you have any problems at a later date.
PLEASE NOTE:
When ordering replacement parts, the Article No. and Serial No. shown on the identification plate must be quoted.
Please see the heading "Fuel / Settings" for instructions on the maximum quantity of fuel and details of the maximum chimney draught (18 Pa).
If you put in too much fuel and/or the draught from the chimney is too strong, there is a risk of overheating, which can damage the stove and/or the oven thermometer. The oven thermometer goes up to a temperature of 350^ max.
The stove can only be used when the fuel door (fire door) is shut.
This door must only be opened when lighting, topping up fuel or cleaning the fire box. Any damage to the stove or the thermometer which has obviously been caused by overheating is not covered by the guarantee.
Contents
Foreword 28
Contents 29
1. Installation 30
2 Fuels / Settings 39
3 Use 40
1.1 Safety measures 30
1.2 Parts 32
1.3 Instructions 34
1.4 Place of installation 34
1.5 Air supply 34
1.6 Safe distances 34
1.7 Chimney attachment 35
1.8 Choice of flue gas connection placement 37
2.1 Fuels 39
2.1 Combustion airflow settings 40
3.1 Important operating components 40
3.1.1 Adjustable grate 40
3.1.2 Performance control 40
3.1.3 3.1.3 Secondary air control (without K 128 F/138 F) 40
3.1.4 Start damper 40
3.1.5 Oven door 41
3.2 Lighting 41
3.3 Cooking, roasting and baking 41
3.4 Care and cleaning 41
3.4.1 Care of the enamel parts: 42
3.4.2 Care of oven: 42
3.4.3 Care of the steel plate: 42
3.4.4 Care of the glass ceramic plate: 42
3.4.5 Care of glass (window): 42
3.5 Trouble shooting 43
3.6 Spacer connection 43
3.7 Pictures 44
4 Technical data 45
4.1 Data 45
4.2 Dimensional 45
5 Disposal of the device after wear 47
1. Installation
1.1 Safety measures
-
The stoves are tested to DIN EN 12815 (see identification plate).
-
For installation and for flue gas connections, the requirements of the Fire Regulations (FeuVO in Germany) apply, as well as local building regulations such as the following technical standards DIN 4705, DIN EN 13384, DIN 18160, DIN EN 1856-2 and DIN EN 15287. In order for the stove to function correctly the chimney to which you want to connect the stove must be in good condition.
-
Before first use and before connecting to the chimney, you must read the Instructions for Use carefully and inform the local authority responsible for approving heating systems.
-
While installing the stove you are recommended to wear clean cotton gloves, in order to avoid leaving fingerprints which can be difficult to remove afterwards.
-
In the interests both of clean air, and of the safe functioning of the stove, the fuel quantities listed in the Instructions for Use should never be exceeded, and the doors of the stove must be shut during use to avoid the risk of overheating, which can lead to damage to the stove. Damage due to this cause is not covered by the guarantee.
-
The stove doors must remain shut at all times while the stove is in use.
-
Permitted fuels are:
-
Natural chopped firewood (up to 33cm max. in length)
-
Lignite (brown coal) briquettes (see permitted fuels in the Instructions for Use)
-
Never use liquid fire starters. Use either special firefighters or wood shavings.
- Burning rubbish, fine chips, bark, coal slack, chips from planing, damp wood or wood treated with preservative, paper, cardboard or similar is not permitted.
- The first time the stove is heated there may be some smoke and an unpleasant smell. Make sure that the room is well ventilated (open windows and doors) and heat for at least an hour at the maximum nominal heat load. If the maximum temperature is not reached the first time the stove is heated, then there may be further unpleasant smells at a later date.
- All controls and settings must be used as indicated in the Instructions for Use. When the stove is hot, please handle only using the implements or protective gloves provided.
- If the stove is not working correctly, or if the chimney is not drawing properly, smoke may appear when the fire door is opened. It is very important to only open the fire door slowly, initially just a crack, then wait a few seconds before opening fully. In addition, before opening the fire door to top up the fuel, make sure that only glowing material is present: there must not be any visible flames.
- Do not place any flammable items in the warming drawer or on the surface of the stove.
- When in use, all surfaces and particularly the glass doors and handles and other controls can become very hot. Make children, young people, older people and animals aware of this danger, and keep them away from this source of heat when the stove is being used. Use the protective gloves or the implements provided.
Children and young people under 16 must not use the stove unless supervised by an adult who is responsible for them.
- Make sure that the ash pan is always fully pushed in, until it touches the back. Never remove ashes while still hot (fire risk).
- In spring and autumn the chimney may no longer draw correctly, so that gases produced by combustion are not completely removed. The fire chamber should then be filled with a small quantity of fuel, ideally with wood shavings, and lit under supervision, in order to stabilise the chimney draught. The grate must be clean.
- After each prolonged period of use for heating, have the stove checked by a professional. The flues and pipes for the evacuation of fumes must also be thoroughly cleaned.
- If repairs or replacements are necessary, please contact your supplier with the necessary article numbers and serial numbers in good time. Only original WAMSLER replacement parts may be used.
- Work such as installation, setup, commissioning and services, as well as repairs, must only be carried out by qualified personnel (heating system or space heating technicians). Intervention by non-qualified persons invalidates the warranty and guarantee.
- As the solid fuel oven/stove draws the air required for combustion from the surrounding room, you must ensure that sufficient air can be drawn in through non-sealed windows and outside doors. It can be assumed that is this is provided by a room volume of at least 4m^3 per kW nominal heat capacity. If the volume is less than this, then air vents can be used to provide access to further air in other rooms (min. 150~cm^2 ).
- You must ensure that the correct safety distance is maintained from all flammable components and materials – to the side, rear and front. These distances can be found in the Instructions for Use or the identification plate.
- The fire chamber must not be modified.
- Connection to a chimney whose functional height is less than 4m , or if multiple stoves are installed, 5m , is not permitted. A maximum of two other fires can be connected to the chimney which is to be connected the stove.
- If the chimney catches fire immediately close all doors and openings and call the fire brigade. Do not attempt to extinguish the fire yourself. Afterwards have the chimney thoroughly checked out by a professional.
- Solid fuels naturally create soot, so it is always possible that the window glass will become dirty: this does not mean there is a malfunction.
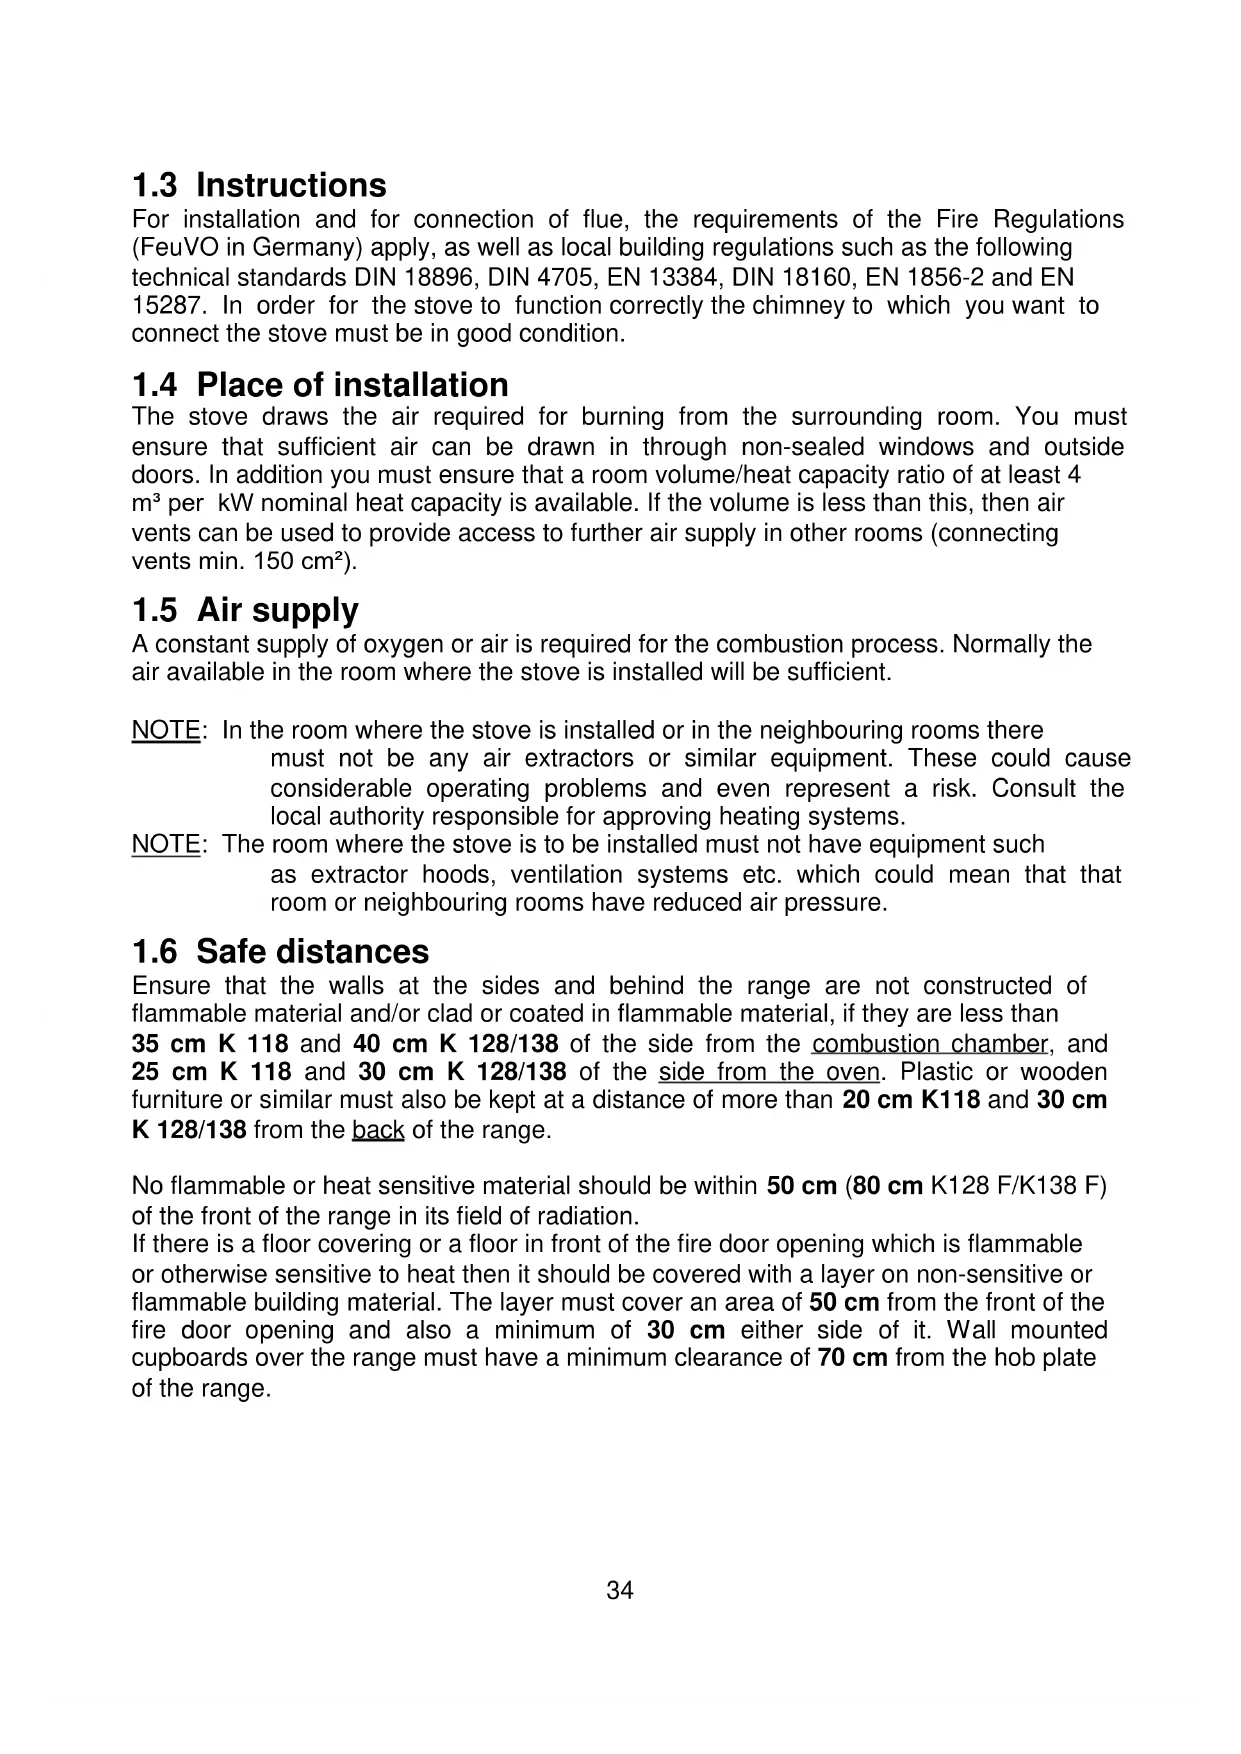
1.2 Parts
K118
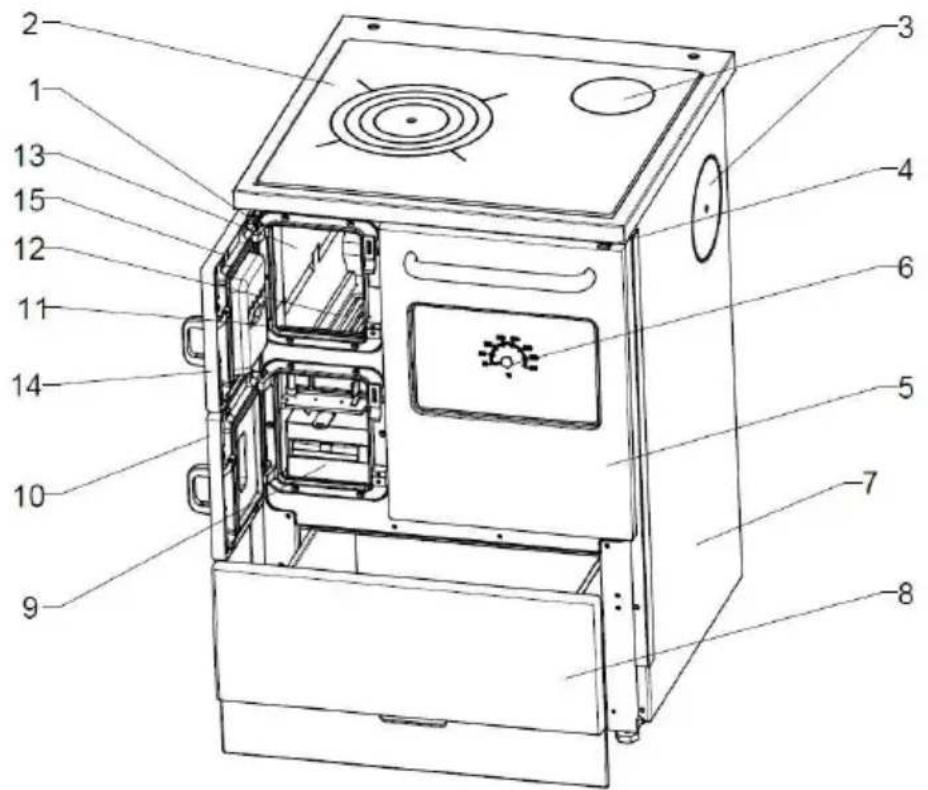
K128; K128 F

K 118 / K128 / K128 F K 138; K138 F
- Primary air control 1. Primary air control
- Steel plate 2. Steel plate
- Flue gas connections 3. Flue gas connections
- Operating lever for start damper 4. Operating lever for start damper
5.Oven door 5.Oven door - Oven thermometer 6. Oven thermometer
- Sidewall 7. Sidewall
- Fuel trolley 8. Fuel trolley
- Ash pan 9. Ash pan
10.Ash door 10.Ash door - Grate location 11. Grate location
12.Grate 12.Grate - Fireclay lining in fire chamber 13. Fireclay lining in fire chamber
- Heating door 14. Heating door
- Secondary air control 15. Secondary air control
- Blind cover
Range accessories
Cover lift handle
- Soot scraper
- Ash pan
- Flue hole cover
Baking tray
- Roasting grid
- Adjustable grate support (for K128 / K138)
1.3 Instructions
For installation and for connection of flue, the requirements of the Fire Regulations (FeuVO in Germany) apply, as well as local building regulations such as the following technical standards DIN 18896, DIN 4705, EN 13384, DIN 18160, EN 1856-2 and EN 15287. In order for the stove to function correctly the chimney to which you want to connect the stove must be in good condition.
1.4 Place of installation
The stove draws the air required for burning from the surrounding room. You must ensure that sufficient air can be drawn in through non-sealed windows and outside doors. In addition you must ensure that a room volume/heat capacity ratio of at least 4 m^3 per kW nominal heat capacity is available. If the volume is less than this, then air vents can be used to provide access to further air supply in other rooms (connecting vents min. 150~cm^2 ).
1.5 Air supply
A constant supply of oxygen or air is required for the combustion process. Normally the air available in the room where the stove is installed will be sufficient.
NOTE: In the room where the stove is installed or in the neighbouring rooms there must not be any air extractors or similar equipment. These could cause considerable operating problems and even represent a risk. Consult the local authority responsible for approving heating systems.
NOTE: The room where the stove is to be installed must not have equipment such as extractor hoods, ventilation systems etc. which could mean that that room or neighbouring rooms have reduced air pressure.
1.6 Safe distances
Ensure that the walls at the sides and behind the range are not constructed of flammable material and/or clad or coated in flammable material, if they are less than 35 cm K 118 and 40 cm K 128/138 of the side from the combustion chamber, and 25 cm K 118 and 30 cm K 128/138 of the side from the oven. Plastic or wooden furniture or similar must also be kept at a distance of more than 20 cm K118 and 30 cm K 128/138 from the back of the range.
No flammable or heat sensitive material should be within 50 cm (80 cm K128 F/K138 F) of the front of the range in its field of radiation.
If there is a floor covering or a floor in front of the fire door opening which is flammable or otherwise sensitive to heat then it should be covered with a layer on non-sensitive or flammable building material. The layer must cover an area of 50~cm from the front of the fire door opening and also a minimum of 30~cm either side of it. Wall mounted cupboards over the range must have a minimum clearance of 70~cm from the hob plate of the range.
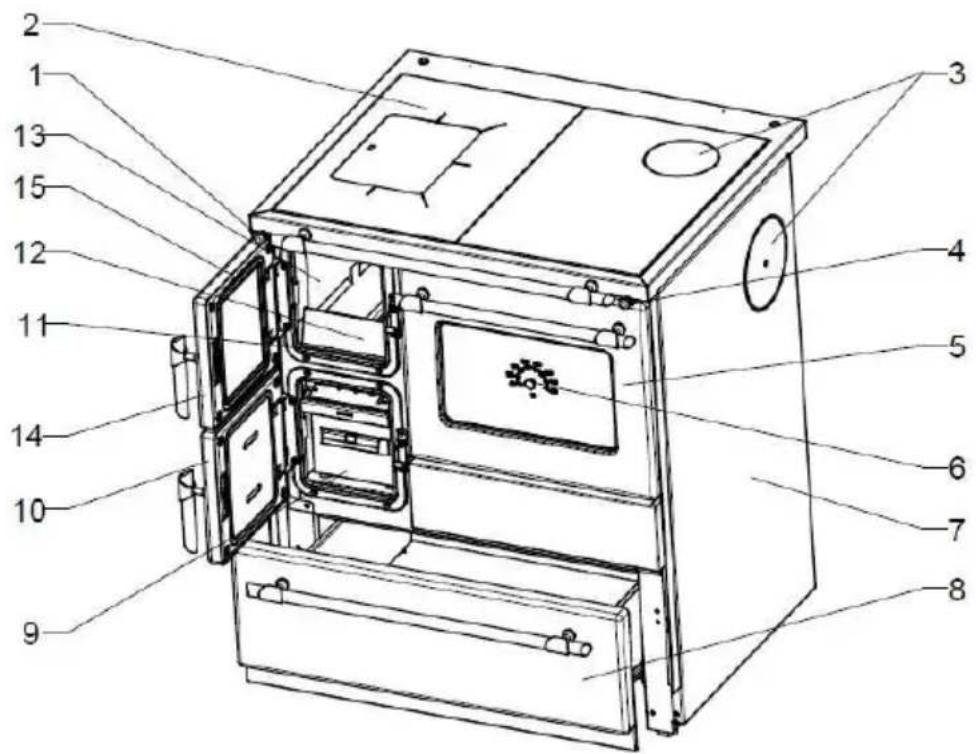
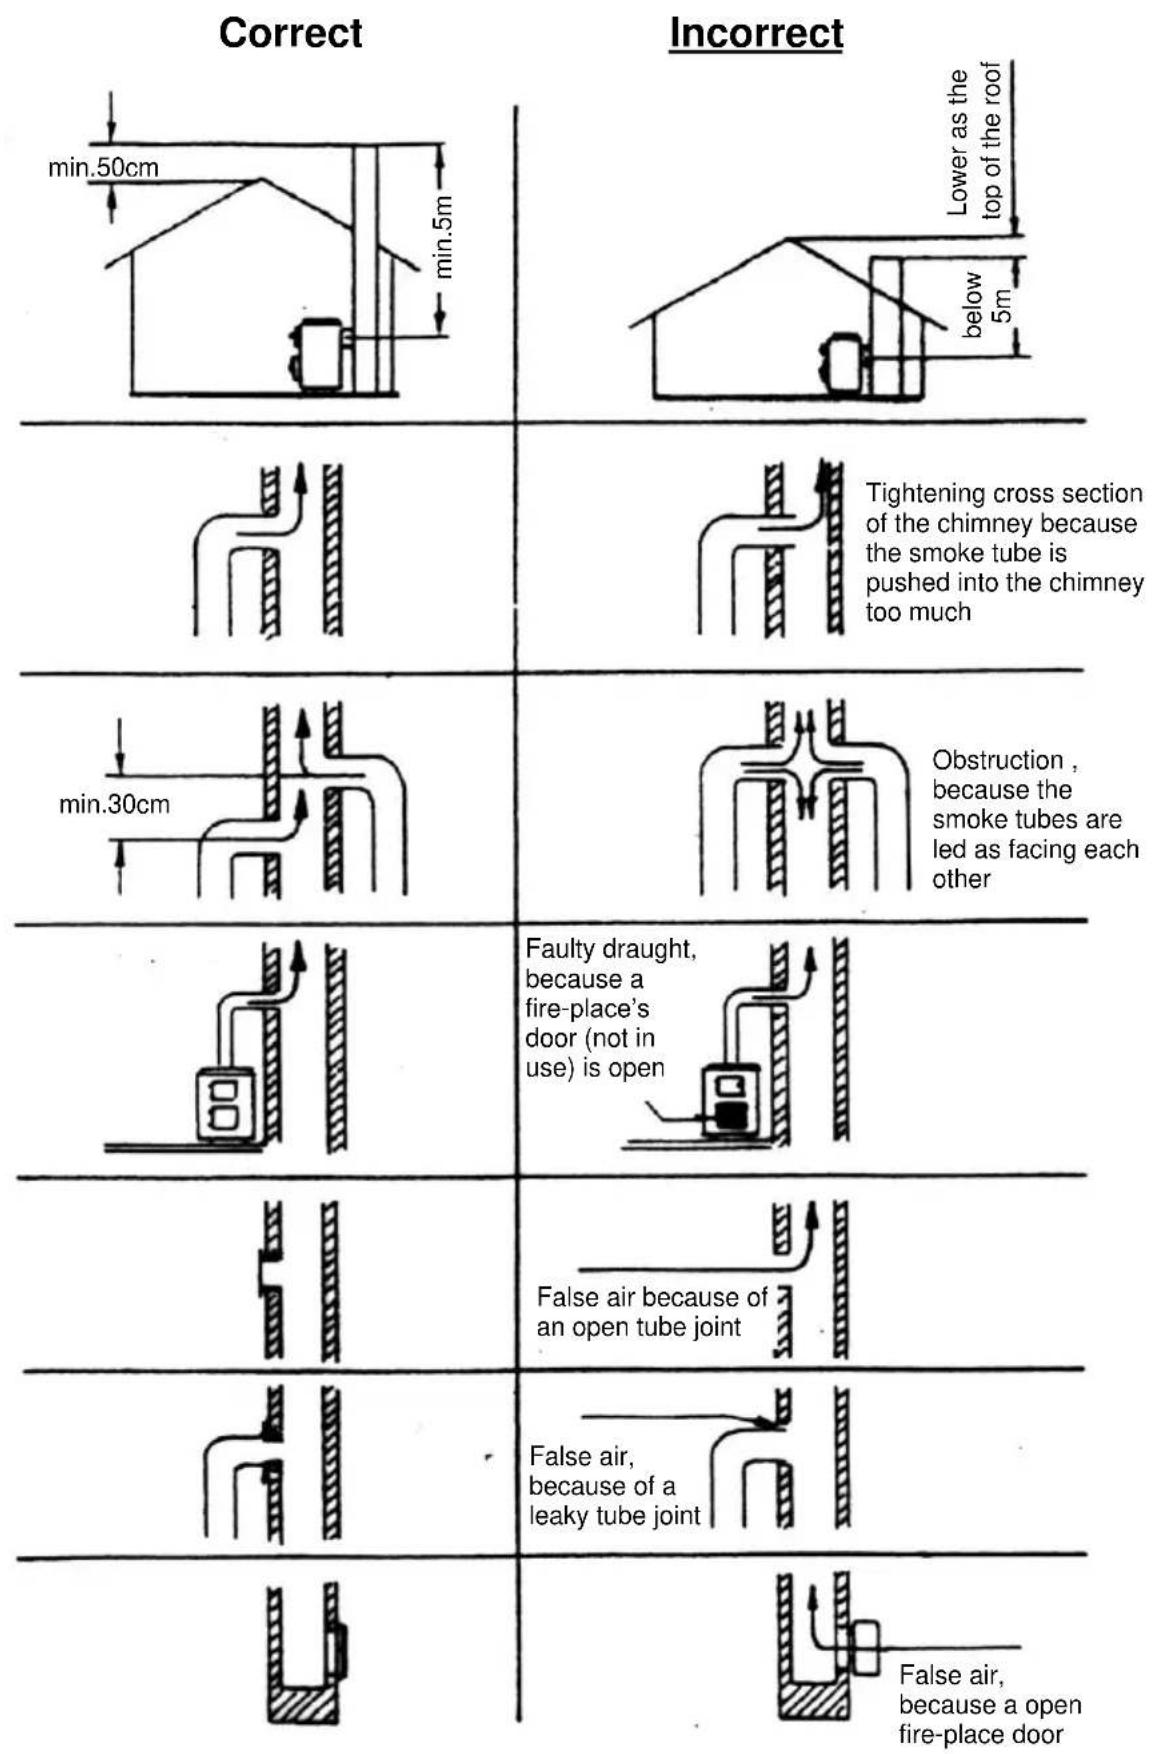
1.7 Chimney attachment
The connection for attaching to the chimney must be able to withstand at least 400^
PLEASE NOTE:
Before connecting the stove the local authority responsible for approving heating systems must be consulted!
Connection pieces must be firmly connected to the stove and to each other and must not leak. They must not project into the open diameter of the chimney. The connection piece between the stove and the chimney must have the same diameter as the pipe socket on the stove. Horizontal connection pieces of over 0.5m must rise towards the chimney at an angle of 10 degrees. Any pipes which are not heat insulated or vertical
must not be longer than 1 metre.
The requirements of the Fire Regulations (FeuVO) apply, as well as local building regulations such as for the chimney standards DIN 4705, DIN EN 13384, DIN 18160 and DIN EN 15287.
Connection pieces must be tested to DIN EN 1856-2. Measurement
X (distance from flammable construction and other materials) must be as defined by the manufacturer of the connection piece.
PLEASE NOTE:
Fitting to a chimney with a functional height of less than 4m or if several stoves are being fitted, less than 5m , is not permitted.
(See: Data for chimney calculations / Chapter 4.) A maximum of
two other fires can be connected to the chimney to be connected to the stove.
For safety reasons it is not permitted to use a steam extractor hood to remove air when the stove is producing heat.
1.8 Choice of flue gas connection placement
The flue socket is fixed and located at the rear of the range. If the flue pipe is to be connected on the side or on the top, the back wall connection must be covered with the blind cover removed from the top or the side.
In the case of a connection from the top, the cover in the top of the range must be removed and the emission nozzle must be installed.
If the flue pipe is to be connected from the side the procedure is as follows:
Remove the blind cover on the outside sidewall by removing the bolt.
Remove sidewall:
- Remove the blind cover (pull off forwards)
- Undo bolts in the sidewall.
Remove the blind cover on the inner sidewall by loosening the bolts and turning the cover.
Take the flue connection from the back and mount it on the side.
Put the blind cover on the back to replace the flue connection which is now remounted on the side. Tighten bolt.
Replace sidewall and blind cover.
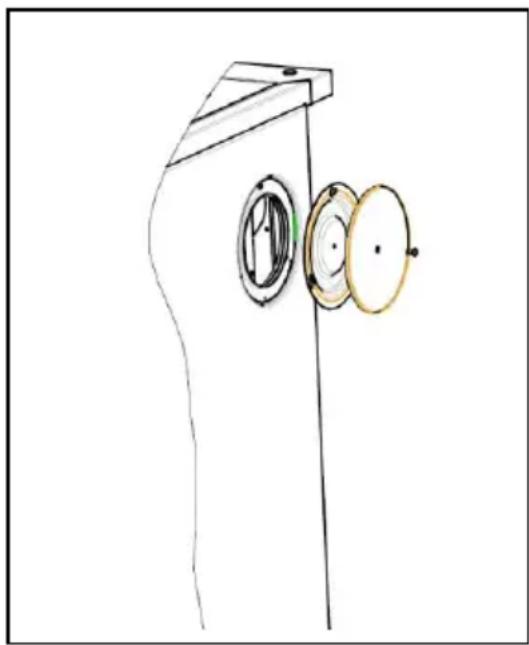
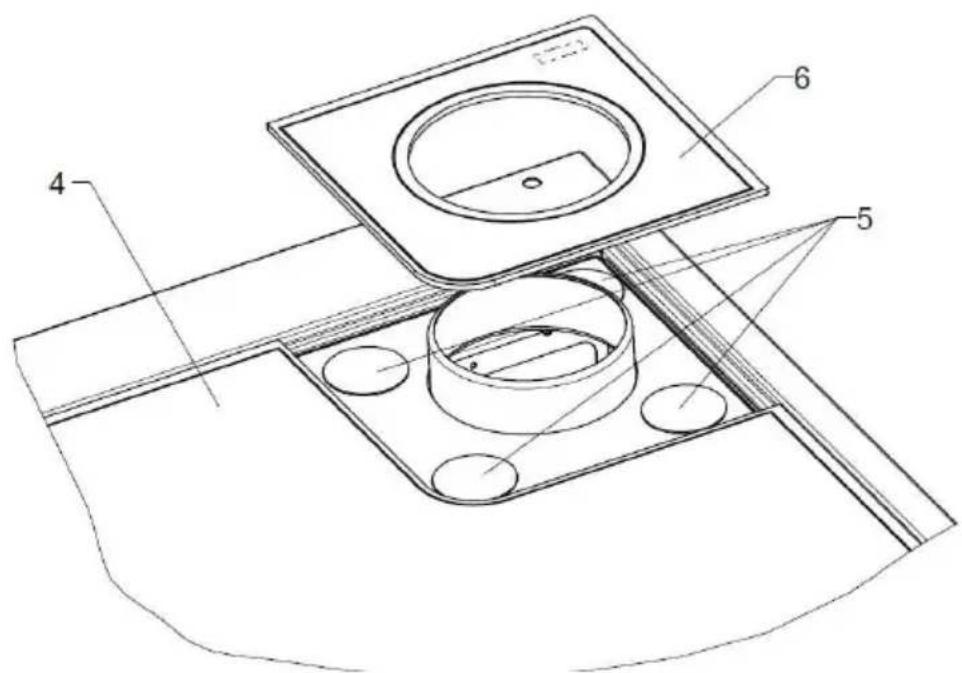
1.9 Connecting flue gas at Ceran plate (only K128 / K128F)
In principle, the devices are manufactured in the version as ordered. Once a device has to be retrofitted or rebuilt, to be carried out subsequent operations (special order):
- seal plates mounted (no. 1)
- Mount connecting plate (no. 2) fixed to the bracket with the two wing nuts (no. 3)
Fix Ceran plate (no. 4) on the cooker - Hang 4 spacers (5 NQ) on the connecting plate (no. 2) and position the small Ceran plate (NQ 6). Ceramic hob - Position can be aligned by adjusting the wing nuts as desired.

2 Fuels / Settings
2.1 Fuels
Low smoke, trouble-free operation of the stove and a supply of heat at the nominal level with a chimney draught of 12 Pa are only guaranteed when you use the following fuels and no others.
Only use natural, dry chopped firewood with a remaining humidity of max. 20% and lignite (brown coal) briquettes.
| Type of fuel | Heating value appr. kWh/kg |
| Lignite briquettes | 5,3 – 5,5 |
| Hardwood | 4,0 – 4,2 |
| Softwood | 4,3 – 4,5 |
Non-permitted fuels include:
Rubbish, fine chips, pellets, bark, chips from planing, coal slack, damp wood or wood treated with preservative, paper, cardboard or similar. For lighting use wood shavings or barbecue lighters. Never use liquid fire starters!
PLEASE NOTE:
The first time the stove is heated there may be some smoke and an unpleasant smell. Make sure that the room is well ventilated (open windows and doors) and heat for at least an hour at the maximum nominal heat load. If the maximum temperature is not reached the first time the stove is heated, then there may be further unpleasant smells at a later date.
Maximum fuel quantities per load
Table 1
| Fuel | K118 | K128 / K138 and F |
| Lignite | 3.2 kg (5-6 briquettes) at nominal heat capacity 3.2 kg (5-6 briquettes) for slow burning | 3.8 kg (6-7 briquettes) at nominal heat capacity 3.8 kg (6-7 briquettes) for slow burning |
| Wood | 2.0 kg (about 3 pieces) | 2.3 kg (about 3 pieces) |
2.2 Combustion airflow settings
The settings must always be as shown.
Table 2
| Fuel | Primary airflow setting | Start damper setting | Secondary airflow setting | Combustion duration in hrs | |
| Lighting | 1 | open | 1 | - | |
| Firewood | Nominal heat | 2 | closed | 1 | approx. 1 |
| Lignite briquette | Nominal heat | 1 | closed | 0 | approx. 2 |
| Lignite briquette | Long-term | 3 | closed | 0 | approx. 12 |
| Not in use: do not add any more fuel | 3 | closed | 0 | - | |
3 Use
3.1 Important operating components
3.1.1 Adjustable grate
The range is equipped with a height adjustable grate for summer and winter operation.
Adjusting the grate for summer operation (K128 / K138)
To adjust the grate to the summer operation position, the grate and the grate support should be removed from the range. Then attach the adjustable grate support (included with the accessories) to the front of the upper grate support (see Fig. 7). Insert the grate support with the grate on top.
3.1.2 Performance control
The burning rate and therefore the heating capacity of the range can be regulated by the combustion air intake under the grate. This primary air is set using the primary air regulator (Fig. 6).

1 = Lighting, Lignite (open)
2 = Wood
3 = Not in use (closed)
3.1.3 Secondary air control (without K 128 F/138 F)
The secondary air regulator is in the top of the fire door and can be set according to the fuel being used, wood (1) or coal (0) (Fig. 8).
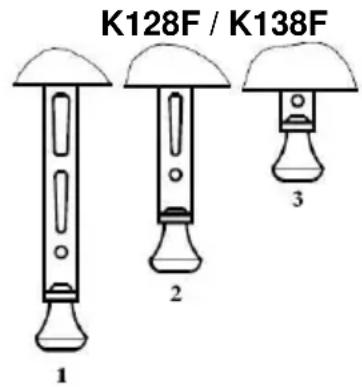
3.1.4 Start damper
The start damper is operated from the front. The hooked end of the lid lifter lever which is supplied should be latched into the operating lever slot (Fig. 9).
The start damper is open, if the operating lever is pushed forward as far as it will go (lighting up, cooking).
The start damper is closed when the operating lever is pushed back as far as it will go (baking, roasting).
WARNING
Leaving the start damper open when heating, leads to overheating and damage to the range components.
Besides which it increases fuel consumption.
3.1.5 Oven door
The oven door can be removed without using any tools. Take hold of the handle, slightly open and then pull upwards at an angle (Fig. 10).
Remounting the oven door is done by inserting the two hinge brackets into the slots and pressing in the lower edge of the door with the knee, at the same time pulling up on the handle.
3.2 Lighting
Open the fire door. First put in fire lighters or wood wool and then lay two or three small pieces of dry wood on top. Then light the fire through the fire door opening. Close the fire door and open the start damper.
When the wood is burning well, add a shovel of coal or a few larger pieces of wood. The ash door should be left slightly open for the time being and should only be closed about five minutes after adding the fuel
The start damper should now also be closed. The performance control is set according to the type of fuel and the desired heat capacity or may be closed completely for a low setting.
Using wood, particularly soft wood, only limited slow burning is possible.
Lignite briquettes are particularly suited to slow burning overnight.
WARNING
In the interests of the environment do not fill the combustion chamber all at once. Feed the fuel onto the fire bed in two or three charges at ten to fifteen minute intervals.
Do not use paper to start the fire
3.3 Cooking, roasting and baking
If the oven is only to be used for cooking, then the start damper should be opened. When roasting or baking, close the start damper. In summer the grate Raking down, removing cinders and ashes
Before adding fuel, open the ash door and, using the cover lifter, riddle the grate.
The ash pan should be emptied every day.
Remove all cinders at least every third day.
WARNING
Do not dispose of glowing cinders in dustbins or outside must be in the upper position and in winter in the lower position.
3.4 Care and cleaning
A decrease in the normal heating capacity and occasional smoke are signs of the need for the range to be cleaned.
Cleaning the draught system
To clean the draught system under the oven the knurled nut on the cleaning cover must be unscrewed and the cover removed. After cleaning the cover needs to be sealed again.
3.4.1 Care of the enamel parts:
Only wipe down the external surfaces when the stove is cold. Varnished surfaces should only be washed with plain water (do not scrub). Enamel surfaces in special cases can be cleaned with soapsuds or a bit of washing-up liquid and then wiped dry.
NOTE: Never use sponges, scouring products or any other chemical or abrasive cleaning products!
3.4.2 Care of oven:
The oven should be cleaned when it is just warm, not after long periods but every time it is used.
3.4.3 Care of the steel plate:
The steel sheet parts must be rubbed over with an acid-free sheet steel care product when at blood temperature. Cleaning is then done when the stove is cold.
The special steel plates which radiate heat need to be taken care of regularly after each time you cook. After any use which causes dampness or dirt to collect on the plate, you must clean it. The hob plate should be cleaned when it is still lukewarm, which allows any remaining water to evaporate and so prevents rust forming. Take care that you do not use water to clean the stove when it is cold.
Expansion joints in the steel hob plate must always be cleaned free of adhesions, to avoid deforming the steel hob plate and the side panels. If necessary the edge of the cover should also be cleaned of any adhesions.
3.4.4 Care of the glass ceramic plate:
Clean the window and/or Ceran plate before first use with a clean damp cloth. Then rub a few drops of a ceramic glass protection product onto the glass / Ceran plate with a paper towel.
After wiping this and polishing it dry, the high quality surface is now covered with an invisible film. The helps to keep the glass pane /Ceran plate clean and if repeated regularly, makes it easy to clean.
3.4.5 Care of glass (window):
Before its first use, clean the ROBAX inspection glass with a wet and clean cloth, and then put a few drops of glass-ceramics cleaner onto both sides of the glass, and spread them with the use of kitchen paper tissues. It provides an invisible film on the valuable surface of the Robax glass. This film helps to keep the glass clean, and facilitates regular cleaning operations. ROBAX S for slightly contaminated surfaces – a commercially available glass surface cleaning agent – may as well be used for the cleaning of the medium or strongly contaminated glass surfaces of the fireplace. Towards this end, spray small quantities of the agent to the cold surfaces,
PLEASE NOTE:
After every period of heating you should check the stove thoroughly. If repairs or replacements are necessary, please contact your supplier with the necessary article numbers and serial number in good time.
Work such as installation, setup, commissioning and servicing, as well as repairs, must only be carried out by qualified personnel (heating system or space heating technicians). Intervention by non-qualified persons invalidates the warranty and guarantee.
3.5 Trouble shooting
Your range is constructed to the latest technical standards.
Nevertheless faults may occur. The reason can be the chimney, the fuel or the emission pipe system. A short period with a smell and smoke when first starting is quite normal.
Make sure the room is properly ventilated.
| Fault | Check/Remedy |
| The range smokes when being fired up in summer | Open the ash door for a short time (high outdoor temperature can cause poor draught).Warm up the chimney with wood wool (either in the chimney or in the range). |
| Open the ash door for a short time.Do not use any damp or smoke intensive fuel.Fill the fire chamber slowly and a little at a time.When the range was last cleaned? | |
| Range does not burn properly | Is the chimney draught too weak?Is the flue connection not sealed properly?Are all cleaning doors on the range and chimney properly closed?Is a fresh air supply ensured from adjoining rooms? (doors and windows should not be absolutely tight)Is the chimney overloaded or not sealed properly? |
| Too low a temperature when cooking and roasting | Open the ash door for a short time. |
| Too high a temperature when cooking and roasting | Add less fuel. |
| Grate jams when riddling | Have the cinders been removed?Is there a nail or something jammed in the grate? |
| Condensation in the range | Is the fuel too damp? |
Action in case of chimney fire!
If a chimney is not cleaned often enough, or if the wrong type of fuel is used (e.g. damp wood) or the air flow is maladjusted the chimney may catch fire. In this case close the air supply to the fire chamber and call the fire brigade.
Never try to extinguish it yourself using water!
3.6 Spacer connection
If the range is to be incorporated in a fitted kitchen, then the interface between an adjoining floor cupboard made of wood should be fitted with spacer connections available from the factory. This thermal spacer has been tested to EN standards together with the range and complies with the building regulations for fire protection.
The spacer connection is either 55mm or 110mm wide and should be mounted on the range frame as a unit and can be adjusted in height (Fig. 11).
3.7 Pictures
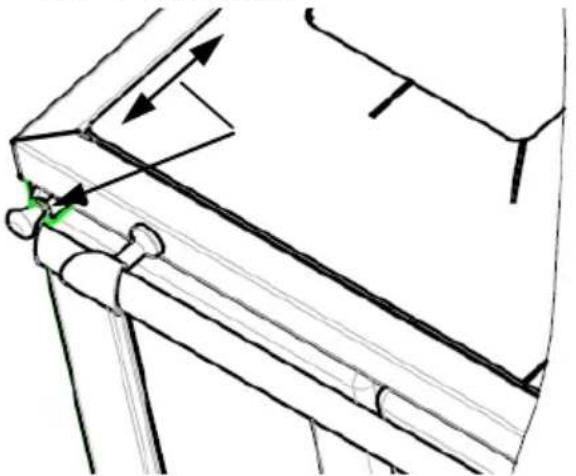
Fig. 6

Fig. 7
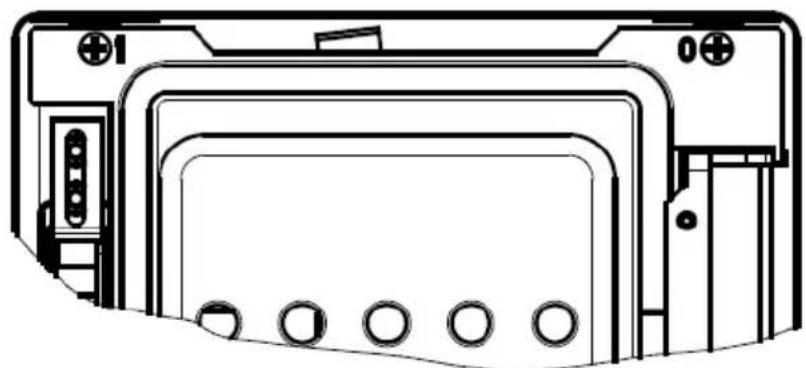

Fig 8.

Fig. 10

OPEN

CLOSED

Fig.9
Fig. 11
4 Technical data
4.1 Data
| Model | K118 | K128 / K128 F K138 / K138 F | |
| Nominal heat output | kW | 6 | 7 |
| Emission flow with coal | g/s | 10,8 / 9,9 | 10,5 / 11,5 |
| Flue gas temperature at exhaust socket | °C | 240 | 250 / 270 |
| Required pressure at NHC | Pa | 12 | 12 |
| Room heat capacity* continuous heating periodic heating | m³ | 165 / 95 / 65 116 / 69 / 47 | 210 / 120 / 82 148 / 86 / 59 |
| Flue gas connection diameter | Ø mm | 120 | 120 |
| Dust (based on 13% O₂) | mg/m³ | ≤ 40 | ≤ 40 |
| CO (based on 13% O₂) | mg/m³ | 1070 / 1409 | 1224 / 1179 |
| CO (based on 13% O₂) | % | 0,09 / 0,11 | 0,10 / 0,10 |
| Efficiency | % | 76,3 / 76,8 | 77,5 / 73,4 |
NHC = Nominal Heat Capacity
* according to DIN 18893 Tab. 2 at good / less good / poor heating conditions
All information provided by the exhaust gas values are based on the EN 13240 under stationary laboratory conditions
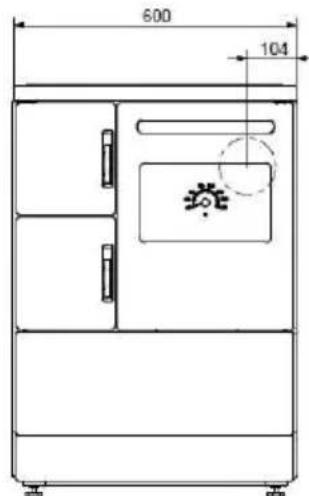
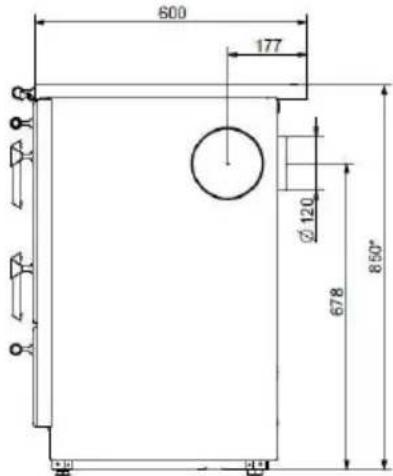
4.2 Dimensional K 118

* Without adjustable feet (unscrewed); With adjustable feet: 860 to 910

K128
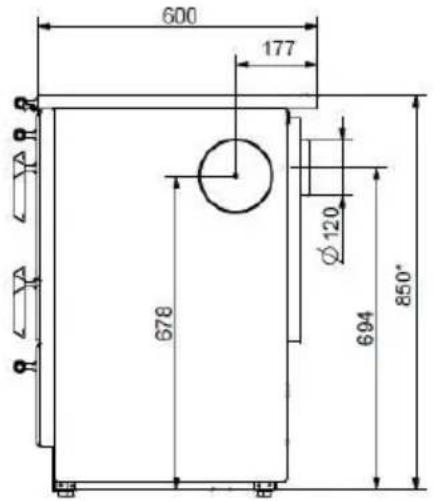
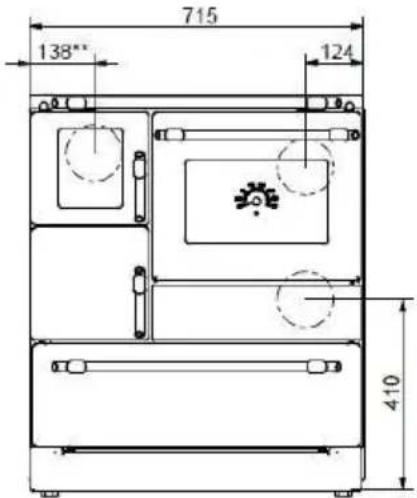
- Without adjustable feet (unscrewed); With adjustable feet: 860 to 910 mm;
** Location of connection to heat distributor (special accessories required);

K138

- Without adjustable feet (unscrewed); With adjustable feet: 860 to 910 mm .
** Location of connection to heat distributor (special accessories required);

The specified dimensions and weights are approximate values, and thus have only informative purposes. We reserve the right to modify the designs as required in terms of technology or quality!
5 Disposal of the device after wear
The device contains no hazardous materials, it is recommended to disassemble the device after the wear and deposit the parts in appropriate landfill.
We will only provide a guarantee for equipment which can be shown to have been connected and set up by an approved installer or another recognised professional.
Complaints:
Complaints about delivered goods relating to obvious faults must be made in writing within 14 days of receipt. If the raw materials used to date are no longer available, we are entitled to replace with alternative materials. The customer is not entitled to withhold an amount of the purchase price due to a fault which is disproportionate to the fault. If they do so, then they lose their right to a guarantee.
WAMSLER

3.3 Fozés, sutes, futes


- PLEASE NOTE:
- Contents
- Foreword 28
- Contents 29
- Installation 30
- Fuels / Settings 39
- Use 40
- Installation
- Safety measures
- Parts
- K 118 / K128 / K128 F K 138; K138 F
- Range accessories
- Instructions
- Place of installation
- Air supply
- Safe distances
- Chimney attachment
- Choice of flue gas connection placement
- Connecting flue gas at Ceran plate (only K128 / K128F)
- Fuels / Settings
- Fuels
- Combustion airflow settings
- Use
- Important operating components
- Adjustable grate
- Adjusting the grate for summer operation (K128 / K138)
- Performance control
- Secondary air control (without K 128 F/138 F)
- Start damper
- WARNING
- Oven door
- Lighting
- Cooking, roasting and baking
- Care and cleaning
- Cleaning the draught system
- Care of the enamel parts:
- Care of oven:
- Care of the steel plate:
- Care of the glass ceramic plate:
- Care of glass (window):
- After every period of heating you should check the stove thoroughly. If repairs or replacements are necessary, please contact your supplier with the necessary article numbers and serial number in good time.
- Trouble shooting
- Action in case of chimney fire!
- Spacer connection
- Pictures
- Technical data
- Data
- Dimensional K 118
- K128
- K138
- Disposal of the device after wear
- Complaints:
- Fozés, sutes, futes
Brand : Wamsler
Model : K128
Category : Cooker