
ELP Manet 8F - Light projector MARTIN - Free user manual and instructions
Find the device manual for free ELP Manet 8F MARTIN in PDF.

User questions about ELP Manet 8F MARTIN
0 question about this device. Answer the ones you know or ask your own.
Ask a new question about this device
Download the instructions for your Light projector in PDF format for free! Find your manual ELP Manet 8F - MARTIN and take your electronic device back in hand. On this page are published all the documents necessary for the use of your device. ELP Manet 8F by MARTIN.
USER MANUAL ELP Manet 8F MARTIN
Safety and Installation Manual
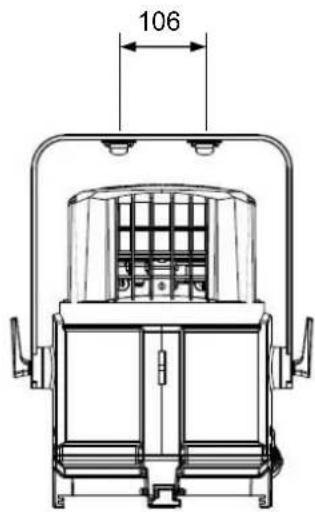
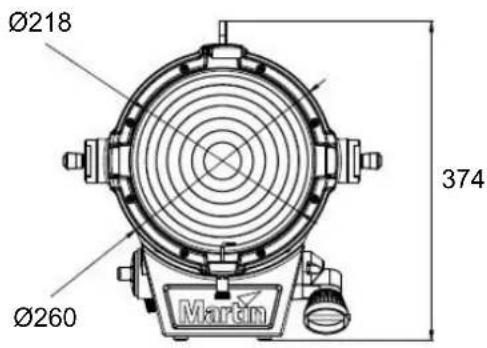
All dimensions are given in millimeters.

© 2025 HARMAN PROFESSIONAL DENMARK ApS. All rights reserved. Features, specifications and appearance are subject to change without notice. HARMAN PROFESSIONAL DENMARK ApS and all affiliated companies disclaim liability for any injury, damage, direct or indirect loss, consequential or economic loss or any other loss occasioned by the use of, inability to use or reliance on the information contained in this document. Martin is a registered trademark of HARMAN PROFESSIONAL DENMARK ApS registered in the United States and/or other countries.
HARMAN PROFESSIONAL DENMARK ApS, Olof Palmes Alle 44, 8200 Aarhus N, Denmark
HARMAN PROFESSIONAL, INC., 8500 Balboa Blvd., Northridge CA 91325, USA
www.martin.com
ELP Manet 8F Safety and Installation Manual Multi-language Revision A, P/N 5154547-00
Table of contents
Dimensions 2
Safety information 5
Before using the product for the first time 25
Fixture overview. 26
Physical installation. 27
Fixture location 27
Using quarter-turn fasteners 27
Fastening the fixture to a flat surface 27
Mounting the fixture on a truss 28
Securing with a safety cable. 29
Standing the fixture on a surface 29
Connecting to AC power 30
Linking fixtures to power in a chain 30
Connecting to data 30
Installation physique 31
Service and maintenance 43
Cleaning. 43
Installing a gel frame. 43
Installing a bardoors accessory 44
Service and repairs. 44
Specifications. 45
Compliance. 45
Disposing of the product. 45
Safety information

WARNING!
Read the safety precautions in this manual before installing, operating or servicing this product.
The following symbols are used to identify important safety information on the product and in this manual:

Warning!
Safety hazard. Risk of severe injury or death.
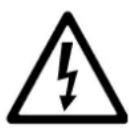
Warning!
Hazardous voltage. Risk of lethal or severe electric shock.

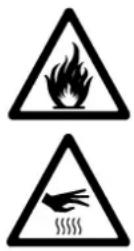
Warning!
Fire hazard.

Warning!
Burn hazard. Hot surface. Do not touch.
Warning!
Intense light emission. Risk of eye injury

Warning!
See user documentation.

Warning! Risk Group 2 product according to IEC/TR 62778 (see "Protection from eye injury" on page 6 for full details). Possibly hazardous radiation emitted from this product. May be harmful to the eyes. Do not stare directly into the light output from the product. Position the product so that prolonged staring into the product at a distance closer than 1.2m (4 ft.) is not expected. Do not view the light output with optical instruments or any device that may concentrate the beam.
This lighting fixture is for professional use as a stage light only. It is not for household use. It presents risks of severe injury or death due to fire hazards, electric shock and falls. It can create a fire hazard or a risk of eye injury if the safety precautions below are not followed.
Respect all locally applicable laws, codes and regulations when installing, applying power to, operating or servicing the fixture.
Installation must be carried out by a qualified professional only. The safety and suitability of lifting equipment, installation location, anchoring method, mounting hardware and electrical installation are the responsibility of the installer.
The light source contained in this luminaire shall only be replaced by the manufacturer or his service agent or a similar qualified person.
The fixture is suitable for mounting at any height, including less than 1.2m (3.9 ft.) and more than 5m (16.4 ft.) above ground or floor level.
Do not operate the fixture at an altitude of more than 2000m (6570 ft.) above sea level.

Install, operate and service this product only as directed in its safety and user manuals, or you may create a safety hazard or cause damage that is not covered by product warranties. Follow the safety precautions listed below and observe all warnings in this manual and printed on the product. Keep this manual for future use. For the latest user documentation and other information about this and all Martin products, please visit the Martin website at www.martin.com
Technical Support
If you have questions about how to install or operate the fixture safely, please contact Harman Professional Technical support:
- For technical support in North America, please contact:
HProTechSupportUSA@harman.com
Phone: (844) 776-4899
- For technical support outside North America, please contact your national distributor.
Protection from electric shock
Do not expose the fixture to rain or moisture. Do not immerse the fixture in water or any other fluid. Do not install the fixture in a location where flooding may occur.
Ensure that the fixture is electrically connected to ground (earth).
Disconnect the fixture from AC power when not in use.
Isolate the fixture from power immediately if any seal, cover, cable, or other component is damaged, defective, deformed or showing signs of overheating. Do not reapply power until repairs have been completed.
Do not open the fixture or remove any cover. Refer any service operation not described in this manual to an authorized Martin Service partner.
Shut down power to the entire installation at the main power distribution board and lock out power before carrying out any installation or maintenance work.
Use only a source of AC mains power that complies with local building and electrical codes and has both overload and ground-fault (earth-fault) protection.
To connect the fixture to AC mains power, you must first obtain 16 AWG or 1.5mm^2 power input cable that is 8 A rated. If you intend to connect devices to AC mains power by creating a daisy chain of interconnected devices, you must obtain 12 AWG or 2.5mm^2 power input cable that is 16 A rated.
In the USA and Canada, power input and power relay cables must be UL-listed, type SJT or better. In the EU, the cables must be type H05RN-F or better. Suitable cables with the correct connectors are available from Martin.
The fixture has a typical total power consumption of 530W
The fixture draws a maximum total current of:
- 5.3 A when connected to mains power at 100 - 120V
- 2.5 A when connected to mains power at 208V
2.2 A when connected to mains power at 230-240 V~
Do not connect a device - or an interconnected daisy chain of devices - to power if the maximum resulting current draw will exceed the electrical ratings of any cable or connector used to supply power.
Before connecting any devices to the fixture's MAINS THRU/OUT connector, check the maximum current draw of all the devices that you will connect to power in a chain. Do not exceed a total of 16 amps maximum when you add together the current draw for the entire chain, including the first device in the chain.
If you relay power from one ELP Manet 8F fixture to another by connecting one fixture's MAINS THRU/OUT connector to the next fixture's MAINS IN connector, observe the following safety limits:
- Do not connect more than three (3) ELP Manet 8F fixtures in total to each other in a daisy chain when supplying the fixture with mains power from 100V to 120V .
- Do not connect more than three (3) ELP Manet 8F fixtures in total to each other in a daisy chain when supplying the fixture with mains power at 208V .
- Do not connect more than five (5) ELP Manet 8F fixtures in total to each other in a daisy chain when supplying the fixture with mains power from 230V to 240V .
The fixture draws a typical half-cycle RMS inrush current of 12.7 A for the first 10 milliseconds when mains power is first applied to the fixture at 230V 50Hz
The voltage and AC frequency of the power at the fixture's MAINS OUT connector are the same as those applied at the MAINS IN connector.
Before using the fixture, check that all power distribution equipment and cables are in perfect condition, are rated for the current requirements of all connected devices, and are of suitable type for the location (including water, pollution, temperature and UV resistance).
The fixture's DMX transceiver is isolated/SELV to prevent ground loops and for safety reasons.
Protection from burns and fire
Do not operate the fixture if the ambient temperature (Ta) exceeds 40^ (104^) .
The surface of the fixture can reach up to 68^ C (155^ F) if the fixture is operated at the maximum permitted ambient temperature. Allow the fixture to cool for at least 5 minutes before handling.
Install the fixture on a non-combustible surface (brick, concrete, plaster etc.) only.
Keep a minimum distance of 50~cm (19 in.) between the fixture and combustible materials (fabric, wood, paper etc.).
Do not aim light from the fixture at any surface that is less than 1m (3.3 ft.) from the fixture.
Keep the fixture well away from flammable materials (volatile liquids etc.).
Do not expose the front glass to sunlight or any other strong light source from any angle. Lenses can focus the sun's rays inside the fixture, creating a potential fire hazard.
Ensure that there is free and unobstructed airflow around the fixture.
Allow at least 0.2m (8 in.) free space around the fixture.
Do not attempt to bypass thermostatic switches or fuses.
Do not modify the fixture in any way not described in this manual or install other than genuine Martin parts. Do not stick filters, masks or other materials onto any lens or other optical component. Use only accessories approved by Martin to modify the light beam.

Protection from eye injury
The light from the LED emitters is possibly hazardous and may be harmful to the eyes. Do not look directly into the product's light output.
Do not look at the light output with magnifiers, telescopes, binoculars or similar optical instruments that may concentrate the light output.
Ensure that persons are not looking directly into the front of the fixture when the product lights up suddenly. This can happen when power is applied, when the product receives a DMX signal, or when certain control menu items are selected.
To minimize the risk of eye irritation or injury, disconnect the fixture from power at all times when the fixture is not in use and provide well-lit conditions to reduce the pupil diameter of anyone working on or near the fixture.
This fixture corresponds to Risk Group 2 for blue light only according to IEC/TR 62778. It emits possibly hazardous optical radiation. It falls into the Risk Group categories shown below according to IEC/TR 62778 under worst-case conditions.
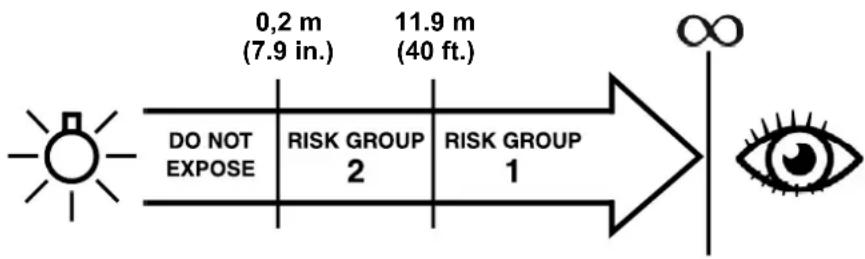
At a distance of less than 0.2m (7.9 in.) from the fixture, the light output can potentially cause eye or skin injury before an exposed person's natural aversion responses (blink reflex and reaction to skin discomfort) can protect them. At distances greater than 0.2m (7.9 in.), potential eye and skin injury hazards from the light output are normally prevented by natural aversion reflexes.
Position the fixture so that persons cannot be exposed to the fixture's light output at a distance of less than 0.2m (7.9 in.) from the fixture, and so that prolonged staring into the light output at less than 11.9m (40 ft.) from the fixture is not expected.

Protection from injury
Fasten the fixture securely to a fixed surface or structure as described in this manual when in use. Do not stand it on a surface where it may fall over or present a hazard.
The fixture is not portable when installed.
Before installing, check that the supporting structure can safely bear at least six times (or more if required by locally applicable regulations) the weight of all fixtures and equipment to be installed on it.
In marine applications and other environments where movement or vibration may be present, the fixture must be fastened to a rigging truss or other structure by means of an omega bracket bolted to the fixture's yoke and a rigging clamp that completely encircles the truss chord or pipe such as a half-coupler clamp. Do not use a rigging clamp bolted directly to the fixture's yoke. Do not use a G-clamp or other clamp with open jaws.
If the fixture is installed in a location where it may cause injury or damage if it falls, install as described in this manual a secondary attachment such as a safety cable that is approved by an official body such as TUV as a safety attachment for the weight that it secures. The safety cable must comply with EN 60598-2-17 Section 17.6.6 or BGV C1 / DGUV 17, and must be capable of bearing a static suspended load at least six times (or more if required by locally applicable regulations) the weight that it secures.
Eliminate as much slack as possible in the safety cable (by looping it more than once around the rigging truss, for example). Make sure that, if the primary attachment fails, the fixture cannot fall more than 20~cm (8 inches) maximum before the safety cable catches it.
If the safety cable attachment point becomes deformed, do not suspend the fixture. Have the fixture repaired by an authorized Martin service partner.
The fixture may be fastened to a surface with its yoke hanging vertically downwards or standing vertically only. Do not try to fasten the fixture to a surface with its yoke at any other angle than vertical.
If you fasten the fixture's yoke directly to a surface, use fasteners that are strong enough and of a suitable type for the application and environment. Install a washer directly under the head of each fastener. All fasteners used must be grade 8.8 steel minimum. Bolts must be fastened with self-locking nuts.
Ensure that any accessories such as gel frames and barn doors are securely fastened.
Do not operate the fixture with missing or damaged covers, shields or any optical component.
If an operating problem occurs, stop using the fixture immediately and disconnect it from power. Do not attempt to use a fixture that is obviously damaged.
Block access below the work area and work from a stable platform whenever installing, setting, adjusting, or cleaning the fixture.
Assistance technique
HProTechSupportUSA@harman.com
Telephone:(844)776-4899
Intensive Lichtemission.

Warning!
HProTechSupportUSA@harman.com
Telefon: (844) 776-4899
The ELP Manet 8F from Martin® is an LED wash lighting fixture with a 500W RGBALC COB LED engine with exceptional color rendering properties.
The fixture can be controlled using any DMX-compliant controller and can be remotely configured by RDM. It also features stand-alone operation with capacity for up to 16 scenes.
The fixture is supplied with the following items:
- This safety and installation manual
- Yoke (U-shaped mounting bracket) for fastening to a structure by means of suitable user-supplied rigging hardware.
- Frame for color filters
- Barndoor module.
Before using the product for the first time
- Read 'Safety information' on page 5 before installing, operating or servicing the fixture.
- Unpack and ensure that there is no transportation damage before using the fixture. Do not attempt to operate a damaged fixture.
- Before operating, ensure that the voltage and frequency of the power supply match the power requirements of the fixture.
- Connect the fixture to AC mains power either by hard-wiring it or by using a suitable power cable and connector that is suitable for the local power outlets.
- If fixtures are exposed to a sudden temperature change, give them time to warm or cool to the ambient temperature before applying power. This will help avoid damage due to condensation.
- Check the support pages on the Martin website at www.martin.com for the most recent user documentation and technical information about the fixture. Martin user manual revisions are identified by the revision letter at the bottom of the inside cover.
Fixture overview
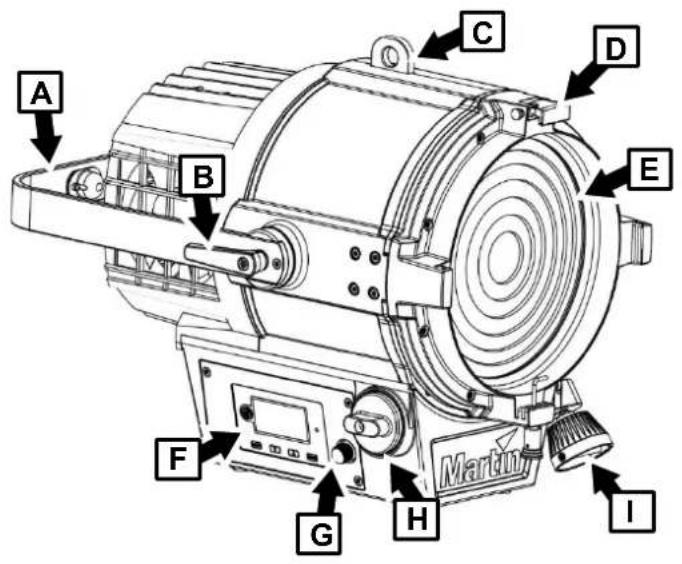
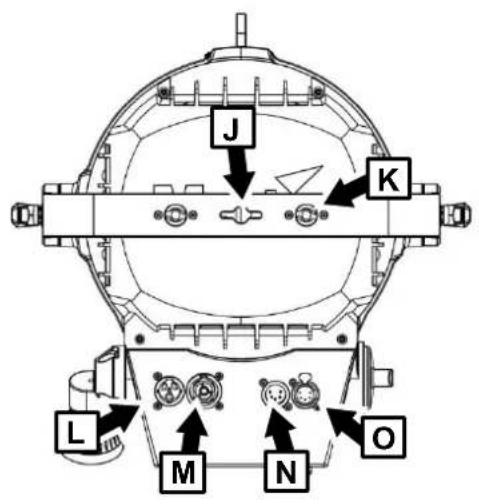
A - Yoke (mounting bracket)
B - Tilt locking handle
C - Safety cable attachment point
D - Filter holder clip (x4)
E-Front lens
F - Control panel with backlit display, NFC sensor
G - Multifunction control knob
H-Zoom adjustment knob
I - Zoom adjustment cup
J - Hole for rigging clamp or surface mounting bolt
K - Quarter-turn fastener attachment point
L - AC MAINS IN connector (Neutrik powerCON TRUE1 male)
M - AC MAINS THRU/OUT connector (Neutrik powerCON TRUE1 female)
N - DMX IN connector (5-pin XLR male)
O - DMX THRU/OUT connector (5-pin XLR female)
Physical installation

Warning! Read 'Safety information' on page 5 before installing the fixture.
Contact your Martin supplier for assistance if you have any questions about how to install this product safely.
Fixture location
The fixture is intended for interior use only. Do not install outside or in damp or humid locations. Respect the limitations given under 'Safety information' on page 5. The fixture requires free and unobstructed airflow around it to ensure adequate cooling. Do not locate it in an unventilated space.

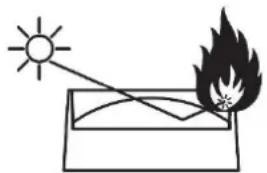
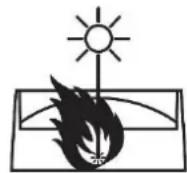
Warning! See drawing on right. Lenses can focus sunlight and strong light, presenting a risk of fire and damage to the fixture, creating a potential fire hazard and causing damage. Position or shade the head so that the front
lens will not be exposed to sunlight or another strong light source from any angle - even for a few seconds.
Important! Do not point the output from other lighting fixtures at the fixture, as powerful light can damage the display.
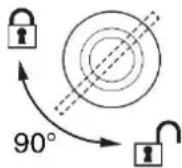
Using quarter-turn fasteners
When fastening an omega clamp to the fixture's yoke, use both quarter-turn fasteners. See drawing on right. Turn quarter-turn fasteners a full 90^ clockwise to lock.
Fastening the fixture to a flat surface
The fixture may be installed on a fixed, flat surface with its mounting yoke hanging vertically or standing vertically only. It may be installed by fastening its mounting yoke directly to the surface or by fastening an omega bracket to its mounting yoke and fastening the omega bracket to the surface.
To fasten the fixture to a surface by bolting its yoke directly to the surface:
- Pass an M12 bolt, screwbolt or similar fastener through the hole in the center of the yoke and fasten the yoke securely to the surface with the fixture aimed towards the area that it must illuminate.
- If there is a risk that the fixture may cause injury or damage if the mounting fails, secure it with a safety cable as described in 'Securing with a safety cable' on page 29.
- Loosen both of the tilt locking handles, adjust tilt, then retighten the handles.
To fasten the fixture to a surface using an omega bracket:
- Pass an M12 bolt, screwbolt or similar fastener through the hole in a correctly dimensioned omega bracket and fasten the bracket securely to the surface so that the fixture, when mounted, will be aimed towards the area that it must illuminate.
- Fasten the fixture's mounting yoke onto the omega bracket using the two quarter-turn fastener points in the yoke.
- If there is a risk that the fixture may cause injury or damage if the mounting fails, secure it with a safety cable as described in 'Securing with a safety cable' on page 29.
- Loosen both of the tilt locking handles, adjust tilt, then retighten the handles.
Mounting the fixture on a truss
Warning! You must use an omega bracket and half-coupler clamp or similar rigging clamp that completely encircles the truss chord in installations that may be subject to movement or vibration such as marine applications (see 'Safety information' on page 5).
Installation hanging vertically downwards
The fixture can be fastened to a horizontal truss or pipe hanging vertically downwards only, using either:
- a suitable approved rigging clamp bolted directly to the fixture's yoke, or
- a standard 28mm spigot and compatible rigging hardware, or
- an omega bracket fastened to the fixture's yoke with quarter-turn fasteners and rigging clamp bolted to the omega bracket.
Installation hanging vertically downwards with a rigging clamp
To install the fixture hanging vertically downwards from a horizontal truss or pipe using a rigging clamp:
- Bolt a suitable rigging clamp securely to the fixture's mounting yoke, bearing in mind the need to aim the fixture at the object or area to be illuminated.
- Working from a stable platform, fasten the clamp to the truss chord or pipe with the fixture hanging vertically downwards and aimed at the area to be illuminated.
- If there is a risk that the fixture may cause injury or damage if it falls, secure it with a safety cable as described in 'Securing with a safety cable' on page 29.
- Loosen the tilt locking handles, adjust tilt, then retighten the handles.
Installation hanging vertically downwards with a 28 mm spigot
The fixture's yoke accepts a standard 28 mm spigot accessory (available from Martin suppliers). The spigot can be used together with compatible rigging hardware to suspend the fixture hanging vertically downwards only. To suspend the fixture from a horizontal truss or pipe using a 28 mm spigot:
- Pass the spigot through the hole in the center of the fixture's yoke and fasten it securely with a self-locking nut that is in perfect condition.
- Working from a stable platform, fasten the spigot to compatible rigging hardware with the fixture hanging vertically downwards and aimed at the area to be illuminated.
- If there is a risk that the fixture may cause injury or damage if it falls, secure it with a safety cable as described in 'Securing with a safety cable' on page 29.
- Loosen the tilt locking handles, adjust tilt, then retighten the handles.
Installation hanging vertically downwards with an omega bracket and rigging clamp
To install the fixture hanging vertically downwards from a horizontal truss or pipe using an omega bracket and rigging clamp:
- Bolt a suitable rigging clamp securely to a 106 mm center-to-center omega bracket using a self-locking nut.
- Fasten the omega bracket to the fixture's mounting yoke, turning quarter-turn fasteners a full 90^ clockwise to lock them.
- Working from a stable platform, fasten the rigging clamp to the truss chord or pipe with the fixture hanging vertically downwards and aimed at the area to be illuminated.
- If there is a risk that the fixture may cause injury or damage if it falls, secure it with a safety cable as described in 'Securing with a safety cable' on page 29.
- Loosen the tilt locking handles, adjust tilt, then retighten the handles.

Securing with a safety cable
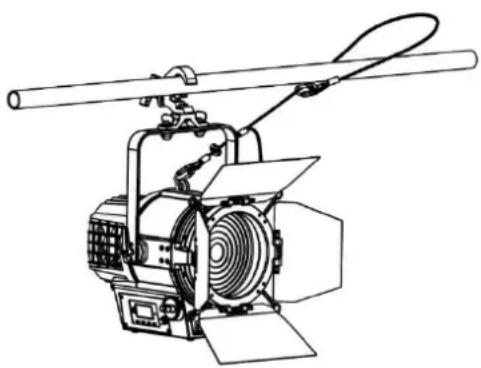
If there is a risk that the fixture may fall and cause injury or damage, secure it with a safety cable (or similar secondary attachment) that is approved for the weight that it will secure and in perfect condition. Fasten the safety cable to the safety cable attachment point on top of the fixture and then loop it around the truss chord or pipe (or other secure anchoring point) as shown in the drawing on the right.
Remove as much slack as possible from the safety cable (by looping it more than once around the truss chord, for example). Make sure that the safety cable will hold the fixture safely if the primary attachment fails.
If a safety cable attachment point becomes damaged or deformed, do not use the fixture. Return it to a Martin Service Centre for repair.
Standing the fixture on a surface
It is possible to install the fixture on a fixed, flat surface with its mounting yoke standing vertically upwards only using a standard 28 mm spigot and tripod or similar secure mounting hardware. Do not install the fixture with the yoke at any other angle.
Warning! Make sure that the fixture and mounting hardware will not present a danger of tripping or falling.
To stand the fixture on a surface:
- Fasten a standard 28mm spigot to the fixture's mounting yoke by passing it through the hole in the center of the yoke and securing it with a self-locking nut.
- Fasten the spigot to a compatible tripod or other secure mounting stand.
- Place the stand in a location where it will not present a hazard due to tripping, falling etc. If you locate the stand where there is a risk that the fixture may cause injury or damage if the mounting fails, secure it with a safety cable as described in 'Securing with a safety cable' above.
- Loosen both the tilt locking handles, adjust tilt, then retighten the handles.
Connecting to AC power

Warning! Read 'Safety information' on page 5 before installing the fixture.
Warning! If you want to connect other devices to the MAINS OUT socket, see 'Linking fixtures to power in a chain' below.
For protection from electric shock, the fixture must be grounded (earthed). The power distribution circuit must be equipped with a fuse or circuit breaker and ground-fault (earth-fault) protection.
Do not use an external dimming system to supply power to the fixture, as this may cause damage to the fixture that is not covered by the product warranty.
The fixture can be hard-wired to a building electrical installation if you want to install it permanently, or a power plug that is suitable for the local power outlets can be installed on the power input cable. Socket outlets or external power switches used to supply the fixture with power must be located near the fixture and easily accessible so that the fixture can easily be disconnected from power.
If you install a power plug on the power input cable, install a grounding type (earthed) plug with integral cable grip that is suitable for your local mains voltage, rated 16 A and has an integral strain relief/cord grip. Follow the plug manufacturer's instructions and connect the wires in the power cable as shown in this table:
| Live or L | Neutral or N | Earth, Ground or Ⓒ | |
| US system | Black | White | Green |
| EU system | Brown | Blue | Yellow/green |
The fixture has an auto-ranging power supply that accepts AC mains power at 100-240 V at 50/60 Hz. Do not apply AC mains power at any other voltage or frequency to the fixture.
Linking fixtures to power in a chain
If you want to use the MAINS OUT socket on the fixture to link power to another fixture in a daisy-chain, you must connect the first fixture to power using a 16 amp rated 12 AWG / 2.5 mm² power input cable. To link the following fixtures to power in a daisy-chain, use 16 amp rated 12 AWG / 2.5 mm² power relay cables to link fixtures' MAINS OUT sockets to MAINS IN sockets. Martin can supply a range of suitable power relay cables. If you create custom power relay cables, use only Neutrik PowerCON TRUE1 connectors.
Warning! Do not exceed the limits for the number of fixtures in a daisy chain given in the 'Safety Precautions' chapter at the beginning of this Safety and Installation Manual.
Connecting to data
See the ELP Manet 8F User Manual available for download from www.martin.com for details of connecting the fixture to a DMX-512 control data link.
Service and maintenance

Warning! Read 'Safety information' on page 6 before servicing the fixture.
Refer any service operation not described in this user manual to a qualified service technician.
Excessive dust, smoke fluid, and particle buildup degrades performance, causes overheating and will damage the fixture. Damage caused by inadequate cleaning or maintenance is not covered by the product warranty.
Disconnect mains power before cleaning or servicing the fixture.
Service fixtures in an area where there is no risk of injury from failing parts, tools or other materials.
Cleaning
The cleaning of external optical lenses must be carried out periodically to optimize light output. Cleaning schedules for lighting fixtures vary greatly depending on the operating environment. It is therefore impossible to specify precise cleaning intervals for the fixture. Environmental factors that may result in a need for frequent cleaning include:
- Use of smoke or fog machines.
- High airflow rates (near air conditioning vents, for example).
Presence of cigarette smoke.
Airborne dust (from stage effects, building structures and fittings or the natural environment at outdoor events, for example).
If one or more of these factors is present, inspect fixtures within their first 100 hours of operation to see whether cleaning is necessary. Check again at frequent intervals. This procedure will allow you to assess cleaning requirements in your particular situation. If in doubt, consult your Martin dealer about a suitable maintenance schedule.
Use gentle pressure only when cleaning, and work in a clean, well-lit area. Do not use any product that contains solvents or abrasives, as these can cause surface damage.
To clean the fixture:
- Disconnect the fixture from power and allow it to cool for at least 10 minutes.
- Vacuum or gently blow away dust and loose particles from the outside of the fixture and the air vents at the back and sides of the head and in the base with low-pressure compressed air.
- Clean the front glass by wiping gently with a soft, clean lint-free cloth moistened with a weak detergent solution. Do not rub the surface hard: lift particles off with a soft repeated press. Dry with a
soft, clean, lint-free cloth or low-pressure compressed air. Remove stuck particles with an unscented tissue or cotton swab moistened with glass cleaner or distilled water. You can remove the lens tube to clean the rear side of the lens if needed.
- Check that the fixture is dry before reapplying power.
Installing a gel frame
The ELP Manet 8F is supplied with a frame for color filters that can be installed in front of the lens.
To install the filter frame:
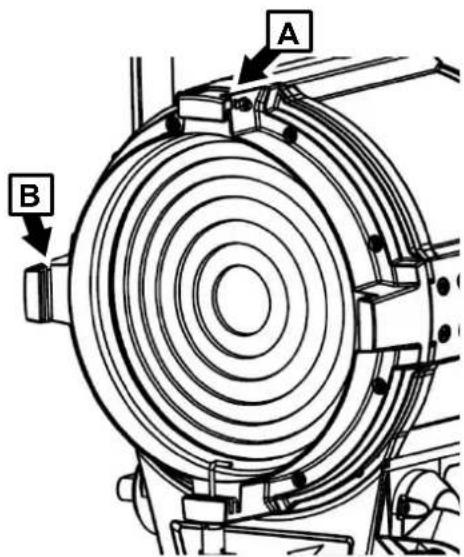
- See drawing on right. Flip the top accessory lock A up to open it.
- Slide the filter frame into the arms on the front of the fixture. The arms have two slots B in them. Slide the frame into the slots closer to the front lens.
- Close the top lock A and check that the filter frame is secure and cannot fall off the front of the fixture.
Installing a bardoors accessory
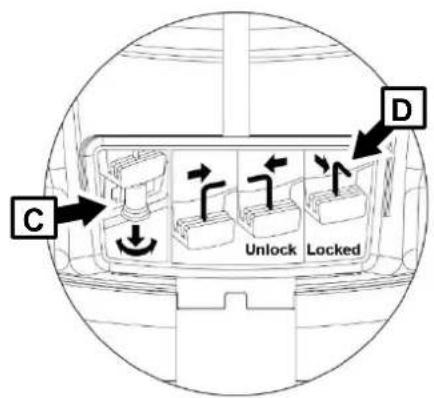
The fixture is supplied with a four-leaf barndoors module that can be installed on the front of the fixture.
To install the bardoors module:
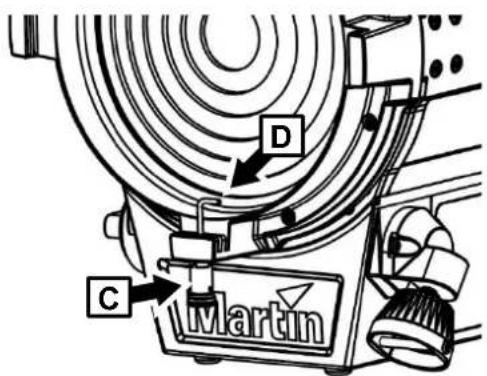
- See drawing on previous page. Flip the top accessory lock A up to open it.
-
See drawings above. Pull the handle C of the bottom accessory lock down slightly and twist it to move the leg D of the lock either to the side or towards the front lens.
-
Slide the barndoors module into the arms on the front of the fixture. The arms have two slots B in them (see drawing on previous page). Slide the frame into the slots further away from the front lens.
-
Close the top accessory lock.
-
Pull the handle C of the bottom accessory lock down slightly and twist it to move the leg D of the lock towards the front of the fixture so that it locks the bardoors module in place.
-
Check that the barndoors module is held securely and cannot fall off the front of the fixture.
-
Rotate the bardoors and open the leaves to adjust them.
Service and repairs
There are no user-serviceable parts inside the fixture. Do not open the housing.
Do not try to repair the fixture by yourself as this may result in damage, malfunction and it may potentially void your product warranty. The equipment must only be serviced or repaired by an authorized Martin service technician.
Installation, on-site service and maintenance can be provided worldwide by the Martin Professional Global Service organization and its approved agents, giving owners access to Martin's expertise and product knowledge in a partnership that will ensure the highest level of performance throughout the product's lifetime. Please contact your Martin supplier for details.
Specifications
For the latest product specifications for this fixture, see the ELP Manet 8F area of www.martin.com.
Compliance
FCC Compliance
This equipment has been tested and found to comply with the limits for a Class B digital device, pursuant to part 15 of the FCC Rules. These limits are designed to provide reasonable protection against harmful interference when the equipment is operated in a commercial environment. This equipment generates, uses and can radiate radio frequency energy and, if not installed and used in accordance with the instructions, may cause harmful interference to radio communications. Operation of this equipment in a residential area is likely to cause harmful interference, in which case the user will be required to correct the interference at his own expense.
Supplier's Declaration of Conformity
Harman Professional, Inc. have issued an FCC Supplier's Declaration of Conformity for this product. The Declaration of Conformity is available for download from the ELP Manet 8F product area of the Martin website at www.martin.com.
EU Declaration of Conformity
An EU Declaration of Conformity covering this product is available for download from the ELP Manet 8F product area of the Martin website at www.martin.com.
Disposing of the product
Martin products are supplied in compliance with Directive 2012/19/EC of the European Parliament and of the Council of the European Union on WEEE (Waste Electrical and Electronic Equipment), where applicable.
Help preserve the environment! Ensure that this product is recycled at the end of its life. Your supplier can give details of local arrangements for the disposal of Martin products