USER MANUAL B400 Bimar
Tasto "Setup/Child Lock
2.1. Nei programmi
This symbol tells you to read these instructions carefully before using the appliance, and to inform any third parties if necessary. Keep the instruction booklet for further reference throughout the lifetime of the appliance. If when reading these instructions you find any parts difficult to understand or have any doubts, contact the manufacturer at the address provided on the back page before using the product.

This symbol highlights instructions and precautions for safe use.Warnings and appliance installation, use, cleaning and maintenance procedures may be updated slightly from those described in this manual; for further details, please consult the updated on-line manual at www.bimaritaly.it.
WARNING: hot surfaces.
This symbol warns users that accessible surfaces may be at high temperatures when the appliance is in operation.
SAFETYNOTICES
This appliance is for cooking food in a home environment, and for heating, toasting, fermenting, drying, defrosting, in the manner indicated in these instructions. Every other use constitutes misuse.
This appliance is intended to be used in household and similar applications such as:
- staff kitchen in shops, offices and other working environments;
- farm houses
- by clients in hotels, motels and other residential type environments
-
bed and breakfast type environments
-
Do not leave the appliance unattended when cooking food with oils and fats, as if they are overheated can cause a fire.
- Keep a constant eye on the oven during cooking. In the event of flames emanating from food or other parts, do not attempt to extinguish them with water, but keep the door closed and first switch off the power socket by turning off the switch on the electrical panel, only then remove the plug from the socket and then smother the flame with a cover or fire blanket.
- Use the appliance indoors, on solid, fireproof, horizontal and safe surfaces and in observance of the instructions in the installation section. Never leave the appliance exposed to the weather (sun, rain, etc.). Any other use constitutes misuse and is hazardous. The manufacturer cannot be held liable for any damage arising from misuse or incorrect or irresponsible use, and/or from repairs by unqualified personnel and/or from tampering with any part of the appliance.
- The user must not leave the appliance unattended when it is connected to the power supply.
- The accessible parts and the appliance become very hot during use: keep children at a safe distance. Do not touch the metal parts or the glass of the door,
handle only the knob, keys and door handle, use heat resistant gloves when handling food inside the cooking compartment.
The appliance becomes very hot during use. Care should be taken not to touch the heating elements inside the oven.
WARNING: During use, the appliance and its accessible parts become very
hot. Care should be taken not to touch the heating elements.
Children under 8 years of age should not get near the oven unless they are constantly supervised.
- When opening the oven door, hot steam may escape: open the door 5 ~cm very carefully for a few seconds, then open the door fully.
- Do not open the oven door during cooking.
- To avoid overheating, the appliance must not be installed behind a decorative door.
- The internal support frame must be kept in place when the oven is in use to avoid accidental falls: only remove the container (pan or plate) with the food.
- Never place paper, cardboard, plastic, forks or other utensils in the oven cavity.
-
Do not insert foreign bodies into the openings, ventilation slots or heat exhaust slots.
-
When using baking paper, make sure that it is resistant to high temperatures and position it so that it does not interfere with the circulation of hot air inside the oven.
-
Before use, make sure that the containers are heat-resistant and suitable for cooking. Do not use plastic kitchenware or containers when cooking food. Always use gloves or protective equipment when inserting or removing containers from the oven. Do not insert bulky foodstuffs as they may cause a fire or risk of electric shock. Warning: liquids and food products must not be heated inside sealed containers as they may explode.
-
Insert the frame and the tray only into the 4 guides inside the cavity (see 1, 2, 3, 4
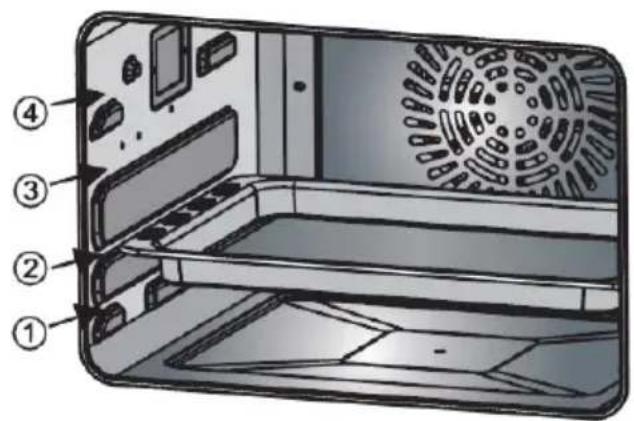
in the picture on the side) until they come to a complete stop. The framesafety bulges that hinder its
complete extraction must face downwards and towards the back of the oven.
Choose the height of the guides according to the dish and recipe to be prepared.
-
Open the door carefully to prevent the oven from tipping over:
-
do not place trays, pots, etc. on top of the door.
- avoid slamming or closing the door violently.
-
do not pour liquids onto or into the oven
-
Unplug the appliance from the socket when not in use.
- The power socket must be easily accessible so that the plug can be removed easily in an emergency.
- The appliance must not be placed just below a power socket.
- Never move the appliance when in operation.
- Do not cover the appliance when in use.
- Do not use the appliance as a heater.
-
This appliance can be used by children aged from 8 years and above and persons with reduced physical, sensory or mental capabilities or lack of experience or the necessary knowledge providing they are supervised or have been instructed on the safe use of the appliance and understand the hazards involved. Children must not play with the appliance. Cleaning and maintenance intended to be carried out by the user should not be done by children unless they are supervised.
-
Warning: when using electrical appliances, always comply with the basic safety precautions to avoid the risks of fire, electric shock and physical injury.
- Take special care when using the oven in the presence of children, since the metal surfaces and oven door become very hot.
- Do not move the appliance by pulling the cable.
- Do not touch the appliance with wet or damp hands or feet.
- Do not use the appliance barefoot.
- If the appliance is dropped or malfunctions, disconnect the power cord at once. Check all parts for damage and do not switch it on unless certain it is intact: if in doubt, call in qualified staff.
- To avoid all risk of electric shock, never immerse the plug, the power cord or the appliance in water or any other liquid.
- Do not pull the power cord or the appliance to remove the plug from the power socket.
- If the power cable is damaged, it must be replaced by the manufacturer or its technical support service, or by a person with similar qualifications, to prevent all risks.
- This appliance is not intended for operation by means of an external timer or with a separate remote
control system, to avoid the risk of fire if the appliance is covered or not correctly positioned.
- Warning: always keep the water in the tank between the minimum and maximum level. During operation, the tank must always be inserted in its place.
- Do not use abrasive detergents or sharp metal scrapers to clean the oven glass door/hinged lid glass (as applicable), as they can scratch the surface and thus cause the glass to break.
- Do not use steam jets to clean the appliance.
- WARNING: Make sure that the appliance is switched off before replacing the bulb to avoid the possibility of electric shock.
INSTALLATION
- After removing the packaging, check that the appliance is intact; if in doubt, do not use it and call in qualified staff. Packaging components (plastic bags, expanded polystyrene, nails, etc.) must not be left within reach of children since they are potentially hazardous; dispose of them in accordance with the current law.
Warning: any stickers or advertising leaflets applied to the door, or protective film, must be removed before the appliance is used.
-
Before connecting the appliance, check that the voltage values marked on the nameplate are the same as those of the electrical mains, and that the power socket is properly earthed (the manufacturer declines all responsibility arising from failure to comply with this rule). If the appliance's plug is not compatible with the socket, have the socket replaced with another of suitable type by qualified staff, who must ensure that the socket's wire gauge is suitable for the appliance's power draw. Check that there are no other appliances drawing large amounts of power on the electrical line, to avoid overloads and fire risks. In general, the use of adapters and/or extension leads is not recommended; if their use is unavoidable, they must comply with current safety regulations and their current rating (amps) must be no lower than the maximum current draw of the appliance.
-
Before each use, check that the appliance is in good condition and ensure that the power cord is not damaged and do not switch it on unless certain it is intact: if in doubt, call in qualified staff.
-
Place the appliance:
-
well away from other heat sources (e.g. other ovens, gas hob, etc.), flammable materials (upholstery, etc.), explosive materials (spray cans) and materials which may warp in heat.
-
on a firm, horizontal worktop with a heat-resistance, sufficiently strong surface, in a position where it cannot be knocked, and far enough from the edge of the unit to ensure that it cannot fall off
- well away from containers holding liquids, such as sinks, etc.
Gaps of at least 35~cm above the appliance, 10 cm behind it and 20 cm at its sides must be ensured.
Never place anything on top of the oven and do not obstruct the ventilation grilles: obstructing the grilles may cause the appliance to overheat.
Make sure that the cable is correctly positioned and is not in contact with hot parts or sharp edges, or wound around the appliance or twisted, and does not become entangled, to prevent the appliance from falling or being damaged. Check that no-one can trip over it, to avoid accidental falls or injuries.
In case of a fault or malfunction, switch the appliance off and have it checked by qualified staff.
The appliance has the following regulator devices:
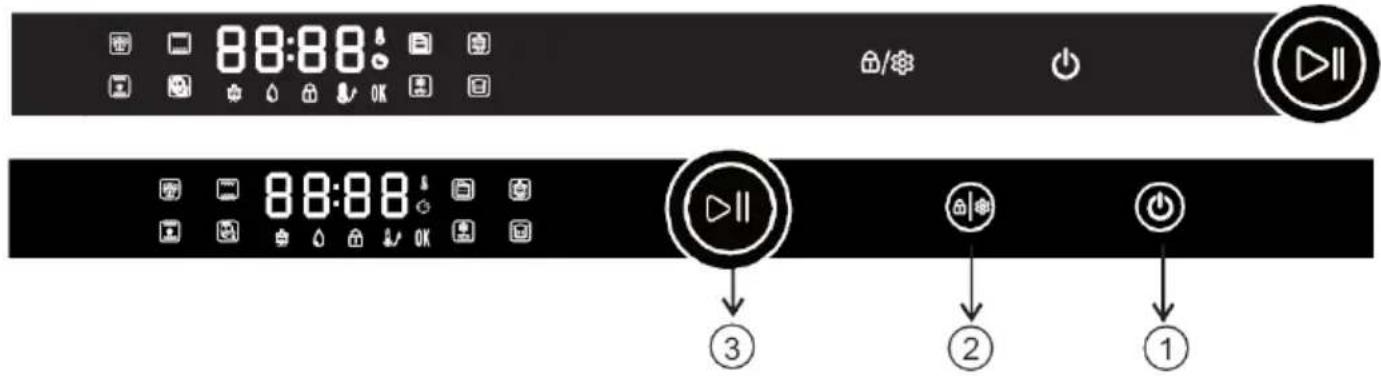
Control Panel
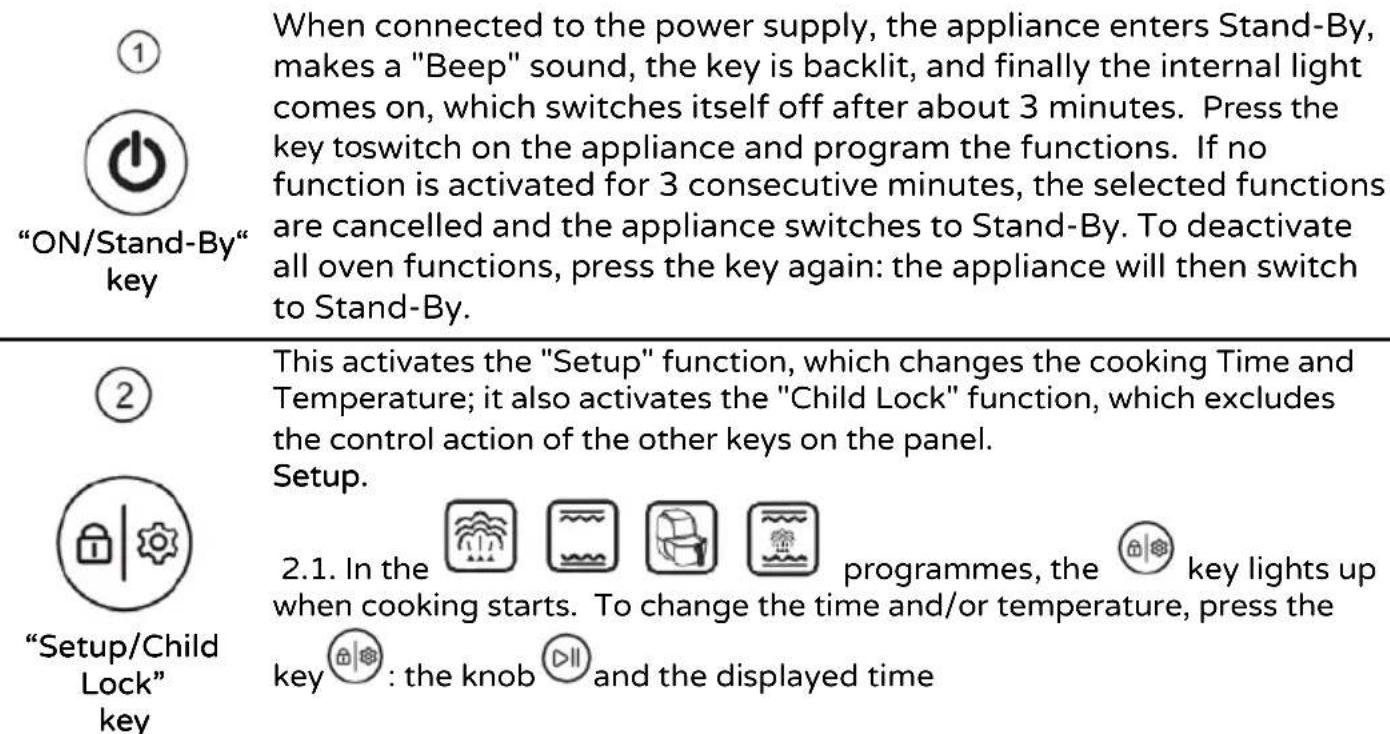
will flash and to increase or decrease it, turn the knob in one direction or the other and then press it to confirm the selection. The temperature then flashes, and to increase or decrease it, turn the knob and press it to confirm the selection. The display will stop flashing, cooking
will resume and will end when the time is up. During the programmes the parameters can be changed repeatedly.
If the parameters are not confirmed within 5 seconds, they are recorded and confirmed automatically, and the display stops flashing.
2.2. In the Menu function, for each of the 31 programmes, the key lights up when cooking starts. It is possible to change the Time only once, and to do so press the key, turn the knob to increase or decrease the time, and then press it to confirm the selection. The key goes off, cooking resumes and will end when the time expires. Further changes during the programme are not possible.
Child Lock
2.3. For any programme, when the key is lit, press it for about three seconds to override the control action of the other keys on the panel: the indicator light will light up. To reactivate the control action, press the key again for three seconds: the indicator light will go out.
③

- Press the knob to start or pause the programme.
- Turn the knob clockwise to select the programmes: steaming/ baking/ baking + steam/ air frying/ Menu/ Cleaning/ Defrosting/ Fermenting with alternate ventilation.
- Turn the knob to adjust the time and temperature when you need to change the programmed ones.
Knob
- When the symbol flashes, turn or press the knob to adjust or confirm the current selection or programme.
- The symbol remains lit when the oven is in operation.
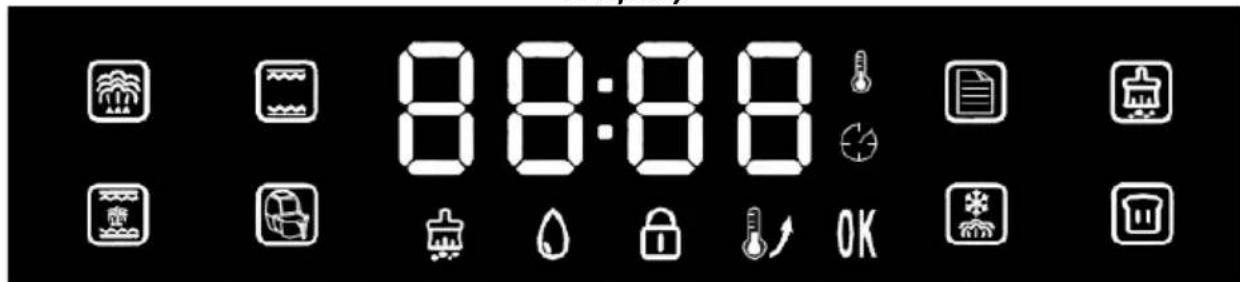
Display
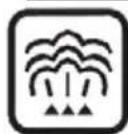
Steaming
The main function is steaming. The default time and temperature are 30
min. and 100^ . When the programme is selected, the symbols and flash: press the knob to access the programme and to adjust the parameters.
The display now flashes the time (00:30): turn the knob to increase or decrease the time, and press it to confirm the selection. The display now flashes the temperature (100): turn the knob to increase or decrease the temperature, and press it to confirm the selection. The display stops flashing, the cooking process starts and ends when the set time expires.
| Time (h:min) | Temperature (°C) |
| Default parameters | 00:30 | 100 |
| Adjustment range | 00:01~ 02:00 | 100~110 |
Baking
The programme uses the upper and lower heating elements. The default time and temperature are 30 min. and 180^ . When the programme is
selected, the symbols and flash: press the knob to access the programme and adjust the parameters.
The display now flashes the time (00:30): turn the knob to increase or decrease the time, and press it to confirm the selection. The display now flashes the temperature (180): turn the knob to increase or decrease the temperature, and press it to confirm the selection. The
display will stop flashing, and the pre-heating function will start: the symbol will light
up. Once the temperature has been reached, the symbol and goes out and a sound signal (about 10 "Beeps") is made to tell you to insert the food in the oven, and also the programmed cooking will start that will end at the end of the set time.
| Time (h:min) | Temperature (°C) |
| Default parameters | 00:30 | 180 |
| Adjustment range | 00:01 ~ 02:00 | 100~230 |

Baking and steaming
The main function is baking, during which steam is injected at intervals. The programme uses the upper and lower heating elements, and the steam generator. The default time and temperature are 30 min. and 180^ .
When the programme is selected, the symbols and flash: press the knob to access the programme and adjust the parameters. The display now flashes the time (00:30): turn the knob to increase or decrease the time, and press it to confirm the selection. The display now flashes the temperature (180): turn the knob to increase or decrease the temperature, and press it to confirm the selection. The display stops flashing, the cooking process starts and ends when the set time expires.
| Time (h:min) | Temperature (°C) |
| Default parameters | 00:30 | 180 |
| Adjustment range | 00:01~ 02:00 120 | ~ 230 |
Air frying
The function cooks like when frying but without immersion in oil. The programme uses the rear heating element combined with the convection system. The default time and temperature are 30 min. and 180^ . When
the programme is selected, the symbols and flash: press the knob to access the programme and adjust the parameters.
The display now flashes the time (00:30): turn the knob to increase or decrease the time, and press it to confirm the selection. The display now flashes the temperature (180): turn the knob to increase or decrease the temperature, and press it to confirm the selection. The
display will stop flashing, and the pre-heating function will start: the symbol will light up. Once the temperature has been reached, the symbol goes out and a sound (about
10 "Beeps") is made to tell you to insert the food in the oven, and also the programmed cooking will start that will end at the end of the set time.
| Time (h:min) | Temperature (°C) |
| Default parameters | 00:30 | 180 |
| Adjustment range | 00:01 ~ -02:00 | 120 ~ 230 |

Menu
The function contains 31 cooking and reheating programs, the list of which (F-00, F-01, F-02, ..., F-31) is shown in the table below, including details of food, times, temperature and weight. When the function is selected, the
symbols and flash, as does the display, which shows No. “ F-00”:
Press the knob to access the programme, and turn it to select the function No. (F-00, F-01, F-02, ...F-31), and then press it to confirm the selection. The display stops flashing and the
selected programme starts. At the same time, the key that allows changing the program time lights up, operating as described in the previous paragraph: when the new time is confirmed, cooking/heating starts again and will end when the set time has expired.

When the function is selected, the symbols and on the knob flash: press the knob to access the programme and to adjust the parameters.
Defrosting
The display now flashes the time (00:20): turn the knob to increase or decrease the time, and press it to confirm the selection. The display now flashes the temperature (55): turn the knob to increase or decrease the temperature, and press it to confirm the selection. The display stops flashing, the programmed heating starts and ends when the set time expires.
| Time (h:min) | Temperature (°C) |
| Default parameters | 00:20 | 55 |
| Adjustment range | 00:05 ~ 02:00 55 | ~ -60 |
Fermenting
When the function is selected, the symbols and on the knob flash: press the knob to access the programme and to adjust the parameters.
The display now flashes the time (00:40): turn the knob to increase or decrease the time, and press it to confirm the selection. The display then flashes the temperature (40): turn the knob to increase or decrease the temperature, and press it to confirm the selection. The display stops flashing, the programmed heating starts and ends when the set time expires.
| Time (h:min) | Temperature (°C) |
| Default parameters | 00:40 | 40 |
| Adjustment range | 00:05 ~ 02:00 | 30~50 |
When the function is selected, the symbols and on the knob flash: press the knob confirm and turn it to select the programme "C-1" or "C-2: C-1: steam generator cleaning for 50 min. C-2: cleaning and disinfection of the cavity for 25 minutes at 100^
Cleaning
Descending C-1
- After the steam generator has been in operation for about 100 hours, with the flashing symbol the system warns that scale must be removed.
- The descending mixture (water and descending agent) must be prepared according to the instructions on the packet, or at a ratio of 1:8 (125ml descending agent per litre of water). Place the mixture in the tank in a quantity not less than the minimum level indicated. Make sure that the descaler does not damage plastic or metal parts.
- 20 minutes before the programme ends, remove the tank, empty it of the descaling agent and pour in clean water. The symbol will flash and a "Beep" is heard until the tank is reinserted in its place: the programme will then resume. 10 minutes before the end of the programme, remove the tank again, empty it, pour in new clean water, and reinsert the tank in its place to proceed. When the programme has finished, the symbol remains lit.
| Empty Water Tank
The programme resumes operation as soon as water is added to the tank. The keys become operational again, the symbol and the sound signal go out. |
| Preheating | When the symbol is lit, it indicates that the pre-heating programme is running. Once the temperature is reached the symbol goes out. |
| OK | The end symbols light up when the programme is finished. |
| The symbol lights up when all the keys on the control panel are inoperative: this is for the "Child lock" in operation. To make the buttons operational and exclude the function, press the button for about three seconds: the symbol goes out. |
| Cleaning | The symbol indicates that descaling is in progress and goes out when the programme is finished. |
| Cooking process | 1. Pause. The cooking process is momentarily interrupted in the following modes:
a) During oven operation, if the knob is pressed, the cooking process enters the "Pause" state: the time display and the symbol flash, the cooking time countdown is momentarily interrupted, and the display remains in the interface of the program in use. If the knob is pressed again, the oven returns to the working state and the cooking process proceeds and is completed.
a) During oven operation, if the oven door is opened, the cooking process enters the "Pause" state: the time display and the symbol flash, the cooking time countdown is momentarily interrupted, and the display remains in the interface of the program in use. Once the door is closed again, the oven returns to the working state and the cooking process proceeds and is completed. |
| 2. Time and temperature adjustment. During the cooking process, it is possible to adjust the cooking time and/or temperature: |
| a) To modify the time, press the key : the knob and the displayed time will flash and to increase or decrease it, turn the knob in one direction or the other and then press it to confirm the selection.
If there is no need to change the time, simply press the knob to confirm the existing time. |
| b) The temperature will now flash and to increase or decrease it, turn the knob in one direction or the other and then press it to confirm the selection. If there is no need to change the temperature, simply press the knob to confirm the original °C. |
| c) In the Menu function , for each of the 31 programmes, the key lights up when cooking starts. The Time adjustment should be carried out according to the quantity of food, and is possible only once: to do it, press the key , turn the knob to increase or decrease the time, and then press it to confirm the selection. The key goes off, cooking resumes and will end when the time expires. Further changes during the programme are not possible. |
| Interior light | a) While the oven is working, the interior light will stay on for about 3 minutes and then go off automatically.
b) When the door is opened, the light will come on for about 3 minutes and then go off automatically: when the door is closed again, the light will go off after about 3 minutes.
c) In the Stand-By or working mode, if the knob is turned, the light will come on and go off after about 3 minutes. |
| Door Opening and Closing | While the oven is working, if the door is opened the oven temporarily stops working and is paused. When the door is closed again, the oven automatically returns working. |
| Programme end | When the oven finishes cooking, you will hear about 10 "Beeps", and the display shows "END" and "OK", indicating that the cooking program is finished. |
The oven is also complete with the following accessories:
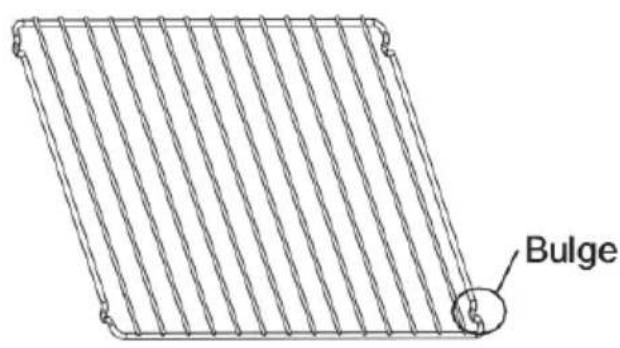
Support frame (4) and tray (5): insert into the guides at the appropriate height from the 4 available. The support frame and tray must be inserted until they come to a complete stop. The frame safety bulges (see figure opposite) make it difficult to pull it out, they must be
facing downwards and towards the back of the cooking space. Use heat resistant protective gloves to pull them out when the oven is hot.
Water tank (6): for the oven to work, it must always be inside its place. To fill the tank, take it out by grasping its handle, open the lid, empty any residual water and then pour in clean and pure drinking water, up to the MAX level (1450ml) or at least above the Min level (200ml). Close the lid and reinsert the tank correctly.
Use only drinking water, with a low limescale content (medium hardness, not exceeding 8^ ): do not add any other liquids, salts or anything else. The use of hard or very hard water may make it necessary to carry out the descaling operation more frequently. If the tap water is hard, it is advisable to dilute it with filtered drinking water or water with a hardness not exceeding 8^ (0.7 litres of tap water + 0.7 litres of soft water).
The oven must operate with the tank filled between a MIN level (200ml) and a MAX level
(1450ml). When the water in the tank is below the "MIN" level, the symbol flashes, a beep sound is made 10 times and the cooking programme is interrupted.
- Drip tray (9): It is inserted under the door, hooked to the front feet and collects overflows of
Rotisserie rod (2) and handle (3).
Place the meat (poultry or other) on the spit rod and use the forks to position it and secure it in the centre; make sure that the ends of the rod are free by a few centimetres, that all the parts of the meat are compact and cannot dangle during the rotation of the spit. Inside the oven, the spit will be placed diagonally, i.e. one end towards the back corner and the other towards the opposite front side. Place the tray in the lowest guides, to collect fat or anything else.
To insert the spit in the oven, use the handle that lifts the rod at the 2 ends, first insert the end into the sleeve of the rotisserie rod, and the other end (the one with the cylindrical section) into the opposite holder. Once cooking is finished, remove the spit rod from its housing in the reverse order of the procedure described above using the handle provided. When inserting and removing the spit, always use heat resistant protective gloves and also take the necessary care to avoid burns.
31 preset programmes

The tables below show the cooking parameters for 31 preset programmes: the cooking times are just an example, as they may vary depending on the weight and initial temperature of the individual
food (e.g. temperature of room, refrigerator, freezer, etc.).
It is advisable to constantly check the food during cooking, especially during the first few uses; with experience you will be able to set the oven times and functions correctly.
Tips to reduce energy consumption:
- avoid opening the door frequently during operation
- remove unused accessories from inside
- regularly clean the door gasket
- when cooking several foods, start the successive cooking when the oven is still hot.
| Code | F-01 | F-02 | F-03 | F-04 | F-05 | F-06 | F-07 | F-08 | F-09 |
| Food Style | Steam Vegetable | Steam Rice | Steam Fish | Steam Shrimp | Steam Crab | Steam Eggs | Steam Chicken | Steam Papaya | Roast Chicken |
| Heating time (minute) | 16 | 50 | 20 | 15 | 30 | 18 | 30 | 35 | 45 |
| Heating temperature(°C) | 100 | 10 | 100 | 100 | 100 | 100 | 100 | 100 | 230 |
| Food weight(g) | 600 | 200 | 600 | 500 | 800 | 300 | 800 | 400 | 1000 |
| Code | F-10 | F-11 | F-12 | F-13 | F-14 | F-15 | F-16 | F-17 | F-18 |
| Food Style | Roast Steak | Roast Muttons | Roast Ribs | Roast Salmon | Roast Chicken legs | Roast Chicken wings | Roast Saury | Roast Chips | Roast Shrimp |
| Heating time (minute) | 13 | 35 | 20 | 22 | 26 | 23 | 20 | 18 | 15 |
| Heating temperature(°C) | 230 | 200 | 210 | 210 | 210 | 210 | 220 | 220 | 180 |
| Food weight(g) | 600 | 600 | 500 | 400 | 750 | 500 | 600 | 500 | 400 |
| Code | F-19 | F-20 | F-21 | F-22 | F-23 | F-24 | F-25 | F-26 | F-27 |
| Food Style | Roast Sausages | Roast Bacon | Roast Pizza | Mini Pizza | Baguette bread | Chiffon cake | Yogurt cheese cake | Puff | Cookies |
| Heating time (minute ) | 13 | 11 | 22 | 18 | 16 | 50 | 60 | 32 | 14 |
| Heating temperature(°C) | 200 | 200 | 180 | 180 | 180 | 150 | 150 | 180 | 180 |
| Code | F-28 | F-29 | F-30 | F-31 | |
| Food Style | Egg tart | Roast Almond | Roast Walnut | Make Yogurt |
| Heating time (minute ) | 22 | 10 | 12 | 480 |
| Heating temperature(°C) | 180 | 140 | 160 | 45 |
First use
Accessories; Grille, Tray, Drip Tray, stainless steel tank and rotisserie rod and handle: clean and wash them as indicated in the Cleaning and Maintenance section; insert them in their respective places.
Run the appliance "empty" using the programme described below to eliminate the "new smell" and/or any residual oil that might emit smoke.
Place pure drinking water in the tank.
Insert the plug into the socket, set the programme " " and set the temperature to 230^ and 30 minutes; during this operation it is a good idea to ventilate the room.
At the end of the operating cycle, before removing the accessories remove the plug from the power socket and wait for the oven to cool.
Use
To operate the oven, insert the plug into the power socket: the symbol " will light up; press the " key and select the programme (see previous paragraphs).
To deactivate all oven functions, press the key again: the appliance will then switch to Stand-By. To fully switch off the appliance, remove the plug from the power socket.
At the end of each programme, remove any water remaining in the tank and liquids in the drip tray.
Warning: unplug the oven from the power socket when not in use.
CLEANING AND MAINTENANCE
Warning: before cleaning the appliance, remove the plug from the power socket and wait for it to cool completely. The appliance and all its components in contact with food (tray, grille and rotisserie rod) need thorough cleaning after each use.
- Do not immerse the appliance in water or any other liquid and do not wash it under running water.
- Do not use chemical solvents, abrasive sponges or abrasive products or metal objects to clean the oven or its accessories.
- The outside surface should only be cleaned only with a soft cloth.
- Grille, tray, rotisserie rod and handle: pull them out. For cleaning, use a soft sponge with warm water and ordinary washing-up liquid and then rinse with plenty of water and dry with care. They are dishwasher safe.
- When cleaning the door or the inside of the oven do not scratch the sides with sharp or pointed objects. Clean with a sponge wet with water and ordinary washing-up liquid. Before using it, check that it is perfectly dry. Do not pour liquids onto the door, especially when it is hot, as this may break the glass.
Door gasket: check frequently that it is in good condition, that it is perfectly inserted in its correct position and clean it with a soft cloth.
- Tank and drip tray: to reduce the formation of bacteria and limescale deposits, empty the tank and drip tray every day after use and allow them to dry. Use ordinary dishwashing detergents for cleaning, and dry thoroughly. They are dishwasher safe.
Dscaling
To clean the cavity, see the previous paragraphs.
Note: the descending programme can still be carried out by the user even before the 100 hours have been reached.
Interior light. To replace the interior light bulb (type E14, 230V-25W), contact a service centre or professionally qualified personnel.
- When the appliance is out of use, cover it and store it in a dry place.
- If you decide not to use the appliance any more, it must be rendered unusable by cutting off the power supply cord (first making sure that the plug has been removed from the power socket), and any parts which are hazardous if used as children's playthings must be rendered harmless.
Information for correct disposal of the product under the European Directive 2011/65/EU
At the end of its lifetime, the product must not be disposed of with ordinary urban waste.
It can be consigned to the special waste recycling centres provided by local government, or by the retailers who provide this service.
Proper disposal of a household appliance prevents possible detrimental effects on the environment or health arising from its incorrect disposal and allows the recovery of its constituent materials, generating major savings of energy and resources. The product bears the crossed-out symbol of a wheeled rubbish bin to indicate that it must be disposed of separately. Illegal dumping of the product by the user will be subject to prosecution under the relevant law.

Guideline for Troubleshooting
| Abnormal conditions | Possible causes | Solution |
| E01 | Open circuit for top sensor | Stop the work, open the oven door and allow the cavity to cool down for 10 minutes, and then restart it or contact the after-sales service. |
| E02 | Short circuit for top sensor | Stop the work, open the oven door and allow the cavity to cool down for 10 minutes, and then restart it or contact the after-sales service. |
| E03 | Open circuit for bottom sensor | Stop the work, open the oven door and allow the cavity to cool down for 10 minutes, and then restart it or contact the after-sales service. |
| E04 | Short circuit for bottom sensor | Stop the work, open the oven door and allow the cavity to cool down for 10 minutes, and then restart it or contact the after-sales service. |
| E05 | Open circuit for evaporating heater sensor | Contact the after-sales department for repair |
| E06 | Short circuit for evaporating heater sensor | Contact the after-sales department for repair |
| No display on the screen | 1. Check whether the power supply plug is plugged;2. Display panel in poor contact | 1. Re-energize;2. Contact the after-sales department for repair |
| Oven lamp doesnot light | 1. Oven lamp is damaged2. Poor contact | 1. Replace or contact the after-salesdepartment for repair2. Contact the after-sales department for repair |
| Fan does not work | 1. Poor contact2. Fan is damaged | 1. Replace or contact the after-salesdepartment for repair2. Contact the after-sales department for repair |
| No response from the button | 1.PCB is failed or damaged;2.Control panel Just time LED flash, other buttons no response; | 1. Replace control PCB2. Be sure the water tank have water andtank is put into Oven; |
| No steam | 1.Water pipe is blocked2. Evaporator heater is damaged3. Water intake system is damaged | Contact the after-sales department for repair |
| Steam oven does not work | 1. Door is not closed tightly2. Poor contact of door control switch | 1. Re-close the oven door;2. Be sure the water tank have water andtank is put into Oven; |
| Steam leakage from oven door | 1. Door is not closed in place2. Door sealant is off or damaged3. Oven release steam when steampressure is too big, it is normal; | 1. Push door by hand2. Replace sealant or contact service Department; |

Este*simbolo destaca instrucciones y advertencias para un uso seguro. Las advertencias, la instalacion, el uso, la limpieza y elostenimiento del aparatoSEOSEOSEOSEOSEOSEOSEOSEOSEOSEOSEOSEOSEOSEOSEOSEOSEOSEOSEOSEOSEOSEOSEOSEOSEOSEOSEOSEOSEOSEOSEOSEOSEOSEOSEOSEOSEOSEOSEOSEOSEOSEOSEOSEOSEOSEOSEOSEOSEOSEOSEOSEOSEOSEOSEOSEOSEOSEOSEOSEOSEOSEOSEOSEOSEOSEOSEOSEOSEOSEOSEOSEOSEOSEOSEOSEOSEOSEOSEOSEOSEOSEOSEOSEOSEOSEOSEOSEOSEOSEOSEOSEOSEOSEOSEOSEOSEOSEOSEOSEO SEOOOOOOOOOOOOOOOOOOOOOOOOOOOOOOOOOOOOOOOOOOOOOOOOOOOOOOOOOOOOOOOOOOOOOOOOOOOOOOOOOOOOOOOOOOOOOOOOOOOOOOOOOOOOOOOOOOOOOOOOOOOOOOOOOOOOOOOOOOOOOOOOOoo
ATENCION: paredes calientes.
Information for domestic oven (REGOLATION (UE) N. 66/2014)
| Simbolo | Valore | Unità di misura |
| Type of oven | B400 (ZKX40A7) |
| Tipology of oven | Forno elettrico per uso domestico |
| Mass of the appliance | M | 21,5 | Kg |
| Number of cavities | | 1 | |
| Heat source per cavity (electricity or gas) | Energia Elettrica |
| Volume di ciascuna cavità | V | 31 | L |
| Energy consumption (electricity) required to heat a standardised load in a cavity of an electric heated oven during a cycle in conventional mode per cavity (electric final energy) | ECcavità elettrica | 0,64 | kWh/ciclo |
| Energy consumption required to heat a standardised load in a cavity of an electric heated oven during a cycle in fan-forced mode per cavity (electric final energy) | ECcavità elettrica | 0,65 | kWh/ciclo |
| Energy Efficiency Index per cavity EEl | EEIcavity | 94,1 | |
| Energy efficiency class | A |
ENERGIE-EFFIZIENZ