
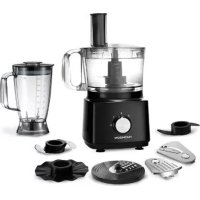
THFP9714G - Food Processor THOMSON - Free user manual and instructions
Find the device manual for free THFP9714G THOMSON in PDF.
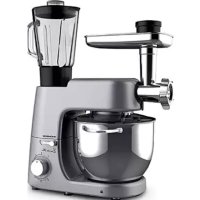


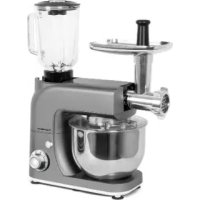
| Product type | Multifunctional stand mixer |
| Brand | Thomson |
| Model | THFP9714G |
| Power supply | 220-240 V ~ 50/60 Hz |
| Power | 1400 W |
| Number of speeds | 6 speeds + pulse |
| Stainless steel bowl capacity | 7 L (max. 2 kg of ingredients) |
| Main functions | Kneading, mixing, whisking, blending, grinding, sausage making |
| Included accessories | Kneading hook, flat beater, balloon whisk, glass blender (1.5 L), meat grinder, sausage attachment (fine and coarse), pusher, strainer, adapter, cone, funnel, meatball accessories |
| Materials | Stainless steel bowl, glass blender, plastic body |
| Dimensions (approx.) | Not specified in the manual - estimated 35 x 25 x 35 cm |
| Weight (approx.) | Not specified in the manual - estimated 7 kg |
| Cable length | Not specified - estimated 1 m |
| Safety | Automatic shut-off in case of overheating, arm locking, anti-splash lid, safety switches |
| Maintenance and cleaning | Clean accessories by hand with soapy water (not dishwasher safe). Never immerse the motor block. Apply vegetable oil to the strainers after drying. |
| Warranty | Legal warranty of conformity; commercial warranty not mentioned - refer to after-sales service |
| Repairability | Spare parts available from the manufacturer; repair by authorized technician only |
| Standards | Compliant with directives 2014/35/EU and 2014/30/EU, CE marking |
Frequently Asked Questions - THFP9714G THOMSON
User questions about THFP9714G THOMSON
0 question about this device. Answer the ones you know or ask your own.
Ask a new question about this device
Download the instructions for your Food Processor in PDF format for free! Find your manual THFP9714G - THOMSON and take your electronic device back in hand. On this page are published all the documents necessary for the use of your device. THFP9714G by THOMSON.
USER MANUAL THFP9714G THOMSON
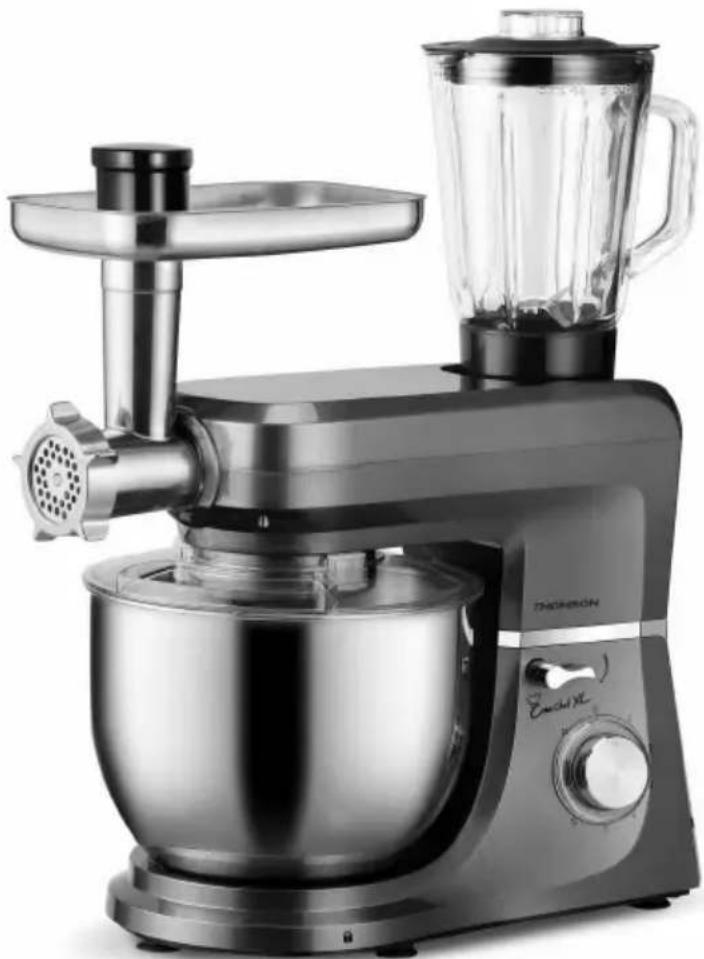
Crea Chef XL
NOTE:
Crea Chef XL
Read carefully the instructions before use.
This product complies with the requirements of Directives 2014/35/EU (repealing Directive 73/23/EEC as amended by Directive 93/68/EEC) and 2014/30/EU (repealing Directive 89/336/EEC).
CE
SAFETY INSTRUCTIONS
Carefully read the instructions before putting the unit into operation and keep the instructions including the warranty, the receipt and, if possible, the box with the internal packing. If you give this device to other people, kindly also transmit the user manual.
- The device is designed exclusively for private use and for the intended use. THIS APPLIANCE is not intended for commercial use. Do not use it outdoors (except if it is designed to be used outdoors). Keep away from sources of heat, direct sunlight, (never dip in any liquid) and sharp edges. Do not use the appliance with wet hands. If the device is wet or damp, disconnect it
immediately.
- When cleaning or storing the unit, turn off the camera and always remove the plug from the socket (pull the plug, not the cable) if the appliance is not in use and remove the attached accessories.
- Do not use the machine without supervision. If you must leave the room, turn off the machine or remove the plug from the socket (pull the plug itself, not the wire).
- Regularly check the device and cable are not damaged. Do not use the device if it is damaged. Do not try to repair the unit by yourself. Always contact an authorized technician. To avoid the exposure to danger, always replace a faulty cable only by the manufacturer, by our
customer service or by a qualified person and with a cable of the same type.
- Do not use anything other than genuine spare parts.
- Please observe the "Special Safety Instructions" following.
Children and vulnerable people
- To ensure the safety of your children, please keep all packaging (plastic bags, boxes, polystyrene, etc.) out of reach. Warning! Do not let small children play with the foil as they can suffocate!
- This device should not be used by children. Keep the device and the power cord out of the reach of children.
- This device is not a toy. Children should not play with the appliance.
- The devices can be used by people with physical, sensory or mental capabilities or lack of experience and knowledge if they have received supervision or instructions on using the unit safely and if they understand the dangers involved.
Special safety instructions for this machine
- Always disconnect the power unit if it is left unattended and before assembling, disassembling or cleaning.
- Turn off the power and disconnect before changing accessories or approaching parts that move in use.
- Do not use the device for purposes other than those intended.
- CAUTION: To avoid a hazard due to unintentional reset of the thermal switch, this device must not be powered by an external switching device, such as a timer, or connected to a circuit that is regularly switched on and off by the utility.
- Do not use the machine without supervision.
- Do not interfere with safety switches.
- Do not insert anything into the rotating hooks while the machine is in operation.
- Place the machine on a smooth, even, and stable work surface.
- Do not plug the machine into the socket without having installed all necessary accessories.
- WARNING: Ensure the blender is turned off before removing the support.
- Care should be taken when handling sharp blades, when emptying the bowl, and during cleaning.

This device is intended for contact with food.
IMPORTANT
It is forbidden to replace the power cable yourself. If damaged, it must be repaired by the local distributor's service, the manufacturer, or a qualified person. If the unit has fallen, ask a qualified person to check it before using it again. Internal damage could lead to accidents.
For all types of problems or repairs, contact the local dealer's service, the manufacturer, or a qualified person to avoid hazards.
DISPOSAL AND ENVIRONMENTAL RESPONSIBILITY
To be environmentally friendly, we encourage you to dispose of the unit properly. Contact your local authorities or recycling centers for more information.
Getting to know your device
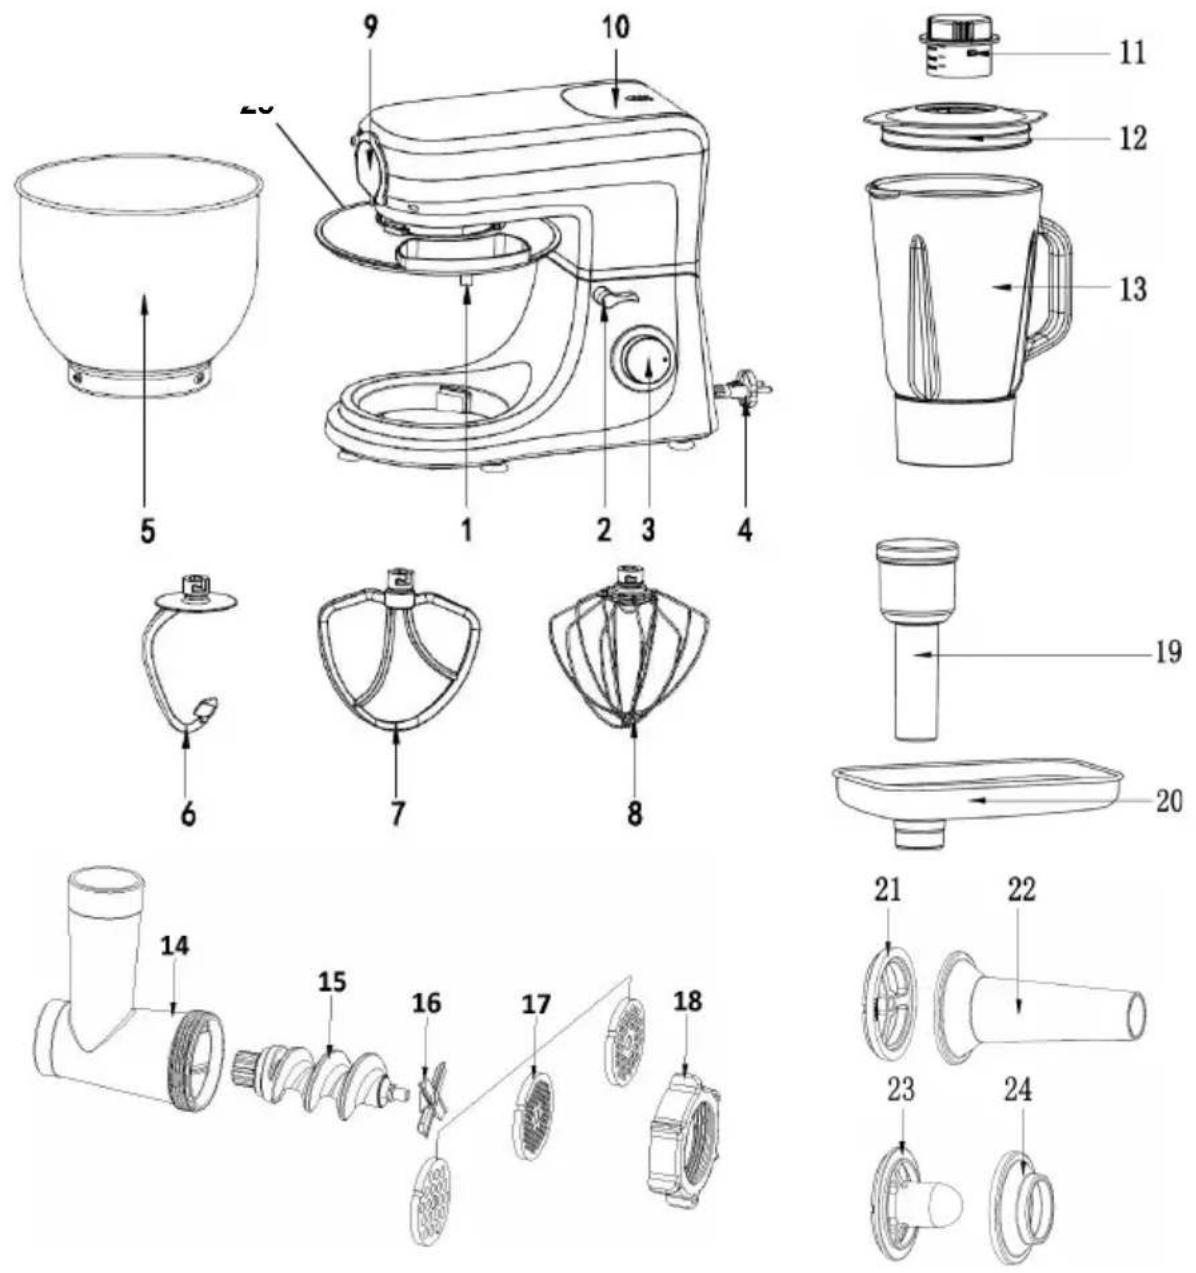
Main components and standard accessories:
- Rotating shaft
- Opening Button
- Speed Button
- Power cord
- Stainless steel bowl
- Dough hook
- Drummer
- Balloon whisk
- Front cover
- Rear cover
- Measuring cap 12.Blender cover
- Blender glass
- Chopper head
- Worm
- Blade
- Sieve
- Locking ring
- Tappet
- Filling tray
- Lead cover 22. Sausage horn
- Cone
- Meatball canister 25. Splash cover
Using the mixing bowl
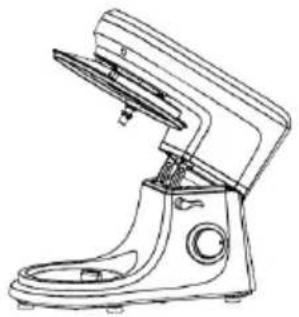
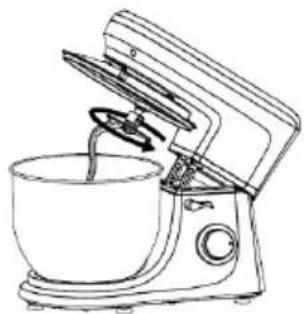
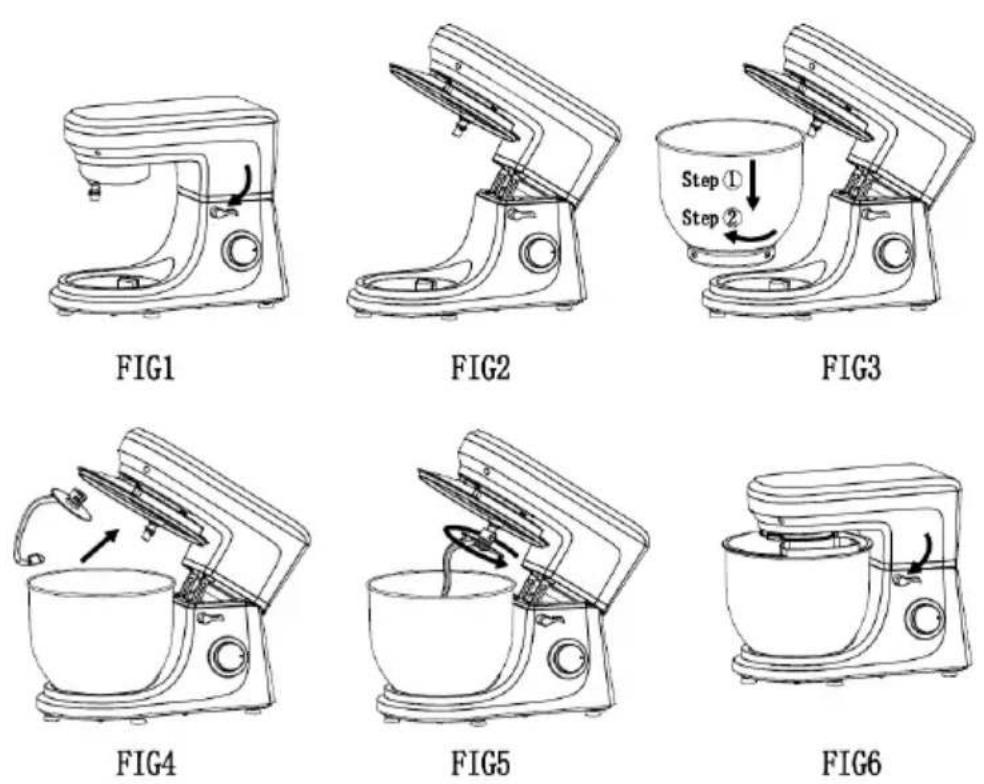
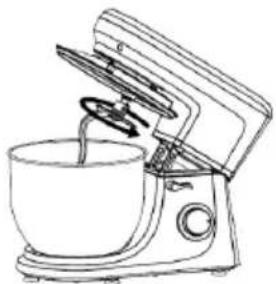
- To lift the arms, rotate the arm release button (2) in the clockwise direction. The arm will now move up. (FIG1)
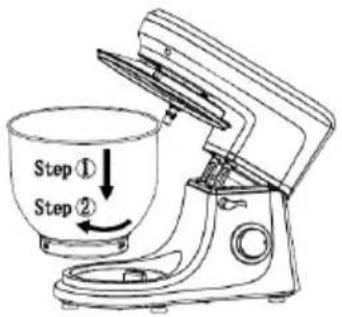
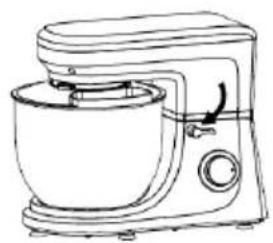
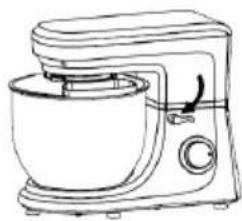
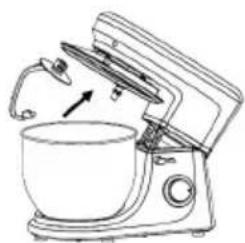
- Place the splash cover on the camera body and turn the cover until it clicks. (FIG2)
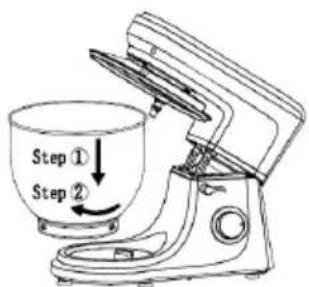
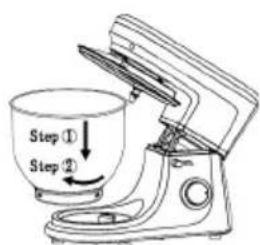
- Place the stainless steel bowl in its slot (step ①) and rotate the bowl in the clockwise direction until it locks (step ②). (Fig 3)
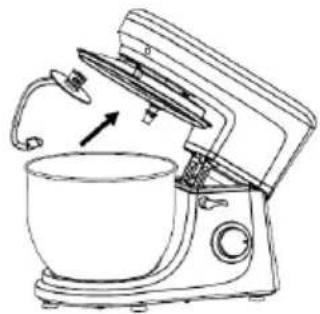
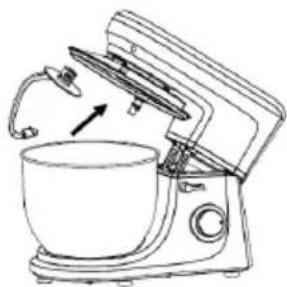
- Mount the required utensil (dough hook, beater, or whip) by inserting its top into the rotating shaft and turning it counterclockwise until it locks. (Fig. 4 & Fig. 5)
- Now add your ingredients. Do not overfill the machine beyond the maximum capacity of 2.0 kilograms.
- Lower the arms using the opening button (2). (Fig. 6)
- Plug the power cord into a properly installed safety socket rated 220-240V, 50/60 Hz.
- Start the machine by turning the speed knob to a speed between 1 and 6 (depending on the mixing task).
- For pulse operation (kneading at short intervals), turn the switch to the "PULSE" position. Hold the switch in that position for the desired interval length. When released, the switch automatically returns to the "0" position.
- After kneading, turn the speed controller (3) to the "0" position once the mixture has formed a ball. Then unplug the power cord.
- Press the arm release button (2) downward, and the arm will lift.
- The mixture can now be removed with a spatula from the mixing bowl.
- The mixing bowl can now be removed.
- Clean the parts as described in the "Cleaning and Maintenance" section.
Speed settings and use of the dough hook for a maximum mixing capacity of 2.0 kg.
| Use | Picture | Levels | Time (Min) | Maximum Remarks |
| dough hook | 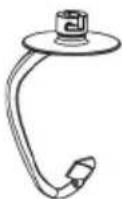 | 1-3 3 | 1000 g flour and 538 g water heavy mixes (eg. short bread or pastry) | |
| Drummer | 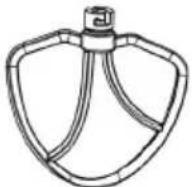 | 2-4 3 | 660 g flour and 840 g water medium-heavy mixes (eg. Mixing pancakes or sponges) | |
| balloon whisk | 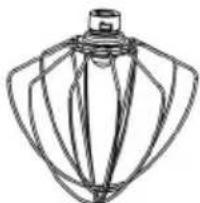 | 5-6 3 | 3 eggs bleached (Minimum) light mixers (eg. cream, egg white, pudding) |
Blender function:
Function:
The mixer can be used for very fine pureeing and mixing. It is suitable for soups, sauces, milkshakes, baby food, vegetables, fruits, batter, mashed potatoes, etc. If necessary, cut solid ingredients into smaller pieces before placing them in the blender.
Important:
1) Before use: do not put the whole plug into the power socket properly secured before the bowl of the mixer and the blender lid. 2) After use: unplug the device before removing the housing blender jar. 3) Do not fill the blender jar with ingredients whose temperature is above 80°C. 4) To prevent spillage, do not put more than 1.5 liters of liquid in the blender. 5) Never remove the lid of the jar while the blender is running. 6) Always cover the blender lid before mounting the mixer on the machine or disassemble the blender machine. 7) Do not use the attachment of the mixer for more than 3 minutes.
How to use the blender:
1) Remove lid back. (FIG.1) 2) Put the food you want to turn into the bowl. 3) Press the bowl cover and is firmly fixed (FIG.2). 4) Place the mixer dosing cap in the bowl cover and rotate in the direction of clockwise to lock (FIG.3). 5) To the blender bowl on the mounting hole and rotating it counterclockwise to clockwise until it is firmly fixed. (FIG.4) 6) Adjust the speed control to position 6.
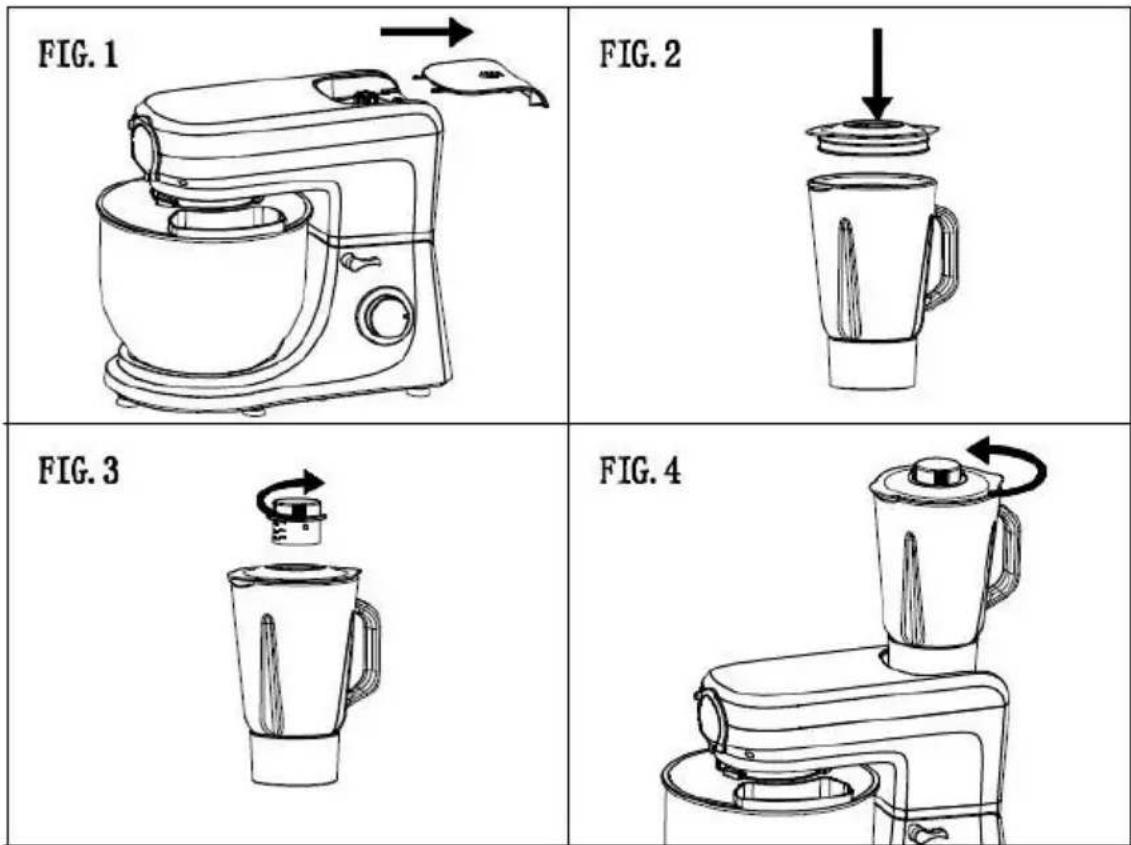
NOTE.
1) You can add ingredients while the machine works by removing the cover of the measuring cap. 2) It may be necessary to turn off the unit time to time to remove pieces of food that are located inside the blender container.
- Turn the unit off and unplug it. -Remove the blender lid.
- Use a spatula to gently remove food pieces located inside the blender jar. Keep the spatula at a safe distance knives. -Turn the blender pot in the direction of clockwise to remove the pot mixer.
Meat mincer Function:
How to use the mincer
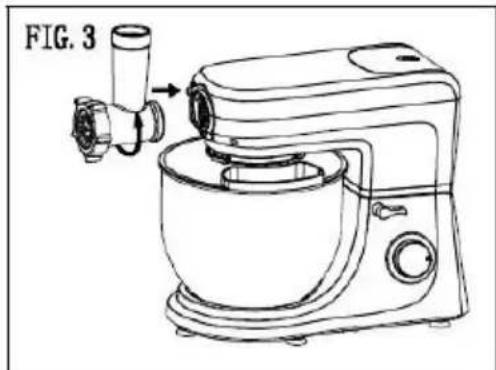
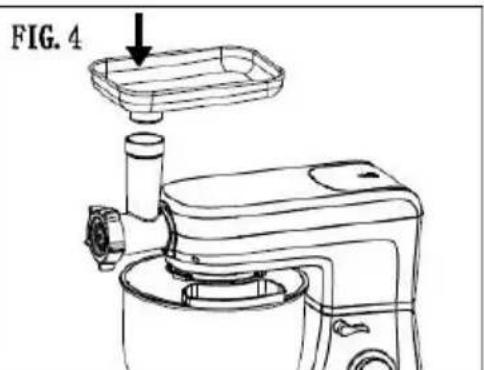
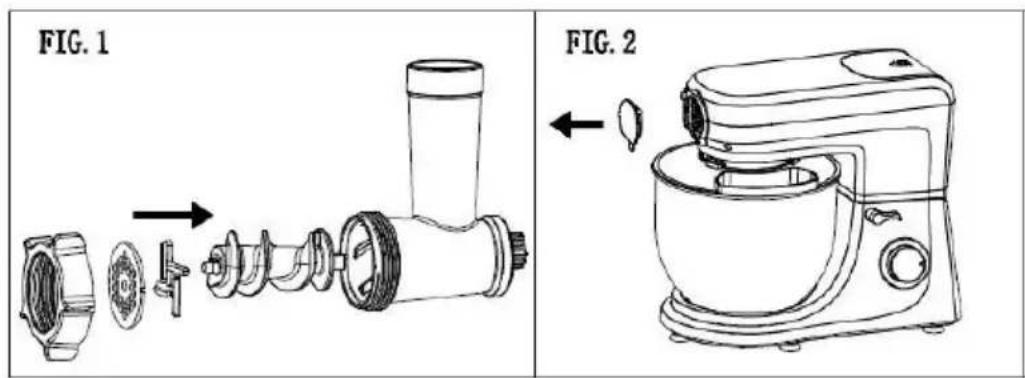
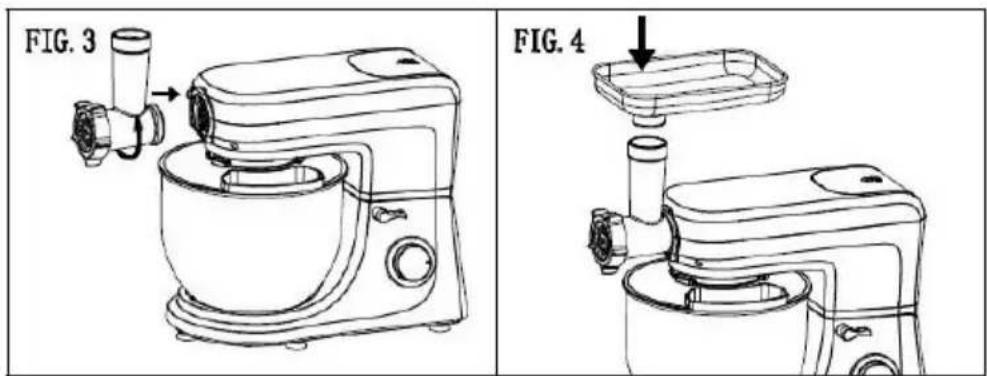
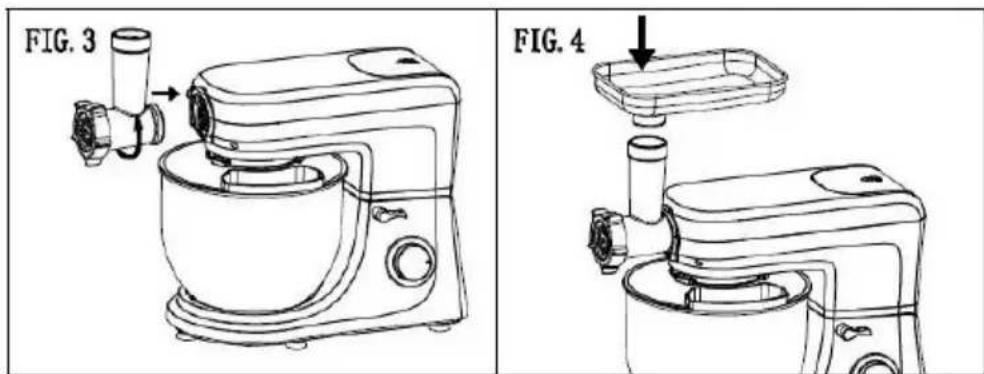
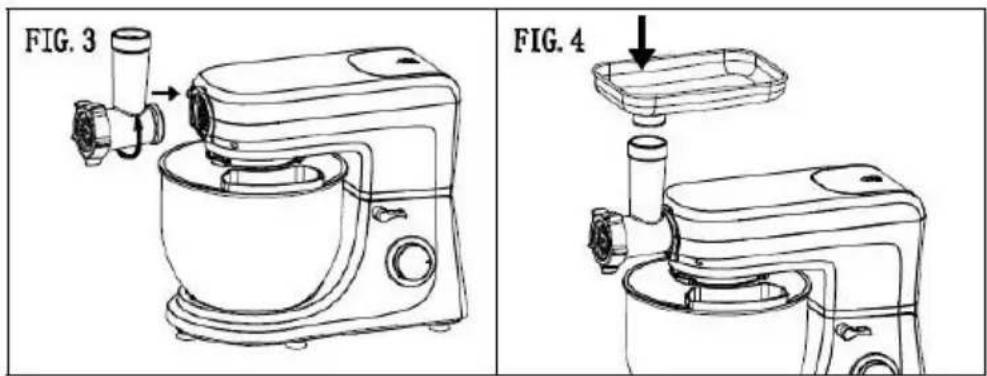
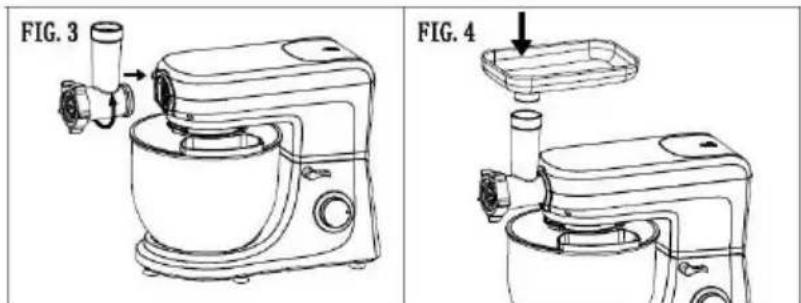
1) To mount the mincer parts, first place the blade (16) on the end of the helix (15) and then a sieve (17) of your choice. Please pay attention to the sieve and the recesses on the helix housing (14). Screw the lock (18) on until it is “hand tight”. (FIG.1) 2) Remove the front cover (FIG.2) from the machine. 3) Press the fixed button then place the helix housing into the machine and turn anticlockwise to lock (FIG.3) 4) Place the filling tray (FIG.4) on the filler neck 5) Place a vessel under the exit. 6) Put the plug in the socket then set the speed control to position 3. Put the pieces of meat on to the filling tray (20) and into the filler neck. If necessary push the meat with the presser (19). Do not use your fingers to push the meat! 7) After use, switch off the appliance and unplug it.
NOTE:
- Cut the meat into pieces of about 2.5 cm. Please take care that the meat does not contain any bones or sinews.
- Connect the device to a 220-240 V, 50/60Hz safety contact power socket.
Sausage Function:
Operation Sausage Attachment (see illustration B/C)

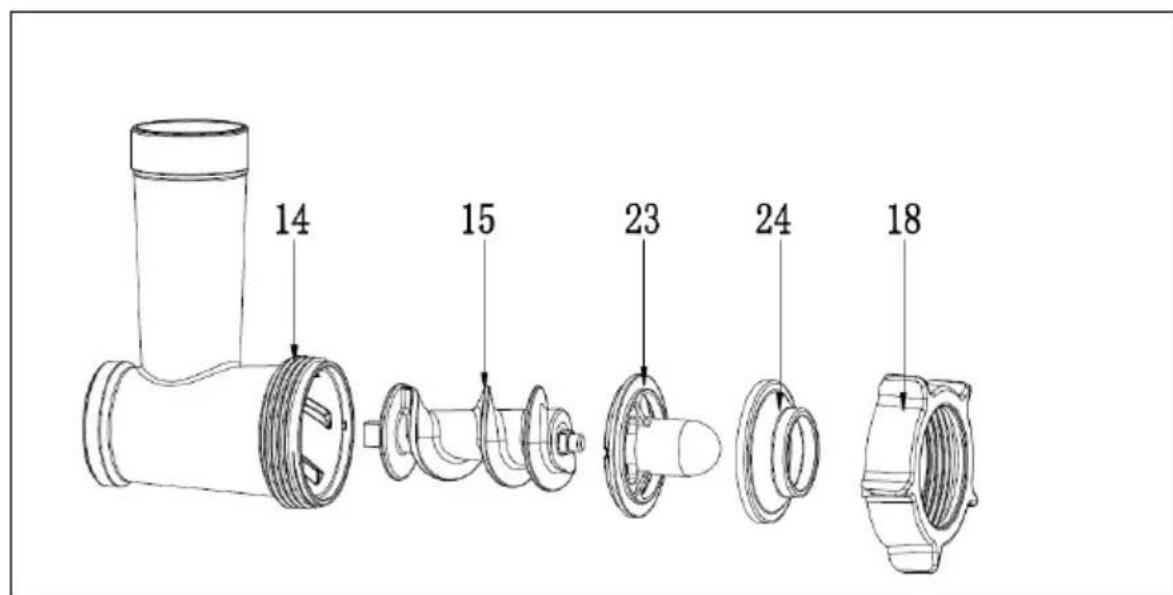
1) Place the adapter (21/23) on the axle of the spiral auger. 2) Insert a sausage attachment (22 or 24) into the lock. Attachment 24 is for thick sausages, attachment 22 for thin sausages. 3) Turn the lock "hand tight" on to the spiral housing. 4) Push the sausage skin (using either real or synthetic skin) over the sausage skin and knot the end. 5) Repeat steps 2 to 4 as described in "How to use the mincer". 6) Fill the sausage paste on to the filling tray and into the filler neck. 7) The sausage mixture is pressed through the sausage attachment and filled into the sausage skin.
8) When the first sausage has reached the desired length, squeeze it together with your fingers at the end of the sausage top. Turn the sausage around its own axis once or twice.
NOTE:
- Cut Levels 1 to 4 are suitable for mincer operation.
- Do not operate the device for more than 10 minutes and then allow it to cool down for a further 10 minutes.
- You can turn off the device after each single sausage length until you are more experienced.
- Carry out step 8 as described. Then turn on the meat mincer again.
- If you decide to use real skin, let it soak in water for a while before use.
- Take care that the sausage skin is filled "loosely" as during boiling or frying the sausage expands and the skin might tear.
Suggested Recipes
Streaky pork 1kg, salt16g, sugar70g, maple syrup 85g, white pepper 2g, Garlic powder 7g, Five-spice powder 5g, Cayenne pepper 7g, black pepper15g, potato starch 50g, Yellow rice wine 90g
Suggested recipes
Biscuit cake (basic recipe) Level 1-4
Ingredients:
200 grams of soft butter or margarine, 200 grams of sugar, 1 packet of vanilla sugar or 1 packet Citro-Back, 1 pinch salt, 4 eggs, 400 grams of wheat flour, 1 teaspoon baking powder, about 1/8 liter of milk.
Preparation:
Transfer the wheat flour and the remaining ingredients into the mixing bowl, mix with the whisk for 3 seconds at level 1, then for about 3 minutes at level 2. Grease a mold or line it with parchment paper. Fill the mold and bake. Before removing the cake from the oven, test to see if it is cooked. With a pointed wooden stick, pierce the center of the cake. If no batter adheres, the cake is done. Place the cake on a wire rack and let it cool.
Oven
Insertion height: 2
Heating: electric oven, top and bottom heat 175-200 °C;
gas oven: level 2-3
Cooking time: 50-60 minutes
According to taste, this recipe can be modified, for example with 100g raisins or nuts or 100g grated chocolate. In fact, the possibilities are endless.
Linseed bread rolls, level 1-4
Ingredients:
wheat flour 500-550g, 50g linseed, 3/8 liter of water, 1 yeast cube (40g), curd 100g lightened, drained well, 1 teaspoon salt. For coating: 2 tablespoons of water.
Preparation:
Soak flax seeds in 1/8 liter of warm water. Transfer the rest of the warm water (1/4 liter) into the mixer bowl, crumble in yeast, add the curd and mix with the dough hook at level 2. The yeast should be completely dissolved. Place flour, soaked linseed, and salt in the bowl. Knead thoroughly at level 1, then move to level 3 and continue to knead for 3 to 5 minutes. Cover the mixture and let it rise in a warm place for 45-60 minutes. Knead thoroughly again, remove the dough from the bowl and form sixteen rolls. Cover the mold with wet greaseproof paper. Place the rolls and let them rise for 15 minutes. Apply warm water and bake.
Oven:
Insertion height: 2
Heating: Electric oven: upper and lower heating 200-220 °C (preheated for 5 minutes), gas oven level 2-3
Cooking time: 30-40 minutes
Chocolate cream, level 5-6
Ingredients:
200ml sweet cream, 150g bittersweet chocolate, 3 eggs, 50-60g sugar, 1 pinch salt, 1 bag of vanilla sugar, 1 tablespoon brandy or rum, chocolate flakes.
Preparation:
Beat the cream in the blender bowl with whisk until it is firm. Remove from bowl and place in a cool place. Melt chocolate as directed on the package or in the microwave for 3 minutes at 600W. Meanwhile, beat eggs, sugar, vanilla sugar, brandy or rum, and salt in the mixing bowl with a whisk at speed 2 to form a foam. Add the melted chocolate and mix uniformly at speed 5-6. Leave a little cream for decoration. Add the remaining cream to the creamy mix and stir briefly using the pulse function. Decorate the chocolate cream and serve chilled.
Pizza dough, level 1-4
Ingredients:
400g flour, 250ml warm water, 1/2 teaspoon sugar, 1 tablespoon active dry yeast (about 2-1/2 teaspoons), 1-1/2 teaspoons olive oil, and 1 tablespoon salt.
Preparation:
Put flour in the bowl. Mix remaining ingredients in a bowl or jug. Rotating the mixer at speed 1-2, gradually add the liquid. Gradually, as the ingredients are incorporated and the dough ball forms, increase the speed to 3-4. Knead for a few minutes at this speed until the dough ball is smooth. Remove from bowl and divide into 2 to 4 pieces. Roll pizzas (circles or rectangles) on floured surface and then place them on a baking sheet or pizza tray. Spread tomato puree on pizza base and add toppings - mushrooms, ham, olives, sun-dried tomatoes, spinach, artichokes, etc. Garnish with dried herbs, pieces of mozzarella, and a drizzle of olive oil.
Basic white bread, level 3-6
Ingredients:
600 g white bread flour, 1 box dried active yeast (about 2½ teaspoons), 345 ml water, 1 tablespoon sunflower oil or butter, 1 teaspoon sugar, 2 teaspoons salt
Preparation:
Follow the mixing instructions for pizza dough, then put the mixture into a bowl, cover, and let it rise in a warm place until it doubles in volume (30–40 minutes). Remove the dough and punch it down to remove air. Knead lightly on a floured board, shape into a loaf or put in a box, cover, and let rise in a warm place for a further 30 minutes. Bake in a preheated oven at 200 °C / 400 °F / gas 6 for 25–30 minutes, until the base is golden brown and sounds hollow when tapped.
Soft poppy seed rolls, levels 1–3
Ingredients:
570 g white bread flour, 1 box active dry yeast (about 2½ tsp), 300 ml milk (slightly warmed), 2 eggs (room temperature), 1 tbsp sunflower oil, 1½ tbsp sugar, 2 tsp salt, 75 g poppy seeds.
Preparation:
Blend milk, eggs, oil, sugar, salt, and yeast in a jug or bowl, and let stand for 5 minutes. Put the flour and poppy seeds into the bowl and mix at speed 1, gradually adding the liquid, then increase speed to 2 and
mix for five minutes. Turn the dough out onto a floured surface, cut into 8–10 pieces, roll into shapes, and place on a greased baking sheet. Leave in a warm place until doubled in size. Brush with some egg or milk and bake in a preheated oven at 220 °C / 425 °F / gas 7 for 20–25 minutes, until the bottom is browned and sounds hollow.
Italian herb bread
Ingredients:
575 g white bread flour, 1 box active dry yeast (about 2½ tsp), 290 ml water, 2 tbsp olive oil, 2 tbsp sugar, 2 tsp salt, 4 tsp dried mixed herbs.
Preparation:
Blend water, oil, sugar, salt, and yeast in a jug or bowl, and let stand for 5 minutes. Put the flour and dried herbs into the bowl and mix at speed 1, gradually adding the liquid, then increase speed to 2 and mix for 5 minutes. Place dough in a bowl, cover, and leave in a warm place until it doubles in volume (20–30 minutes). Turn out onto a floured surface, gently knead to remove air, then shape, place on a baking sheet, and leave in a warm place until doubled in size. Preheat oven to 200 °C / 400 °F / gas 6 and bake for 25 minutes or until the bottom is browned and sounds hollow.
Coffee ice cream and brandy, levels 5–6
Ingredients:
3 eggs, 75g caster sugar, 300ml single cream, 2 tbsp instant coffee powder, 300ml double cream, 2½ tbsp brandy.
Preparation:
Add sugar and eggs to the bowl and mix at speed 6 until smooth. In a saucepan, bring the cream and coffee to a boil, then stir into the egg and sugar mixture. Place the bowl over a pan of simmering water and cook slowly, stirring, until the mixture coats the back of a spoon. Strain into a bowl and cool. Whisk the double cream at speed 6 until soft peaks form, then fold in the cold egg and sugar mixture with the brandy. Pour into a container, cover, and freeze for 2½–3 hours until partially frozen. Remove, blend, and freeze again until desired texture.
Basic meringues, Level 5-6
Ingredients:
4 egg whites, 100g caster sugar, 100g powdered sugar.
Preparation:
Put the egg whites in the bowl and mix at speed 6 until firm. Add half the sugar and whisk again until smooth and stiff peaks form. Remove the bowl and gently fold in the remaining sugar with a metal spoon. Line a baking tray and spoon or pipe the meringue mixture into ovals. Sprinkle with remaining sugar and place on the bottom shelf of a cold oven (120°C / 250°F / gas ½) for 1½ hours. Let cool on a rack. Garnish with soft fruit, chocolate, and sweet cream.
Cleaning and maintenance
- Before cleaning, remove the power cord from the outlet.
- Never immerse the housing with the engine in water!
- Do not use harsh or abrasive detergents.
Motor Housing
- Only a wet rinse cloth should be used to clean the outside of the housing.
Mixing bowl, mixing equipment
WARNING:
- The components are not suitable for cleaning in the dishwasher. If they are exposed to heat or caustic cleaners, they may deform or discolor.
- exposed to heat or caustic cleaners, they may deform or discolor.
- The components that have come into contact with food can be cleaned with soap and water.
- Allow parts to dry completely before reassembling the device.
- Please apply a small amount of vegetable oil on the screens after drying.
| Problems Solution | |
| The machine does not work. | - Check whether the plug is in good contact with the socket.- Check whether the arm release button is pressed.- Check whether the machine works continuously for more than 6 minutes and wait until the engine cools down. |
| Noise in the mixing bowl when working (accessory scraped the bowl) | - Check the mixing bowl is properly installed.- Check that the accessory is correctly installed on the machine. |
| The pot lid does not fit properly in the mixing bowl. | - Check the bowl lid is placed correctly on the machine.- Check the mixing bowl is properly installed on the machine and properly locked. |
| The machine does not work at a certain speed. | - Check that the mark on the speed button corresponds to the speed of screen printing on the case.- Turn the speed button 0, and check again if the machine works. |
| Movements at the machine work | - Check the slip feet are not removed.- Check if the machine is placed on a smooth and flat table. |
| The up button has not replaced after the installation of the mixing bowl and pot lid. | - Check the bowl lid is placed correctly on the machine.- Check the mixing bowl is properly installed. |
For any other problems occurring on your device: contact customer service.
Voltage: 220-240V ~ 50/60Hz
Power: 1400W
Number of speed control: 6 speeds + pulse
Capacity stainless steel bowl: 7 L
Defects due to improper use of the device and damage due to an intervention or repairs made by a third party or due to the installation of parts that are not original are not covered by the responsibility of the provider.
Defects due to improper use of the device and damage due to an intervention or repairs made by a third party or due to the installation of parts that are not original are not covered by the responsibility of the provider.
DISPOSAL AND ENVIRONMENTAL
If you want to dispose of your appliance because it needs to be replaced or is no longer used, remember to protect the environment. Seek advice from local authorities, as there are many environmentally friendly waste disposal options.

The logo on the product means that it is a device whose treatment as waste falls within the scope of Directive 2012/19/EC of 4 July 2012 on electrical and electronic waste (WEEE).
The presence of hazardous substances in electrical and electronic equipment may have potential effects on the environment and human health during the reprocessing cycle of this product.
Thus, at the end of life of this product, it should not be disposed of as unsorted municipal waste.
As an end user, your role is crucial in the reuse, recycling, and other forms of recovery of electrical and electronic equipment. Return and collection systems are made available by local authorities (waste disposal) and distributors.
You have an obligation to use the collection systems available to you.
The warranty does not cover the wear parts of the product, nor the problems or damage resulting from:
(1) Surface deterioration due to normal wear and tear of the product; (2) Defects or deterioration due to contact with liquids and corrosion caused by rust or the presence of insects; (3) Any incident, abuse, misuse, alteration, disassembly, or unauthorized repair; (4) Improper maintenance, improper use concerning the product, or connection to an incorrect voltage; (5) Any use of accessories not supplied or not approved by the manufacturer.
The warranty is void if the label and/or product serial number is removed.
THOMSON is a trademark of Technicolor SA used under license by SCHNEIDER CONSUMER GROUP.
This product is imported by SCHNEIDER CONSUMER GROUP, 12, rue Jules Ferry, 93110 Rosny-sous-Bois, FRANCE
THOMSON
Multifunctionele keukenmachine
THFP9714G
HANDLEIDING
Crea Chef XL
FIG1
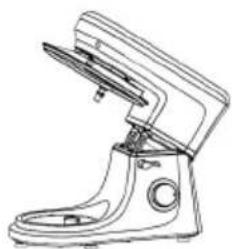
FIG2
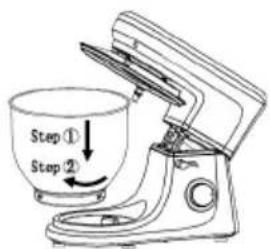
FIG3
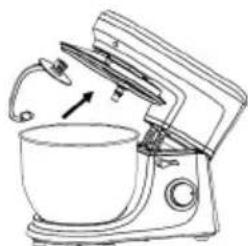
FIG4
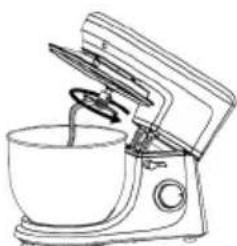
FIG5
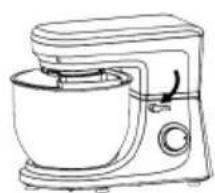
FIG6
NOTE:
Sponge cake (basic recipe) Level 1-4
Ingredients:
200 grams soft butter or margarine, 200 grams sugar, 1 packet vanilla sugar or 1 packet Citro-Back, a pinch of salt, 4 eggs, 400 grams wheat flour, 1 teaspoon baking powder, about 1/8 liter milk.
Preparation:
Crea Chef XL
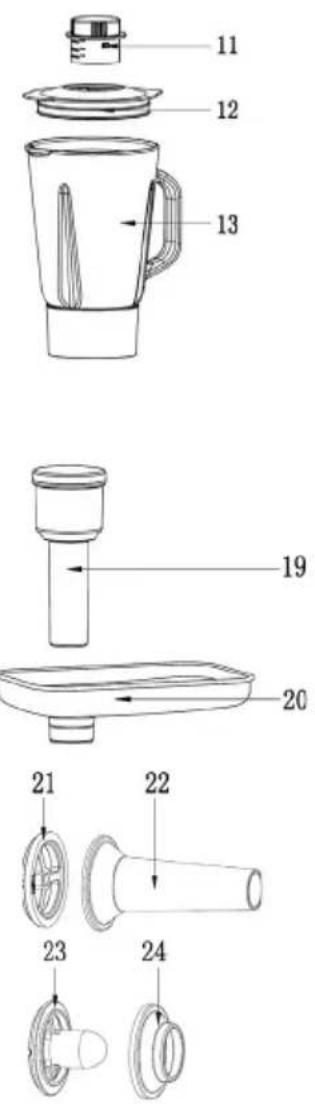
FIG1
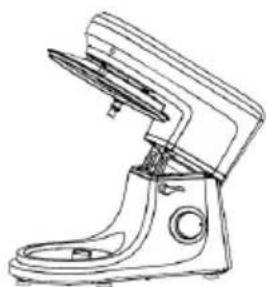
FIG2
NOTE:
Crea Chef XL

NOTE:
- NOTE
- SAFETY INSTRUCTIONS
- CHILDREN AND VULNERABLE PEOPLE
- SPECIAL SAFETY INSTRUCTIONS FOR THIS MACHINE
- IMPORTANT
- DISPOSAL AND ENVIRONMENTAL RESPONSIBILITY
- GETTING TO KNOW YOUR DEVICE
- MAIN COMPONENTS AND STANDARD ACCESSORIES
- USING THE MIXING BOWL
- BLENDER FUNCTION
- FUNCTION
- HOW TO USE THE BLENDER
- MEAT MINCER FUNCTION
- HOW TO USE THE MINCER
- SAUSAGE FUNCTION
- OPERATION SAUSAGE ATTACHMENT (SEE ILLUSTRATION B/C)
- SUGGESTED RECIPES
- BISCUIT CAKE (BASIC RECIPE) LEVEL
- INGREDIENTS
- PREPARATION
- OVEN
- LINSEED BREAD ROLLS, LEVEL
- CHOCOLATE CREAM, LEVEL
- PIZZA DOUGH, LEVEL
- BASIC WHITE BREAD, LEVEL
- SOFT POPPY SEED ROLLS, LEVELS
- ITALIAN HERB BREAD
- COFFEE ICE CREAM AND BRANDY, LEVELS
- BASIC MERINGUES, LEVEL
- CLEANING AND MAINTENANCE
- MOTOR HOUSING
- MIXING BOWL, MIXING EQUIPMENT
- WARNING
- VOLTAGE: 220-240V ~ 50/60HZ
- DISPOSAL AND ENVIRONMENTAL
- THOMSON
- MULTIFUNCTIONELE KEUKENMACHINE
- SPONGE CAKE (BASIC RECIPE) LEVEL
Brand : THOMSON
Model : THFP9714G
Category : Food Processor