
THFP248GM - Food Processor THOMSON - Free user manual and instructions
Find the device manual for free THFP248GM THOMSON in PDF.

| Product type | Multifunction food processor |
| Brand | Thomson |
| Model | THFP248GM |
| Power supply | 220-240 V ~ 50/60 Hz |
| Total power | 800 W |
| Blender capacity | 1500 ml (max), 1350 ml (nominal) |
| Functions | Kneading, mixing, whisking, chopping, sausage making, blending |
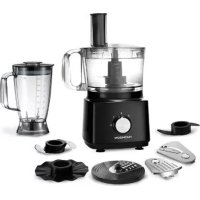
| Included accessories | Dough hook, whisk, beater, stainless steel bowl, meat grinder with auger, blade, grinding discs (medium and coarse), food tray, pusher, glass blender, sausage nozzles (short and long), nozzle fixing |
| Materials | Stainless steel bowl, glass blender, stainless steel blades |
| Safety | Motor head release button, automatic shut-off in case of overheating, very sharp blades |
| Cleaning and maintenance | Hand wash with dish soap; do not immerse the motor unit; do not put the stainless steel bowl and mixing accessories in the dishwasher |
| Warranty | Warranty does not cover wear parts or damage due to improper use |
| General information | Imported by SCHNEIDER CONSUMER GROUP, 12 rue Jules Ferry, 93110 Rosny-sous-Bois, France |
Frequently Asked Questions - THFP248GM THOMSON
User questions about THFP248GM THOMSON
0 question about this device. Answer the ones you know or ask your own.
Ask a new question about this device
Download the instructions for your Food Processor in PDF format for free! Find your manual THFP248GM - THOMSON and take your electronic device back in hand. On this page are published all the documents necessary for the use of your device. THFP248GM by THOMSON.
USER MANUAL THFP248GM THOMSON
Read the instructions carefully before use
This product complies with the requirements of the 2014/35/EC Directive (repealing the 73/23/EEC Directive, amended by the 93/68/EEC Directive) and the 2014/30 /EC Directive (repealing the 89/336/EEC Directive)
IMPORTANT SAFETY INSTRUCTIONS
When using electrical appliances, always observe basic safety rules:
- Read the instruction manual completely.
- To avoid electric shock, do not put the appliance, power cord or plug in water or any other liquid.
- Unplug the appliance from the mains after use, before cleaning and before changing accessories.
- Avoid contact with the moving parts.
- If the power cord is damaged, it must be replaced by the manufacturer, its service agent or similarly qualified persons in order to avoid a hazard.
- The use of accessories which are not sold or recommended by the manufacturer may cause fire, injury or electric shock.
- Do not use this appliance outdoors.
- Do not let power cord hang over edge of table or come into
contact with hot surfaces.
- Never approach the moving blades or discs during use: you may injure yourself and cause damage to the appliance.
- The blades are very sharp, handle with care.
- Always follow the instructions of this manual for using the stand mixer and assembling the accessories.
- Turn off the appliance before changing accessories or touching moving parts.
- Before using the stand mixer, make sure that the mains voltage is compatible with the unit's voltage requirement indicated on the rating plate.
- Place your stand mixer on a horizontal, clean and stable surface during use.
-
Do not pull the power cord to move the unit. Arrange the cord so that it is not pinched. Do not wrap the cord around the appliance and do not bend it.
-
This appliance is intended to be used in household.
- Care shall be taken when handling the sharp cutting blades, emptying the bowl and during cleaning
- Always disconnect the appliance from the supply if it is left unattended and before assembling, disassembling or cleaning.
- This appliance shall not be used by children. Keep the appliance and its cord out of reach of children.
- Appliances can be used by persons with reduced physical, sensory or mental capabilities or lack of experience and knowledge if they have been given supervision or instruction concerning use of the appliance in a safe way and if they understand the hazards involved.
- Children shall not play with the appliance.
- Cleaning and user maintenance shall not be made by children without supervision.
- This appliance is not designed to be operated by means of external timer or remote-control system.
We decline all liability for defects due to improper use of the appliance and damage caused by service or repair made by a third party or due to installation of unauthorized parts.
"NOTE: Never use hot liquids or run the unit empty. The bowl can be used to grind ice."

This appliance is designed for contact with food.
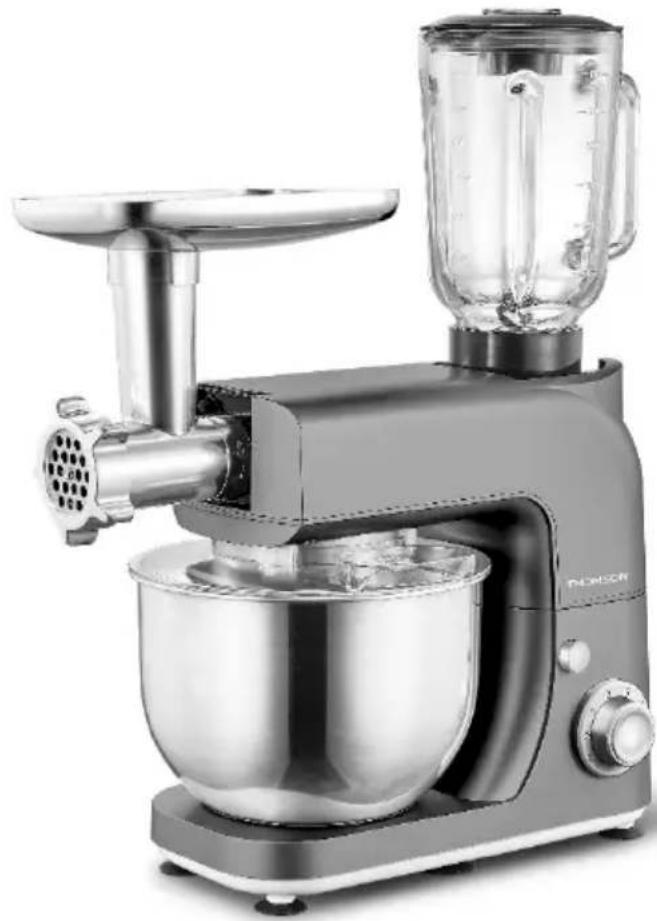
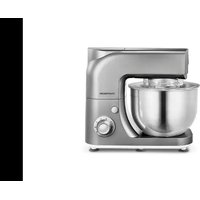
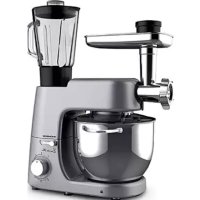
GETTING TO KNOW YOUR APPLIANCE
Main product
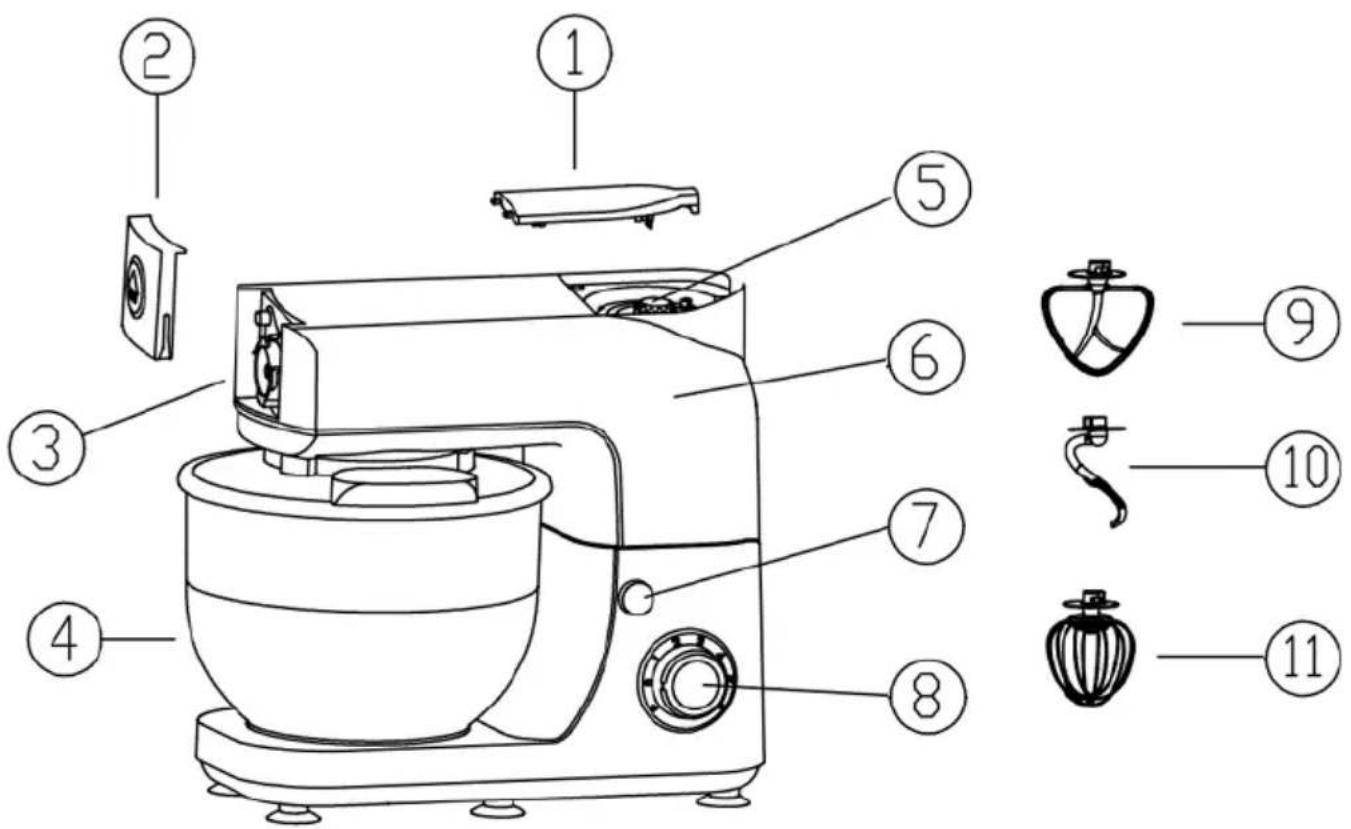
- Top cover
- Front cover
- Assembly opening of the chopper
- Stainless steel mixing bowl
-
Blender mounting opening
-
Engine block
- Push button for unlocking the drive head
- Speed selector
- Beater
10.Dough hook
11.Whisk
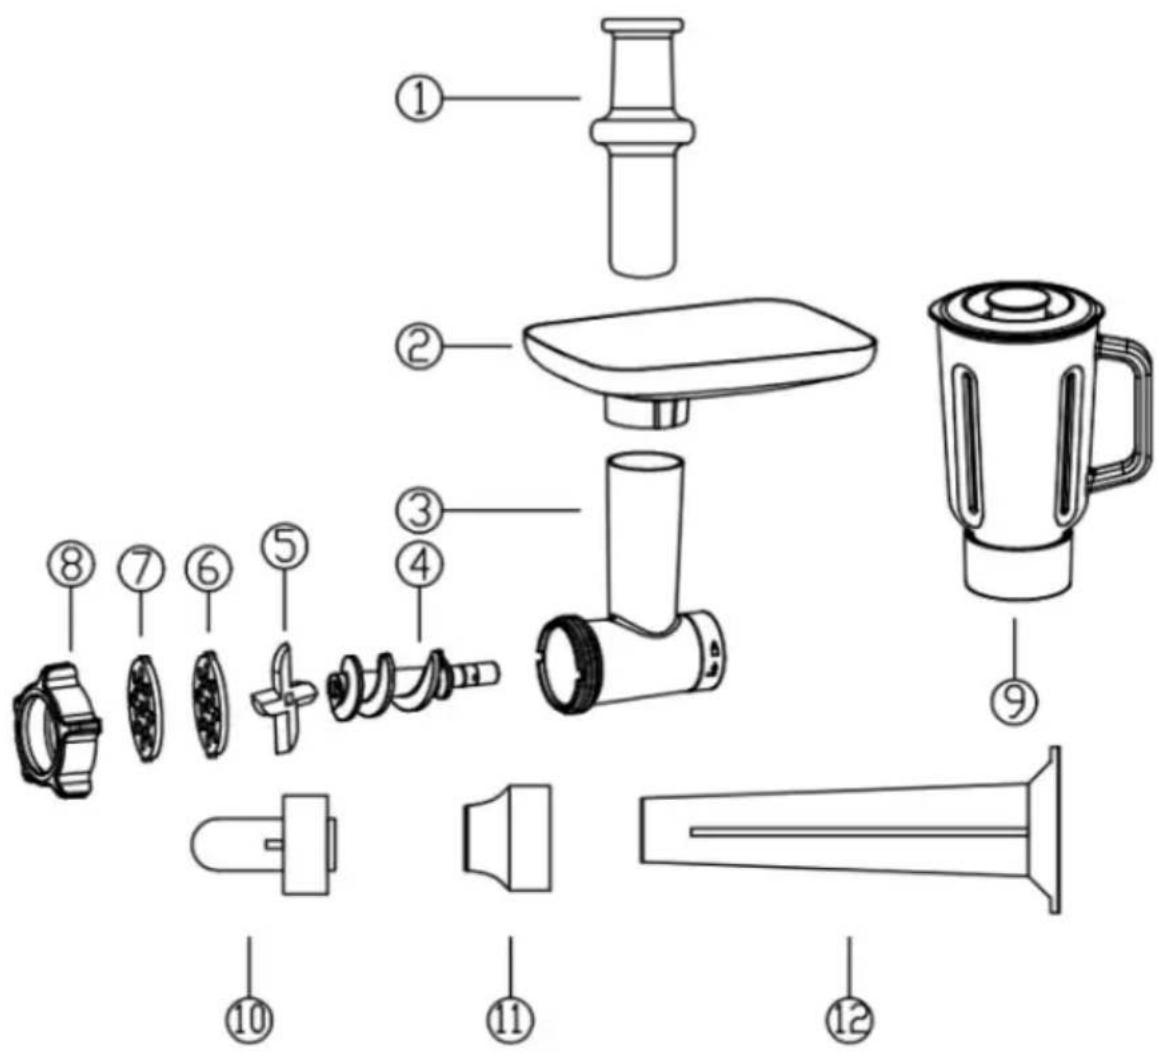
Mincer, Sausage, Juicer
- Food Pusher
- Food Tray
- Chopper Tube
- Worm screw
- Blade
-
Medium cutting Plate
-
Thick cutting Plate
- Locking Ring
- Glass blender
- Attached sausage nozzle
- Short sausage nozzle
- Long sausage nozzle
DESCRIPTION FOR STANDARD ACCESSORIES PASTRY KIT
The standard parts of this machine are composed of dough hook, whisk, beater and stainless-steel mixing bowl.
Installation and dismantling of mixing head Installation.
- Insert the bowl cover to insert the notch at the upper end of the dough hook to the driving shaft.
- Push the dough hook upward and turn counterclockwise until it cannot move.
To remove attachment
- Push the dough hook upward and turn clockwise until it cannot move.
- Take the dough hook out and remove the transparent lid.
\~ Stainless steel mixing bowl
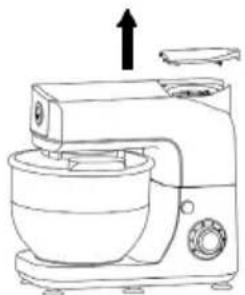
- Keep the appliance in a safe, stable, clean and dry place.
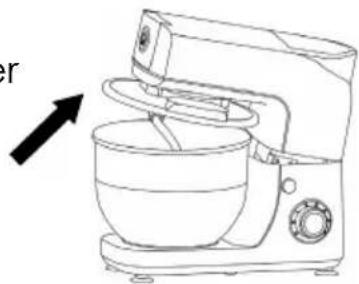
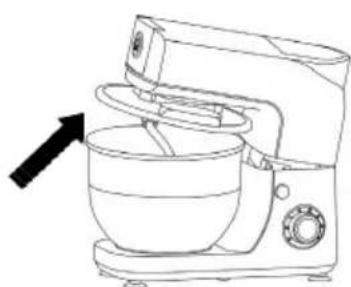
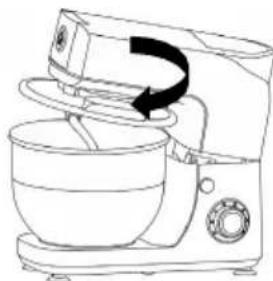
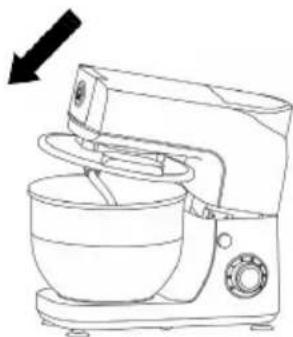
- One hand hold on the head of the machine, another hand presses the release button, the appliance will automatically lift the head, and we can make the appliance head to the maximum position by hand and install bowl cover.
- Installing the dough hook to the specified position according to above installing method.
- Place the stainless-steel bowl in the specified position and lock it clockwise.
- Do not exceed the bowl's maximum capacity so as not to overload the appliance.
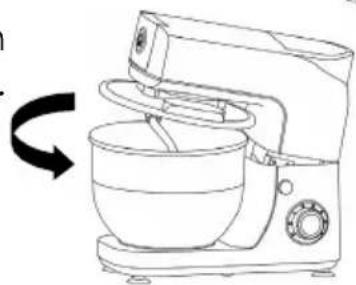
- Ready and press down the appliance head to lock (the release button will pop up) to recover the head position.
- Switch on the 220V-240V 50-60Hz safety power.
- Use the speed control button of the mixer to help you find the correct speed to use.
- When the mixture reaches the desired range of agitation, turn the speed knob to the "OFF" and unplug the power plug.
- Turn the stainless-steel bowl counterclockwise and remove it from the machine.
11.Take out the mixture from bowl. - The cleaning of parts can be carried out in the light of the methods described in "cleaning and maintenance".
P.S.: Before using this product, please clean the accessories with detergent, rinse it with water and leave it dry and ready.
\~ Dough Hook
Use of the dough hook for mixing bread, dough, pasta and other consistent foodstuffs.
- Install the kneading hook and stainless-steel bowl according to the steps described above. Add the dry yeast and liquid elements after adding the flour to be incorporated.
- After the complete installation, turn the speed variator to speed 1 and wait for the flour to be kneaded. Turn the switch to speed 2 until the dough has good elasticity or the necessary gluten.
\~Beater
Use the mixer to blend medium consistency ingredients such as cake or pie dough, cookie dough, butter, etc. produced with low gluten flour.
- Following the steps described above, install the mixer and stainless steel bowl. Add the ingredients to be incorporated.
- After completing the installation, plug in the power cord and turn the power switch to the ON position. Before mixing the ingredients, set the switch to speed 1 and gradually increase to the desired speed for the mixing process.
Whisk
Use it to obtain a light and airy preparation of choux pastry, sponge cake, etc. Please wipe the stainless steel bowl and whisk to make sure there is no water or oil.
- Following the steps described above, turn the whisk, install the egg beater in the stainless steel bowl. (There must be no yolk in the bowl).
- After completing the installation, plug in the power cord and turn the speed control knob to speed 5, so that the preparation reaches the desired level of consistency.
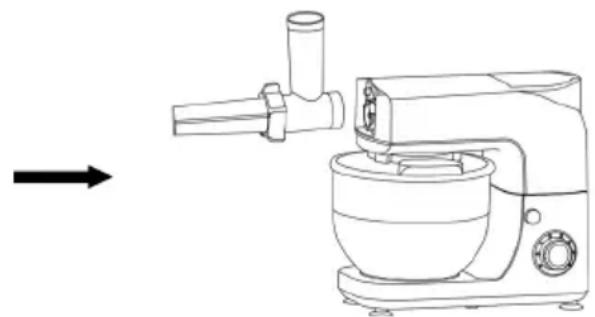
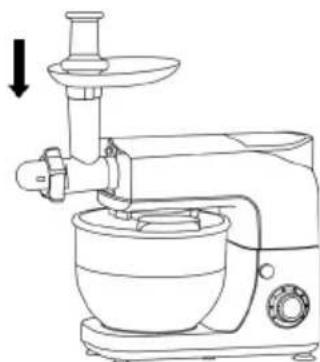
DESCRIPTION OF CHOPPER ACCESSORIES
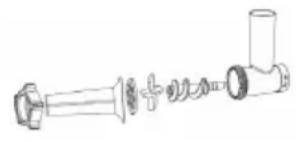
- Hold the chopper tube and put the auger into the tube.
- Place the blade on the auger with the cutting edge facing upwards.
- Select the chopping disc (thick or medium) of your choice on the blade.
- Tighten the lock nut.
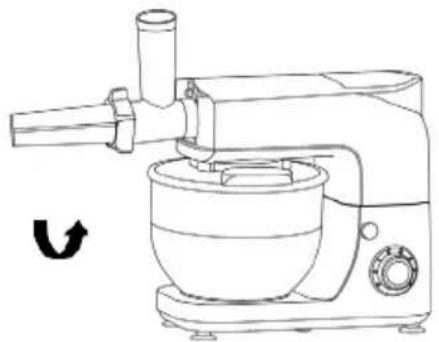
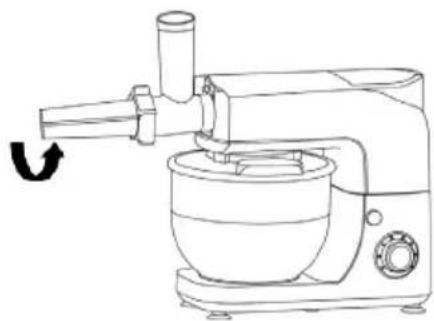
- Open the front cover of the machine and insert the assembled accessories into the cross outlet end of the machine.
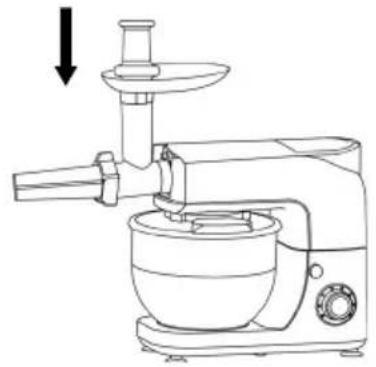
- Place the food tray over the meat grinder inlet.
- Place a container at the meat outlet.
- Cut the meat into small pieces, place it on the food tray, push the food pusher and switch on the meat grinder.
Notes:
- Please use food pusher to push meat into the feed port, and do not use finger or other utensils to transport food.
- It will be better to cut the meat in small pieces.
- When using mincer, it is necessary to remove the mixing parts from the stainless-steel bowl Caution: Do not put the meat with skin tendon or bone into the grinder.
Caution: Do not put the meat with skin tendon or bone into the grinder.
- Sausage
- Hold the mincer and put the screw into mincing tube.

- Place the blade, the appropriate cutting plate and the sausageholder
on the screw one after the other and tighten the lock ring.
- Open the front cover of the unit, insert the sausage end into the cross port at the end of the robot, turn counter-clockwise and straighten.
- Soak the casing in cold water for 10 minutes, and gently cover it on the sausage shaper.
Place the meat on the plate and push the meat into the meat grinder with the food pusher. Turn on the machine, stir the meat into the casing, and if the casing gets stuck, wipe it off.
- The sausage is filled with nodes then finish.
Warning!
Attention! Stuffed sausages maybe swell when boiled or fried, and sausages can tear! Please use the pusher to push the meat into the feed port, and do not use finger or other utensils to deliver the food!
- KEBBE
- Hold the mincer and put the snake into tube.

-
The attachment of the nozzle and the short sausage nozzle are successively placed on screw, then tighten the locking ring.
-
Before opening the front cover of the appliance, insert the set of mincing rolls into the head tube of the lateral output port, turn counterclockwise righting.
- Place the meat mixture on the food tray, push it into the mincer with a food pusher, turn on the device and mix the ingredients to form a hollow donut with the meat chopped.
- Cut the doughnut into the required length. Each small circle can be filled with meat which is well blended with the taste. The edges of the face ring are tightly pressed and sealed.
- Place the meat pie in the pan until it is deep fried and well done.
Notes: This accessory can be used to make meat pie, fishing dumpling and other typical food.
Warning!
Please use the pusher to push the meat into the feed port, and do not use finger or other utensils to deliver the food.
- Blender
Notes: the maximum scale of cup is 1500mL (rated capacity: 1350mL )
Assembling:
- Open the head cover
- Lower the machine head in a horizontal position, the locking rotary knob will popup automatically and lock the head.
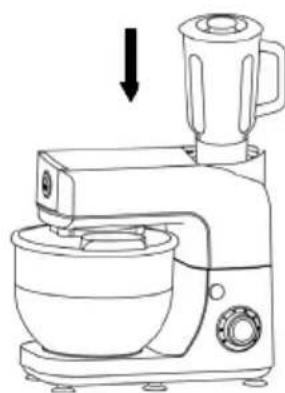
- Hold the blender handle into the output connector, rotate it clockwise to lock.
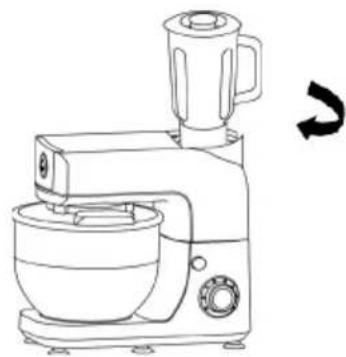
Usage of the blender
- Put the sliced fruit in the glass bowl, add water, milk or other liquids and close the lid.
- Lock the bowl by turning it clockwise.
- After installation, turn on the power and adjust the speed until the desired effect is achieved.
- If the fruit cubes are large, use the PULSE level for 2 or 3 seconds and then return to the appropriate speed.
Cautions:
- Make sure the machine is off before install the blender.
- Pause level cannot be stay for a long time, but can be repeat operated.
- Do not turn on the machine for more than 30s while the blender is empty.
- Do not put food into the blender exceed the capacity.
- The blender is glass, water over 40^ is not allowed.
| Function | Recipe | Speed | Operate Time |
| Food blender | 540g carrots + 810g water | Speed 6 1 min | |
| Kneader | 1680g flour + 1209g water | Speed 1-6 | 2 mins |
| Egg beater | 800ml cream Speed 2-6 2 | mins | |
| 4-16 egg white | Speed 6 | 4-6min | |
| Beater | Flour 100gSugar 100Butter 100Egg 2 | Speed 1-6 | 3-5min |
| Mincer | 1.5kg beef | Speed 3-6 | 3min |
CLEANING AND MAINTENANCE
✓ Motor housing
- Please unplug the power cord before cleaning.
- Do not wash the stand mixer to avoid electric shock.
- Wipe the mixer head, stand, bowl locking plate and unit base with a damp cloth, then dry.
- Do not immerse the stand mixer in water.
- Do not use sharp or abrasive cleaner, as they may damage the finish of the stand mixer.
Stand Mixer
- To clean pastry kit, stainless steel bowl and other accessories cleaning, be sure to turn speed control knob to "OFF", so that the machine stopped and the power plug removal, otherwise it may cause an electric shock or injury risk.
- The mixing parts and stainless-steel bowl cannot be cleaned by dishwashers. If heat sources or corrosive detergents are used, they may be deformed or discolored.
- The parts that connected with food can be washed with detergent, and washed with water.
- Some parts can be separated to wash and must be install again when they are completely dried.
TROUBLESHOOTING GUIDE
| Phenomenon | Reason | Methods |
| The machine suddenly stops working. | Whether the machine is running too long or the temperature is too high, resulting in motor overheating, and power failure. | Turn the speed control knob to "OFF" and remove the power plug until the machine is completely cooled. |
| Turn the speed knob and the machine does not work. | Whether the power failure. | Operate after incoming electric. |
| Whether the head is locked. | Let the front of head in a horizontal position. | |
| Whether the plug is plugged into the socket. | Be sure that the plug is plug into socket. | |
| Machine or motor sound in motion. | A loud increase in speed or load during a mechanical operation. | May overload or use too long, please adjust the amount of mixture and rest after use. |
| Motor speed down. | Whether it is used in low temperatures and it will harden the oil in the machine; whether the mix will cause the motor to load too much. | No-load 5 minutes to loosen the mechanism and stabilize the speed. Reduce the amount of agitation and reduce the load. And turn the speed to the low position. |
| Motor unstable. | ||
| Motor does not work. |
SPECIFICATIONS
Voltage: 220-240V~
Frequency: 50-60Hz
Power: 800W
Rated power input for: Blender - 800W
Beater - 350W
Mincer - 250W
Capacity for metal bowl: 4.8L
Capacity for blender: 1.5L

This logo affixed to the product indicates that is an appliance of which the waste processing falls within the framework of the 2012/19/EC Directive of 4 July 2012, on Waste Electrical and Electronic Equipment (WEEE).
The presence of hazardous substances in electrical and electronic equipment may have potential effects on the environment and human health in the reprocessing cycle of the product.
Thus, at the end of the life of this appliance, it should not be disposed of with unsorted household waste.
As a consumer, your role is crucial in the cycle of reuse, recycling and other forms of recovery of electrical and electronic equipment. Waste reception center and collection facilities are implemented at your disposal by local communities (recycling facilities) and distributors.
The warranty does not cover the wear parts of the product, nor the problems or damage resulting from:
(1) surface deterioration due to normal wear and tear of the product;
(2) defects or deterioration due to contact with liquids and corrosion caused by rust or the presence of insects;
(3) any incident, abuse, misuse, alteration, disassembly or unauthorized repair;
(4) improper maintenance, improper use Concerning the product or connection to an incorrect voltage;
(5) any use of accessories not supplied or not approved by the manufacturer.
The guarantee will be cancelled if the nameplate and / or serial number of the product are removed.
THOMSON is a trademark of Technicolor SA used under license by SCHNEIDER CONSUMER GROUP
This product is imported by SCHNEIDER CONSUMER GROUP
12, rue Jules Ferry, 93110 Rosny-sous-Bois, FRANCE
THOMSON
MEZCLADOR MULTIFUNCCIONAL
THFP248GM
MANUAL DEL USUARIO
- Read the instructions carefully before use
- IMPORTANT SAFETY INSTRUCTIONS
- GETTING TO KNOW YOUR APPLIANCE
- Main product
- DESCRIPTION FOR STANDARD ACCESSORIES PASTRY KIT
- To remove attachment
- \~ Stainless steel mixing bowl
- \~ Dough Hook
- \~Beater
- Whisk
- DESCRIPTION OF CHOPPER ACCESSORIES
- Notes:
- Caution: Do not put the meat with skin tendon or bone into the grinder.
- - Sausage
- Warning!
- - KEBBE
- Usage of the blender
- Cautions:
- CLEANING AND MAINTENANCE
- ✓ Motor housing
- Stand Mixer
- SPECIFICATIONS
- THOMSON
- MEZCLADOR MULTIFUNCCIONAL
- MANUAL DEL USUARIO
Brand : THOMSON
Model : THFP248GM
Category : Food Processor