
PSSFS 3 A2 - Electronic detector PARKSIDE - Free user manual and instructions
Find the device manual for free PSSFS 3 A2 PARKSIDE in PDF.

| Product type | Electronic detector (satellite pointer) |
| Brand | Parkside |
| Model | PSSFS 3 A2 |
| Power supply | 13-18 V DC (via satellite receiver, LNB or multiswitch) |
| Power consumption | Approx. 100 mA |
| Frequency range | 950-2300 MHz |
| Input level (min) | 68 dBµV (-40 dBm) |
| Input level (max) | 98 dBµV (-10 dBm) |
| Display | Analog scale with needle |
| LED indicators | 0 Hz/22 kHz (bandwidth), 13 V/18 V (polarization) |
| Audible signal | Built-in buzzer (variable tone) |
| Connectors | 2 F-type connectors (LNB and receiver) |
| Main functions | Satellite alignment, sensitivity adjustment, polarization and bandwidth indication |
| Wall mounting | Wall mountable (2 holes) |
| Intended use | Indoor only, for satellite systems |
| Maintenance and cleaning | Dry lint-free cloth; avoid liquids and abrasive cleaners |
| Safety | Disconnect before connecting/disconnecting; avoid short circuits; do not use outdoors |
| Package contents | 1 satellite pointer, 1 coaxial cable with F connector, 1 instruction manual |
| Warranty | 3 years |
Frequently Asked Questions - PSSFS 3 A2 PARKSIDE
User questions about PSSFS 3 A2 PARKSIDE
0 question about this device. Answer the ones you know or ask your own.
Ask a new question about this device
Download the instructions for your Electronic detector in PDF format for free! Find your manual PSSFS 3 A2 - PARKSIDE and take your electronic device back in hand. On this page are published all the documents necessary for the use of your device. PSSFS 3 A2 by PARKSIDE.
USER MANUAL PSSFS 3 A2 PARKSIDE
SATELLITE FINDER PSSFS 3 A2
GB IE NI
SATELLITE FINDER
Operation and safety notes
DK
SATELLITFINDER
GB/IE/NI Operation and safety notes Page 5
Warnings and symbols used.
Introduction 6
Intended use. Page 7
Scope of delivery. Page 8
Parts description. 8
Technical data . 9
Safety instructions. 9
Before first use. 11
Use. 12
Polarization levels. Page 16
High/Low band. 16
Troubleshooting 17
Cleaning and care 18
Storage 18
Disposal. 19
Warranty 19
Warnings and symbols used
The following warnings are used in this user manual and on the packaging:

ATTENTION! This symbol with the signal word "Attention" indicates a possible property damage.

CE mark indicates conformity with relevant EU directives applicable for this product.

NOTE: This symbol in combination with "Note" provides additional useful information.

Read the instruction manual.

Direct current/voltage
SATELLITE FINDER

Introduction
We congratulate you on the purchase of your new product. You have chosen a high quality product. The instructions for use are part of the product. They contain important information concerning safety, use and disposal. Before using the product, please familiarise yourself with all of the safety information and instructions for use. Only use the product as described and for the specified applications. If you pass the product on to anyone else, please ensure that you also pass on all the documentation with it.
6 GB/IE/NI
Intended use
This satellite finder enables you to quickly and easily align satellite systems. Results are provided via both the display and an acoustic signal. The product is very sensitive and can pick up even weak signals. Strong input signals (through powerful satellites or large satellite antennas) can be attenuated using the control knob. The product can be configured with all types of satellite systems and produces highly accurate readings. The product is powered through the LNB operating voltage by the receiver/TV or multi-switch. An additional power supply is not required.
Any other use or product modification shall be considered improper use and hold considerable safety hazards. The manufacturer assumes no liability for damages due to improper use. The product is not intended for commercial use. The product is designed only for indoor use. Observe the regulations and laws in the country of use.
Scope of delivery
Immediately after unpacking please check the package contents for completeness and if all parts and the product are in good condition.
1 Satellite finder
1 Coaxial cable with F-plug
1 Instruction manual
Parts description
1 Display scale
2 Receiver connector
3 Control knob
4 LED indicators
5 LNB (low-noise block) connector*
6 Display needle
7Buzzer
8 Wall holder
9 Wall mounting holes
10 Protective caps
- NOTE: The LNB (Low-Noise Block down-converter) is the receiving device mounted on the satellite antenna; it is used for satellite TV reception. The LNB collects the radio waves from the satellite antenna and converts them to a signal. This signal is then sent through a cable to the receiver inside the building. In most cases, the LNB is detachable from the satellite antenna. In some cases, the LNB is non-detachable or even the built into the satellite antenna. Refer to the instruction manual of the relevant appliance (LNB/satellite antenna/satellite receiver) for more details.
Technical data
Operating voltage: 13-18 V (supply via the satellite receiver)
Current consumption: approx. 100mA
Frequency range: 950-2300 MHz
Input level (min.): 68 dBμV (-40 dBm)
Input level (max.): 98 dBμV (-10 dBm)
LED indicators: 0Hz , 22kHz , 13V , 18V

Safety instructions
Before using the product, please familiarise yourself with all the operating and safety instructions. Please include all documentation when passing this product on to others.
The warranty will be void in the event of damage caused by failure to observe these safety instructions! We do not assume any liability for any resulting damage!
We shall not accept liability for damage to property or personal injury caused by incorrect handling or non-compliance with the safety instructions! In such cases, the warranty will be null and void.
The unauthorised conversion and/or modification of the product is not allowed for safety and approval reasons. Do not disassemble the product.
The product is not a toy. Be especially careful when children are around.
The product may not be subjected to extreme temperatures, thunderstorms, strong vibrations, heavy mechanical strain, direct sunlight or high degrees of humidity. Avoid using the product under unfavourable ambient conditions. Risk of product damage.
The product must be immediately isolated from the operating voltage if it comes into contact with fluids.
The product must be connected and used in accordance with the user instructions.
- Do not leave the packaging material lying around carelessly since it constitutes a danger to children.
Do not put the product into operation if it is damaged.
The manufacturer or supplier will assume no responsibility for incorrect displays on the consequences which arise through an incorrect display.
- Do not use the product in situations in which professional measuring technology is required.
The product must never be operated unsupervised.
The product may only be opened and repaired by qualified personnel.
If questions arise which are not clarified in this instruction manual, contact our service centre or another specialist.
Numerous regulations must be observed when installing/mounting satellite systems (e.g. safety, lightning protection, etc.) A satellite system should always be installed and serviced by a technician familiar with the corresponding risks and regulations.
The installation and servicing of satellite systems also requires knowledge of accident prevention regulations. When installing or servicing satellite systems, ensure a safe stand and sufficient weight-bearing capacity of ladders and similar equipment (have this secured by a second person, if applicable). When working on satellite systems, wear slip-proof shoes and suitable clothing. It may be necessary to secure the installation site (e.g. wear safety belts). In the interests of your own safety, you must always comply with the safety instructions.
- Also observe the safety and operating instructions of any other devices that are connected to this product.
Before first use
Remove all packing materials (including protective foils) before use.
Use
Before every use: Check the product for damages.
Before taking a measurement

ATTENTION! Before connecting the product: Separate any multi-switches and the satellite receiver from their power supply. Otherwise, a short-circuit may occur. Avoid short-circuiting or overloading the connected F connection cable or the product's connector. Risk of product damage.
For better sensitivity and better results, do not position the product directly in front of the satellite antenna.
Connecting the product and alignment of the satellite antenna
Remove the protective caps 10 from the LNB connector 5 and from the receiver connector 2.
- Connect the output of your LNB with the LNB connector 5. For this connection purpose, use the included coaxial cable with F-plug.
12 GB/IE/NI
① NOTE: If your LNB has more than one output (Example: Quattro LNB), choose the LNB output to which your satellite receiver is connected. Refer to the instruction manual the relevant appliance (LNB/satellite antenna/satellite receiver) for selecting the correct LNB output.
Connect the receiver connector 2 with the antenna input of the satellite receiver.
① NOTE: There are 2 wall mounting holes on the back of the product. If necessary, make use of those 2 holes to mount the product on a wall. Alternatively, use the wall holder to hang the product on a wall.
- Check and verify all the cable connections one more time: Make sure that there are no loose connections and that connections are correct (Fig. D). Switch on the satellite receiver.
The product is now supplied with power via the connected satellite receiver. The display scale 1 lights up.
Issue Potential cause Solution
The display needle 6 jumps to the highest value of the display scale 1.
The receiver signal is too high for the product.
Reduce the sensitivity of the product: Turn the control knob 3 counterclockwise until the display needle 6 is aligned with the middle part of the display scale 1.
The display needle 6 is always jumping to highest value of the display scale 1. The display needle cannot be aligned with the middle part of the display scale.
The connected LNB is a high capacity type with high amplification (>60dB) ./ The connected satellite antenna is larger than 1 metre.
Insert an attenuation controller (0-20 dB) between the LNB and the product.
Point the satellite antenna in a rough direction towards the desired satellite.
① NOTE: Read the instruction manual of the satellite antenna or perform research on correct values for the height and side angle required for adjusting the satellite antenna.
- Rotate the control knob 3 until the display needle 6 is aligned with the middle part of the display scale 1. The buzzer 7 emits an acoustic signal. The higher the acoustic signal, the better the antenna is aligned towards the satellite.
- Change the position (height and side angle) of the satellite antenna until the display needle 6 shows the maximum value on the display scale 1 .
- Rotate the control knob 3 counter-clockwise until the display needle 6 is aligned with the middle part of the display scale 1.
① NOTE: It may be necessary to repeat the setting process several times while adjusting the satellite antenna.
- Finely adjust the satellite antenna to achieve the highest value on the display needle 6 and an acoustic signal.
Once the satellite antenna is optimally set, fix it in place (observe the satellite antenna manufacturer's instructions).
Switch off the satellite receiver. Disconnect the product from the antenna.
ATTENTION! Never disconnect the product from the antenna before switching off the satellite receiver. Risk of short circuit product damage.
- Connect the LNB with the satellite receiver. Restore the original cabling. Check the picture on the TV and whether the desired satellite is accessed.
① NOTE: It may be necessary to repeat the setting process several times.
Polarization levels
The two indicators (18 V / 13 V) show the polarization level selected by the satellite receiver.
LED indicators 4
Indicator lights up
18 V Horizontal frequency band active.
13 V Vertical frequency band active.
Switch the polarization level of the satellite antenna while adjusting the satellite antenna in order to be able to align the satellite antenna optimally on both polarization levels.
High/Low band
The two indicators (22 kHz / 0 kHz) show whether the received signal is a low or high frequency band.
16 GB/IE/NI
LED indicators 4
Indicator lights up
22 kHz High frequency band active (= digital)
0 kHz Low frequency band active (= analogue)
Troubleshooting
Error Possible causes and solutions
The product does not work after connecting between LNB and satellite receiver.
Switch on the satellite receiver.
The needle pointer 6 keeps jumping to the highest value of the display scale 1 even after rotating the control knob 3 counter-clockwise several times.
Check the LNB and satellite antenna type. Insert an attenuation controller (0-20 dB) between the LNB and the product...
if the LNB is a high capacity type with high amplification or
if the satellite antenna is larger than 1 metre.
Cleaning and care
ATTENTION! Do not allow liquids to enter the product. Risk of product damage.
- Do not use abrasive cleaning agents, cleaning alcohol or other chemical solutions since these could damage the housing or even impair operation.
Use a dry, lint-free cloth for cleaning.
The product is maintenance-free. No components need to be maintained by you inside the product. - Keep the product clean to ensure fault-free operation.
Storage
When the product is not in use: Reattach the protective caps 10 to the LNB connector 5 and to the receiver connector 2.
Store the product in a dry location.

Disposal
The packaging is made entirely of recyclable materials, which you may dispose of at local recycling facilities.
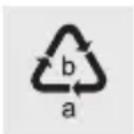
Observe the marking of the packaging materials for waste separation, which are marked with abbreviations (a) and numbers (b) with following meaning: 1-7: plastics / 20-22: paper and fibreboard / 80-98: composite materials.

The product and packaging materials are recyclable, dispose of it separately for better waste treatment.
The Triman logo is valid in France only.

Contact your local refuse disposal authority for more details of how to dispose of your worn-out product.
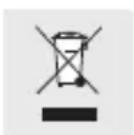
To help protect the environment, please dispose of the product properly when it has reached the end of its useful life and not in the household waste. Information on collection points and their opening hours can be obtained from your local authority.

Warranty
The product has been manufactured to strict quality guidelines and meticulously examined before delivery. In the event of product defects you have legal rights against the retailer of this product. Your legal rights are not limited in any way by our warranty detailed below.
The warranty for this product is 3 years from the date of purchase. The warranty period begins on the date of purchase. Please keep the original sales receipt in a safe location. This document is required as your proof of purchase.
Should this product show any fault in materials or manufacture within 3 years from the date of purchase, we will repair or replace it - at our choice - free of charge to you. This warranty becomes void if the product has been damaged, or used or maintained improperly.
The warranty applies to defects in material or manufacture. This warranty does not cover product parts subject to normal wear, thus possibly considered consumables (e.g. batteries) or for damage to fragile parts, e.g. switches, rechargeable batteries or glass parts.
Warranty claim procedure
To ensure quick processing of your case, please observe the following instructions:
Please have the till receipt and the item number (IAN 374239_2104) available as proof of purchase.
You will find the item number on the rating plate, an engraving, on the front page of the instructions for use (bottom left), or as a sticker on the rear or bottom of the product.
20 GB/IE/NI
If functional or other defects occur, please contact the service department listed either by telephone or by e-mail.
You can return a defective product to us free of charge to the service address that will be provided to you. Ensure that you enclose the proof of purchase (till receipt) and information about what the defect is and when it occurred.
Service
GB Service Great Britain
Tel.:08000569216
E-Mail: owim@lidl.co.uk
IE Service Ireland
Tel.:1800200736
NI Service Northern Ireland
Tel.:08000927852
E-Mail: owim@lidl.ie

LED's: 0 Hz, 22 kHz, 13 V, 18 V

Courant/tension continu(e)
