WS 9008 - Anemometer TECHNOLINE - Free user manual and instructions
Find the device manual for free WS 9008 TECHNOLINE in PDF.

User questions about WS 9008 TECHNOLINE
0 question about this device. Answer the ones you know or ask your own.
Ask a new question about this device
Download the instructions for your Anemometer in PDF format for free! Find your manual WS 9008 - TECHNOLINE and take your electronic device back in hand. On this page are published all the documents necessary for the use of your device. WS 9008 by TECHNOLINE.
USER MANUAL WS 9008 TECHNOLINE
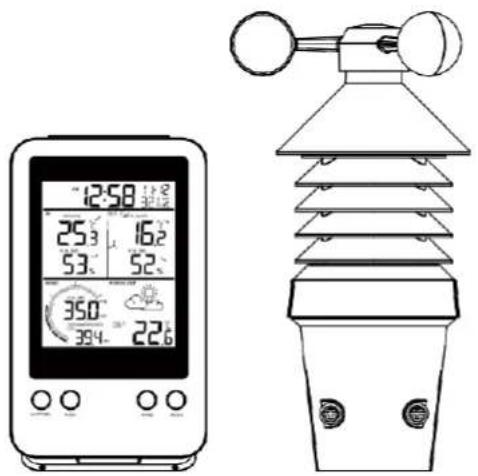
Weather station with 3-in-1 professional sensor WS9008 - user manual
Please read the instructions carefully according to the version you purchased and keep the manual well for future reference.
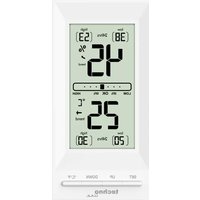
Overview Base Station
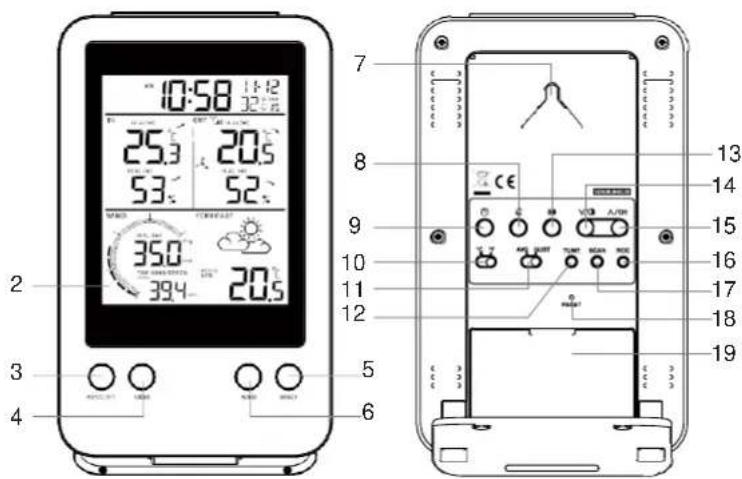
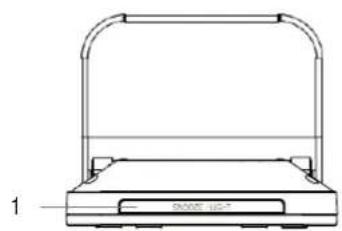
1-[SNOOZE/LIGHT]button
2-LCD display 12-TUNE] button
3- [HISTORY] button
4-[MEM]button
5- [INDEX] button
6- [WIND] button
7 - Wall mounting holder
8- [ALARM] button
9-[G(TIME)] button
10- [ C / F] slide switch
LCD / Display
1 - Time and calendar section
2 - Indoor temperature & humidity reading section
3 - Wind speed related reading section
4 - Outdoor / Channel temperature & humidity reading section
5 - Weather forecast icon
6-Weather index reading section
11-[AVG/GUST] slide switch
13- [ALERT] button
14-[DOWN/MOON] button
15-[NCH(UP/CH)]button
16-[RCC] button
17-[SCAN] button
18- [RESET] button
19 - Battery compartment

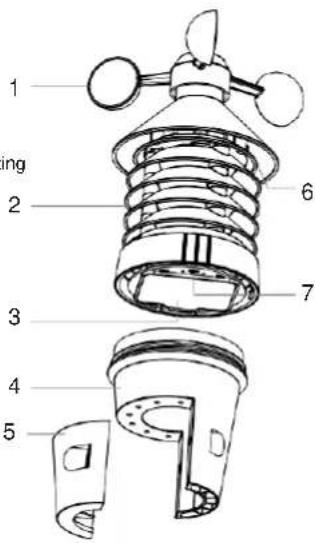
Wireless 3-in1-Sensor
1-Wind cup
2 - Radiation shield
3 - Battery compartment
4-Bottom case
5 - Mounting clamps for bottom case
6-LEDindicator
Flashes when the remote unit is transmitting
7- [RESET]key
Setup & installation
Install wireless wind speed 3-in-1 sensor
| 1. Turn the top case anti-clockwise to open. | Step 1 |
| 2. Remove the battery door. 3. Insert 3x AA size batteries into the battery compartment, then close the battery door. Note: Make sure you insert the batteries in right way according to the polarity information marked on the battery compartment. Once installed, the LED indicator flashes and start transmit the signals. | Step 2 Step 3 |
| 4. Twist the Top case clockwise. | Step 4 |
| 5. Mount the 3-in-1 sensor on a pole by using the clamps with the big screws and nuts Note: The possible pole diameter is between 28 ~ 40mm. | Step 5 Not included |
| Mounting guidelines - Secure the clamps (included) to a post or pole. - Install the sensor at least 1.5m off the ground for better and more accurate wind measurements. - Choose an open area within 150 meters* from the LCD display console. | |
Note:
After replacing the batteries of the wireless sensor or the unit fails to receive wireless sensor signal of a specified channel, you need to press and hold [SCAN] key on the console to pair this sensor again.
*The building material and the position of the receiver and transmitter affect the effective range. So try various locations to obtain the best result.
Place the units away from metal objects and electrical appliances to minimize the interference.
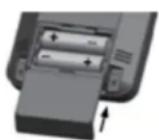
Power up the station
- Remove the battery door and insert 2 x AA batteries into the battery compartment, according to the polarity mark on the battery compartment.
- Once the batteries are installed, all LCD segment will be shown.
-
Replace the battery door.
-
After 5 minutes channel searching, it will turn to DCF signal reception automatically.
- Radio Controlled function, the current time & date automatically synchronized with the time signal transmitted from Germany (DCF77).
Note:
- If no display appears on the LCD after installing the batteries, press the [RESET] key by using a metal wire.
- You may not receive the DCF77 and wireless sensor(s) signal immediately. Due to the atmospheric disturbance, the best reception for DCF often occurs during night time.
Install the table stand
The unit is designed for desktop or wall mount for easy viewing. The following step is for table stand installation.
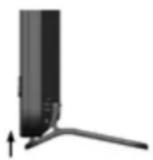
Step 1 Step 2
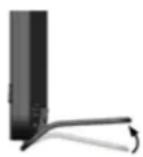
Step 3
Set LCD display viewing angle
Press [DOWN /MOON] button in normal mode to adjust LCD viewing angle to fit table stand or wall mount situation.
Use the LCD backlight
In normal mode, press [SNOOZE / LIGHT] button to turn on backlight for 5 seconds.
Pairing additional wireless sensor/s (optional)
This console can support up to 3 additional wireless thermo-hygro sensor(s). You can press [SCAN] key to search the corresponding channel's sensor manually. Once your sensor paired up, the sensor signal strength indicator and weather reading will appear on your console display.
Note:
The additional wireless sensor(s) is not included
- Select CH 1, 2 or 3 in the wireless sensor
- Please check the additional sensor's user manual for more detail of the installation.
View multiple wireless sensor channels (optional)
- In normal mode, press [UP/CH] key to switch the display between CH 1~3.
- In normal mode, press and hold [UP / CH] key for 2 seconds to enter autocycle mode, After a confirmation tone, it will alternately display the CH 1~3 at 4 second intervals.
- During auto-cycle mode, press [UP / CH] key again to stop auto-cycle mode and display the current channel.
Reception of radio-controlled signal
The time and date are radio-controlled. The current time and date are automatically synchronized with the time signal transmitted from Germany (DCF77).
When used for the first time (after inserting the batteries or pressing the [RESET] key), the clock will start to receive the RC signal after 5 minutes with the signal strength indicator flashing. You can also press [RCC] key to receive the DCF signal once.
DCF77 signal reception icon
The signal indicator shows signal receive status. The signal receiving status could be classified into 3 types:
| No DCF signal received | Receiving DCF signal | Received DCF signal |
Note:
Every day the weather station will automatically search for the time signal at 2:00, 3:00 and 4:00.
- Always place the unit away from interfering sources such as TV set, computer, etc. Avoid placing the unit on or next to metal plate.
- Closed area such as airport basement, tower block or factory is not recommended. Do not start reception on a moving vehicle or train.
- User can permanent disable or enable the RC function by press and hold the [RCC] key for 8 seconds. OFF appears when the function was disabled.
Daylight saving time (DST)
This clock has been programmed to automatically switch when the daylight saving time is in effect. User can disable the DST function in time and calendar setting mode.
Note:
DST AUTO/OFF setting only available when RCC function is ON.
Time & calendar setting and display
Manual time & date setting
In normal mode, press and hold [TIME] key for 2 seconds to enter date and time setting mode.
Press [UP /CH] or [DOWN /MOON] key to adjust the setting
Press [TIME] key to enter the next setting.
The setting sequence: 12/24 format -> hour -> minute -> second -> year -> date-month /month-date -> month -> day -> ± 23 time zone -> weekday language -> DST AUTO/OFF
Press [TIME] key or leave the unit for 60 seconds to complete the setting and return to normal mode.
Weekday language: EN -> FR -> DE -> ES -> IT -> NL -> RU
View time
In normal mode, press [TIME] key to switch between seconds and weekday display.
Alarm time setting and display
- In normal mode, press and hold [ALARM] key for 2 seconds until alarm hour digit flashes to enter alarm time setting mode.
- Press [UP / CH] or [DOWN / MOON] key to change the value. Press and hold the key for quick adjust.
- Press [ALARM] key again to step the setting value to Minute with the Minute digit flashing.
- Press [UP / CH] or [DOWN / MOON] key to adjust the value of the flashing digit.
- Press [ALARM] key to save and exit the setting
Note:
In alarm mode, the "icon will display on the LCD.
The alarm function will turn on automatically once you set the alarm time.
Activating alarm and temperature pre-alarm function
- In normal mode, press [ALARM] key to show the alarm time for 5 seconds.
- When the alarm time displays, press [ALARM] key again to activate the alarm function.
Or press [ALARM] key twice to activate the alarm with ice pre-alarm function.

Once the ice pre-alert activates, the pre-set alarm will sound and alert light will flash 30 minutes earlier if the outdoor temperature is below -3^ .
When clock reach the alarm time, alarm sound will start. Where it can be stopped by following operation:
- Auto-stop after 2 minutes alarming if without any operation and the alarm will activate again in the next day.
- By pressing [SNOOZE / LIGHT] key to enter snooze that the alarm will sound again after 5 minutes.
- By pressing and hold [SNOOZE / LIGHT] key for 2 seconds to stop the alarm and will activate again in the next day.
- By pressing [ALARM] key to stop the alarm and the alarm will activate again in the next day.
Note:
The snooze could be used continuously in 24 hours.
- During the snooze, the alarm icon " will keep flashing
Wireless sensor signal receiving
The console display signal strength for the wireless wind speed 3-IN-1 sensor, as per table below:

- If the signal has discontinued and does not recover within 15 minutes, the signal icon will disappear. The wind speed, temperature and humidity will display "--" for the corresponding channel.
- If the signal does not recover within 1 hour, the wind speed, temperature and humidity will display "Er" for the corresponding channel, if over 48 hours, the "Er" display will become permanent. You need to replace the batteries and then press [SCAN] key to pair up the sensor again.
View the outdoor channel (Optional feature for additional thermal-hygro sensors)
This console can pair with a wireless wind speed 3-IN-1 sensor and up to 3 wireless thermal-hygro sensors. If you have 1 or more additional sensors, you can press [UP / CH] key to switch between different wireless channels in normal mode, or press and hold [UP / CH] key for 2 seconds to toggle auto-cycle mode to display the connected channels at 4 seconds interval and the " " icon will show on the display.
During auto-cycle mode, press [UP/CH] key to stop auto cycle and display the current channel.
Temperature and humidity trend
The Barometric pressure, temperature and humidity trend indicator shows the trends of changes in the forthcoming few minutes. Arrows indicate a rising, steady or falling trend.

Note:
If no signals are received or the transmission is interfered, "--" will appear on the LCD.
- Relocate the console or transmitter in other positions and make sure the outdoor sensor is within the effective range of 150m straight distance approx.
Weather index
At the WEATHER INDEX section, you can press [INDEX] key to view the weather index in this sequence: FEELS LIKE -> HEAT INDEX -> DEW POINT -> WIND CHILL
"FEELS LIKE" temperature
The "FEELS LIKE" temperature index determines how the outdoor temperature actually feels.
Heat index
The heat index, which is determined by the wireless wind speed 3-IN-1 sensor's temperature & humidity data, when the temperature is between 27^ (80^) and 50^ (120^) .
| Heat Index | Warning | Explanation |
| 27°C to 32°C (80°F to 90°F) | Caution | Possibility of heat exhaustion |
| 33°C to 40°C (91°F to 105°F) | Extreme Caution | Possibility of heat dehydration |
| 41°C to 54°C (106°F to 129°F) | Danger | Heat exhaustion likely |
| ≥55°C (≥130°F) | Extreme Danger | Strong risk of dehydration / sun stroke |
Dew point
-
The dew point is the temperature below which the water vapor in air at constant barometric pressure condenses into liquid water at the same rate at which it evaporates. The condensed water is called dew when it forms on a solid surface.
-
The dew point temperature is determined by the temperature & humidity data from wireless 3-IN-1 sensor.
Wind chill
The built-in barometer can notice atmosphere pressure changes. Based on the data collected, it can predict the weather conditions in the forthcoming 24 ~ 72 hours.

Sunny

Partly cloudy
Cloudy

Rainy

Stormy

Snowy
Note:
- The accuracy of a general pressure-based weather forecast is about 70% to 75% .
- The weather forecast is meant for the next 24 72 hours, it may not necessarily reflect the current situation.
- The Snowy weather forecast is not based on the atmospheric pressure, but based on the temperature of outdoor sensor. When the current channel temperature is below -3^ , the Snowy weather indicator will be displayed on the 24 HOUR FORECAST display section.
Record of maximum / minimum values (MAX / MIN)
The console can record the accumulated MAX / MIN weather data with the corresponding time stamp for you to easy review.
To view accumulated MAX / MIN
In normal mode, press [MEM] key to check MAX/MIN records. The display sequence is: MAX indoor temperature -> MIN indoor temperature -> MAX indoor humidity -> MIN indoor humidity -> MAX outdoor (current channel) temperature -> MIN (current channel) temperature -> MAX (current channel) humidity -> MIN (current channel) humidity -> MAX "FEELS LIKE" temperature -> MIN "FEELS LIKE" temperature -> MAX heat index -> MIN heat index -> MAX dew point -> MIN dew point -> MAX wind chill -> MIN wind chill -> MAX wind speed -> MAX wind gust.
To clear the MAX / MIN records
When viewing the record, press and hold [MEM] key for 2 seconds to reset the current MAX / MIN record of the selected display section.
Wind speed
To select wind speed unit
- In normal mode, press and hold [WIND] key for wind speed unit selection.
- Press [UP / CH] or [DOWN / MOON] key to switch between: mph, m/s, km/h, knots.
- Press [WIND] key to confirm unit selection and back to normal mode.
To select the wind display mode
Use the [AVG/GUST] slide switch to switch between AVERAGE and GUST wind speed. In normal mode, press [WIND] key to switch between HOURLY, DAILY, MONTHLY and YEARLY top wind speed record.
Beaufort scale
The Beaufort scale is an international scale of wind velocities ranging from 0 (calm) to 12 (Hurricane force).
| < 1 km/h | |||
| 0 | Calm | < 1 mph | Calm, smoke rises vertically. |
| < 1 knot | |||
| < 0.3 m/s | |||
| 1 | Light air flow | 1.1 ~ 5.5 km/h | Smoke drift indicates wind direction. Leaves and wind vanes are stationary. |
| 1 ~ 3 mph | |||
| 1 ~ 3 knot | |||
| 0.3 ~ 1.5 m/s | |||
| 2 | Light breeze | 5.6 ~ 11 km/h | Wind felt on exposed skin. Leaves rustle. Wind vanes begin to move. |
| 4 ~ 7 mph | |||
| 4 ~ 6 knot | |||
| 1.6 ~ 3.3 m/s | |||
| 3 | Gentle breeze | 12 ~ 19 km/h | Leaves and small twigs constantly moving, light flags extended. |
| 8 ~ 12 mph | |||
| 7 ~ 10 knot | |||
| 3.4 ~ 5.4 m/s | |||
| 20 ~ 28 km/h | |||
| 4 | Moderate breeze | 13 ~ 17 mph | Dust and loose paper raised. Small branches begin to move. |
| 11 ~ 16 knot | |||
| 5.5 ~ 7.9 m/s | |||
| 5 | Fresh breeze | 29 ~ 38 km/h | Branches of a moderate size move. Small trees in leaf begin to sway. |
| 18 ~ 24 mph | |||
| 17 ~ 21 knot | |||
| 8.0 ~ 10.7 m/s | |||
| 6 | Strong breeze | 39 ~ 49 km/h | Large branches in motion. Whistling heard in overhead wires. Umbrella use becomes difficult. Empty plastic bins tip over. |
| 25 ~ 30 mph | |||
| 22 ~ 27 knot | |||
| 10.8 ~ 13.8 m/s | |||
| 7 | High wind | 50 ~ 61 km/h | Whole troos in motion. Effort needed to walk against the wind. |
| 31 ~ 38 mph | |||
| 28 ~ 33 knot | |||
| 13.9 ~ 17.1 m/s | |||
| 8 | Gale | 62 ~ 74 km/h | Some twigs broken from trees. Cars veer on road. Progress on foot is seriously impeded. |
| 39 ~ 46 mph | |||
| 34 ~ 40 knot | |||
| 17.2 ~ 20.7 m/s | |||
| 9 | Strong gale | 75 ~ 88 km/h | Some branches break off trees, and some small trees blow over. Construction /temporary signs and barricades blow over. |
| 47 ~ 54 mph | |||
| 41 ~ 47 knot | |||
| 20.8 ~ 24.4 m/s | |||
| 10 | Storm | 89 ~ 102 km/h | Trees are broken off or uprooted, structural damage likely. |
| 55 ~ 63 mph | |||
| 48 ~ 55 knot | |||
| 24.5 ~ 28.4 m/s | |||
| 11 | Violent storm | 103 ~ 117 km/h | Widespread vegetation and structural damage likely. |
| 64 ~ 73 mph | |||
| 56 ~ 63 knot | |||
| 28.5 ~ 32.6 m/s | |||
| 12 | Hurricane force | ≥ 118 km/h | Severe widespread damage to vegetation and structures. Debris and unsecured objects are hurled about. |
| ≥ 74 mph | |||
| ≥ 64 knot | |||
| ≥ 32.7m/s |
Past history record
The console automatically stores past 24 hours weather data.
-
When the HOURLY top wind speed shown, press [HISTORY] key to check the beginning of the current hour's weather data, e.g. the current time is 7:25 am, March 8, the display will show the data of 7:00am. March 8.
-
Press [HISTORY] key repeatedly to view older readings of the past 24 hours (-01H to -24H).
| When the DAILY top wind speed shown, press the [HISTORY] key repeatedly to check back the MAX wind speed for the past 31 days. | -31 | TOP WIND SPEED 5.1m/s |
| daily history mode of highest wind speed | ||
| When the MONTHLY top wind speed shown, press the [HISTORY] key repeatedly to check back the MAX wind speed for the past 12 months. | -12 | TOP WIND SPEED 3.1m/s |
| monthly history mode of highest wind speed | ||
| When the YEARLY top wind speed shown, press the [HISTORY] key repeatedly to check back the MAX wind speed for the past 3 years. | -03y | TOP WIND SPEED 39.7m/s |
| yearly history mode of highest wind speed | ||
Note:
If the LCD will also display the "HISTORY" icon, history data records with time & date.
- All the Top wind speed historical reading depend on the current display mode (Gust or Avg wind speed).
Weather alert setting
Weather Alert can alert you of certain weather conditions. Once the alert criterion is met, the alarm sound will activate and the LCD's alert icon will flash.
Setting weather alert
- In normal mode, press [ALERT] key to enter alert setting mode.
- Press [UP/CH] or [DOWN/MOON] key to select the IN/OUT or channel in following sequence:
IN->OUT->CH1->CH2->CH3
- Once selected, press [ALERT] key to select the alert type in following sequence: High temperature alert low temperature alert high humidity alert low humidity alert average wind speed (for OUT only)
- Press [UP / CH] or [DOWN / MOON] key to adjust the value or press and hold the key to accelerate adjustment.
| Alert setting parameter | Setting range | Display section | Default value |
| High indoor temperature | -39.9°C ~ 70°C | Indoor or Outdoor /CH temperature &humidity section | 40°C |
| Low indoor temperature | -40°C ~ 69.9°C | 0°C | |
| High outdoor temperature | -39.9°C ~ 80°C | 40°C | |
| Low outdoor temperature | -40°C ~ 79.9°C | 0°C | |
| High humidity | 2% ~ 99% | 80% | |
| Low humidity | 1% ~ 98% | 40% | |
| Average wind speed | 0.1m/s ~ 50m/s | Wind speed section | 17.2 m/s |
- Press [ALARM] key to toggle the currently selected alert on / off.
e.g. both high outdoor temperature and low outdoor temperature alert are on
e.g. both high temperature outdoor and low outdoor temperature alert are off
- Press [ALERT] key key to step to next parameter or channel selection.
- Press and hold [ALERT] key for 2 seconds or press any key in front to save alert on/off status and back to normal mode. Please note the display will also return back to normal mode. If no key is pressed in 30 seconds.
To silence the alert
Press [SNOOZE / LIGHT] key to silence the alert alarm or let the alarm automatically turn off after 2 minutes.
Note:
- Once the alert is triggered, the alarm will sound for 2 minutes and the related alert icon and readings will flash.
- If the alert alarm is automatically off after 2 minutes, the alert icon and readings will still keep flash until the weather reading is out of the alert range.
- The weather alert will sound again when the weather readings falls into the alert range again
Calibration
- In normal mode, press [TUNE] key to enter calibration mode and the current channel's offset value will shown on the display.
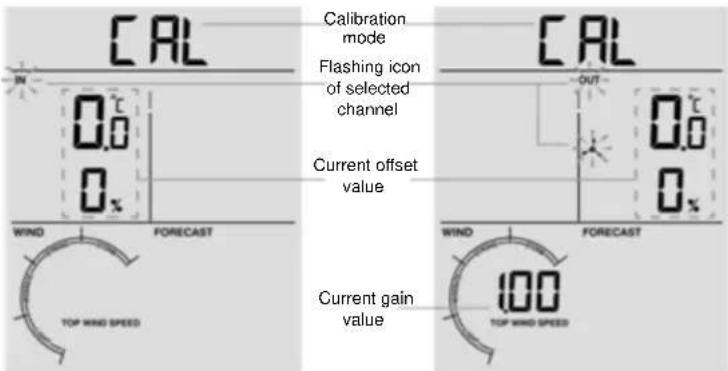
e.g. Calibration for indoor (IN)
e.g. Calibration for outdoor (OUT)
- Press [UP/CH] or [DOWN/MOON] key to select the IN/OUT or channel in sequence: IN->OUT->CH1->CH2->CH3
- Once selected, press [TUNE] key to select the offset in sequence: Temperature -> Humidity -> Wind speed gain (only available for OUT channel).
- Press [UP / CH] or [DOWN / MOON] key to adjust the offset value or press and hold the key to change rapidly:
For temperature: Measured value (e.g.: 25.2°C) + Offset value (e.g.: 2.1) = Calibrated value (27.3°C). - For humidity: Measured value (e.g.: 55%) + Offset value (e.g.: 5) = Calibrated value (60%).
For wind speed: Measured value (e.g.: 10.5km/h) x Gain factor (e.g.: 1.2) = Calibrated value (12.6km/h).
| Calibration parameter | Offset range | Increments | Default value |
| Temperature (IN / OUT / CH) | +20 to -20°C(+36 to -36°F) | 1 decimal place | 0.0 |
| Humidity (IN / OUT / CH) | +20 to -20% | 1% | 0 |
| Wind speed gain factor (OUT) | 0.75 ~ 1.50 | 0.01 | 1.00 |
- Press [TUNE] key to step to next parameter or channel selection.
- Press and hold [TUNE] key for 2 seconds or press any key in front to save alert on/off status and back to normal mode. If 30 seconds without pressing any key it will also back to normal mode.
Note:
- The weather index is based on calibrated wind speed, temperature and humidity values. The purpose of calibration is to fine tune or correct for the sensor(s) error associated with the devices margin of error. Errors can occur due to electronic variation (example, the temperature sensor is a resistive thermal device or RTD, the humidity sensor is a capacitance device), or degradation (contamination of sensors).
- Calibration is only useful if you have a known calibrated source you can compare it against, and is optional. This section discusses practices, procedures and sources for sensor calibration to reduce manufacturing and degradation errors. Do not compare your readings obtained from sources such as the internet, radio, television or newspapers.
- The purpose of your weather station is to measure conditions of your surroundings, which vary significantly from location to location.
Low battery indicator
When the battery indicator " appears on the clock section or the LCD becomes dim, replace with 2 new AA size batteries at once. If the low battery indicator " appear in the outdoor section, it indicates that the battery power of the transmitter is not enough, and you should replace with 3 new AA size batteries at once.
Hereby, Technotrade declares that this product WS9008 is in compliance with the essential requirements and other relevant provisions of Directive 2014/53/EU and ROHS 2011/65/EC. The original EU declaration of conformity may be found at: www.technoline.de/doc/4029665090085
Specifications
Station
| Dimensions (W x H x D) | 95 x 155 x 23mm (size exclude table stand) |
| Main power | 2 x AA size 1.5V batteries |
| Operating temperature range | -5°C to 50°C (23°F to 122°F) |
| Temperature display range (Indoor / Outdoor) | -40°C to 70°C (-40°F to 158°F) |
| Humidity display range (Indoor / Outdoor) | RH 1% to 99 % |
| Wind speed display range | 0 ~ 112mph, 50m/s, 180km/h, 97knots |
| Resolution of temperature | 1 decimal place (°C/°F) |
| Resolution of humidity | 1% |
| Resolution of wind speed | 1 decimal place (mph, m/s, km/h or knots) |
| Support sensors | 1 wireless wind speed 3-in-1 sensor and up to 3 wireless thermo-hygro- |
| sensors | |
| Radio controlled signal | DCF 77 / MSF (depend on country version) |
Wireless 3-in-1 Sensor
| Dimensions (W x H x D) | 136 x 249 x 136mm |
| Main power | 3 x AA size 1.5V batteries(Lithium battery recommended for low temperature environment) |
| Operating temperature range | -40°C to 60°C (-40°F to 140°F) |
| Operating humidity range | RH 1% to 99 % (non-condensing) |
| RF frequency | 868 MHz |
| Maximum transmission power | 13dBm |
| RF transmission range | 150 meters |
Environmental reception effects
The station obtains the accurate time with wireless technology. Same as all wireless devices, the reception is maybe affected by the following circumstances:
- long transmitting distance
- nearby mountains and valleys
- near freeway, railway, airports, high voltage cable etc.
- near construction site
among tall buildings - inside concrete buildings
- near electrical appliances (computers, TV's, etc) and metallic structures
- inside moving vehicles
Place the station at a location with optimal signal, i.e. close to a window and away from metal surfaces or electrical appliances.
Precautions
- This main unit is intended to be used only indoors.
- Do not subject the unit to excessive force or shock
Do not expose the unit to extreme temperatures, direct sunlight, dust or humidity. - Do not immerse in water.
- Avoid contact with any corrosive materials.
- Do not dispose this unit in a fire as it may explode.
- Do not open the inner back case or tamper with any components of this unit.
Batteries safety warnings
- Use only alkaline batteries, not rechargeable batteries.
Install batteries correctly by matching the polarities (+/-) .
Always replace a complete set of batteries. - Never mix used and new batteries.
- Remove exhausted batteries immediately.
- Remove batteries when not in use.
- Do not recharge and do not dispose of batteries in fire as the batteries may explode.
- Ensure batteries are stored away from metal objects as contact may cause a short circuit.
- Avoid exposing batteries to extreme temperature or humidity or direct sunlight.
- Keep all batteries out of reach from children. They are a choking hazard
Use the product only for its intended purpose!
Consideration of duty according to the battery law

Old batteries do not belong to domestic waste because they could cause damages of health and environment. You can return used batteries free of charge to your dealer and collection points. As end-user you are committed by law to bring back needed batteries to distributors and other collecting points!
Consideration of duty according to the law of electrical devices
This symbol means that you must dispose of electrical devices separated from the General household waste when it reaches the end of its useful life. Take your unit to your local waste collection point or recycling centre. This applies to all countries of the European Union, and to other European countries with a separate waste collection system.
Tendance temperature and humidity
Specifications Station
Installing & installation
Specifications Station
Sensore wireless 3 in 1
TEMPERATURA "FEELS LIKE"
Sensore 3 in 1 wireless

Odebrany syngnal DCF