WS 1911 - Weather Station ADE - Free user manual and instructions
Find the device manual for free WS 1911 ADE in PDF.
| Brand | ADE |
| Model | WS 1911 |
| Product type | Radio-controlled weather station with projector |
| Base station power supply | 5V~ power adapter (included) + CR2032/3V backup battery |
| Outdoor sensor power supply | 2 LR3 (AAA) / 1.5V batteries (included) |
| Indoor temperature range | -10 °C to 50 °C (15 °F to 122 °F) |
| Outdoor temperature range | -40 °C to 70 °C (-40 °F to 158 °F) |
| Humidity range | 20% to 95% |
| Outdoor sensor range | Approximately 60 meters (in open field) |
| Transmission frequency | 433.92 MHz |
| Display | LCD screen with backlight (4 levels) + 180° rotating projector |
| Weather functions | Animated forecasts, indoor/outdoor temperature/humidity, comfort index, frost alarm, mold indicator |
| Clock | DCF77 radio-controlled, dual alarm with adjustable snooze |
| Projection | Displays time and indoor/outdoor temperatures, adjustable brightness |
| Number of outdoor sensors | Up to 3 (1 included) |
| Warranty | 2 years |
| Maintenance | Clean with a slightly damp cloth, unplug the adapter before cleaning |
| Safety | Do not immerse; use the supplied adapter; keep out of reach of children under 8; handle batteries with care |
| Included accessories | Base station, wireless outdoor sensor, mains adapter, batteries (1x CR2032, 2x AAA) |
| Declaration of conformity | Directives 2014/53/EU and 2011/65/EU |
Frequently Asked Questions - WS 1911 ADE
User questions about WS 1911 ADE
0 question about this device. Answer the ones you know or ask your own.
Ask a new question about this device
Download the instructions for your Weather Station in PDF format for free! Find your manual WS 1911 - ADE and take your electronic device back in hand. On this page are published all the documents necessary for the use of your device. WS 1911 by ADE.
USER MANUAL WS 1911 ADE
natural_image
Icon of a person using a laptop inside a circle (no text or symbols)text_image
6 7 8 9 10 11 ALARM1 OFF ON Projection OFF ON ALARM2 OFF ON AC 5Vnatural_image
Game scene with white clouds and grass under a dark sky, no readable text or symbols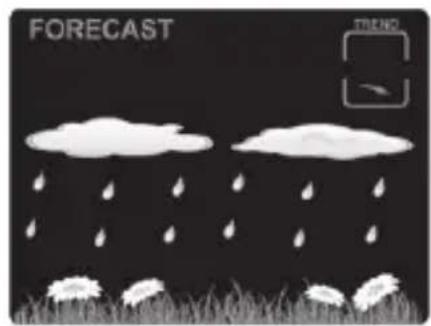
text_image
FORECAST TRENDbewölkt regnerisch
text_image
FORECAST TREND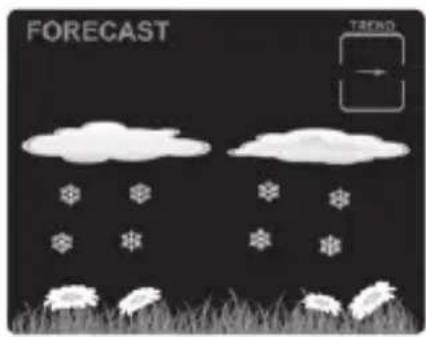
text_image
FORECAST TREND22089 Hamburg, Germany
natural_image
Symbol of a trash bin crossed with two crossed arms, no text or labels presentnatural_image
Symbol of a trash bin crossed with no text or labelsYou have chosen to purchase a high-quality ADE brand product, which combines intelligent functions with an exceptional design. With this weather station, you will always have a variety of weather and temperature data available at a glance. The wealth of experience of the ADE brand ensures a high technical standard and proven quality.
We wish you much enjoyment and success while monitoring and examining your weather data.
Your ADE Team
Scope of delivery
- Weather stations consist of:
-Base station with projection
-Wireless outdoor sensor - Batteries:
-1x CR2032 / 3 V for base station
-2x LR3/R3 (AAA) / 1.5 V for wireless outdoor sensor - Mains adaptor for base station
- Operating Manual
Table of Contents
Scope of delivery 46
General information....49
Intended use 50
Safety 50
Your wireless weather station provides 55
Base station 56
Front view 56
Rear view....57
Top view 58
Wireless outdoor sensor 59
Start-up 60
Wireless outdoor sensor....60
Base station 61
Starting signal reception 62
Checklist when data is missing on the display .....63
Setting the time and date manually ....64
Manually starting signal reception....65
Choosing a location....66
About the time signal transmitter DCF77 ....70
Display indicators of the base station....71
Outdoor weather data 71
Indoor weather data 72
Time, date and week display....72
Weather forecast and weather trend....73
Temperature and humidity trend 75
Other weather data and functions....75
Comfort indicator....75
Saved weather data.... 76
Frost alert....77
Mould indicator....77
Alarm....78
Setting the alarm time 78
Switching the alarm function on/off....79
Waking up....79
Use projection 80
Other functions....81
Display illumination 81
Change temperature unit 81
Battery change indicator....82
Cleaning....82
Fault/Remedy 83
Technical data....84
Declaration of Conformity 86
Warranty 86
Disposal 86
About this operating manual

This operating manual describes how to operate and maintain your product safely. Keep this operating manual in a safe place for future reference. If you pass this product on to someone else, pass on this operating manual as well. Failure to observe this operating manual may result in injuries or damage to your product.
Explanation of symbols

This symbol combined with the word DANGER warns of serious injuries.

This symbol combined with the word WARNING warns of moderate and mild injuries.

This symbol combined with the word NOTE warns of material damage.

This symbol indicates additional information and general notes.
Intended use
- The weather station, which consists of the base station and wireless outdoor sensor, displays various weather data from the immediate environment. The weather station makes a weather forecast on the basis of the measured weather data.
- Apart from that, the weather station displays the date and time and is also equipped with an alarm function.
- The weather station is unsuited to commercial use in weather forecasting or in taking meteorological measurements.
Safety
- This device can be used by children 8 years of age and older, as well as by persons with reduced physical, sensory, or mental capabilities or lacking experience and/or knowledge, if they are being supervised or have been instructed in the safe use of the device and understand the dangers that may arise.
- The device and the mains adaptor must be kept away from children younger than 8 years.
- Cleaning and maintenance by the user must not be carried out by children unless they are 8 years of age or older and are being supervised.
- Batteries can be life-threatening. Therefore, keep batteries out of reach of small children. If the battery has been swallowed or has ended up in the body in any other way, seek medical help immediately. Failure to do so within 2 hours may result in severe internal burns that could cause death.
- Children must be supervised to ensure that they do not play with the device.
- The wireless weather station and mains adaptor must not be submerged in water or other liquids. Risk of electric shock! You should therefore not use the base station of the wireless weather station in the vicinity of sources of moisture, such as wash basins.
- Only use the supplied mains adaptor and replace it only with one of the same type. The mains adaptor may only be used in dry indoor spaces and must be protected from moisture.
Danger to children
- Keep children away from packaging material and other small parts included in the scope of delivery. There is a risk of choking if swallowed.
Danger from electricity
- Connect the device to a correctly installed socket that has a voltage corresponding to that described under "Technical Data".
- Ensure that the socket is easily accessible, so that the mains adaptor can be pulled out quickly if necessary.
- Do not use the wireless weather station if the mains adaptor or mains adaptor cable are damaged.
- Do not cover the mains adaptor with curtains, newspapers, etc., and ensure sufficient ventilation. The mains adaptor can become hot.
- Completely uncoil the mains adaptor cable before connecting it. In doing so, take care to keep the cable from being damaged by sharp corners or hot objects.
- Pull the mains adaptor out of the socket:
-before cleaning the wireless weather station,
-if, during operation, there appears to be interference, during a storm.
- When doing so, always pull on the plug, not on the cable.
- Do not make any modifications to the item or to the connection cable. Only allow repairs to be carried out at a specialist workshop, since inexpertly repaired devices can present hazards to the user.
- Do not replace the mains adaptor cable. When the cable or mains adaptor is damaged, it must be scrapped and replaced with a mains adaptor of the same type.
Risk of injuries
- Attention: Risk of explosion if batteries are improperly used. Batteries must not be recharged, reactivated by other means, dismantled, thrown into fire, or short-circuited.
- Avoid contact of the battery fluid with skin, eyes, and mucosa. If you do come into contact with the fluid, you must immediately flush the affected areas thoroughly with clean water and promptly see a doctor.
Note on material damage
- Protect the base station and outdoor sensor from dust, impacts, extreme temperatures and direct sunlight.
- Protect the base station from moisture. Position the base station exclusively in a dry, closed room.
- The outdoor sensor is protected against moisture, but must be protected against direct exposure to moisture, such as rain.
- Remove the batteries from the base station and outdoor sensor once they have been consumed or when you are no longer using the weather station. You will thus avoid damage that may result from leakage of battery acid.
-
Do not expose the batteries to any extreme conditions, e.g. by storing them on heaters or under direct sunlight. Increased risk of leakage!
-
Clean the battery and device contacts, as needed, before inserting the battery.
- Always exchange all of the batteries in the base station or in the outdoor sensor at the same time.
- Only insert batteries of the same type; do not use different types or used and new batteries with each other.
- Do not make any modifications to the device. Only allow repairs to be carried out at a specialist workshop and pay attention to the guarantee conditions.
- Do not under any circumstances use hard, scratching, or abrasive cleaning agents or the like in order to clean the weather station. Doing so may scratch the surfaces.
Your wireless weather station provides
Weather station
- Animated weather forecast
- Indoor and outdoor temperature indicator (°C and °F)
- Indoor and outdoor hygrometer (%)
- Display of dew point and heat index
- Mould and comfort indicator
- Frost alert
- Radio clock (DCF time signal) with dual alarm and snooze function SNOOZE
- Date and weekday display
- LCD display with backlight and additional projection display
- 4 adjustable brightness levels
- Projection display can be rotated by 180°
Wireless outdoor sensor
- Range of up to 60 metres (on open ground)
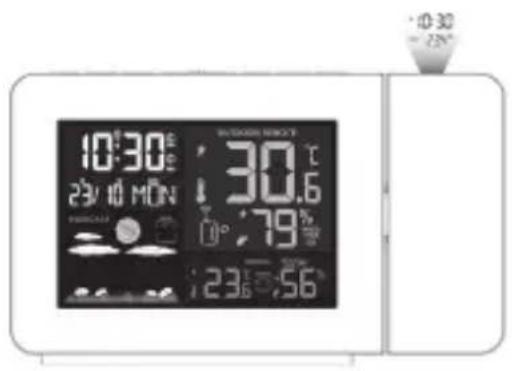
Front view
text_image
10:30 23V 10 MUN 30.6 79% 23:56
text_image
10:30 D M DAY 23/10 MON FORECAST INDOOR MOLD RISK 30.6 79% MOLD RISK ME 23.6 56%1 see "Outdoor weather data"
2 see "Indoor weather data"
3 see "Weather forecast and weather trend"
4 see "Time, date and week display"
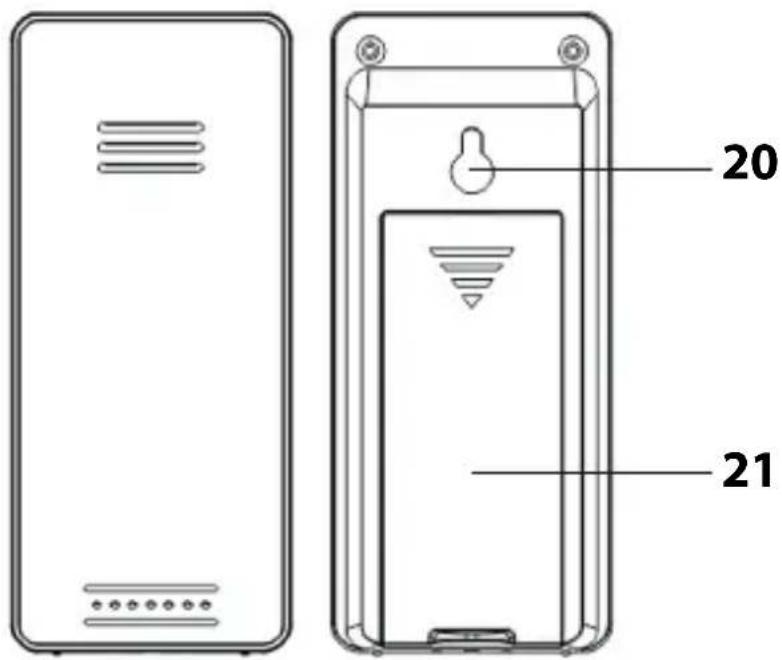
Rear view

text_image
6 7 8 9 10 11 Projection ALARM1 OFF ON OFF ON ALARM2 OFF ON AC 5VEnglish
6 Swivelling projector
7 Temperature sensor
8 Battery compartment for CR2032, 3 V storage battery
9 Switch the projection on and off
10 Switch alarm 1 and 2 on and off
11 AC 5V connection socket for mains adaptor
Not depicted:
-Mains adaptor
Top view

text_image
SET/× ALARM MAX MIN 3000 SNOOZE/LIGHT +CH -°C/°F 12 14 3 15 16 17 18 1912 Change display brightness
13 - Enable the setting mode for alarm time setting
- Show alarm times
14 Retrieve stored MIN and MAX values
15 · Switch display light on/off
· Activate snooze function
16 · Select wireless sensor
· Adjust values (increase)
17 · Starting the radio transmission manually
· Cancel radio transmission
· Change temperature unit
18 Mirror projection display
19 Projector lens
text_image
20 2120 Hanging loop
21 Battery compartment (2x LR03, 1.5 V)

- Proceed in the order listed below and first insert the batteries into the outdoor sensor. Only then can the weather station function without flaws.
- Do not use rechargeable batteries, since their voltage is too low (only 1.2 V instead of 1.5 V). This affects, among other things, the precision of the measurements.
- Where possible, use alkaline rather than zinc-carbon batteries. Alkaline batteries last longer, especially at low outdoor temperatures.
Wireless outdoor sensor
- Remove the battery compartment cover on the rear side of the outdoor sensor by pressing with a little force on the imprinted arrow. Slide the battery compartment cover in the direction of the arrow, away from the outdoor sensor.
- Insert 2 batteries of type LR3/R3 (AAA)/1.5 V as depicted on the bottom of the battery compartment. Pay attention to the correct polarity of the batteries (+/-).
- Slide the battery compartment cover back into place on the outdoor sensor.
Base station
The base station can only be operated with electricity. In the event of a power failure, the storage battery only ensures that the settings are saved for several hours and are not lost.
Backup battery

The base station can also be operated without a storage battery. However, operation with the storage battery alone is not possible.
- Use a coin or similar to open the battery compartment on the back of the base station by turning the round cover counter-clockwise as far as it will go.
- Remove the lid.
- Push the batteries against the contact springs under the large, angular retaining tabs. The battery then snaps into place under the side retaining tabs so that the battery is firmly seated in its holder.
Pay attention to the correct polarity. The plus pole (+) must point upwards.
Put the battery compartment cover back on and turn it clockwise until it stops. Making the electrical connection

NOTE on material damage
- Use only the supplied mains adaptor.
- Insert the plug of the supplied mains adaptor into the AC 5V connection socket of the base station.
- Plug the mains adaptor into a socket that has a voltage corresponding to that described under "Technical Data".
- Wait approx. 30 minutes. The base station requires this time to collect all weather data and to receive radio signals from the time signal transmitter.
Starting signal reception
As soon as the base station is supplied with power, all the indicators appear briefly on the display and the display is illuminated.

The device then switches to receiving-mode, during which the number of radio waves indicates the quality of the reception: The more radio waves shown on the display, the better is the reception.
While receiving, only the ☐ button functions; all other buttons are deactivated during this time.
- After a short time, the weather data received by the wireless outdoor sensor is shown on the display. From now on, this data will be transmitted several times a minute and constantly updated.
- As soon as the signal from the time signal transmitter has been received with sufficient strength, the corresponding data and the radio tower symbol are shown permanently on the display. This process can last a few minutes.
From now on, the weather station automatically switches to receiving-mode multiple times each night. During this process, the displayed time is compared with that received from the time signal transmitter and, if necessary, corrected.
If no sufficiently strong signal has been received, the base station aborts the receiving process after a few minutes and the radio-tower symbol goes out. The receiving process is started again at a later point in time.
In this case, the time proceeds as usual (beginning with the start time of "00:00").
Checklist when data is missing on the display
| No data display from the time signal transmitter | |
| 1. Check whether the location of the base station is suitable, see "Choosing a location". | |
| 2. Start the reception process again manually by pressing and holding down the button for approx. 3 seconds. | |
| 3. Wait until the base station automatically switches back to reception at a later time. The reception is usually better at night. | |
| 4. Manually perform the settings if reception is not possible at your location, see "Setting the time and date manually". | |
| No data display from the wireless outdoor sensor | |
| 1. Check whether you have inserted the batteries correctly. | |
| 2. Check whether the location of the outdoor sensor is suitable, see “Choosing a location”. | |
| 3. Press and hold + to manually start signal reception to the outdoor sensor. |
Setting the time and date manually

If there is more than approx. 30 seconds between two pushes of a button, the setting process automatically ends and you will have to repeat it.
- Keep the button pressed until the radio tower symbol and "ON" or "OFF" flash on the display.
- Use the +CH or - button to set the automatic reception of the time signal transmitter to "ON" (recommended).
- Press in order to save the settings. On display "00".
- Proceed as previously described.
-Press SET() to save a setting.
-Press the + or - button to set the desired value.
- Carry out the following settings:
-Time zone you are in (for mainland Europe, select 00)
-24- or 12-hour display
-Hours
-Minutes
-Year
-Month
-Day
-Date format
–Language (relates exclusively to the weekday indicator)
-Weather display
- Then press SET(0).
Manually starting signal reception

If the radio signal symbol to the left is no longer displayed, the radio signals from the time signal transmitter are no longer being received. The time indicator nevertheless continues precisely.
-Press and hold the button until the radio signal symbol is displayed again. The signal reception is thus started manually.
Pay attention to the following:
- If the reception was not successful, the reception symbol fades out after a few minutes and the time on the display continues normally.
- Upon successful signal reception, the base station adjusts itself to the time of the time signal transmitter. If you have already made manual time and date settings, they will be adjusted automatically.

NOTE on material damage
- Protect the base station from dust, shocks, extreme temperatures, and direct sunlight.
- Protect the base station from moisture. Position the base station exclusively in a dry, closed room.
Signal reception between the base station and wireless outdoor sensor
- The maximum distance between the base station and the outdoor sensor may be 60 metres. This range is, however, only possible with “direct line of sight”.
- Protective construction materials such as reinforced concrete reduce or inhibit signal reception between the base station and outdoor sensor.
- Devices such as TVs, cordless phones, computers, and fluorescent tubes can likewise disrupt signal reception.
- Do not place the base station and the outdoor sensor directly on the ground. This limits the range.
- At low temperatures in winter, the performance of the outdoor sensor batteries can markedly decrease. This reduces the transmission range.
Signal reception between the base station and time signal transmitter
- Maintain distance from TV sets, computers, and monitors. Base stations of wireless phones should also not be located in the immediate vicinity of the base station.
- The reception is generally better at night. If the base station did not have reception during the day, it may well be that the signal will be immediately and fully received at night.
- Depending on your location, it can infrequently happen that the base station receives signals from another time signal transmitter or even alternately from two time signal transmitters. This is not a fault in the device. In this case you should change the location of the base station.
- The weather, e.g. a heavy storm, can cause interference with the reception.
- Temporary shutoffs of the transmitter can sometimes happen, e.g. because of maintenance work.
Setting up the base station
- Set up the base station as close to a window as possible. Here, the reception will generally be best.
Setting up the outdoor sensor

DANGER of severe injuries
-During wall installation, there must be no electrical cables, gas or water pipes installed in the walls at the mounting site. Otherwise, when drilling holes, there is a risk of electric shock!
The wireless outdoor sensor is equipped with a hanging eyelet on the rear side.
- Place or hang the outdoor sensor at a position where it is protected from the direct influence of the weather (rain, sun, wind, etc.). Suitable locations are, for example, under an awning or in a carport.
Use additional wireless sensors
The base station is supplied with a wireless sensor. However, you can operate it with up to three outdoor sensors.
Please contact service@ade-germany.de for more information or a paid order.
- The outdoor sensors can be situated in different spaces or outdoors.
- Every sensor must be allocated its own number (= no. of the transmission channel).
- The standard sensor included in the scope of delivery always has channel number 1. This number is fixed and cannot be changed.
Procedure:
- Place the base station and new outdoor sensors close together.
- Remove the battery compartment cover on the rear side of the outdoor sensor.
- Use the switches to set a separate channel for each new outdoor sensor. Since the sensor included in the scope of delivery uses channel 1 as standard, select channel 2 for the second sensor and channel 3 for the third one.
- Insert two batteries of the type indicated on the base. Pay attention to the correct polarity (+/-).
- Replace the battery compartment cover.
Using the ☐ button, select the corresponding outdoor sensor (1, 2 or 3) in order to have its data displayed. Pay attention to the following:
- You can also press the button repeatedly until the base station display shows next to the outdoor sensor number. This is a sign that the data from the outdoor sensors will automatically be called up and displayed in succession.
- If the channel number is not displayed after inserting the batteries, press the TX button for the respective wireless sensor. This way, the weather data is transmitted directly to the base station.
You can then set up the new outdoor sensor at its own installation site.
About the time signal transmitter DCF77
The radio clock integrated into the base station receives its radio signals from the time signal transmitter DCF77.
This broadcasts the precise and official time of the Federal Republic of Germany on the long-wave frequency of 77.5 kHz.
The transmitter is located in Mainflingen near Frankfurt am Main and, with its range of up to 2000 km, supplies the majority of radio-controlled clocks in western Europe with the necessary radio signals.
As soon as the base station is supplied with current, it switches to receiving mode and searches for the signal from the DCF77 transmitter. If the time signal is received in sufficient strength, the display shows the date and time.
The base station switches on multiple times daily and synchronises the time with the radio signal from the DCF77 transmitter. In the event the signal is not received, e.g. during a strong storm, the device continues to run precisely and then switches to receiving mode again at the next scheduled time.
Display indicators of the base station
Outdoor weather data
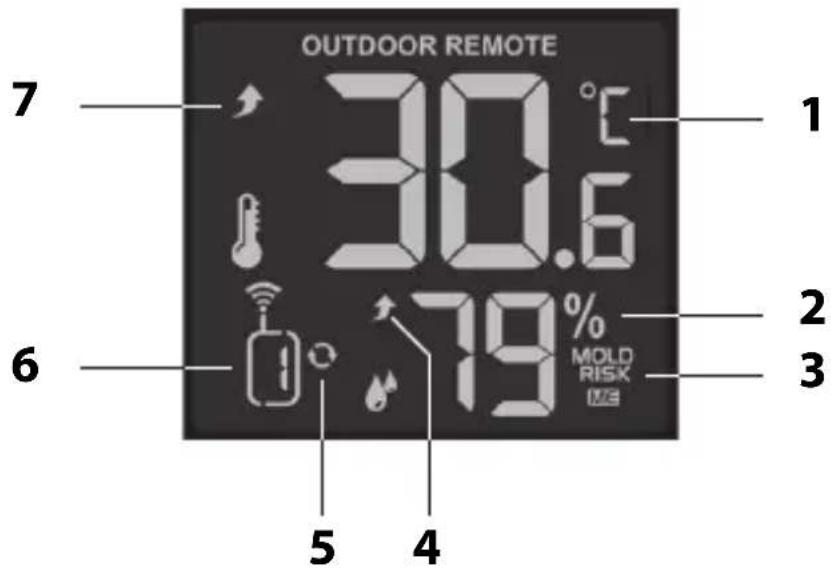
text_image
OUTDOOR REMOTE 7 30.6 1 2 6 79% MOLD RISK WE 5 41 Outdoor temperature in °C or °F
2 Humidity in percentage
3 Mould risk: LO = low, ME = medium, HI = high
4 Trend for humidity, see "Temperature and humidity trend"
5 Symbol for automatic change of the outdoor sensor displays (only if more than one outdoor sensor is connected to the weather station)
6 Display of the current transmission channel
7 Temperature trend, see "Temperature and humidity trend"
Indoor weather data

text_image
INDOOR MOLD 23.6 % Comfort 5.6% 1 2 4 31 Mould risk: LO = low, ME = medium, HI = high
2 Humidity in percentage
3 see "Comfort indicator"
4 Temperature in degrees Celsius or Fahrenheit
5 Temperature trend, see "Temperature and humidity trend"
Time, date and week display
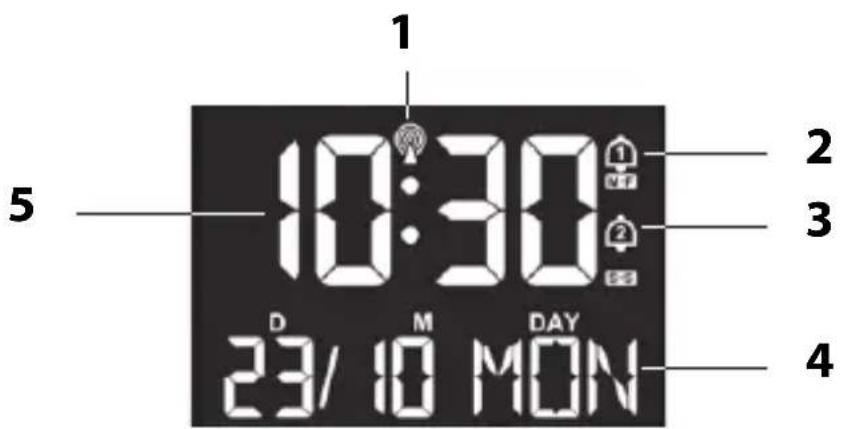
text_image
1 2 3 4 5 10:30 D M DAY 23/10 MON1 Symbol for radio reception to DCF77
2 Alarm time 1 is active ("M-F" = Monday - Friday)
3 Alarm time 2 is active ("S-S" = Saturday - Sunday)
4 Date, month and day of the week (depending on the setting)
5 Time in 12-hour or 24-hour format
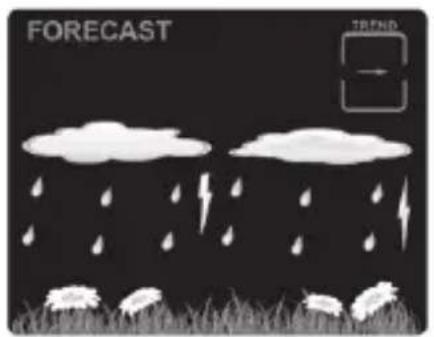
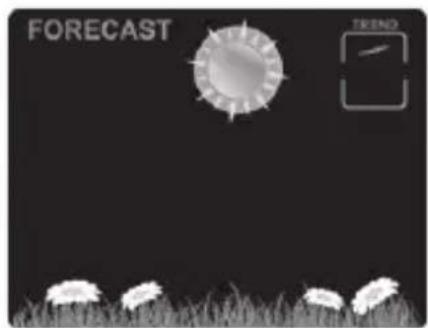
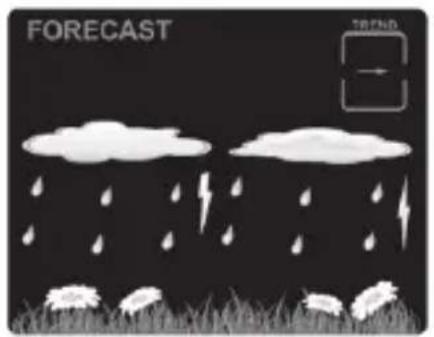
Weather forecast and weather trend
After start-up, the information still can not be used for weather forecasting for approximately 12 hours, since the weather station needs this time to collect and analyse the weather data.
The weather forecast is based on the collected data and the measured air pressure changes.
The forecast pertains to the region around the weather station with a radius of approx 30 to 50 ~km , for a period of 12 to 24 hours.
The accuracy of the weather forecast lies around 75%.
text_image
FORECAST TREND
natural_image
Illustration of a sunny landscape with clouds and flowers, no text or symbols presentsunny light cloud

natural_image
Black-and-white illustration of a landscape with clouds, grass, and flowers under a 'FORECAST' label (no other text or symbols)
text_image
FORECAST TRENDcloudy rainy
text_image
FORECAST TREND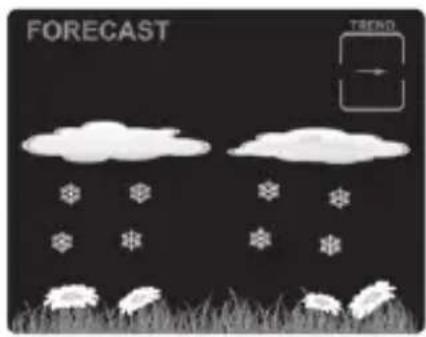
text_image
FORECAST TRENDheavy rain/thunderstorm snowfall
In conjunction with the air pressure trend, further weather interpretations are possible.
rising air pressure

constant air pressure
falling air pressure
Two examples:
- Weather forecast shows rain, the air pressure is falling off quickly and steeply >> strong rain is probable.
- Weather forecast shows rain, the air pressure has risen in the last 12 hours but in the last 3 hours as fallen off somewhat >> light rain is probable.
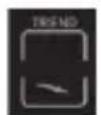
Temperature and humidity trend
The trend for the values of temperature and humidity measured by the base station and outdoor sensor is shown in the form of an arrow:

rising

falling
no display constant
Other weather data and functions
Comfort indicator
The comfort indicator consists of temperature (T) and humidity (L). Values are measured by the base station.

T: very pleasant
L: very pleasant

T: pleasant
L: pleasant

T: a little too cool or warm
L: a little too dry or wet

T: too cold or warm
L: considerably too dry or wet

T: much too cold or hot
L: much too dry or wet
Saved weather data
By repeatedly pressing the button, the following values are displayed for the last 24 hours:
- highest and lowest indoor and outdoor temperature with display of the corresponding air humidity,
- Dew point (outdoor)
- Heat index (outdoor)

- The dew point is the temperature below which the water vapour separates out of moist air as dew or mist.
- The heat index is made up of temperature and humidity and shows the perceived temperature.
- Press 1x: MAX temperature values are displayed
- Press 2x: MIN temperature values are displayed
- Press 3x: Dew point is displayed
- Press 4x: Heat index is displayed
- Press 5x: normal display indication

If "LL.L" or "HH.H" appears on the display, the temperature is below or above the display range.
Show values of other outdoor sensors
Only if you have connected more than one outdoor sensor to the wireless weather station:
-Press the +/CH button during the display.
Delete stored MAX/MIN values:
-Press and hold down the button for approx. 3 seconds while the display is on until the displayed MAX and MIN values for the temperature are deleted.
Frost alert

As soon as the outdoor sensor measures a temperature between -1 °C and +3 °C (+30 °F to +37 °F), the frost alarm symbol flashes on the display.
Pay attention to the following:
- Even if the frost alarm does not flash, there is always a risk of frost or icing at temperatures around freezing point. An outdoor sensor can only measure the local temperature at the installation site.
- The flashing cannot be switched off. It stops automatically as soon as the temperature is outside the specified range.
- If you have connected several outdoor sensors to that of the base station: Note which sensor (= note the channel number on the display) triggered the frost alarm.
Mould indicator
The mould indicator ("MOLD" display) is made up of temperature and humidity.
The indicator shows the likelihood of mould growth.
Possible displays: LO (low), ME (medium) and HI (high).
The mould indicator is available for indoor and outdoor areas.
Alarm
The device offers the possibility of setting two alarm times independently of each other:
- An alarm time for Monday to Friday ("M-F" display) and
- an alarm time for Saturday to Sunday ("S-S" display).
- You can also combine both alarm times so that you are woken up at the same time throughout the week.
Setting the alarm time

If there are more than 30 seconds between two button presses, the setting process is ended and must be repeated.
Both alarm times are set in the same way.
-
Select "AL1" with ALARM. Note the display.
-
Hold down ALARM for a few seconds until the alarm hour indicator blinks.
-
Use the ☐ or ☐ button to set the desired wake-up hour.
-
Press ALARM. The minute indicator for the alarm time blinks on the display.
-
Use the +CH or -button to set the desired wake-up minute.
-
Press ALARM.
"M-F" flashes on the display.
-
Use the ☐ or ☐ button to set the desired alarm period: "M-F", "S-S" or "M-F" and "S-S".
-
Press ALARM
"05" (= default setting 5 minutes) and "Z" flash on the display.
- Use the ☐ or ☐ button to set the desired time span for the snooze function (time span between two alarms). If you select "OFF", the snooze function is switched off.
- Press ALARM.
- Proceed as described to make the same settings for ALARM2. If you do not want to set a second alarm time, simply press ALARM repeatedly until the normal display is shown again.
Switching the alarm function on/off
- Slide the ALARM1 or ALARM2 switch or both on the back of the device to ON.
The display shows "M-F" or "S-S" or "M-F" and "S-S" accordingly.
The alarm function is activated.

To deactivate an alarm function, slide the respective switch to OFF.
Waking up
At the set time, you will be woken by an alarm signal, which will become more intense as the waking time increases.
End alarm clock
-Press any button on the base station (except) to stop the alarm. After 24 hours, the alarm will be triggered again.
Auto stop function
If you do not press a button, the alarm switches off automatically after 2 minutes. After 24 hours, the alarm will be triggered again.
Repeat alarm (snooze function)
-Press the button once when the alarm signal sounds.
The alarm signal stops according to the setting made (default setting: 5 minutes). Then the device switches back on and the alarm sounds again. This procedure can be repeated multiple times.
-To exit snooze mode, press any button (except SNOOZE/LIGHT) or hold down for more than 2 seconds.
Use projection
The projection only works if the room is sufficiently darkened.
- Aim the projector at a wall or ceiling. Recommended distance: 1 to 3 metres.
- Slide the Projection switch to ON.
- If necessary, press the ⏻ button if the projection on the wall or ceiling is inverted.
The projection display consists of the time of day and the indoor and outdoor temperature, with the display changing every 5 seconds. The outdoor temperature (channel 1-3) always shows the value that is shown on the display at the same time.

- If you press and hold down for more than 3 seconds, you can decrease or increase the brightness of the projection.
- When data is received from the time signal transmitter, the projection is automatically interrupted to avoid reception interference.
Other functions
Display illumination
-Select the desired display brightness by repeatedly pressing [SET/米].
-Press SNOOZE/LIGHT to maximally illuminate the display for approx. 15 seconds.

When data is received from the time signal transmitter, the display illumination is automatically interrupted to avoid reception interference.
Change temperature unit
-Press to switch between degrees Celsius (°C) and degrees Fahrenheit (°F).
Battery change indicator
The base station and outdoor sensor each have a battery change indicator.
If the battery symbol 📋 is displayed, you must replace all the batteries of the respective device.
Only if you have connected several outdoor sensors to the wireless weather station: Observe the channel display in order to change the batteries in the “correct” outdoor sensor.
Cleaning
- Pull the mains adaptor plug out of the base station.
- As necessary, wipe the base station and the outdoor sensor clean with a lightly-dampened cloth.
Fault/Remedy
| Fault Possible cause | |
| The DCF77 signal for the time cannot be received. | · Check the chosen location.· Start the signal reception manually, if necessary.· Adjust the time manually. |
| Temperature indication of the outdoor sensor appears too high. | · Check whether the sensor has been exposed to direct sunlight. |
| The display shows “H.HH” or “LL.L” instead of the measured values. | · The values lie above or below the measurement range. |
| The indicator is illegible, the function is unclear, or the values are obviously false. | Reset the weather station to the delivery state.1. Remove the batteries from the outdoor sensor and pull the mains adaptor plug for the base station out of the socket.2. Wait a moment.3. Proceed as described in “Start-up”. |
| The base station receives no signals from the outdoor sensor. | · Ensure that no electrical sources of interference are located in the vicinity of the wireless sensor or of the base station.· Check the batteries in the outdoor sensor.· Move the base station closer to the outdoor sensor or vice versa. |
| The time differs exactly by one or two hours. | · You have probably set an incorrect time zone. Select “00” for mainland Europe. |
| The alarm clock didn't ring. | · Did you activate the correct alarm time? Check whether the alarm day and setting (“M-F” or “S-S”) match. |
Technical data
Base station
Model: WS 1911 weather station
Input: 5 V\~
Battery: 1x CR2032/3 V

Measuring range
- Temperature: -10 °C to 50 °C (15 °F to 122 °F)
-Humidity: 20% – 95%
Wireless outdoor sensor
Batteries: 2x LR6 (AA) / 1.5 V
Measuring range:
- Temperature: -40 °C to 70 °C (-40 °F to 158 °F)
-Humidity: like base station
Range: approx. 60 metres (open terrain)
Transmission frequency: 433.92 MHz
Max. transmission power: +10 dBm
Mains adaptor
Input: 230 V\~, 50 Hz
Output: 5 V\~ / 150 mA
Protection class: II ☐
Distributor: Waagen-Schmitt GmbH
Hammer Steindamm 27-29
22089 Hamburg, Germany
Our products are constantly being developed and improved. For this reason, design and technical modifications are possible at any time.
Declaration of Conformity
Waagen-Schmitt GmbH hereby declares that the digital weather station WS 1911 complies with EU directives 2014/53/EU and 2011/65/EU.
The full text of the EU declaration of conformity is available at the following Internet address: www.ade-germany.de/doc The declaration will lose its validity if any modification is made to the device without our consent.
Hamburg, January 2021
Waagen-Schmitt GmbH

Warranty
Dear Valued Customer,
Waagen-Schmitt GmbH warrants for 2 years from the purchase date the cost-free rectification of defects in material and workmanship through repair or exchange.
In the event of a warranty claim, please return the product with the proof of purchase (specifying the reason for claim) to your dealer.
Disposal
Disposing of the packaging

Dispose of the packaging with similar materials. Dispose of cardboard with waste paper and of films with recyclable materials.
Disposing of the product
Dispose of the product in accordance with the regulations that apply in your country.

natural_image
Symbol of a trash bin with no visible text or labelsDevices must not be disposed of in normal household waste
At the end of its life, the product must be disposed of in an appropriate way. In this way, valuable materials contained in the device will be recycled and the burden on the environment avoided. Bring the old device to a collection point for electronic waste or to a recycling depot.
For more information, contact your local waste disposal firm or your local administrative body.

natural_image
Symbol of a trash bin crossed with no text or labelsStandard and rechargeable batteries should not be disposed of along with household waste
All batteries and rechargeable batteries must be brought to a local or district collection point or to the retailer. Such batteries and rechargeable batteries can thus be disposed of in an environmentally friendly way.
text_image
6 7 8 9 10 11 Projection ALARM1 OFF ON OFF ON ALARM2 OFF ON AC 5Vnatural_image
Illustration of a weather forecast with sun, clouds, and grass on a black background (no text or symbols)soleado ligeramente nuboso

natural_image
Illustration of a sky with clouds and grass at the base, no text or symbols present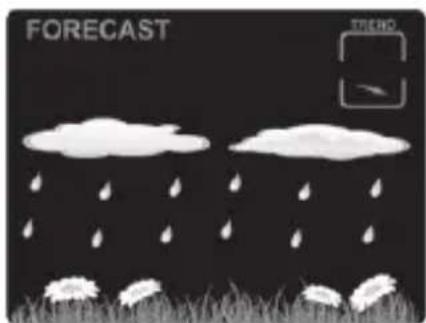
text_image
FORECAST TRENDnublado lluvioso

text_image
FORECAST TREND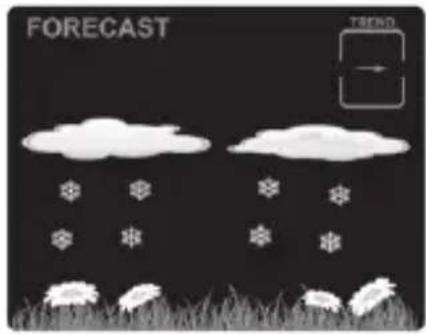
text_image
FORECAST TRENDnatural_image
Symbol of a trash bin crossed with two crossed arms, no text or labels presentnatural_image
Simple line drawing of a trash bin with two crossed lines indicating no waste or prohibition (no text or symbols)Station de base....142
Vue de face....142
text_image
6 7 8 9 10 11 Projection ALARM1 OFF ON OFF ON ALARM2 OFF ON AC 5Vnatural_image
Black-and-white illustration of a landscape with clouds, grass, and flowers under a 'FORECAST' label, with a directional arrow icon (no text or symbols on the landscape itself)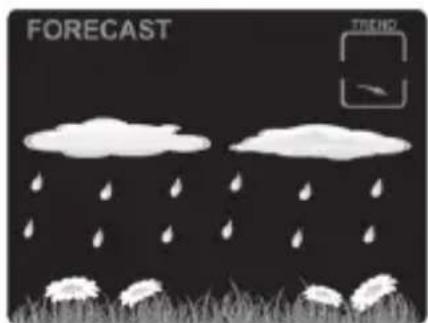
natural_image
Illustration of two cloudy clouds with raindrops over grass and a bird, no text or symbols present.nuageux pluvieux

text_image
FORECAST TROPED
text_image
FORECAST TRENDnatural_image
Symbol of a trash bin crossed with a diagonal line, no text or numbers presentnatural_image
Symbol of a trash bin crossed with no text or numbers, representing waste restriction (no text present)natural_image
Illustration of a sunny landscape with clouds and flowers, no text or symbols presentnatural_image
Game scene with white clouds and grass under a black sky, no text or symbols present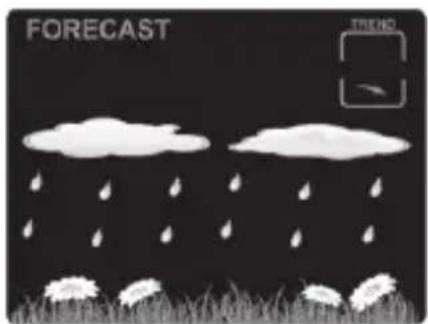
text_image
FORECAST TRENDnuvoloso pioggia

text_image
FORECAST TREND