Skyscraper Ice Smart - Air Conditioning Klarstein - Free user manual and instructions
Find the device manual for free Skyscraper Ice Smart Klarstein in PDF.
User questions about Skyscraper Ice Smart Klarstein
0 question about this device. Answer the ones you know or ask your own.
Ask a new question about this device
Download the instructions for your Air Conditioning in PDF format for free! Find your manual Skyscraper Ice Smart - Klarstein and take your electronic device back in hand. On this page are published all the documents necessary for the use of your device. Skyscraper Ice Smart by Klarstein.
USER MANUAL Skyscraper Ice Smart Klarstein
SKYSCRAPER ICE SMART
Luftkühler
Air Cooler
Enfriador de aire
text_image
QR code image containing encoded data, no visible human-readable textINHALTSVERZEICHNIS
text_image
Technical diagram of a vertical fan or air conditioner unit with numbered components labeled 1 through 6.
text_image
Technical diagram of a vertical industrial vessel with numbered components for identificationnatural_image
Three technical line drawings of industrial air purifiers with no visible text or symbolsnatural_image
Pure technical line drawing of a rectangular frame with a vertical oval cutout and base (no text or symbols)natural_image
3D rendered image of a light green plastic enclosure with internal geometric patterns (no text or symbols)natural_image
Diagram of a stylized device with icons for wireless, air, fan, and cloud (no text or labels)line
| Zeit (Stunde) | Windgeschwindigkeit | | ------------- | ------------------- | | 0.0 | H | | 0.1 | M | | 0.2 | L | | 0.3 | H | | 0.4 | M | | 0.5 | H | | 0.6 | L | | 0.7 | H | | 0.8 | M | | 0.9 | L | | 1.0 | H | | 1.1 | M | | 1.2 | L | | 1.3 | H | | 1.4 | M | | 1.5 | L |line
| Time (Stunde) | Windgeschwindigkeit | | ------------- | ------------------- | | 0 | H | | 1 | M | | 2 | L | | 3 | H | | 4 | M | | 5 | L | | 6 | H | | 7 | M | | 8 | L | | 9 | H | | 10 | M | | 11 | L | | 12 | H | | 13 | M | | 14 | L | | 15 | H | | 16 | M | | 17 | L | | 18 | H | | 19 | M | | 20 | L | | 21 | H | | 22 | M | | 23 | L | | 24 | H | | 25 | M | | 26 | L | | 27 | H | | 28 | M | | 29 | L | | 30 | H | | 31 | M | | 32 | L | | 33 | H | | 34 | M | | 35 | L | | 36 | H | | 37 | M | | 38 | L | | 39 | H | | 40 | M | | 41 | L | | 42 | H | | 43 | M | | 44 | L | | 45 | H | | 46 | M | | 47 | L | | 48 | H | | 49 | M | | 50 | L | | 51 | H | | 52 | M | | 53 | L | | 54 | H | | 55 | M | | 56 | L | | 57 | H | | 58 | M | | 59 | L | | 60 | H | | 61 | M | | 62 | L | | 63 | H | | 64 | M | | 65 | L | | 66 | H | | 67 | M | | 68 | L | | 69 | H | | 70 | M | | 71 | L | | 72 | H | | 73 | M | | 74 | L | | 75 | H | | 76 | M | | 77 | L | | 78 | H | | 79 | M | | 80 | L | | 81 | H | | 82 | M | | 83 | L | | 84 | H | | 85 | M | | 86 | L | | 87 | H | | 88 | M | | 89 | L | | 90 | H | | 91 | M | | 92 | L | | 93 | H | | 94 | M | | 95 | L | | 96 | H | | 97 | M | | 98 | L | | 99 | H | | 100 | M |natural_image
Technical line drawing of a cylindrical industrial device with internal components and external views (no text or symbols)Filter installieren
Member of Berlin Brands Group
Handwerkerstr. 11
15366 Dahlwitz-Hoppegarten
Deutschland
natural_image
Symbol of a trash bin crossed with a diagonal line, no text or numbers presentBerlin Brands Group UK Ltd
PO Box 1145
Oxford, OX1 9UW
United Kingdom
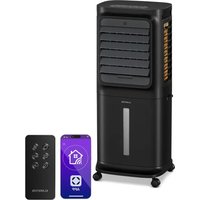
Congratulations on purchasing this device. Please read the following instructions carefully and follow them to prevent possible damages. We assume no liability for damage caused by disregard of the instructions and improper use. Scan the QR code to get access to the latest user manual and more product information.

text_image
QR code image containing encoded data, no visible human-readable textCONTENTS
Safety Instructions 24
Product Overview 26
Start and Operation 27
Remote Control 28
Button Functions and Display Indicators on the Appliance 30
Wind Pattern 32
Device Control by Smartphone 35
Cleaning and Maintenance 37
Troubleshooting 38
Disposal Considerations 39
Declaration of Conformity 39
TECHNICAL DATA
| Item number | 10040205, 10040206, 10040207, 10040208 |
| Power supply 220-240 V ~ 50 Hz | |
| WiFi standard | 802.11 b/g/n |
| WiFi frequency | 2.400-2.4835 GHz |
| WiFi radio-frequency power (max.) | 11b: 17 dBm,11g: 15 dBm11n: 13 dBm |
SAFETY INSTRUCTIONS
- Check the voltage on the rating plate before use. Only connect the appliance to sockets which correspond to the voltage of the appliance.
- Keep the appliance and cable away from sources of heat, sharp objects or anything that may cause damage.
- Do not place the cord under carpets. Do not cover the cord with small clothes, shirts or other similar elements. Place the cord away from traffic areas in order to avoid any risk of tripping over.
- Do not operate the appliance if the cable or plug is damaged.
- If the supply cord or plug is damaged, it must be replaced by the manufacturer, its service agent or similarly qualified persons in order to avoid a hazard.
- Indoor use only.
- Do not cover the machine during using.
- Place the appliance on a stable flat horizontal surface. Make sure the appliance is in an upright position during use.
- Ensure the appliance is switched off before connecting to the mains power supply.
- Always ensure that hands are dry before operating or adjusting any switch on the product or touching the plug and mains supply connections.
- Do not leave this appliance unattended when it's in use. Turn off and disconnect the appliance when you leave the room for an extended period.
- Switch off the appliance and unplug from the mains socket when not in use, before filling, cleaning or other maintain.
- To disconnect the appliance, switch it "OFF", and then remove the plug from outlet. Do not pull the cord to disconnect the plug.
- Use the appliance only as described in this manual.
- Do not insert your fingers in the openings of the guard.
- Do not leave hair, tissue, tablecloths, clothes or curtains near all openings of the fan, they could be sucked into the fan and be taken within the internal moving parts that could cause injury or damage.
- Do not use the appliance in wet or damp locations such as bathrooms.
- Do not operate the appliance when it's not mounted on its wheels or if it's lying on the side.
• Make sure the cord is completely extended before use. - When in operation, evaporative coolers moisturize the ambient air. Over-humidification of residential rooms should be avoided. Recommendation: 40-50 % relative humidity. Excessive humidity of the air can damage the home and cause health problems.
- The appliance may only be set up on water- and moisture-proof flooring materials (spilling some drops of water is unavoidable when the content of the tank is changed).
-
With each and every change of tank content, completely remove residual water from the equipment. To prevent nucleation, remove residual water from the equipment and water tank every time after three days of use.
-
This device can be used by children over 8 years of age and persons with limited physical, sensory or mental abilities or lack of experience and knowledge, if they have been supervised or instructed in the safe use of the device and understand the dangers involved. Children must not play with the device. Cleaning and maintenance of the air cooler must not be performed by children without supervision.
- Keep new and used batteries away from children.
- If the battery compartment does not close securely, stop using the product.
- The batteries contain environmentally hazardous substances. They must be removed from the product before it is scrapped and disposed of safely.

WARNING
Danger of injury! Make sure that children do not swallow the battery. If the button cell battery is swallowed, it can cause severe internal burns in only 2 hours and lead to death. If you think that batteries may have been swallowed, consult a doctor immediately.
Special notes on use
- Note that high humidity can encourage the growth of biological organisms in the environment.
- Make sure that the area around the humidifi er does not get damp or wet. If humidity occurs, turn down the power of the humidifi er. If the humidifi er output cannot be reduced, use the humidifi er intermittently. Make sure that absorbent materials such as carpets, curtains, drapes or tablecloths do not get wet.
- Disconnect the device from the power supply while filling and cleaning.
- Never leave water in the holder when the appliance is not in use.
- Empty and clean the humidifi er before storage. Clean the humidifi er before the next use.
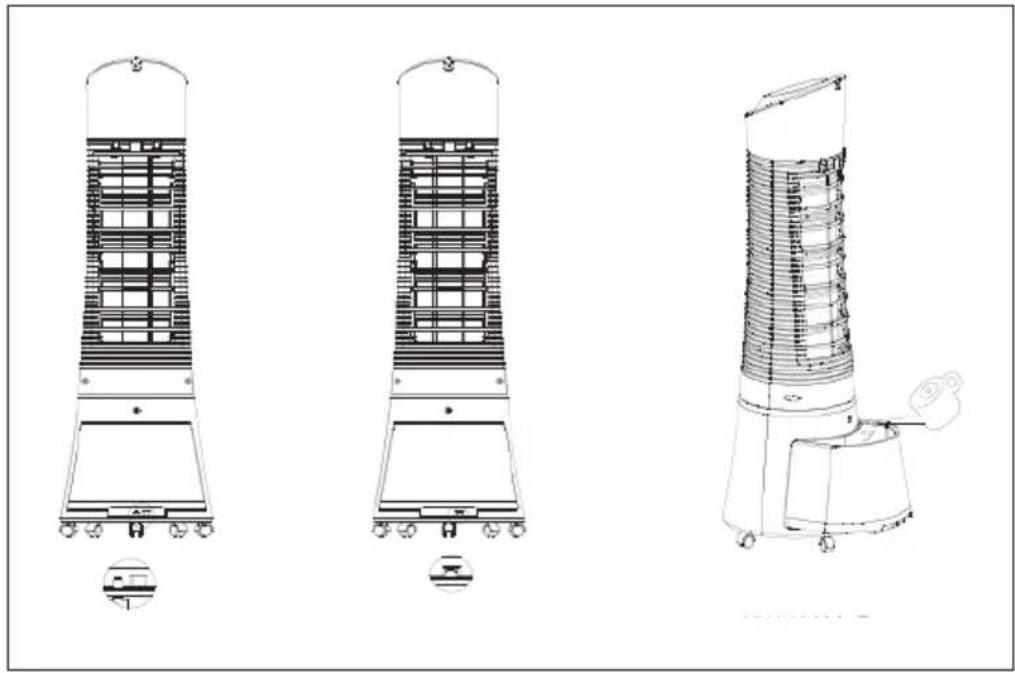
PRODUCT OVERVIEW

text_image
Technical diagram of a vertical fan or air conditioner unit with numbered components labeled 1 through 6.
text_image
Technical diagram of a vertical industrial vessel with numbered components for identification| 1 Control panel 5 Water level indicator 9 Water tank | |
| 2 Display panel 6 Caster 10 Power cord | |
| 3 Remote control receiver 7 Dustproof air filter 11 Water tank knob | |
| 4 Air louvers 8 Cooler Master holder |
ACCESSORIES
| Ice box Remote control | |
 |  |
START AND OPERATION
Carefully remove all packaging materials and retain for future storage/use. Make sure there is no residual foam left in any of the components. No tools will be required to assemble this tower evaporative cooler.
Filling the water tank
Fill water into the water tank before using the cooling or humidifying function of the air cooler. Turn the tank knob to the left, pull the tank halfway out and pour water into the water tank. Close the water tank again after filling.
natural_image
Three technical line drawings of industrial air purifiers with structural panels and mounting base (no text or symbols)Pay attention to the water level when filling the water tank. The water level should not be higher than the MAX mark and not lower than the MIN mark. Use clean water to fill the water tank. After filling, push the water tank back into the drawer of the appliance and lock the water tank.
natural_image
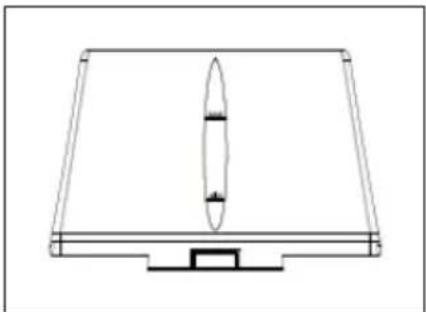
Pure technical line drawing of a rectangular frame with a vertical oval cutout and base (no text or symbols)Note: When used for the first time, there may be a slight odour and discolouration of the water. This is not a health hazard.
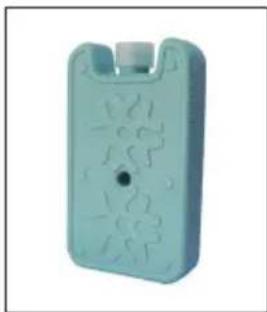
Using the ice box
The appliance contains two ice boxes for extra cooling.
- Place the ice box in a freezer compartment.
- Place the frozen ice box in the tank. After about 10 minutes, the water temperature in the tank will be lower than the ambient temperature.
natural_image
3D rendered image of a light green plastic electronic component with no visible text or symbolsNote: Never open the ice box and do not swallow the ice.
REMOTE CONTROL
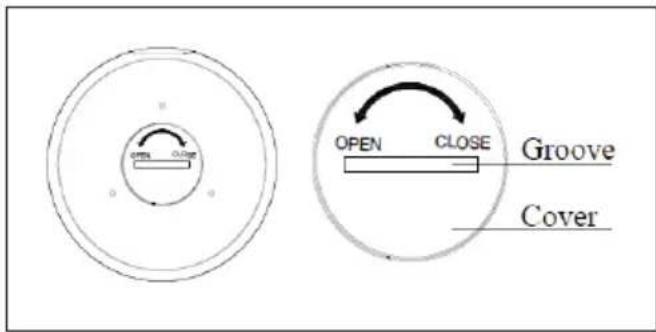
Inserting the battery
Open the battery compartment cover on the back of the remote control, insert a 3V CR2032 battery. The remote control can then be used.
text_image
OPEN CLOSE Groove CoverUse a coin to open the battery compartment. Insert the coin into the slot on the back of the remote control and turn it as indicated on the remote control. Pay attention to the positive and negative poles when inserting the battery. Point the remote control at the sensor and press one of the function buttons.
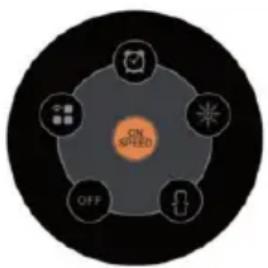
Remote control
flowchart
graph TD
    A["Camera Icon"] --> B["ON SPEED"]
    C["Lock Icon"] --> B
    D["App Icon"] --> B
    E["Switch Icon"] --> B
    F["Off Icon"] --> B
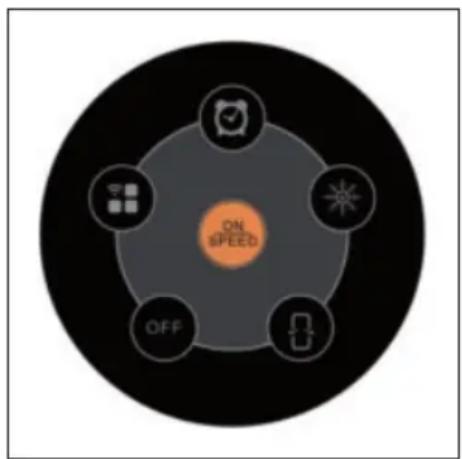
 | ON/SPEED | Power ON and adjusts speed. |
 | OFF | Power OFF. |
 | MODE/WIFI | Adjusts the airflow mode. Switch on the WiFi function. |
 | TIMER | Timer function of up to 7.5 hours. |
 | SWING | Oscillating air louvers. |
 | COOLER/HUMIDIFIER | Controls cooling/humidification function. |
BUTTON FUNCTIONS AND DISPLAY INDICATORS ON THE APPLIANCE
text_image
ON OFF
natural_image
Diagram of a stylized device with icons for wireless, air, fan, and cloud (no text or labels)| ON/SPEED & OFF | After the tank is filled with water, connect the tower evaporative cooler to a power outlet. The unit will beep twice, indicating that the cooler is in standby mode at this time. Press the ON/SPEED button to turn on the tower evaporative cooler. To adjust the fan speed, press the ON/SPEED button again until your desired speed has been reached. To turn the tower evaporative cooler off and revert back to standby mode, press the OFF button. |
| COOLER/HUMIDIFIER | After the desired fan speed has been selected, press the COOLER/HUMIDIFIER button to activate the cooling/humidifying function. This powers the water pump, cools the air and adds moisture to your air at the same time. The snowflake icon will also be visible on the display panel once the cooling/humidifying function has been selected. |
| MODE | Setting the airflow mode is optional. To set the airflow mode, press the MODE button.Manual Mode: Indicated by the three circular icons on the display panel, this allows you to set the fan speeds manually.Sleep Mode: Indicated by the moon icon on the display panel, this setting will gradually lower the fan speed at different intervals. If the fan speed is set to high, the cooler will run for 30 minutes on high speed, 30 minutes on medium speed and then continue to operate on low speed.Natural Mode – Indicated by the palm tree icon on the display panel, this setting will adjust the airflow speed between low, medium and high. |
| WIFI | When switched on, press and hold the MODE/WIFI button for 5 seconds. After a beep sounds, the WiFi indicator flashes quickly after approx. 5 seconds and the app network can be configured in standard mode. If the connection is not established within 3 minutes, the WiFi indicator goes out. To re-establish the connection, press and hold the MODE/WIFI button for 5 seconds. After the beep sounds, the WiFi module is reset, the WiFi indicator flashes quickly after about 5 seconds and the app network can be configured in standard mode. If the WiFi indicator flashes quickly, press and hold the MODE/WIFI button again for 5 seconds. After the beep sounds, the WiFi indicator flashes slowly after about 5 seconds and the app network can be configured in compatibility mode.Notes on the WiFi function:If the unit is switched off within 10 seconds after it is switched on, the WiFi indicator returns to the state before it was switched off. If the unit is switched off after 10 seconds, the WiFi indicator goes off and changes to low power mode. You must press and hold the setting button for 5 seconds to restart.During the pairing process, if the network is not configured within 3 minutes, the WiFi indicator goes off. You must press and hold the setting button for 5 seconds to restart.When pairing is complete, the router switches off and the WiFi indicator goes out. When the router is switched on again, it is automatically paired and connected.When using the WiFi function, the WiFi indicator must flash quickly. A WiFi router (must be able to connect to the external network) and a mobile end device (e.g. smartphone) are required to use the Klarstein app. The Klarstein app must be installed on the mobile end device that is also connected to the WiFi network. |
| TIMER | This tower evaporative cooler is equipped with a 7.5 hour programmable timer. To set the timer, press the TIMER button. Each press of this button will add 0.5 hours to the set time. The set time will be indicated in the middle of the display panel. |
| SWING | To activate the oscillation feature, press the SWING button. The evaporative cooler's air louvers will automatically move from side to side, which increases air circulation and distributes air more evenly. |
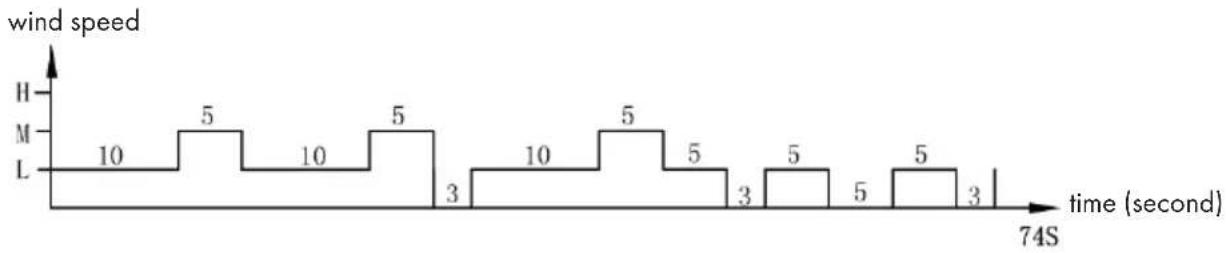
WIND PATTERN
1. Natural mode
This mode is based on the set speed. The exact wind pattern is as follows:
Natural mode in high speed
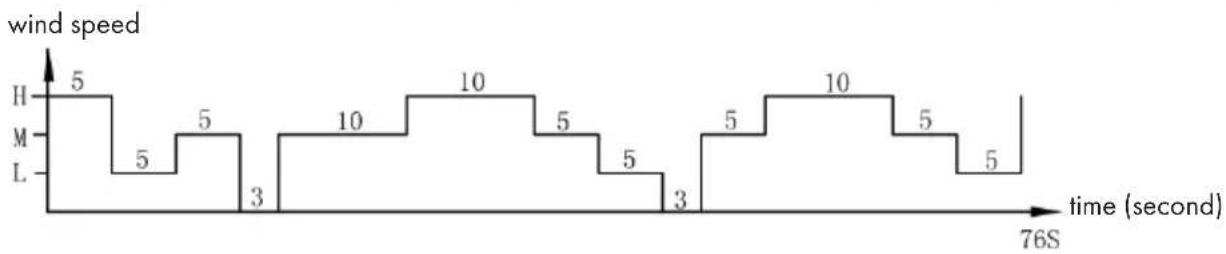
line
| Time (second) | Wind Speed | |---|---| | 0 | 5 | | 1 | 5 | | 2 | 5 | | 3 | 3 | | 4 | 10 | | 5 | 10 | | 6 | 5 | | 7 | 5 | | 8 | 3 | | 9 | 5 | | 10 | 10 | | 11 | 5 | | 12 | 5 | | 13 | 5 | 76S at start.Natural mode in medium speed
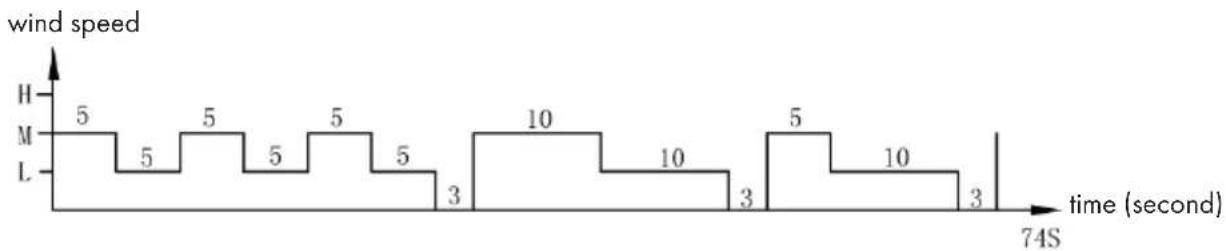
line
| Time (second) | Wind Speed | |---|---| | 0 | 5 | | 1 | 5 | | 2 | 5 | | 3 | 5 | | 4 | 5 | | 5 | 3 | | 6 | 10 | | 7 | 10 | | 8 | 3 | | 9 | 5 | | 10 | 10 | | 11 | 3 | | 12 | 3 | | 13 | 3 | 74SNatural mode in low speed
line
| time (second) | wind speed | | ------------- | ---------- | | 10 | 10 | | 5 | 5 | | 10 | 10 | | 5 | 5 | | 3 | 3 | | 10 | 10 | | 5 | 5 | | 3 | 5 | | 5 | 3 | | 5 | 5 | | 3 | 3 |Example: Wind pattern for natural mode in high speed
The motor will run in high speed at an interval of 5 seconds, in mid speed at an interval of 5 seconds, runs to low speed per 5 seconds, then stops 3 seconds without any wind.
And again the motor runs in mid speed 10 seconds, then to high speed for 10 seconds, then in mid speed 5 seconds, then runs to low speed for 5 seconds, then stops 3 seconds!
Again the motor runs to mid speed for 5 seconds, then in high speed for 10 seconds, then runs to mid speed for 5 seconds, then in low speed for 5 seconds.
The whole cycle lasts 76 seconds and is repeated continuously.
2. Night mode
In this mode, the speed is gradually reduced, depending on the set speed. The exact wind scheme is as follows:
Night mode in natural wind of high speed

line
| time (hour) | wind speed | | ----------- | ---------- | | 0.0 | H | | 0.1 | M | | 0.2 | L | | 0.3 | H | | 0.4 | M | | 0.5 | H | | 0.6 | L | | 0.7 | H | | 0.8 | M | | 0.9 | L | | 1.0 | H | | 1.1 | M | | 1.2 | L | | 1.3 | H | | 1.4 | M | | 1.5 | L |When in night mode, for instance, if you set high speed with natural mode, the motor will run 30 minutes in high speed under natural wind mode first, then 30 minutes in mid speed under natural wind mode, then to low speed and keep this speed until the end.
Night mode in natural wind of medium speed

line
| time (hour) | wind speed | | ----------- | ---------- | | 0.0 | H | | 0.1 | M | | 0.2 | L | | 0.3 | H | | 0.4 | M | | 0.5 | H | | 0.6 | L | | 0.7 | H | | 0.8 | M | | 0.9 | L | | 1.0 | H | | 1.1 | M | | 1.2 | L | | 1.3 | H | | 1.4 | M | | 1.5 | L | | 1.6 | H | | 1.7 | M | | 1.8 | L | | 1.9 | H | | 2.0 | M | | 2.1 | L | | 2.2 | H | | 2.3 | M | | 2.4 | L | | 2.5 | H | | 2.6 | M | | 2.7 | L | | 2.8 | H | | 2.9 | M | | 3.0 | L | | 3.1 | H | | 3.2 | M | | 3.3 | L | | 3.4 | H | | 3.5 | M | | 3.6 | L | | 3.7 | H | | 3.8 | M | | 3.9 | L | | 4.0 | H | | 4.1 | M | | 4.2 | L | | 4.3 | H | | 4.4 | M | | 4.5 | L | | 4.6 | H | | 4.7 | M | | 4.8 | L | | 4.9 | H | | 5.0 | M | | 5.1 | L | | 5.2 | H | | 5.3 | M | | 5.4 | L | | 5.5 | H | | 5.6 | M | | 5.7 | L | | 5.8 | H | | 5.9 | M | | 6.0 | L | | 6.1 | H | | 6.2 | M | | 6.3 | L | | 6.4 | H | | 6.5 | M | | 6.6 | L | | 6.7 | H | | 6.8 | M | | 6.9 | L | | 7.0 | H | | 7.1 | M | | 7.2 | L | | 7.3 | H | | 7.4 | M | | 7.5 | L | | 7.6 | H | | 7.7 | M | | 7.8 | L | | 7.9 | H | | 8.0 | M | | 8.1 | L | | 8.2 | H | | 8.3 | M | | 8.4 | L | | 8.5 | H | | 8.6 | M | | 8.7 | L | | 8.8 | H | | 8.9 | M | | 9.0 | L | | 9.1 | H | | 9.2 | M | | 9.3 | L | | 9.4 | H | | 9.5 | M | | 9.6 | L | | 9.7 | H | | 9.8 | M | | 9.9 | L | | 10.0 | H | | 10.1 | M | | 10.2 | L | | 10.3 | H | | 10.4 | M | | 10.5 | L | | 10.6 | H | | 10.7 | M | | 10.8 | L | | 10.9 | H | | 11.0 | M | | 11.1 | L | | 11.2 | H | | 11.3 | M | | 11.4 | L | | 11.5 | H | | 11.6 | M | | 11.7 | L | | 11.8 | H | | 11.9 | M | | 12.0 | L | | 12.1 | H | | 12.2 | M | | 12.3 | L | | 12.4 | H | | 12.5 | M | | 12.6 | L | | 12.7 | H | | 12.8 | M | | 12.9 | L | | 13.0 | H | | 13.1 | M | | 13.2 | L | | 13.3 | H | | 13.4 | M | | 13.5 | L | | 13.6 | H | | 13.7 | M | | 13.8 | L | | 13.9 | H | | 14.0 | M | | 14.1 | L | | 14.2 | H | | 14.3 | M | | 14.4 | L | | 14.5 | H | | 14.6 | M | | 14.7 | L | | 14.8 | H | | 14.9 | M | | 15.0 | L | | 15.1 | H | | 15.2 | M | | 15.3 | L | | 15.4 | H | | 15.5 | M | | 15.6 | L | | 15.7 | H | | 15.8 | M | | 15.9 | L | | 16.0 | H | | 16.1 | M | | 16.2 | L | | 16.3 | H | | 16.4 | M | | 16.5 | L | | 16.6 | H | | 16.7 | M | | 16.8 | L | | 16.9 | H | | 17.0 | M | | 17.1 | L | | 17.2 | H | | 17.3 | M | | 17.4 | L | | 17.5 | H | | 17.6 | M | | 17.7 | L | | 17.8 | H | | 17.9 | M | | 18.0 | L | | 18.1 | H | | 18.2 | M | | 18.3 | L | | 18.4 | H | | 18.5 | M | | 18.6 | L | | 18.7 | H | | 18.8 | M | | 18.9 | L | | 19.0 | H | | 19.1 | M | | 19.2 | L | | 19.3 | H | | 19.4 | M | | 19.5 | L | | 19.6 | H | | 19.7 | M | | 19.8 | L | | 19.9 | H | | 20.0 | M | | \ | |If you set mid speed with night mode, the motor will run 30 minutes in mid speed under natural wind mode first, then to low speed and keep this speed until the end.
Night mode in natural wind of low speed

line
| time (hour) | wind speed | | ----------- | ---------- | | 0 | H | | 1 | M | | 2 | L | | 3 | H | | 4 | M | | 5 | L | | 6 | H | | 7 | M | | 8 | L | | 9 | H | | 10 | M | | 11 | L | | 12 | H | | 13 | M | | 14 | L | | 15 | H | | 16 | M | | 17 | L | | 18 | H | | 19 | M | | 20 | L | | 21 | H | | 22 | M | | 23 | L | | 24 | H | | 25 | M | | 26 | L | | 27 | H | | 28 | M | | 29 | L | | 30 | H | | 31 | M | | 32 | L | | 33 | H | | 34 | M | | 35 | L | | 36 | H | | 37 | M | | 38 | L | | 39 | H | | 40 | M | | 41 | L | | 42 | H | | 43 | M | | 44 | L | | 45 | H | | 46 | M | | 47 | L | | 48 | H | | 49 | M | | 50 | L | | 51 | H | | 52 | M | | 53 | L | | 54 | H | | 55 | M | | 56 | L | | 57 | H | | 58 | M | | 59 | L | | 60 | H | | 61 | M | | 62 | L | | 63 | H | | 64 | M | | 65 | L | | 66 | H | | 67 | M | | 68 | L | | 69 | H | | 70 | M | | 71 | L | | 72 | H | | 73 | M | | 74 | L | | 75 | H | | 76 | M | | 77 | L | | 78 | H | | 79 | M | | 80 | L | | 81 | H | | 82 | M | | 83 | L | | 84 | H | | 85 | M | | 86 | L | | 87 | H | | 88 | M | | 89 | L | | 90 | H | | 91 | M | | 92 | L | | 93 | H | | 94 | M | | 95 | L | | 96 | H | | 97 | M | | 98 | L | | 99 | H | | 100 | M |If it's low speed with night mode at the very first time, it will keep this speed all the time.
Note: It is recommended to select the low speed mode for night mode when sleeping, as this mode is intended to give the user a more comfortable feeling of wind. If you run the appliance at a high speed all the time in night mode, you may feel uncomfortable and get cold at night.
DEVICE CONTROL BY SMARTPHONE
If you integrate the device into your home WiFi, you can conveniently operate it via the associated Klarstein app. The app not only allows you to remotely control the device via your smartphone, but also gives you access to recipes and additional information.
Follow these steps to connect your smartphone to your Klarstein device:
1 Download the Klarstein app first by scanning the QR code with your smartphone (see below), or download it directly from App Store or Google Play.
2 Make sure your smartphone is connected to the same WiFi network that your Klarstein device is to be connected to.
3 Open the Klarstein app.
4 Sign in to your account. If you do not have an account, sign up in the Klarstein app.
5 Follow the instructions from the app.
App Download
Use the scan function of your smartphone to scan the QR code and save the app on your smartphone.
Note: The app provides further information on how to use the app and help on how to connect to your device as soon as you open it for the first time.
| iOS Android | |
 |  |
Troubleshooting connection problems
If your Klarstein device cannot be found in the WLAN, check the following:
1 The device is not plugged in. Make sure that your device is plugged into an electric socket.
2 The device is not in pairing mode. Make sure that the WiFi indicator (LED) on the smart device control panel is blinking as described in the 'Reset WiFi settings' instruction of your smart device (instructions are usually available on device connection process).
3 The WiFi access point does not operate on 2.4 GHz. Make sure that your access point operates on 2.4 GHz band and you have a separate SSID on 2.4 GHz band. If you are not sure about the operating band of your access point, please contact your internet provider company.
Important: please note that if your WiFi router is dual band - operating on both 2.4 GHz and 5 GHz band - you need to separate the SSIDs for each band and use the 2.4 GHz SSID for connection.
4 Firewall settings of your WiFi network; the firewall setting of your WiFi network may not allow the Klarstein app to configure the WiFi settings on your smart device. Please make sure that you are not using a public WiFi network, e.g. airports, dormitories, companies, etc.
5 Different credentials used in smartphone and the app. Make sure that the WiFi credentials entered in the Klarstein app are the same as the ones that your smartphone is connected to.
Following the above mentioned points, if your smart device still fails to connect to the app, please contact us via email for support: appsupport@go-bbg.com
CLEANING AND MAINTENANCE
- Regular cleaning and maintenance is important to increase the life of the appliance.
- Switch off the appliance and always unplug the appliance before cleaning it.
Cleaning the appliance
Clean the surface of the appliance with a damp cloth. Do not use abrasive cleaners or harsh detergents and solvents.
Cleaning the water tank
• Pull out the water tank as described in the instructions.
- Clean it with a damp cloth and washing-up liquid and remove any deposits.
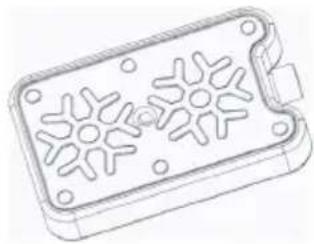
Cleaning the dustproof filter and the Cooler Master filter
To avoid overloading the dust protection filter, clean the filter at least once a month.
- Remove the dustproof filter and turn the cooling pad knob as shown in the illustration.
- Clean the dustproof filter with a detergent or a soft brush.
- Switch off the appliance, clean the cooling pad in detergent water, then rinse it with water and let it dry.

natural_image
Technical line drawing of a cylindrical industrial device with internal components and three side-view views (no text or symbols)Install filters
- Reinstall the filters in the following order, one after the other: Water tank, CoolerMaster and dustproof filter.
- Connect the appliance to make sure it is working.
- Check that the dustproof filter is correctly installed.
Storage
- Unplug the appliance and repack it to protect it from dust if you are not going to use it for a long time.
- Make sure the cooling pad, filter and water tank are dry before packing.
- Store the appliance in a dry and well-ventilated place.
TROUBLESHOOTING
| Problem Possible Cause(s) | Possible Solution | |
| There is no airflow. The power cord is not plugged in. | Check to make sure the plug is plugged into an outlet. The unit should beep twice once the power supply is connected. | |
| The water tank is not locked into the unit. | ||
| The unit does not cool at all. | There is insufficient water in the tank. | Check the water level in the tank and make sure there is enough water. |
| The cooler/humidifier button was not pressed. | Press the COOLER/HUMIDIFIER button. | |
| The pump is defective. Contact customer service if there is an issue with the water pump. | ||
| Cooling is not sufficient. The cooling pad is not sufficiently saturated with water. | Wait a few minutes for the cooling pad to be fully saturated with water. | |
DISPOSAL CONSIDERATIONS
natural_image
Symbol of a trash bin crossed with a diagonal line, no text or numbers presentIf there is a legal regulation for the disposal of electrical and electronic devices in your country, this symbol on the product or on the packaging indicates that this product must not be disposed of with household waste. Instead, it must be taken to a collection point for the recycling of electrical and electronic equipment. By disposing of it in accordance with the rules, you are protecting the environment and the health of your fellow human beings from negative consequences. For information about the recycling and disposal of this product, please contact your local authority or your household waste disposal service.
This product contains batteries. If there is a legal regulation for the disposal of batteries in your country, the batteries must not be disposed of with household waste. Find out about local regulations for disposing of batteries. By disposing of them in accordance with the rules, you are protecting the environment and the health of your fellow human beings from negative consequences.
DECLARATION OF CONFORMITY
CE UK CA
Manufacturer:
Chal-Tec GmbH, Wallstrasse 16, 10179 Berlin, Germany.
Importer for Great Britain:
Berlin Brands Group UK Ltd
PO Box 1145
Oxford, OX1 9UW
United Kingdom
Hereby, Chal-Tec GmbH declares that the radio equipment type Skyscraper Ice Smart is in compliance with Directive 2014/53/EU. The full text of the EU declaration of conformity is available at the following internet address: use.berlin/10040205
For Great Britain: Hereby, Chal-Tec GmbH declares that the radio equipment type Skyscraper Ice Smart is in compliance with the relevant statutory requirements. The full text of the declaration of conformity is available at the following internet address: use. berlin/10040205
Cher client, chère cliente,
text_image
QR code image containing encoded data, no visible human-readable textSOMMAIRE
text_image
Technical diagram of a vertical fan or air conditioner unit with numbered components labeled 1 through 6.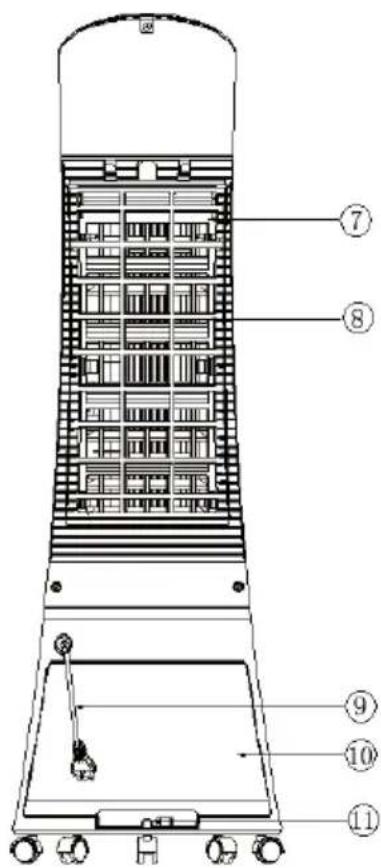
text_image
Technical diagram of a vertical industrial vessel with numbered components for identificationnatural_image
Three technical line drawings of industrial equipment or storage units, showing vertical structures with no visible text or symbols.natural_image
Simple line drawing of a rectangular frame with a vertical oval cutout and a small base (no text or symbols)natural_image
3D rendered image of a light green plastic device with star-like cutouts and a central hole (no text or symbols)natural_image
Diagram of a stylized device with icons for wireless, air, fan, and cloud (no text or labels)line
| Durée (heure) | Vitesse du vent | | ------------- | -------------- | | 0.0 | H | | 0.1 | M | | 0.2 | L | | 0.3 | H | | 0.4 | M | | 0.5 | H | | 0.6 | M | | 0.7 | H | | 0.8 | M | | 0.9 | H | | 1.0 | H | | 1.1 | M | | 1.2 | M | | 1.3 | H | | 1.4 | M | | 1.5 | L |line
| Time (hour) | Vitesse du vent (m/s) | |-------------|----------------------| | 0 | H | | 1 | M | | 2 | L | | 3 | H | | 4 | M | | 5 | L | | 6 | H | | 7 | M | | 8 | L | | 9 | H | | 10 | M | | 11 | L | | 12 | H | | 13 | M | | 14 | L | | 15 | H | | 16 | M | | 17 | L | | 18 | H | | 19 | M | | 20 | L | | 21 | H | | 22 | M | | 23 | L | | 24 | H | | 25 | M | | 26 | L | | 27 | H | | 28 | M | | 29 | L | | 30 | H | | 31 | M | | 32 | L | | 33 | H | | 34 | M | | 35 | L | | 36 | H | | 37 | M | | 38 | L | | 39 | H | | 40 | M | | 41 | L | | 42 | H | | 43 | M | | 44 | L | | 45 | H | | 46 | M | | 47 | L | | 48 | H | | 49 | M | | 50 | L | | 51 | H | | 52 | M | | 53 | L | | 54 | H | | 55 | M | | 56 | L | | 57 | H | | 58 | M | | 59 | L | | 60 | H | | 61 | M | | 62 | L | | 63 | H | | 64 | M | | 65 | L | | 66 | H | | 67 | M | | 68 | L | | 69 | H | | 70 | M | | 71 | L | | 72 | H | | 73 | M | | 74 | L | | 75 | H | | 76 | M | | 77 | L | | 78 | H | | 79 | M | | 80 | L | | 81 | H | | 82 | M | | 83 | L | | 84 | H | | 85 | M | | 86 | L | | 87 | H | | 88 | M | | 89 | L | | 90 | H | | 91 | M | | 92 | L | | 93 | H | | 94 | M | | 95 | L | | 96 | H | | 97 | M | | 98 | L | | 99 | H | | 100 | M |line
| Hour | Value | |------|-------| | 0 | H | | 1 | L | | 2 | M | | 3 | H | | 4 | L | | 5 | M | | 6 | H | | 7 | L | | 8 | M | | 9 | H | | 10 | L | | 11 | M | | 12 | H | | 13 | L | | 14 | M | | 15 | H | | 16 | L | | 17 | M | | 18 | H | | 19 | L | | 20 | M | | 21 | H | | 22 | L | | 23 | M | | 24 | H | | 25 | L | | 26 | M | | 27 | H | | 28 | L | | 29 | M | | 30 | H | | 31 | L | | 32 | M | | 33 | H | | 34 | L | | 35 | M | | 36 | H | | 37 | L | | 38 | M | | 39 | H | | 40 | L | | 41 | M | | 42 | H | | 43 | L | | 44 | M | | 45 | H | | 46 | L | | 47 | M | | 48 | H | | 49 | L | | 50 | M | | 51 | H | | 52 | L | | 53 | M | | 54 | H | | 55 | L | | 56 | M | | 57 | H | | 58 | L | | 59 | M | | 60 | H | | 61 | L | | 62 | M | | 63 | H | | 64 | L | | 65 | M | | 66 | H | | 67 | L | | 68 | M | | 69 | H | | 70 | L | | 71 | M | | 72 | H | | 73 | L | | 74 | M | | 75 | H | | 76 | L | | 77 | M | | 78 | H | | 79 | L | | 80 | M | | 81 | H | | 82 | L | | 83 | M | | 84 | H | | 85 | L | | 86 | M | | 87 | H | | 88 | L | | 89 | M | | 90 | H | | 91 | L | | 92 | M | | 93 | H | | 94 | L | | 95 | M | | 96 | H | | 97 | L | | 98 | M | | 99 | H | | 100 | L |natural_image
Technical line drawing of a cylindrical industrial device with internal components and three separate views (no text or symbols)natural_image
Symbol of a trash bin crossed with a diagonal line, no text or numbers presentDÉCLARATION DE CONFORMITÉ

text_image
CE UK CAFabricant :
Chal-Tec GmbH, Wallstraße 16, 10179 Berlin, Allemagne.
Berlin Brands Group UK Ltd
PO Box 1145
Oxford, OX1 9UW
United Kingdom
text_image
QR code image containing encoded data, no visible human-readable textÍNDICE
text_image
Technical diagram of a vertical fan or air conditioner unit with numbered components labeled 1 through 6.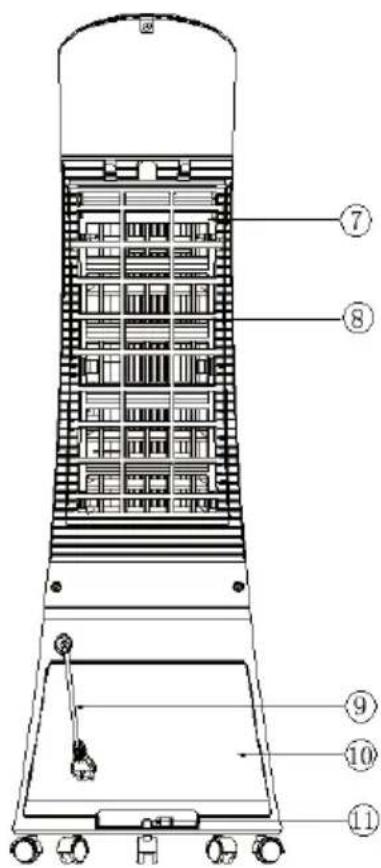
text_image
Technical diagram of a vertical industrial vessel with numbered components for identificationnatural_image
Three technical line drawings of industrial equipment or storage units, showing front, side, and top views with no visible text or symbols.natural_image
Simple line drawing of a rectangular frame with a vertical oval cutout and a small base (no text or symbols)natural_image
3D rendered image of a light green plastic electronic component with no visible text or symbolsnatural_image
Diagram of a stylized device with icons for wireless, air, fan, and cloud (no text or labels)line
| Time Period | Value | | ----------- | ----- | | H | 5 | | M | 5 | | L | 3 | | M | 10 | | L | 5 | | M | 10 | | L | 5 | | M | 3 | | L | 5 | | Tiempo | 10 | | 76S | 5 |line
| Tiempo (hora) | Velocidad de ventilación | | ------------- | ------------------------ | | 0 | H | | 1 | M | | 2 | L | | 3 | H | | 4 | M | | 5 | L | | 6 | H | | 7 | M | | 8 | L | | 9 | H | | 10 | M | | 11 | L | | 12 | H | | 13 | M | | 14 | L | | 15 | H | | 16 | M | | 17 | L | | 18 | H | | 19 | M | | 20 | L | | 21 | H | | 22 | M | | 23 | L | | 24 | H | | 25 | M | | 26 | L | | 27 | H | | 28 | M | | 29 | L | | 30 | H | | 31 | M | | 32 | L | | 33 | H | | 34 | M | | 35 | L | | 36 | H | | 37 | M | | 38 | L | | 39 | H | | 40 | M | | 41 | L | | 42 | H | | 43 | M | | 44 | L | | 45 | H | | 46 | M | | 47 | L | | 48 | H | | 49 | M | | 50 | L | | 51 | H | | 52 | M | | 53 | L | | 54 | H | | 55 | M | | 56 | L | | 57 | H | | 58 | M | | 59 | L | | 60 | H | | 61 | M | | 62 | L | | 63 | H | | 64 | M | | 65 | L | | 66 | H | | 67 | M | | 68 | L | | 69 | H | | 70 | M | | 71 | L | | 72 | H | | 73 | M | | 74 | L | | 75 | H | | 76 | M | | 77 | L | | 78 | H | | 79 | M | | 80 | L | | 81 | H | | 82 | M | | 83 | L | | 84 | H | | 85 | M | | 86 | L | | 87 | H | | 88 | M | | 89 | L | | 90 | H | | 91 | M | | 92 | L | | 93 | H | | 94 | M | | 95 | L | | 96 | H | | 97 | M | | 98 | L | | 99 | H | | 100 | M |line
| Tiempo (hora) | Velocidad de ventilación | | ------------- | ------------------------ | | 0 | H | | 1 | M | | 2 | L | | 3 | H | | 4 | M | | 5 | L | | 6 | H | | 7 | M | | 8 | L | | 9 | H | | 10 | M | | 11 | L | | 12 | H | | 13 | M | | 14 | L | | 15 | H | | 16 | M | | 17 | L | | 18 | H | | 19 | M | | 20 | L | | 21 | H | | 22 | M | | 23 | L | | 24 | H | | 25 | M | | 26 | L | | 27 | H | | 28 | M | | 29 | L | | 30 | H | | 31 | M | | 32 | L | | 33 | H | | 34 | M | | 35 | L | | 36 | H | | 37 | M | | 38 | L | | 39 | H | | 40 | M | | 41 | L | | 42 | H | | 43 | M | | 44 | L | | 45 | H | | 46 | M | | 47 | L | | 48 | H | | 49 | M | | 50 | L | | 51 | H | | 52 | M | | 53 | L | | 54 | H | | 55 | M | | 56 | L | | 57 | H | | 58 | M | | 59 | L | | 60 | H | | 61 | M | | 62 | L | | 63 | H | | 64 | M | | 65 | L | | 66 | H | | 67 | M | | 68 | L | | 69 | H | | 70 | M | | 71 | L | | 72 | H | | 73 | M | | 74 | L | | 75 | H | | 76 | M | | 77 | L | | 78 | H | | 79 | M | | 80 | L | | 81 | H | | 82 | M | | 83 | L | | 84 | H | | 85 | M | | 86 | L | | 87 | H | | 88 | M | | 89 | L | | 90 | H | | 91 | M | | 92 | L | | 93 | H | | 94 | M | | 95 | L | | 96 | H | | 97 | M | | 98 | L | | 99 | H | | 100 | M |natural_image
Technical line drawing of a cylindrical industrial device with internal components and three side-view views (no text or symbols)Instalar el filtro
natural_image
Symbol of a trash bin crossed with a diagonal line, no text or numbers presentBerlin Brands Group UK Ltd
PO Box 1145
Oxford, OX1 9UW
United Kingdom
text_image
QR code image containing encoded data, no visible human-readable textINDICE
text_image
Technical diagram of a vertical fan or air conditioner unit with numbered components labeled 1 through 6.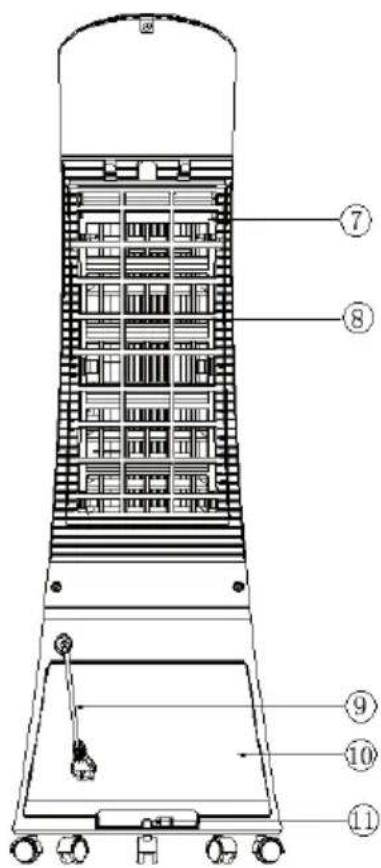
text_image
Technical diagram of a vertical industrial vessel with numbered components for identificationnatural_image
Three technical line drawings of industrial air purifiers with structural panels and mounting base (no text or symbols)natural_image
Simple line drawing of a rectangular frame with a vertical oval cutout and a small base (no text or symbols)natural_image
3D rendered image of a light green plastic electronic component with no visible text or symbolsnatural_image
Diagram of a stylized device with icons for wireless, air, fan, and cloud (no text or labels)natural_image
Technical line drawing of a cylindrical industrial device with internal components and three side-view views (no text or symbols)natural_image
Symbol of a trash bin crossed with a diagonal line, no text or numbers presentBerlin Brands Group UK Ltd
PO Box 1145
Oxford, OX1 9UW
United Kingdom