
AirSecure CO2WM110 - Multimeter ABUS - Free user manual and instructions
Find the device manual for free AirSecure CO2WM110 ABUS in PDF.
| Product type | Multimeter (CO2 detector) |
| Brand | ABUS |
| Model | AirSecure CO2WM110 |
| Power supply | AC adapter 100-240 V, output DC 5 V/1 A via Micro-USB; integrated lithium-ion battery 3.7 V, 1000 mAh (backup) |
| CO2 sensor type | Non-dispersive infrared (NDIR) sensor |
| CO2 sensor lifetime | Max. 10 years |
| CO2 measurement range | 0 – 5000 ppm |
| CO2 resolution | 1 ppm |
| CO2 accuracy | ±100 ppm or ±10% of measured value (whichever is higher) |
| Operating temperature | -10 °C to 40 °C |
| Operating humidity | 0% to 95% (non-condensing) |
| Mounting | Wall or tabletop stand |
| Display | Backlit display with multiple menus (temperature, humidity, CO2, date/time, settings) |
| Languages | English, German, French, Dutch, Italian, Spanish |
| Alarm | LED (green, yellow, red) and audible (30 s) based on CO2 level; configurable alarm |
| Do Not Disturb function | Yes, programmable (default 22:00 – 08:00) |
| Calibration | Manual outdoor (fresh air, ~500 ppm) – duration ~16 minutes |
| Package contents | Detector, Micro-USB cable, AC adapter, screws and wall plugs, manual |
| Cleaning | Vacuum the air inlets; surface with a damp cloth (soapy water) |
| Warranty | 2 years |
| Compliance | EU (directives 2014/35/EU, 2014/30/EU, 2011/65/EU) |
Frequently Asked Questions - AirSecure CO2WM110 ABUS
User questions about AirSecure CO2WM110 ABUS
0 question about this device. Answer the ones you know or ask your own.
Ask a new question about this device
Download the instructions for your Multimeter in PDF format for free! Find your manual AirSecure CO2WM110 - ABUS and take your electronic device back in hand. On this page are published all the documents necessary for the use of your device. AirSecure CO2WM110 by ABUS.
USER MANUAL AirSecure CO2WM110 ABUS
Security Tech Germany
Bedienungsanleitung
Scope of delivery, Display and controls
Scope of delivery
- ABUS AirSecure™ 1000 mAh 3,7 V lithium-ion battery carbon dioxide alarm CO2WM110 (built in backup battery)
- Micro-USB-cable - AC adapter (5 V/1 A output)
- This manual - Installation material: Screws, dowels

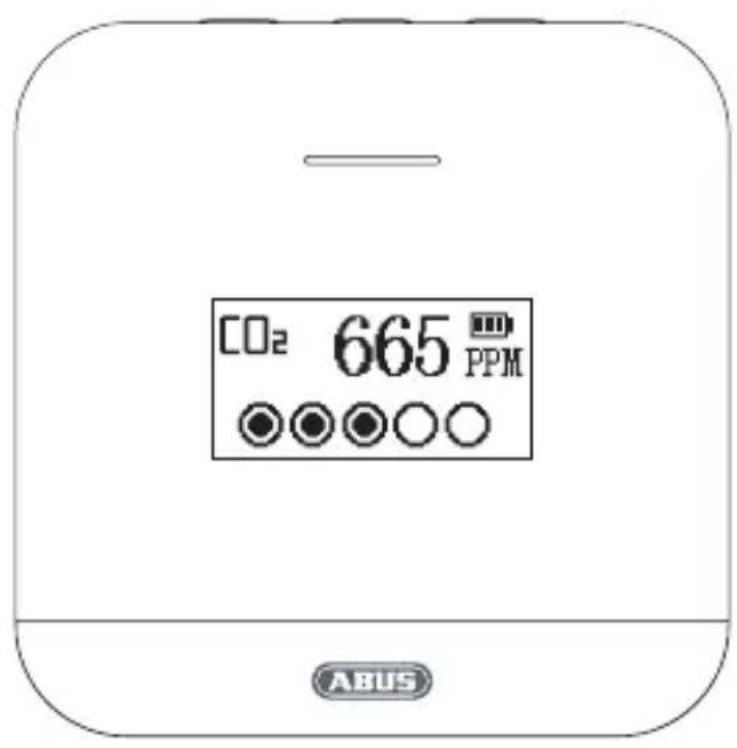
Display and controls
OLED display


A: Inlet opening for CO, measurement
B: Inlet opening for temperature- and humidity-measurement
C:
Connec tion for
micro
USB cable
Intended use, Start-up Installation
Intended use
Only use the device for the purpose for which it was built and designed. Any other use is not considered to be the intended use!
This device may only be used for the following purpose:
- Measuring carbon dioxide content, temperature and humidity in privately used indoor spaces.
Poor indoor air is considered unhealthy. It can cause drowsiness, lack of concentration and illness.
Reference values for carbon dioxide
250-350 ppm: normal ambient outdoor concentrations
600 ppm: minimum air quality impairment
600-1000 ppm: high air quality impairment
1000 ppm: indicates insufficient ventilation; complaints such as headaches, fatigue or irritation of the eyes and throat can occur.
1000 ppm should be the upper limit for the CO_2 concentration in the room.
Start-up
Before using the detector for the first time, please read the following instructions carefully and observe all warnings, even if you are familiar with the use of electronic devices.
- Store and operate the detector in a dry place out of direct sunlight to protect the components inside the detector
- Before using the carbon dioxide detector for the first time, set it up in a well-ventilated environment
- In order to maintain the best performance of your detector, please use it for at least 24 hours of permanent operation
- Do not cover the detector and in particular do not block the air inlets while
the detector is active
- Keep water and other liquids away from the detector as it is not waterproof
- Do not insert sharp, flammable or metallic objects into the air inlets as this can result in an electric shock or burns
- Power should be supplied via the micro-USB cable and the AC adapter; the internal, built-in battery is only used for emergency power supply
- The detector can be mounted on the wall or set up with the table base
- If the device has been dropped or otherwise damaged, it may not be used anymore
- The device must not be opened or repaired. Failure to comply will invalidate the warranty
Wall installation:
- mark the drill holes horizontally with the enclosed template and a spirit level
- drill the holes with a 5mm drill bit. Important: do not damage any cables when drilling and keep the detector away from drilling dusts
- push the plastic dowels into the drilled holes and screw in the screws until the screw heads protrude approx. 5 mm


Installation, Operating buttons and display symbols Operating buttons and display symbols
Stand mounting:
- fold out the table base on the underside of the housing and place the detector on a flat and dust-free surface
- ensure that the detector is stable and that no objects interfere with the penetration of CO_2 into the detector
Operating buttons

- Power on/off with a long press (approx. 3 seconds)
- Mute
- Switch on display with a short press
- In setup mode: Move one position to the right
- In setup mode: Increase value(s) by one
- In the normal state: Change pages

- Enter the setup mode by pressing and holding (approx. 3 seconds)
- Switch the display off/on by pressing briefly
- Save and exit settings by pressing briefly
- Mute

- In setup mode: Move one position to the left
- In setup mode: Decrease value by one
- In the normal state: Change pages
- Switch on display with a short press
- Mute
OLED display symbols

Air temperature

Relative humidity

Degrees Celsius

Degrees Fahrenheit

Carbon dioxide (CO_2)

CO2 content in parts per million (proportions of CO2 per million molecules in the air)

Carbon dioxide content good

Carbon dioxide content normal

Carbon dioxide content poor

Battery level: more than 75% charged

Battery level: 50-75% charged

Battery level: 25-50% charged

Battery level: almost empty (the "power" symbol will flash)

Go back

Selection

Set time and date

Manual language selection

Set CO_2 level

Set temperature and humidity levels

Do not disturb

CO_2 alarm history

Set temperature unit (^ / ^)

English

German

French

Dutch

Italian

Spanish

Set minimum value

Set maximum value

Start time

End time
Operating buttons and display symbols Operating buttons and display symbols
Menu pages of the OLED display
- When the detector is switched on, the "Temperature and humidity" menu will appear first
- In standby mode, press the "+" or "-" button to go to the next / previous page
| 23.4℃ 50.6% | CDe 665 PPM | 2021/01/15 17:24:12 |
| Menu 1: Temperature and humidity | Menu 2: Carbon dioxide content | Menu 3: Date and time |
| A Language EN DE FR NL IT ES | A LANGUAGE EN DE FR NL IT ES | A Language EN DE FR NL IT ES 17:25:51 |
| Menu 4: Settings | Menu 5: Set language | Menu 6: Set date and time |
| Min Max 8℃ 19127 4℃ 30180 | 22:00 08:00 | COS FPM Min: 500 Max: 1200 |
| Menu 7: Set value for temperature and humidity alarm | Menu 8: Set "Do not disturb" time | Menu 9: Set max. and min. value for CO2alarm |
| 2021/01/12 19:25:07 20.5℃ 129.9% 02:15:57 784PPM | ℃ ℃ F | Err(!!) |
| Menu 10: View alarm history | Menu 11: Set temperature unit | Menu 12: Sensor error |
-24-
LED display and tones
- When powered via AC adapter:
| Status LED Display Sound | |||
| Screen off, CO2content good | flashes green | - | - |
| every 5 seconds | |||
| Screen on, CO2content good | lights up green normal - | ||
| Screen off, CO2content normal | flashes yellow | - | - |
| every 5 seconds | |||
| Screen on, CO2content normal | lights up | normal - | |
| yellow | |||
| Screen off, CO2content poor | flashes red | - | - |
| every 5 seconds | |||
| Screen on, CO2content poor | lights up red normal - | ||
| CO2content fromgood to normal | flashes yellow | data flashing | - |
| 30 seconds | 30 seconds | ||
| CO2content changeto poor | flashes red 30seconds | data flashing30 seconds | alarm tone for30 seconds |
-25-
Operating buttons and display symbols Settings
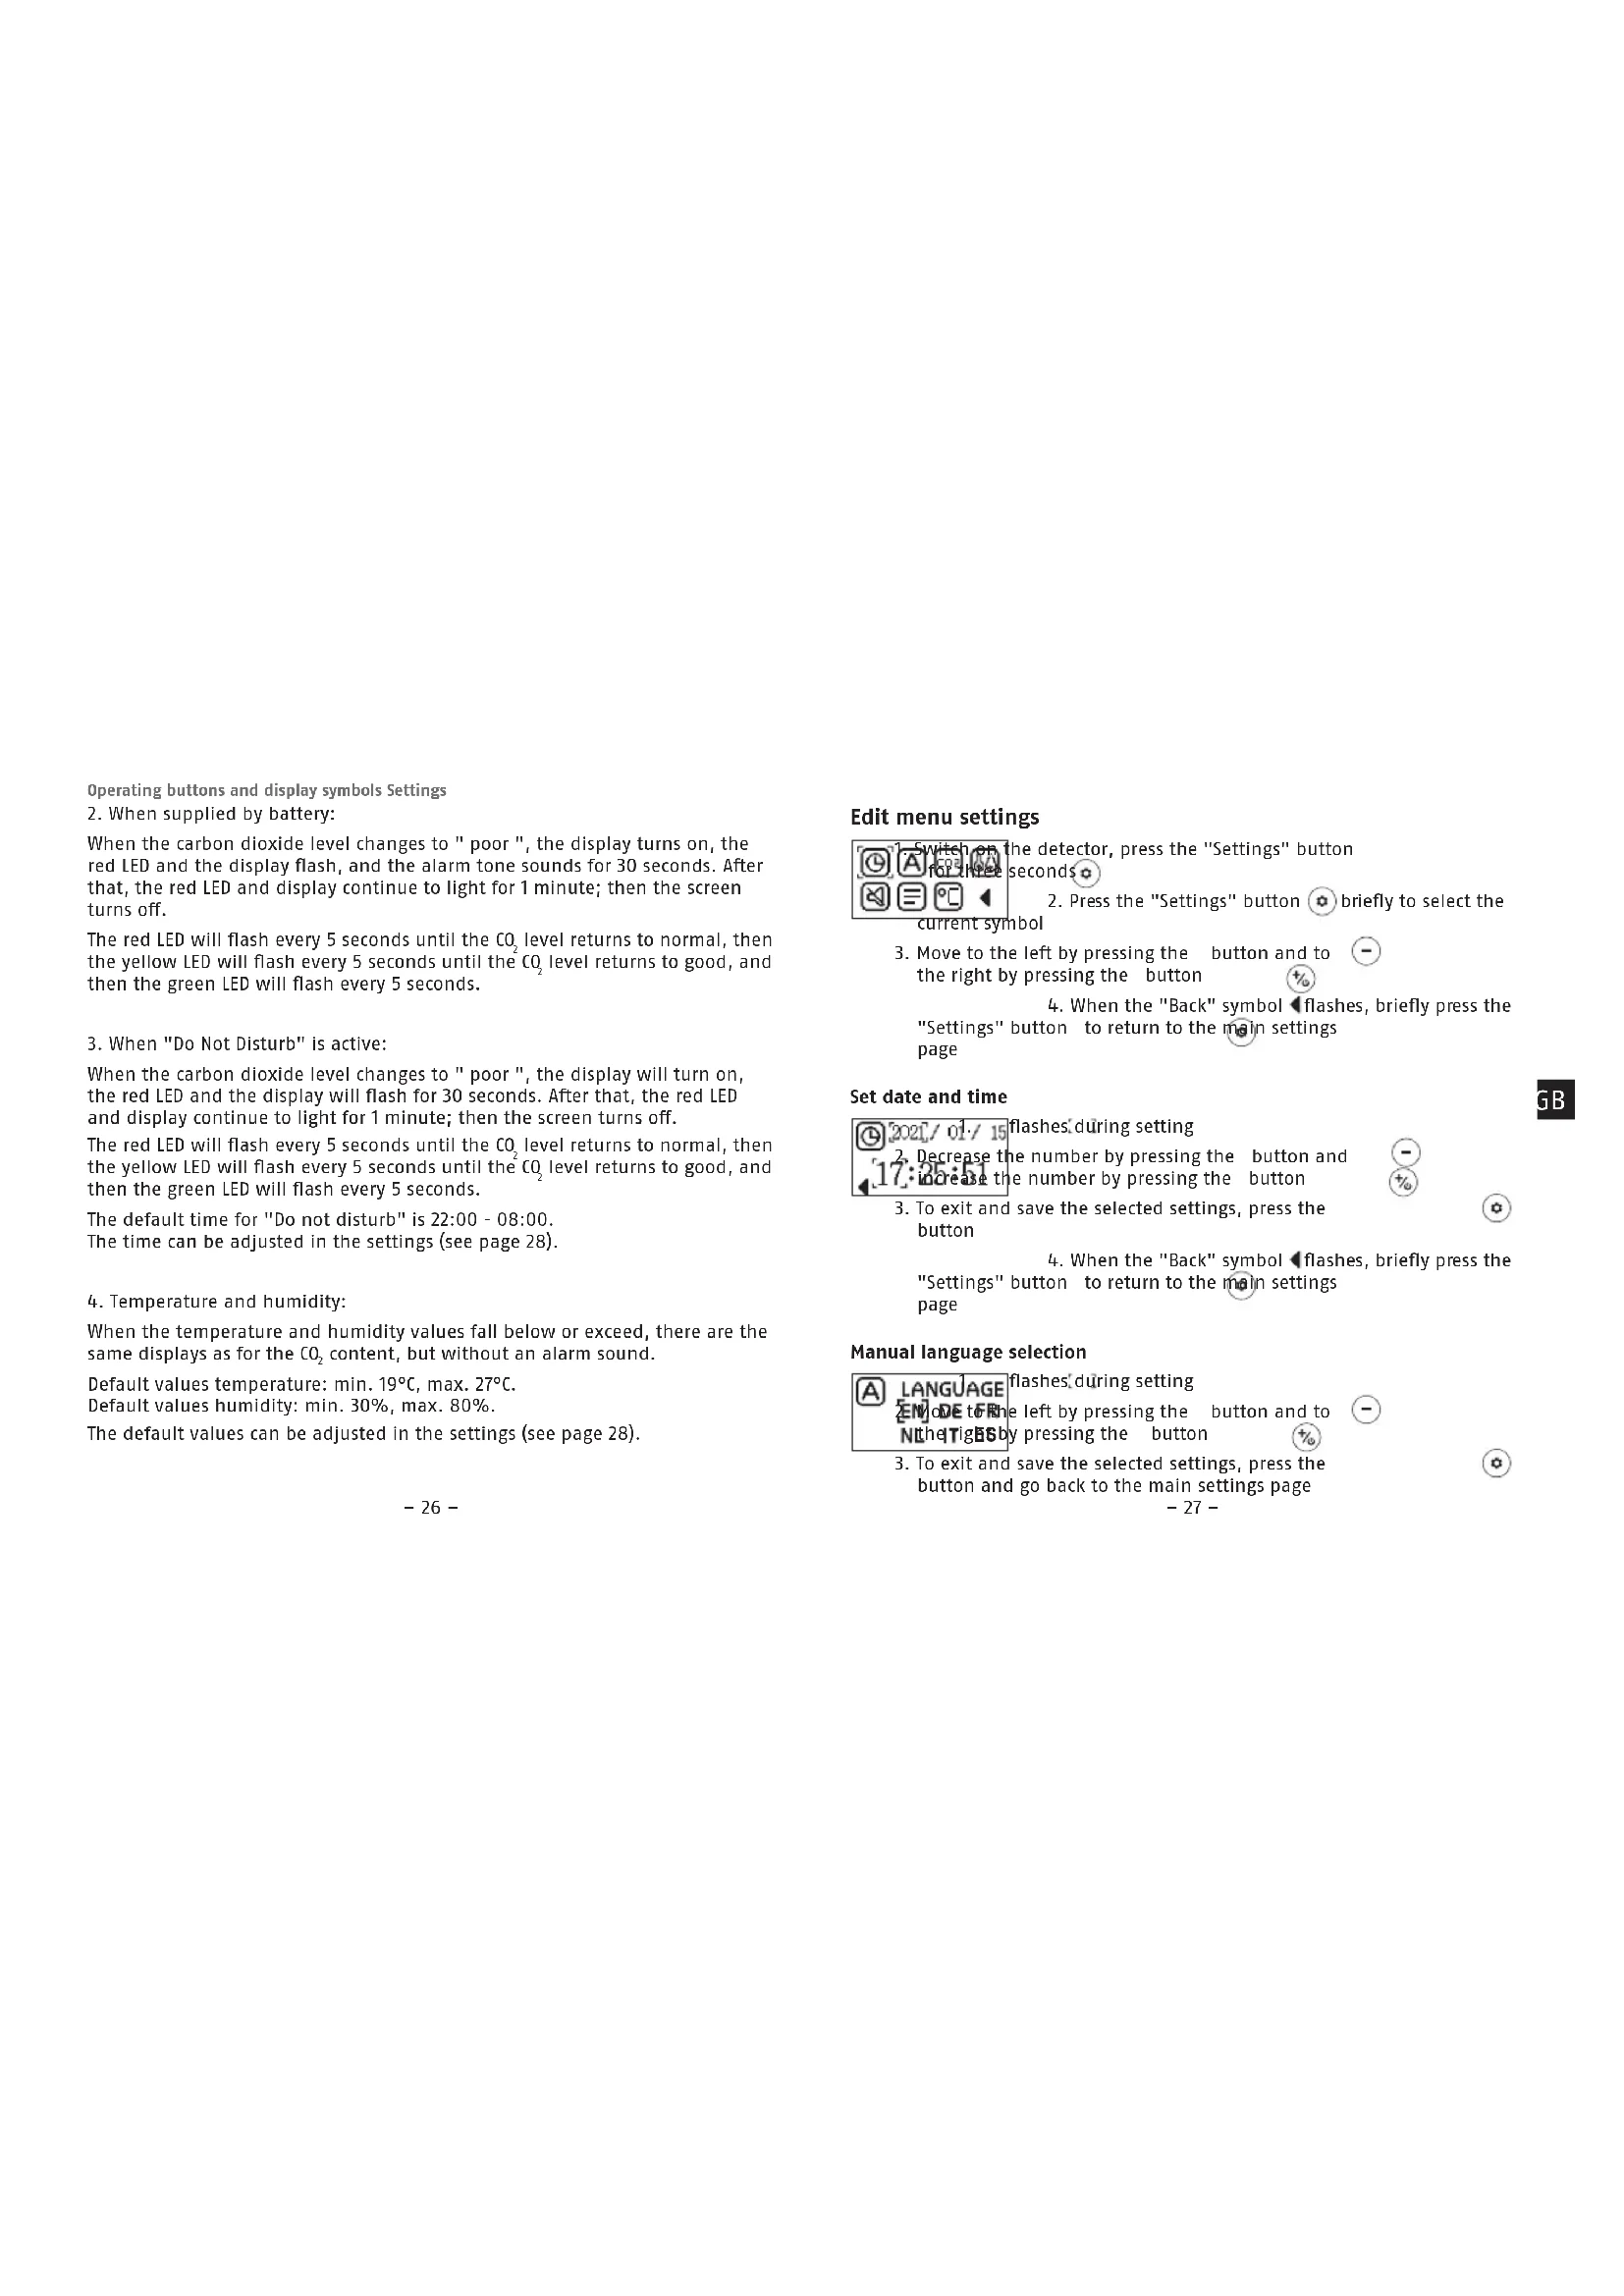
- When supplied by battery:
When the carbon dioxide level changes to " poor ", the display turns on, the red LED and the display flash, and the alarm tone sounds for 30 seconds. After that, the red LED and display continue to light for 1 minute; then the screen turns off.
The red LED will flash every 5 seconds until the CO2 level returns to normal, then the yellow LED will flash every 5 seconds until the CO2 level returns to good, and then the green LED will flash every 5 seconds.
- When "Do Not Disturb" is active:
When the carbon dioxide level changes to " poor ", the display will turn on, the red LED and the display will flash for 30 seconds. After that, the red LED and display continue to light for 1 minute; then the screen turns off.
The red LED will flash every 5 seconds until the CO2 level returns to normal, then the yellow LED will flash every 5 seconds until the CO2 level returns to good, and then the green LED will flash every 5 seconds.
The default time for "Do not disturb" is 22:00 - 08:00.
The time can be adjusted in the settings (see page 28).
- Temperature and humidity:
When the temperature and humidity values fall below or exceed, there are the same displays as for the CO_2 content, but without an alarm sound.
Default values temperature: min. 19^, max. 27^
Default values humidity: min. 30% , max. 80% .
The default values can be adjusted in the settings (see page 28).
Edit menu settings
Switch on the detector, press the "Settings" button seconds 2. Press the "Settings" button briefly to select the current symbol 3. Move to the left by pressing the button and to -the right by pressing the button 4.When the Backsymbol flashes,briefly press the Settings" button to return to the main settings page
Set date and time
- Decrease the number by pressing the button and 17. Increase the number by pressing the button 3. To exit and save the selected settings, press the button 4. When the "Back" symbol flashes, briefly press the "Settings" button to return to the main settings page
Manual language selection
ALANGUAGE flashes during setting ENode to the left by pressing the button and to NtheTigBby pressing the button
- To exit and save the selected settings, press the button and go back to the main settings page
-27-
Settings Settings, Troubleshooting
Set max, and min. value for CO_2 alarm
FFM flashes during setting
1. Decrease the value by pressing the button and increase the value by pressing the button
3.To exit and save the selected settings, press the button

- When the "Back" symbol flashes, briefly press the "Settings" button to return to the main settings page
Set value for temperature and humidity alarm
Mid-Max flashes during setting
1. Redress the number by pressing the button and increase the number by pressing the button
2. To exit and save the selected settings, press the button
- When the "Back" symbol flashes, briefly press the "Settings" button to return to the main settings page
Set "Do not disturb" time
flashes during setting
The number by pressing the button and
the number by pressing the button
3. To exit and save the selected settings, press the button
- When the "Back" symbol flashes, briefly press the "Settings" button to return to the main settings page
-28-
View alarm history
Move to the previous entry by pressing the button 102nd to the next entry by pressing the button 2051 to 98. Press the button to exit and return to the main settings menu
Set temperature unit
- Select °C (degrees Celsius) or °F (degrees Fahrenheit) by pressing the button or 2. To exit and save the selected settings, press the button and go back to the main settings page
Troubleshooting tips
-
The device will not switch on Check that the power supply unit is powered and that the meter is firmly plugged in.
-
Low battery power Charge the battery for more than 24 hours.
-
Slow response Check that the airflow channels on the back of the meter are not blocked.
-
The detector displays "Sensor error" Contact your dealer.
-29-
Troubleshooting Cleaning Technical data
- Manual calibration
Fresh and dry outdoor air is required for manual calibration when the CO2 value is approx. 500~ppm . Do not calibrate the detector in the rain. High humidity increases the CO2 content in the air. When calibrating manually, keep the detector away from areas where there are many people or objects that could emit CO_2 , such as ventilation pipes, chimneys or cars.
To calibrate manually, place the detector outdoors and press the three buttons - 0 simultaneously. "C02" will flash during calibration, which lasts approx. 16 minutes until the flashing stops. Calibration is completely automatic.
Cleaning
- Dusty detectors have to be cleaned.
Dust deposits in the air inlets of the detector can be vacuumed or blown out.
If necessary, you can remove the dust with a brush. - The surface can be cleaned using a cloth lightly moistened with soapy water.
- Do not allow water to enter the inside of the device!
- Do not clean the device in a dishwasher!
- Do not use sharp, pointed, abrasive, or corrosive cleaning materials or hard brushes!
- Do not use chemicals and do not clean the detector with highly flammable liquids!
Technical data
| Power supply AC adapter input: | AC 100~240V Output DC 5V/1A Micro-USB |
| Emergency power supply 1000mAh 3.7V lithium-ion battery (built in) | |
| CO2 sensor type non-dispersive Infrared (NDIR) sensor | |
| CO2 sensor lifespan* max. 10 years | |
| Operating temperature -10° to 40°C | |
| Humidity 0 % to 95 % (non-condensing) | |
| Installation location Wall or stand-alone mounting | |
| CO2 measurement range 0-5000 ppm | |
| CO2 dissolution 1 ppm | |
| CO2 accuracy | 100 ppm or 10% of the measured values, whichever is higher |
| Air quality / CO2 concentration | good: < 600 ppm* normal: 600-1200 ppm* poor: > 1200 ppm* * Values can be adjusted on the CO2 setup page |
| Alarm triggering | > 1200 ppm (can be adjusted on the CO2 setup page) |
- End of sensor lifespan
Since the electrochemical sensor is subject to ageing processes, the lifespan of the CO_2 sensor is a maximum of 10 years. When the detector has reached the end of its lifespan, it must be replaced.
Information on the battery
This product contains a built-in lithium-ion battery. Built-in batteries may only be replaced or removed by qualified personnel. Do not charge or use the product in environments where there is a risk of explosion, e.g. from flammable liquids, gases or dust. Never burn the product! The battery may explode in the fire. This would also release toxic substances. Only use the micro USB cable provided and a suitable charging device (power supply unit 5V DC) to charge the device. Do not leave the device unattended while it is charging.
Warranty
- ABUS products are designed, manufactured and tested in accordance with applicable regulations with great care.
- The warranty exclusively covers faults that are caused by material or manufacturing defects. If a material or manufacturing defect can be proven, the product will be repaired or replaced at the discretion of the warrantor.
- In such cases, the warranty ends with the termination of the original warranty period of 2 years. Any further claims are expressly excluded.
- ABUS assumes no liability for defects or damage that has been caused by external influences (e.g. transport, external forces), improper use, normal wear and tear or non-compliance with this operating and installation instructions document.
- If a warranty claim is asserted, the product must be returned with the original receipt with date of purchase and a brief written description of the fault.
- If you discover a defect on your product which existed at the time of purchase, contact your dealer directly within the first two years.
Disposal, Conformity
Disposal
Dispose of the packaging according to type. Separate the cardboard, foil and plastic elements for recycling.
This product contains valuable raw materials. At the end of its service life, dispose of the product in accordance with the applicable legal requirements. Electrical appliances, rechargeable batteries and batteries must not be disposed of with household waste. Disposal must be carried out in accordance with Directive 2012/19/EU on waste electrical and electronic equipment (WEEE), or Directive 2006/66/EC on batteries and accumulators and waste batteries and accumulators.
Please contact the local authority responsible for disposal if you have any queries. You can obtain information on collection points for your old appliances, for example, from the local municipal or city administration, the local waste disposal companies, or your specialist dealer.

Declaration of conformity
ABUS August Bremicker Söhne KG hereby declares that the device type AirSecure™ CO2WM110 complies with Directives 2014/35/EU, 2014/30/EU and 2011/65/EU. The full text of the EU Declaration of Conformity can be requested by contacting: info@abus.de
Subject to technical alterations.
No liability for mistakes and printing errors.
念 ABUS 2021
ABUS August Bremicker Söhne KG | D 58292 Wetter | Germany.
Tel.: +49 (0) 23 35 63 40 | www.abus.com info@abus.de
ABUS August Bremicker Sohne KG | D 58292 Wetter | Germany.
Tel.: +49 (0) 23 35 63 40 | www.abus.com info@abus.de
ABUS August Bremicker Söhne KG | D 58292 Wetter | Germany.
Tel.: +49 (0) 23 35 63 40 |www.abus.com info@abus.de
- Scope of delivery
- Intended use
- Reference values for carbon dioxide
- Start-up
- Wall installation:
- Stand mounting:
- Operating buttons
- OLED display symbols
- Menu pages of the OLED display
- LED display and tones
- Edit menu settings
- Set date and time
- Manual language selection
- Troubleshooting tips
- Cleaning
- Information on the battery
- Warranty
- Disposal
- Declaration of conformity
Brand : ABUS
Model : AirSecure CO2WM110
Category : Multimeter