57 01 95 - Saw Storch - Free user manual and instructions
Find the device manual for free 57 01 95 Storch in PDF.

| Product Type | Cordless Reciprocating Saw |
| Brand | Storch |
| Model | 57 01 95 |
| Rated Voltage | 10.8 V |
| No-load stroke rate | 0 - 3,100 spm |
| Stroke Length | 13 mm (1/2 inch) |
| Weight (with battery) | 2 kg (2.6 lbs) |
| Battery Type | Lithium-ion 10.8 V / 2 Ah |
| Battery Capacity | 2 Ah |
| Charger Included | Yes, charging current 2.3 A |
| Charging Time (2 Ah battery) | Approximately 53 minutes |
| LED Work Light | Yes |
| Sound Pressure Level LpA | 79 dB(A) |
| Sound Power Level LwA | 90 dB(A) |
| Sound Uncertainty KpA/KwA | 3 dB |
| Vibration Emission Value (wood) | 7 m/s² |
| Vibration Uncertainty Kh | 1.5 m/s² |
| Safety Features | Trigger lock, multifunctional monitoring system |
| Blade Type | Reciprocating saw blades and jigsaw blades |
| Machinable Materials | Wood, metals, plastics, mineral wool, rigid foam |
| Included Accessories | 2 batteries, charger, wood/metal blade set, carry bag |
| Maintenance | Regular cleaning of ventilation slots with compressed air |
Frequently Asked Questions - 57 01 95 Storch
User questions about 57 01 95 Storch
0 question about this device. Answer the ones you know or ask your own.
Ask a new question about this device
Download the instructions for your Saw in PDF format for free! Find your manual 57 01 95 - Storch and take your electronic device back in hand. On this page are published all the documents necessary for the use of your device. 57 01 95 by Storch.
USER MANUAL 57 01 95 Storch
Cordless reciprocating saw, 10.8 V
for purchasing a STORCH product. You have purchased a quality product. If you would like to suggest an improvement, or experience a problem with your product, please do not hesitate to contact us.
Please contact your field sales representative or, in urgent cases, contact us directly.
Yours sincerely,
STORCH Service Department
Tel.: +49 (0)2 02 . 49 20 - 112
Fax: +49 (0)2 02 . 49 20 - 244
Free service hotline: 0800 786 72 47
Toll-free order hotline: +49 800 7867244
Toll-free order fax: +49 800 7867243
(only available in Germany)
Table of contents Page
Scope of supply 82
Technical specifications 83
Application area 84
Proper use 84
General safety instructions 84 - 87
Control elements 88
Use 89 - 92
Maintenance 92
Accessories 92
Repairs 93
Charger 94 - 98
Warranty 99
EC Declaration of Conformity 100 - 101
Scope of supply
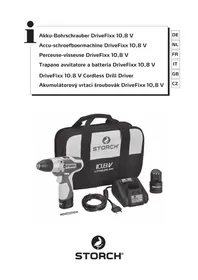
10.8 V cordless reciprocating saw, 2x 10.8 V / 2 Ah Li-ion batteries, charger, saw blade set for wood and metal, transport and storage bag, operating instructions.
Technical specifications
| 12. | ||
| UV 10.8 | ||
| n0 | /min (spm) O - 3,100 | |
| s mm (in) 13 (1/2) | ||
| m kg (lbs) 1.2 | (2.6) | |
| ah, CW/Kh, CW m/s | 2 | 7 / 1.5 |
| LpA/KpA | db(A) 79 / 3 | |
| LWA/KWA | db(A) 90 / 3 | |
Subject to change in terms of technical progress.
U = Battery pack voltage nO = Stroke rate at idle speed
s = stroke length
m = weight (with smallest battery pack)
Measuring values determined as per EN 60745.
Vibration total value (vector sum from three directions) determined as per EN 60745:
ah, CW = level of vibration (sawing wood)
Kh, CW = Shakiness (vibration)
Typical A-weighted sound level: LpA = sound pressure level
LWA = sound power level KpA, KWA = shakiness
When working, the noise level can exceed 80 dB(A).

Wear hearing protection!
Direct current
The technical data specified have tolerance (according to the respective valid standards).

Emission values
This values make it possible to estimate the emissions from the electric power tool and to compare different electric power tools. Depending on the operating conditions, the state of the electric power tool or the use of tools, the actual load may be higher or lower. Breaks from work and phases with lower loads must be taken into account in the estimation. Define protective measures for the user based on corresponding adjusted estimates, e.g. organisational measures.
Application area
The machine is suitable for sawing wood, metals, plastics or similar materials such as hard rubber, fibreglass, etc. in conjunction with the STORCH mineral fibre cutter ProCut mineral PLUS and ProCut mineral 128 PLUS, the appropriate insulating material blades (blade for use with STORCH mineral fibre cutters, see final page) and also for cutting mineral wool, glass wool, RESOL foam and hybrid insulating boards. XPS perimeter foam boards are also suitable for cutting.
The user alone is responsible for damage caused by improper use.
Generally recognised accident prevention regulations and the attached safety instructions must be observed.
General safety instructions
Observe the passages of text marked with this symbol in order to ensure your own protection and that of the electric power tool!

WARNING
Please read the operating instructions to reduce the risk of injury.

WARNING
Read all the safety precautions and instructions. Failure to comply with the safety precautions and instructions may result in an electric shock, fire and / or severe injuries.
Keep all the safety precautions and instructions for the future.
Only pass on your electric power tool together with these documents.
Special safety instructions
Hold the appliance using the insulated handles when performing work where the tool could come into contact with hidden power lines. Contact with live wires can also apply voltage to metallic appliance parts and cause the user to receive an electric shock.
When the machine is not being used, lock it using the safety lock (4) to ensure it is not switched on unintentionally. Remove the battery pack from the machine before making any adjustments, upgrade, performing maintenance or cleaning.
Make sure that the machine is switched of before inserting the battery pack. Always wear protective glasses, work gloves and sturdy shoes when working with your machine.
Make sure that there are not any power, water or gas lines in the place you want to work on (e.g. using a metal detector).
When sawing water pipes, make sure they do not contain any water.
Wear hearing protection when working for a longer period of time. Prolonged exposure to high noise levels can lead to hearing damage.
Materials which produce harmful dusts or vapours (e.g. asbestos) must not be dealt with.
Dusts from materials such as paint containing lead, some types of wood, minerals and metals can be harmful. Touching or breathing in the dusts may induce allergic reactions and / or respiratory diseases to the user or people in the vicinity.
Particular dusts such as oak or beech dust are seen as carcinogenic, particularly in conjunction with additives for wood treatment (chromate, wood preservative). Material containing asbestos may only be dealt with by specialists.
-
Make sure the workplace is well aerated.
-
It is recommended that you wear a filter class P2 protective mask.
Observe the valid regulations in your country for the materials you are working with.
Do not try to saw extremely small parts.
Clamp the part well. Do not, under any circumstance, support the part using your hand or foot.
Use only sharp, undamaged saw blades. Do not use saw blades that are cracked or ones whose form has changed.
Only use the machine with the limit stop fitted. The limit stop must be securely placed on the part when sawing.
Always hold the machine with both hands on the hand grips provided, take up a secure position and concentrate while working.
Risk of injury due to sharp saw blade. Do not try to grab the moving saw blade! Only remove chips or the like when the machine is stopped.
Do not try to grab under the part during operation.
Risk of crushing during operation! Keep your fingers away from the area of the saw blade tensioning appliance (2).
LED work light (2): do not look at the LED beam directly using optical instruments.

Protect the battery packs from moisture!

Do not expose the battery packs to fire!
Do not use any faulty or deformed battery packs!
Do not open the battery packs!
Do not touch or short circuit the battery pack contacts!
A slightly acidic, flammable fluid may leak from faulty Li-ion battery packs!
If battery fluid does leak and comes into contact with your skin, rinse it off with plenty of water immediately. If you get battery fluid in your eye, wash it out using clean water and seek medical attention immediately!
Control elements
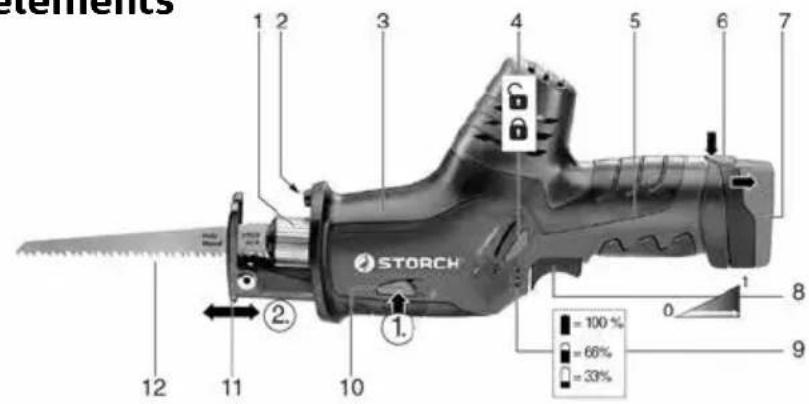
| 1 | Saw blade tensioning appliance for reciprocating saw blades and jigsaw blades |
| 2 | LED work light |
| 3 | Front hand grip |
| 4 | Safety lock: For locking the trigger switch (8) to avoid the machine being unintentionally switched on. |
| 5 | Rear hand grip |
| 6 | Battery pack unlocking appliance |
| 7 | Battery pack |
| 8 | Trigger switch |
| 9 | Capacity display for checking the battery's charge level |
| 10 | Button for setting the limit stop |
| 11 | Limit stop |
| 12 | Saw blade |
Use
Multifunctional monitoring system for the machine
If the machine switches of independently, this means that the electronics have activated the self-protection mode.
Causes and remedies
-
Battery pack almost empty (the electronics protect the battery back from damaged caused by the battery being completely discharged).
-
Overloading the machine for an extended period of time may lead to a temperature shutoff.
-
The machine switches off if the current is too high (e.g. with a long-lasting blockage).
If the battery pack is empty, it must be charged again!
Allow the machine or battery pack to cool down. Note: The machine cools down more quickly if it is left to run at idling speed.
Switch off the machine using the trigger switch (8). Then continue to work again. Avoid further blockages.
Battery pack
Charge the battery back before use. Charge the battery pack again if performance drops. The optimal storage temperature is between 10^ and 30^ .
Removing: Press the button for unlocking the battery pack (6) and remove the battery pack (7).
Inserting: Push the battery pack (7) in until it clicks into place.
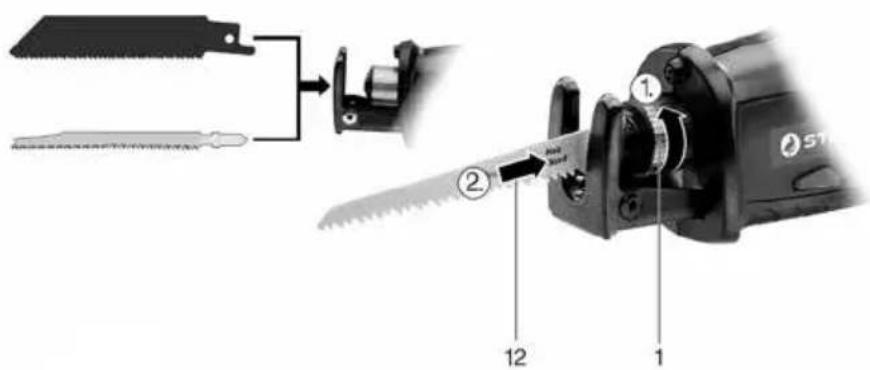
Inserting, removing saw blade
Before performing any work on the machine: remove the battery pack.
Do not touch the saw blade immediately after it has been used as it may be extremely hot and this could lead to skin burns.
Reciprocating saw blades should generally be used.
| 1. | Rotate the clamping sleeve (1) in the direction of the arrow and hold. |
| 2. | Insert the saw blade (12) until the limit stop or remove it. |
| 3. | Let go of the clamping sleeve (1) (the clamping sleeve will rotate back into its starting position). |
| 4. | Check that the saw blade is securely fitted. |
Information for using jigsaw blades:
It is possible to use reciprocating or jigsaw blades. Reciprocating blades should generally be used.
When inserting jigsaw blades, make sure that the jigsaw blade is inserted vertically until the limit stop. Rotate the clamping sleeve (1) slowly back to its starting position and make sure that the jigsaw blade sits in the recess.
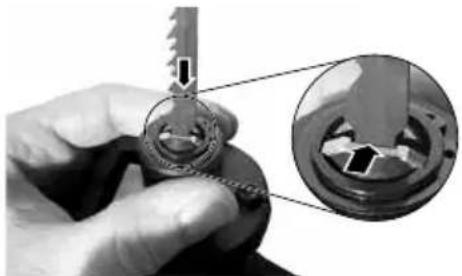
Note: If a saw blade is broken at any point and it is not possible to remove it from the saw blade tensioning appliance by hand:
Rotate the clamping sleeve (1) in the direction of the arrow and hold. Hook the tip of a saw blade onto the broken off part and pull it out. A fine-tooth metal saw blade is the most suitable.
Setting the limit stop
It is possible to limit the cutting depth by moving the limit stop (11) (e.g. when sawing in front of a wall).
Move the limit stop (11) occasionally to make sure the saw blade wears evenly.
| 1. | Press the button (10) and move the limit stop (11) to the desired position. |
| 2. | Let go of the button (10) and move the limit stop until it clicks into position. |
Check that the limit stop (11) is securely fixed.
Use
Switching on and off, safety lock stroke rate (4):
Trigger switch (8) locked.

Trigger switch (8) unlocked.
Switching on, stroke rate
Press the trigger switch (8). The stroke rate can be changed by pressing in the trigger switch.
Switching off
Let go of the trigger switch (8).
Work instructions
Sawing
Use a saw blade that is designed for the material to be sawed.
Press the machine against the part with the limit stop (11). Switch on the machine and only then should the saw blade be pressed against the part.
Do not touch any objects or the ground with the moving saw blade (risk of kickback, blade breaking!)
Adjust the stroke rate for the material to be sawed.
Avoid placing excessive pressure on the saw blade (particularly with long saw blades).
Switch off the machine immediately if the saw blade gets jammed. Widen the sawing gap a little using a suitable tool and remove the machine.
Once the saw cut is complete, switch off the machine. Only remove it from the sawing gap and put away once the saw blade is no longer moving (risk of kickback).
Lock the machine using the safety lock (4) to avoid it being unintentionally switched on.
Plunge cuts
Plunge cuts may only be made in soft materials such as wood or plastic. Only use short saw blades. Hold the machine with both hands on the hand grips provided, take up a secure position and concentrate while working.
The machine is pressed against the part with the edge of the limit stop (11). The saw blade does not touch the part. Switch on the machine. The corner of the limit stop serves as a pivot around which the machine is slowly raised and the saw blades cuts into the part.
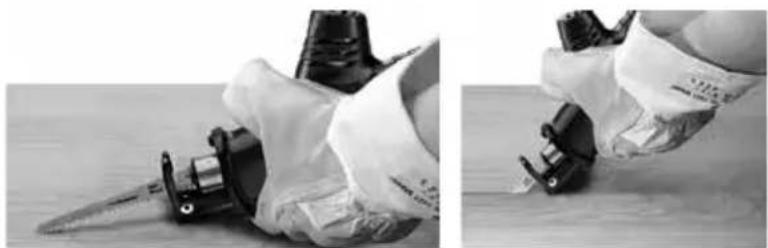
Maintenance
Regularly blow out the machine through the engine / ventilation passages with compressed air.
Clean regularly: Press the button (10) and remove the limit stop (11). With the saw blade remove, hold the appliance pointing vertically downwards and knock lightly on the machine with your hand. The accumulated dust will fall out.
Accessories
Only use original STORCH accessories (see final page).
Only use accessories which fulfil the requirements and identification data specified in these operating instructions.
Repairs

electricians!
Repairs to electric power tools may only be carried out by trained
Environmental protection
Observe national regulations for environment-friendly disposal and for recycling disused machines, packaging and accessories.
Battery packs must not be thrown out with domestic waste! Return faulty or used battery packs to your STORCH retailer!
Do not dispose of battery packs in water.
Only for EU countries: Do not throw out electric power tools with domestic waste! As per European Directive 2002/96/EG about electric and electronic waste and implementation in national law, used electric power tools must be collected separately and recycled in an environmentally friendly manner. Discharge the battery pack in the electric power tool before disposing of it. Protect the contacts from short-circuiting (e.g. insulate using adhesive tape).
Charger
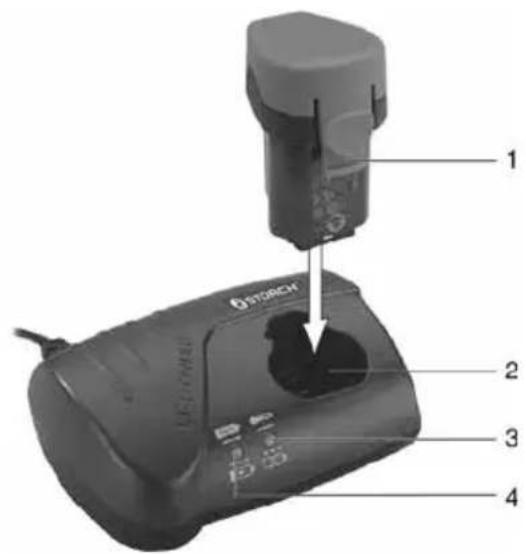
| 1 | Battery pack |
| 2 | Charging slot |
| 3 | Warning indicator |
| 4 | Operation indicator |
Technical specifications
Subject to change in terms of technical progress.
Battery pack voltage range = 10.8V
Charging current = 2.3A
Charging time1 (Li-ion battery pack)
1.5Ah = 40 min.
2.0Ah = 53 min
4.0Ah = 105min
5.2 Ah = 138 min.
1Depending on the residual capacity and the temperature of the battery pack, the actual charge times may vary from the specifications..

Protection class II machine
\~alternating current
Proper use
The chargers are only suitable for charging the battery packs supplied.
This appliance is not intended to be used by individuals with limited physical, sensory or mental capacities or those lacking in experience and/or knowledge, unless they supervised or receive instructions about how to use the appliance from a person responsible for their safety.
The charger is suitable for charging Li-ion battery packs (10.8 V, 1.5 Ah - 5.2 Ah, 3 batteries).

Never try to charge non-rechargeable batteries. Risk of explosion!
The user alone is responsible for damage caused by improper use.
Generally recognised accident prevention regulations and the attached safety instructions must be observed.

General safety instructions

Before using the charger, carefully read all the attached safety
instructions and the operating instructions. Keep all attached documents and only ever pass on the charger together with these documents.

Special safety instructions
Observe the passages of text marked with this symbol in order to ensure your own protection and that of the charger!
Warning of hazardous electrical voltage!

A slightly acidic, flammable fluid may leak from faulty Li-ion battery.
packs!
If battery fluid does leak and comes into contact with your skin, rinse it off with plenty of water immediately. If you get battery fluid in your eye, wash it out using clean water and seek medical attention immediately!
Do not continue to charge fully charged battery packs! Overcharging causes damage and reduce the battery pack's service life!

Only use the charger indoors!
Protect your charger from moisture!
Never let children use the appliance.
Children should be supervised to ensure that they do not play with the appliance.
Keep children away from the charger and from the work area! Keep the charger in a safe place so that it is inaccessible to children!
Immediately remove the power plug if smoke or fire is detected in the charger!
Do not use faulty battery packs!
Initial operation
Before the initial operation, compare whether the mains voltage and mains frequency specified on the nameplate conforms with the data for your power supply. Appliance such as this one which generate direct current could influence simple fault-current circuit breakers. Use type F or better, with a trip current of max. 30mA .
Self-test
The warning indicator (3) and the operation indicator (4) light up one after the other for approx. 1 second.
Use
Charging the battery pack
Insert the battery pack (1) into the charging slot (2) up to the end stop.
The operation indicator (4) flashes and the battery pack is charging.

Once the battery pack is fully charged, the operation indicator (4) is constantly lit.

The battery pack can remain in the charger and thus always ready for use.
Fault
- Warning indicator (3) is constantly lit

- Battery pack is not charging. Temperature too high / too low. If the temperature of the battery pack is between 0^ and 50^ , the charging process begins automatically.
Warning indicator (3) flashing
-
Battery pack is faulty. Immediately remove the battery pack from the charger.
-
Short-circuit between the charging contacts. Check contact system for foreign matter.
Repairs
Repairs to the charger may only be carried out by trained electricians!
If the appliance's power cable is damaged, the manufacturer or a similarly qualified individual must replace it in order to prevent any hazards.
Environmental protection
The packaging is 100% recyclable.
Disused charger and accessories contain large amount of valuable raw materials and plastics which can also be recycled.
Only for EU countries: Do not throw out electric power tools with domestic waste! As per European Directive 2002/96/EG about electric and electronic waste and implementation in national law, used electric power tools must be collected separately and recycled in an environmentally friendly manner.
Warranty
Warranty conditions
A warranty period of twelve months from the date of purchase/date of invoice applies to our tools for commercial customers.
Claims
If you wish to claim under our warranty or guarantee, please return the complete machine and your invoice to our logistics centre in Berka, postage paid, or send it to one of our authorised service centres.
We request that you contact us beforehand by calling our free STORCH service hotline on 08 00 7 86 72 47.
Your rights under our warranty or guarantee
Claims can only be accepted for material defects or manufacturing errors, and only assuming proper use of the appliance. Wear parts are not covered by such claims. All claims shall become void in the event of installation of third party components, improper handling and storage, as well as in the event of obvious disregard of the operating instructions.
Repairs
All repairs have to be conducted on our premises or by an authorised STORCH service centre.
EC Declaration of Conformity for cordless reciprocating saws
Name / address of the issuer: STORCH
We herewith declare:
that the following machine complies with the fundamental health and safety requirements of the EC Directives in terms of its design, construction and version we have brought into circulation.
This warranty loses its validity in case of unauthorised modification of the device.
Appliance description: 10.8 V cordless reciprocating saw
Appliance model: Reciprocating saw
Article number: 57 01 95
Applicable Directives
Machinery Directive: 2006/42/EC
EN 60745-1:2009+A11:2010
EN 60745-2-11:2010
EC Electromagnetic Compatibility Directive: 2014/30/EU
EC Directive on the restriction of the use of certain hazardous substances in electrical and electronic equipment: 2011/65/EU (RoHS)
Representative authorised to compile the technical documentation:
EC Declaration of Conformity for chargers
Name / address of the issuer: STORCH
We herewith declare:
that the following machine complies with the fundamental health and safety requirements of the EC Directives in terms of its design, construction and version we have brought into circulation.
This warranty loses its validity in case of unauthorised modification of the device.
Appliance description: Charger for 10.8 V cordless reciprocating saw
Appliance model: Charger
Article number: 57 03 97
Applicable Directives
Machinery Directive: 2006/95/EC
EC Electromagnetic Compatibility Directive: 2014/30/EU
EC Directive on the restriction of the use of certain hazardous substances in electrical and electronic equipment: 2011/65/EU (RoHS)
Representative authorised to compile the technical documentation:
57 01 95 10.8 V cordless reciprocating saw
57 03 91 Replacement battery 10.8 V
Blades for use with ProCut mineral PLUS / 128 Plus
57 01 96 Blade for cordless reciprocating saw, 45 cm
57 01 97 Blade for cordless reciprocating saw, 30 cm
57 03 96 Saw blade set for wood and metal