DriveFixx 10.8 V - Drill Storch - Free user manual and instructions
Find the device manual for free DriveFixx 10.8 V Storch in PDF.

| Product type | Cordless drill driver |
| Brand | Storch |
| Model | DriveFixx 10.8 V |
| Battery voltage | 10.8 V DC |
| Battery capacity | 1.3 Ah |
| Battery type | Lithium-ion |
| Max. torque | 16 Nm |
| Torque settings | 18 |
| No-load speed (LO) | 0 - 400 rpm |
| No-load speed (HI) | 0 - 1,300 rpm |
| Chuck | 10 mm, keyless quick-release |
| Charging time | Approx. 30 minutes |
| Weight (with battery) | 990 g |
| Sound pressure level | 65 dB(A) |
| Charger | Input 220-240 V, output 12.6 V / 3.2 A |
| Package contents | Drill, 2 Li-ion batteries, fast charger, cross and flat bits, storage bag |
| Main functions | Electric brake, LED light, variable speed trigger, forward/reverse switch, 2 mechanical speeds, battery protection |
| Maintenance and cleaning | Clean with a dry cloth, do not use solvents |
| Safety | Overload, temperature and deep discharge protection |
| Spare parts and repairability | Repairs exclusively by an authorized Storch service partner |
| Warranty | 12 months legal (see conditions in manual) |
Frequently Asked Questions - DriveFixx 10.8 V Storch
User questions about DriveFixx 10.8 V Storch
0 question about this device. Answer the ones you know or ask your own.
Ask a new question about this device
Download the instructions for your Drill in PDF format for free! Find your manual DriveFixx 10.8 V - Storch and take your electronic device back in hand. On this page are published all the documents necessary for the use of your device. DriveFixx 10.8 V by Storch.
USER MANUAL DriveFixx 10.8 V Storch
DriveFixx 10.8 V Cordless Drill Driver
BESCHERMING VAN DE ACCU
AAN-SCHAKELAAR (afb. 5)
BOREN/BITS PLAATSEN (afb.11)
MISE EN PLACE DU BLOC D'ACCU (ill. 4)
ENLEVER LE BLOC D'ACCUS (ill. 4)
Dirittive CE applicate:
for purchasing a STORCH product. You have purchased a quality product.
If you would like to suggest an improvement, or experience a problem with your product, please do not hesitate to contact us.
Please contact your field sales representative or, in urgent cases, contact us directly.
Yours sincerely,
STORCH Service Department
Tel.: +49 (0)2 02 . 49 20 - 112
Fax: +49 (0)2 02 . 49 20 - 244
Free service hotline: 0800 786 7247
Toll-free order hotline: +49 800 7867244
Toll-free order fax: +49 800 7867243
(only available in Germany)
Table of contents Page
- Scope of delivery 74
- Technical specifications 75
- General safety precautions 75-79
- Symbols 80
- Device description 80
- Battery 81-83
- Operating the cordless drill driver 84-87
8.Drilling in wood/masonry 88 - Servicing and maintenance 89
- Warranty 90
11.Declaration of conformity 91
Scope of delivery
Cordless drill driver, 2x Li-ion 10.8 volt batteries, quick-charger, universal crosshead and flathead bit, carrying and storage case, instruction manual.
Technical specifications
Battery Voltage 10.8 Volt DC
Battery capacity 1.3 Ah
Battery type Lithium-ion
Max. torque 16Nm
Torque settings 18
Idle speed LO-gear 0 - 400
Chuck 10 mm
Optimum charging temperature 0^ - 40^
Charger voltage
-
Input: 220 V - 240 V,
-
Output: 12.6 V DC, 3.2 A
Charging time 30min
Drill weight (incl. battery) 990 g
Level of noise pressure LPA (KPA) 65 dB (A)
50Hz
GENERAL POWER TOOL SAFETY WARNINGS.
All of the machine's important data can be found on the type plate:

WARNING:
Read all of the safety precautions and instructions. Failure to follow the warnings and instructions may result in electric shock, fire and/or serious personal injury. Keep all of the warning information and instructions safe for future reference. The term "power tool" which is used in the warnings refers to the battery-operated (cordless) tool.
1. SAFETY at the WORKPLACE
Keep your work area clean and well ventilated. Cluttered working environments and poorly illuminated areas can result in accidents.
Do not operate power tools in explosive environments, such as in the presence of flammable liquids, gases, or dust. Power tools create sparks which may ignite the dust or fumes.
Keep unauthorised personnel away from the work area. Distractions can result in losing control of the device.
2. ELECTRICAL SAFETY
The device possesses a voltage range which can pose an electrical hazard to humans and animals.
It should only be unscrewed and / or disassembled by authorised personnel. Similarly, maintenance and repair work should only be conducted by service partners authorised by Storch. The buyer / user operates the device at their own risk and under their own responsibility.
Power tool plugs must match the outlet. Never modify the plug in any way. Do not use any adapter plugs with earthed (grounded) power tools. Unmodified plugs and matching outlets will reduce risk of electric shock.
Avoid body contact with grounded surfaces such as pipes, radiators, ranges and refrigerators. There is an increased risk of electric shock if your body is earthed or grounded.
Don't expose power tools to rain or wet conditions. Water entering a power tool will increase the risk of electric shock.
Don't abuse the cord. Never use the cord for carrying, pulling, or unplugging the power tool. Keep the cord away from heat, oil, sharp edge, or moving parts. Damaged or entangled cords increase the risk of electric shock.
When operating a power tool outdoors, use an extension cord suitable for outdoor use. Use of a cord suitable for outdoor use reduces the risk of electric shock.
If operating a power tool in a damp location is unavoidable, use a residual current device (RCD) protected supply. Use of an RCD reduces the risk of electric shock.
PERSONAL SAFETY
When operating a power tool stay alert and concentrate on what you are doing. Do not use the tool if you are tired or under the influence of drugs, alcohol, or medication. A lapse in concentration while operating a power tool may result in serious personal injury.
Use personal protective equipment. Always wear eye protection. Safety equipment such as dust mask, non-skid safety shoes, hard hat, or hearing protection used for appropriate conditions will reduce personal injuries.
Prevent the tool from being started accidentally. Prior to connecting the battery pack and before lifting or carrying the tool make sure that the switch is in the OFF position. Carrying tools with your finger on the ON/OFF switch, or plugging in tools whose switch is set to the ON position, can result in an accident.
Remove any adjusting key or wrench before turning the power tool on. A wrench or a key left attached to a rotating part of the tool may result in personal injury.
Do not overreach. Keep proper footing and balance at all times. This enables better control of the power tool in unexpected situations.
Wear suitable clothing. Do not wear loose clothing or jewellery. Keep your hair, clothing, and gloves away from moving parts. Loose clothes, jewelry or long hair can be caught in moving parts.
If devices are provided for the connection of dust extraction and collection facilities, ensure these are connected and properly used. Use of dust collection can reduce dust-related hazards.
POWER TOOL USE AND CARE
Do not force the power tool. Use the correct power tool for your application. The correct power tool will do the job better and more safely at the rate for which it was designated.
Do not use the power tool if the switch does not turn it ON and OFF. Any power tool that cannot be controlled with the switch is dangerous and must be repaired.
Disconnect the battery pack before making any adjustments, changing accessories, or storing the power tool. This safety measure will prevent the tool from starting accidentally.
Keep any power tools that are not being used out of the reach of children. Do not allow any person who is unfamiliar with the power tool or these instructions to operate the tool. Power tools are dangerous when placed in the hands of inexperienced users.
Maintain power tools. Check for misalignment or binding of moving parts, breakage of parts, and any other condition that may affect the tools operation. If damaged, have the power tool repaired before use. Many accidents are caused by poorly maintained power tools.
Use the power tool, accessories, tool bits etc. in accordance with these instructions, taking into account the working conditions and the work to be performed. Use of the power tool for operations different from intended could result in a hazardous situation.
HANDLING AND USE OF CORDLESS TOOLS
Make sure that the switch is in the OFF position before inserting the battery pack. Inserting the battery pack into power tools that have the switch ON invites accidents.
Recharge only with the charger specified by the manufacturer. Acharger that is suitable for one type of battery pack may create a risk offire when used with another battery pack.
Use power tools only with specifically designated battery packs. Use of any other battery packs may create a risk of injury and fire.
When the battery pack is not in use, keep it away from other metal objects, such as paper clips, coins, keys, nails screws, or other small metal objects that can make a connection from one terminal to another. Shorting the battery terminals together may cause burns or a fire.
Under abusive conditions, liquid may be ejected from the battery; avoid contact. If contact accidentally occurs, flush with water. If liquid contacts eyes, additionally seek medical help. Liquid ejected from the battery may cause irritation or burns.
SERVICE
The power tool should be repaired exclusively by a STORCH technician or by a co-operating STORCH service centre.
When servicing a power tool, use only identical replacement parts.
Observe the instructions specified under the "Maintenance" section of this manual. The use of non-approved parts or non-compliance with the maintenance instructions can result in electric shock or potential injury.
SPECIFIC SAFETY RULES FOR CORDLESS DRILL
Hold the power tool by the insulated gripping surfaces if there is any risk of drilling into hidden electric cables during use. If the power tool comes into contact with live cables, it can cause unprotected metal parts of the tool to become energised and give the user an electric shock.
If possible, always use clamps or a vice to hold your work.
Always switch off before you put the drill down.
Ensure that the lighting is adequate.
Only exert enough pressure on the drill driver to prevent the motor from slowing. Doing this will protect the tool and ensure optimum results are obtained.
Keep the area free of tripping hazards.
Only allow properly instructed and competent personnel to use the power tool.
Only use the drill if it is in perfect working order.
Before drilling make sure there is sufficient space for the drill underneath the workpiece.
Do not touch the drill after use. It heats up considerably.
Keep your hands away from under the workpiece.
Never use your hands to remove dust, chips or waste close by the bit.
Rags, cloths, cord, string and the like should never be left around the work area.
Support the work properly.
If you are interrupted when operating the drill, complete the process and switch off before looking up.
Periodically check that all nuts, bolts and other fixings are properly tightened.
HANDLING AND USE OF CORDLESS TOOLS (continued)
When using the drill, use safety equipment including safety glasses or shield, hearing protection, and protective clothing including safety gloves. Wear a dust mask if the drilling operation creates dust. The tool is designed for drilling in wood and metal. The tool must be used only for its prescribed purpose. Any use other than those mentioned in this Manual will be considered a case of misuse. The user and not the manufacturer shall be liable for any damage or injury resulting from such cases of misuse. To use this tool properly, you must observe the safety regulations, the assembly instructions and the operating instructions to be found in this Manual. All persons who use and service the machine have to be acquainted with this Manual and must be informed about its potential hazards. Children and frail people must not use this tool. Children should be supervised at all times if they are in the area in which the tool is being used. It is also imperative that you observe the accident prevention regulations in force in your area.
The same applies for general rules of occupational health and safety. The manufacturer shall not be liable for any changes made to the tool nor for any damage resulting from such changes. Even when the tool is used as prescribed it is not possible to eliminate all residual risk factors. The following hazards may arise in connection with the tool's construction and design:
Damage to the lungs if an effective dust mask is not worn.
Damage to hearing if effective hearing protection is not worn.
Hand-arm vibration syndrome if its use is not adequately managed.
ADDITIONAL SAFETY RULES FOR THE QUICK CHARGER
Before using the battery charger read through all of the instructions and warnings on the charger and battery pack.
Only charge your battery pack indoors as the charger is designed for indoor use only.
DANGER: If the battery pack is cracked or damaged in any other way, do not insert it in the charging base. There is a danger of electric shock or electrocution.

WARNING: Do not allow any liquid to come into contact with the charger. There is a danger of electric shock.
The charger is not intended for any use other than charging the exact type of rechargeable battery pack as supplied with the charger. Any other use may result in the risk of fire, electric shock or electrocution.
The charger and battery pack supplied with it are specifically designed to work together. Do not attempt to charge the battery pack with any other charger than the one supplied.
Do not place any object on top of the charger as it could cause overheating. Do not place the charger near any heat source.
Pull on the charger to disconnect it from the power source. Do not pull on the lead.
Make sure that the charger lead is positioned where it will not be stepped on, tripped over or otherwise subjected to damage or stress.
Do not use any extension cables unless absolutely necessary. Using an unsuitable or defective extension cable can result in fire, electric shock or electrocution.
Do not use the charger if it has been subjected to a severe impact, if it has been dropped, or if it has been damaged in any other way. Send the charger to an authorised STORCH service centre for inspection or repair.
Do not dismantle the charger. Send it to an authorised STORCH service centre for any maintenance and repair work. Improper assembly may result in fire, electric shock or electrocution.
Before cleaning the charger disconnect it from the power supply to prevent the risk of electric shock. Removing the battery pack alone will not reduce this risk.
The charger is designed for use from a standard household electrical supply. Do not attempt to connect the charger to a supply with a different voltage.
The charger is not intended for use by persons (including children) with reduced physical, sensory or mental capabilities, or lack of experience and knowledge, unless they have been given supervision or instruction concerning use of the charger by a person responsible for their safety.
Do not abuse cord or charger. Never use the cord to carry the charger. Do not pull the charger cord rather than the plug when disconnecting from receptacle. Damage to the cord or charger could occur and create an electric shock hazard. Replace damaged power cords without delay. Do not let gasoline, oils, petroleum-based products, etc. come in contact with plastic parts. They contain chemicals that can damage, weaken or destroy plastic.
ADDITIONAL SAFETY INSTRUCTIONS FOR BATTERY PACK
To ensure the longest battery life and best battery performance, always charge the battery when the temperature is between 18 24^ Do not charge and store your battery in temperatures below 0^ and above 40^ . Failure to observe this safety rule could cause serious damage to the battery pack.
Do not discard the battery pack in a fire under any circumstances. The battery pack can explode.
If leaking battery fluid comes into contact with the skin, wash the affected area immediately with soap and water. The fluid can be neutralised by using a mild acidic substance, such as lemon juice or vinegar. In the event of contact with the eyes rinse with clean water for at least 10 minutes and seek medical advice immediately. Inform any medical personnel that this fluid is a 25 - 35 percent potassium hydroxide solution.
Do not attempt to open the battery pack under any circumstances. If the plastic housing around the battery pack breaks or exhibits any cracks, stop using the battery pack immediately and do not charge it again. The battery pack should be disposed of as hazardous waste in accordance with the relevant requirements.
Do not keep a spare battery in your pocket or store it in a tool box. Make sure that the poles do not come into contact with any metal objects during transport. Such objects can short and damage the battery pack, as well as result in burns or a fire. When storing or disposing of the battery pack tape over the contacts using thick insulating tape to prevent it from short-circuiting. Batteries that are stored for a prolonged period of time become discharged. Do not store or use the tool and the battery pack in areas where the temperature reaches, or exceeds, 50^ .
Do not subject the battery pack to any mechanical loads / processes.
The battery should not be located in close proximity to open flames, ovens or other high temperature areas. Do not expose the battery to direct sunlight and do not use or leave it in a vehicle during hot weather. This can result in the development of heat or to the battery exploding or igniting. Such use of the battery can also lead to reduced performance and a shorter service life.
If you intend to store a battery for a period without use then store battery at room temperature (18^ to 24^) , charged to about 30 - 50% of capacity. When storing for very long periods boost-charge the battery once per year to prevent overdischarge.
After charging the battery pack allow it to cool down. Do not leave it in warm areas or in direct sunlight.
Only charge the battery with the charger supplied.

ATTENTION:
The user must read the instruction manual in order to avoid injury.

SYMBOLS
Wear hearing protection. Wear eye protection. Wear respiratory protection.

Double insulated for additional protection.

Conforms to relevant safety standards.

Recycle packaging material wherever possible.

A product or battery bearing this symbol should not be disposed of along with household waste. Chemicals contained in electrical / electronic devices or batteries can be hazardous to health and the environment.

Dispos of electrical / electronic equipment or batteries at separate collection points which have the facilities to recycle and reuse the specific material. Your cooperation is critical to the success of such facilities and environmental protection.

For indoor use only.

Do not dispose of batteries in rivers or lakes or immerse them in water.

Do not dispose of batteries in fire. They will explode and cause injury.

Do not expose the battery to heat in excess of 40^ .

Approx. 30 minutes charging time
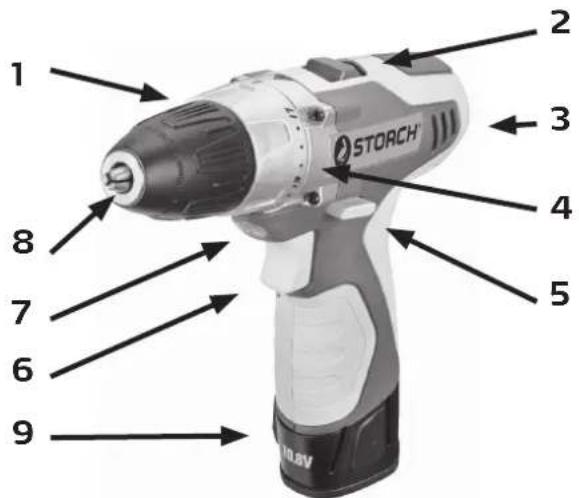
Device description
Drivefixx CORDLESS DRILL DRIVER
- Torque adjustment ring
- Two-speed switch (Hi / LOW)
- Air vents
- Drive mechanism
- Direction-of-rotation selector
(FORWARD/CENTER LOCK/REVERSE - On / Off switch
- LED Light
- Keyless chuck 10 mm
- Battery pack
If the LED light begins to flash rapidly and continuously when the trigger switch on the drill is depressed, the battery pack's power has run out, and the battery pack needs to be recharged.
Unlike other battery types, lithium-ion batteries provide an even performance throughout their operating period. The tool is not subjected to a slow, continuous decrease in performance during use. A sudden drop in performance indicates that the battery pack is depleted and needs to be recharged.
NOTE:
The LED light can also flash in the event of an overload or high temperature (see BATTERY PROTECTION).
BATTERY PROTECTION
The battery protection circuit protects the battery pack from extreme temperatures, over-discharge and overcharge. In order to protect the battery from damage and to increase its service life, the battery protection circuit switches the battery pack off as soon as it is overloaded or if it gets too high during use. This may be the case in the event of high torques, blockages or an overload. This intelligent system switches the battery pack off as soon as the temperature exceeds 80^ and resumes normal operation when the temperature falls to between 0^ and 50^ again. The LED light flashes slowly when the battery protection circuit detects a transient overload.
NOTE:
The battery can be reset automatically. If the LED light continues to flash rapidly, it indicates a low battery level. Insert the battery into the charger to charge it. (See the section above under CHARGE LEVEL INDICATOR.)
NOTE:
A significantly reduced operating capacity after a full charging cycle indicates that the battery pack is depleted and needs to be replaced.
This lithium-ion battery pack functions optimally at temperatures between 0^ and 40^ . If the battery pack is very cold, it may "pulsate" during the first minute of operation to warm itself sufficiently. Connect the battery pack to a tool and then operate the tool without exerting a high load. The battery pack will have warmed up sufficiently after approximately one minute and will start to operate normally.
WHEN TO CHARGE THE BATTERY PACK
It is not necessary to discharge the battery pack completely before recharging. The lithium-ion battery can be charged at any time and it doesn't develop a "memory effect" if it is recharged after a partial discharge.
Remove the battery pack from the tool at an appropriate time. Refresh the charge level of the battery pack again before prolonged periods of operation.
Due to Lithium-lon fade-free properties, the only time it is necessary to charge the Lithium-lon battery pack is when the pack has reached the end of its charge. To signal the end of charge, power to the tool will drop quickly. Charge the battery pack as needed.
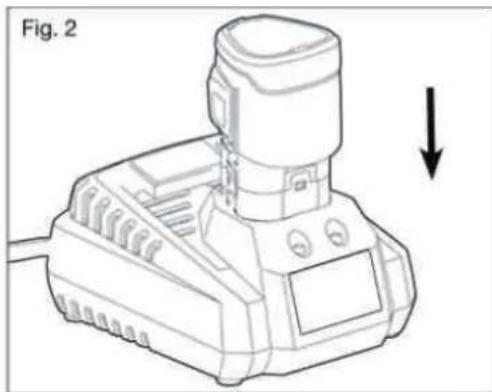
HOW TO CHARGE THE BATTERY PACK
NOTE:
This lithium-ion battery pack is delivered partially charged. Charge the battery pack fully prior to first use. A fully discharged battery pack can be fully charged at an ambient temperature between 0^ and 40^ in approximately 30 minutes.
Charge the lithium-ion battery pack using the supplied charger.
Connect the charger to a power supply.
Insert the battery pack into the charger (Fig. 2).
The green light will flash while the battery pack is charging. After charging is complete, the green LED on the charger will be on. The flickering red light indicates a defective battery or a bad connection between the battery and the charger.
The battery pack will fully charge if left on the charger, but it will not overcharge.
NOTE:
The charger can be operated with the majority of generators and converters with a rated power of 300 watts or above.

LED FUNCTIONS OF CHARGER (Fig. 3)
| LED indicates HIGH | / DEVICE TEM-PERATURE | DEFECT BATTERY CHARGING BATTERY FULL | |
| Battery pack Hot cold battery Defective Charging Fully charged | |||
| Red LED On Flashes Off | |||
| Green LED | Off | Off | Flashes |
| Action | Charging starts when the battery temperature returns to between 0°C and 40°C | Barmy pack or charger is defective | Charges in 30 minutes |
CHARGING A HOT BATTERY PACK
If the temperature of the battery pack exceeds the normal temperature range, the red LED light will illuminate and the green LED light will go out. When the battery pack cools down to approximately 40^ the charger will automatically start the charging process.
CHARGING A COLD BATTERY PACK
If the temperature of the battery pack falls below the normal temperature range, the red LED light will illuminate and the green LED light will go out. When the battery pack heats up to approximately 0^ the charger will automatically start the charging process.
DEFECTIVE BATTERY
If the charger detects a problem, the red LED will begin flashing and the green LED will be off.
If the battery pack is identified as defective, remove it and re-insert it into the charger. If the status of the LED lights indicate a "defective" battery pack for a second time, charge another battery pack.
If the other battery pack is charged without any problems, dispose of the defective battery pack properly (see the section entitled "Maintenance").
If the other battery pack is also identified as "defective", it is possible the charger is damaged.
BATTERY CHARGING
When the battery pack is charged at a normal ambient temperature (0^ to 40^) , the green LED light will flash and the red LED light will remain off. The battery pack is fully charged in approximately 30 minutes.
BATTERY FULL
If the battery pack is within normal temperature range, the green LED will illuminate and the red LED will be off. The battery pack is fully charged and ready to use. The battery pack will fully charge if left on the charger, but it will not overcharge.
NOTE:
The charger can heat up in the event of multiple charging cycles. This is part of the normal charging process. Always charge in well ventilated areas.
CONNECTING THE BATTERY PACK (Fig.4)
Make sure that the drill driver is set to "OFF".
Align the raised ribs on the battery pack with the grooves in the drill and insert the battery pack into the drill.
NOTE:
Before using the tool make sure that the lock on the battery pack is engaged and that the battery pack is secured to the tool.
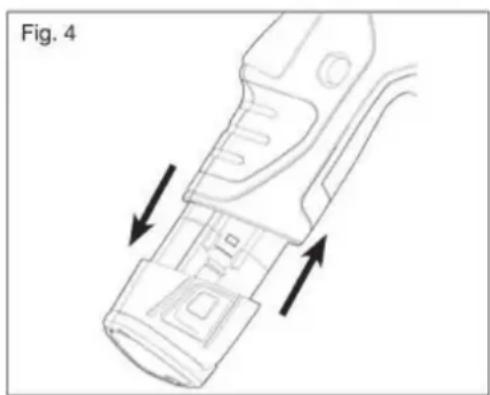
REMOVING THE BATTERY PACK (Fig. 4)
Lock the trigger switch on the drill driver by actuating the direction switch (forward / reverse / switch lock) to the centre position.
Depress the battery release buttons located on the both sides of the battery pack to release it.
Pull the battery pack out and remove it from the tool.

ATTENTION:
When installing the battery pack in the tool make sure that the raised rib on the battery pack is aligned with the groove inside the drill driver and that the lock is engaged properly. Incorrect installation of the battery pack can damage internal components.
WARNING:
Battery powered tools are always in an operational state. The direction of rotation switch should therefore always be locked when the tool is not in use.
Operating the cordless drill driver
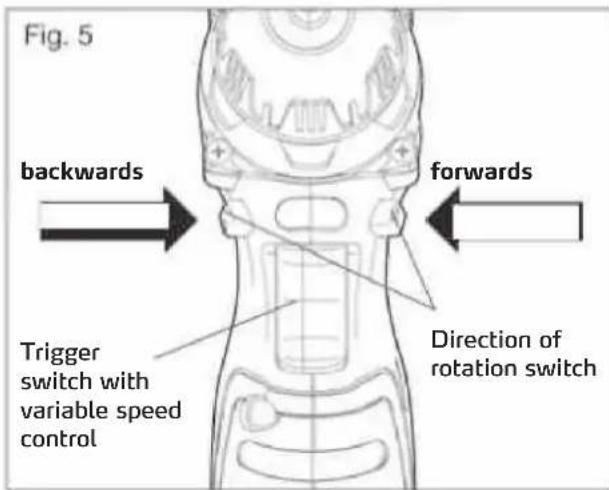
TRIGGER SWITCH (Fig. 5)
To turn the drill ON, depress the trigger switch. To turn it OFF, release the trigger switch.
VARIABLE SPEED (Fig.5)
The variable-speed trigger switch delivers higher speed with increased trigger pressure and lower speed with decreased trigger pressure.
DIRECTION OF ROTATION SWITCH (FORWARDS / SWITCH LOCK / BACKWARDS) (Fig. 5)
The direction of rotation of the bit can be reversed and is controlled by a selector located above the trigger switch. With the drill held in normal operating position:
Actuate the direction of rotation switch on the left of the tool for drilling.
Actuate the direction of rotation switch on the right of the tool for reverse motion.
To prevent the drill from being switched on accidentally set the switch to the OFF position (switch lock, centre) when the drill is not in use.

ATTENTION:
To prevent damaging the transmission only change the direction of rotation when the tool is at a complete standstill.
NOTE:
The drill driver will not work if the direction of rotation switch is not engaged properly on the left or right-hand side.
ELECTRIC BRAKE
To stop the drill, release the trigger switch and allow the chuck to come to a complete stop. The electric brake quickly stops the chuck from rotating. This feature engages automatically when you release the trigger switch.
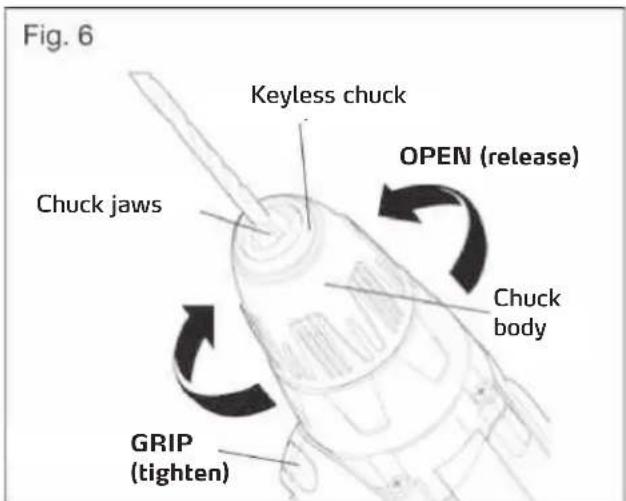
KEYLESS CHUCK (Fig. 6)
The drill driver has a keyless chuck to tighten or release drill bits in the chuck jaws. The arrows on the chuck indicate the direction in which to rotate the chuck body in order to GRIP (tighten) or OPEN (release) the chuck jaws on the drill bit.

WARNING:
Do not use the rotary motion of the drill to tighten the chuck jaws around the drill bit while holding the chuck body in one hand. The chuck body can spin in your hand, or your hand could slip and come into contact with the rotating drill. This can result in an accident and serious bodily injury.
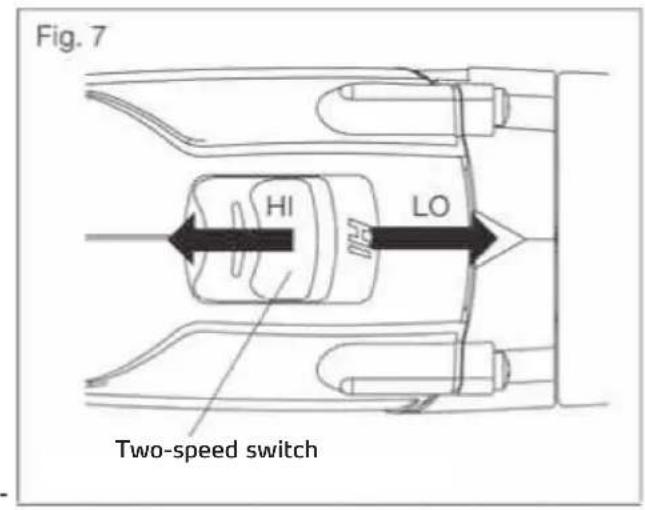
TWO-SPEED GEARBOX (Fig. 7)
The drill driver has a two-speed gearbox designed for drilling or driving at LO or HI speeds. A slide switch is located on the top of the tool to select either LO or HI speed.
When the drill driver is operated using the LO setting the speed is reduced and the drill exhibits more force and a higher torque. The HI setting increases the speed and provides the drill driver with a higher driving power. Use the LO setting for power and torque-intensive applications, and use the HI setting for rapid drilling and screwing procedures.
Use the LO setting for starting holes without a centre punch, drilling metal or plastic, drilling ceramics, or in applications requiring a higher torque (see below).
The HI setting is better suited for drilling into wood and wood composites.

NOTE:
Do not operate the drill driver for prolonged periods while in the LO setting. Continuous use of the LO setting can result in the drill driver overheating. If it does overheat, cool the drill driver by operating it freely in the HI setting.
ATTENTION:
Never change the setting while the machine is running. Failure to comply with this could result in serious damage to the drill driver.
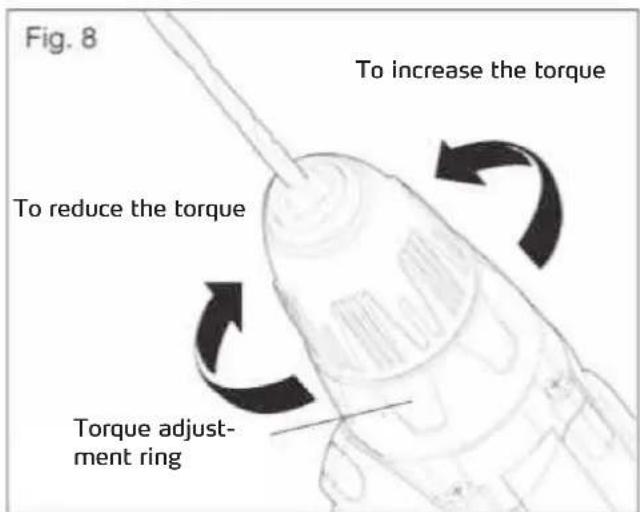
ADJUSTABLE-TORQUE CLUTCH (Fig. 8)
The Torque clutch can be adjusted to 17 different settings. The higher the torque setting, the more force the drill produces to turn an object in either LO or HI rotation speed.
When using the drill driver for different driving applications, increase or decrease the torque in order to help prevent damaging screw heads, threads, workpieces, etc. Adjust the torque by rotating the torque-adjustment ring.
The setting depends on the task at hand, the type of application, the mounting device and the material. Generally speaking a higher torque should be used for larger screws. If the torque is too high, it can result in screws being damaged or broken.
For delicate operations, such as removing a partially stripped screw, use a low torque setting. For operations such as drilling into hardwood, use a higher torque setting.

NOTE:
When adjusting the torque setting make sure that the switch is either completely in the LO or HI position.
ATTENTION:
Do not adjust the torque while the machine is running.
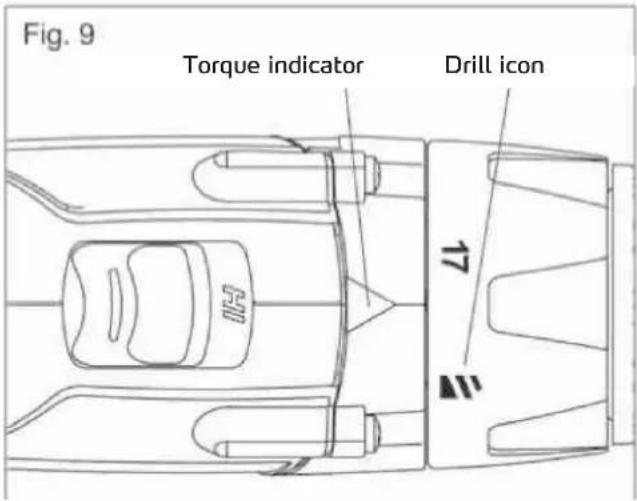
DRILL MODE (Fig. 9)
Select the drill mode for drilling and other heavy duty applications.
To select the drill mode, rotate the torque-adjustment ring until the icon aligns with the torque indicator and clicks into position.
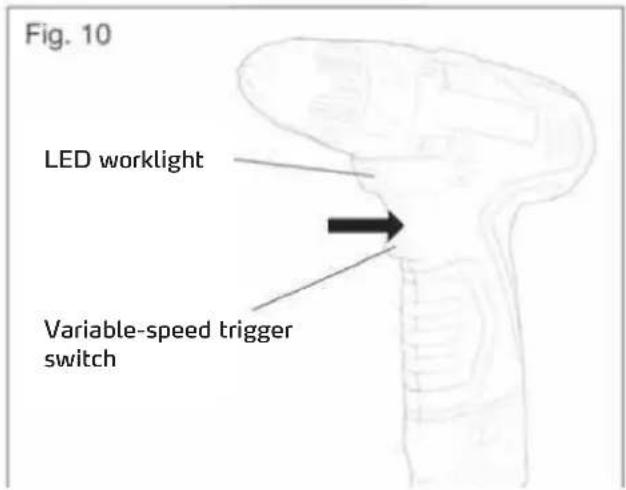
LED WORKLIGHT (Fig. 10)
The LED worklight underneath the chuck will illuminate when the trigger switch is depressed. This provides additional lighting on the surface of the workpiece for operation in lower light areas. The LED worklight will turn off when the trigger switch is released.
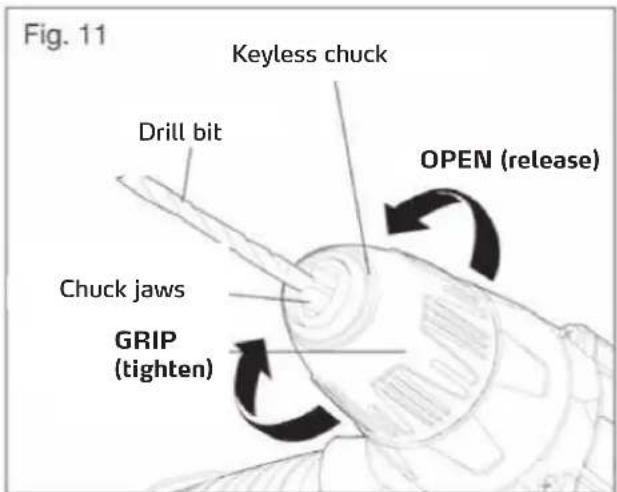
INSTALLING BITS (Fig. 11)
Lock the trigger switch by placing the direction-of-rotation selector in the OFF (center) position.
Open or close the chuck jaws to a point where the opening is slightly larger than the bit size you intend to use.
Raise the front of the drill slightly to keep the bit from falling out of the chuck jaws.
Insert a drill bit.
NOTE:
Rotate the chuck body in the direction of the arrow marked GRIP to close the chuck jaws. Do not use a key to tighten or loosen the jaws.
Tighten the chuck jaws securely on the bit
REMOVING BITS (Fig. 11)
Lock the trigger switch by placing the direction-of-rotation selector in the OFF (center) position.
Open the chuck jaws.

NOTE:
Rotate the chuck body in the direction of the arrow marked OPEN to open the chuck jaws. Do not use a key to tighten or loosen the jaws.
Remove the drill bit.

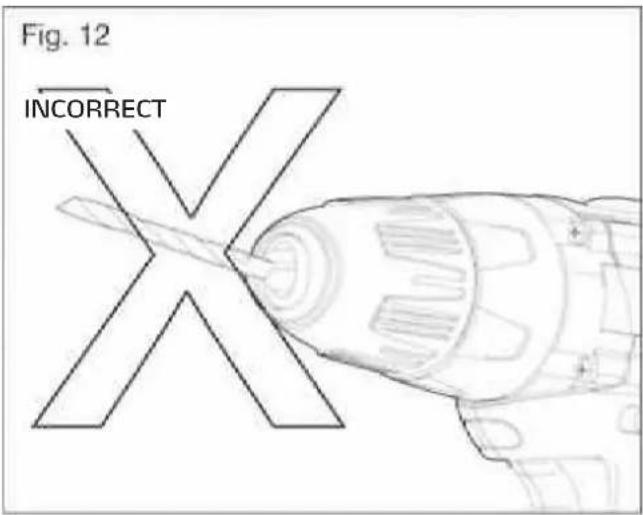
WARNING:
Insert the drill bit into the chuck jaws so that it is straight. Do not insert the drill bit into the chuck jaws at an angle and then tighten it (see Fig. 12). This can cause the bit to be ejected from the drill, which can result in severe personal injury or damage to the chuck.
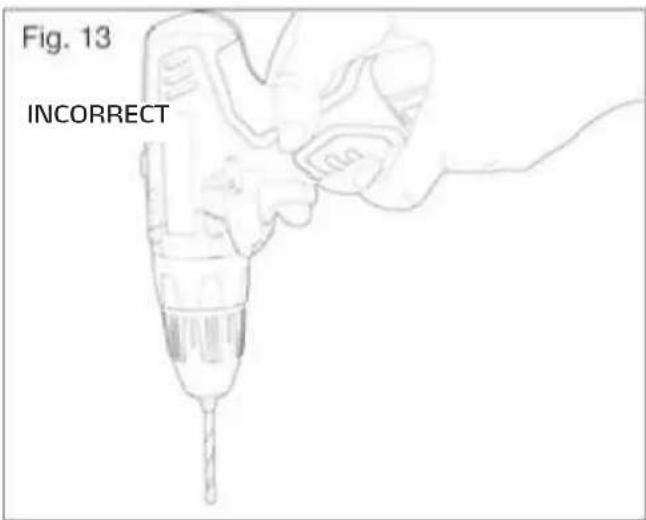
DRILLING (Fig. 13)
Check that the direction-of-rotation selector is at the correct setting (forward or reverse).
Secure the material to be drilled in a visor with clamps to keep it from turning as the drill bit rotates.
Grasp the drill firmly and hold the bit at the position to be drilled.
Depress the trigger switch to start the drill.
Move the drill bit into the workpiece, applying only enough pressure to keep the bit cutting. Do not force the drill or apply side pressure to elongate a hole.
When drilling hard, smooth surfaces, use a center punch to mark the desired location of the hole. This will prevent the drill bit from slipping off-center as the hole is started.
When drilling metals, use light oil on the drill bit to keep it from overheating. The oil will prolong the life of the bit and increase the drilling action.
If the bit jams in the workpiece or if the drill stalls, stop the tool immediately. Remove the bit from the workpiece and determine the reason for jamming.

WARNING:
This drill driver is equipped with an electric brake. When the brake is working properly sparks can be seen through the vents in the housing. This is a normal occurrence and a consequence of the braking process.
DRILLING IN WOOD
Use a wood drill for the best possible results.
Begin drilling at a very low speed to prevent the bit from slipping off the starting point.
Increase speed as the drill bit bites into the material.
When drilling "through" holes place a block of wood behind the workpiece to prevent ragged or splintered edges on the rear side of the hole.
DRILLING IN METAL
Use metal or steel drill bits for the best possible results.
When drilling metals, use light oil on the drill bit to keep it from overheating. The oil will prolong the life of the bit and increase the drilling action.
Begin drilling at a very low speed to prevent the bit from slipping off the starting point.
Maintain a speed and a pressure which allows cutting without the bit or drill overheating. Applying too much pressure will: cause the drill to overheat; cause the bearings to wear; bend or burn bits; produce off-centre or irregular-shaped holes.
MASONRY DRILLING
Use a masonry bit (carbide tip) for the best possible results when drilling brick, tiles, concrete, etc.
Maintain a speed and a pressure which allows cutting without the bit or drill overheating. Applying too much pressure will: cause the drill to overheat; cause the bearings to wear; bend or burn bits; produce off-centre or irregular-shaped holes.
Apply light pressure and medium speed for best results in brick.
Apply additional pressure for hard materials such as concrete.
When drilling holes in tile, practice on a scrap piece to determine the best speed and pressure.
Begin drilling at a very low speed to prevent the bit from slipping off the starting point.
WARNING:
Protective goggles or safety glasses with side protection should be worn while working with the drill driver or in dusty environments. If a lot of dust accumulates you should also wear a dust mask.

MAINTENANCE
WARNING:
To avoid serious bodily injury remove the battery pack from the tool before conducting any cleaning and maintenance work.

WARNING:
Only use original spare parts for maintenance work. The use of other parts can be dangerous or result in damage to property.
WARNING:
We do not recommend the use of compressed air to clean the drill driver. If the device can only be cleaned with compressed air, make sure you always wear protective goggles or safety glasses with side protection while cleaning. If a lot of dust accumulates you should also wear a dust mask.
SERVICE and MAINTENANCE
WARNING:

In order to ensure operational safety, all repairs and maintenance work must be conducted by a qualified service partner of STORCH.
Take care not to expose this tool to the rain.
Cleaning:
Avoid using solvents when cleaning plastic parts. Most plastic parts are susceptible to damage from various types of commercial solvents and may be damaged by their use. Use clean cloths to remove dirt, carbon dust, etc.
Lubrication:
All the gears in this tool are lubricated with a sufficient amount of high grade lubricant for the life of the unit under normal operating conditions, therefore no further lubrication if required.
Electrical products must not be thrown out with domestic waste. Recycle them at the special disposal centers provided for the purpose. Contact your local authorities or stockiest for advice on recycling.
Li-ion:
Do not dispose of battery packs/batteries into household waste, fire or water. Battery packs/batteries should be collected, recycled or disposed of in an environmental-friendly manner.
7. Warranty
Warranty conditions
A warranty period of 12 months from the date of purchase/date of invoice applies to our tools for commercial customers. If we have granted an extended warranty period, this said period will be noted separately in the operating manual for the equipment in question.
Claims
If you wish to claim under our warranty or guarantee, please return the complete equipment and your invoice to our logistics centre in Berka, postage paid, or send it to one of our authorised service centres.
Your rights under our warranty or guarantee
Claims for repairs only relate to material or manufacturing defects and are subject to the intended use of the equipment. Wear parts (e.g. battery packs, drill bits, etc.) are not covered by such claims. All claims shall become void in the event of the installation of parts supplied by a third party, improper handling and storage, as well as apparent failure to comply with the operating manual.
Repairs
All repairs must be conducted on our premises or by an authorised STORCH service centre.
EC Declaration of Conformity
We herewith declare:
THAT THE FOLLOWING MACHINE COMPLIES WITH THE APPROPRIATE BASIC SAFETY AND HEALTH REQUIREMENTS OF THE EC DIRECTIVE BASED ON ITS DESIGN AND TYPE, AS BROUGHT INTO CIRCULATION BY US.
In case of alternation of the machine, not agreed upon by us, this declaration will lose its validity.
Device description: Cordless drill driver
Device model: DriveFixx
Additional details: 10.8V
Year of CE marking: 2010
Applicable EC Directive:
Machinery Directive 2006 / 42 / EG
Low Voltage Directive 2006 / 95 / EG
EMC Directive 2004 / 108 / EG
Applied harmonised standards: EN 60745-1
EN60745-2-1
EN60745-2-2
EN55014-1
EN55014-2
EN61000-3-2
EN61000-3-3
EN60335-1
EN60335-2-29
EN62233
Authorised agent for compilation of the technical documents:
- Director of Product Management Technology & Service
-
- Managing Director

Wuppertal, October 2010
cz
Dekujeme Vam
PROVOZ PřI NIZKÍCH TEPLOTÁCH
Tento lithium ionovy akublok poskytuje pri teplotach mezi 0^ a 40^ optimalni vykon. Kdyz je akublok velmi studeny, muze v prvni minuté provozu "pulzovat", aby se sam ohral. Akublok pripojte k nariadia nariadipouzivejte bez yvsokeho zatiženi. Po cca jegne minuté se akublok ohral a funguje normalne.
NABIJENI AKUBLOKU - KDY?
Pred dal'sim nabijenim neni tbreba akublok upnve vybit. Lithium ionovy akumulator lze kdykoli nabit a nevytvariz zadny "Memory efekt", kdyz se nabije po castecnem vybiti.
Akublok ve vhdnou dobu odejmte od naradi. Pred delsi dobou provozu nabiti akubloku jeste Jednou ozivte.
62 00 00 DriveFixx 10.8 V Cordless Drill Driver
62 00 30 Replacement battery 10.8 V
62 00 40 Battery charger