Legacy SE300 - Sewing machine SINGER - Free user manual and instructions
Find the device manual for free Legacy SE300 SINGER in PDF.
User questions about Legacy SE300 SINGER
0 question about this device. Answer the ones you know or ask your own.
Ask a new question about this device
Download the instructions for your Sewing machine in PDF format for free! Find your manual Legacy SE300 - SINGER and take your electronic device back in hand. On this page are published all the documents necessary for the use of your device. Legacy SE300 by SINGER.
USER MANUAL Legacy SE300 SINGER
INSTRUCTION MANUAL SE300 SE3402 This household sewing machine is designed to comply with IEC/EN 60335-2-28 and UL 1594.
IMPORTANT SAFETY INSTRUCTIONS
When using an electrical appliance, basic safety precautions should always be followed, including the following: Read all instructions before using this household sewing machine. Keep these instructions conveniently near the machine. Make sure to hand them over if the machine is given to a third party.
IMPORTANT SAFETY INSTRUCTIONS
DANGER To reduce the risk of electric shock: A sewing machine should never be left unattended when plugged in. Always unplug this sewing machine from the electric outlet immediately after using and before cleaning, removing covers or when making any other user servicing adjustments mentioned in the instruction manual. WARNING
7RUHGXFHWKHULVNRIEXUQV¿UHHOHFWULFVKRFNRULQMXU\WRSHUVRQV
- Do not allow to be used as a toy. Close attention is necessary when this sewing machine is used by or near children.
- Use this sewing machine only for its intended use as described in this manual. Use only attachments recommended by the manufacturer as contained in this manual.
- Never operate this sewing machine if it has a damaged cord or plug, if it is not working properly, if it has been dropped or damaged, or dropped into water. Return the sewing machine to the nearest authorized service center for examination, repair, electrical or mechanical adjustment.
- Never operate the sewing machine with any air openings blocked. Keep ventilation openings of the sewing machine free from the accumulation of lint, dust, and loose fabric.
- Always use the proper needle plate. The wrong plate can cause the needle to break.
- Wear safety glasses.
6ZLWFKWKHVHZLQJPDFKLQHRII³´ZKHQPDNLQJDQ\DGMXVWPHQWLQWKHQHHGOHDUHDVXFKDV
threading needle, changing needle, threading bobbin, changing presser foot, etc.
- Never drop or insert any object into any opening.
- Do not use outdoors.
- Do not unplug by pulling on cord. To unplug, grasp the plug, not the cord.
- The foot control is used to operate the machine. Avoid placing other objects on the foot control.
- Do not use the machine if it is wet.
- If the LED lamp is damaged or broken, it must be replaced by the manufacturer or its service
DJHQWRUDVLPLODUO\TXDOL¿HGSHUVRQLQRUGHUWRDYRLGDKD]DUG
- If the supply cord connected with the foot control is damaged, it must be replaced by the
PDQXIDFWXUHURULWVVHUYLFHDJHQWRUDVLPLODUO\TXDOL¿HGSHUVRQLQRUGHUWRDYRLGDKD]DUG3
PREFACE Thank you for your purchase of this sewing machine. This machine intended for household use will provide you with excellent performance in sewing from light to heavy material and sewing embroidery designs and lettering. Please refer to this booklet for proper use and optimum performance. To get the most out of your sewing machine, read the entire instruction manual before attempting to operate the machine. Then familiarize yourself with the machine by following the instruction manual page by page. To ensure that you are always provided with the most modern sewing capabilities, the manufacturer reserves the right to change the appearance, design or accessories of this sewing
PDFKLQHZKHQFRQVLGHUHGQHFHVVDU\ZLWKRXWQRWL¿FDWLRQRUREOLJDWLRQ
FOR EUROPE ONLY: This appliance can be used by children aged from 8 years and above and persons with reduced physical, sensory or mental capabilities or lack of experience and knowledge if they have been given supervision or instruction concerning use of the appliance in a safe way and understand the hazards involved. Children shall not play with the appliance. Cleaning and user maintenance shall not be made by children without supervision. The noise level under normal operating conditions is less than 70db. The machine must only be used with foot control of type C-9001 manufactured by CHIEN HUNG TAIWAN Ltd. FOR OUTSIDE EUROPE: 7KLVVHZLQJPDFKLQHLVQRWLQWHQGHGIRUXVHE\SHUVRQVLQFOXGLQJFKLOGUHQZLWKUHGXFHG physical, sensory or mental capabilities, or lack of experience and knowledge, unless they have been given supervision or instruction concerning use of the sewing machine by a person responsible for their safety. Children should be supervised to ensure that they do not play with the sewing machine. The noise level under normal operating conditions is less than 70db. The machine must only be used with foot control of type C-9001 manufactured by CHIEN HUNG TAIWAN Ltd.
SERVICING OF DOUBLE INSULATED PRODUCTS
In a double-insulated product, two systems of insulation are provided instead of grounding. No ground means is provided on a double-insulated product, nor should a means for grounding
parts for a double-insulated product must be identical to those parts in the product. A double- LQVXODWHGSURGXFWLVPDUNHGZLWKWKHZRUGVµ'28%/(,168/$7,21¶RUµ'28%/(,168/$7('
SETTING UP THE MACHINESEWING
- This sewing machine is provided with double insulation. Use only identical replacement parts.
6HHLQVWUXFWLRQVIRU6HUYLFLQJRI'RXEOH,QVXODWHG$SSOLDQFHV
SAVE THESE INSTRUCTIONS
2. Pressure Regulator
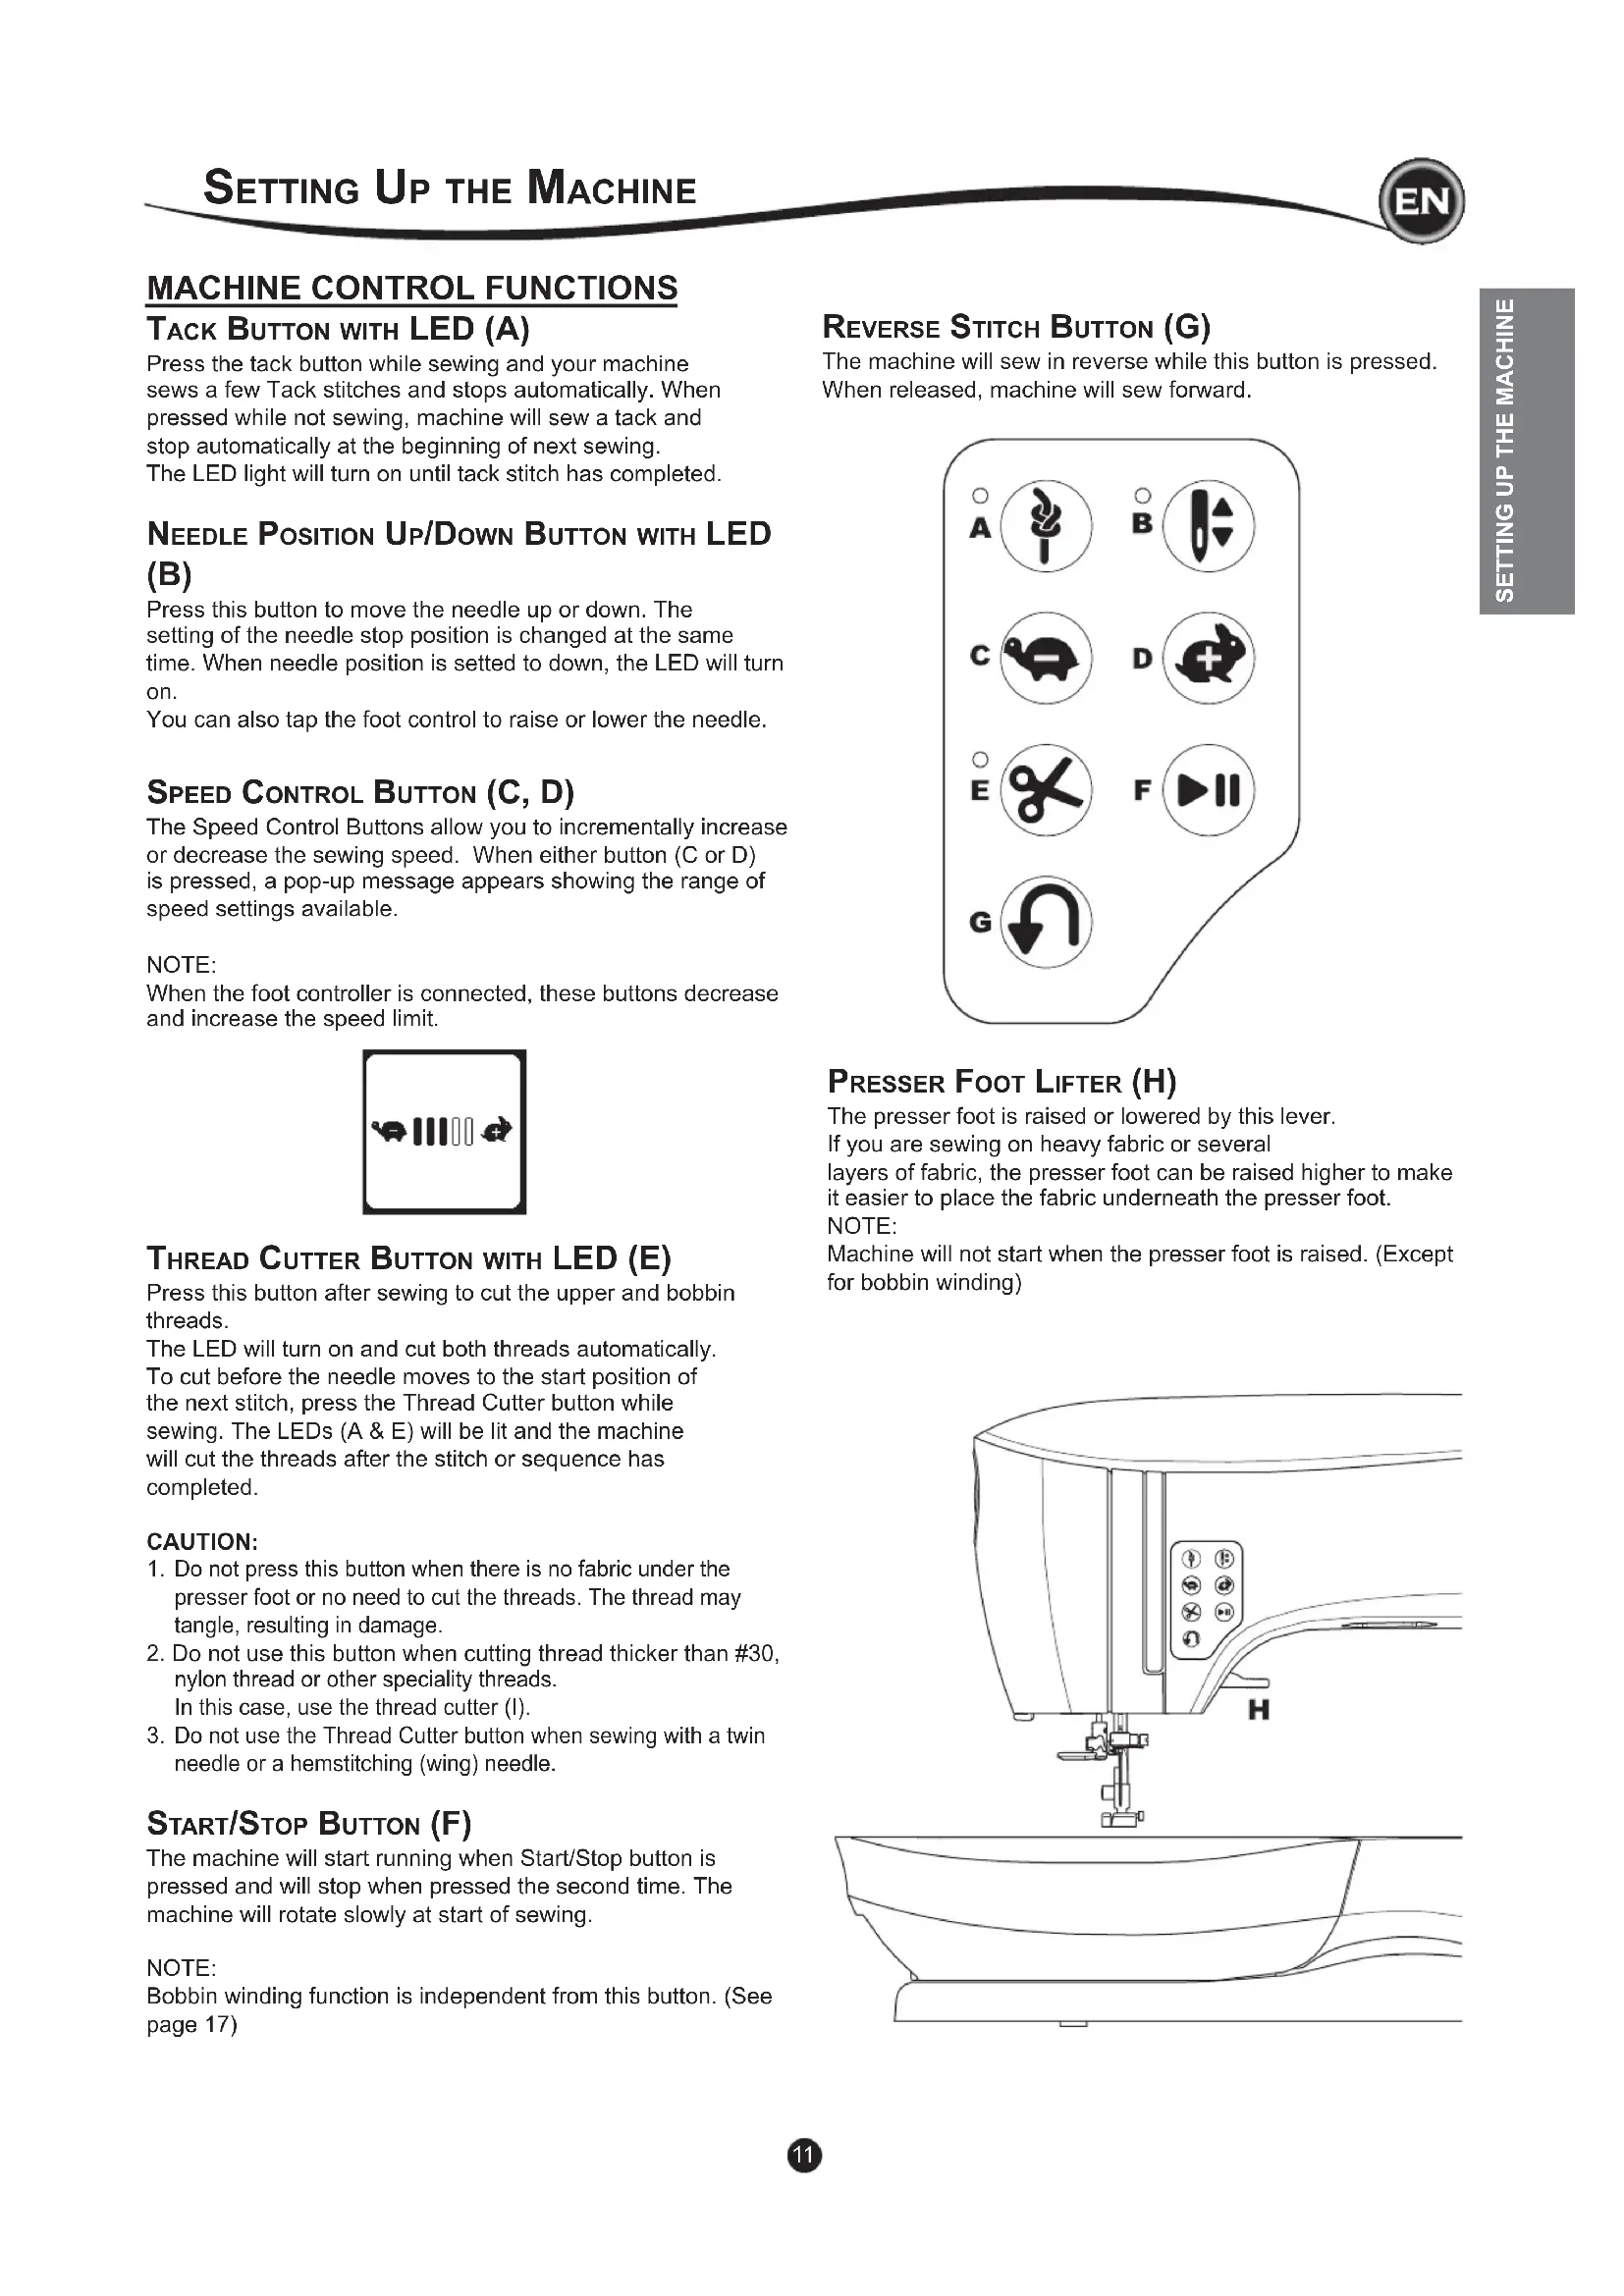
11. Tack Button with LED
12. Needle Position Up/
Down Button with LED 6SHHG'HFUHDVH%XWWRQ
The accessory tray is located on the left side of the embroidery unit. Pull to open.
REMOVABLE EXTENSION TABLE
TO OPEN THE ACCESSORY TRAY
7KHPDFKLQH¶VDFFHVVRULHVDUHVWRUHGLQWKHWUD\RIWKH
removable extension table. To open the tray, reach under the table, then pull the lever located under the table, while resting your thumb on the top edge of the table.
TO REMOVE THE EXTENSION TABLE
+ROGOHIWVLGHRIWKHH[WHQVLRQWDEOHDQGSXOOWRWKHOHIW127 SXOOLQJWKHOHYHUIRUDFFHVVRU\WUD\ To attach, slide the table to the right.8 The presser foot must be changed according to the stitch
RUWHFKQLTXH\RXVHZ,QIRUPDWLRQRQVHZLQJDQGVHZLQJ
WHFKQLTXHVEHJLQVRQSDJH
CHANGING THE PRESSER FOOT
1. Turn the hand wheel toward you until the needle is at its
3. Remove the presser foot by pushing the presser foot
release lever toward you.
4. Place desired foot with its pin directly under the slot in
presser foot holder.
5. Lower the presser foot lifting lever and the presser foot will
When attaching presser feet that have their own shank, or when cleaning the machine, you should remove the presser foot holder.
3. To replace the holder, pull up the holder as far as it will go
from bottom of presser bar.
4. Tighten the presser foot screw securely using the
screwdriver. ACCESSORIES CAUTION 7RSUHYHQWDFFLGHQWV 7XUQRIIWKHSRZHUVZLWFKEHIRUH\RXFKDQJHWKH SUHVVHUIRRW NOTE: This sewing machine is a low shank model. When VKRSSLQJIRURSWLRQDO6,1*(5SUHVVHUIHHWDQGDFFHVVRULHV make sure they are designed for low shank models.9
cotton, silk All-purpose
cotton, machine TXLOWLQJ All-purpose polyester, heavy duty, topstitching thread All-purpose polyester All-purpose polyester All-purpose polyester, heavy duty, topstitching thread
1. Turn the hand wheel toward you until the needle is at its
2. Loosen the needle clamp screw.
3. Remove the needle.
,QVHUWQHZQHHGOHLQWRQHHGOHFODPSZLWKWKHÀDWVLGHWRWKH back and push it up as far as it will go.
5. Tighten the needle clamp screw.
1. Place machine on stable surface.
2. Connect the power line cord to the machine by inserting
the 2-hole plug into the power cord connector.
SETTING UP THE MACHINE
3. Connect the power line plug to the electric outlet.
4. Turn on the power switch.
DTXDOL¿HGHOHFWULFLDQWRLQVWDOOWKHSURSHURXWOHW'RQRWPRGLI\ the plug in any way. FOOT CONTROLLER Use of foot controller will permit control of start, stop and speed with your foot. 7XUQRIIWKHSRZHUVZLWFKV\PERO2
2. Push foot controller plug into the connector on machine.
3. Place foot controller at your feet.
4. Turn on the power switch.
5. A lamp will light up when switch is turned on.
6. The harder you press the foot controller, the faster the
TACK BUTTON WITH LED (A) Press the tack button while sewing and your machine sews a few Tack stitches and stops automatically. When pressed while not sewing, machine will sew a tack and stop automatically at the beginning of next sewing. The LED light will turn on until tack stitch has completed. NEEDLE POSITION UP/DOWN BUTTON WITH LED (B) Press this button to move the needle up or down. The setting of the needle stop position is changed at the same time. When needle position is setted to down, the LED will turn on. <RXFDQDOVRWDSWKHIRRWFRQWUROWRUDLVHRUORZHUWKHQHHGOH SPEED CONTROL BUTTON (C, D)
7KH6SHHG&RQWURO%XWWRQVDOORZ\RXWRLQFUHPHQWDOO\LQFUHDVH
RUGHFUHDVHWKHVHZLQJVSHHG:KHQHLWKHUEXWWRQ&RU'
is pressed, a pop-up message appears showing the range of speed settings available. NOTE: When the foot controller is connected, these buttons decrease and increase the speed limit. THREAD CUTTER BUTTON WITH LED (E) Press this button after sewing to cut the upper and bobbin threads. The LED will turn on and cut both threads automatically. To cut before the needle moves to the start position of the next stitch, press the Thread Cutter button while
VHZLQJ7KH/('V$(ZLOOEHOLWDQGWKHPDFKLQH
ZLOOFXWWKHWKUHDGVDIWHUWKHVWLWFKRUVHTXHQFHKDV completed. CAUTION:
Do not press this button when there is no fabric under the presser foot or no need to cut the threads. The thread may tangle, resulting in damage.
2. Do not use this button when cutting thread thicker than #30,
pressed and will stop when pressed the second time. The machine will rotate slowly at start of sewing. NOTE: %REELQZLQGLQJIXQFWLRQLVLQGHSHQGHQWIURPWKLVEXWWRQ6HH SDJH
SETTING UP THE MACHINE
PRESSER FOOT LIFTER (H) The presser foot is raised or lowered by this lever. If you are sewing on heavy fabric or several layers of fabric, the presser foot can be raised higher to make it easier to place the fabric underneath the presser foot. NOTE: 0DFKLQHZLOOQRWVWDUWZKHQWKHSUHVVHUIRRWLVUDLVHG([FHSW IRUEREELQZLQGLQJ REVERSE STITCH BUTTON (G) The machine will sew in reverse while this button is pressed. When released, machine will sew forward. nylon thread or other speciality threads. In this case, use the thread cutter (I).12 THREAD CUTTER (I) Use this cutter if the Thread Cutter button is not used.1. Raise the presser foot and bring fabric and threadsbackward after sewing.2. Hook the threads to the thread cutter from back to front.3. Pull the thread tails to cut the threads. PRESSURE REGULATOR (J) The correct presser foot pressure allows fabrics to feed properly while sewing. The setting of the presser foot pressure is determined mainly by the weight of the fabric being sewn.)RUOLJKWZHLJKWIDEULFVVXFKDVVKHHUVEDWLVWHYRLOHHWFWKHSUHVVXUHLVGHFUHDVHG)RUKHDY\ZHLJKWIDEULFVOLNHGHQLPRUcanvas, the pressure in increased.To increase the pressure, turn dial to 5.To decrease the pressure, turn dial to 1.)RUPRVWIDEULFVWXUQGLDOWR1 TOP COVER (K) To open the top cover, lift up the front right side of the cover. HAND WHEEL (L) %\WXUQLQJWKHKDQGZKHHOWKHQHHGOHZLOOUDLVHRUORZHU<RXshould always turn hand wheel toward you. DROP FEED LEVER (M) The feed dogs project up through the needle plate, directly below the presser foot. Their function is to move the fabric ZKLOHLWLVEHLQJVHZQ7KH'URS)HHG/HYHUORFDWHGRQWKHback of the free arm controls the feed dogs. )RURUGLQDU\VHZLQJPRYHWKHOHYHUWRWKHULJKW7KLVUDLVHVIHHGGRJVWRWKHLUKLJKHVWSRVLWLRQ)RUPRVWVHZLQJWKHOHYHUshould be in this position.)RUGDUQLQJRUIUHHPRWLRQHPEURLGHU\RUZKHQHYHUIDEULFLVWRbe moved by hand, move the lever to the left to lower the feed dogs.NOTE:After sewing with the feed dogs lowered, push the Drop )HHG/HYHUEDFNWRWKHULJKWWRUHVXPHVHZLQJZLWKIHHGdogs engaged. Push the lever to the right and then turn the handwheel toward you one full revolution. This will re-engage the feed dogs.
MOUNTING MACHINE IN SEWING CABINET (N) There are two holes on the underside of the machine designed for mounting the machine into a sewing cabinet. Align the KROHVLQGLFDWHGLQWKHSLFWXUHZLWKWKHFRUUHVSRQGLQJKROHVLQWKHFDELQHWEDVH$WWDFKWKHPDFKLQHZLWKVFUHZV6FUHZVQRWLQFOXGHG
HOME SCREEN (A) When you turn on the power, machine will display the Home
By pressing this button, you can select and sew stitch pattern normally. b. Sequence Mode Button By pressing this button, you can combine stitch patterns and letters easily by selecting each pattern or letter. )256(/(&7,1*$1'6(77,1*2)6(48(1&(02'( 6((3$*( NOTE:
$WWKH+RPH6FUHHQE\SUHVVLQJWKH6HZLQJ0RGHEXWWRQ
the pattern chart located inside of the top cover. NOTE: It is not possible to sew when the embroidery unit is attached. STITCH INFORMATION
The shape of stitch pattern will change according to the setting of stitch length, width, mirror/reverse and elongation. b. Pattern Number
F 5HFRPPHQGHG3UHVVHU)RRW
Indicated presser foot is one of suggested foot for normal VHZLQJ<RXFDQXVHRWKHUSUHVVHUIHHWDVGHVFULEHGLQWKLV instruction manual.
G 6WLWFK:LGWK1HHGOH3RVLWLRQ
H 6WLWFK/HQJWK'HQVLW\
select that stitch number immediately. 3UHVVWZRRUWKUHHGLJLWVLQTXLFNVXFFHVVLRQWRVHOHFWDVWLWFK from 10 and up. If the stitch number does not exist, you will hear a beep and the last entered stitch number will remain selected.
When you turn on the power, the touch panel LCD will display
NOTE: If the message show below appears, this means the needle is not in correct position. Turn the hand wheel toward you to UDLVHWKHQHHGOHWRLWVKLJKHVWSRVLWLRQ7KHQSUHVVWKH³
THREAD TENSION (B) This machine sets the thread tension automatically when pattern is selected. However, you can change the thread tension, as follows. To increase the upper thread tension, press the + button. To decrease the upper thread tension, press the – button. If you change from pre-set, number will be highlighted. <RXFDQVWDUWVHZLQJZKLOHLQWKLVPRGHDQGFKDQJHWHQVLRQ while sewing. 7RUHWXUQWRSUHYLRXVVFUHHQVWRSVHZLQJDQGSUHVVWKH6HWWLQJ Button again. When another stitch pattern is selected, thread tension will return to pre-set.
Upper and bobbin thread will lock approximately in the middle of fabric.
SETTING OF THE STITCH PATTERN
desired. Adjusted settings only affect the selected stitch and will be reset to default when another stitch is selected. Adjusted settings are not automatically saved when the machine is turned off.
I 6WLWFK:LGWK1HHGOH3RVLWLRQ
Increase or decrease the stitch width using + and - buttons. )RUVWUDLJKWVWLWFKHVXVHDQGWRPRYHWKHVWLWFKSRVLWLRQ left or right. When a setting is changed, the numbers will be highlighted. When trying to exceed minimum or maximum settings, a warning sound will be heard.
J 6WLWFK/HQJWK'HQVLW\
Increase or decrease the stitch length using + and - buttons.
:KHQVHZLQJVWLWFKHVIURPWKH6DWLQFDWHJRU\VWLWFKHV
XVHWKHDQGEXWWRQVWRLQFUHDVHRUGHFUHDVH stitch density. This may be necessary depending on the type of thread being used. When a satin stitch is selected, the icon changes to show that stitch density is active instead of stitch length. h. Width Mirroring
to bottom. When mirroring is active, the button will be highlighted. If mirroring is not available, a warning sound will be heard. j. Elongation
6WLWFKHVLQWKH(ORQJDWLRQFDWHJRU\VWLWFKHVFDQ
be elongated. The entire stitch will be longer but the density will remain the same. Press the Alt button to show the elongation setting instead of density for satin stitches. The density changes to show an elongation symbol. Increase or decrease the elongation of the satin stitch using the + and - buttons.
ETTING BUTTON (A) Before or during the sewing process, you can adjust the
VHWWLQJVE\SUHVVLQJWKH6HWWLQJ%XWWRQ
7KH6HWWLQJ6FUHHQZLOODSSHDU
This screen is scrolled by pressing the right side arrow buttons.
3UHVVLQJWKH6HWWLQJ%XWWRQDJDLQPDFKLQHZLOOUHWXUQWR
previous screen. NOTE: All settings except for thread tension will remain until you change them. Thread tension will return to pre-set when you change the pattern. Default settings will differ depending on the stitch selected. SEWING PREPARATION
8SSHU7KUHDG7HQVLRQ7RR7LJKW
Bobbin thread will appear on the top side of the fabric. Decrease upper thread tension.15
Upper thread will appear on the bottom side of the fabric. Increase upper thread tension.
7KUHDG7HQVLRQIRU'HFRUDWLYH6WLWFKLQJ
Thread tension should be set to a slightly looser tension than that for straight stitch. The upper thread should appear slightly on the bottom side of your fabric, for example, when doing decorative sewing. +HOSIXO+LQWV ,I\RXUVHZLQJDSSHDUVDVVKRZQLQWKHLOOXVWUDWLRQVWLWFKHV on the top side of the fabric are good, but the bottom side
ORRNVYHU\ORRS\LWLVPRVWOLNHO\WKDWWKHXSSHUWKUHDG
is not threaded correctly. Refer to page 19 for correct threading.
2. If after checking the top thread and the bobbin thread is still
showing on the top side, check the bobbin to see if it is set correctly. Refer to page 18 for information on correct bobbin setting. TWIN NEEDLE Activate the twin needle program by pressing - or + buttons to set the twin needle width. When a twin needle width is selected, the width of all stitches is limited to prevent needle breakage. To deactivate, press - button until number of twin needle width will disappear. In sewing mode, the Twin Needle icon will be shown. The setting is kept until you deactivate it. 6HHSDJHIRUPRUHLQIRUPDWLRQDERXWWZLQQHHGOHVHZLQJ SEWING PREPARATION 323830(66$*(6$%2877:,11(('/( This pop-up message will appear when Twin Needle program is activated. &KHFNWKHQHHGOHDQGSUHVVWKH³
button to continue. This message will appear when a stitch that cannot be used with twin needle, is selected. 3UHVVWKHWKH³
button and select another pattern or reset the twin needle program. This message will appear when stitch width is adjusted to the limit. 3UHVVWKHWKH³
button to continue.16
AUDIBLE BEEP <RXFDQWXUQRIIWKHDXGLEOHEHHSE\SUHVVLQJWKLVEXWWRQi. Audible Beep is on.ii. Audible Beep is off.
1. Pull the bobbin cover latch to the right and remove the
2. Lift up the bobbin from the machine.
THREADING THE MACHINE
SETTING SPOOL OF THREAD ON SPOOL PIN
1. Pull up the left end of spool pin and set the felt washer and
the spool of thread on spool pin so that the thread unrolls from the front of the spool. 6HWWKHVSRROFDSRQVSRROSLQDVIDUDVLWZLOOJR a. Reverse spool cap direction according to the size of spool. b. Use the small spool cap when you use cross wound thread. Leave small opening between cap and spool as illustrated. c. 6HWWKHWKUHDGQHWRYHUWKHVSRROLIWKUHDGXQUROOVWRR easily.
1. Hold thread in both hands and hook thread to the guide
2. Bring thread to the right and pass it through the thread
guide from the back side. Pass thread under the bobbin winding tension disk in a clockwise direction.
3. Insert thread through hole in bobbin and place the bobbin
on bobbin winder spindle.
4. Hold the end of the thread and push bobbin stopper to the
right. When the bobbin winding screen appears, press the 6WDUW6WRSEXWWRQRQWKHVFUHHQWRVWDUWZLQGLQJ
5. After the bobbin winds a few turns, stop the machine by
SUHVVLQJWKH6WDUW6WRSEXWWRQRQWKHVFUHHQ
6. Cut the thread near the hole, as illustrated.
8. When the bobbin is wound fully, the bobbin stopper will
return to the left and stop winding automatically.
9. Remove the bobbin from the spindle and cut thread with
the thread cutter.18
INSERTING THE BOBBIN
1. Place bobbin into bobbin case, making sure the bobbinturns in a counter-clockwise direction.
WINDING BOBBIN INDEPENDENTLY
<RXFDQZLQGWKHEREELQLQGHSHQGHQWO\ZKLOHVWLWFKLQJ1. Insert the auxiliary spool pin into the hole at the left side onthe top of the machine.2. Place the felt washer and spool of thread onto the auxiliaryspool pin.3. Bring thread to the right and hook the thread to the threadguide from rear opening. )ROORZWKHQRUPDOZLQGLQJSURFHGXUHIURP6WHSVWRRQSDJH
'UDZWKUHDGLQWRQRWFKDZKLOHKROGLQJWKHEREELQOLJKWO\ZLWK\RXU¿QJHU3. Pull thread along the groove, up and around the top, to theleft, then down.Pull thread to the right to cut the thread. 5HSODFHWKHEREELQFRYHU6HWWKHOHIWWDEVLQWRWKHKROHVLQneedle plate and push the right side of bobbin cover down until it clicks into place.NOTE:This machine can start to sew without drawing up the bobbin thread.If you want to draw up the bobbin thread, see page 20.%HVXUHWRXVHRQO\6,1*(5&ODVVEREELQVWUDQVSDUHQWLQthis machine.19
REPARING TO THREAD MACHINE
5$,6(7+(35(66(5)227/,)7(5,WLVYHU\LPSRUWDQW to raise the presser foot lifter before you proceed to thread the machine.
2. Raise the needle in highest position by turning the
handwheel toward you. .HHSWKLVSRVLWLRQIRUWKUHDGLQJWKHH\HRIWKHQHHGOH NOTE: It is very important to raise the presser foot lifter before you thread the machine. Not doing so will likely result in poor
VWLWFKTXDOLW\RUH[FHVVLYHWKUHDGORRSVRQWKHXQGHUVLGHRI
the fabric. Always raise the presser foot lifter before you begin threading the machine.
THREADING THE MACHINE
SETTING SPOOL OF THREAD ON SPOOL PIN
1. Pull up the left end of spool pin and set the felt washer and
the spool of thread on spool pin so that the thread unrolls from the front of the spool.
6HWWKHVSRROFDSRQVSRROSLQDVIDUDVLWZLOOJR a. Reverse spool cap direction according to the size of spool. b. Use the small spool cap when you use cross wound thread. Leave small opening between cap and spool as illustrated. c. 6HWWKHWKUHDGQHWRYHUWKHVSRROLIWKUHDGXQUROOVWRR easily.
THREADING THE UPPER THREAD
1. Hold thread in both hands and pass thread into the guide
2. Bring thread backward and pass through the slit from right
3. Bring thread to the left and pull thread down toward you
4. Pull the thread around the U-turn, then bring it back up.
5. To thread the take-up lever, draw thread up and bring
thread back down again from right to left along the slit.
6. Pull thread downward along the slit.
7. Draw thread through thread guide from right side opening.
8. Pass through needle eye from front to back.
Refer to next page for instructions on how to use needle threader.20
RAWING UP THE BOBBIN THREAD
This machine can start to sew without drawing up the bobbin thread. If you want to start sewing with longer bobbin thread, draw up the bobbin thread as follows.
1. Insert the bobbin into the bobbin holder as shown on page
18, but do not cut thread.
2. Raise the presser foot.
3. Hold upper thread loosely and turn hand wheel toward you
one complete revolution. 7RSUHYHQWDFFLGHQWV
.HHS¿QJHUVDZD\IURPDOOPRYLQJSDUWV6SHFLDOFDUH
LVUHTXLUHGDURXQGWKHQHHGOH
2. Do not lower the threader lever while machine is
operating. NOTE: The needle threader is used for needle sizes 11/80, 14/90, and 16/100.
1. Lower the presser foot.
2. Check that the needle is raised to its highest position. If it is
not, raise needle by turning the handwheel toward you.
3. Lower the threader slowly and draw thread through thread
JXLGHDDQGSXOOWRZDUGWKHULJKW
4. Push the lever as far as it will go. The threader will turn and
the hook pin will go through the needle eye.
5. Draw the thread into the guide, making sure it is under the
6. Hold thread loosely and swing back the lever.
As the threader rotates back, the hook pin will pass throughthe needle eye, forming a loop of thread. 3XOOWKUHDGRXWDERXWFPLQFKHVWKURXJKWKHQHHGOH eye.
THREADING THE MACHINE
4. Pull upper thread lightly. Bobbin thread will come up in a
4. Overcasting of stretch fabric, decorative stitch
)HDWKHUVWLWFK 6WUDLJKWVWUHWFKVWLWFK
- Reinforcement straight stitch
25. Round Ended Buttonhole with cross bar
Refer to page 8 for changing the presser foot.
2. Place the fabric under the presser foot and lower the
press the foot controller pedal. Keep holding thread after sewing a few stitches. Lightly guide the fabric while sewing.
<RXFDQUHJXODWHWKHVHZLQJVSHHGE\SUHVVLQJWKH6SHHG
Control buttons or the foot control. The buttons are used to set the speed when using start/stop button and also sets the top speed when using foot control.
:KHQ\RXUHDFKHQGRIVHDPSUHVVWKH6WDUW6WRSEXWWRQ
to stop sewing or release the foot controller pedal.
5. Press the Thread Cutter button.
REVERSE STITCHING Reverse stitching is used for reinforcing the ends of the seams. 6WDUWVHZLQJVWLWFKHV
2. Press and hold the Reverse button to sew reverse stitch
6. Raise the presser foot lifter and remove the fabric.
3. Release the Reverse button and sew forward until reach
4. Press and hold Reverse button and sew 4-5 reverse
5. Release Reverse button and sew until end of seam.
If upper thread is breaking, machine will stop automatically. Rethread the upper thread and resume sewing. CAUTION
'RQRWXVHWKH7KUHDG&XWWHUEXWWRQZKHQFXWWLQJ
1. Press the Tack button. LED light will be turned on.
6WDUWWRVHZ Machine will sew tacking stitches and stop automatically. 6WDUWVHZLQJDJDLQDQGVHZWKHVHOHFWHGSDWWHUQ
2. Turn the hand wheel toward you to insert the needle into
fabric. NOTE: <RXFDQFKDQJHWKHQHHGOHVWRSSRVLWLRQE\SUHVVLQJWKH Needle Up/Down button. When needle position is setted to down, the LED will turn on. <RXFDQDOVRWDSWKHIRRWFRQWUROWRUDLVHRUORZHUWKH needle.
3. Raise the presser foot.
4. Use the needle as a pivot and turn fabric.
5. Lower the presser foot and resume sewing.
WIDTH OF SEAM ALLOWANCE
Guide lines on the needle plate indicate the distance from the center needle positon. To keep a consistent seam allowance, guide the fabric along the desired guide line on the needle plate.
When sewing heavy or thick fabrics, the toe end of the presser foot tends to lift up when it comes to seams or other bulky areas. To sew these heavy or thick fabrics:
1. When the toe of the presser foot begins to tilt up, lower the
needle into the fabric and then raise the presser foot lifter.
3XVKWKH6WDELOL]HU3LQORFDWHGRQWKHULJKWVLGHRIWKH$OO
3XUSRVH)RRWDQGDWWKHVDPHWLPHORZHUWKHSUHVVHUIRRW lifter. The presser foot should now be level on the thick fabric.
SEWING OVER OVERLAPPED AREAS
Guide the fabric with your hand when sewing over overlapped areas.
6WDUWVHZLQJ$IWHUDIHZVWLWFKHVWKH6WDELOL]HU3LQZLOO
release. a. The presser bar lifter can be raised one step higher for placing heavy materials under the presser foot easily.
ATTERN NO. 12, 13) 1. Position the fabric under the presser foot and lower it.2. Hold the upper thread loosely and start sewing.Machine will sew 4-5 stitches forward and sew 4-5 stitches backward and continue sewing forward.3. When you reach the end of seam, press the Reverse button.Machine will sew a few stitches backward and sew a few stitches forward and stop automatically.4. Press and release the Thread Cutter button. SATIN STITCHING 7RVHZDVDWLQVWLWFKVKRUWHQWKHVWLWFKOHQJWKDQGDWWDFKWKH6DWLQ)RRW%Refer to next page for using the zig-zag to overcast. SEWING25 SEWING OVERCASTING-OVERLOCKING
SING THE OVERCASTING FOOT
2YHUFDVWLQJ)RRW& Line up the fabric against the guide plate of the overcasting foot so that the needle falls near the edge of the fabric.
1R:LGWK LVXVHGWRKHOSSUHYHQWUDYHOLQJRIIDEULFV
The hem is sewn without stitches showing on right side of fabric. No. 2 Blind hemming for non-stretch fabric No. 8 Blind hem for stretch fabric
fabric fold is guided evenly when blind hem stitching. The JXLGHHLVDGMXVWHGE\WXUQLQJWKHDGMXVWLQJVFUHZI
3ODFHIDEULFVRWKDWWKHVWUDLJKWVWLWFKHVRUVPDOO]LJ]DJ
VWLWFKHVDUHRQWKHSURWUXGLQJKHPHGJHDQGWKHODUJH ]LJ]DJVWLWFKHVMXVWFDWFKRQHWKUHDGRIWKHIROGHGHGJHJ ,IQHFHVVDU\WXUQWKHVFUHZIWRDGMXVWWKHIRRWVRWKDWWKH needle slightly touches the folded edge of the fabric.
4. Lower the presser foot and sew hem, guiding fabric evenly
5. Turn the fabric over when you have completed sewing.
c. Wrong side of fabric h. Right side of fabric NOTE: Test on a scrap piece of fabric similar to your project so you FDQGHWHUPLQHWKHEHVWSODFHPHQWRIWKHIRRW¶VJXLGH No. 3, 33, 35, 36 are designed to sew the seam and seam ¿QLVKDWWKHVDPHWLPH SEWING26
USING THE ALL-PURPOSE FOOT
No. 1, 4, 7, 15, 34, 37, 38
Place fabric so that the needle falls near the edge of the fabric
No. 4, 7, 15, 34, 37, 38 when sewing easy to ravel or stretch fabrics. CRAZY PATCH Create interesting surface embellishment by sewing decorative stitches over the seams. Try mixing several types of fabrics for even more variety. No. 0
$OO3XUSRVHRU6DWLQ)RRW$%
1. Place two pieces of fabric right sides together and sew a
long straight stitch.
2. Press the seam open.
3. With the right side of the fabric facing up, sew the decorative
stitch, making sure the stitches fall on both sides of the seam. CAUTION
7RSUHYHQWDFFLGHQWVWKH2YHUFDVWLQJ)RRWVKRXOG
EHXVHGIRUVHZLQJSDWWHUQVRQO\'R QRWFKDQJHWKHVWLWFKVHWWLQJV,WLVSRVVLEOHWKDWWKH QHHGOHFRXOGKLWWKHSUHVVHUIRRWDQGEUHDNZKHQ VHZLQJRWKHUSDWWHUQVDQGVHWWLQJV NOTE: g. If desired, trim the excess fabric after stitching is complete. Be careful not to cut the threads while trimming. SEWING27 SEWING
STRETCH STITCH SEWING
6WUHWFKVWLWFKHVDUHVWURQJDQGÀH[LEOHDQGZLOOJLYHZLWKWKH
fabric without breaking. Good for knit fabrics as well as durable fabrics like denim or twill.
We recommend that you use a needle for knit and synthetic fabrics to prevent skipping stitches and thread breakages. 6HHSDJHIRUQHHGOHUHFRPPHQGDWLRQV a. Jacket b. Trousers c. Bag d. Pocket MULTI-STITCH ZIGZAG Used for sewing on elastic and overcast stitching.
$ (ODVWLF6HZLQJ Pull elastic in front and back of needle while sewing. % 2YHUFDVW6WLWFKLQJ Used for easy to ravel and knit fabrics. Needle should fall on extreme edge of fabric. Refer to next page for overcasting. BASTING
%DVWLQJLVWHPSRUDU\VWLWFKLQJXVHGIRU¿WWLQJJDUPHQWVDQG
for gathering and marking fabric.
1. Place the fabric under the presser foot and then lower the
presser foot lifter.
2. Hold the upper thread loosely and start to sew.
Machine will make two stitches only. 6WDUWWRVHZ0DFKLQHZLOOVHZWZRVWLWFKHV
+ROGLQJWKHXSSHUWKUHDGSXOOWKHUHTXLUHGDPRXQWRIIDEULF to the rear and lower the presser foot lifter. SEWING NOTE: To prevent the fabric layers from shifting, insert dress pins crosswise to the basting direction. Pull the bobbin thread to remove the stitching. CAUTION 7RSUHYHQWDFFLGHQWVEHVXUHWKHQHHGOHGRHVQRWKLW SLQVZKLOHVHZLQJ28
3. Adjust the stitch width so that the needle enters the left
4. Check the swing of the needle by pressing the Width
Mirror Button to be sure the needle will not hit the button. Bring the needle down into the holes of the button with the handwheel to verify.
8. Pull the thread ends to the wrong side of the fabric with a
hand sewing needle. Tie the threads together to secure.
$IWHUVHZLQJPRYHWKH'URS)HHG/HYHUWRWKHULJKW
NOTE: To sew a 4-hole button, follow the procedure above for the
¿UVWWZRKROHV7KHQOLIWSUHVVHUIRRWVOLJKWO\DQGPRYHIDEULF
to permit stitching the other two holes, either parallel or criss- cross. THREAD SHANK Buttons on coats and jackets often have a thread shank to make them stand away from the fabric. Insert a straight pin or sewing machine needle under the center slit of the foot from
WKHIURQW6HZRYHUWKHSLQRUQHHGOH7RFUHDWHDWKUHDGVKDQN
pull thread to the back side of the button and wind the thread around the stitches. Tie the thread ends securely.29 SEWING INSERTING ZIPPERS
1. Baste the zipper opening to the seam line.
D6WUDLJKWVWLWFK b: End of opening c: Basting d: Wrong side of fabric
2. Press open the seam allowance.
Place the open zipper face down on the seam allowance with the teeth against the seam line. Baste the zipper tape.
Attach the left side of the presser foot pin to the presser foot holder when sewing the right side of the zipper, and right side of the presser foot pin to the holder when sewing the left side of the zipper. 6HZLQJRQWKHULJKWVLGHRIWKHIDEULFVWLWFKWKHOHIWVLGHRI the zipper from bottom to top. 6WLWFKDFURVVWKHORZHUHQGDQGULJKWVLGHRI]LSSHU Remove the basting and press. LAPPED INSERTION
1. Baste the zipper opening to the seam line.
Attach the left side of the presser foot pin to the presser foot holder when sewing the right side of the zipper, and right side of the presser foot pin to the holder when sewing the left side of the zipper. 6WLWFKWKHOHIWVLGHRI]LSSHUIURPERWWRPWRWRS 7-10 mm
5. Turn the fabric right side out stitch across the lower end
and right side of zipper. 6WRSVWLWFKLQJZLWKWKHQHHGOHGRZQLQWKHIDEULFZKHQWKH
2. Lower the needle into fabric.
4. Lower the presser foot and continue stitching.
5. Remove the basting stitches.
a. Zipper tab QUILTING $TXLOWFRQVLVWVRIWKUHHOD\HUV The topper, batting, and backing fabric. The top layer is formed E\VKDSHGSLHFHVRIIDEULFVMRLQHGWRJHWKHUFUHDWLQJWKHTXLOW topper.
TXLOWLQJEDUWRVHZVXFFHVVLYHURZV,QVHUWTXLOWLQJEDULQWRWKH hole of presser foot holder and set the spacing as desired. HAND LOOK QUILTING STITCH (NO. 198) Use invisible nylon sewing thread or very lightweight thread that matches the fabric on top. Place thread that contrasts to WKHFRORURIWKHIDEULFRQWKHEREELQ6HWWKHXSSHUWHQVLRQWR maximum or near maximum. When you sew, bobbin thread will pull to the top and give the appearance of a traditional hand TXLOWLQJVWLWFK$GMXVWWKHWKUHDGWHQVLRQDQGVWLWFKOHQJWKDV desired for the look you want to achieve for your project. SEWING31 SEWING
AUTOMATIC BAR-TACK AND DARNING
<RXFDQVHZDXWRPDWLFEDUWDFNDQGGDUQLQJXVLQJWKH %XWWRQKROH)RRW No. 16 Bar-tack, to reinforce areas that will be subject to strain, such as pocket corners. No.17 Darning, mending and other applications. %XWWRQKROH)RRW
bring upper thread to the left.
3. Position fabric under presser foot so that the starting point
is on the thick area. Lower the foot. b. When sewing the bar-tack on the edge of thick fabric, such as a pocket, place a cardboard or fabric piece of the same thickness beside the fabric to help keep the foot level as you sew.
4. Lower the Buttonhole Lever completely.
NOTE: Machine will not start to sew if Buttonhole Lever is not lowered properly or buttonhole foot is not positioned correctly.
5. Hold upper thread lightly and start the machine.
6. Machine will sew bar-tack or darning stitch, as shown.
0DFKLQHZLOOVWRSDXWRPDWLFDOO\ZKHQWKHSDWWHUQLV¿QLVKHG
7. Press the Thread Cutter button and raise the presser foot
lifter to remove the fabric. SEWING32 BUTTONHOLE SEWING
6HOHFWWKHEXWWRQKROHVW\OH\RXZDQWWRVHZ
This machine can sew 13 types of buttonholes.
25. Round Ended Buttonhole with cross bar
NOTE: Density of the sides of the buttonhole may be adjusted with stitch length control.
1. Mark position and length of buttonhole on fabric.
3DVVXSSHUWKUHDGWKURXJKWKHKROHRI%XWWRQKROH)RRWDQG
bring upper thread to the left.
4. Position fabric under presser foot so that the center line
PDUNLVLQWKHFHQWHURIWKH%XWWRQKROH)RRW
Lower the foot while pulling the frame of the Buttonhole )RRWWRZDUGV\RX NOTE: When sewing stretch fabrics, it is suggested that you use interfacing on the backside of the fabric.
7. Machine will sew the buttonhole in the order as shown and
stop automatically after sewing.
slide on the base to the diameter of the button, plus the thickness of the button. D /HQJWKRIEXWWRQWKLFNQHVV
5. Lower the Buttonhole Lever completely.
NOTE: Machine will not start to sew if Buttonhole Lever is not
ORZHUHGSURSHUO\RUIUDPHRI%XWWRQKROH)RRWLVQRW
positioned all the way forward.
6. Hold upper thread lightly and start the machine.
8. Press the Thread Cutter button and raise the presser foot
to remove the fabric. To sew over same buttonhole, raise presser foot to return to original position.
9. Use a seam ripper to cut open the center of the buttonhole,
being careful not to cut into the ends of the buttonhole. It is helpful to place a pin at the end of the buttonhole to serve as a stopper while cutting. CAUTION 7RSUHYHQWDFFLGHQWV
BOUND BUTTONHOLE A bound buttonhole provides a professional touch to tailored garments like suits, coats and jackets.
30. Bound Buttonhole
%XWWRQKROH)RRW &XWDSDWFKRIIDEULFFP´ZLGHFP ´ORQJHUWKDQWKH¿QLVKHGEXWWRQKROH Baste a patch so that the center line of patch will align with the center line mark of buttonhole. a. Right side of fabric b. Wrong side of patch
/RZHUWKH%XWWRQKROH/HYHUDQGVHZEXWWRQKROH6HH
SUHYLRXVSDJH Machine will sew the buttonhole in the order as shown and stop automatically after sewing.
3. Press the Thread Cutter button and raise the presser foot
to remove the fabric. )ROGWKHIDEULFDQGVWLWFKDORQJWKHVHDPVRQHDFKVLGH just a needle width from the original stitching line. Remove the basting. c. Wrong side of fabric )ROGWKHIDEULFDORQJWKHEXWWRQKROHHQGDQGVWLWFK triangular ends on the original stitching line.
4. Carefully cut through the center of buttonhole to within 3
mm of each end. Cut diagonally to each corner as shown. Remove the basting.
5. Draw the patch through the opening to the underside.
6. Turn the fabric and pull the patch through the buttonhole
rectangle. Press the patch. c. Wrong side of fabric d. Right side of patch
7. Turn the patch and press the side seam allowance.
)ROGHDFKVLGHRIWKHSDWFKWRIRUPSOHDWVWKDWPHHWDWWKH center of the buttonhole and cover the opening. Press the patch.
9. Turn the fabric to right side and baste along the center of
each fold. a. Right side of fabric 3UHVVDQGWULPWKHSDWFKWRZLWKLQPP´RIWKH stitching. a. Right side of fabric c. Wrong side of fabric NOTE: When sewing lighter weight fabric, reinforce buttonhole area. &XWDSDWFKRIIXVLEOHLQWHUIDFLQJFP´ZLGHUDQGFP ´ORQJHUWKDQWKHEXWWRQKROH)XVHWRZURQJVLGHRYHUHDFK buttonhole marking. SEWING35 SEWING EYELET This stitch pattern is used for making belt holes and other similar applications. 31 Eyelet 6DWLQ)RRW%
1. Place the fabric under the presser foot and lower the
SUHVVHUIRRW6WDUWWKHPDFKLQH Machine will sew the eyelet and stop automatically.
No. 39-249 6DWLQ)RRW% To customize the continuous decorative stitch pattern, you may adjust the length and width of pattern. Experiment with fabric scraps until you achieve the desired length and width.
2. Press the Thread Cutter button and raise the presser foot.
3. Make a hole in the center of the eyelet.
NOTE: Eyelet punch is not provided with this machine.
SEWING LIGHTWEIGHT FABRICS
When sewing lightweight fabrics, it is suggested that you use stabilizer on the backside of the fabric. This can help prevent stitches from puckering the fabric. SEWING36 APPLIQUE No. 200, 201, 202
By simply removing the extension table, you can access the free arm, making it easier to stitch hard-to-reach areas like SDQWKHPVVOHHYHFXIIVDQGFKLOGUHQ¶VFORWKLQJ NOTE: Refer to page 7 for Removing the Extension Table.
PARALLEL SEWING FOOT
This foot is used for sewing rows of stitching in parallel rows.
6QDSRQWKH3DUDOOHO6HZLQJ)RRW
6HZWKH¿UVWURZRIVWLWFKLQJ $OLJQWKH¿UVWURZRIVWLWFKLQJHLWKHUEHWZHHQRURQWKHUHG guideline markings on the foot, depending on the desired
GLVWDQFHIURPWKH¿UVWURZRIVWLWFKLQJ6HZWKHQH[WURZRI
stitching, using the red guidelines as a reference.
4. Align the two rows sewn, following the red guideline
markings on the foot, depending on the desired distance
EHWZHHQURZVRIVWLWFKLQJ6HZWKHQH[WURZRIVWLWFKLQJ
using the red guideline markings as a reference.
5. Continue for as many rows as desired.
NOTE: 7KH¿UVWYHUWLFDOJXLGHOLQHWRHLWKHUWKHOHIWRUULJKWLV´ from the center needle position. The second guideline is
DSSUR[LPDWHO\´IURPWKH¿UVWJXLGHOLQHRQHLWKHUVLGH
There is a marking at the center front of the foot that can also be used a reference. When sewing sharp angles or curves, bring the needle to its lowest position and raise the presser foot. Use needle as pivot and turn fabric. NOTE: $SSOLTXHFDQDOVREHGRQHZLWKDVDWLQVWLWFKXVLQJWKH6DWLQ
)RRWSDJH,WPD\EHKHOSIXOWRSODFHDIDEULFVWDELOL]HU
underneath your work, which may help prevent any fabric puckering. SEWING37 SEWING
desire. Twin needle mark will appear on screen and the stitch width will be reduced automatically.
Interesting effects can be produced by sewing decorative stitches using a twin needle. Try using two different colors of
WKUHDGIRUHYHQPRUHYDULHW\$OZD\VPDNHDWHVWVDPSOH¿UVW
to help you determine the best settings for the stitch you are sewing. All patterns except No. 11, 16-31 may be sewn with a twin needle.
$OO3XUSRVH)RRWRU6DWLQ)RRW$%
NOTE: A twin needle is not provided with this machine. CAUTION 7RSUHYHQWDFFLGHQWV
1. Remove the single needle and insert twin needle.
7KUHDGWKH¿UVWWKUHDGDVXVXDOIROORZLQJWKUHDGLQJURXWH
3. Thread the left needle eye by hand from front to back.
3XVKWKH$X[LOLDU\6SRRO3LQZLWKIHOWZDVKHULQWRWKHKROH
5. Place second spool of thread.
6. Hook second thread to the hook from rear opening.
7KUHDGWKHVHFRQGWKUHDGVDPHDV¿UVW )RUEHWWHUVHZLQJUHVXOWVGRQRWSODFHWKHWKUHDGLQWRWKH needle bar thread guide.
9. Thread right needle eye by hand from front to back.
$OZD\VWHVWWKHVHOHFWHGVWLWFKE\¿UVWWXUQLQJWKHKDQG
wheel toward you slowly, to ensure that the swing of the QHHGOHGRHVQ¶WKLWWKHVLGHVRIWKHIRRW 6HZWKHVWLWFKHV 7ZLQQHHGOHPRGHZLOOUHPDLQXQWLO\RXFKDQJHWKHVHWWLQJWR³´ :KHQWKHWZLQQHHGOHPRGHKDVEHHQVHWEDFNWR³´WKHWZLQ needle icon will disappear from the main screen. NOTE: 7ZLQQHHGOHVHZLQJPD\EHDOVRXVHGZLWKVHTXHQFLQJE\ setting to twin needle mode.38 SEQUENCE SEWING <RXFDQFRPELQHVWLWFKSDWWHUQVOHWWHUVWLWFKHVLQWRD VHTXHQFH
6HOHFWWKHGHVLUHGVWLWFKSDWWHUQVLQWKHVDPHPDQQHUDV WKDWXVHGIRUQRUPDOVHZLQJ6HHSDJHIRULQIRUPDWLRQ RQVHOHFWLQJVWLWFKHV The selected patterns will display at the top left side of the LCD screen.
2. After selecting a stitch, use the same procedure to select
the next stitch pattern. The selected pattern will be added, and it will display on the left side of the LCD screen below the previously selected pattern. NOTE: 6RPHSDWWHUQVPD\QRWFRPELQHLQWRWKH
VHTXHQFH,I\RXVHOHFWDSDWWHUQWKDWFDQQRWEH
combined, a message will appear on screen to
4. Press the desired letter directly. Press the Character tabs
and select letter. To delete the letter, move the cursor to the right side of the OHWWHUWREHGHOHWHGWKHQSUHVVWKH'HOHWHEXWWRQG
be shown on the left side of the LCD screen. The cursor may disappear if the length of letters are over the indicating area. 6HHQH[WSDJHWRVKLIWWKHFXUVRU
to proportion automatically. 7KHVHTXHQFHFDQFRQWDLQDPD[LPXP of 60 patterns and letters. Message will appear when you reach the limit. 3UHVVWKH³
7RHQWHUDOHWWHUVWLWFKLQWRWKHVHTXHQFHSUHVVWKH/HWWHU button on the LCD screen, which is indicated by a lower FDVHµD¶DVVKRZQEHORZ
´EXWWRQ Uppercase letter of selected style will appear.39 SEQUENCING
INSERTING PATTERN OR LETTER
Machine will insert a pattern or letter to the next of the highlighted pattern or letter. 6KLIWWKHFXUVRUWRKLJKOLJKWWKHSDWWHUQMXVWEHIRUHWKHGHVLUHG position. To insert a pattern, select pattern number. To insert a letter, press the Letter button and select or edit letter as described on the previous page. SHIFTING THE CURSOR (HIGHLIGHT) The cursor position is the highlighted pattern or letter. %\SUHVVLQJWKH&XUVRUEXWWRQVDEFXUVRUZLOOVKLIWXSRU down. The cursor is used to check selected patterns, insert patterns, delete patterns or edit each pattern as described below. 127(:KHQWKHFXUVRULVVKLIWHGWRWKHWRSRIVHTXHQFHLWZLOO GLVDSSHDUF
CHECKING SELECTED PATTERNS AND LETTERS
$VWKHOHQJWKRIWKHVHTXHQFHLQFUHDVHVSDWWHUQVDQGOHWWHUV will disappear from view on screen. <RXFDQFKHFNSDWWHUQVDQGOHWWHUVE\PRYLQJWKHFXUVRU upward or downward using the Cursor buttons.
DELETING PATTERN OR LETTER
6KLIWWKHFXUVRUWRWKHSDWWHUQRUOHWWHU\RXZDQWWRGHOHWH 3UHVVWKH'HOHWHEXWWRQGTXLFNO\OHVVWKDQVHF Machine will delete the pattern or letter and cursor will
VKLIWWRQH[WSDWWHUQRUOHWWHU,ILWZDVODVWSDWWHUQRUOHWWHU
cursor will shift to previous pattern or letter.
3. If you want to delete all patterns and letters, press and hold
button. Machine will delete all selected patterns and letters. To FDQFHOSUHVVWKH³;´EXWWRQ SEQUENCING
4. Edit the letter as described on the previous page.40
NOTE: If the selected folder has a memorized VHTXHQFHLQLWSUHYLRXVO\DPHVVDJHZLOO appear asking to rewrite over the previous VHTXHQFHRUQRW7RUHZULWHGHOHWLQJ SUHYLRXVVHTXHQFHSUHVVWKH³
the number of memorized folder.
2. The memories are indicated by numbers. Press the desired
1. Press the Memory button after you have selected patterns
$IWHUVHOHFWLQJVWLWFKHVIRUDVHTXHQFHWKHVHTXHQFHZLOOVHZ repeatedly. 6(:,1*
2. Lower the presser foot and start sewing.
WRDFLUFOHDQGDFWLYDWHWKH6LQJOH6HTXHQFHPRGH7KLVPRGH
1. Adjustments as one stitch pattern. The value of stitch
length and width are now common for all stitch patterns in WKHVHTXHQFH<RXFDQFKDQJHWKHOHQJWKZLGWKDQGPLUURU reverse of all stitches as one stitch pattern. 6HZLQJLQVLQJOHWLPH 7KHVWLWFKVHTXHQFHZLOOVHZRQHWLPH DQGWKHQVWRSDWWKHHQGRIWKHVHTXHQFH NOTE: In this mode, the Delete button is not activated. Press the 6LQJOH6HTXHQFHEXWWRQDJDLQWRDFWLYDWH SEQUENCING SEQUENCING42 EMBROIDERY PREPARATION
3. If needed, use the level adjusting feet so that the machine
and embroidery unit are even with one another.
1. To store the embroidery unit into the box, move the carriage
to park position by selecting Park Position in the Hoop 2SWLRQ6HHSDJH
and slide the unit to the left to remove it. The cover of the socket closes automatically. 6WRUHWKHHPEURLGHU\XQLWLQWKHRULJLQDOSDFNLQJPDWHULDO
1. Remove the presser foot and holder.
hand wheel toward you.
4. Tighten the presser foot screw securely.
<RXUVHZLQJPDFKLQHFDQFRQYHUWWRHPEURLGHU\PRGHHDVLO\ by attaching the embroidery unit as follows.
When you turn the machine on, a series of messages will appear on the screen. a. If the needle is not in its highest position, this message will appear. Turn the hand wheel toward you to raise the QHHGOHWRLWVKLJKHVWSRVLWLRQDQGWKHQSUHVVWKH³
´EXWWRQ c. If presser foot is lowered, this message will appear. Raise WKHSUHVVHUIRRWOLIWHUDQGSUHVVWKH³
´EXWWRQ When the messages a-c have cleared the screen, the carriage will move to start point.
OME SCREEN (A) When you have attached the embroidery unit correctly, the
pressing the Home Button. At this time, all selected designs or letters and editing for embroidery will be cleared.
ETTING BUTTON (C) Before or during the embroidery process, you can adjust the
PDFKLQHVHWWLQJVE\SUHVVLQJWKH6HWWLQJ%XWWRQ
7KH6HWWLQJ6FUHHQZLOODSSHDUD
This screen is scrolled by pressing the right side arrow buttons.
3UHVVLQJWKH6HWWLQJ%XWWRQDJDLQPDFKLQHZLOOUHWXUQWR
previous screen. NOTE: All settings except for thread tension will remain until you change them. Thread tension will return to pre-set when you load a design. THREAD TENSION (D) This embroidery machine adjusts thread tension automatically. However, depending on the thread or fabric being used, it may be necessary to modify the tension setting to achieve the desired results. To obtain the desired thread tension, adjust as follows.
i. CORRECT THREAD TENSION
Upper thread appears slightly on the bottom side of fabric.
ii. UPPER THREAD TOO TIGHT
Bobbin thread appears on the top side of fabric. 'HFUHDVHWKHXSSHUWKUHDGWHQVLRQE\SUHVVLQJWKH³´ button.
Embroidery can be applied to many different types of fabrics. Regardless of the fabric, it will be necessary to use
the embroidery machine stitches out the design, eliminating distortion in the fabric and the design.
'LIIHUHQWIDEULFVZLOOUHTXLUHGLIIHUHQWW\SHVRIVWDELOL]HU
depending on the nature of the fabric and the density of the design being embroidered. But most embroidery designs will stitch out looking their best if the fabric is properly stabilized.
6WDELOL]HULVPDLQO\XVHGDVDEDFNLQJEXWDWWLPHVDVWDELOL]HU
is used on the top of the project as well. $³%DFNLQJ´JRHVRQWKHEDFNVLGHRIWKHDUHDWREH embroidered. It may be hooped along with the fabric or hooped alone, depending on the fabric and project.
$³7RSSHU´PHDQVWKDWDQDGGLWLRQDOVWDELOL]HULVSODFHGRQWKH
top of the fabric, either hooped with the fabric or secured in another manner. Its function is to ensure that the texture or loft of the fabric is held down, providing a smooth surface for the embroidery. Though there are many types of stabilizers available, the most common types are tear-away, wash away, and cut away.
6WDELOL]HUVFRPHLQGLIIHUHQWZHLJKWVDVZHOO$IWHUVHOHFWLQJWKH
best type of stabilizer for the project, choose the appropriate weight. A good general rule is that the weight of the stabilizer be compatible with the fabric. Tear-away stabilizers are temporary, so once the excess is removed after embroidering, the fabric itself must be able to support the design on its own. Tear-away stabilizers are usually recommended for woven fabrics. Cut-away stabilizers are permanent, and therefore a better choice for supporting embroidery on unstable fabrics, to
SUHYHQWGLVWRUWLRQ6LPSO\WULPDZD\WKHH[FHVVIURPDURXQG
WKHGHVLJQ(YHQDIWHUIUHTXHQWODXQGHULQJWKHHPEURLGHU\ design will stay intact. Wash-away stabilizers rinse away from the embroidered area. Though they are a good choice when sewing very light weight fabrics, they can also be used as a topping. After removing the main excess stabilizer, the rest is simply rinsed away. There are also fusible and non-fusible version of stabilizer
DYDLODEOH)XVLEOHVWDELOL]HUVFDQEHLURQHGRQWRWKHEDFNRI
the area to be embroidered, preventing distortion of the fabric while hooping. However, for fabrics that may be more sensitive to ironing, the non-fusible stabilizers are used. In these cases, another helpful tool is a temporary fabric spray adhesive. Use this to WHPSRUDULO\µKROG¶WKHIDEULFVDQGVWDELOL]HUZKLOHKRRSLQJDQG embroidering, to prevent the fabrics from shifting during the embroidery process. Knowing how to properly stabilize involves a little trial and error
:KHQWKUHDGWHQVLRQLVFKDQJHGIURPWKHGHIDXOWSUHVHW setting, the number will be highlighted. NOTE: If the bobbin has been threaded or inserted incorrectly, or if the upper thread has not been threaded correctly, good thread tension cannot be achieved. Check to make sure that the bobbin and upper thread are correctly threaded before making any adjustments.
When starting to embroider, the machine can be set so that it will stop after a few stitches, allowing you the opportunity to cut the thread tail. <RXFDQVHOHFWRUGHVHOHFWWKLVIXQFWLRQDVIROORZV
L 6WRSIRU&XWLVDFWLYDWHG
Generally, the stabilizer should be larger in size than the hoop with which it is being used. When embroidery is completed,
,WLVSRVVLEOHWRVXEVWLWXWH6,1*(5
BOBBIN THREAD NEEDLE THREAD T-Shirts Soft Mesh Cut-Away Hoop fabric and stabilizer together. SINGER
Chromium #2001 Size 11/80 Bobbinfill Polyester or Rayon Fleece Cut-Away and Topper Hoop cut-away stabilizer. Pin topper and fleece to the hooped cut-away stabilizer. SINGER
Chromium #2001 Size 14/90 Bobbinfill Polyester or Rayon Towels Topper and Tear-Away Hoop tear-away stabilizer. Pin topper and towel to the hooped tear-away. SINGER
Chromium #2000 Size 14/90 Same color as needle thread or towel Polyester is recommended Sweater Knits Cut-Away Stabilizer Hoop cut-away stabilizer. Pin topper and sweater to the hooped cut-away stabilizer. SINGER
Chromium #2000 Size 11/80 Bobbinfill Rayon is most often used Medium to Heavy Weight Tear-Away Hoop fabric and stabilizer together. SINGER
Chromium #2000 Size 14/90 Bobbinfill Polyester or Rayon Denim Medium to Heavy Weight Cut-Away Hoop fabric and stabilizer together. SINGER
Chromium #2000 Size 14/90 Bobbinfill Polyester or Rayon Napped Fabrics Medium to Heavy Weight Cut-Away and Topper Hoop cut-away stabilizer. Pin topper and fabric to the hooped cut-away stabilizer. SINGER
Chromium #2000 Size 1 4/90 Bobbinfill Polyester or Rayon Vinyl & Leather Cut-Away Hoop cut-away stabilizer. Secure fabric to the hooped cut-away stabilizer. SINGER
beneath the fabric. When hooping stabilizer and fabric make sure that they are smooth and securely hooped.
1. Open the Quick Release Lever on the outer hoop and
on the lower right. There is a small arrow in the center of the left edge of the outer hoop which will line up with a small arrow on the inner hoop.
3. Place stabilizer and the fabric, with the right sides facing
up, on top of the outer hoop.
4. Place the inner hoop on top of the fabric with the small
Quick Release Lever again.
6. Adjust the pressure of the outer hoop by turning the
retaining screw. The fabric should be taut in the hoop for the best results. NOTE: When embroidering additional designs on the same fabric, open the Quick Release Lever, move the hoop to the new position RQWKHIDEULFDQGFORVHWKHTXLFNUHOHDVHOHYHU:KHQFKDQJLQJ type of fabric, you might need to adjust the pressure using the retaining screw. Do not force the Quick Release Lever.
1. Raise the presser foot. Raise the needle to its highest
position by turning the hand wheel toward you. 6OLGHWKHKRRSRQWRWKHHPEURLGHU\XQLWIURPIURQWWREDFN until it clicks into place. NOTE: Presser foot lever can be raised and held in a higher position to help passing the hoop under the foot.
assembly, then slide the hoop toward you. D47
RQLQGLYLGXDOGHVLJQVYLHZHGRQ3&
not force it into the socket.
machine or stitching the embroidery, as this can damage the
¿OHVRQ\RXU86%HPEURLGHU\VWLFN
DESIGN BOOK A Design Book is provided, which displays an overview of the included embroidery designs and fonts that come with your PDFKLQH<RXFDQVHHDQLPDJHVRIWKHGHVLJQVDVZHOODV the dimensions and stitch count of the designs.
Adobe Acrobat Reader installed in order to view the Design %RRN,I\RXU3&GRHVQ¶WKDYH$FUREDW5HDGHUDFFHVVWKH Adobe website to install it.
about each individual embroidery design that comes with your machine, such as the order of thread colors, suggested thread colors and more.
Adobe Acrobat Reader installed in order to view the Design %RRN,I\RXU3&GRHVQ¶WKDYH$FUREDW5HDGHUDFFHVVWKH Adobe website to install it. EMBROIDERY SOFTWARE Embroidery software is available for your machine, which will allow you to use designs from other sources, such as design &'¶VDQGGHVLJQVIURPWKHLQWHUQHW Go to singer.mysewnet.com for information on how to download this software to your PC.
UPDATING YOUR MACHINE
Periodically, updates may be made available for your machine.
<RXUPDFKLQHLVXSGDWHGYLD\RXU86%VWLFN
1. Go to singer.mysewnet.com for information about available
D 6HOHFWLQJDGHVLJQHGLWLQJDQGVWLWFKLQJ b. Programming letters, editing and stitching.
fonts, built-in to the machine. The remainder of the designs DUHRQWKH86%VWLFN
iii. Total number of colors
iv. Total number of stitches
´EXWWRQDWWHQNH\VFUHHQ The design is selected and Embroidery Placement screen will appear.
button. When folder is opened, the list of designs included in that IROGHUZLOODSSHDUJ 7RJREDFNSUHVVWKHDUURZEXWWRQRQWKHWRSOLQHK Press the info button for more information about the selected design. NOTE:
,IWKH86%VWLFNRUDIROGHULVHPSW\RULIUHDGDEOH¿OHLVQRW
included, empty mark will appear.
:KHQ¿OHLVORDGHGHPEURLGHU\SODFHPHQWVFUHHQZLOO
appear.49 Before you begin embroidering, you can edit designs, as shown below, using the Edit Tabs. NOTE: A pop up message may appear if you did not attach the correct hoop. 3UHVV³
2. Press the Rotate button. By pressing this button, the design
will rotate 90 degrees clockwise. If the design is too wide or too high to rotate 90 degrees, it will rotate 180 degrees. The total rotation value will be indicated at the top right of the LCD screen. Located to the left of the rotation value is DµPDFKLQHLFRQ¶ZKLFKZLOOURWDWHDVWKHURWDWLRQYDOXHLV changed.
3. Press the Mirror buttons.
a. Mirror from top to bottom b. Mirror from side to side 7KHµPDFKLQHLFRQ¶ORFDWHGQHDUWKHWRSRIWKH/&'VFUHHQ will change to the selections made, indicating the new orientation of the embroidery design.
<RXFDQPRYHWKHSODFHPHQWRUSRVLWLRQRIWKHVHOHFWHG embroidery design, as follows:
2. Press the four arrow buttons to move the position.
a: up, b: left, c: right, d: down The hoop will move according to the direction selected. Each time the button is touched, the hoop will move. If the button is touched and held, the movement will be done in larger increments. 7KHYDOXHV;<QHDUWKHWRSRIWKHVFUHHQLQGLFDWH distance from center position. NOTE: The left side of screen is showing the embroidery area and relative design position and size.
7RLQFUHDVHWKHVFDOHSUHVVWKHXSSHUDUURZEXWWRQD 7RGHFUHDVHWKHVFDOHSUHVVWKHORZHUDUURZEXWWRQE The design will be scaled 5 percent each pressing on a button. The maximum scaling is +/- 20 percent. If scaling is exceeding the hoop size, it cannot be selected. 7RUHWXUQWRRULJLQDOVL]HSUHVVWKHEXWWRQF The value of the current scale is indicated between the buttons, and size of scaled design is indicated on the top line of screen. EMBROIDERY50
buttons, as shown below:
HOOP OPTION AND SELECTION (A) The top right button shows the hoop size selected. Press this button to select a hoop position or to change the hoop size.
i. Current Position:
When you want to return to the current stitch and start embroidering again where the embroidery was interrupted, press this button. Hoop will move to current positon and return to embroidery option screen. NOTE: <RXFDQDOVRSUHVVWKH³
By pressing this button, move the hoop towards you, making it easier to trim fabric when embroidering an DSSOLTXp
´EXWWRQ7KHFDUULDJHZLOOWKHQPRYHWR the correct position for storage. Then, turn off the power switch and remove the unit. NOTE: It is very important that the hoop is removed, otherwise it may be damaged.
iv. Center Position:
If you want to check where the center position of the hoop will be placed on the fabric, press this button.
HOOP SELECTION When you select the design, machine will select most suitable hoop automatically.
6HOHFWWKHKRRS\RXZDQWWRXVH The hoop list can be scrolled by pressing the right side arrow buttons. Only hoops that are big enough for the selected design will be possible to select. Hoops that are too small are marked with an X and cannot be selected. 6HOHFWHGKRRSLVPDUNHGZLWKDEODFNGRW 3UHVVWKH´
size and edits will not change and return to the Embroidery Option screen. NOTE: If the hoop you have selected is not the same as the hoop attached to the embroidery unit, a pop-up will appear to inform you of this. Attach the correct hoop or select another hoop from the list. Hoops 260x150 and 100x100 are provided with this machine. TRACING (B) The Tracing function can be used to trace around the design area. Press the second button to move the hoop so the needle is placed in the upper left corner of where the design will be embroidered. Each press of the button will move the hoop to view all corners of the design. 2QWKH¿IWKSUHVVWKHKRRSZLOOPRYHWRWKHFHQWHUSRVLWLRQ of the design and on the sixth press it will move back to its original position. The Tracing button will indicate the position by highlighting mark. BASTING (C)
%\SUHVVLQJWKHWKLUGEXWWRQDQGSUHVVLQJWKH6WDUW6WRSEXWWRQ
machine will sew a basting stitch around the design area as a box. Basting enables you to secure your fabric to a stabilizer placed beneath it, especially when the fabric to be embroidered cannot be hooped. Basting can also provide added support, especially for unstable fabrics. NOTE: During basting, the design box will be indicated with a dashed line and Basting button will be highlighted. MONOCHROME (D) Press the fourth button to activate monochrome embroidery. The machine will not stop for color block changes. Press the button again to deactivate monochrome embroidery. When Monochrome is activated, this button will be highlighted.
:KHQ\RXFRPSOHWHHGLWLQJWKHGHVLJQSUHVVWKH6WLWFK2XW
tab to start sewing.
:KHQ\RXSUHVVWKH6WLWFK2XWWDE$WKH6WLWFK2XW6FUHHQ will appear.
design. By pressing -/+ buttons, stitch will go backward/forward. Press and hold will increase stepping speed. c. Current color / Total number of colors By pressing -/+ buttons, color block will go backward/ forward.
2. Pass the upper thread through the hole of the embroidery
foot from the top side.
3. Lower the presser foot lifter.
4. Hold the upper thread.
automatically after few stitches for cut thread end. A pop up appears asking you to cut thread end. Cut thread end and SUHVVWKH³
8. When embroidering a color block is completed, machine
will stop automatically and cut upper thread. A pop up will appears asking you to change color. Re- WKUHDGZLWKWKHQH[WFRORUDQGSUHVV³
Each color segment is tied of at the end and the upper and bobbin threads are cut.
9. When the entire embroidery is completed, your machine
cuts both threads and stops.
2. This machine has 2 fonts and each font has 3 sizes.
button. The uppercase letter screen will appear. 6HOHFWWKHOHWWHUV\RXZDQWWRHPEURLGHU To change to different types of characters, press the tab that contains the desired characters, as follows: a. Uppercase letters b. Lowercase letters c. Numeric letters and special letters 6HOHFWHGOHWWHUZLOOEHDGGHGWRWKHWRSOLQH
5. The arrow buttons on top line will move the cursor.
6. To insert a letter at any desired position, move the cursor to
the inserting point and select letter. To delete the letter, move the cursor to the right side of the OHWWHUWREHGHOHWHGWKHQSUHVVWKH'HOHWHEXWWRQG :KHQVHTXHQFHRIOHWWHUVLVFRPSOHWHGSUHVVWKH
Lettering can be edited, similar to the way designs can be edited.
all letters b. Current letter / Total number of all letters The machine will stitch each letter, cutting the threads between each letter.
MACHINE SET FOR TWIN NEEDLE
This pop-up message will appear when Twin Needle program is activated. &KHFNWKHQHHGOHDQGSUHVVWKH³
This message will appear when a stitch that cannot be used with twin needle, is VHOHFWHG3UHVVWKHWKH³
button and select another pattern or reset the twin needle program.
button to continue. CALIBRATION FAILED If calibration has not completed correctly, SRSXSPHVVDJHZLOODSSHDU3UHVVWKH³
button and retry the calibration.
LOWER THE DROP FEED LEVER
When sewing on the button, this pop-up
WKHVHTXHQFH,I\RXVHOHFWDSDWWHUQ
that cannot be combined, a message will appear on screen to alert you of this. 3UHVVWKH³
If the needle is in lowered position and need to be raised before function can be executed, this pop-up meesage is VKRZQ5DLVHWKHQHHGOHDQGSUHVVWKH³
button to close the pop-up message.
ORE STITCHES 7KHVHTXHQFHFDQFRQWDLQDPD[LPXP of 60 patterns and letters. Message will appear when you came to the limit. 3UHVVWKH³
If you are sewing on very heavy fabric or if the machine is blocked when sewing, the main motor can get overloaded and the machine will stop sewing. The pop-up message will close when the main motor and power supply are secure.
LOWER THE PRESSER FOOT
This pop-up will appear when you start the sewing without lowering the presser IRRW3UHVVWKH³
´EXWWRQDQGORZHUWKH presser foot lifter to start to sew.
RAISE THE PRESSER FOOT
This pop-up will appear when the function has chosen that the presser foot must EHXSSRVLWLRQ3UHVVWKH³
When the upper thread breaks or runs out, this pop-up will appear and sewing will stop. 5HWKUHDGWKHXSSHUWKUHDGDQGSUHVV³
sewing. THREAD JAM If upper or bobbin thread is jammed under the needle plate, machine will stop and pop-up this message. 5HPRYHWKHKRRSDQGQHHGOHSODWHVHH
´EXWWRQ0DFKLQHZLOO delete all selected patterns and letters. To FDQFHOSUHVVWKH³;´EXWWRQ OVERWRITE If the selected folder has a memorized VHTXHQFHLQLWSUHYLRXVO\DPHVVDJHZLOO appear asking to rewrite over the previous VHTXHQFHRUQRW7RUHZULWHGHOHWLQJ SUHYLRXVVHTXHQFHSUHVVWKH³
When starting to embroider or after changing the thread, the machine will sew a few stitches and then stop so you can cut the thread end.
When embroidering a color block is completed, machine will stop automatically and cut both threads. A pop up will appears asking you to change color. Re-thread with the next FRORUDQGSUHVV³
´EXWWRQ EMBROIDERY FINISHED When the entire embroidery is completed, your machine cuts both threads and stops. A pop-up informs you that your embroidery
This pop-up will appear if a design is too ODUJHIRUWKLVPDFKLQHWRUHDGIURP86% stick.
STOP COMMAND IN DESIGN
This pop-up will appear when there is a programmed stop in the design. The PDFKLQHZLOOVWRS3UHVV³
´EXWWRQWR continue embroidering. CORRUPTED DATA This pop-up will appear when the content
This pop-up will appear when the selected hoop in the hoop selection list is not the same as the hoop attached to the embroidery unit. Attach the correct hoop W\SHDQGSUHVVWKH³
This pop-up will appear when your embroidery machine cannot access the
non-compatible with this machine.
This pop-up will appear when a function has been chosen that the forces the embroidery unit to move outside the limits for the attached hoop. In order for the carriage to move freely, remove the hoop DQGWKHQSUHVVWKH³
MAINTENANCE CLEANING If lint and bits of thread accumulate in the hook, this will interfere with the smooth operation of the machine. Check regularly and clean the stitching mechanism as needed. NOTE:
- An LED lamp is used to illuminate the stitching area. It does
- There is no need to lubricate this machine. BOBBIN HOLDER Remove the bobbin cover and bobbin. Clean the bobbin holder with a brush.
HOOK RACE AND FEED DOG
1. Remove the needle, presser foot and holder. Remove the
bobbin cover and bobbin. Remove the screws holding the needle plate.
2. Remove the needle plate by lifting up the right side of the
3. Lift up the bobbin holder and remove it.
CAUTION 7RSUHYHQWDFFLGHQWVGRQRWWRXFKWKHWKUHDGFXWWHU XQLWD
4. Clean the hook race, feed dogs and bobbin holder with a
brush. Also clean them, using a soft, dry cloth.
5. Replace the bobbin holder into the hook race so that the tip
E¿WVWRWKHVWRSSHUFDVVKRZQ
6. Replace the needle plate inserting the hook into the
machine. Replace the screws and tighten. DANGER To reduce the risk of electric shock, disconnect the SRZHUOLQHSOXJIURPWKHHOHFWULFRXWOHWEHIRUHFDUU\LQJ RXWDQ\PDLQWHQDQFH57 MAINTENANCE PROBLEM Upper thread breaks Lower thread breaks Machine skips stitches )DEULFSXFNHUV Machine makes loose stitches or loops 6WLWFKSDWWHUQLV distorted Threader does not thread to needle eye Machine does not feed properly Needle breaks Machine runs with GLI¿FXOW\ Machine will not run HELPFUL HINTS CORRECTION Re-thread machine. Remove entwined thread. Re-insert needle. Readjust thread tension. Choose correct thread. Re-thread the bobbin. Rewind the bobbin. Clean the holder. Re-insert needle. Insert new needle. Choose correct size needle for fabric. XVHVWUHWFKQHHGOH Re-thread machine. Re-thread the bobbin. Insert new needle. Readjust thread tension. 6HOHFWOHVVGHQVHGHVLJQIRUIDEULFRUFKDQJH fabric type. Use proper stabilizer for fabric being embroidered. Re-thread the bobbin. Re-thread machine. Readjust thread tension. Attach correct foot. Remove obstruction. Adjust the thread tension. Use proper stabilizer for fabric being embroidered. Raise the needle. Re-insert needle. Insert new needle. Raise the feed dogs. Regulate stitch length. Clean the feed dog area. Do not pull fabric. 6HOHFWFRUUHFWIRRWDQGSDWWHUQ Re-insert needle. Choose correct size needle and thread. Remove the needle plate and bobbin holder and clean the hook race. Insert plug fully into outlet. Turn on the switch. Lower the foot. CAUSE Machine not properly threaded. Thread entwined around bobbin. Needle inserted incorrectly. Thread tension too tight. 7KUHDGRILQFRUUHFWVL]HRUSRRUTXDOLW\ Bobbin threaded incorrectly. Bobbin wound unevenly or too full. Dirt or lint in the bobbin holder. Needle inserted incorrectly. Bent or blunt needle. Incorrect size of needle. RQVWUHWFKIDEULF Machine not properly threaded. Bobbin threaded incorrectly. Blunt needle. Thread tension too tight. Design too dense for fabric being embroidered.
,QVXI¿FLHQWVWDELOL]HU
Bobbin threaded incorrectly. Machine not properly threaded. Tension not adjusted properly. Presser foot is not suited for the pattern. Hoop or carriage is interferred. Thread tension is not balanced.
,QVXI¿FLHQWVWDELOL]HU
Needle is not raised to highest position. Needle inserted incorrectly. Bent needle. )HHGGRJVDUHORZHUHG 6WLWFKOHQJWKQRWVXLWDWEOHIRUIDEULF Lint and dust accumulated around feed dog. )DEULFSXOOHGZKLOHVHZLQJ Needle is hitting the presser foot. Needle inserted incorrectly. Incorrect size needle or thread for fabric being sewn. Dirt or lint accumulated in the hook race and feed dog. Cord not plugged into electrical outlet. Power switch is not turned on. Presser foot is not lowered. 3DJH
COUTURE AU POINT DROIT
COUTURE POINT EXTENSIBLE
1R 3RLQW'URLW$LJXLOOH3RVLWLRQ&HQWUDOH
1R0DWHODVVDJHDSSDUHQFHIDLWjODPDLQ
3LHG3RLQW'URLW3DWFKZRUN
GDQVOHWURXSUpYXWjFHWWH¿Q
(Q¿OH]OHVHFRQG¿OFRPPHOHSUHPLHU
GHIHUPHUOHOHYLHUGXV\VWqPHG¶DWWDFKHjQRXYHDX
YRXVSHUPHWWUDG¶XWLOLVHUOHVPRWLIVG¶DXWUHVVRXUFHVWHOVTXH
V¶HQFDVWUHGDQVODEXWpHFFRPPHLQGLTXp