
MYQG0402 - Smart Home CHAMBERLAIN - Free user manual and instructions
Find the device manual for free MYQG0402 CHAMBERLAIN in PDF.

| Product Type | Smart Garage Hub (garage door opener control) |
| Brand | Chamberlain |
| Model | MYQG0402 |
| Category | Smart Home |
| Number of controllable openers | Up to 2 |
| Number of controllable myQ accessories | Up to 16 |
| Operating temperature | -20 °C to 65 °C (-4 °F to 149 °F) |
| Compatible door type | Sectional garage doors only |
| Required sensors | Safety photo-eye sensors on the door |
| Wi-Fi frequency | 2.4 GHz (5 GHz band not supported) |
| Wi-Fi protocols | 802.11 b/g/n |
| Wi-Fi security | WPA, WPA2, WPA2/3, and WPA3 |
| Network compatibility | IPv4 and IPv6 |
| Hub power supply | Power adapter (included) |
| Door sensor battery | CR2450 3 V (replaceable) |
| Mobile app | myQ (iOS and Android) |
| Key features | Remote open/close, monitoring, sensor scheduling, myQ lighting control |
| LED indicators | Blue, green, amber, red (Wi-Fi, sensor, battery status) |
| Warranty | 1-year limited |
| Available spare parts | Door sensor, power adapter, CR2450 battery |
Frequently Asked Questions - MYQG0402 CHAMBERLAIN
User questions about MYQG0402 CHAMBERLAIN
0 question about this device. Answer the ones you know or ask your own.
Ask a new question about this device
Download the instructions for your Smart Home in PDF format for free! Find your manual MYQG0402 - CHAMBERLAIN and take your electronic device back in hand. On this page are published all the documents necessary for the use of your device. MYQG0402 by CHAMBERLAIN.
USER MANUAL MYQG0402 CHAMBERLAIN
Accessories and Parts
CHAMBERLAIN®
Smart Garage™ Control

text_image
CHAMBERLAIN myQ connectedAll versions of
MYQ-G0401
Overview
What's in the Box
Specifications
Get to Know your Smart Garage Control
Buttons and LEDs
Set Up Your Smart
Garage Control
Need Help?
Accessories and Parts
Overview
What's in the Box
natural_image
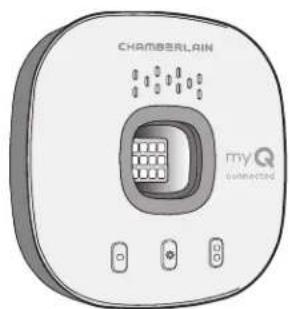
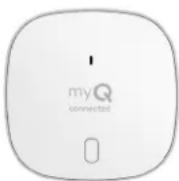
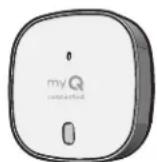
Illustration of a Chamberlain air conditioner unit with control buttons and a central display (no text or symbols on the device itself)Hub
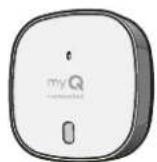
Door Sensor

Hook and Loop Adhesive Strips for Door Sensor
natural_image
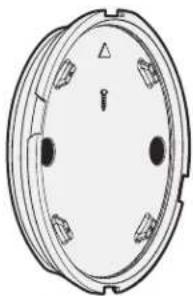
Technical line drawing of a circular mechanical component with mounting holes and a central pin (no text or symbols)Mounting Plate

natural_image
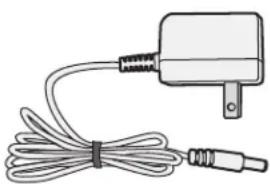
Line drawing of a handheld electronic device with coiled cable and connector (no text or symbols)Power Adapter
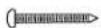


Anchors and Screws for Hub
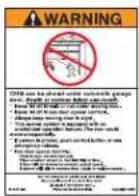
Warning Placard

Screws for Door Sensor
Specifications
- Smart Garage™ Control can control up to 2 garage door openers (requires a second door sensor, sold separately, see Accessories and Parts.)
- Smart Garage Control can control up to 16 myQ ^® accessories.
- Operating temperature: -4^ to 149^ (-20° to 65°C).
- For use with sectional garage doors ONLY.
- The garage door MUST have safety sensors installed.
• 2.4 GHz Wi-Fi with WPA, WPA2, WPA2/3 and WPA3 security protocols. - IPv4 and IPv6 compatible.
- Smart Garage Control is compatible with myQ commercial door operators.
- Smart Garage Control is NOT compatible with gate operators.
Overview
What's in the Box
Specifications
Get to Know your Smart Garage Control
Buttons and LEDs
Set Up Your Smart
Garage Control
Need Help?
Accessories and Parts
Overview
Get to Know your Smart Garage Control
Smart Garage Control lets you control up to 2 garage door openers, and 16 devices from the myQ App.
See Accessories and Parts.
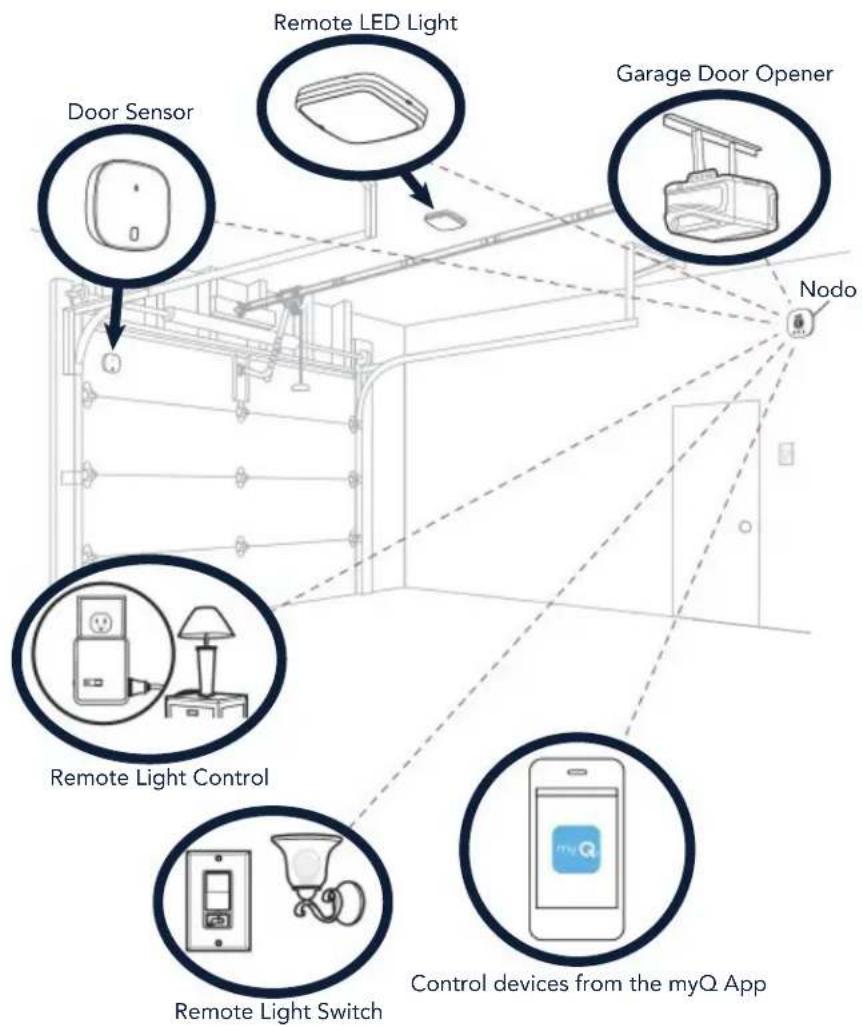
flowchart
graph TD
    A["Door Sensor"] --> B["Remote LED Light"]
    C["Garage Door Opener"] --> D["Node"]
    E["Remote Light Control"] --> F["Remote Light Switch"]
    G["Control devices from the myQ App"] --> H["Mobile Device"]
Overview
What's in the Box
Specifications
Get to Know your Smart Garage Control
Buttons and LEDs
Set Up Your Smart Garage Control
Need Help?
Accessories and Parts
Overview
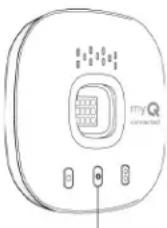
Buttons and LEDs
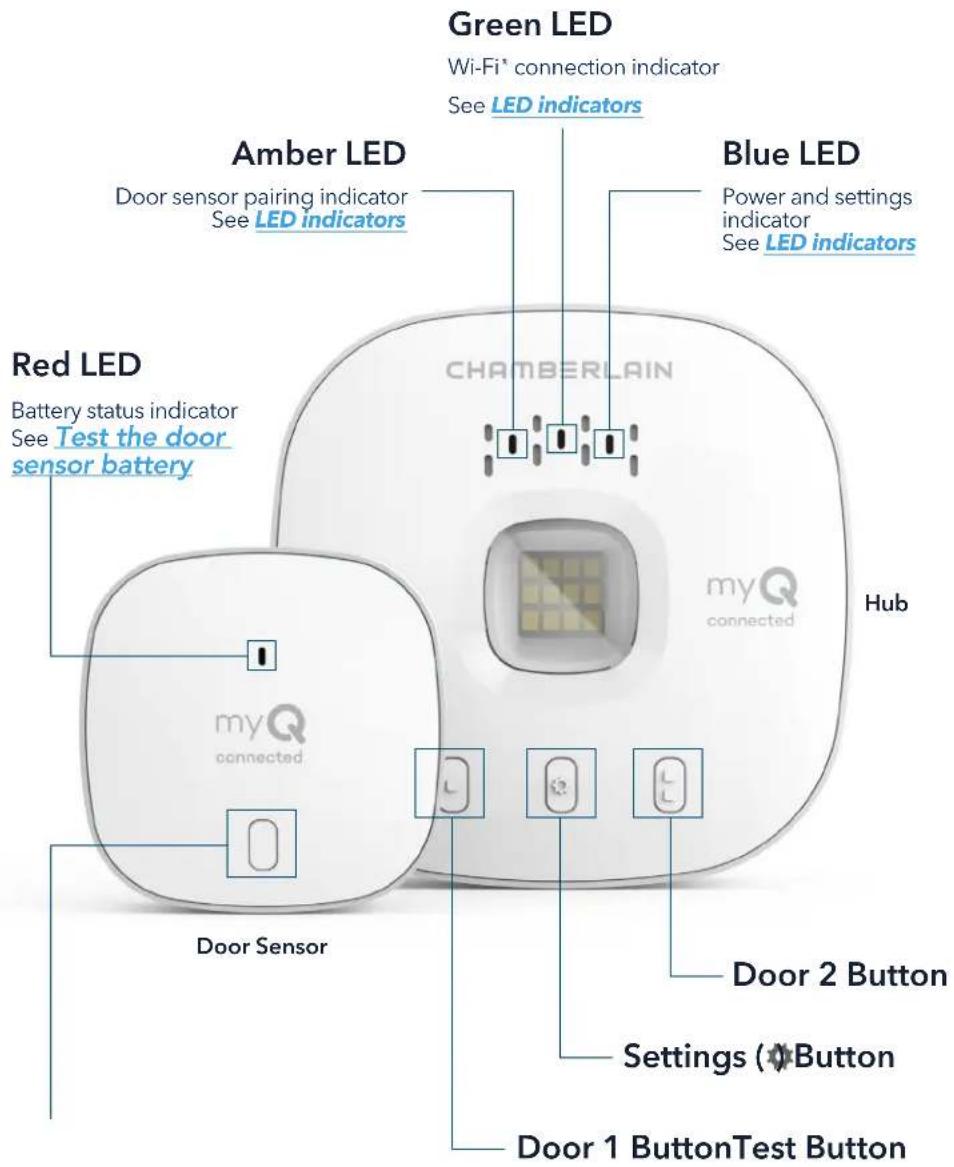
text_image
Green LED Wi-Fi* connection indicator See LED indicators Amber LED Door sensor pairing indicator See LED indicators Red LED Battery status indicator See Test the door sensor battery Blue LED Power and settings indicator See LED indicators CHAMBERLAIN Hub myQ connected Door Sensor Door 2 Button Settings (Button) Door 1 ButtonTest ButtonOverview
Set Up Your Smart Garage Control
What you Need
Connect Your Smart Garage Control
Check Your Wi-Fi Signal
Pair the Door Sensor to the Hub
Pair a second door sensor
Mount the Door Sensor
Choose the Hub Location
Mount the Hub
How-To Video
Add myQ Smart Partners and Accessories
Need Help?
Accessories and Parts
Set Up Your Smart Garage Control
What You Need
- Access to your compatible garage door opener, check opener compatibility by manufacturer
- A strong Wi-Fi signal in the garage, see Check Your Wi-Fi Signal
- Your Wi-Fi network password
- A ladder
- A drill with 5/32" bit
• A Phillips screwdriver - Bluetooth enabled on your mobile device
Connect Your Smart Garage Control


1. Download the myQ app.
If you have already installed the app, make sure you have the latest version to optimize your myQ experience.
2. Set up your account and log in.
3. Tap (+) to add your Smart Garage Control.
The app will guide you through installing and connecting your Smart Garage Control and show you how to:
Connect the hub to your home Wi-Fi network.
a. Connect the hub to your home Wi-Fi network.
b. Pair the Door Sensor to the Hub.
c. Mount the door sensor.
d. Pair the hub to your garage door opener.
e. Mount the Hub.
Congratulations! Installation of your Smart Garage Control is now complete.
App Store and the Apple and App Store logos are trademarks of Apple Inc.
Google Play and the Google Play logo are trademarks of Google LLC.
Overview
Set Up Your Smart Garage Control
What you Need
Connect Your Smart Garage Control
Check Your Wi-Fi Signal
Pair the Door Sensor to the Hub
Pair a second door sensor
Mount the Door Sensor
Choose the Hub Location
Mount the Hub
How-To Video
Add myQ Smart Partners and Accessories
Need Help?
Accessories and Parts
Set Up Your Smart Garage Control
Check Your Wi-Fi Signal
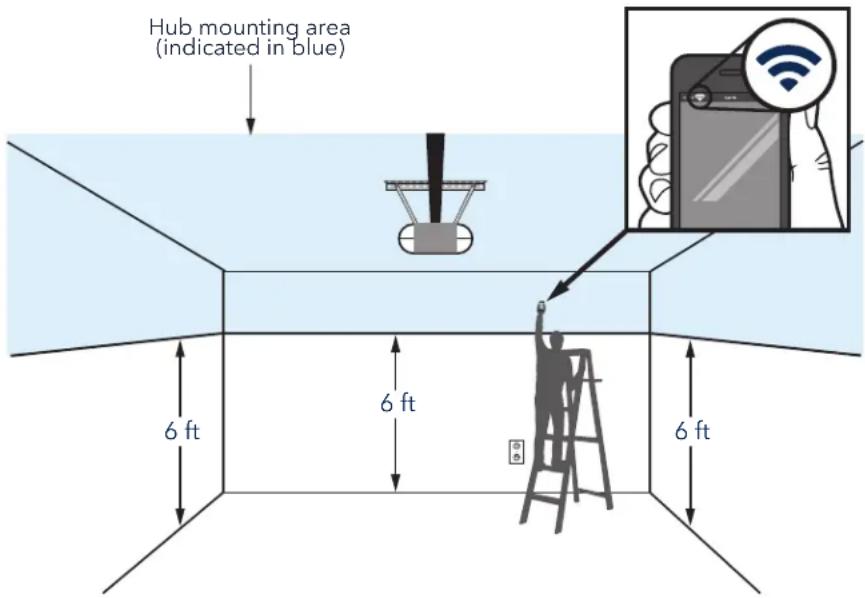
Make sure your device is connected to your Wi-Fi network. Hold the device where you plan to mount the hub.
text_image
Hub mounting area (indicated in blue) 6 ft 6 ft 6 ftIf you see:

Wi-Fi signal is strong.
You're all set! Proceed to next step.

Wi-Fi signal is weak.
The hub may not connect to your Wi-Fi network. If it doesn't connect, see How to improve your Wi-Fi signal.

No Wi-Fi signal.
See How to improve your Wi-Fi signal.
Overview
Set Up Your Smart Garage Control
What you Need
Connect Your Smart Garage Control
Check Your Wi-Fi Signal
Pair the Door Sensor to the Hub
Pair a second door sensor
Mount the Door Sensor
Choose the Hub Location
Mount the Hub
How-To Video
Add myQ Smart Partners and Accessories
Need Help?
Accessories and Parts
Set Up Your Smart Garage Control
Pair the Door Sensor to the Hub
The myQ app will pair the door sensor to the hub during initial set up.
Pair a second door sensor
To add a door sensor to a second garage door opener, in the myQ app tap (+) to add a door sensor. Follow the instructions in the app.
Mount the Door Sensor
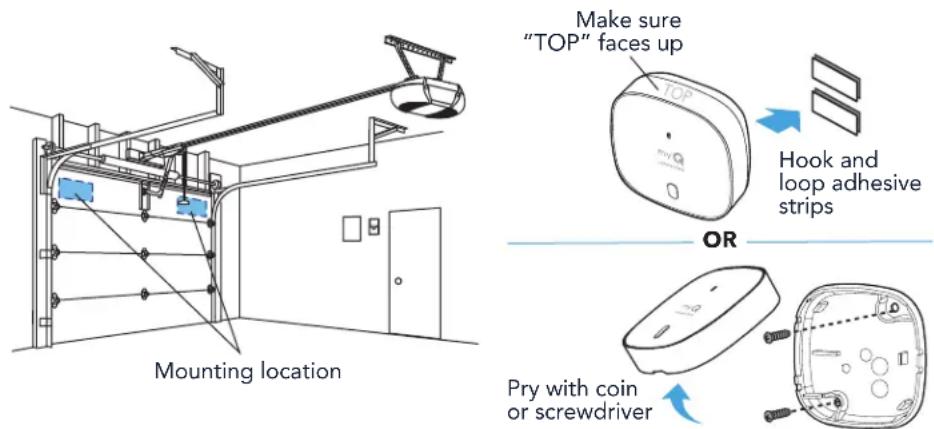
Mount the door sensor (top facing up) with the included hook and loop adhesive strips or optional screws to a clean, dry area on top panel of garage door as shown. Test the door sensor battery every 6 months.
text_image
Mounting location Make sure "TOP" faces up Hook and loop adhesive strips OR Pry with coin or screwdriverOverview
Set Up Your Smart Garage Control
What you Need
Connect Your Smart Garage Control
Check Your Wi-Fi Signal
Pair the Door Sensor to the Hub
Pair a second door sensor
Mount the Door Sensor
Choose the Hub Location
Mount the Hub
How-To Video
Add myQ Smart Partners and Accessories
Need Help?
Accessories and Parts
Set Up Your Smart Garage Control
Choose the Hub Location
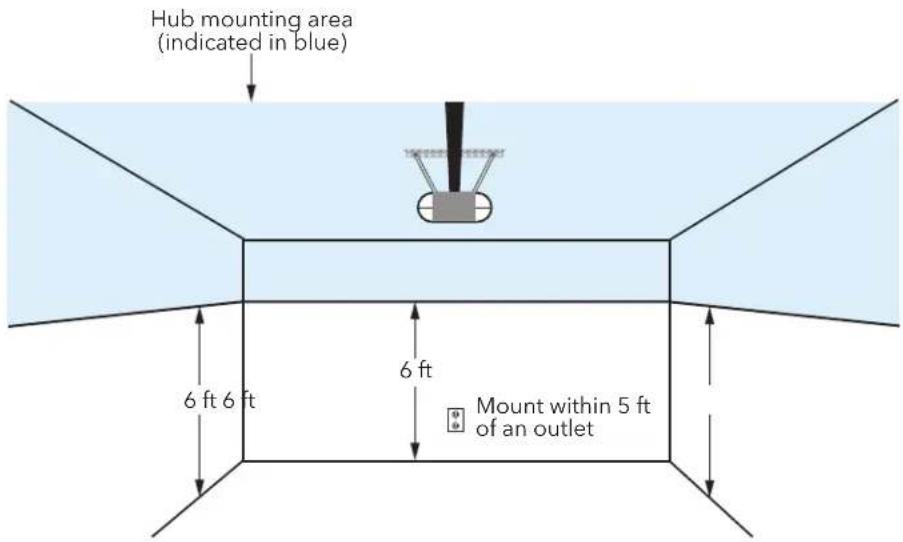
Find an area on the ceiling, a side wall, or opposing wall to the garage door that is:
• at least 6 feet above the ground.
• within 5 feet of an outlet.
• where the hub and light is visible at all times from within the garage.
• 4 feet away from any metal objects.
text_image
Hub mounting area (indicated in blue) 6 ft 6 ft 6 ft Mount within 5 ft of an outletOverview
Set Up Your Smart Garage Control
What you Need
Connect Your Smart Garage Control
Check Your Wi-Fi Signal
Pair the Door Sensor to the Hub
Pair a second door sensor
Mount the Door Sensor
Choose the Hub Location
Mount the Hub
How-To Video
Add myQ Smart Partners and Accessories
Need Help?
Accessories and Parts
Set Up Your Smart Garage Control
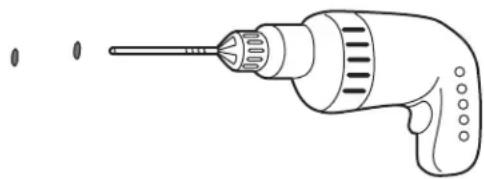
Mount the Hub
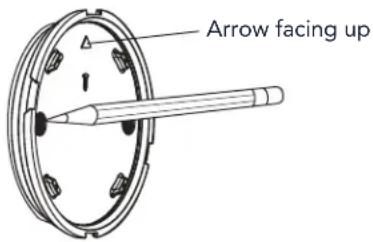
- With the arrow facing up, use the mounting plate to mark the drill holes.
text_image
Arrow facing up- Drill holes using a 5/32" bit.
natural_image
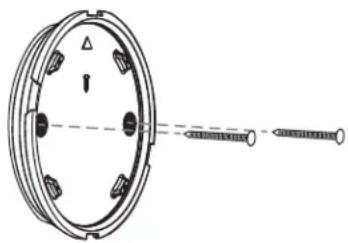
Line drawing of a drill bit with screwdriver and two other drill bits (no text or symbols)- Insert drywall anchors until they are flush with the surface.

natural_image
Diagram showing two cylindrical objects with internal structures connected by dashed lines, no text or symbols present- Attach the mounting plate with screws.
natural_image
Technical line drawing of a mechanical component with screws and a central hub (no text or symbols)Continue

Overview
Set Up Your Smart Garage Control
What you Need
Connect Your Smart Garage Control
Check Your Wi-Fi Signal
Pair the Door Sensor to the Hub
Pair a second door sensor
Mount the Door Sensor
Choose the Hub Location
Mount the Hub
How-To Video
Add myQ Smart Partners and Accessories
Need Help?
Accessories and Parts
Set Up Your Smart Garage Control
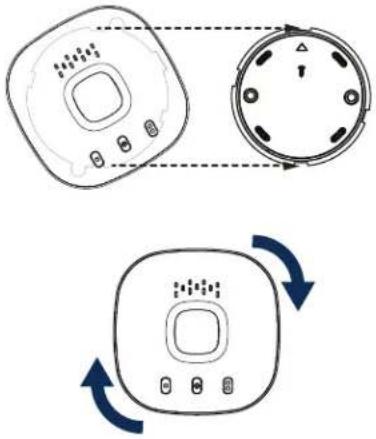
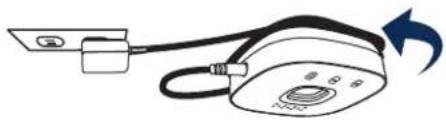
Mount the Hub
- Place the hub on the mounting plate at an angle and rotate until secure.
flowchart
graph TD
    A["Device 1"] --> B["Device 2"]
    B --> C["Device 3"]
    C --> D["Device 4"]
    D --> E["Device 5"]
    style A fill:#f9f,stroke:#333
    style B fill:#f9f,stroke:#333
    style C fill:#f9f,stroke:#333
    style D fill:#f9f,stroke:#333
    style E fill:#f9f,stroke:#333
NOTE: Wrap excess power cable around the hub and mounting bracket.
natural_image
Diagram of a portable electronic device with cable and indicator lights, no text or symbols present- Attach the warning placard on the wall next to the door control.
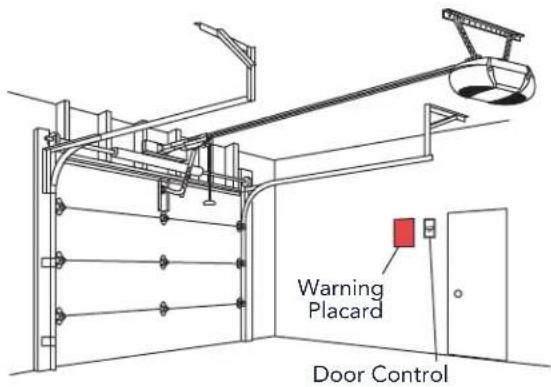
text_image
Warning Placard Door ControlOverview
Set Up Your Smart Garage Control
What you Need
Connect Your Smart Garage Control
Check Your Wi-Fi Signal
Pair the Door Sensor to the Hub
Pair a second door sensor
Mount the Door Sensor
Choose the Hub Location
Mount the Hub
How-To Video
Add myQ Smart Partners and Accessories
Need Help?
Accessories and Parts
Set Up Your Smart Garage Control
How-To Video
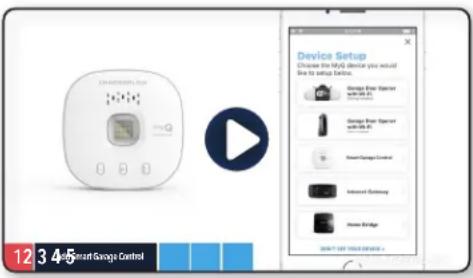
text_image
Device Setup Choose the My device you would Use to setup before. Change from Exporter with 10% UI. Change from Exporter with 10% UI. SmartGauge Control Instruct Backway Home Bridge DON'T GET YOUR GROUP.How to Install and Set Up the Chamberlain® Smart Garage™ Control Using the myQ App
Overview
Set Up Your Smart Garage Control
What you Need
Connect Your Smart Garage Control
Check Your Wi-Fi Signal
Pair the Door Sensor to the Hub
Pair a second door sensor
Mount the Door Sensor
Choose the Hub Location
Mount the Hub
How-To Video
Add myQ Smart Partners and Accessories
Need Help?
Accessories and Parts
Set Up Your Smart Garage Control
Add myQ Smart Partners and Accessories
Your Smart Garage Control is compatible with a wide variety of interactive service providers and accessories.
See myQ smart partners or select Works with myQ in the app.
See Accessories and Parts.

natural_image
Two smiling adults sitting together, one using a tablet device, in a bright room with city buildings visible through the window (no text or symbols)Overview
Set Up Your Smart Garage Control
Need Help?
Troubleshooting videos
Garage door opener compatibility
Router compatibility and settings
How to improve your Wi-Fi signal
Test the door sensor battery
Change the door sensor battery
Pair a replacement door sensor
You have reached the maximum number of doors
How to manually add a door sensor
Erase Wi-Fi settings from the hub
Reset the hub to factory default
Update my network settings in the myQ app
LED indicators
The app says Monitor Mode
App error messages
Locate a garage door opener program or learn button
Accessories and Parts
Need Help?
Troubleshooting videos
myQ™ Smart Garage™ Control connection trouble singing guide
Main Smart Garage Control connection troubleshooting guide

text_image
Connecting your myQ® hub to the home myQ® Smart Group Control connection troubleshooting guideConnecting your Smart Garage Control to the myQ app
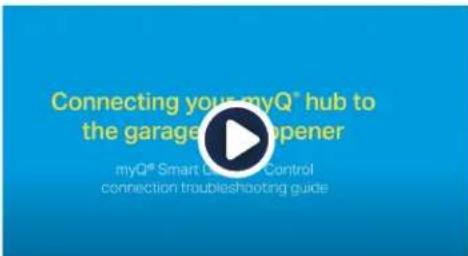
text_image
Connecting your myQ® hub to the garage opener myQ® Smart Control Control connection troubleshooting guideConnecting your Smart Garage Control to the garage door opener
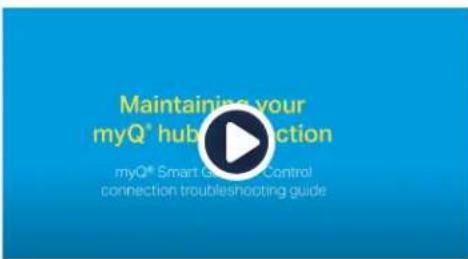
text_image
Maintaining your myQ® hub connection myQ® Smart Control connection troubleshooting guideMaintaining your Smart Garage Control's connection

text_image
Your myQ® hub is not pulling up myQ® Smart Control connection troubleshooting guideYour Smart Garage Control hub is not powering up

text_image
Connecting your myQ® hub to Internet myQ® Smart Control connection troubleshooting guideConnecting your Smart Garage Control to the Internet
text_image
Connecting your myQ® hub to the myQ® sensor myQ® Smart Control Control connection troubleshooting guideConnecting your Smart Garage Control to the door sensor
text_image
How to test and replace the battery in your sensor myQ® Smart Garage™ ControlHow to test and replace the battery in your Smart Garage Control door sensor
Overview
Set Up Your Smart Garage Control
Need Help?
Troubleshooting videos
Garage door opener compatibility
Router compatibility and settings
How to improve your Wi-Fi signal
Test the door sensor battery
Change the door sensor battery
Pair a replacement door sensor
You have reached the maximum number of doors
How to manually add a door sensor
Erase Wi-Fi settings from the hub
Reset the hub to factory default
Update my network settings in the myQ app
LED indicators
The app says Monitor Mode
App error messages
Locate a garage door opener program or learn button
Accessories and Parts
Need Help?
Garage door opener compatibility
The Smart Garage Control is compatible with most garage door opener brands manufactured starting January 1, 1993 that use photoelectric sensors near the bottom of the door track and where those sensors do not change state to a low power mode. Check opener compatibility by manufacturer.
Router compatibility and settings
Make sure the router has the following settings:
• 2.4 GHz is enabled, 5 GHz is NOT compatible
- 802.11g or 802.11n (802.11 b/g/n) is enabled
- DHCP is enabled.
• Security is set to WPA2, WPA3 or WPA2/WPA3.
- Inbound and outbound /TCP port 8883 is open
See more information about router settings and compatibility here.
How to improve your Wi-Fi signal
The Wi-Fi signal in a garage can be diminished because of the structure in the walls. If you have a weak signal in your garage, try the following:
• Make sure the router is within 50 ft. of the hub.
- Move the router closer to your garage to minimize interference from walls and other objects.
- Be sure the Smart Garage Control hub is mounted in a recommended location. Choose the Hub Location.
- Use a Wi-Fi extender.
Overview
Set Up Your Smart Garage Control
Need Help?
Troubleshooting videos
Garage door opener compatibility
Router compatibility and settings
How to improve your Wi-Fi signal
Test the door sensor battery
Change the door sensor battery
Pair a replacement door sensor
You have reached the maximum number of doors
How to manually add a door sensor
Erase Wi-Fi settings from the hub
Reset the hub to factory default
Update my network settings in the myQ app
LED indicators
The app says Monitor Mode
App error messages
Locate a garage door opener program or learn button
Accessories and Parts
Need Help?
Test the door sensor battery
Test the door sensor battery every 6 months or if the Smart Garage Control is not working as expected.
- Press and release the test button on the door sensor. The red LED on the door sensor should blink and the hub should beep.
- Wait 5 seconds, then repeat this test 5 more times (wait 5 seconds between each test).
- If the LED doesn't blink or the hub doesn't beep with each press, try the following:
- Make sure you remove the pull tab from the door sensor.
- Debris may be present on the battery. Remove the sensor cover and slide the battery out to check.
- Replace the battery, see Replacement Parts.
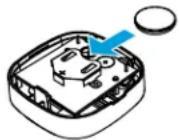
Change the door sensor battery
- Pry the latch panel on the bottom of the door sensor with a coin or screwdriver and lift the top to remove it.
- Using a soft non-conductive tool (such as a cotton swab), gently push the coin battery out of the clip.
- Gently but firmly insert the new battery into the clip and replace the cover.
Dispose of batteries properly. Replace ONLY with 3V CR2450 coin batteries, see Replacement Parts.
Pry with coin or screwdriver

Overview
Set Up Your Smart Garage Control
Need Help?
Troubleshooting videos
Garage door opener compatibility
Router compatibility and settings
How to improve your Wi-Fi signal
Test the door sensor battery
Change the door sensor battery
Pair a replacement door sensor
You have reached the maximum number of doors
How to manually add a door sensor
Erase Wi-Fi settings from the hub
Reset the hub to factory default
Update my network settings in the myQ app
LED indicators
The app says Monitor Mode
App error messages
Locate a garage door opener program or learn button
Accessories and Parts
Need Help?
Pair a replacement door sensor
To replace an existing door sensor follow the steps below:
- If the current door sensor is still operating and connected to a garage door opener, press the test button on the existing door sensor. The hub beeps one time if the current door sensor is door 1 or beeps twice if door 2.
- If the current door sensor does not work and you have two door sensors connected to the hub, press the test button on the other door sensor. The hub will beep once if the other door sensor is door 1 or beep twice if door 2. You will need to select the other button on the hub for your new door sensor.
- Remove the pull tab from the new door sensor to activate the battery.
- On the hub, press the button for door 1 or 2, depending on the information from steps 1 and 2 above. A solid amber LED light will appear.
- Press and release the test button on the new door sensor. The hub will flash and beep indicating successful programming.
- Mount the door sensor.
- In the myQ app, check that you can open and close your garage door to confirm successful programming.

text_image
Door Sensor Test Button Pull Tab Amber LED Hub myQ Door 2 Button Door 1 ButtonYou have reached the maximum number of doors
The Smart Garage Control hub has the ability to pair two (2) door sensors and two (2) garage door openers at a time. If you try to add more than two sensors and/or garage door openers, you will receive the following error message, "Two Sensor Limit. You already have two sensors paired to this hub."
If you receive this message and do not have more than two door sensors or two garage door openers paired when trying to add a door sensor through the app, manually add the door sensor using the steps below.
Overview
Set Up Your Smart Garage Control
Need Help?
Troubleshooting videos
Garage door opener compatibility
Router compatibility and settings
How to improve your Wi-Fi signal
Test the door sensor battery
Change the door sensor battery
Pair a replacement door sensor
You have reached the maximum number of doors
How to manually add a door sensor
Erase Wi-Fi settings from the hub
Reset the hub to factory default
Update my network settings in the myQ app
LED indicators
The app says Monitor Mode
App error messages
Locate a garage door opener program or learn button
Accessories and Parts
Need Help?
How to manually add a door sensor
-
Clear the channels on the hub.
-
Press and hold button 1 on the hub until the amber LED turns off.
-
Press and hold button 2 on the hub until the amber LED turns off.
-
Press and release button 1 on the hub.
-
Press and release the test button on the door sensor.
- The hub will beep and flash indicating successful door sensor programming.
- Log into the myQ app.
- A picture of the garage door will show the Monitor Door Only displayed within a blue bar.
- Tap on the blue bar and proceed with pairing the garage door opener.
Erase Wi-Fi settings from the hub
Erasing the Wi-Fi settings allows you to reset the Wi-Fi settings on the hub.
- The green LED MUST be on or blinking to erase Wi-Fi settings.
- Press and hold the button on the hub until the blue LED blinks.
Settings Button
Reset the hub to factory default
Resetting the hub to factory default will erase the Wi-Fi settings, and removes the device from the myQ account.
- Press and hold the button on the Wi-Fi hub until the blue LED starts blinking then release.
- While the blue LED is blinking, press and hold the button again until the blue LED pauses then blinks or beeps. The Wi-Fi hub is set to factory default..
To install and connect the hub, see Connect Your Smart Garage Control.
Update my network settings in the myQ app
When you replace your router or update any of your home network settings or password, you need to update the Wi-Fi settings in the myQ app and reconnect your Smart Garage Control.
Overview
Set Up Your Smart Garage Control
Need Help?
Troubleshooting videos
Garage door opener compatibility
Router compatibility and settings
How to improve your Wi-Fi signal
Test the door sensor battery
Change the door sensor battery
Pair a replacement door sensor
You have reached the maximum number of doors
How to manually add a door sensor
Erase Wi-Fi settings from the hub
Reset the hub to factory default
Update my network settings in the myQ app
LED indicators
The app says Monitor Mode
App error messages
Locate a garage door opener program or learn button
Accessories and Parts
Need Help?
LED indicators
The LEDs indicate the status of the Smart Garage Control.
 | Blinking blue and green | The hub was unable to connect to your home's Wi-Fi router. | If unable to connect:Try moving the hub to a location in the garage closer to your home's Wi-Fi router.Unplug the power cord for your router and plug it back in. Note: this will disconnect all your devices.Be sure the hub is not blocked by any additional network security (Firewall, MAC filtering).Update the Wi-Fi settings on your hub by going to device management in the myQ app. |
 | Blinking blue | The hub is attempting to connect to your mobile device. | If unable to connect:Check that Bluetooth is enabled to setup your myQ device.Check that you are entering the correct network password. |
| [0044] | Solid blue The | hub was unable to connect to your home Wi-Fi network. | Unplug power to your hub and plug it back in. If it's not blinking blue, press and hold the button until the LED goes to a blinking blue.Disable and re-enable Bluetooth on your mobile device. |
 | Blinking green | The hub was unable to connect to the internet or myQ server. | If unable to connect:Unplug power to the router and plug it back in.Be sure the hub is not blocked by any additional network security (Firewall, MAC filtering)Make sure router TCP/ UDP port 8883 is open, seeRouter compatibility andsettings. |
| [SIGNATURE] | Solid green The | hub has successfully connected to the myQ server. | |
| [SIGNATURE] | Solid amber Door | door button 1 or 2 has been pressed | Press the test button on the door sensor to pair the sensor with the hub. |
| [X5WS] | Blinking amber | Door sensor is pairing to the hub. |
Overview
Set Up Your Smart Garage Control
Need Help?
Troubleshooting videos
Garage door opener compatibility
Router compatibility and settings
How to improve your Wi-Fi signal
Test the door sensor battery
Change the door sensor battery
Pair a replacement door sensor
You have reached the maximum number of doors
How to manually add a door sensor
Erase Wi-Fi settings from the hub
Reset the hub to factory default
Update my network settings in the myQ app
LED indicators
The app says Monitor Mode
App error messages
Locate a garage door opener program or learn button
Accessories and Parts
Need Help?
LED indicators
The LEDs indicate the status of the Smart Garage Control.
| No LED The hub is idle or there is no power to the hub. | Unplug power cord to the hub and plug back in. The hub should show a blinking blue LED.If there is no blinking blue LED, plug a working lamp into the same power outlet to check the outlet is providing power. If the lamp does not turn on, check the circuit breaker.If the lamp does turn on, try plugging the hub into another outlet in the home that is providing power. If there is no blinking blue LED on the hub, replace the hub. |
Overview
Set Up Your Smart Garage Control
Need Help?
Troubleshooting videos
Garage door opener compatibility
Router compatibility and settings
How to improve your Wi-Fi signal
Test the door sensor battery
Change the door sensor battery
Pair a replacement door sensor
You have reached the maximum number of doors
How to manually add a door sensor
Erase Wi-Fi settings from the hub
Reset the hub to factory default
Update my network settings in the myQ app
LED indicators
The app says Monitor Mode
App error messages
Locate a garage door opener program or learn button
Accessories and Parts
Need Help?
The app says Monitor Mode
The door sensor is paired to the hub, but the garage door opener is not.
- In the myQ app tap Monitor Mode, this will attempt to pair the garage door opener to the hub. Try to open and close the garage door in the app.
- If the hub is mounted on the ceiling move it to a location 6 feet off the ground, and 4 feet from any large metal objects. From the wall mounted door control, open and close the garage door twice.
App error messages
Close error
A close error occurs when the door is commanded to close from the app and is unable to close twice consecutively.
- Use your remote or the wall-mounted door panel button to close the garage door.
- If the garage door is not closing, check for an obstruction, check for an obstruction in the safety sensor beam. Remove any obstructions and confirm the door opens and closes from the wall mounted door control or a remote.
- If the hub is mounted on the ceiling move it to a location 6 feet off the ground, and 4 feet from any large metal objects. From the wall mounted door control, open and close the garage door twice.
- Replace the battery in the door sensor. See Test the door sensor battery.
Off line error
Your Smart Garage Control has lost connection to the router and cannot be controlled by the myQ app.
- Check that the hub is plugged in and has power.
- The router may have lost connection to the Internet. Check the router and follow the instructions that came with it to reconnect to the Internet.
- Tap the error message in the app and follow the instructions.
Overview
Set Up Your Smart Garage Control
Need Help?
Troubleshooting videos
Garage door opener compatibility
Router compatibility and settings
How to improve your Wi-Fi signal
Test the door sensor battery
Change the door sensor battery
Pair a replacement door sensor
You have reached the maximum number of doors
How to manually add a door sensor
Erase Wi-Fi settings from the hub
Reset the hub to factory default
Update my network settings in the myQ app
LED indicators
The app says Monitor Mode
App error messages
Locate a garage door opener program or learn button
Accessories and Parts
Need Help?
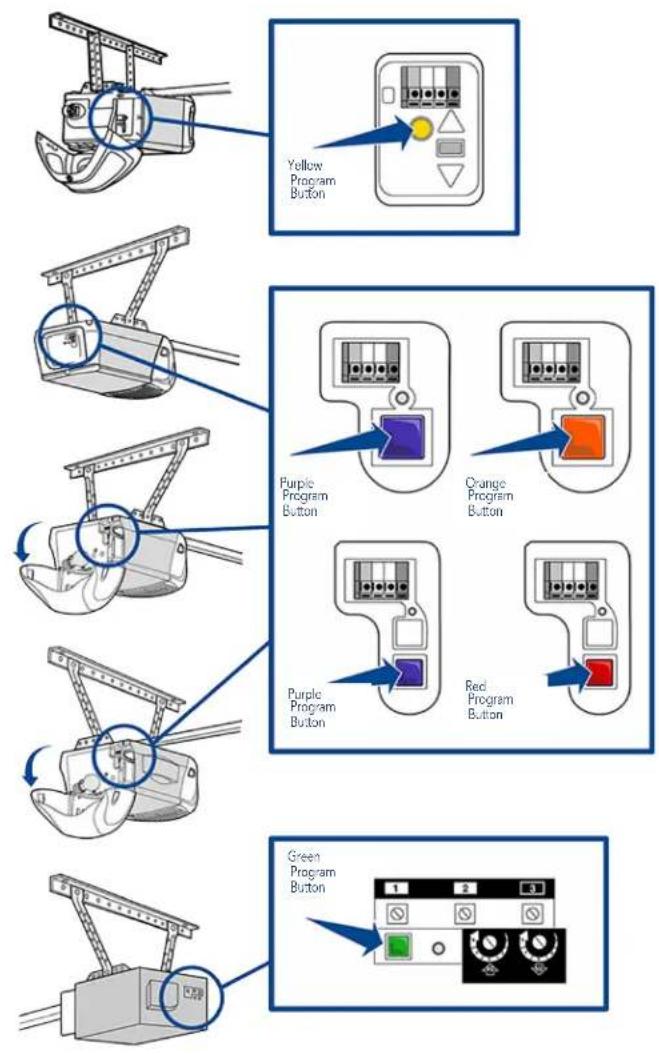
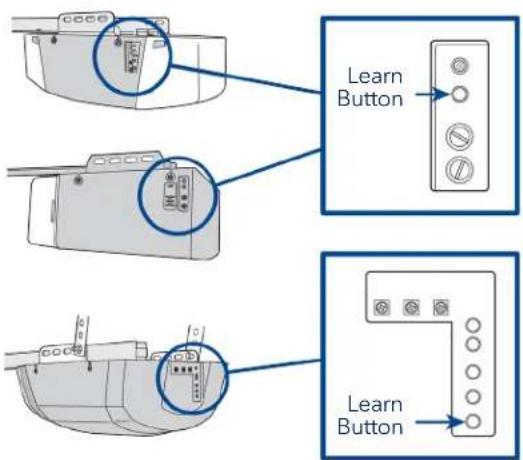
Locate a garage door opener program or learn button
Chamberlain\* Products
Overview
Set Up Your Smart Garage Control
Need Help?
Troubleshooting videos
Garage door opener compatibility
Router compatibility and settings
How to improve your Wi-Fi signal
Test the door sensor battery
Change the door sensor battery
Pair a replacement door sensor
You have reached the maximum number of doors
How to manually add a door sensor
Erase Wi-Fi settings from the hub
Reset the hub to factory default
Update my network settings in the myQ app
LED indicators
The app says Monitor Mode
App error messages
Locate a garage door opener program or learn button
Accessories and Parts
Need Help?
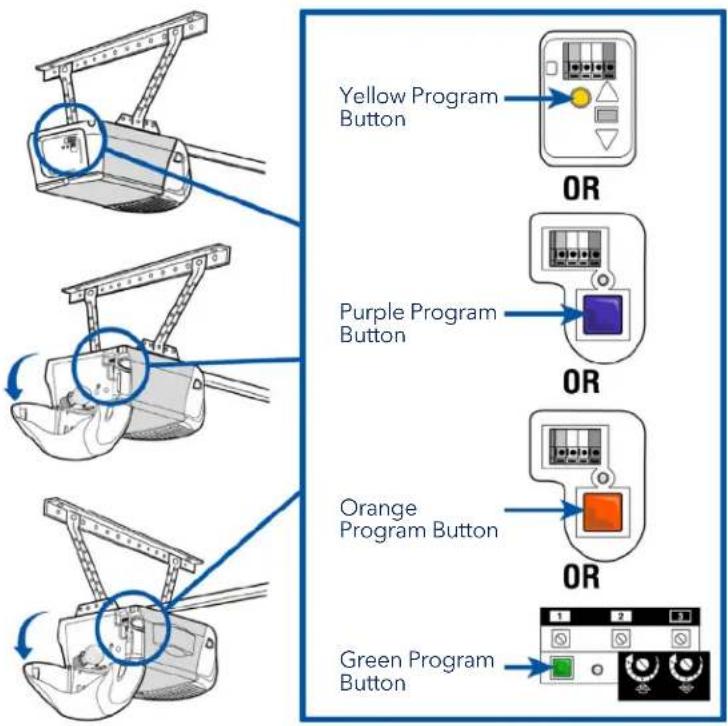
Locate a garage door opener program or learn button
LiftMaster\* Products
text_image
Yellow Program Button OR Purple Program Button OR Orange Program Button OR Green Program ButtonOverview
Set Up Your Smart Garage Control
Need Help?
Troubleshooting videos
Garage door opener compatibility
Router compatibility and settings
How to improve your Wi-Fi signal
Test the door sensor battery
Change the door sensor battery
Pair a replacement door sensor
You have reached the maximum number of doors
How to manually add a door sensor
Erase Wi-Fi settings from the hub
Reset the hub to factory default
Update my network settings in the myQ app
LED indicators
The app says Monitor Mode
App error messages
Locate a garage door opener program or learn button
Accessories and Parts
Need Help?
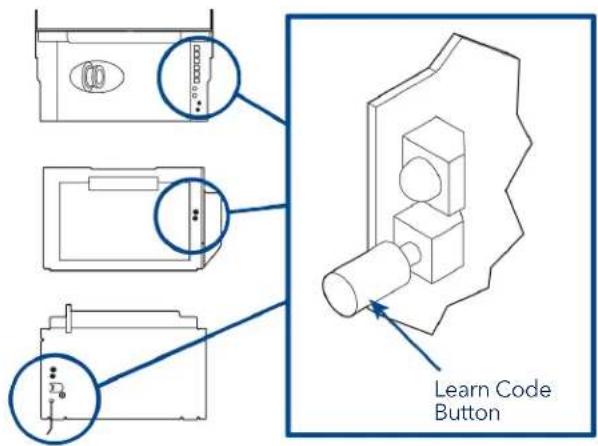
Locate a garage door opener program or learn button
Genie Products
text_image
Learn Code Button
text_image
PROGRAM SET Program Set ButtonOverhead Door Products
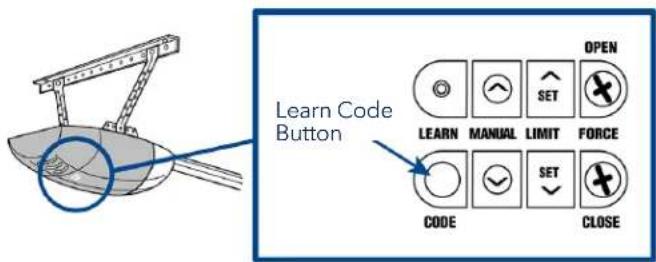
text_image
Learn Code Button OPEN LEARN MANUAL LIMIT FORCE CODE SET CLOSE
text_image
PROGRAM SET Program Set ButtonOverview
Set Up Your Smart Garage Control
Need Help?
Troubleshooting videos
Garage door opener compatibility
Router compatibility and settings
How to improve your Wi-Fi signal
Test the door sensor battery
Change the door sensor battery
Pair a replacement door sensor
You have reached the maximum number of doors
How to manually add a door sensor
Erase Wi-Fi settings from the hub
Reset the hub to factory default
Update my network settings in the myQ app
LED indicators
The app says Monitor Mode
App error messages
Locate a garage door opener program or learn button
Accessories and Parts
Need Help?
Locate a garage door opener program or learn button Linear Products
text_image
Learn Button Learn ButtonWayne Dalton Products
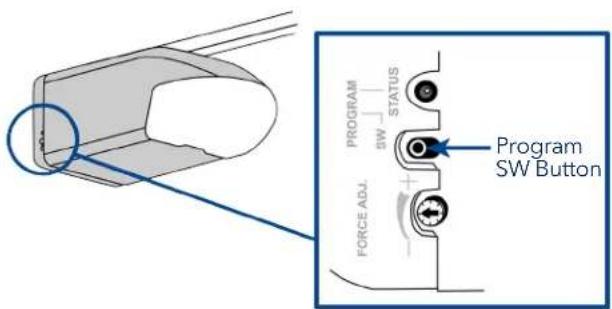
text_image
PROGRAM SW STATUS FORCE ADL. Program SW ButtonOverview
Set Up Your Smart Garage Control
Need Help?
Troubleshooting videos
Garage door opener compatibility
Router compatibility and settings
How to improve your Wi-Fi signal
Test the door sensor battery
Change the door sensor battery
Pair a replacement door sensor
You have reached the maximum number of doors
How to manually add a door sensor
Erase Wi-Fi settings from the hub
Reset the hub to factory default
Update my network settings in the myQ app
LED indicators
The app says Monitor Mode
App error messages
Locate a garage door opener program or learn button
Accessories and Parts
Need Help?
Locate a garage door opener program or learn button
Stanley Products
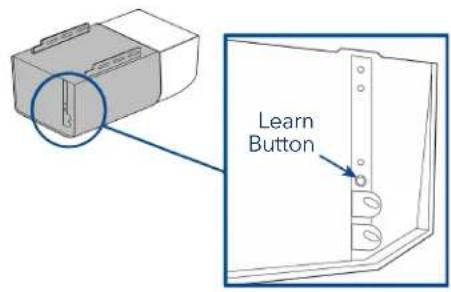
text_image
Learn ButtonSommer Products
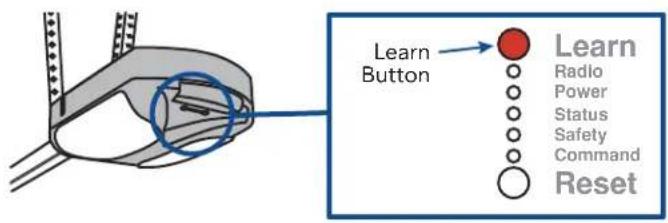
text_image
Learn Button Learn Radio Power Status Safety Command ResetGuardian / Xtreme Garage / Performax
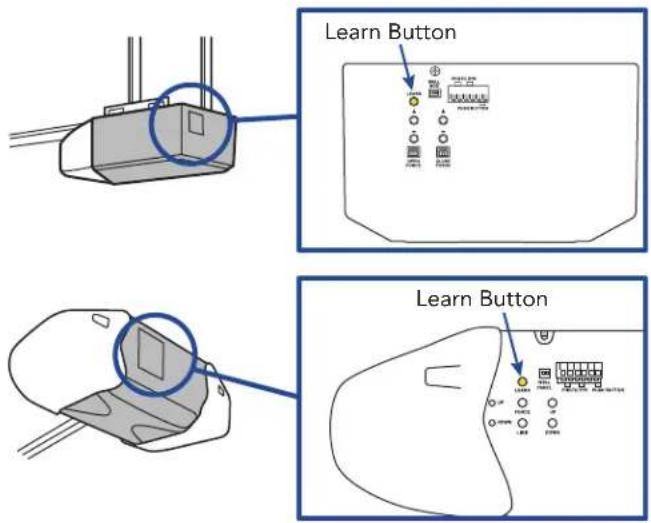
text_image
Learn Button Learn ButtonOverview
Set Up Your Smart Garage Control
Need Help?
Troubleshooting videos
Garage door opener compatibility
Router compatibility and settings
How to improve your Wi-Fi signal
Test the door sensor battery
Change the door sensor battery
Pair a replacement door sensor
You have reached the maximum number of doors
How to manually add a door sensor
Erase Wi-Fi settings from the hub
Reset the hub to factory default
Update my network settings in the myQ app
LED indicators
The app says Monitor Mode
App error messages
Locate a garage door opener program or learn button
Accessories and Parts
Accessories and Parts
Accessories
Smart Garage Control Door Sensor
Adds smart control of a second garage door opener.
MYQ-G0402
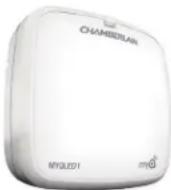
Remote LED Light
Easily mounts in minutes to provide light to any location in the garage.
MYQLED1
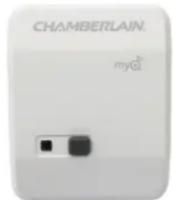
Remote Light Control
Monitor and control this plug-in lamp switch with the myQ App.
PILCEV-P1
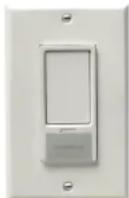
Remote Light Switch
Replaces an existing wall switch to enable home lighting control with a smartphone or remote.
WSLCEV-P1
Replacement Parts
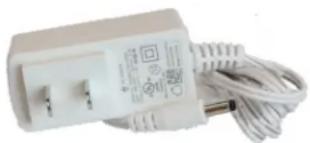
natural_image
White electrical plug with coiled cable and a small terminal, no visible text or symbolsSmart Garage Control Power Supply 041-0106
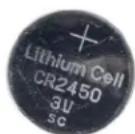
Door Sensor Battery 3V CR2450
K010A0056
Overview
Set Up Your Smart Garage Control
Need Help?
Accessories and Parts
One Year Limited Warranty
The Chamberlain Group LLC warrants to the first consumer purchaser of this product that it is free from defect in materials and/or workmanship for a period of 1 year from the date of purchase.
Software Agreement
Use of this product and the software embedded within the product is subject to the copyright notices, terms, and conditions available at www.myChamberlain.com/agreement.
WARNING
To reduce the risk of SEVERE INJURY to persons:
- DO NOT enable the Chamberlain ^® Smart Garage ^TM Control if operating either one-piece or swinging doors. Enable this device with sectional doors ONLY.

If using the Smart Garage Control with residential door openers, the control must be used only with door openers manufactured after 1993 that use photoelectric sensors located near the bottom of the door track that do not change the state of those photoelectric sensors to a low power mode.

WARNING: This product can expose you to chemicals including lead, which are known to the State of California to cause cancer or birth defects or other reproductive harm. For more information go to www.P65Warnings.ca.gov.
NOTICE: This device complies with Part 15 of the FCC rules and Industry Canada's license-exempt RSSs. Operation is subject to the following two conditions: (1) this device may not cause harmful interference, and (2) this device must accept any interference received, including interference that may cause undesired operation.
Any changes or modifications not expressly approved by the party responsible for compliance could void the user's authority to operate the equipment.
This device must be installed to ensure a minimum 20 cm (8 in.) distance is maintained between users/bystanders and device.
This device has been tested and found to comply with the limits for a Class B digital device, pursuant to part 15 of the FCC rules and Industry Canada ICES standard. These limits are designed to provide reasonable protection against harmful interference in a residential installation. This equipment generates, uses and can radiate radio frequency energy and, if not installed and used in accordance with the instructions, may cause harmful interference to radio communications. However, there is no guarantee that interference will not occur in a particular installation. If this equipment does cause harmful interference to radio or television reception, which can be determined by turning the equipment off and on, the user is encouraged to try to correct the interference by one or more of the following measures:
Reorient or relocate the receiving antenna.
Increase the separation between the equipment and receiver.
Connect the equipment into an outlet on a circuit different from that to which the receiver is connected.
Consult the dealer or an experienced radio/TV technician for help.
Chamberlain, the Chamberlain logo, LiftMaster, myQ and the myQ logo are registered trademarks of The Chamberlain Group LLC. Patented and patents pending. See ChamberlainGroup.com/ patents. Wi-Fi ^3 is a trademark of Wi-Fi Alliance ^5 . Overhead Door and Wayne Dalton are trademarks of Overhead Door Corporation. Genie is a trademark of GMI Holdings, Inc. Linear is a trademark of Nortek Security & Control LLC. Stanley is a trademark of Stanley Logistics L.L.C. Sommer is a trademark of Sommer Antriebs- und Funktechnik GmbH. Guardian is a trademark of ADH Guardian USA LLC. Xtreme Garage and Performax are trademarks of Menard, Inc. All other trademarks are the property of their respective owners.
©2021 The Chamberlain Group LLC
All Rights Reserved.
114-5737-000
Vista general
text_image
CHAMBERLAIN myQ connectedtext_image
CHAMBERLAIN my Q connectedNodo
Sensor de puerta MYQ-G0402
natural_image
Technical line drawing of a circular mechanical component with mounting holes and a central knob (no text or symbols)Placa de montaje
natural_image
Simple line drawing of a handheld electronic device with coiled cable and connector (no text or symbols)natural_image
Line drawing of a drill bit with a screwdriver and two small holes (no text or symbols)natural_image
Diagram of two cylindrical objects with internal wavy patterns connected by dashed lines (no text or symbols)natural_image
Technical line drawing of a mechanical component with screws and a central hub (no text or symbols)Continuación

Vista general
natural_image
Diagram showing a device with a circular component and its corresponding circular socket (no text or symbols)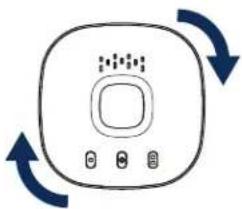
natural_image
Simple line drawing of a device with circular ports and bidirectional arrows (no text or symbols)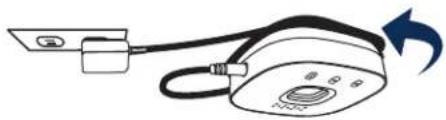
natural_image
Diagram of a portable electronic device with cable and indicator lights, no text or symbols presenttext_image
Device Setup Choose the My device you would Use to setup Device. Change from Adapter with 100% CI Change from Adapter with 100% CI Control Sensor Change Intenset Security Home Bridge DON'T LET YOUR DEVICE >natural_image
Two smiling adults sitting together, one using a tablet device while the other looks on (no text or symbols visible)Vista general
text_image
Your myQ® hub is not pulling up myQ® Smart Home Control connection troubleshooting guideConnecting your myQ' hub to the app myQ® Smart Control
myQ® Smart Geo Control connection troubleshooting guide
Connecting your myQ® hub to the garage opener
myQ® Smart Control connection troubleshooting guide
Connecting your myQ® hub to Internet myQ® Smart Control
Connecting your myQ® hub to the myQ® sensor
myQ® Smart Control connection troubleshooting guide
Maintaining your myQ® hub control myQ® Smart Control
myQ® Smart Control Control connection troubleshooting guide
How to test and replace the battery in your sensor mvQ® Smart Garage Control
text_image
Diagram illustrating three-step robotic arm operation with labeled parts and directional arrows indicating motion.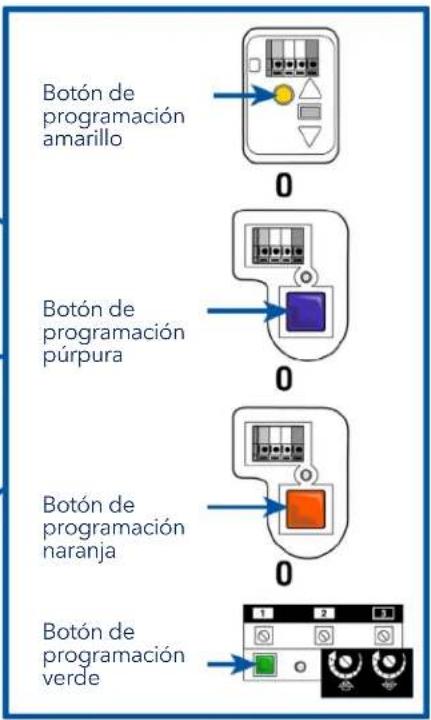
natural_image
White electrical plug with a black terminal and coiled cable, no visible text or symbols©2021 The Chamberlain Group LLC
text_image
CHAMBERLAIN myQ connectedtext_image
CHAMBERLAIN myQ connectedConcentrateur
natural_image
Technical line drawing of a circular mechanical component with mounting holes and a central knob (no text or symbols)Plaque de montage
natural_image
Line drawing of a handheld electronic device with coiled cable and connector (no text or symbols)natural_image
Line drawing of a drill bit with screwdriver and two other drill bits (no text or symbols)natural_image
Diagram of two cylindrical objects with internal wavy lines, connected by dashed lines (no text or symbols)natural_image
Technical line drawing of a mechanical component with screws and a central hub (no text or symbols)Suite

Vue d'ensemble
natural_image
Three technical diagrams showing a device with internal components and directional arrows indicating rotation or synchronization (no text or symbols present)natural_image
Diagram of a portable air conditioner with attached plug and cord, showing airflow direction (no text or symbols)text_image
Device Setup Choose the My device you would like to setup Devio. Change from Master (100%) Change from Master (100%) Command Smart Garage Indirect Security Home Bridge START YOUR DEVICE >natural_image
Two smiling adults sitting together, one using a tablet device while the other watches (no visible text or symbols)Vue d'ensemble
text_image
Connecting your myQ' hub to the home app myQ® Smart Control connection troubleshooting guidetext_image
Connecting your myQ® hub to the garagekeeper myQ® Smart Control Control connection troubleshooting guidetext_image
Maintaining your myQ® hub connection myQ® Smart Control Control connection troubleshooting guidetext_image
Your myQ® hub is not pulling up myQ® Smart Home Control connection troubleshooting guidetext_image
Connecting your myQ® hub to internet myQ® Smart Control connection troubleshooting guidetext_image
Connecting your myQ® hub to the myQ® sensor myQ® Smart Grid Control connection troubleshooting guidetext_image
How to test and replace the battery in your sensor myQ® Smart Garage® Controlnatural_image
White electrical plug with a black terminal and coiled cable, no visible text or symbols©2021 The Chamberlain Group LLC