
WSLCEV-P1 - Home Automation CHAMBERLAIN - Free user manual and instructions
Find the device manual for free WSLCEV-P1 CHAMBERLAIN in PDF.


| Product Type | Smart Light Switch |
| Brand | Chamberlain |
| Model | WSLCEV-P1 |
| Category | Home Automation |
| Voltage | 120 Vac |
| Max Load (Incandescent) | 300 Watts |
| Max Load (CFL) | 2.5 Amps |
| Supported Bulb Types | Compact Fluorescent, Incandescent, LED |
| Compatibility | MyQ App (with gateway), Security+ 2.0 remotes, MyQ garage door openers |
| Smartphone Control | Yes (requires MyQ Garage, Smart Garage Hub, MyQ Gateway, or Wi-Fi Garage Door Opener) |
| Remote Control Type | Security+ 2.0 |
| Number of Compatible Devices | Up to 8 remote controls or combination of 8 MyQ devices |
| Installation | Replace existing single-pole switch (not for 3/4-way) |
| Wiring Requirements | Ground, Line (black), Load (red), Neutral optional |
| Indoor/Outdoor | Indoor only |
| Dimensions (Approx.) | 4.2 x 2.8 x 1.5 inches |
| Weight (Approx.) | 0.2 lbs |
| Power Indicator | LED on switch |
| Smart Features | Scheduling, notifications, remote on/off via app |
| Safety Certifications | FCC Part 15, IC RSS-210 |
| Warranty | See documentation |
| User Serviceable Parts | None |
| Wall Plate Included | No |
| Special Notes | Not for household appliances or fans; requires ground |
| Compliance | California Prop 65 (lead warning) |
Frequently Asked Questions - WSLCEV-P1 CHAMBERLAIN
User questions about WSLCEV-P1 CHAMBERLAIN
0 question about this device. Answer the ones you know or ask your own.
Ask a new question about this device
Download the instructions for your Home Automation in PDF format for free! Find your manual WSLCEV-P1 - CHAMBERLAIN and take your electronic device back in hand. On this page are published all the documents necessary for the use of your device. WSLCEV-P1 by CHAMBERLAIN.
USER MANUAL WSLCEV-P1 CHAMBERLAIN
The Smart Light Switch offers a convenient way to control the lights in your home. It can be programmed to be controlled from anywhere with your smartphone and the Chamberlain MyQ® App*. The Smart Light Switch is also compatible with up to 8 Security+ 2.0® remote controls OR a combination of up to 8 MyQ® enabled garage door openers. This product is NOT recommended for control of household appliances or fans. Not for use with 3-way or 4-way switch combinations.

NOTE: The wall plate is not provided.
SPECIFICATIONS
Bulb Type: .... Compact fluorescent, incandescent, or LED
Max Load Rating: 300 Watts
Incandescent Lamp 300 Watts
Compact Fluorescent Lamp (CFL) 2.5 Amps
Voltage....120 Vac
WARNING
To prevent possible SERIOUS INJURY or DEATH from electrocution or fire:
- Turn off power at the fuse box or circuit breaker BEFORE proceeding.
- The light control is ONLY for indoor use.
- Installation and wiring MUST be in compliance with ALL local electrical and building codes.
NOTICE: To comply with FCC and/or Industry Canada (IC) rules, adjustment or modifications of this transceiver are prohibited. THERE ARE NO USER SERVICEABLE PARTS.
This device complies with Part 15 of the FCC rules and IC RSS-210. Operation is subject to the following two conditions: (1) this device may not cause harmful interference, and (2) this device must accept any interference received, including interference that may cause undesired operation.
WARNING: This product can expose you to chemicals including lead, which are known to the State of California to cause cancer or birth defects or other reproductive harm. For more information go to www.P65Warnings.ca.gov

natural_image
Technical line drawing of a small electronic device with mounting flanges and a labeled section (no text or symbols beyond label)CARTON INVENTORY

Screws (2)
Wire Nuts

(1) (2)
MODES OF OPERATION
The Smart Light Switch can be programmed to the MyQ® app*, to a Security+ 2.0® remote control, or to a MyQ® enabled garage door opener.
REMOTE CONTROL OPERATION:
Allows you to activate the Smart Light Switch from a remote control.
NOTE: If your remote control is already programmed to your garage door opener, choose a different remote control button to program to the Smart Light Switch.

Allows you to activate the smart light switch from your smartphone or tablet, set schedules to switch your lights on/off at customized times, and receive notifications when your light remains on.

*Smartphone control requires a MyQ® Garage, Smart Garage Hub, MyQ® Internet Gateway, or Wi-Fi® Garage Door Opener.
GARAGE DOOR OPENER OPERATION:
Allows you to synchronize the Smart Light Switch with your garage door opener light bulbs. The synchronization with the garage door opener lights is disabled if you manually turn the light switch on. The light switch must be OFF to synchronize the garage door opener with the light switch.
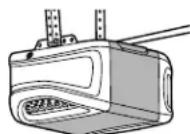
Example: The garage door opener light bulbs are set to automatically turn off after 4 ½ minutes, the Smart Light Switch will also turn off after 4 ½ minutes.
INSTALLATION
BEFORE YOU BEGIN:
This device REQUIRES a ground; if a ground is not available, contact a qualified electrician. If you are not experienced and familiar with electrical wiring and electrical codes, contact a qualified electrician. Some codes require installation by a qualified electrician. Install in accordance with all national and local codes. Ensure the existing switch and light are working prior to installing the new switch.
- Disconnect power at the circuit breaker or fuse box BEFORE proceeding.
- Remove the wall plate and set aside for re-assembly.
REMOVE OLD WALL SWITCH:
- Remove switch from switch box.
- During removal, identify or label the load and line wires.
NOTE: Typically a line wire is the incoming hot wire from the circuit breaker. The load wire is the wire supplying power between the switch and the light.
- Keep all load wires separated from line wires.
INSTALL NEW SWITCH (Figure 1):
- Identify the antenna routing (Figure 1).
- Connect the wires (Figure 2). NOTE: If your wiring includes a neutral wire this wire is not required, combine neutral wire(s) and cap with wire nut (not provided).
- Green wire to ground.
Connect the green wire on the new switch to the exposed copper ground, green wire, or to the ground connection within metal switch box. NOTE: If ground doesn't exist contact an electrician to add a ground. This product will not function without a proper ground.
- Red wire to load.
-
Black wire to line.
-
Secure connections with a wire nut and wrap each wire nut with electrical tape.
NOTE: Turn all wire nuts clockwise, making sure the bare wires are covered. Tug on each wire nut to make sure the connections are good.
- Carefully pack the wiring back into switch box. Make sure the wires are not pinched or strained. Make sure the antenna is hanging straight down between the switch box and the drywall.
- Fasten the Smart Light Switch to the switch box with the screws (provided).
- Fasten the wall plate securely over the switch box with the original screws from the wall plate.
TEST
- Turn on the power to circuit at fuse box or circuit breaker.
- Test the light switch, manually press the light switch to ensure the light is functional (Figure 3). If it is not functional, see Troubleshooting.
Figure 3
Press the switch to the ON position. The light should turn on.
Press the switch to the OFF position. The light should turn off.

natural_image
Illustration showing a hand pressing a button next to a wall-mounted lamp (no text or symbols present)
natural_image
Illustration showing a hand inserting a door onto an electrical outlet while the funnel symbolizes the lamp (no text or symbols present)WARNING
To prevent possible SERIOUS INJURY or DEATH from electrocution or fire:
- Turn off power at the fuse box or circuit breaker BEFORE proceeding.
• The light control is ONLY for indoor use.
• Installation and wiring MUST be in compliance with ALL local electrical and building codes.
Figure 1
IMPORTANT NOTE: This illustration is ONLY an example and your application and wiring may be different.

Figure 2

INSTALLATION (CONTINUED)
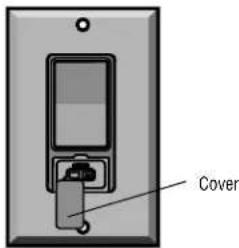
- Open the cover on the light switch so you can view the LED (Figure 4).
- Allow up to 10 minutes for Smart Light Switch to power up properly, when the LED stops flashing proceed to Programming.
Figure 4
PROGRAMMING
IMPORTANT NOTE: When the LED has stopped flashing (up to 10 minutes), proceed to Programming.
1
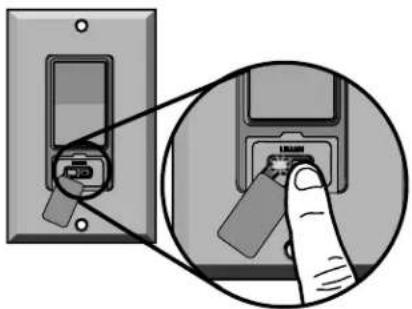
Lift the cover on the Smart Light Switch to access the "LEARN" button.

2
- Download the Chamberlain MyQ® App*.
• Create or sign-in to your account and follow the in-app instructions to add the Smart L to your MyQ® ad
* Smartphone control requires a MyQ® Garage, Smart Garage Hub, MyQ® Internet Gateway, or Wi-Fi® Garage Door Opener.

OR
Press and HOLD the remote control button.
OR
Press and release the Learn button on the garage door opener.

natural_image
Illustration of a hand holding a smartphone with a button, no text or symbols visible
natural_image
Diagram showing a hand pressing a button on a device, with an inset close-up of the button (no text or symbols visible)3
Then press and release the "LEARN" button. Both the LED on the Smart Light Switch and the light will flash once indicating the programming is complete.
NOTE: If needed, press and release the "LEARN" button with a narrow instrument.

natural_image
Diagram showing a hand inserting a USB into a memory card slot (no text or symbols present)TEST
Testing the Smart Light Switch will vary depending on your application.
REMOTE CONTROL
Press the remote control button. The light should turn on.

Press again and the light should turn off.

Test the remote control operation at various locations within your home for convenience and range. The remote control range will vary depending on your house and wiring construction. The range may be reduced by metal lath, foil-backed insulation or aluminum siding.
GARAGE DOOR OPENER
Activate the garage door opener. The light should turn on. The light will stay on for the same length of time as your garage door opener lights.

natural_image
Diagram showing a device with a ruler and a funnel-shaped lamp connected to a wall-mounted dish (no text or symbols present)NOTE: If the light does not turn on and off, repeat programming steps.
TO ERASE ALL CODES FROM MEMORY

Press and HOLD the "LEARN" button until the LED flashes (approximately 6 seconds). All codes are now erased.
IMPORTANT NOTE: If multiple devices are programmed to the switch, ALL devices will be erased.
TROUBLESHOOTING
If the light does not operate, below are some troubleshooting suggestions.
| Symptom Solution | |
| The light does not operate from the switch. | Verify the power is ON. Check the fuse box or circuit breaker.Verify the light bulb is “good”.Press the top half of the Smart Light Switch to make sure it is ON.Ensure the device is properly grounded.Verify the electrical Line and Load wiring is correct. If you are unsure which wires are Line and Load, reverse the Line and Load wire connections. |
| The light does not operate from the remote control. | Make sure you are pressing the remote control button selected to operate the light control.The LED on the remote control should glow when the button is pressed, if not replace the battery.Program the remote control to the Smart Light Switch. |
| The LED flashes for more than 10 minutes and cannot enter the programming mode. | This indicates an issue with low voltage or improper grounding. Ensure the device is properly grounded. Contact a qualified electrician. |
CAUTION
To avoid electric shock, press the switch to the OFF position when changing the light bulb.
www.chamberlain.com
1-800-528-9131
Wi-Fi® is a registered trademark of Wi-Fi Alliance.
© 2017, The Chamberlain Group, Inc.


- SPECIFICATIONS
- WARNING
- MODES OF OPERATION
- REMOTE CONTROL OPERATION:
- GARAGE DOOR OPENER OPERATION:
- INSTALLATION
- BEFORE YOU BEGIN:
- REMOVE OLD WALL SWITCH:
- INSTALL NEW SWITCH (Figure 1):
- TEST
- INSTALLATION (CONTINUED)
- PROGRAMMING
- 1
- 2
- OR
- 3
- REMOTE CONTROL
- GARAGE DOOR OPENER
- TO ERASE ALL CODES FROM MEMORY
- TROUBLESHOOTING
- CAUTION
Brand : CHAMBERLAIN
Model : WSLCEV-P1
Category : Home Automation