ESLS9A - Shaver PANASONIC - Free user manual and instructions
Find the device manual for free ESLS9A PANASONIC in PDF.



| Product type | Rechargeable shaver |
| Brand | Panasonic |
| Model | ES-LS9A |
| Power supply | AC adapter (RE7-87) and 3.6V lithium-ion battery |
| Charging time | Approx. 1 hour (3-minute quick charge for one shave) |
| Battery life | Approx. 2 weeks (based on 3 min dry shave per day) |
| Usage | Dry or wet shaving, usable in the shower |
| Shaving system | System protective foil with integrated inner blades |
| Main features | Beard sensor, precision trimmer, smooth rollers, intelligent lock |
| Cleaning modes | Self-cleaning charger (Auto, Dry/Charge modes), water cleaning with sonic vibration mode |
| Lubricating oil | WES003P |
| Special detergent | WES4L03 (for self-cleaning charger) |
| Replacement parts | System protective foil (WES9600) |
| Foil lifespan | Approx. 18 months (3 min/day) |
| Water resistance | Usable in the shower, washable with water |
| Safety | Automatic power button lock, overheat protection, shutdown in case of malfunction |
| Charging temperature | 10 °C to 35 °C |
| Operating temperature | 5 °C or higher |
| Included accessories | Travel case, cleaning brush, oil, detergent, AC adapter, self-cleaning charger (RC9-23) |
| Recycling | Removable lithium-ion battery, follow local regulations |
| Use | Household use only |
Frequently Asked Questions - ESLS9A PANASONIC
User questions about ESLS9A PANASONIC
0 question about this device. Answer the ones you know or ask your own.
Ask a new question about this device
Download the instructions for your Shaver in PDF format for free! Find your manual ESLS9A - PANASONIC and take your electronic device back in hand. On this page are published all the documents necessary for the use of your device. ESLS9A by PANASONIC.
USER MANUAL ESLS9A PANASONIC
Operating Instructions
(Household use) Rechargeable Shaver
Model No. ES-LS9A
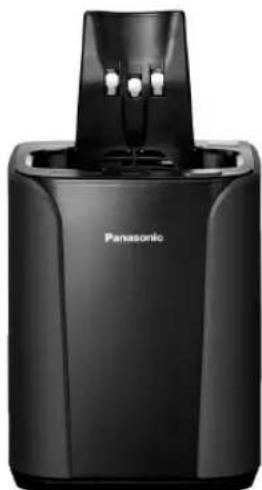
natural_image
Black Panasonic electric shaver with a white top and control panel (no visible text or symbols on body)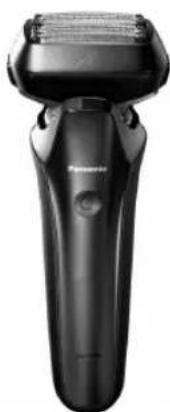
natural_image
Black electric shaver with textured grip and buttons (no visible text or symbols)CE
GB English....5 DK Dansk....179 CZ Česky....341
D Deutsch .... 33 P Português....205 SK Slovensky....367
F Français......63 N Norsk ...... 233 H Magyar ...... 393
I Italiano....91 S Svenska....259 RO Română....421
NL Nederlands....119 FIN Suomi....285 TR Türkçe....449
E Español....149 PL Polski....311
Panasonic
Operating Instructions
(Household use) Rechargeable Shaver
Model No. ES-LS9A
Contents
Safety precautions...... 8
Important information....12
Parts identification....13
Preparation....14
How to use ....16
Cleaning thoroughly....19
Replacing the system outer foil .....21
Replacing the cleaning liquid......22
When the LOW/STATUS lamp glows 23
FAQ....23
Troubleshooting 24
Service....30
For environmental protection and recycling of materials ....30
Specifications 31
Thank you for purchasing this Panasonic product.
Before operating this unit, please read these instructions completely and save them for future use.
WARNING
- This appliance can be used by children aged from 8 years and above and persons with reduced physical, sensory or mental capabilities or lack of experience and knowledge if they have been given supervision or instruction concerning use of the appliance in a safe way and understand the hazards involved. Children shall not play with the appliance. Cleaning and user maintenance shall not be made by children without supervision.
- The supply cord cannot be replaced. If the cord is damaged, the AC adaptor should be scrapped.
- This WET/DRY shaver can be used for wet shaving using shaving lather or for dry shaving. You can use this watertight shaver in the shower and clean with water. The following symbol means suitable for use in a bath or shower.

- Do not use anything other than the supplied AC adaptor and the self-cleaning recharger for any purpose.
Also, do not use any other product with the supplied AC adaptor and the self-cleaning recharger. (See page 13.)
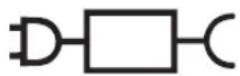
- The following symbol indicates that a specific detachable power supply unit is required for connecting the electrical appliance to the supply mains. The type reference of power supply unit is marked near the symbol.
Safety precautions
Make sure to follow these instructions.
To prevent accidents, injuries or damage to property, please follow the instructions below.
■ The following chart indicates the degree of damage caused by improper operation.
| ⚠️ DANGER | Indicates a potential hazard that will result in serious injury or death. |
| ⚠️ WARNING | Indicates a potential hazard that could result in serious injury or death. |
| ⚠️ CAUTION | Indicates a potential hazard that could result in minor injury or property damage. |
■ The symbols are classified and explained as follows.
| This symbol indicates prohibition. |
| This symbol indicates requirement that must be followed. |
WARNING
▶ This product
This product has a built-in rechargeable battery. Do not throw into fire, apply heat, or charge, use, or leave in a high temperature environment.
- Doing so may cause overheating, ignition, or explosion.

Do not modify or repair.

- Doing so may cause fire, electric shock, or injury.
Contact an authorized service centre for repair (replacement of battery etc).

Never disassemble except when disposing of the product.
- Doing so may cause fire, electric shock, or injury.
WARNING
▶ In case of an abnormality or malfunction immediately stop using and remove the AC adaptor if there is an abnormality or malfunction.
- Failure to do so may cause fire, electric shock, or injury.
• The main unit, self-cleaning recharger, AC adaptor or cord is deformed or abnormally hot.
• The main unit, self-cleaning recharger, adaptor or cord smells of burning.
- There is an abnormal sound during use or charging of the main unit or self-cleaning recharger.
- Immediately request inspection or repair at an authorized service centre.
▶ Power supply

Do not connect or disconnect the adaptor to a household outlet with a wet hand.
- Doing so may cause electric shock or injury.
Do not immerse the AC adaptor and the self-cleaning recharger in water or wash with water. Do not place the AC adaptor and the self-cleaning recharger over or near water filled sink or bathtub.

Never use the appliance if the AC adaptor is damaged or if the power plug fits loosely in a household outlet.
Do not damage the cord or the power plug.
- Do not deface, modify, forcefully bend or pull the cord or the power plug. Also, do not place anything heavy on, twist or pinch the cord.
- Doing so may cause electric shock or fire due to a short circuit.

Do not use in a way that would exceed the rating of the household outlet or the wiring.
- Exceeding the rating by connecting too many plugs to one household outlet may cause fire due to overheating.
Fully insert the power plug.
-Failure to do so may cause fire or electric shock.

Disconnect the AC adaptor when cleaning the main body with water.
-Failure to do so may cause electric shock or injury.
! appliance plug to prevent dust from accumulating.
- Failure to do so may cause fire due to insulation failure caused by humidity.
WARNING
▶ Preventing accidents

Persons using an implanted medical electronic device, such as a pacemaker, should not allow this unit to touch the skin where the medical electronic device is implanted.
- Doing so may cause an accident or illness.

Do not place within reach of children or infants. Do not let them use it.
- Putting parts or accessories in the mouth may cause an accident or injury.

Do not use or store the self-cleaning recharger on top of other electrical devices.
- Doing so may cause electric shock due to liquid spill or fire due to a short circuit.

If detergent or oil is consumed accidentally, do not induce vomiting, drink a large amount of water and contact a physician.
If detergent or oil comes into contact with eyes, wash immediately and thoroughly with running water and contact a physician.
- Failure to follow these instructions may result in physical problems.
If detergent contacts skin, wash immediately and thoroughly with soap.
If you experience skin irritation anywhere on the body, stop using immediately and contact a physician.
- Failure to follow these instructions may result in physical injury or injury to the skin.
CAUTION
▶ Protecting the skin
Do not use excessive pressure to apply the system outer foil to your lip or other part of your face.

Do not apply the system outer foil directly to blemishes or injured skin.
- Doing so may cause injury to skin.

Do not forcefully press the system outer foil. Also, do not touch the system outer foil with fingers or nails when in use.
Do not use this product for hair on head or any other part of the body.
- Doing so may cause injury to skin or reduce the life of the system outer foil.

Do not remove the shaver from the self-cleaning recharger while using the "AUTO" mode or "Dry/Charge" mode.
- Doing so may cause burn due to high temperatures around the system outer foil.

CAUTION

Check the system outer foil for cracks or deformations before use.
- Failure to do so may cause injury to the skin.
▶ Note the following precautions

Do not allow metal objects or trash to adhere to the power plug or the appliance plug.
- Doing so may cause electric shock or fire due to a short circuit.

Do not share your shaver with your family or other people.
- Doing so may result in infection or inflammation.

Do not use detergent for any purpose other than washing the system outer foil.
- Using it with other products may cause discoloration or cracking.

Disconnect the adaptor from the household outlet when not charging.
- Failure to do so may cause electric shock or fire due to electrical leakage resulting from insulation deterioration.

Use caution when opening detergent as spout is sharp.
- Failure to do so may cause injury.
Handling of the removed battery when disposing

DANGER
•The rechargeable battery is exclusively for use with this appliance. Do not use the battery with other products.
- Do not charge the battery after it has been removed from the product.
- Do not throw into fire or apply heat.
- Do not hit, disassemble, modify, or puncture with a nail.
- Do not let the positive and negative terminals of the battery get in contact with each other through metallic objects.
- Do not carry or store the battery together with metallic jewellery such as necklaces and hairpins.
- Do not use or leave the battery where it will be exposed to high temperatures, such as under direct sunlight or near other sources of heat.
• Never peel off the tube.
- Doing so may cause overheating, ignition, or explosion.
WARNING

After removing the rechargeable battery, do not keep it within reach of children and infants.
- The battery will harm the body if accidentally swallowed.
If this happens, consult a physician immediately.

If the battery fluid leaks out and comes in contact with the eyes, do not rub the eyes, and thoroughly rinse with clean water, such as tap water.
- Failure to do so may cause eye injury.
Consult a physician immediately.
CAUTION

If the battery fluid leaks out and comes in contact with the skin or clothes, rinse off with clean water, such as tap water.
- Failure to do so may cause inflammation.
Important information
- Treat yourself to wet lather shaves for at least three weeks and notice the difference. Your Panasonic WET/DRY shaver requires a little time to get used to because your skin and beard need about a month to adjust to any new shaving method.
-
If you clean the shaver with water, do not use salt water or hot water. Do not soak the shaver in water for a long period of time.
-
Charge the appliance correctly according to these Operating Instructions. (See page 14 "Charging the shaver".)
- This appliance contains battery that is only replaceable by skilled persons. Please contact an authorized service centre for the details of repair.
Note the following precautions
▶ When using
- Do not bring the system outer foil into contact with hard objects.
Doing so may damage the system outer foil as it is very thin and deforms easily. - Do not drop or hit against other objects.
Doing so may cause injury.
▶ About detergent
- Do not leave the detergent in location of high temperatures.
Doing so may cause deterioration. - Immediately wipe up any cleaning liquid that has been spilt.
Prolonged contact may cause discoloration of leather products or wooden floors.
▶ When storing
- Store the shaver in a place with low humidity after use.
Failure to do so may cause malfunction due to condensation or rust.
- Be sure to place the protective cap on the shaver when carrying around or storing.
Failure to do so may cause injury to skin or reduce the life of the system outer foil.
▶ When cleaning
- Do not dry the main unit with a dryer or a fan heater. Doing so may cause malfunction or deformation of the parts.
- Do not leave the shaver exposed to direct sunlight with the foil frame detached.
Doing so may deteriorate the waterproof rubber and degrade waterproof function, which may cause to malfunction.
Parts identification
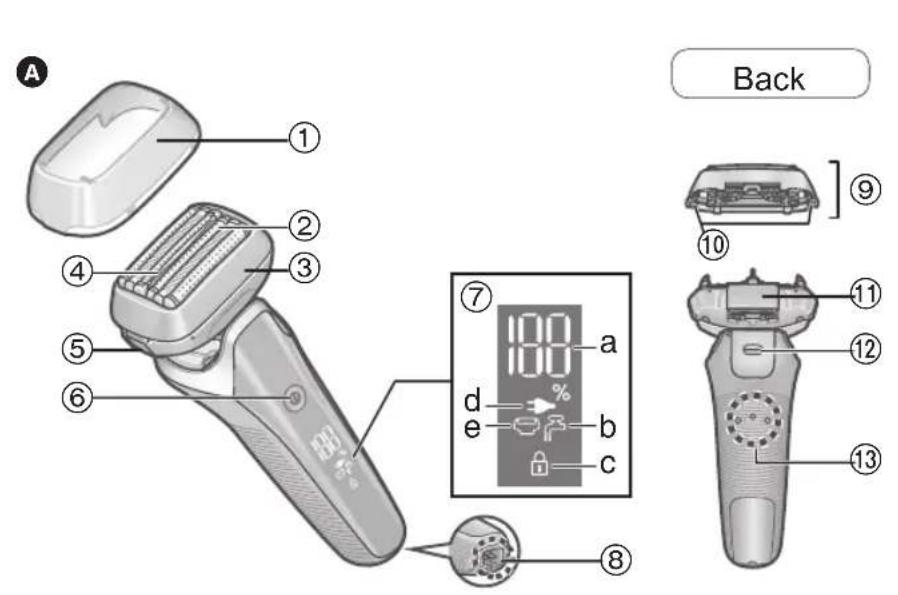
A Main body
① Protective cap
② System outer foil
③Foil frame
④ Smooth rollers
• They help to glide over the skin more easily.
⑤ Foil frame release buttons
⑥ Power switch
⑦ Lamp display
a. Battery capacity lamp
b. Clean lamp (图)
c. Switch lock lamp (🔒)
d. Charge status lamp (☐)
e. Foil/blade check lamp (☐)
⑧Appliance socket
⑨ Outer foil section
⑩ System outer foil release buttons
⑪ Trimmer
⑫ Trimmer handle
⑬ Main body rear terminals
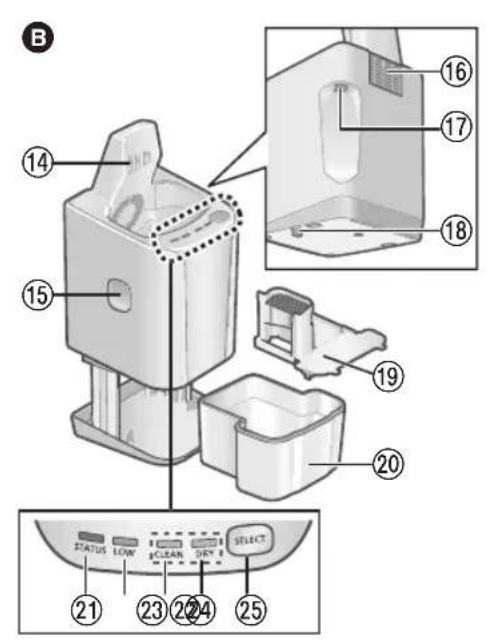
B Self-cleaning recharger (RC9-23)
⑭ Charging terminals
⑮ Cleaning liquid unit removal button
⑯Intake port
⑰ Self-cleaning recharger socket
⑱ Lock release lever
⑲ Cleaning liquid filter
⑳ Cleaning liquid unit
②1 STATUS lamp
②2 LOW lamp
②3 CLEAN lamp
②4 DRY lamp
⑲SELECT button
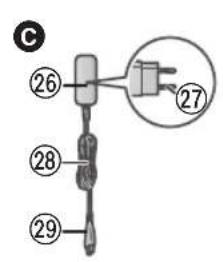
© AC adaptor (RE7-87)
②6Adaptor
⑳Power plug
⑳ Cord
⑲Appliance plug
Accessories
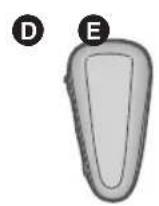
D Travel case
E Cleaning brush
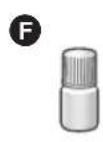
F Oil
G Special detergent (Detergent)
H Operating Instructions
① Guarantee Card
There may be water droplets inside the self-cleaning recharger at the time of purchase, but there is no problem regarding the hygiene. They are remains after the factory inspection.
Preparation
Charging the shaver
- Turn the shaver off.
- Wipe off any water droplets on the main body rear terminals.
1 Insert the appliance plug [C29] into the self-cleaning recharger [B].
2 Remove the protective cap [A①] while pressing the side of the cap and insert the shaver into the self-cleaning recharger.
- Slowly insert the shaver into the self-cleaning recharger taking care not to damage the system outer foil.

3 Plug the adaptor [C②6] into a household outlet.
- Check that the charge status lamp ( ) is glowing.
- Charging is completed after approx. 1 hour.
4 Disconnect the adaptor after charging is completed.
Quick charge
Even though the battery runs out, you can shave once after 3-minute charge.
(This will differ depending on usage.)
While charging
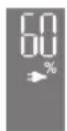
glows.
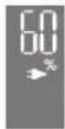
The number of the battery capacity lamp will increase as charging progresses.
After charging is completed
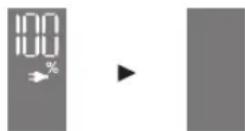
“100%” appears and then turns off after 5 seconds.
Notes
- When charging the shaver for the first time or when it has not been in use for more than 6 months, the charging time may change or the charge status lamp (☐) may not glow for a few minutes. It will eventually glow if kept connected.
- Recommended ambient temperature for charging is 10^ - 35^ . It may take longer to charge, or the charge status lamp (☐) will blink quickly and the battery may fail to charge properly in extremely high or low temperatures.
• The shaver can be used for approximately 2 weeks with a full charge.
(Based on one 3-minute dry-shave usage per day in an ambient temperature range of 20^ - 30^ .)
The number of usable days varies depending on the following conditions.
- Beard thickness
- Pressure applied to the skin
-Usage frequency of the sonic vibration cleaning mode - If there is noise from the radio or other sources while using or charging the appliance, move to a different location to use the appliance.
Charging without the self-cleaning recharger
- Turn the shaver off.
- Wipe off any water droplets on the appliance socket.
1 Insert the appliance plug [©29] into the shaver.
2 Plug the adaptor [C②6] into a household outlet.
3 Disconnect the adaptor after charging is completed.
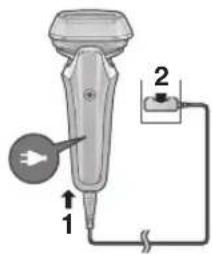
Note
You cannot operate the shaver while charging.
Preparing the cleaning liquid
Cleaning can start right after the usage by preparing in advance.
(See page 18.)
- Remove the AC adaptor from the self-cleaning recharger.
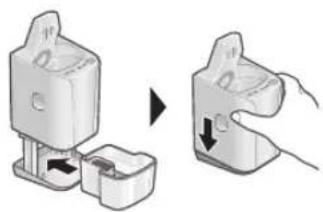
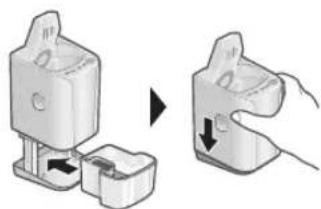
1 Press the cleaning liquid unit removal button (①) and remove the cleanin liquid unit (②) on a hard, flat surface.
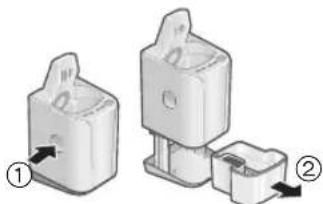
natural_image
Two mechanical components with arrows indicating assembly or movement (no text or symbols present)- When the self-cleaning recharger is lifted, or on the soft surface such as carpets, the lock release lever will not fit in the recharger properly. In that case, the cleaning liquid unit cannot be removed.
2 Pour tap water (①) and detergent (②) into the cleaning liquid unit.
- Be careful not to let the water rise above the maximum water line (a). - Pour the entire packet of detergent.
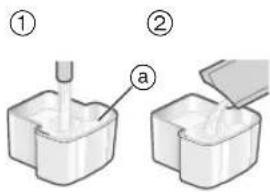
3 Slowly insert the cleaning liquid unit [B20] into the self-cleaning recharger [B] until it clicks.
natural_image
Illustration of a device being adjusted to form a separate package (no text or symbols present)Notes
• To replace the cleaning liquid, see page 22.
- Only use self-cleaning recharger detergent for Panasonic shavers.
Not doing so may cause malfunction or failure.
- Do not tilt the self-cleaning recharger.
Doing so may cause spill or the number of days that cleaning liquid can be used reduce.
- You can use the cleaning liquid for approximately 30 days if used once per day.
(This will differ depending on beard thickness and the ambient temperature.)
How to use
This appliance has a smart lock function, so the power switch is automatically locked to prevent accidental operation when not shaving.
▶ Unlocking the power switch
The power switch is automatically unlocked when the main body is grasped.
- The lamps glow and then turn off after approximately 6 seconds.
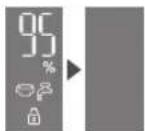
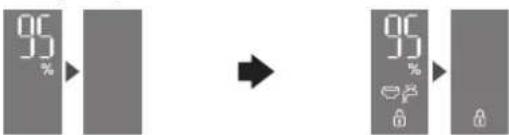
▶ Locking the power switch
flowchart
graph LR
    A["95%"] --> B["→"]
    B --> C["95%"]
    C --> D["→"]
All the lamps turn off when releasing the main body.
The lamps glow and the power switch is automatically locked after 1 minute.
• The switch lock lamp (☐) will light up for 6 seconds and turn off.
- The sensor may respond and the power switch may be unlocked when an electrical device or metal object is brought closer. This is not abnormal.
Shaving beard
1 Press and shave.
- The "shaving sensor", which automatically adjusts the power depending on the beard thickness, will operate.
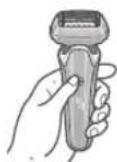
It will shave with high power on areas where the beard is heavy, and reduce the power on areas where the beard is thin, to reduce burden on the skin.
Tips for better shaving
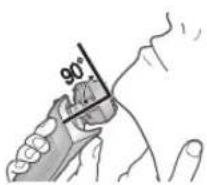
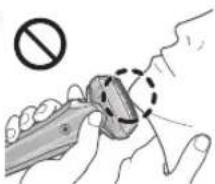
Apply the whole system outer foil perpendicularly against the skin and shave by slowly gliding the shaver over the face against the grain of the beard.
• The beard under the chin and around the throat can be shaved better by stretching the skin so the beard will stand.
• To prevent damaging the system outer foil, do not shave with only a part of the system outer foil.
natural_image
Illustration of a hand holding a tool with a circular symbol and dashed line indicating a dislocation or motion (no text or symbols present)2 Press when finished.
When the battery capacity is low
"5%" appears.
The appliance beeps twice after switched off.
- You can shave 1 to 2 times after "5%" appears. (This will differ depending on usage.)

Notes
- The appliance may not operate in an ambient temperature lower than approximately 5 °C.
- The shaving sensor may not respond depending on the type and quantity of the shaving gel. This is not abnormal.
- Depending on the beard thickness or the amount of beard trimmings in the shaver head, the shaving sensor may not react and the driving sound may not change. This is not abnormal.
• To prevent erroneous operation, place your fingers on the finger rest while using the shaver. - The sonic vibration cleaning mode is activated when the power switch is pressed for more than 2 seconds while the shaver is not operating. (See page 19.)
You cannot shave in this mode.
▶ Using the trimmer
-
Slide the trimmer handle up to the "mm" position so that the trimmer stands upright.
-
Press Ⓞ and use.
Press and hold the top knob (a) and slide the trimmer handle down to lower the trimmer.
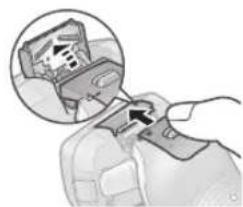
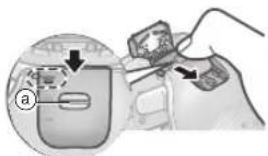
Tips for better usage
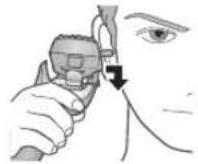
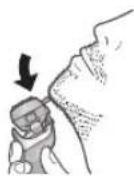
Apply the trimmer edge perpendicular to skin gently and move downward slowly.
Trimming sideburns Pre-shave of long beards
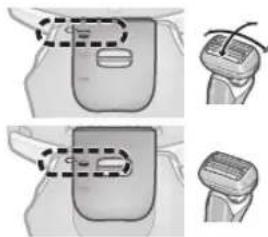
▶ Switching the shaver head You can change the pivot action.

The shaver head is moved to prevent missed spots.

You can lock the shaver head.
natural_image
Diagram showing two views of a device with internal components and a handle, no text or symbols presentCleaning, drying, charging
We recommend cleaning the shaver after each use.
1 Insert the shaver into the self-cleaning recharger [B] and plug the adaptor [C②6] into a household outlet. (See page 14.)
- Check that the charge status lamp (☐) is glowing. - When the LOW lamp or the STATUS lamp lights up, see page 23.
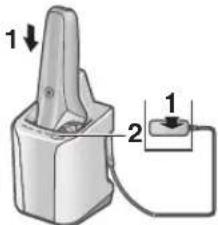
2 Press
The CLEAN lamp and the DRY lamp glow, and the "AUTO" mode will start after approximately 6 seconds. It is not possible to change the mode after the "AUTO" mode has started.
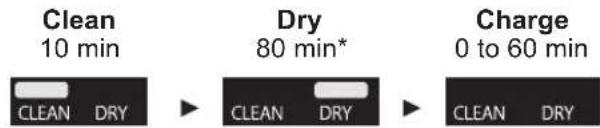
flowchart
graph LR
    A["Clean 10 min\nCLEAN DRY"] --> B["Dry 80 min*"]
    B --> C["Charge 0 to 60 min\nCLEAN DRY"]
* When the ambient temperature of the self-cleaning recharger is low (approx. 15 °C or lower), the drying process will take up to 170 min.
3 Remove the adaptor after the selected mode is completed.
Clean the shaver with water or with the cleaning brush once per month. (See pages 19 to 21.)
The main unit neck section (a), trimmer, system outer foil gaps, etc. cannot be cleaned with the self-cleaning recharger.
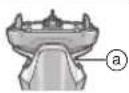
Changing the mode of self-cleaning recharger
The "Charge" mode starts when attaching the shaver, and the mode can be changed by pressing the SELECT button.

flowchart
graph LR
    A["Charge mode (Charge)"] --> B["AUTO mode (Clean/Dry/Charge)"]
    B --> C["Dry/Charge mode (Dry/Charge)"]
    A --> D["CLEAN DRY"]
    B --> E["CLEAN DRY"]
    C --> F["CLEAN DRY"]
Notes
- Do not press the cleaning liquid unit removal button during cleaning as the cleaning liquid may spill causing a malfunction.
• The drying time may increase in an ambient temperature approximately 15^ C or lower.
The Clean or Dry function may not operate under extreme low temperatures (approximately 0 °C or lower).
- A lubricant constituent is included in the detergent, so smooth shave is maintained without applying oil.
Cleaning thoroughly
Cleaning with water
- Turn the shaver off and disconnect the AC adaptor.
1 Apply some hand soap and some water to the system outer foil [A②].
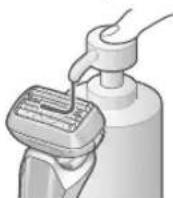
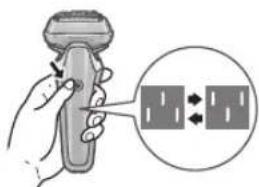
2 Press for more than 2 seconds to activate the sonic vibration cleaning mode.
natural_image
Illustration of a hand holding a remote control device with a magnified inset showing two rectangular blocks (no text or symbols)- Splashing of foam is suppressed.
• The lamps blink alternately.
• After about 20 seconds, it will be automatically turned off, or you can turn it off by pressing the power switch.
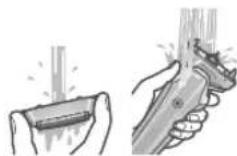
3 Remove the outer foil section [A⑨] and clean with running water.
• See page 21 for removing the outer foil section.
- Splashing is reduced by rinsing the shaver in sonic vibration cleaning mode.
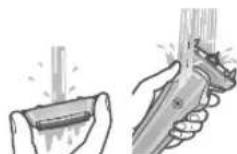
• After rinsing with water, shake the shaver up and down for a few times to remove excess moisture and then wipe off any drops of water with a dry cloth.
4 Attach the outer foil section and dry with the self-cleaning recharger [B].
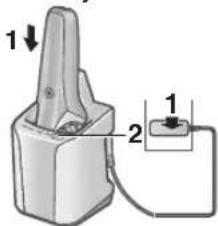
- Insert the shaver into the self-cleaning recharger and plug the adaptor into a household outlet.
- Check that the charge status lamp (▶) is glowing.
- Press twice.
The DRY lamp glows, and the "Dry/Charge" mode will start after approximately 6 seconds.
- It is possible to change to the "AUTO" mode even after the "Dry/Charge" mode has started.
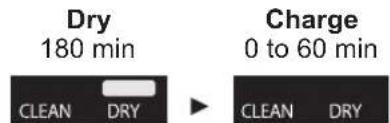
- Remove the adaptor after the selected mode is completed.
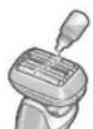
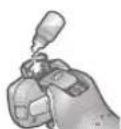
5 Lubricate the shaver.
It will keep the movement of the blades smooth and maintain a comfort shave.
-
Apply one drop of oil to each of the system outer foils.
-
Raise the trimmer and apply a drop of oil.
-
Switch the shaver on, and run it for approximately five seconds.
- Switch off the shaver, and wipe off any excess oil from the system outer foil with a soft cloth.
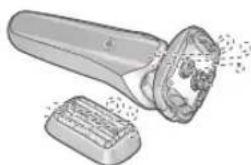
▶Drying the shaver without the self-cleaning recharger
Dry in a shade and apply oil.
natural_image
Illustration of a handheld electric shaver with exposed internal components and dust particles (no text or symbols)Notes
- Do not use any kitchen or bathroom detergents other than hand soap.
Doing so may cause malfunction.
- Be careful not to hit the main body on the sink or any other object while draining the water. Failure to do so may cause malfunction.
- Do not wipe with thinners, benzine, alcohol etc.
Doing so may cause malfunction, cracking or discoloration of the parts.
Wipe with diluted soapy water.
- Do not use the self-cleaning recharger while droplets or soap remain on the shaver.
Doing so may change the concentration level or composition of the cleaning liquid in the cleaning liquid unit, which may degrade cleaning, sterilization, lubrication and drying performance. This may also cause cleaning liquid to spill from the self-cleaning recharger.
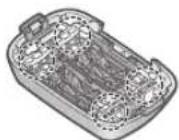
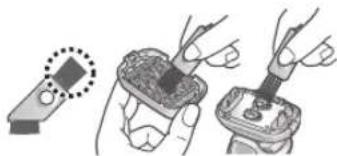
Cleaning with the brush
Remove the outer foil section.
(See this page.)
Clean the system outer foil in the areas indicated by the circles every time you use the shaver. Otherwise, abnormal sound may be generated.
▶ Cleaning with the long brush
Clean the foil frame [A③], system outer foil [A②], the main body [A] and the trimmer [A⑪] using the long brush.
natural_image
Illustration of three hands performing a manual tool manipulation (no text or symbols present)Replacing the system outer foil
appears on the lamp display once every 18 months.
(Based on one 3-minute shave use per day)
We recommend checking the system outer foil when it appears.
Press the power switch for more than 30 seconds to turn off ☐.
Even if ☐ is not turned off right after the replacement, it will automatically turn off within approximately 7 uses.
system outer foil once every 18 months
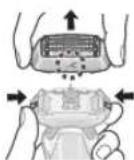
▶Removing the outer foil section
Press the foil frame release buttons [A⑤] and lift the outer foil section [A⑨] upwards.
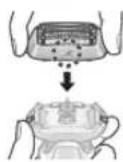
▶ Attaching the outer foil section
After turning the foil frame mark (✗) to the front, securely attach the outer foil section [A⑨] to the shaver until it clicks.
▶Replacing the system outer foil
- Press the system outer foil release buttons [A⑩] and pull down the system outer foil [A②].
- Do not press the system outer foil release buttons with excessive force.
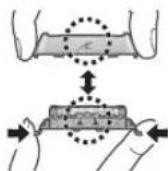
Doing so may bend the system outer foil, preventing complete attachment to the foil frame.
- Align the foil frame mark ( ) and the system outer foil mark (△) and securely attach together until it clicks.
Note
Do not throw away the foil frame.
Replacing the cleaning liquid
If the STATUS lamp glows for 5 seconds when the SELECT button is pressed, the cleaning liquid needs to be replaced.
- Even if the STATUS lamp does not light up, replace the cleaning liquid after 6 months have passed.
1 Remove the AC adaptor [C] and remove the cleaning liquid unit [B⑳]. (See page 15.)
2 Wash away the old cleaning liquid.
- It can be drained as sewage.
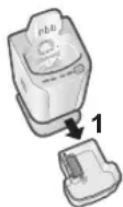
3 Rinse the cleaning liquid unit.
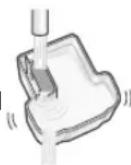
- Pour water as illustrated while tilting the cleaning liquid unit and shaking it gently.
- You can clean with the cleaning liquid filter removed.
After washing, be sure to attach the cleaning liquid filter.
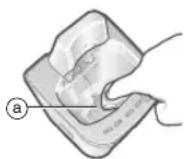
4 Gently wipe off any beard trimmings attached to the inside of the cleaning tray (a) with a cloth or tissue paper dampened with water.
- Clean the corners and uneven parts of the cleaning tray with a cotton swab dampened with water.
5 Prepare the new cleaning liquid. (See page 15.)
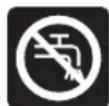
The symbol on the left means "Do not wash the self-cleaning recharger with water".
Notes
- The cleaning liquid will decrease every time it is used, but do not add detergent and water except when replacing the cleaning liquid.
Doing so may deteriorate the cleaning function.
- Do not wash the self-cleaning recharger unit with water.
- Do not wipe with thinners, benzine, alcohol etc. Doing so may cause malfunction, or cracking or discoloration of the parts.
Wipe with diluted soapy water.
▶When the water does not drain from the cleaning tray
- Do not tilt the self-cleaning recharger to pour out water. Doing so may cause the cleaning liquid in the cleaning liquid unit to spill or cause the self-cleaning recharger to malfunction.
- Beard trimmings may clog the drain at the bottom of the cleaning tray. In this case, you cannot clean or dry the shaver.
- Be sure to remove the AC adaptor from the self-cleaning recharger.
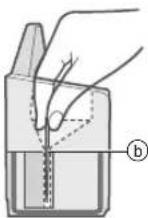
- Place the self-cleaning recharger on a flat surface, and push the beard trimmings down through the drain (⑥) with a toothpick etc.
When the LOW/STATUS lamp glows
It indicates that the cleaning liquid is due for replacement when the LOW lamp or STATUS lamp glows for approximately 5 seconds when the SELECT button is pressed.
Lamp on the self- cleaning recharger
The LOW lamp glows.
Content of notification
Replacement of the cleaning liquid is required in approximately 7 days. Prepare the detergent.
Lamp on the self- cleaning recharger
The STATUS lamp glows.
Content of notification
Replace the cleaning liquid. (Modes other than the "AUTO" mode can be used even if it is not replaced.)
If you think the replacement should not be due yet.
• Is the cleaning liquid unit correctly attached?
• Is the self-cleaning recharger placed in a level surface?
• Is the self-cleaning recharger used outside the range of the recommended usage temperature?
(Only "Charge" mode can be used.)
FAQ
Question
Does this product require inner blades?
Answer
Outer foils and inner blades are integrated into the system outer foil.
| Question Answer | |
| Why does “Dry/Charge” mode take longer than “AUTO” mode? | This is due to the difference in the drying time.The drying time for the “Dry/Charge” mode is set longer as there may still be excess moisture on the areas other than the system outer foil after the shaver has been rinsed and cleaned with water. |
| Can I refill the self-cleaning recharger with water when the cleaning liquid has decreased? | Do not refill with water as doing so may deteriorate the cleaning function.Replace the cleaning liquid. |
| Can the self-cleaning recharger be used to wash other models? | Doing so may cause malfunction, so do not use with other models. |
| Will the battery deteriorate if not used for an extended period of time? | The battery will deteriorate if not used for over 6 months, so make sure to perform a full charge at least once every 6 months. |
| Can I charge the shaver after every use? | The battery used is a lithium-ion, so charging after every use will have no effect on battery life. |
| Question Answer | |
| Why should the adaptor be disconnected after charge? | Charging the battery for more than 1 hour will not affect▶ battery performance, but disconnect the adaptor for safety and to save energy. |
| What is the constituent of the dedicated oil and the detergent? | Oil: Liquid paraffin▶ Detergent: Non-ionic surfactant agent, antimicrobial agent, lubricant and fragrance. |
| Why does the appliance beep twice after switched off? | The sound indicates that the battery capacity is running low. Please charge the appliance. |
Troubleshooting
Perform the following actions. If the problems still cannot be solved or all self-cleaning recharger's lamps blink, contact the store where you purchased the unit or a service centre authorized by Panasonic for repair.
▶ Self-cleaning recharger
| Problem Action | |
| The system outer foil has not been thoroughly washed. | If the shaver is not cleaned for more than 2 weeks, first clean with the cleaning brush to remove beard trimmings.(See page 21.) |
| Do not add detergent and water except when replacing the cleaning liquid. Doing so may deteriorate the cleaning function.(See page 22.) | |
| After cleaning, oil-like droplets may remain on the outside of the foil frame.This is the lubricating component of the cleaning liquid and does not indicate a problem. You may wipe it off with a soft cloth. | |
| The system outer foil is not dry or is sticky. | The system outer foil may not dry quickly due to temperature conditions.Run the “Dry/Charge” mode again or wipe with a soft cloth before shaving. |
| Problem Action | |
| The system outer foil cracks or deforms during cleaning. | Do not insert any foreign objects into the recharger.Remove foreign objects in the cleaning tray. (See page 22.) |
| Replace the system outer foil. (See page 21.) | |
| The cleaning liquid has foamed. | If you mix soapy water or hand soap with the detergent or use another detergent, the cleaning liquid will foam. Use the self-cleaning recharger after thoroughly washing and drying the shaver. |
| Replace the cleaning liquid. (See page 22.) | |
| Cleaning liquid has accumulated in the cleaning tray. | Remove any waste, etc. that has accumulated in the drain at the bottom of the cleaning tray. (See page 22.) |
| If you use the self-cleaning recharger when the shaver is wet or when soap or shaving gel is on the shaver, cleaning liquid may accumulate in the cleaning tray. | |
| Cleaning liquid leaked from the cleaning liquid unit. | Do not press the cleaning liquid unit removal button during any mode. |
| Place the self-cleaning recharger horizontally. | |
| If you use the self-cleaning recharger when the shaver is wet or when soap or shaving gel is on the shaver, cleaning liquid may leak. | |
| The cleaning liquid unit cannot be removed. | Place the self-cleaning recharger on a hard, flat surface.(See page 15.) |
| Problem Action | |
| The mode does not start. | Check that the AC adaptor is connected to the self-cleaning recharger, and that the adaptor is plugged in to a household outlet. (See page 18.) |
| Confirm that the shaver is properly attached to the self-cleaning recharger. (See page 18.) | |
| The Clean or Dry function may not operate under extreme low temperatures (approximately 0 °C or lower). | |
| Check if the STATUS lamp is glowing. (See page 23.) | |
| The shaver cannot be charged. | Gently wipe the main body rear terminals and the charging terminals of the self-cleaning recharger with a cloth or tissue dampened with water. |
Problem Action
Makes a loud sound.
During cleaning:
The self-cleaning recharger makes a loud sound due to the cleaning of the system outer foil.
After cleaning:
The self-cleaning recharger makes a loud sound due to the removal of water droplets in order to speed drying.
The sound after cleaning is different from the sound during cleaning. The water level has dropped and it is removing water droplets from the system outer foil after cleaning. This does not indicate a problem.
▶ Shaver
Problem Action
The power switch does not turn ON.
The clean lamp (☐) glows. (It turns off in about 1 minute.)
The appliance may not unlock depending on usage conditions. Place the appliance on the desk, then
▶ pick it up again. If it still does not operate, press and hold the power switch for more than 2 seconds to forcibly unlock the appliance.
Please clean the blades with the self-cleaning recharger or the sonic vibration cleaning mode.
| Problem Action | |
| The shaving sensor does not respond. | Depending on the beard thickness or the amount of beard trimmings in the shaver head, the shaving sensor may not react and the driving sound may not change. This is not abnormal.The shaving sensor may not respond depending on the type and quantity of the shaving gel. This is not abnormal.The shaving sensor may not respond when the remaining battery capacity is low. If this happens, recharge the shaver.Apply oil. (See page 20.) The shaving sensor may not respond when there is not enough oil on the system outer foil. |
| Problem Action | |
| The shaving sensor responds even though the shaver is not in contact with the skin. | Clean the beard trimmings from the shaver.Clean the system outer foil with the brush. (See page 21.)When the shaver is extremely dirty, remove the foil frame and wash with water.(See page 19.) |
| Replace the system outer foil.Expected life of system outer foil:Approximately 18 months | |
| Operating time is short even after a full charge. | Although the shaver can be used for about 2 weeks after a full charge (assuming dry-shave usages for 3 minutes per day), the usable number of days might be lower depending on how the shaver is used (for example, when used for wet shaving). |
| Apply oil. | |
| Clean the shaver. | |
| When the number of operations per charge starts to decrease, the battery is nearing the end of its life. | |
| Shaver does not operate even after charging. | Use the appliance in an ambient temperature approximately 5 °C or higher. |
| The battery has reached the end of its life. | |
| The shaver will not operate with the AC adaptor connected. Please use the shaver after it has been sufficiently charged and the AC adaptor disconnected. |
| Problem Action | |
| The driving sound changes while shaving. | The shaving sensor is operating. The sound changes depending on the beard thickness. |
| Makes a loud sound. | Apply oil.The blades will not move smoothly when there is no oil on the system outer foil, requiring more power.The shaver makes a high-pitched sound due to the linear motor drive. This does not indicate a problem.Confirm that the system outer foil is properly attached.Clean the system outer foil with the brush. (See page 21.)Wash the system outer foil with water. (See page 19.) |
| The odor is getting stronger. | Clean the shaver. |
| System outer foil gets hot. | Apply oil.Replace the system outer foil if it is damaged or deformed.(See page 21.) |
Problem Action
You do not get as close a shave as before.
▶ Clean the shaver.
▶ Apply oil.
Replace the system outer foil.
Expected life of system
outer foil:
Approximately 18 months
Service
Contact
Please visit Panasonic web site http://www.panasonic.com or contact an authorized service centre (you find its contact address in the pan european guarantee leaflet.) if you need information or if the shaver or the cord gets damaged.
Replacement parts
Replacement parts are available at your dealer or Service Centre.
| Replacement parts for ES-LS9A | System outer foil WES9600 |
| Special Detergent for Shaver Cleaning & Charging System | |
| Lubrication oil WES003P | |
Battery life
The life of the battery is 3 years. The battery in this shaver is not intended to be replaced by consumers. Have the battery replaced by an authorized service centre.
For environmental protection and recycling of materials
This shaver contains a Lithium-ion battery.
Please make sure that the battery is disposed of at an officially assigned location, if there is one in your country.
Disposal of Old Equipment and Batteries
Only for European Union and countries with recycling systems
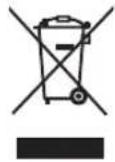
These symbols on the products, packaging, and/or accompanying documents mean that used electrical and electronic products and batteries must not be mixed with general household waste. For proper treatment, recovery and recycling of old products and batteries, please take them to applicable collection points in accordance with your national legislation.
By disposing of them correctly, you will help to save valuable resources and prevent any potential negative effects on human health and the environment.
For more information about collection and recycling, please contact your local authority. Penalties may be applicable for incorrect disposal of this waste, in accordance with national legislation.
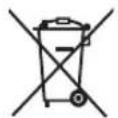
Note for the battery symbol (bottom symbol) This symbol might be used in combination with a chemical symbol. In this case it complies with the requirement set by the Directive for the chemical involved.
Disposal of the built-in rechargeable battery
Remove the built-in rechargeable battery before disposing of the shaver.
The battery is to be disposed of safely.
Please make sure that the battery is disposed of at an officially designated location if there is one.
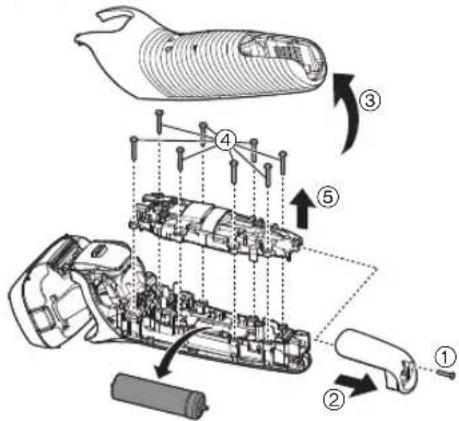
This figure must only be used when disposing of the shaver, and must not be used to repair it. If you dismantle the shaver yourself, it will no longer be waterproof, which may cause it to malfunction.
- Remove the shaver from the AC adaptor.
- Press the power switch to turn on the power and then keep the power on until the battery is completely discharged.
- Perform steps ① to ⑤ and lift the battery, and then remove it. - Take care not to short circuit the positive and negative terminals of the removed battery, and insulate the terminals by applying tape to them.
Specifications
| Power source | See the name plate on the AC adaptor.(Automatic voltage conversion) |
| Motor voltage | 3.6 V--- |
| Charging time Approx. 1 hour | |
| Airborne Acoustical Noise | In shaving mode: 64 (dB (A) re 1 pW)In trimmer mode: 65 (dB (A) re 1 pW) |
This product is intended for household use only.
For more information about the energy efficiency of the product, please visit our website, www.panasonic.com, and enter the model number in the search box.
Panasonic
Betriebsanleitung
natural_image
Two mechanical components with arrows indicating assembly steps (no text or symbols present)natural_image
Illustration of a device being inserted into a housing, showing the process with arrows indicating movement (no text or symbols present)Hinweise
natural_image
Illustration of a hand holding a tool with a prohibition symbol (no text or labels)natural_image
Close-up of a hand inserting a belt buckle into a car seatbelt, showing the buckle being inserted (no text or symbols visible)natural_image
Illustration of a hand holding a small object with granular material inside, no text or symbols presentHinweise
natural_image
Illustration of three hands using a tool to apply a sample onto a surface, with no visible text or symbols.Spezifikationen
▶ Prévention des accidents
Remarque
natural_image
Two 3D mechanical components with arrows indicating assembly or movement, no visible text or symbolsnatural_image
Illustration of a device being inserted into a package, showing the process with arrows indicating insertion (no text or symbols present)Notes
natural_image
Illustration of a hand holding a tool with a circular symbol and dashed line indicating a dissection or mark (no text or symbols present)natural_image
Close-up of a hand inserting a belt buckle into a device (no text or symbols visible)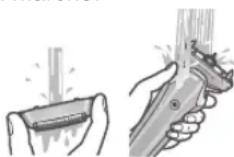
natural_image
Illustration of a hand brushing a toothbrush with teeth removed (no text or symbols)Notes
natural_image
Illustration of three hands using a tool to apply a sample onto a device (no text or symbols present)Spécifications
© Adattatore CA (RE7-87)
②6 Adattatore
Nota
natural_image
Two mechanical component diagrams showing pin alignment (no text or symbols)3
natural_image
Illustration of a device being inserted into a clip, showing the process with arrows indicating the insertion (no text or symbols present)Nota
natural_image
Illustration of a hand holding a tool with a circular symbol and dashed line indicating a dissection or defect (no text or symbols present)natural_image
Illustration of a hand holding a device with an inset showing a device inside (no text or symbols visible)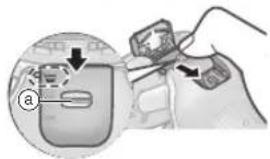
natural_image
Illustration of a handheld electric shaver with exposed internal components (no text or symbols)Nota
natural_image
Illustration showing three steps of a hand holding a small object, with no visible text or symbols.Specifiche
© Wisselstroomadapter (RE7-87)
②6Adapter
⑳ Stroomstekker
⑳Netsnoer
⑲ Apparaatstekker
Accessoires
D Reistasje
Opmerking
natural_image
Two mechanical components with arrows indicating assembly or movement (no text or symbols present)natural_image
Illustration of a hand inserting a small object into a container, showing the process (no text or symbols)Opmerkingen
natural_image
Illustration of a hand holding a tool with a prohibition symbol (no text or labels)natural_image
Hand inserting a device into a car seatbelt, showing the cable being inserted (no text or symbols visible)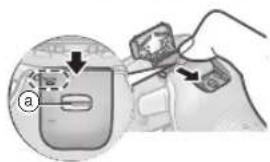
natural_image
Illustration of a hand holding a device with a magnified inset showing a component (no text or symbols visible)Reinigen, drogen, opladen
natural_image
Illustration of a hand holding a remote control device with a magnified inset showing two rectangular components (no text or symbols)natural_image
Illustration of a handheld electric shaver with a circular lid and textured base (no text or symbols)Opmerkingen
natural_image
Illustration showing three steps of a hand holding a small object, with no visible text or symbols.Specifications
Nota
natural_image
Two mechanical components with arrows indicating assembly or movement (no text or symbols present)natural_image
Illustration of a device being adjusted to form a separate package (no text or symbols present)Notas
natural_image
Illustration of a hand holding a tool with a prohibition symbol (no text or labels)natural_image
Illustration of a hand inserting a device into a car seat (no text or symbols visible)natural_image
Illustration of a hand holding a remote control device with a magnified inset showing two rectangular components (no text or symbols)natural_image
Illustration of a handheld electric shaver with internal components and dust particles (no text or symbols)Notas
natural_image
Illustration of three steps of a hand holding a small object, with no visible text or symbols.Especificaciones
© Vekselstrømsadapter (RE7-87)
②6Adapter
⑳ Strømstik
⑳Ledning
⑲Barbermaskinestik
Tilbehør
Bemærk!
natural_image
Two mechanical components with arrows indicating assembly steps (no text or symbols)natural_image
Illustration of a hand inserting a small device into a container, showing the process (no text or symbols)Noter
natural_image
Illustration of a hand holding a handheld device with a prohibition symbol above (no text or labels)natural_image
Close-up of a hand inserting a device into a car seatbelt, showing the cable being inserted (no text or symbols visible)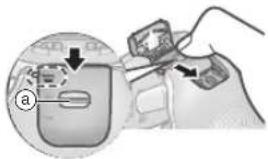
natural_image
Illustration of a hand holding a handheld device with a magnified inset showing two rectangular blocks (no text or symbols)natural_image
Illustration of a handheld electric shaver with a button and textured tip (no text or symbols)Noter
natural_image
Illustration of three hands using a tool to apply a sample into a container (no text or symbols present)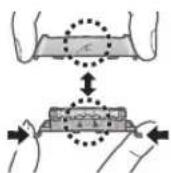
Specifikationer
Nota
natural_image
Two 3D mechanical component diagrams showing pin positioning and mounting features (no text or symbols)natural_image
Illustration of a device being adjusted to form a separate package (no text or symbols present)Notas
natural_image
Illustration of a hand holding a tool with a prohibition symbol (no text or labels)natural_image
Illustration of a handheld electric shaver with visible internal components and exhaust platters (no text or symbols)Notas
natural_image
Illustration of three hands using a tool to apply a sample onto a sample (no text or symbols present)Especificações
© Vekselstrømsadapter (RE7-87)
②6Adapter
⑳Støpsel
⑳Kabel
⑲Apparatplugg
Tilbehør
- Kontroller at lampen for ladestatus ( ) lyser.
• Opplading er ferdig etter ca. 1 time.
Under lading Etter at
lyser.
Tallet på
natural_image
Two mechanical component diagrams showing pin insertion and disassembly (no text or symbols)natural_image
Illustration of a device being inserted into a housing, showing the process with arrows indicating insertion (no text or symbols present)Merknader
natural_image
Illustration of a hand holding a small object with a dashed line indicating a step, no text or symbols present.Tips for bedre bruk
Sett kanten av trimmeren vinkelrett og forsiktig på huden, og beveg den sakte nedover.
natural_image
Illustration of a hand holding a remote control device with a magnified inset showing two rectangular components (no text or symbols)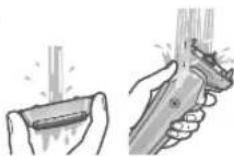
natural_image
Illustration of a handheld electric shaver with internal components and exhaust platters (no text or symbols)Merknader
natural_image
Illustration of three-step electrical circuitry: a plug, a socket with wires, and a hand holding a socket (no text or symbols)Bytte systemets ytre folie
Spesifikasjoner
| Strømkilde | Se merkeplaten på vekselstrømsadapteren (automatisk spenningsomformer). |
| Motorspenning | 3,6 V--- |
| Ladetid Omtrent 1 time | |
| Luftbåren akustisk støy | Under barbering: 64 (dB (A) re 1 pW) Under trimming: 65 (dB (A) re 1 pW) |
Dette produktet er kun ment til husholdningsbruk.
© AC-adapter (RE7-87)
②6Adapter
⑳ Strömkontakt
⑳ Sladd
⑲Apparatens kontakt
Tillbehör
D Skyddsfodral
E Rengöringsborste
F Olja
G Specialrengöringsmedel (Rengöringsmedel)
H Bruksanvisning
① Garantikort
Obs
natural_image
Two mechanical component diagrams showing pin insertion and disassembly (no text or symbols)natural_image
Two-step diagram showing a device being inserted into a container, with no visible text or symbols.OBS!
natural_image
Illustration of a hand holding a small object with a dashed line indicating a step, no text or symbols presentnatural_image
Close-up of a hand inserting a belt switch into a car seatbelt, showing the mechanism (no text or symbols visible)Rengöra, torka, ladda
natural_image
Illustration of a handheld electric shaver with visible internal components and exhaust platters (no text or symbols)OBS!
natural_image
Illustration of three hands holding a small electronic device with a magnified inset showing a square component (no text or symbols)Specifikationer
Huom
natural_image
Two 3D mechanical components with arrows indicating assembly or movement, no visible text or symbolsnatural_image
Illustration of a device being inserted into a container, showing the process (no text or symbols present)Huomautuksia
natural_image
Illustration of a hand holding a tool with a circular mark and a prohibition symbol (no text or labels)natural_image
Close-up of a hand inserting a device into a car seat, showing the cable being inserted (no text or symbols visible)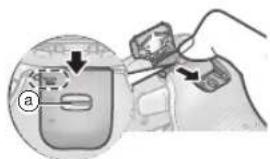
natural_image
Diagram showing car seatbelt buckle components with dashed outlines, no text or symbols presentnatural_image
Illustration of a hand holding a remote control device with a magnified inset showing two rectangular blocks (no text or symbols)natural_image
Illustration of a handheld electric shaver with a lid removed (no text or symbols)Huomautuksia
natural_image
Illustration of three hands using a tool to apply a sample into a sample holder (no text or symbols present)Teräverkon vaihto
Tekniset tiedot
Uwagi
natural_image
Two mechanical component diagrams showing pin insertion steps (no text or symbols)natural_image
Illustration of a hand inserting a battery into a device (no text or symbols present)Uwagi
natural_image
Illustration of a hand holding a tool with a prohibition symbol (no text or labels)natural_image
Illustration of a hand inserting a device into a seatbelt, showing the cable being inserted (no text or symbols present)natural_image
Diagram showing three views of a car seatbelt device with no visible text or symbolsnatural_image
Illustration of a hand holding a remote control device with a magnified inset showing two rectangular blocks (no text or symbols)natural_image
Illustration of a handbrush and a small rectangular object with textured surfaces (no text or symbols)Uwagi
natural_image
Illustration of three hands using a tool to apply a component, no text or symbols present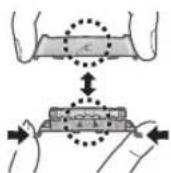
Dane techniczne
Poznámka
natural_image
Two 3D mechanical components with arrows indicating fasteners or fasteners (no text or symbols present)natural_image
Illustration of a device being inserted into a container, showing the process with arrows indicating insertion (no text or symbols present)Poznámky
natural_image
Illustration of a hand holding a small object with a dashed line indicating a step, no text or symbols presentnatural_image
Close-up of a hand inserting a belt switch into a car seatbelt, showing the mechanism (no text or symbols visible)natural_image
Diagram showing car seatbelt components with dashed outlines, no text or symbols presentnatural_image
Illustration of a hand using a handheld device to interact with a grid of rectangular blocks (no text or symbols present)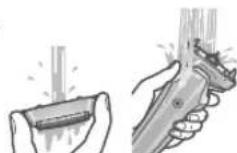
natural_image
Illustration of a handheld electric shaver with a lid removed (no text or symbols)Poznámky
natural_image
Illustration of three hands holding test probes with a magnified inset showing a small object (no text or symbols)Technické údaje
Poznámka
natural_image
Two mechanical component diagrams showing pin positioning and assembly (no text or symbols)3 Pomaly vložte zásuvku čistiacej kvapaliny [B20] do automatickej čistiacej jednotky [B] tak, aby zacvakla na miesto.
natural_image
Illustration of a device being inserted into a package, showing the process with arrows indicating insertion (no text or symbols present)Poznámky
natural_image
Illustration of a hand holding a small object with a dashed line indicating a step, no text or symbols presentnatural_image
Close-up of a hand inserting a belt switch into a car seatbelt, showing the mechanism (no text or symbols visible)Čistenie, sušenie, nabíjanie
natural_image
Illustration of a handbrush and eraser with powder particles (no text or symbols)Poznámky
natural_image
Illustration of three hands using a tool to apply a component, with no visible text or symbols.
Technické údaje
| Zdroj energie | Pozrite si štítok na adaptéri na striedavý prúd.(Automatický prevod napätia) |
| Napätie motora | 3,6 V--- |
| Čas nabíjania Približne 1 hodina | |
| Akustický hlukvo vzduchu | V režime holenia: 64 (dB (A) pri 1 pW)V režime zastrihávania: 65 (dB (A) pri 1 pW) |
Megjegyzés
natural_image
Two 3D mechanical components with arrows indicating assembly or movement, no visible text or symbolsnatural_image
Two-step diagram showing a device being inserted into a housing, with no visible text or symbols.Megjegyzések
natural_image
Illustration of a hand holding a tool with a prohibition symbol (no text or labels)natural_image
Close-up of a hand inserting a belt switch into a car seatbelt, with a magnified inset showing the belt (no text or symbols visible)natural_image
Illustration of a hand holding a device with an arrow pointing to a component, no visible text or symbolsnatural_image
Illustration of a hand holding a remote control device with a magnified inset showing two rectangular components (no text or symbols)natural_image
Illustration of a handheld electric shaver with exposed internal components and a separate base (no text or symbols)Megjegyzések
natural_image
Illustration of hands using a tool to apply a component to a device (no text or symbols present)Müszaki adatok
Notă
natural_image
Two white plastic electrical connectors with labeled parts, shown from different angles (no text or symbols present)natural_image
Illustration of a device being inserted into a housing, showing the process with arrows indicating insertion (no text or symbols present)Notă
natural_image
Illustration of a hand holding a tool with a magnified inset showing a circular detail (no text or symbols)natural_image
Hand holding a device with an arrow pointing to a component, no visible text or symbols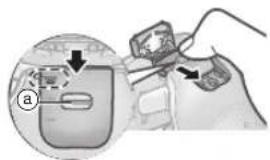
natural_image
Illustration of a hand holding a remote control device with a magnified inset showing two rectangular blocks (no text or symbols)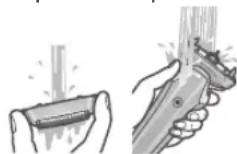
natural_image
Illustration of a handheld electric shaver with a lid removed (no text or symbols)Notă
natural_image
Illustration showing three steps of a hand holding a small object, with no visible text or symbols.Specificații
© AC adaptörü (RE7-87)
Not
natural_image
Two 3D mechanical component diagrams showing pin insertion and disassembly (no text or symbols)natural_image
Illustration of a device being inserted into a housing, showing the process with arrows indicating insertion (no text or symbols present)Notlar
natural_image
Illustration of a hand holding a tool with a circular mark and a prohibition symbol (no text or labels)2 Bittiğinde

ğmesine basın.
natural_image
Close-up of a hand using a belt switch to adjust a car seatbelt (no text or symbols visible)natural_image
Diagram showing three views of a car seatbelt device with dashed outlines indicating components (no text or symbols present)natural_image
Illustration of a handheld electric shaver with internal components and a separate base (no text or symbols)Notlar
natural_image
Illustration showing three steps of a hand holding a small object, with no visible text or symbols.Özellikler
© Panasonic Corporation 2022
⑤ EN, DE, FR, IT, NL, SP, DA, PT, NB, SV, FI, PL, CS, SK, HU, RO, TR
Printed in Japan
ES9700LS9A1E Y0222-0

- Panasonic
- Contents
- Safety precautions...... 8
- WARNING
- Safety precautions
- ▶ This product
- ▶ Preventing accidents
- CAUTION
- ▶ Protecting the skin
- Handling of the removed battery when disposing
- DANGER
- Important information
- Note the following precautions
- ▶ When using
- ▶ About detergent
- ▶ When storing
- ▶ When cleaning
- Parts identification
- A Main body
- B Self-cleaning recharger (RC9-23)
- © AC adaptor (RE7-87)
- Accessories
- Preparation
- Charging the shaver
- Quick charge
- Notes
- Charging without the self-cleaning recharger
- Note
- Preparing the cleaning liquid
- How to use
- ▶ Unlocking the power switch
- Shaving beard
- Press and shave.
- Tips for better shaving
- Press when finished.
- ▶ Using the trimmer
- Tips for better usage
- Cleaning, drying, charging
- Changing the mode of self-cleaning recharger
- Cleaning thoroughly
- Cleaning with water
- Attach the outer foil section and dry with the self-cleaning recharger [B].
- Lubricate the shaver.
- ▶Drying the shaver without the self-cleaning recharger
- Cleaning with the brush
- ▶ Cleaning with the long brush
- Replacing the system outer foil
- ▶Removing the outer foil section
- ▶ Attaching the outer foil section
- ▶Replacing the system outer foil
- Replacing the cleaning liquid
- Prepare the new cleaning liquid. (See page 15.)
- When the LOW/STATUS lamp glows
- Content of notification
- Lamp on the self- cleaning recharger
- FAQ
- Question
- Answer
- Troubleshooting
- Problem Action
- ▶ Shaver
- Service
- Contact
- Replacement parts
- Battery life
- For environmental protection and recycling of materials
- Disposal of Old Equipment and Batteries
- Only for European Union and countries with recycling systems
- Disposal of the built-in rechargeable battery
- Remove the built-in rechargeable battery before disposing of the shaver.
- Hinweise
- Remarque
- © Adattatore CA (RE7-87)
- Nota
- 3
- Opmerking
- Opmerkingen
- Reinigen, drogen, opladen
- Notas
- © Vekselstrømsadapter (RE7-87)
- Tilbehør
- Noter
- Merknader
- Tips for bedre bruk
- Bytte systemets ytre folie
- © AC-adapter (RE7-87)
- OBS!
- Rengöra, torka, ladda
- Huomautuksia
- Teräverkon vaihto
- Uwagi
- Poznámka
- Poznámky
- Čistenie, sušenie, nabíjanie
- Megjegyzés
- Megjegyzések
- Notă
- © AC adaptörü (RE7-87)
- Not
- Notlar
- Bittiğinde
- ğmesine basın.
Brand : PANASONIC
Model : ESLS9A
Category : Shaver