Smart Standing Fan 2 Pro - Fan Xiaomi - Free user manual and instructions
Find the device manual for free Smart Standing Fan 2 Pro Xiaomi in PDF.
User questions about Smart Standing Fan 2 Pro Xiaomi
0 question about this device. Answer the ones you know or ask your own.
Ask a new question about this device
Download the instructions for your Fan in PDF format for free! Find your manual Smart Standing Fan 2 Pro - Xiaomi and take your electronic device back in hand. On this page are published all the documents necessary for the use of your device. Smart Standing Fan 2 Pro by Xiaomi.
USER MANUAL Smart Standing Fan 2 Pro Xiaomi
xiaomi Smart Standing Fan 2 Pro User Manual .1
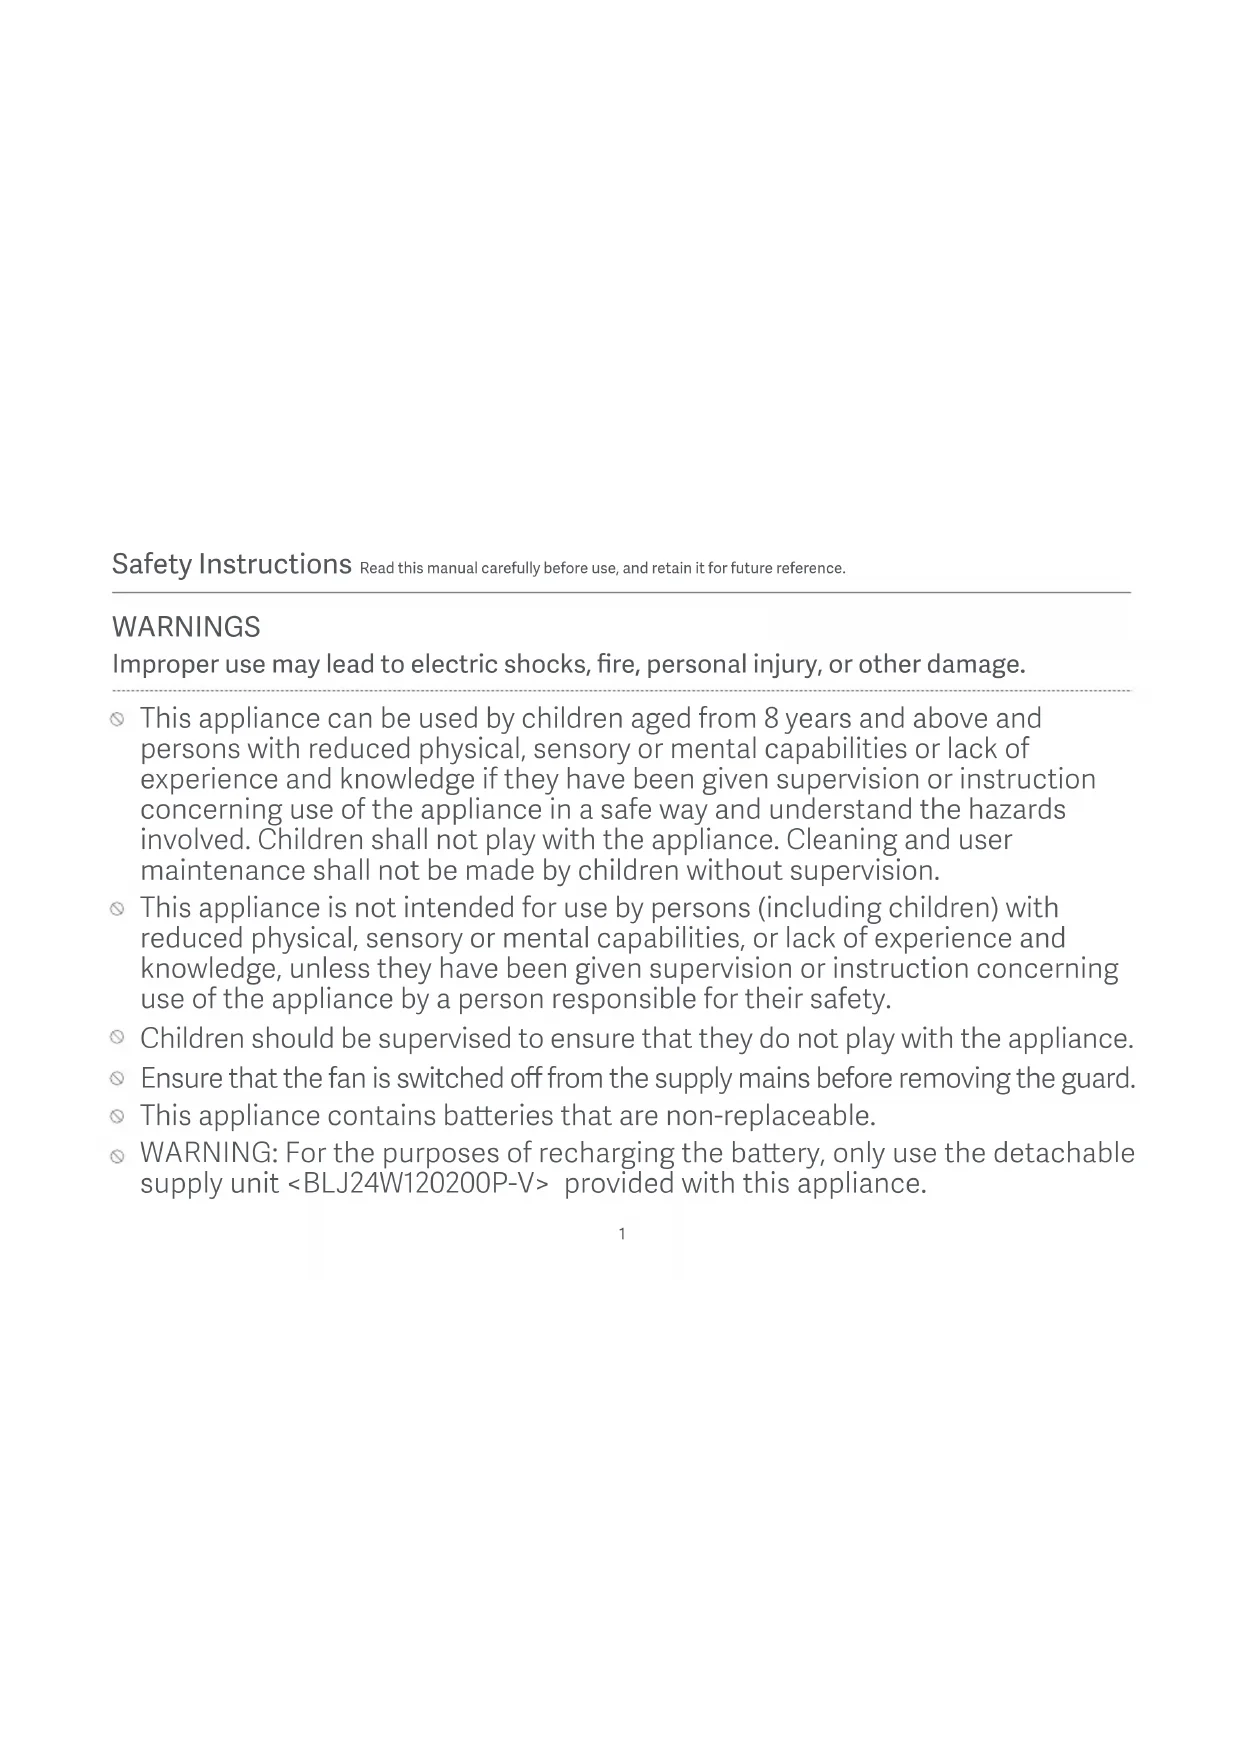
Improper use may lead to electric shocks, fire, personal injury, or other damage.
This appliance can be used by children aged from 8 years and above and persons with reduced physical, sensory or mental capabilities or lack of experience and knowledge if they have been given supervision or instruction concerning use of the appliance in a safe way and understand the hazards involved. Children shall not play with the appliance. Cleaning and user maintenance shall not be made by children without supervision.
This appliance is not intended for use by persons (including children) with reduced physical, sensory or mental capabilities, or lack of experience and knowledge, unless they have been given supervision or instruction concerning use of the appliance by a person responsible for their safety.
Children should be supervised to ensure that they do not play with the appliance.
- Ensure that the fan is switched off from the supply mains before removing the guard.
This appliance contains batteries that are non-replaceable.
- WARNING: For the purposes of recharging the battery, only use the detachable supply unit
Under normal use of condition, this equipment should be kept a separation distance of at least 20 cm between the antenna and the body of the user.
This appliance contains built-in li-ion battery. Do not disassemble, impact, crush the battery or throw it into fire. If there is severe swelling, do not continue to use. Do not leave the battery in high temperature environment.
Do not use this fan if the power cord of the charging base is damaged or its power plug is loose.
Do not operate any fan with a damaged cord or plug. Discard fan or return to an authorized service facility for examination and/or repair.
Do not use this fan in a place where it will easily fall over or where there are other unstable objects nearby.
Do not excessively pinch, bend, or twist the power cord of the charging base as this may expose or break its core.
Do not insert your fingers or any object into the front grille, rear grille, or the fan blades when the fan is in use.
Keep hair and fabrics away from the fan to avoid getting them caught in the fan.
Do not use any improper power outlet.
Do not use the charging base provided with this fan for any other device.
Do not improperly dispose of old batteries. Used batteries should be discarded at a professional recycling facility.
Do not charge the fan on uneven places or plush materials. Otherwise, it is easy to cause circuit failure or fire due to poor contact between the charging base and the charging port.
- Prior to cleaning or other maintenance, the appliance must be disconnected from the supply mains.
PRECAUTIONS
Installation
To avoid electric shocks, fire, personal injury, or other damage, make sure the fan base is installed last. Please follow the installation instructions in the user manual.
Do not turn on the fan or connect it to the charging base if it is not completely assembled.
Turn off or unplug the fan before installing or disassembling it. Do not touch the on/off button to prevent the fan from running and causing danger.
Transportation
Firmly hold the fan stand to avoid it from falling down and causing personal injury.
Using the Fan
Immediately stop using the fan if it makes unusual sounds, gives off bad odors, overheats, or rotates irregularly.
Do not lean on or tilt the fan while it is running.
Do not shake the fan's head repeatedly so as to avoid damage to the internal mechanism.
Charging the Fan
When the battery is depleted, the fan should be charged as soon as possible. To prevent the battery from being damaged, connect the charging base to the fan base in a timely manner.
Do not unplug the charging base by directly pulling at the cord or wiggling it out of the outlet. Instead, pull the plug out itself.
Do not attempt to repair the charging base by yourself if it is damaged.
When the charging base is damaged or broken, it must be replaced with a genuine one purchased from the manufacturer or after-sales service department.
When the fan is charging, the fan base may get warm. It is recommended to charge the fan on insulating materials or in places that are not easily affected by heat sources, so as to prevent the places where the fan is put from becoming discolored or deformed.
Care & Maintenance
⚠️ Make sure the fan is unplugged before removing the protective cover.
When maintaining and cleaning the fan, make sure to remove the fan base first before removing other parts and to install the fan base last when installing.
Package Contents
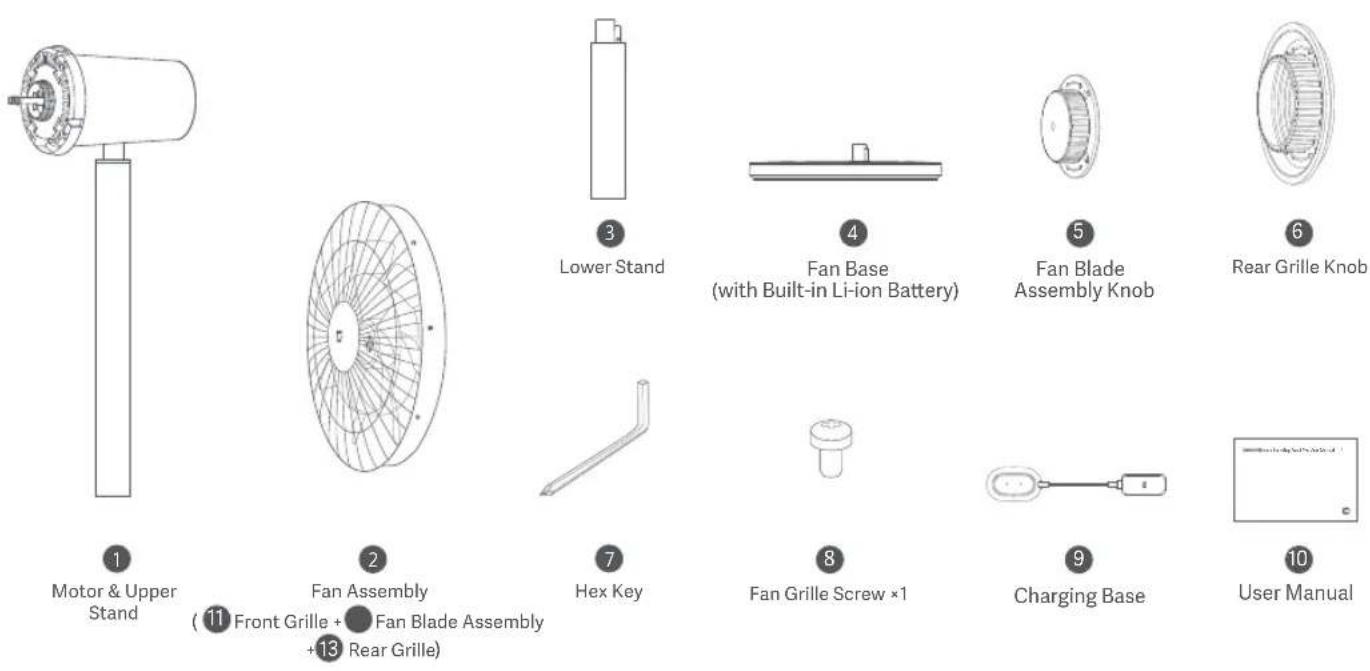
Note: Illustrations of the product, accessories, and user interface in the user manual are for reference purposes only. The actual product and functions may vary due to product enhancements.
Product Overview
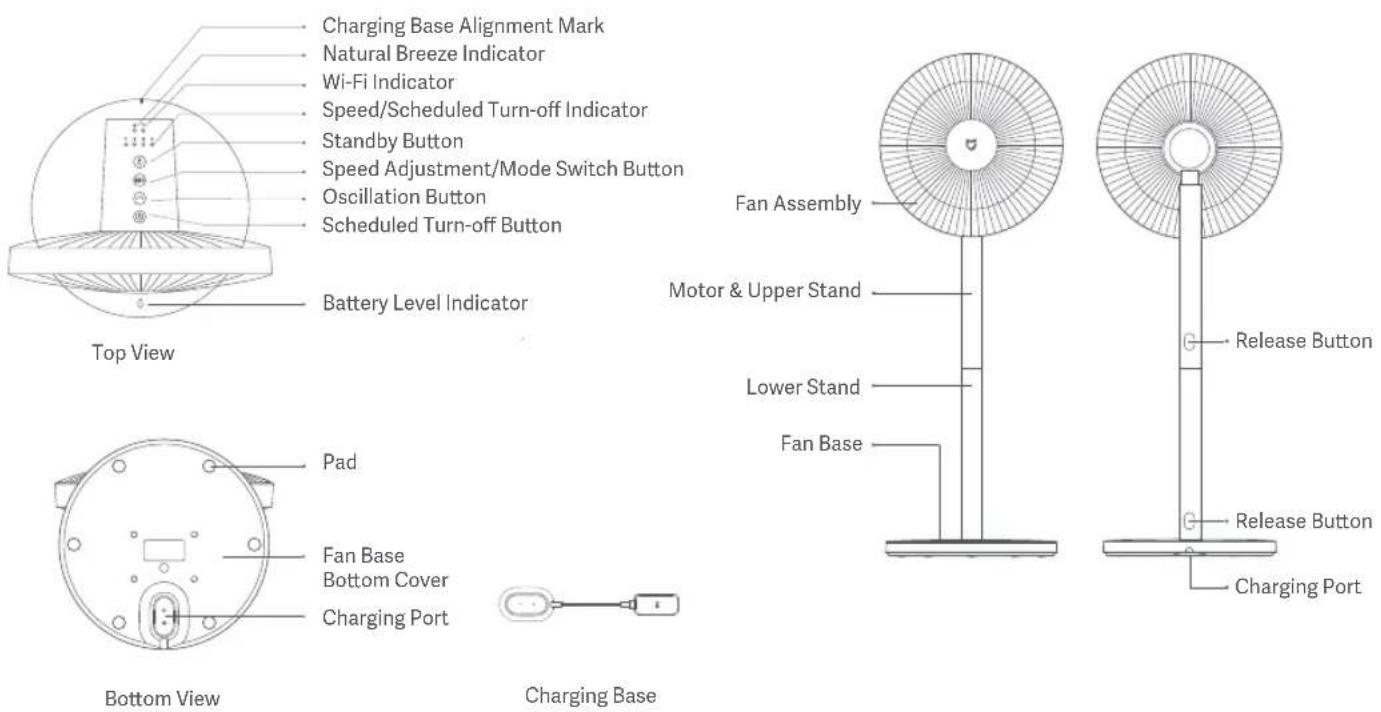
Charging Base Alignment Mark
Natural Breeze Indicator
Wi-Fi Indicator
Speed/Scheduled Turn-off Indicator
Standby Button
Speed Adjustment/Mode Switch Button
Oscillation Button
Scheduled Turn-off Button
Battery Level Indicator
Pad
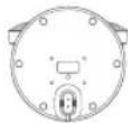
Fan Base
Bottom Cover
Charging Port
Installation
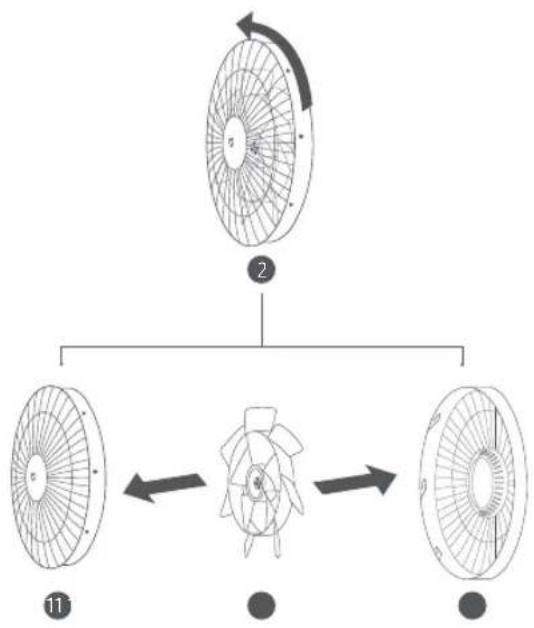
Step 1: Open the fan assembly
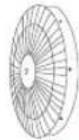
Turn the 11 front grille counterclockwise until it separates from the 13 rear grille. Remove the front and rear grille, then take out the 12 fan blade assembly.
flowchart
graph TD
    A[" fan "] --> B[" fan "]
    B --> C[" fan "]
    C --> D[" fan "]
    style A fill:#f9f,stroke:#333
    style B fill:#ccf,stroke:#333
    style C fill:#cfc,stroke:#333
    style D fill:#fcc,stroke:#333
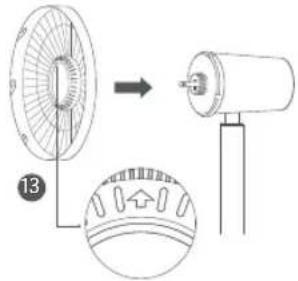
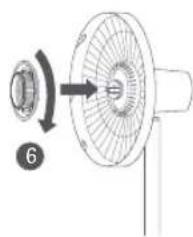
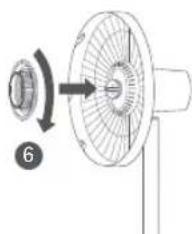
Step 2: Install the rear grille
Install the 13 rear grille onto the motor with "↑" facing upwards, and then install and turn the 6 rear grille knob clockwise to firmly fix the rear grille to the shaft of the motor.
natural_image
Diagram of a fan with a rotating knob and a labeled component (no text or symbols present)Step 3: Install the fan blade assembly
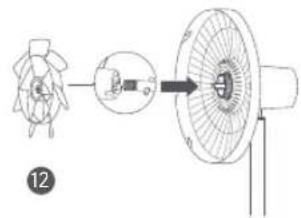
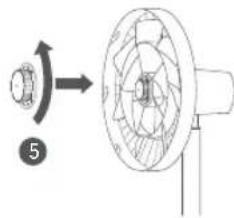
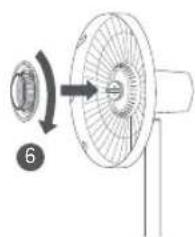
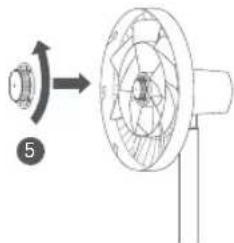
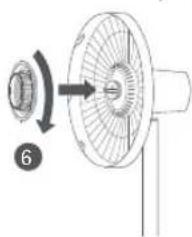
Align the center hole of the 12 fan blade assembly with the motor's shaft to install it into position, then install the 5 fan blade assembly knob onto the motor's shaft. Turn the knob counterclockwise to fix the fan blade assembly to the motor's shaft.
natural_image
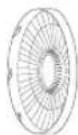
Diagram showing a mechanical component with a rotating shaft and a cross-sectional view (no text or symbols)Align the front grille alignment mark with the rear grille left alignment mark, and make sure the 11 front grille is properly embedded into the 13 rear grille. Turn the front grille clockwise until the front grille alignment mark aligns the rear grille right alignment mark. Make sure the grilles are securely fastened.
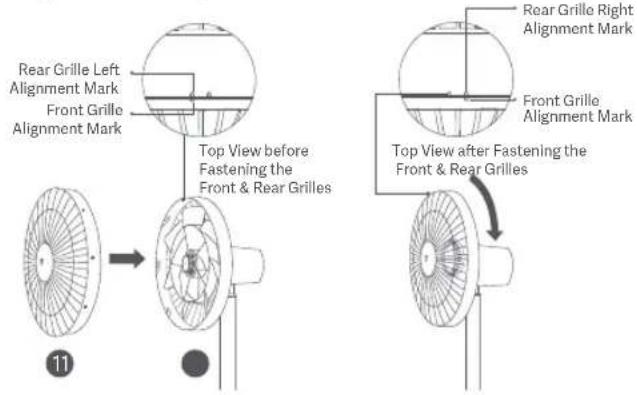
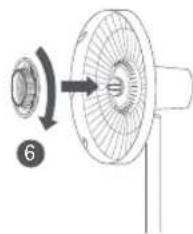
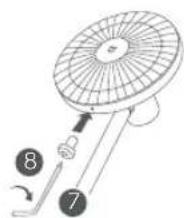
Step 5: Fasten the front grille
Insert the ⑧ fan grille screw into the hole at the bottom of the fan grille. Turn the screw clockwise with the included ⑦ hex key to tighten it.
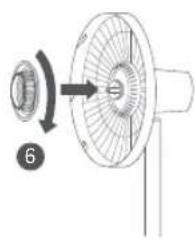
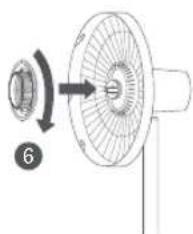
Step 6: Install the fan baseStep 4: Install the front grille
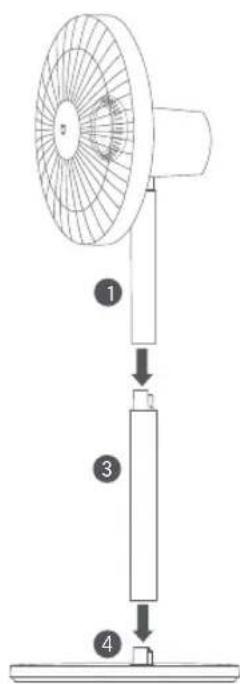
Standing fan mode: Connect 1 motor & upper stand to the 3 lower stand, and then connect lower stand to the 4 fan base, as illustrated. Once you hear a click, the parts have been installed successfully.
Table fan mode: Connect 1 motor & upper stand to the 4 fan base. Once you hear a click, the parts have been installed successfully. Note: Press the release button to remove the lower stand.
How to Use
Charging
- It is recommended to fully charge the fan before use.
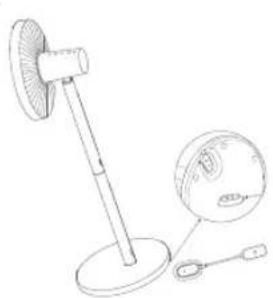
- Connect the charging base to the charging port on the bottom of the fan base, and then plug in the charging base.
- When the battery level indicator is blinking, the fan is successfully connected to the power.
- You can use this fan by either connecting to a power outlet or not. The fan is equipped with a built-in Wi-Fi module, and energy consumption occurs even when it is turned off. By fully charging the fan and then turning it off, the battery can last for approximately 2 days. To maintain optimal battery performance, it is recommended to keep charging the fan if it is not in use.
natural_image
Technical line drawing of a stand-mounted device with a magnified inset showing internal components (no text or symbols)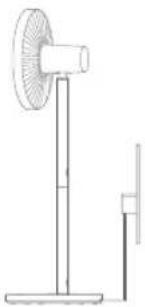
natural_image
Simple line drawing of a standing fan and vertical pole (no text or symbols)Note: Always charge and use the fan in a flat, stable place.
· Connecting to the power outlet
| Battery LevelFan Status | Battery Level Indicator Status | |
| On/Standby | ≤30% | Blinking orange |
| 30%-100% | Blinking white | |
| 100% | Off |
· Not connecting to the power outlet
| Battery LevelFan Status | Battery Level Indicator Status | |
| On | 30%-100% | White |
| 1%-30% | Orange | |
| 0% | Off (The fan will automatically turn off) | |
| Standby | 0%-100% Off |
Turning On/Standing By
Turning On
Press the button ⓞ to start the fan. When turned on for the first time, the default speed is slow (1) and the mode is direct breeze.
Standing By
Press the button Ⓞ to stop the fan while it is running.
Switching Speed/Mode
Switching Speed
Press the button to adjust the speed, and the corresponding indicators will light up (see table below). After the fan is turned off and turned back on again, the speed will be the last used one.
| Speed | Slow (1) Medium (2) | Fast (3) | Turbo (4) |
| Indicator |
Note: * means the indicator is on; • means the indicator is off.
Switching Mode
Press and hold the button 📋 to switch between direct breeze and natural breeze. The indicator is off while in direct breeze mode and is on while in natural breeze mode. After the fan is turned off and turned back on again, the mode will be the last used one.
Enable/Disable Oscillation
Press the button ⏻ to enable or disable oscillation. You can set the oscillation angle range in the app. After the fan is turned off and turned back on again, the oscillation setting will be the last used one.
Note: When the Wi-Fi connection is reset, the oscillation angle range will change to the default angle of 90^ . Unplug then plug the fan in or reset the Wi-Fi connection then turn on the fan, the fan will automatically oscillate its angle if enabling the oscillation function. The oscillation time varies depending on different angles, please wait with patience.
Scheduled Turn-off
Press the button Ⓞ to cycle through the scheduled turn-off times: 1 hour, 2 hours, 3 hours, 4 hours, and disabled, and the corresponding indicator(s) will light up (see table below). Five seconds after using the scheduled turn-off function, the indicator(s) resume to indicate the corresponding status of the current speed.
Note: means the indicator is on; means the indicator is off. For more scheduled turn-off options (up to 8 hours), please go to the Xiaomi Home app.
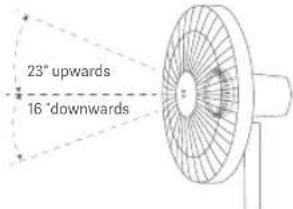
Adjust the Airflow Direction
Gently lift or push down the fan's head or fan grille to adjust the airflow upwards or downwards.
Connecting with the Xiaomi Home App
This product works with the Xiaomi Home app. Control your device with Xiaomi Home app.
Scan the QR code to download and install the app. You will be directed to the connection setup page if the app is installed already. Or search for "Xiaomi Home" In the app store to download and install it.
Open the Xiaomi Home app, tap "+" on the upper right, and then follow the instructions to add your device.
Note: The version of the app might have been updated, please follow the instructions based on the current app version.

12E361AF
Connecting to Wi-Fi
Simultaneously press and hold the buttons ⏻ and ⏻. Once you hear a long beep, the fan is awaiting a connection, then you can pair it with a device via the app.
Wi-Fi Status & Indicator Description
| Wi-Fi Status | Awaiting Connection | Connecting | Connected | Fail to Connect |
| Indicator | Blinking orange | Blinking blue | Blue | Orange |
Resetting Wi-Fi Connection
Simultaneously press and hold the buttons ⏻ and ⏻. Once you hear a long beep, the Wi-Fi connection has been reset successfully and then the fan is awaiting a connection. The Wi-Fi connection needs to be reset on the circumstances listed below:
• The Xiaomi Account that the fan is paired with has been changed.
• The router that the fan is connected to has been changed.
• The account or password of the router that the fan is connected to has been changed.
• The Xiaomi Home app is unable to control the fan.
Enabling/Disabling Wi-Fi
Simultaneously press and hold the buttons ⏻ and ⏱ for seven seconds until you hear a notification sound, and then the Wi-Fi is enabled or disabled.
Child Lock Function
To disable the function of child lock, go to the page of Xiaomi Smart Standing Fan 2 Pro in the Xiaomi Home app, or simultaneously press and hold the buttons ⏻ and ⏻ until you hear a long beep.
Note: Resetting the Wi-Fi connection or unplugging and plugging in the fan again can also disable this function.
Care & Maintenance
Washable Parts
The parts listed below can be cleaned with a soft cloth or sponge using water or neutral detergent.
11
●
13
6
Front Grille Fan Blade Assembly Rear Grille
Rear Grille Knob
Note: Stop and unplug the fan, then disassemble it and clean its parts. After cleaning, make sure all parts are completely dry before installing them and using the fan again. Avoid direct sunlight.
Not Washable Parts
The parts listed below can be wiped clean with a soft, dry cloth.

5
4

9
3
1
Fan Blade Assembly Knob
Fan Base
Charging Base
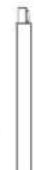
Lower Stand
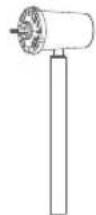
Motor & Upper Stand
Notes:
• Do not rinse the parts listed above with water.
- Do not use thinner, gasoline, detergent or alkaline detergent to clean any parts.
Specifications
| Name | xiaomi Smart Standing Fan 2 Pro | Rated Voltage | 12 V = | |
| Model | BPLDS03DM | Rated Power | 24 W | |
| Type Standing Fan | Noise Emission | ≤58 dB(A) | ||
| Net Weight | Approx. 3.2 kg | Battery Type Rechargeable | Li-ion Battery | |
| Item Dimensions | Battery Capacity | 2800 mAh(33.6 Wh)343 × 330 × 1000 mm | ||
| Charging Input 12 V 2 | A Limited Charging Voltage 0.8 V | = | ||
| Wireless Connectivity | Wi-Fi IEEE 802.11 b/g/n 2.4 GHz | |||
| *Radio Frequency and Radio Transmission Power | ||||
| RF Specification | Operation Frequency | Maximum Output Power | ||
| 2.4 G Wi-Fi | 2412-2472 MHz | <20 dBm | ||
| Product Information Requirements | Test Data | |||
| Maximum Fan Flow Rate (F) | 20.28 m^3/min | |||
| Fan Power Input (P) | 12.7 W | |||
| Service Value (SV) | 1.60 ( m^3/min )/W | |||
| Maximum Air Velocity (c) | 3.47 meters/sec | |||
| Measurement Standard for Service Value | EN IEC 60879:2019 | |||
| Standby Power Consumption (PSB) | Without Wi-Fi connection: 0.216 WWith Wi-Fi connection: 0.391 W | |||
| Fan Sound Power Level (LWA) | 56.3 dB(A) | |||
| Contact Details | Dream Maker (Zhejiang) Technology Co., Ltd.South Side, 24th Floor, Jinpin Building, Headquarters Center, Yongkang City, Zhejiang Province, China | |||
Power Adapter
| Information Published | Value and Precision | Unit |
| Manufacturer | Zhongshan Baolijin Electronic Co., Ltd. | - |
| Model Identifier | BLJ24W120200P-V | - |
| Input Voltage | 100-240 | V~ |
| Input AC Frequency | 50/60 Hz | |
| Output Voltage | 12.0 V | --- |
| Output Current | 2.0 | A |
| Output Power | 24.0 | W |
| Average Active Efficiency 89.09 | % | |
| Efficiency at Low Load(10%) | 83.11 | % |
| No-load Power Consumption | 0.070 | W |
Troubleshooting
| Fault | Possible Cause Solution | |
| The fan doesn't work. | The stand does not properly connect to the fan base. | Install the fan base with the stand correctly. |
| Child lock is enabled. | Disable the child lock function. | |
| The battery is depleted. | Charge the fan with the charging base. | |
| The fan is unable to connect to Wi-Fi. | The Wi-Fi connection is 5 GHz. Connect to a 2.4 GHz Wi-Fi network. | |
| The fan has been offline for more than half an hour. | Reset the Wi-Fi connection. | |
| Fan blades are stuck. | Fan blades are stuck by a foreign object. | Unplug the fan and remove the foreign object. |
| The battery level indicator does not light up. | The battery enters into sleep protection. | Connect the fan to the charging base to activate the battery. |
| The oscillation function does not work. | The fan is under the auto-oscillation state. | Wait for the auto-oscillation completes. It will last for 14 seconds at most. |
Environmental Notice
The built-in rechargeable li-ion battery of this fan contains chemicals that may pollute the environment. Before disposing of this fan, remove the battery and then discard it at a professional recycling facility.
Steps of Removing the Battery
Warning: The fan will no longer be usable once the battery is removed. The following steps should only be completed upon the permanent disposal of the fan. Do not dismantle the fan on your own for routine maintenance.
- Turn off the fan and remove the fan base.
- Take the pads out from the fan base and unscrew the bottom cover of the fan base to remove it.
- Press the cable connector clip that connects to the battery, and pull out the cable. Then unscrew the battery to remove it.
Note: If you accidentally touch the substances leaked from the battery, wash the affected area with a large amount of water and seek medical attention immediately.
Regulatory Compliance Information
Europe —EU Declaration of Conformity

Hereby, Dream Maker (Zhejiang) Technology Co., Ltd. declares that the radio equipment type BPLDS03DM is in compliance with Directive 2014/53/EU. The full text of the EU declaration of conformity is available at the following internet address: http://www.mi.com/global/service/support/declaration.html
Disposal and Recycling Information

All products bearing this symbol are waste electrical and electronic equipment (WEEE as in directive 2012/19/EU) which should not be mixed with unsorted household waste. Instead, you should protect human health and the environment by handing over your waste equipment to a designated collection point for the recycling of waste electrical and electronic equipment, appointed by the government or local authorities. Correct disposal and recycling will help prevent potential negative consequences to the environment and human health. Please contact the installer or local authorities for more information about the location as well as terms and conditions of such collection points.
For detailed e-manual, please go to www.mi.com/global/support/user-guide
Manufactured for: Xiaomi Communications Co., Ltd.
Manufactured by: Dream Maker (Zhejiang) Technology Co., Ltd.
(a Mi Ecosystem company)
Address: South Side, 24th Floor, Jinpin Building, Headquarters
Center, Yongkang City, Zhejiang Province, China
For further information, please go to www.mi.com
User Manual Version: V1.3
Sicherheitshinweise
natural_image
Diagram of a fan with a rotating knob and a labeled component (no text or symbols present)natural_image
Technical diagram showing a mechanical component with an arrow indicating rotation and a numbered label (5) pointing to it, alongside a schematic view of the internal structure.natural_image
Line drawings of three different outdoor fan models with no text or symbolsAdresse: South Side, 24th Floor, Jinpin Building, Headquarters
Center, Yongkang City, Zhejiang Province, China

natural_image
Diagram of a fan with a rotating knob and fan blade, no text or symbols presentnatural_image
Line drawings of a standing fan with adjustable arm and base, plus a close-up view of the dial (no text or symbols)Indirizzo: South Side, 24th Floor, Jinpin Building, Headquarters Center, Yongkang City, Zhejiang Province, China
natural_image
Diagram of a fan with a rotating knob and labeled component (no text or symbols)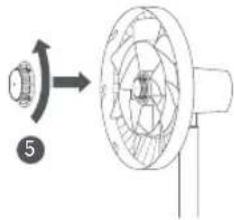
natural_image
Line drawings of a desktop fan with stand, lamp, and screen (no text or symbols)Adresse : South Side, 24th Floor, Jinpin Building, Headquarters Center, Yongkang City, Zhejiang Province, China
natural_image
Technical diagram showing a mechanical component with a rotating shaft and a circular housing (no text or symbols)natural_image
Technical line drawings of a desktop fan with stand, showing front and side views (no text or symbols)Center, Yongkang City, Zhejiang Province, China
flowchart
graph TD
    A[" fan with 2 unit"] --> B[" fan with 11 unit"]
    A --> C[" fan with 2 units and rotation arrow"]
natural_image
Line drawings of a desktop fan with stand, magnified view of a circular dial indicator (no text or symbols)Адрес: South Side, 24th Floor, Jinpin Building, Headquarters Center,
Yongkang City, Zhejiang Province, China
natural_image
Simple line drawing of a cylindrical mechanical component with a shaft (no text or symbols)natural_image
Diagram of a circular fan with radial lines and labeled points (no text or symbols beyond labels)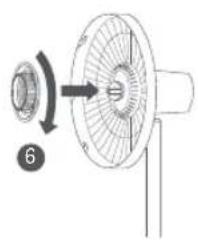
natural_image
Diagram of a fan with a rotating knob and a labeled component (no text or symbols present)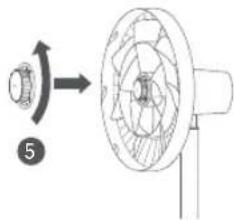
natural_image
Diagram showing a mechanical component with a rotating shaft and a circular housing, no text or symbols presentnatural_image
Technical line drawings of a floor-mounted fan with adjustable arm and circular dial (no text or symbols)Adres: South Side, 24th Floor, Jinpin Building, Headquarters Center,
Yongkang City, Zhejiang Province, China
natural_image
Diagram of a fan with a rotating knob and a labeled component (no text or symbols present)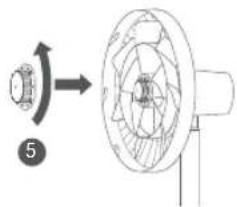
natural_image
Line drawings of three different outdoor fans and a circular device with a handle, shown from different angles (no text or symbols)Adres: South Side, 24th Floor, Jinpin Building, Headquarters Center, Yongkang City, Zhejiang Province, China
natural_image
Diagram of a fan blade assembly with a rotating blade and base, showing internal structure (no text or symbols)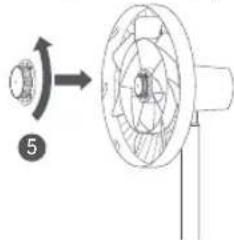
natural_image
Technical line drawing of a mechanical device with a circular component and a magnified inset showing internal components (no text or symbols)
natural_image
Line drawing of a standing fan with a side-mounted stand (no text or symbols)South Side, 24th Floor, Jinpin Building, Headquarters : العئوان Center, Yongkang City, Zhejiang Province, China
natural_image
Simple line drawing of a cylindrical mechanical component mounted on a vertical base (no text or symbols)natural_image
Diagram of a circular structure with radial lines and central star-like pattern, no text or symbols present
natural_image
Diagram of a fan with a rotating knob and a base, showing no text or symbols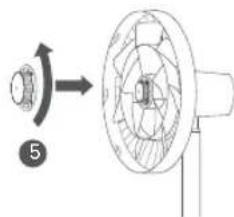
natural_image
Technical diagram of a mechanical component with a rotating shaft and housing (no text or symbols)natural_image
Technical line drawings of a desktop fan with stand, dial indicator, and base mount (no text or symbols)Ескерту: желдеткішті аркашан тегіс, туракты жерде зарядтаңыз жане пайдаланыңыз.
• Куат кезіне косу
natural_image
Two vertical cylindrical objects labeled 1 and 3, one with a mechanical component shown above (no text or symbols on the objects themselves)Center, Yongkang City, Zhejiang Province, China
THIS WARRANTY GIVES YOU SPECIFIC RIGHTS, AND YOU MAY HAVE OTHER RIGHTS CONVEYED BY LAWS OF YOUR COUNTRY, PROVINCE OR STATE. INDEED, IN SOME COUNTRIES, PROVINCES OR STATES, CONSUMER LAW MAY IMPOSE A MINIMUM WARRANTY PERIOD. OTHER THAN AS PERMITTED BY LAW, XIAOMI DOES NOT EXCLUDE, LIMIT OR SUSPEND OTHER RIGHTS YOU MAY HAVE. FOR A FULL UNDERSTANDING OF YOUR RIGHTS WE INVITE YOU TO CONSULT THE LAWS OF YOUR COUNTRY, PROVINCE OR STATE.
1. LIMITED PRODUCT WARRANTY
XIAOMI warrants that the Products are free from defects in materials and workmanship under normal use and use in accordance with the respective Product user manual, during the Warranty Period.
The duration and conditions related to the legal warranties are provided by respective local laws. For more information about the consumer warranty benefits, please refer to Xiaomi's official website https://www.mi.com/global/support/warranty.
Xiaomi warrants to the original purchaser that its Xiaomi Product will be free from defects in materials and workmanship under normal use in the period mentioned above.
Xiaomi does not guarantee that the operation of the Product will be uninterrupted or error free.
Xiaomi is not liable for damages arising from non-compliance with the instructions related to the use of the Product.
2. REMEDIES
If a hardware defect is found and a valid claim is received by Xiaomi within the Warranty Period, Xiaomi will either (1) repair the product at no charge, (2) replace the product, or (3) refund the Product, excluding potential shipping costs.
3. HOW TO OBTAIN WARRANTY SERVICE
To obtain warranty service, you must deliver the Product, in its original packaging or similar packaging providing an equal degree of Product protection, to the address specified by Xiaomi. Except to the extent prohibited by applicable law, Xiaomi may require you to present proofs or proof of purchase and / or comply with registration requirements before receiving warranty service.
4. EXCLUSIONS AND LIMITATIONS
Unless otherwise stipulated by Xiaomi, this Limited Warranty applies only to the Product manufactured by or for Xiaomi and identifiable by the trademarks, trade name or "Xiaomi" or "Mi" logo.
The Limited Warranty does not apply to any (a) Damage due to acts of nature or God, for example, lightning strikes, tornadoes, flood, fire, earthquake or other external causes; (b) Negligence; (c) Commercial use; (d) Alterations or modifications to any part of the Product; (e) Damage caused by use with non-Xiaomi products; (f) Damage caused by accident, abuse or misuse; (g) Damage caused by operating the Product outside the permitted or intended uses described by Xiaomi or with improper voltage or power supply; or (h) Damage caused by service (including upgrades and expansions) performed by anyone who is not a representative of Xiaomi.
It is your responsibility to backup any data, software, or other materials you may have stored or preserved on the product. It is likely that the data, software or other materials in the equipment will be lost or reformatted during the service process, Xiaomi is not responsible for such damage or loss.
No Xiaomi reseller, agent, or employee is authorized to make any modification, extension, or addition to this Limited Warranty. If any term is held to be illegal or unenforceable, the legality or enforceability of the remaining terms shall not be affected or impaired.
Except as prohibited by laws or otherwise promised by Xiaomi, the after-sales services shall be limited to the country or region of the original purchase. Products which were not duly imported and/or were not duly manufactured by Xiaomi and/or were not duly acquired from Xiaomi or a Xiaomi's official seller are not covered by the present warranties. As per applicable law you may benefit from warranties from the non-official retailer who sold the product. Therefore, Xiaomi invites you to contact the retailer from whom you purchased the product.
The present warranties do not apply in Hong Kong and Taiwan.
5. IMPLIED WARRANTIES
Except to the extent prohibited by applicable law, all implied warranties (including warranties of merchantability and fitness for a particular purpose) will have a limited duration up to a maximum duration of this limited warranty. Some jurisdictions do not allow limitations on the duration of an implied warranty, so the above limitation will not be applied in these cases.
6. DAMAGE LIMITATION
Except to the extent prohibited by applicable law, Xiaomi shall not be liable for any damages caused by accidents, indirect, special or consequential damages, including but not limited to loss of profits, revenue or data, damages resulting from any breach of express or implied warranty or condition, or under any other legal theory, even if Xiaomi has been informed of the possibility of such damages. Some jurisdictions do not allow the exclusion or limitation of special, indirect, or consequential damages, so the above limitation or exclusion may not apply to you.
7. XIAOMI CONTACTS
For customers, please visit the website: https://www.mi.com/global/support/warranty
The contact person for the after-sale service may be any person in Xiaomi's authorized service network, Xiaomi's authorized distributors or the final vendor who sold the products to you. If in doubt please contact the relevant person as Xiaomi may identify.
GARANTIEERKLÄRUNG
Pour les clients, consultez le site Web : https://www.mi.com/global/support/warranty
Xiaomi Technology Netherlands B.V.
Prinses Beatrixlaan 582, 2595BM, The Hague, The Netherlands
contact@support.mi.com
UK REP.
Xiaomi Technology UK Limited
Davidson House, Forbury Square, Reading, Berkshire RG1 3EU
contact@support.mi.com