Mi Smart Standing Fan 1C - Fan Xiaomi - Free user manual and instructions
Find the device manual for free Mi Smart Standing Fan 1C Xiaomi in PDF.
User questions about Mi Smart Standing Fan 1C Xiaomi
0 question about this device. Answer the ones you know or ask your own.
Ask a new question about this device
Download the instructions for your Fan in PDF format for free! Find your manual Mi Smart Standing Fan 1C - Xiaomi and take your electronic device back in hand. On this page are published all the documents necessary for the use of your device. Mi Smart Standing Fan 1C by Xiaomi.
USER MANUAL Mi Smart Standing Fan 1C Xiaomi
Read this manual carefully before use, and retain it for future reference.
PrecautionsWarnings
Installation
Make sure the fan is properly installed according to the instructions, so as to avoid electric shocks, fire, personal injury, or other damage.
Do not connect the fan to a power outlet as long as it is not assembled.
Handling the Fan
Turn off and unplug the fan before moving it.
Firmly hold the fan stand to avoid it from falling down and causing personal injury.
Using the Fan
Immediately stop using the fan if it makes unusual sounds, gives off bad odors, overheats, or rotates irregularly.
Do not lean on or tilt the fan while it is running.
Do not push the fan's head repeatedly so as to avoid damage to the internal mechanism.
Power Cord
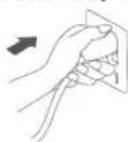
Unplug the power cord before repairing or moving the fan.
Always unplug the fan by pulling the power plug rather than the cord.
When the power cord is damaged, it must be replaced with a genuine power cord purchased from the manufacturer or after-sales service department.
Improper use may lead to electric shocks, fire, personal injury, or other damage.
This appliance can be used by children aged from 8 years and above and persons with reduced physical, sensory or mental capabilities or lack of experience and knowledge if they have been given supervision or instruction concerning use of the appliance in a safe way and understand the hazards involved. Children shall not play with the appliance. Cleaning and user maintenance shall not be made by children without supervision. (For European countries or regions)
This appliance is not intended for use by persons (including children) with reduced physical, sensory or mental capabilities, or lack of experience and knowledge, unless they have been given supervision or instruction concerning use of the appliance by a person responsible for their safety.
Children should be supervised to ensure that they do not play with the appliance. (For no European countries or regions)
Once assembly completed, it's strictly forbidden to remove the guards for any purpose.
Children should be supervised to ensure that they do not play with the appliance.
If the supply cord is damaged, it must be replaced by the manufacturer, its service agent or similarly qualified persons in order to avoid a hazard.
Safety Instructions
Read this manual carefully before use, and retain it for future reference.
Warnings
Improper use may lead to electric shocks, fire, personal injury, or other damage.
Do not use this fan in place where it is easy to fall over or where there are other unstable objects nearby.
Do not use this fan in hot and humid environments such as a bathroom.
Do not use this fan if its power cord is damaged or its power plug is loose.
Do not use this fan if its front grille is not installed, or its rear grille is loose or fell off.
Do not allow adults who are incapable of operating this fan or children to use it.
Do not disassemble or repair this fan.
Do not pinch, bend, or twist the power cord too much, so as to prevent from exposing or breaking its core.
Do not insert your fingers or any object into the front grille, rear grille, or the fan blades when the fan is in use.
Keep hair and fabrics away from the fan to avoid getting them caught in the fan.
Do not use any improper power outlet.
Do not use the supplied power cord with any other device.
Under normal use of condition, this equipment should be kept a separation distance of at least 20cm between the antenna and the body of the user.
Package Contents

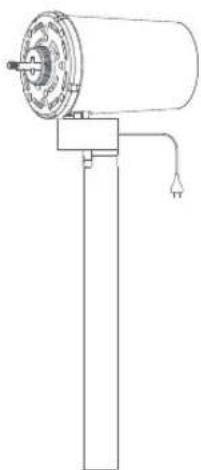
1
Motor & Upper Stand & Power Cord
2
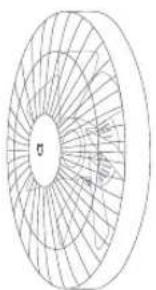
Fan Assembly (front grille, fan blade assembly, rear grille)

Lower Stand
4
Base
5
Fan Blade Assembly Knob Rear Grille Knob
7
Allen Key Base Bolt×1
8

9
FanGrilleScrew × 1 User Manual
Note: Illustrations of the product, accessories, and user interface in the user manual are for reference purposes only. The actual product and functions may vary due to product enhancements.
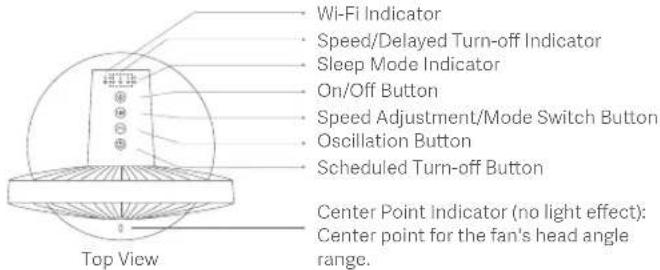
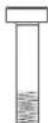
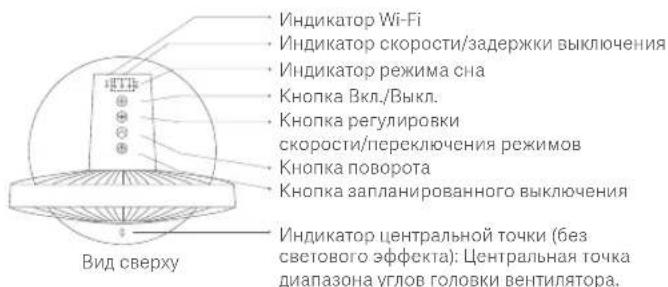
Overview

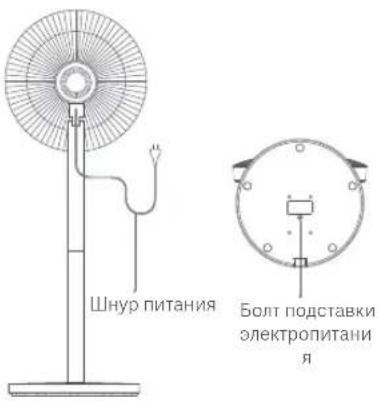
Installation Instructions
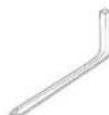
Step 1: Base installation
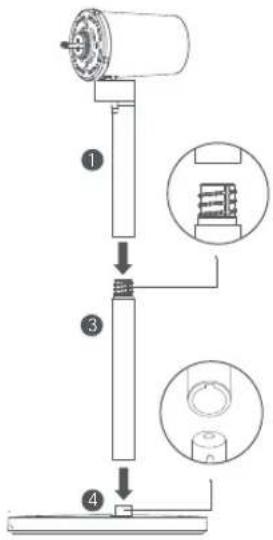
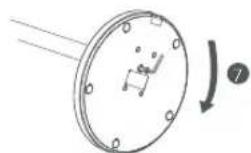
1(1). Standing fan mode: Connect 3 lower stand to 1 upper stand, then install 3 it onto 4 base as shown in the figure.
1(2).Table fan mode: Install 1 upper stand directly onto 4 base.
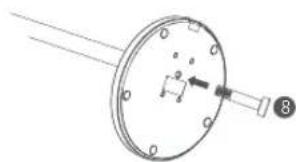
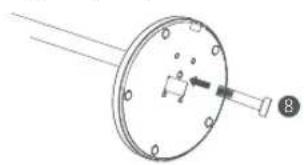
2. Insert 8 base bolt into the hole on the bottom of the base.
3.Use the included 7 Allen key to turn 8 base bolt clockwise to fix the stand to the base.
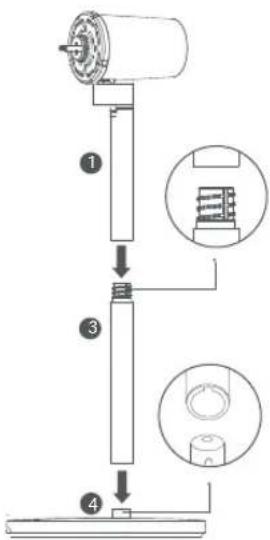
Installation Instructions
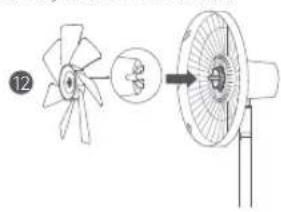
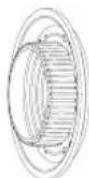
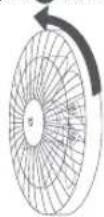
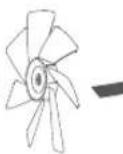
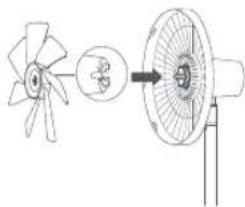
Disassemble 2 fan assembly as shown in the figures below: (1)Turn the front grille counterclockwise until the grilles are properly loosened. (2)Then remove 1 front grille from 1 rear grille and take out 2 fan blade assembly.

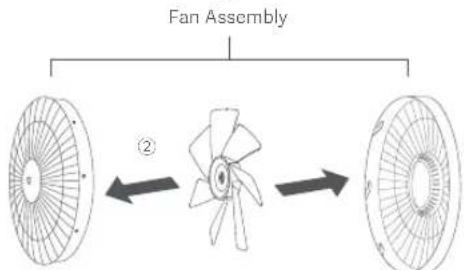
2
11
FrontGrille
12
Fan Blade Assembly
RearGrille
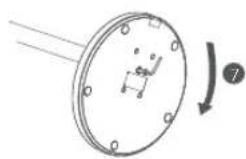
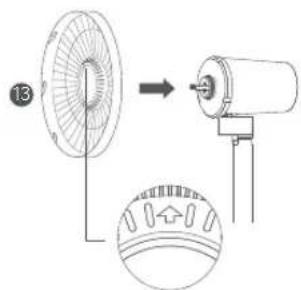
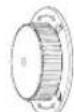
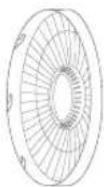
Step 3: Install the rear grille
Make sure " points up when installing 13 rear grille onto the motor, and turn 6 rear grille knob clockwise to tighten the rear grille to the motor.
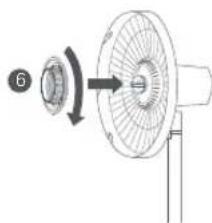
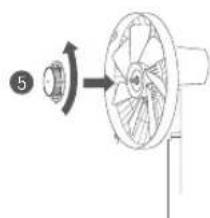
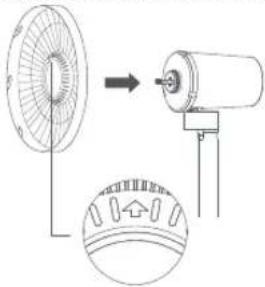
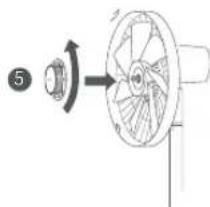
Step 4: Install the fan blade assembly
Align the center hole of 12 fan blade assembly with the motor's shaft and install it onto the shaft, then install 5 fan blade assembly knob onto the motor's shaft. Turn the knob counterclockwise in order to fix the fan blade assembly to the motor's shaft.
Installation Instructions
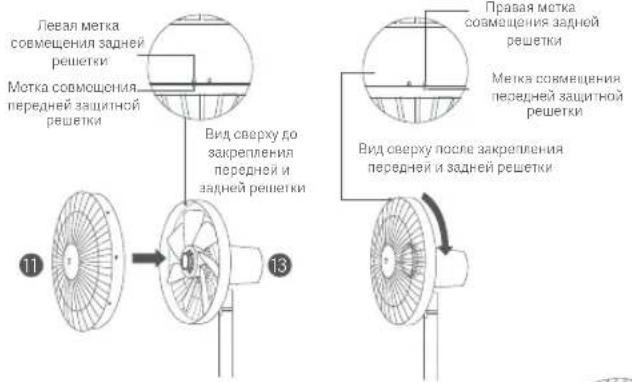
Step 5: Install the front grille
- Align 11 Front Grille Alignment Mark with 13 Rear Grille Left Alignment Mark, and make sure the front grille is properly embedded into the rear grille.
- Turn the front grille clockwise until the Front Grillie Alignment Mark aligns the Rear Grillie Right Alignment Mark. Make sure the grilles are securely fastened.
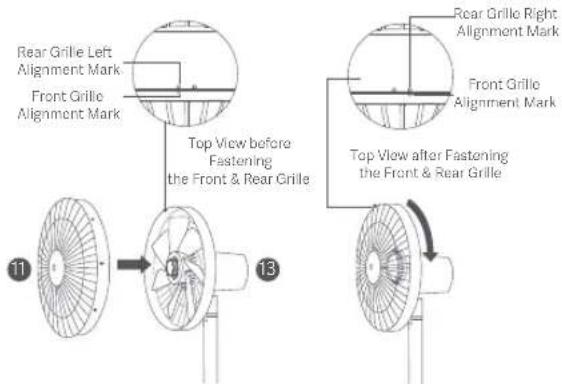
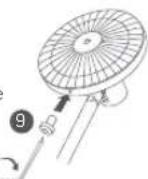
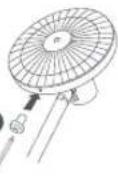
Step 6: Fasten the front grille
Insert fan grille screw into the hole at the bottom of the fan grille. Turn the screw clockwise by using the included Allen key to tighten it.
How to Use
Connect to a power outlet
Plug the power cord into a power outlet. Once you hear a beep, the fan is connected successfully.

Turn on/off
Turn on
Press the button to start the fan. When turned on for the first time, the default speed is slow (1).
Turn off
When the fan is working, press and hold the button to stop it.
Switching Speed/Mode
Switching speed
Press the button to adjust the speed. With each press, the corresponding status indicator will be on (see the table below). The fan will remember and apply the last used speed mode when turned on again.
| Fan Speed | Slow (1) | Medium (2) | Fast (3) |
| Indicator Status | *** | *** | *** |
Note: means the indicator is on; means the indicator is off.
How to Use
Switching mode
Press and hold the button to switch between direct breeze and sleep mode. The sleep mode indicator is on while in sleep mode, and off while in direct breeze mode.
Note: The fan is set to direct breeze by default. The fan will remember and apply the last used mode when turned on again.
Enable/Disable Oscillation
Press the button to enable or disable 90^ oscillation. The fan will remember and apply the last used oscillation setting when turned on again.
Delayed Turn-off
Press the button to cycle through the delayed turn-off times: 1 hour, 2 hours, 3 hours, and disabled, and the corresponding status indicator(s) will be on (see the table below). Five seconds after using the delayed turn-off function, the status indicator(s) will display the corresponding status of the currently selected speed.
| Scheduled Status | Disabled | 1 hour 2 hours 3 hours | |
| Indicator Status | *** | *** | *** |
Note: means the indicator is on; means the indicator is off. For more delayed turn-off options (up to 8 hours), please go to the MI Home/Xiaomi Home app.
Adjust the Airflow Direction
Gently lift or push down the fan's head or fan grille to adjust the airflow upwards or downwards.

Connect with Mi Home/Xiaomi Home App
Scan the QR code to download and install the app. You will be directed to the connection setup page if the app is installed already. Or search "Mi Home/Xiaomi Home" in the app store to download and install it. Open Mi Home/Xiaomi Home app, tap "+" on the upper right, and then follow prompts to add your device.
- The app is referred to as Xiaomi Home app in Europe (except for Russia). The name of the app displayed on your device should be taken as the default.
Note: The version of the app might have been updated, please follow the instructions based on the current app version.


Connecting to Wi-Fi
Simultaneously press and hold the buttons and. Once you hear a beep, the fan is awaiting a connection, then you can pair it with a device via the app.
How to Use
Wi-Fi Indicator Status:
| Wi-Fi Status | Awaiting connection | Connecting | Connected | couldn't connect |
| Indicator Status | Blinking orange | Blinking blue Blue | Orange |
Resetting the Wi-Fi
The Wi-Fi connection needs to be reset on the circumstances listed in the table below.
| The Mi account that the fan is paired with has been changed. |
| The router that the fan is connected to has been changed. |
| The account or password of the router that the fan is connected to has been changed. |
| The Mi Home/Xiaomi Home app cannot control the fan. |
Simultaneously press and hold the buttons and 出 .Once you hear a long beep, the Wi-Fi connection has been reset successfully and then the Wi-Fi is awaiting a connection.
Child Safety Lock
Enabling
You can enable the function of child lock in the Mi Home/Xiaomi Home app. Once it is enabled, the fan will not respond to button operations but instead of all indicators blinking twice with two beeping sounds.
Disabling
You can disable the function of child lock in the Mi Home/Xiaomi Home app. Resetting the Wi-Fi connection or unplugging and plugging in the fan again can also disable this function.
Trobleshooting
| Fault | Possible Cause Solution | |
| The fan doesn't work | No electricity from the power outlet or the fan does not connect to the power. | Connect to a power outlet that meets the fan's requirements. |
| The fan blade assembly or the grilles are not installed properly. | Follow the steps in the user manual to check and make sure they are securely installed. | |
| Child lock is enabled. | Disable the child lock in the Mi Home/Xiaomi Home app, or disconnect the fan from power then connect again. | |
| Wi-Fi is unable to connect | The Wi-Fi connection is 5 GHz. | Connect to a 2.4 GHz Wi-Fi connection. |
| The fan is offline for more than half an hour. | Reset the Wi-Fi connection. | |
| Fan blades are stuck | Fan blades are stuck by a foreign object. | Unplug the fan and remove the foreign object. |
Specifications
| Name | Mi Smart Standing Fan 1C | Rated Voltage Power Co200±200V | 1.6 m | ||
| Model | JLLDS01XY | 50/60 Hz | Wireless ConnectivityRat-Off-Fire:80.11b/g/n 2.4G Hz | ||
| Type | AC Standing Fan | Rated Power Item Dimension | 343 × 330 × 1000 mm | ||
| Gross Weight | 4.5 kg | Net Weight | 3.5 kg | Noise Emission | ≤63 dB(A) |
| *Radio frequency and radio transmission power | |||||
| RF Specification Working Frequency Maximum Output Power | |||||
| 2.4G Wi-Fi | 2412-2472 MHz 19.67 dBm | ||||

Hereby, Zhejiang Xingyue Electric Equipment Co., Ltd. declares that the radio equipment type JLLDS01XY is in compliance with Directive 2014/93/EU. The full text of the EU declaration of conformity is available at the following internet address: http://www.mi.com/global/service/support/declaration.html

All products bearing this symbol are waste electrical and electronic equipment (WEEE as in directive 2012/19/EU) which should not be mixed with unsorted household waste. Instead, you should protect human health and the environment by handing over your waste equipment to a designated collection point for the recycling of waste electrical and electronic equipment, appointed by the government or local authorities. Correct disposal and recycling will help prevent potential negative consequences to the environment and human health. Please contact the installer or local authorities for more information about the location as well as terms and conditions of such collection points.
Manufactured for: Xiaomi Communications Co., Ltd.
Manufactured by: Zhejiang Xingyue Electric Equipment Co., Ltd. (a MI Ecosystem company)
Address: South Side, 24th Floor, Jinpin Building, Headquarters Center, Yangkang City, Zhejiang Province, China
For further information, please go to www.mi.com
V1.0
Direcction: South Side, 24th Floor, Jinpin Building, Headquarters
Center, Yongkang City, Zhejiang Province, China
Para Obtener mas informacion, visite www.mi.com
V1.0
HCTpykunnoTeXnke6e3onacHOCTN
Ipeep nCnOJIb3OBaHHeM BHNMaTeNbHO pOHTne 3TO pyKOBOcTBo. CoXpaHInTe erO - OHO MOKeT NOHaDoBtCBaM B DaJIbHeHWeM.
MepblnpedocTopoxKHOCTn PpeDynpexKdHna
YCTAHOBKa
YBeHnTecb HnAeKaeJeYCTAHOBKe BEHTNHITOPA B COOTBETCBM C INHCTpyKUne, YTObIyN36EkaTaYbApO8 3eKTPuueckm TOKOM, NOkapa, TEOCHbX IOBpeKdEHN IIN BO3HKNHOBHeHHN IHOY OUcP6a.
He noKIOUaIe BHTINATOP K 3JIeKTPuuecko pOaTeK, ecn OH He co6paH.
06paueHne C BcHTnIaTOpom
IpeepnepemeeHmBcHTnTTopaBbIKNQHTeEroNBbHbTeBUNkyu3 0JIeKTPnueckoP03eTKI.
Kpenko depknte cToKy BEHTnIaTOpa, Yo6b OHa He yna Hne npuHnla TeleChIe NOpeXdHn.
VcnoJIb3OBAHnE BeHTnIaTopa
HemdeHHe HpeCTaHbTe cNcNtBcOaTb BEHTnTApTOp,ecn OH n3daeT HeobHbHe 3ByKn, HepnAeTHb 3anax mIn BpaaaetcHepaBHomepHO.
He onnpaTecb Ha BENTNJITOP n He HAKIOHReTe erO, KOrda OH pa6oTaT.
HeToKaaTe RoNoBky BeHTnIaTopa HeckoNbKO pa3 NoIpa, YTO6bl 136exAtb NOBpeHn BHYtpHeHr MExAHm3Ma.
LHyp nItaHnI
BbHbte Hpy np nHTAHn H3 pOeTKn Do BbIOJIHeHHpeMOHTa nn nepeMeueHHBcHTNlTOpA.
PnOtKIOHcENBENTNITOPaOT3eKTPuecko po3ETKn Bcerda depXITecb 3a WTeNCen,b,a He 3a WHyp.
EcmHypnHTAHINOBpexdHnnpa3OpBaH,ero Heo6xOaIM0 3aMeHNTbOPrHnHaBnBM HpyPOMnTAAHn,prHO6pTeHHbM y n3rTOBNTeNnBnBOTeNEocnpdoaxHoroOcbnykBaHn,TO6bI 366kaTbOnaCHOCTnTpabmpoBaHN.
HeaJnEkauee HcNtB3ObaHMe MoKET PnBeCTN KnpaKeHHIO 3eKTPnCeKM TOKOM, NOKApY, TENEChbIM NOBpeXDeHm IM NBO3HNIKHOBEHHIO IHOrO yUep6a.
He nCnoBsyte BeHTnIaTOp B MeCTax, rDe OH MoKet ONpOKHyTbCa, HIN N6JIbN3OCTN OT dpyrNX HcyTOHNVbIX PcEIMETOB.
He nCnoB3yTe BHTnTApTOB B KApKo Nn BnAkhOcpe, HApPmep, B BaHHo.
He nOJbayte BeHTnIaTOp,ecHn Hpy nITAHn NOBpeXeHnn 3NeKtpueckar BINKa BCTaBnHa HeNtHO.
He nCnoBanyte BENTnTOp,ecnH Ye yctaHOBLeHa nepeDnHa 3auTHa peWetKa nn 3aDnPa peWetKa He 3akpenHe Ha 0tnJa.
He no3BOJIaIte HcNOJIb3O8aTb BEHTNIATOP B3POCJIbIM JIOJAM, HcNOCo6HbIM 3KcNpyAtnpOBaTb BEHTNIATOP, INJETM.
He pa36npaate n He pemOHHTnpyTe 3OT BENTNNTOP.
He 3aueemnIte, n3rnbaiTe nnCKpyuBaIe WHP NTaHnYpe3mepHO, YTO6bI N36exKaTb OOrJIeHNn IINIOJOMKn XJIbI.
He BCTabIaIte naIbci IIN KAKNe-1N6 nppeMeTb B nepeHIOIO 3aunTHyPeWETKy,3aHIOIO PeWETky INN nonACTn BEHTINrTOpa, KOrda OH NcOJIbEyETc.
He donyckaIte nonaHaHb BBeHTnTOp BOnoc HnTKaHH, YTo6bl OHn He 3anytaNcB BCHNTnTOpC.
He nIcNoJIb3yIte HeNOJIOxOJaIe 3JIeKTPnueCKe P03ETKm.
PnO6bHbXyCNOBHXNCN0b3OBaHHMeXy aHTeHHo3TOrO 6OpYDoBaHH N ToIOM NOJb3OBaTeJI DOxKHO COxPAHbCTpACCTOHHe Me Hee20 cm.
1
BnntaB, Bepx CToKn m Hyp nTahm
2
BENTNATOPBCOPE(NEPENHNAIHTAHPaepetkaJONACTINBEENTNATOPBCOPE,3ADHpeWETKa)

3
Hn3 cToiKn
7
TopceBOn KIOH

4
Iopctabka 3NeKTPoNTaHn
8
Boiit noctabkn 3nektponntahnK
5
Pyka y3na Iopacte BENTINrTopa
6
PукаЗадн
peштк

9
BnHT peWetKu
BeHTNlaTopa*1
10
Yyobokobctbo Nnonb08aene
PnmeHne. NIOCTpaunu Hdnn, akceccyapOB nONb3oBATEbckO INHTeppeca B Hactonue pykoBDCTBE nonb3oBATEI npedctabHeN bckIOHTeJIbHO B O3HaKOMITeNBHX CEJX. PaKInueckme XapaTepncTNKn pnp6op a er o yHKUIN MOrTy OTNIuATCB CCBN C yUYuHENAMM IPOdykTa.
0630p

Hnctpykunno yctaHOBke
3Tan1:YcTaHOBKaNoDCTaBKN3JeKTPoNtAHH
1(1).PeknHANoBHOBeHTNHTopa: coeHNHTe Hm3 CTOnKn C 1 BepxOM cTOnK,3aTeMycbHOBeTe eO 3 Ha4 NOCTABky JNeKTpONITAHnK, KAK NOKa3aHO Ha pncyHke.
1(2).PeknHactoIbHorO 1 BEHTNATOPaYCTAHOBITE BEPX cTOnKHeNopeCTeBHeHOHa4 NoCTABkyJAEKPTONTHA
2.BCTABTE8BONTNOCTABKNOTBEPCNTBHNKHeYACNTNOCTABKNNEKTPONNTAHNA
3.Пи nOmo7 TOpEBOKI KUoya, BxOJMaeroB KOMnJIeKT NOCTABKN, NOBOPaHbAaTe8 BoNT NOCTABKN No cAOBoB CTpenKe, YTObI 3aKpeINITcTOnKy Ha NOCTABKN 3aKtPONITAHN.
HCTpyKznaNo yctaHOBKe
3tan2:OTKpoIeBENTINaTOpBC6OpKe
BbnoHnHe pa3bOpky 2 BeHTnIaTopa, KaK noka3aHo Ha pncyHKax HnKe: ①NobopauBaIe11 nepeHIOO 3aunTHyo peWetKy npOTNB acoBOI cTpeKN doocTaTOHO Ocna6BeHnPeWetK. ②3aTeM ydaJIte nepeHIOO 3aunTHyo peWetKY n 13 3aHN He peWetKn BbInBeYaeI2 nonacteBbHTnIaTopa.
①
BentnTopc6opke
11
JIOIaCTNBeHTNIITOPA Bc6OpKe
12
13
3aHnpeWetka
3tan 3:YctaHOBITE 3aHIOpeWetky
Pn yctaHOBKe 3aHHepeeTKn Ha DbVaTeB CNMBOI «O»
6b3aTeBbHO DoJIxHc Hb HapPaBHe BBePx, TaKke CJeDyET NOBepHyTb 6
pyKy 3aHHe peeTkn No YacOBoN CTpeKe BCTOPOHy DVBaTeJIA.
13

3tan 4:YctaHOBka y3na Inonacte BENTINrTopa
BbPOBnHTe CEHTPAbHoe OTEBPcTne y3a12 IONacte BeHTnIATop a
OTHCNTENbHO Bana DBnTATEN U YCTAHOBITE BEHTNITOP HA BA, 3aTEM H
BAI DBnATeN yCTAOBNT5 pyky y3na IONACTe BEHTNITOPa.
IOBOPaNBtE pyky npOTN YACOBON CTpeKN, TTObI 3akpenNTb y3en
nonacte BEHTNITOPa HA Bany.
12
HCTpyKznaNo yctaHOBKe
3tan5:YcTaHOBuTe nepeDnIO peWetKy
1.BbipOBHnTe MeKy COBMeIeHHNnepeHHe 3aunTHoH peWetKn C neBOI METKO COBMeIeHH 3aHHe peWetKN. Y6eNTcB B TOM, YTO 11 nepeHnpeWetKa HADNeKaIIM 06pa3OM BCTabIeHa B 3aHIO PeWetKy.
2.ПовораьainepepenHIO3aunTHyOpeWetkynoHacOBONCTpeIKe do cOBMeueHnREtKNnepeHnepeWetKnCnpaBOmEtKoCobMeueHn 3adnepeWetKn.O63aTeNbHO npOHO 3akpeHnTepeWetKn.
3Tan 6:3akpenite nepeHIO peweTky
BCTABBE 9 BHT peWETK BEHTNITOPA B OTBepCTNE B HNXHEYACTPNPEWTKBEHTNITOPA NOBOPAUBaIe BHT no cacoB0 CTpeKne npn NOMOUI 7 TopeBOrO KIOVA, BXOJUcERo B KOMIIIEKT NOCTABKN, YTOBbE ERO 3ATHHyTb.
HctpyKu
IopknIOUHTe K 3JIeKtpuueckoP03eTKe
PnoknquHte Hpy nntaHnK cTeBOB po3eTke. 3BykoBoCnHan6ydet O3Haatb, YTO NOkKnueHHe BENTnIaTopa BInOnHeNo yCneuHO.
FHyHKnIO DetCKoB 6KOpOBKn MoxHO BKnOHTb Mi Home/Xiaomi
Home. Nocne ee BknOHeH BeHnIaTOp He dyer pearupoRabHa
Hakatna KNkOn. BMeTO aToro BCE HnIkaToPb dyyr MuraTb DaBaXbln
Hdabab DA 3BkyOBblc HnHa.
OTKNOUeyHe
FyHKnIO DeTCKO BJOKPBOKMOXHO OTKIOHb MI Home/Xiaomi Home.3y FyHKnIO TAKOE MOXER OTKIOUHTb c6poc CoeINHEHNI WI-FI INOTKIOHHe BEHTNIATopa OT JIeKTPNUeCKo PO3ETKN I NOBTOHoe erBO KIOHHe.
YcTpaHHe HeNoJaOk
Aepoc: South Side, 24th Floor, Jinpin Building, Headquarters Center, Yongkang City, Zhaijiang Province, Kirtai
YtOoIyOJyHbIeONHOHbIHyNHOHPOMAHO, NOCTeTIcAITWMI.com V1.0
Fabricant: Zhejiang Xingyue Electric Equipment Co. Ltd. (une societe MI Ecosystem)
Adress: South Side, 24th Floor, Jinping Building, Headquarters Center, Yongkang City, Zhejiang Province, China
Adresse: South Sids, 24th Floor, Jinpin Building, Headquarters Center, Yongkang City, Zhejiang Province, China
Indirizzo: South Side, 24th Floor, Jinping Building, Headquarters Center, Yongkang City, Zhejiang Province, Cina
THIS WARRANTY GIVES YOU SPECIFIC RIGHTS, AND YOU MAY HAVE OTHER RIGHTS CONVEYED BY LAWS OF YOUR COUNTRY, PROVINCE OR STATE. IN SOME COUNTRIES, PROVINCES OR STATES, CONSUMER LAW MAY IMPOSE A MINIMUM WARRANTY PERIOD. OTHER THAN AS PERMITTED BY LAW, XIAMI DOES NOT EXCLUDE, LIMIT OR Suspend OTHER RIGHTS YOU MAY HAVE. FOR A FULL UNDERSTANDING OF YOUR RIGHTS WE INVITE YOU TO CONSULT THE LAWS OF YOUR COUNTRY, PROVINCE OR STATE.
1. LIMITED PRODUCT WARRANTY
XIAOMI warrants that the Products are free from defects in materials and workmanship under normal use and use in accordance with the respective Product user manual, during the Warranty Period.
The duration and conditions related to the legal warranties are provided by respective local laws. For more information about the consumer warranty benefits, please refer to Xiaomi's official website https://www.mi.com/en/service/warranty/.
Xiaomi warrants to the original purchaser that its Xiaomi Product will be free from defects in materials and workmanship under normal use in the period mentioned above.
Xiaomi does not guarantee that the operation of the Product will be uninterrupted or error free.
Xiaomi is not liable for damages arising from non-compliance with the instructions related to the use of the Product.
2. REMEDIES
If a hardware defect is found and a valid claim is received by Xiaomi within the Warranty Period, Xiaomi will either (1) repair the product at no charge, (2) replace the product, or (3) refund the Product, excluding potential shipping costs.
3. HOW TO OBTAIN WARRANTY SERVICE
To obtain warranty service, you must deliver the Product, in its original packaging or similar packaging providing an equal degree of Product protection, to the address specified by Xiaomi. Except to the extent prohibited by applicable law, Xiaomi may require you to present proofs or proof of purchase and / or comply with registration requirements before receiving warranty service.
4. EXCLUSIONS AND LIMITATIONS
Unless otherwise stipulated by Xiaomi, this Limited Warranty applies only to the Product manufactured by or for Xiaomi and identifiable by the trademarks, trade name or "Xiaomi" or "Mi" logo.
The Limited Warranty does not apply to any (a) Damage due to acts of nature or God, for example, lightning strikes, tornadoes, flood, fire, earthquake or other external causes; (b) Negligence; (c) Commercial use; (d) Alterations or modifications to any part of the Product; (e) Damage caused by use with non-Xiaomi products; (f) Damage caused by accident, abuse or misuse; (g) Damage caused by operating the Product outside the permitted or intended uses described by Xiaomi or with improper voltage or power supply; or (h) Damage caused by service (including upgrades and expansions) performed by anyone who is not a representative of Xiaomi.
It is your responsibility to backup any data, software, or other materials you may have stored or preserved on the product. It is likely that the data, software or other materials in the equipment will be lost or reformatted during the service process, Xiaomi is not responsible for such damage or loss.
No Xiaomi reseller, agent, or employee is authorized to make any modification, extension, or addition to this Limited Warranty. If any term is held to be illegal or unenforceable, the legality or enforceability of the remaining terms shall not be affected or impaired.
Except as prohibited by laws or otherwise promised by Xiaomi, the after-sales services shall be limited to the country or region of the original purchase. Products which were not duly imported and/or were not duly manufactured by Xiaomi and/or were not duly acquired from Xiaomi or a Xiaomi's official seller are not covered by the present warranties. As per applicable law you may benefit from warranties from the non-official retailer who sold the product.
Therefore, Xiaomi invites you to contact the retailer from whom you purchased the product.
The present warranties do not apply in Hong Kong and Taiwan.
5. IMPLIED WARRANTYES
Except to the extent prohibited by applicable law, all implied warranties (including warranties of merchantability and fitness for a particular purpose) will have a limited duration up to a maximum duration of this limited warranty. Some jurisdictions do not allow limitations on the duration of an implied warranty, so the above limitation will not be applied in these cases.
6.DAMAGE LIMITATION
Except to the extent prohibited by applicable law, Xiaomi shall not be liable for any damages caused by accidents, indirect, special or consequential damages, including but not limited to loss of profits, revenue or data, damages resulting from any breach of express or implied warranty or condition, or under any other legal theory, even if Xiaomi has been informed of the possibility of such damages. Some jurisdictions do not allow the exclusion or limitation of special, indirect, or consequential damages, so the above limitation or exclusion may not apply to you.
7. XIAMI CONTACTS
For customers, please visit the website: https://www.mi.com/en/service/warranty/
The contact person for the after-sale service may be any person in Xiaomi's authorized service network, Xiaomi's authorized distributors or the final vendor who sold the products to you. If in doubt please contact the relevant person as Xiaomi may identify.
AVISO DE GARANTÍA
ESTA GARANTIA LE OTORGA DERECHOS ESPECIFICOS Y PUEDE QUE YA TENG A OTROS DERECHOS QUE VENGAN REFLEJADOS EN LAS LEYES DE SU PAIS, PROVINCE O ESTADO. DE HECHO, EN ALGUNOS PAISES, PROVINCIAS O ESTADOS, LAS LEYES DEL CONSUMIDOR PUEDEN IMPONER UN PERIODO MINIMO DE GARANTIA. EXCEPTO LO PERMITIDO POR LA LEY, XIAOMI NO EXCLUYE, LIMITA NI SUSPENDE OTROS DERECHOS QUE USTED PUEDA TENER. PARA COMPRENDER DELTodo SUS DERECHOS, LE RECOMENDAMOs QUE CONSULTE LAS LEYES DE SU PAIS, PROVINCA O ESTADO.
1. GARANTÍA LIMITADA DEL PRODUCTO
Para clients, visiten la pagina web https://www.mi.com/en/service/warranty/