BTX2 Pro S - Headphones MIDLAND - Free user manual and instructions
Find the device manual for free BTX2 Pro S MIDLAND in PDF.

User questions about BTX2 Pro S MIDLAND
0 question about this device. Answer the ones you know or ask your own.
Ask a new question about this device
Download the instructions for your Headphones in PDF format for free! Find your manual BTX2 Pro S - MIDLAND and take your electronic device back in hand. On this page are published all the documents necessary for the use of your device. BTX2 Pro S by MIDLAND.
USER MANUAL BTX2 Pro S MIDLAND
natural_image
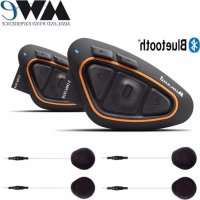
Close-up of a Midland brand electronic device with control buttons and a 'BIPK PROS' label (no readable text beyond branding)Bluetooth
MANUALE D'USO • INSTRUCTION GUIDE • BEDIENUNGSANLEITUNG • MANUAL DE INSTRUCCIONES GUIDE D'UTILISATION • UPORABNIŠKI PRIROČNIK • NÁVOD K OBSLUZE
MIDLAND®
Sommario
Caratteristiche tecniche Midland BTX2 PRO S 2
Dual Core Intercom System
natural_image
Simple line drawing of two circular objects connected by a curved line to a device (no text or symbols)Microfono
natural_image
Technical line drawing of a mechanical component with wires (no text or symbols)natural_image
Technical line drawing of a mechanical component with a cable and connector (no text or symbols)natural_image
Technical line drawing of a biodesivo tool (no text or symbols on the diagram itself)natural_image
Technical diagram of a mechanical component with arrows indicating assembly or movement (no text or symbols present)natural_image
Technical line drawings of two mechanical components (no text or symbols)Radio FM in background
Technical specifications of Midland BTX2 PRO S....18
Charging batteries....19
Switching ON and OFF your Midland BTX2 PRO S....21
How to pair two Midland BTX2 PRO S units....22
Set up of the AGC system 23
How to pair the Midland BTX2 PRO S to more than two units 23
Conference 25
Talk 2 All - Universal Intercom with different brand unit....26
Compatibility with Midland BT line units 27
Pairing the Midland BTX2 PRO S to Bluetooth devices....27
How to listen to the FM Radio....30
Setup and special configurations 31
Setup and Firmware update 32
European CE Notice Certification and Safety Approval Information 32
MIDLAND BTX2 PRO S
Dual core intercom system
Midland BTX2 PRO S is an intercom system solution with Dual Bluetooth Core (Dual Bluetooth processor) for conference communication and real background stereo audio. The design is very slim and aerodynamic, all the main functions are easy to operate thanks to the three big buttons placed on the front of the unit. Midland BTX2 PRO S is fixed on the helmet using the adhesive plate or the screw mounting clamp.
Main features
Dual Bluetooth core system.
Intercom "one to one" up to 1.2Km distance.
Conference up to 8 people (4 couples)
Connect up to 6 people for "one to one" intercom communication MWE Noise Killer
Universal Intercom feature to connect other brand intercom
FM Radio Stereo with RDS
Music Share (Driver and Passenger)
Connect your phone to receive and place phone call and listen to stereo music
Support for 2 phones
Connect your GPS for voice street indications
Setup and Firmware update via USB connection to a PC
Midland BTX2 PRO S is available in two versions:
Single Midland BTX2 PRO S Intercom kit with one unit only
) Twin Midland BTX2 PRO S Intercom kit with with two units
Depending on the model purchased, the package contains the following parts:
Midland BTX2 PRO S single
1 BTX2 PRO S communication unit
1 Slide-in mounting kit with two HI-FI stereo speakers
1 microphone with boom and 1 wired microphone
1 plate with bi-adhesive strip to fix the unit onto the helmet
1 plate with screw to fix the unit onto the helmet
) 1 micro USB wall-mounting power supply
Midland BTX2 PRO S Twin
, 2 BTX2 PRO S communication units
2 Slide-in mounting kit with two HI-FI stereo speakers
) 2 microphones with boom and 2 wired microphones
2 plates with bi-adhesive strip to fix the unit onto the helmet
) 2 plates with screw to fix the unit onto the helmet
1 micro USB wall-mounting power supply with double plug
The units included in the TWIN kit are already paired on Middle button and can therefore be immediately used in Intercom mode.
Technical specifications of Midland BTX2 PRO S
General:
, Bluetooth ver. 4.2 Stereo (Handsfree/A2DP/AVRCP protocol)
, Frequency 2.4GHz - Max power 100 mW
, Dual Bluetooth core for real Stereo Background
AGC system automatically controls the volume in relation to background noise
, Voice (VOX) or manual communications activation
Manual controls to enable: telephone, intercom, FM Radio
, Fully waterproof
) Lithium battery with 20 hours talk time
Recharge time: app. 2 hours
Bluetooth connections:
With identical device for Rider to Pillion or Bike-to-Bike Intercom mode, up to a maximum distance range of 1.2 Km without obstructions and interferences (the riders must be always in sight).
Bluetooth devices:
Mobile phone with MP3 player Stereo (A2DP protocol) and GPS navigator
Charging batteries
Attention: Make sure that the unit is fully charged before use. Allow at least 3 hours for a full charge before using the unit for the first time.
Charge the unit by inserting the wall-charger into the charging socket (lift the rubber cover to insert the plug). The red LED on the unit will start flashing when charging begins.
Allow the headset to charge until the unit stops flashing and the blue LED turns on.
When the charge is complete (the red LED is not flashing), release the headset from the charger. Normally, after the first time, it takes 2 hours for a full charge.
Attention: Midland BTX2 PRO S is designed to withstand rain and water. However, if it is raining, always verify that the rubber cap protecting the recharging sockets is fully fitted.
Attention: every time the micro USB recharging plug is inserted (or detached), the device is automatically turned off. To use it while it is in charge, you should turn the device on with the plug already inserted.
Unit and fixing system description
BTX2 PRO S description
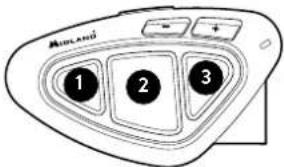
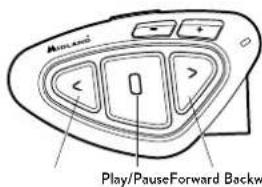
The BTX2 PRO S has five buttons on the front; the main three big button are multi functions buttons: the Forward (on the left), the middle button and the Backward (on the right), the two squared buttons are the Volume + and Volume -.
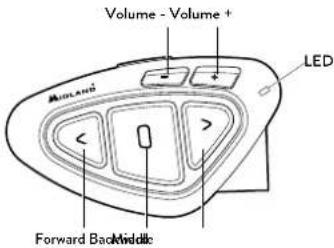
text_image
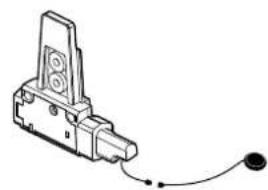
Volume - Volume + LED MIDLAND Forward Back/MiddleOn the bottom of the unit you can find the Charger jack that enables to recharge the unit using a standard microUSB power supply
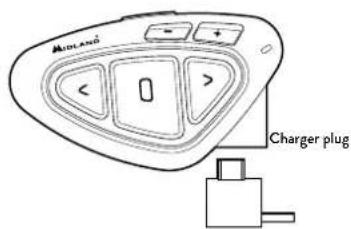
text_image
Miolano Charger plugDescription of the audio kit
The audio system includes two HI-FI stereo speakers and two interchangeable microphones, which are both supplied with a bracket and wired connection. The mini connector on the microphone allows you to choose the microphone that best suits the helmet you are using.
Fixing the stereo speakers
The two stereo speakers have a Velcro/adhesive strip that aids their fixing into your helmet. Beware not to keep the volume too high, you must always be able to listen to the traffic sound.
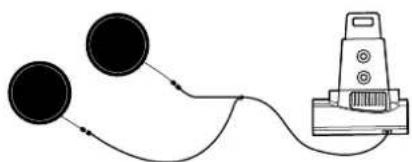
natural_image
Simple line drawing of two circular objects connected by a curved line to a device (no text or symbols)Fixing the microphone
Boom Microphone
Place the section with the Velcro/adhesive strip between the padding and the rigid cover of the helmet, so that the microphone is correctly positioned in front of your mouth and that the white symbol is facing your mouth. This type of microphone is suited for Open Faced and Flip Front helmets. For open helmets it is also available a specific optional microphone cod. C1253.
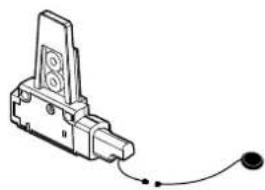
Wired microphone
Using the Velcro/adhesive strip, place the microphone inside the helmet in front of your mouth. This type of microphone is more suited for Full Faced helmets. The mini connector on the microphone allows you choose the microphone that best suits the helmet you are using.
natural_image
Pure electrical circuit lines without any symbolsBoom microphone Wired microphone
natural_image
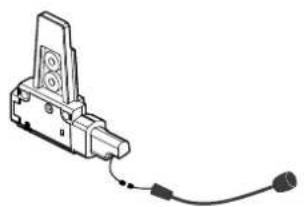
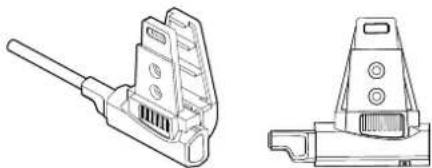
Technical line drawing of a mechanical component with a cable and connector (no text or symbols)Description of the Slide-in mounting kit
The Midland BTX2 PRO S can be fixed onto the helmet, installing the slide-in mounting kit in two different ways: By either using the plate with bi-adhesive strip, or the screw plate. These methods allow you to safely "fix" the BTX2 PRO S unit onto your helmet and to remove it at any time in order to recharge or store it.
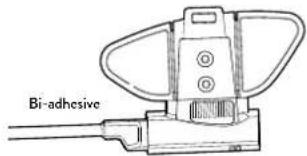
Plate with bi-adhesive strip
The Bi-adhesive plate is already assembled on the slide-in mounting kit.
text_image
Bi-adhesiveClean the application area on the helmet surface, fold the two little wings to better stick to the curved surface of the helmet, remove the bi-adhesive film and place the fixing plate on the left side of the helmet by keeping it contact with the surface for a few seconds.
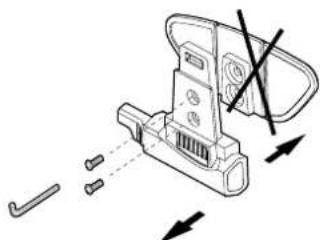
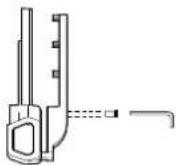
Screw Clamp
Step 1. remove the bi-adhesive plate from the slide mount using the allen wrench included in the box. Remember to keep the two screws.
natural_image
Technical line drawing of a mechanical clamp or bracket assembly with arrows indicating motion (no text or symbols)Step 2. Tighten the screw plate to the slide-in mounting kit with the two provided screws.
www.midlandeurope.com
Step 3. Then, tighten more the two screws in order to firmly fix the clamp in place on the left side of the helmet.
natural_image
Technical line drawings of mechanical components (no text or symbols)If necessary, you can use also the rubber plate in order to have more grip for the screw clamp. Just use the two short screw to fix the rubber plate on the slide-in mount and tighten the screw plate again.
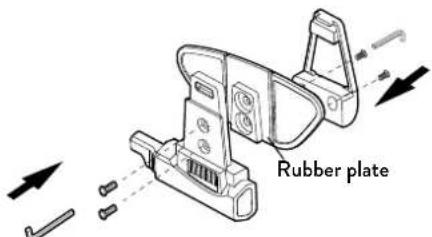
text_image
Rubber plateFitting and removing your Midland BTX2 PRO S
The BTX2 PRO S can be easily fitted onto the helmet by sliding it downwards on the sliding mounting kit. BTX2 PRO S is maintained in position thanks to the fixing clip located on the upper section (A).
To detach the BTX2 PRO S, simply press the fixing clip and push the unit upwards.
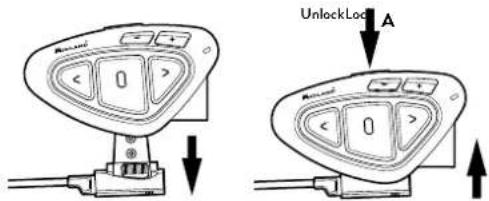
text_image
UnlockLock ASwitching ON and OFF your Midland BTX2 PRO S
Switching the unit on:
Press and hold "Middle" button for approximately 3 seconds until the BLUE indicator lights.
Switching the unit off:
Press and hold both "Middle" and "Backward" buttons together for approximately 3 seconds until the RED indicator flashes 3 times, thus lessening the chances that you might turn off the unit accidentally (especially whilst wearing gloves).
Operative "mode"
The BTX2 PRO S can operate in three main "mode": Intercom, Phone and FM Radio.
The 3 multi function buttons can have different functionality depending on which mode the unit is at that moment.
In "Intercom mode" the three buttons let you manage the Intercom communications between driver and passenger or bike to bike.
In "Phone mode" you can manage your Bluetooth mobile phone to place/answer a phone call or to listen to the music. Please use your phone responsibly and safely.
In "FM Radio mode" you can listen to your favourite radio station in stereo, seek for a specific radio station and save it (6 memories are available).
You can switch (toggle) from one mode to the other simply pressing the Middle button for 3 seconds. A voice announcement will tell in which mode you are on.
The toggle sequence is the following:
Intercom mode (if another unit has been paired)
FM Radio
Phone mode (if a phone has been paired)
Every time you turn on the unit, the default mode is the last used mode.
The Intercom mode and Phone mode are available only if it was previously paired to another unit or to a phone.
If you need to know in which mode the unit currently is, just press the "Volume + " and "Volume - " button together. A voice announcement will tell you the current mode.
Maximum Distance
You can reach 1.2 Km intercom distance if you are in line of sight without obstructions and interferences (the riders must be always in sight).
How to pair two Midland BTX2 PRO S units
The two units supplied in the same Midland BTX2 PRO S box, are already paired and ready to use, this means you don't need to perform this procedure. The units are already paired using the Middle button.
If the devices are not part of the same kit, or the units has been purchased separately, you need to first pair them in order to use them.
To pair the Midland BTX2 PRO S to another Midland BTX2 PRO S unit
To pair the Midland BTX2 PRO S to another Midland BTX2 PRO S unit, you must first enter the setup mode:
-
Turn off the unit.
-
Press and hold down the middle button about 7 sec., until the Red light is on permanently.
-
Now press the Middle button for 3 seconds. The Blue and Red lights will flash.
-
Do the same procedure on the other unit. When successfully paired, each unit will have the Blue light on for one second and then go back to the setup mode (Red light always on).
-
Now the pairing procedure is complete, you just need to exit the setup mode before you can use the units.
-
Double click on the Middle button, the Red light will turn off and the Blue light will start flashing.
You can use now your Midland BTX2 PRO S
Attention: remember to switch off all the other Bluetooth devices that are not part of the pairing procedure, only the two devices involved in the pairing must be turned on.
How to use the Intercom with two units
To use the intercom feature, be sure that both units are turned on and correctly paired together.
Here is an example of the buttons main functionality based on the mode you are on.
| Mode Forward (Left button) Middle button Rear (Right button) | |||
| Intercom Open/close the intercom to the first rider Open/close the intercom to the second rider | Open/close the intercom to the Third rider | ||
| Phone Redial last number/accept or reject incoming call on “Vol+” | Redial last number/accept or reject incoming call on “Vol-” | ||
| Phone (while music play) | Forward the song | Play/pause | Backward the song |
| FM Radio | Scan up | FM Radio On/off | Scan down |
Manual activation
When in "Intercom Mode" press the Middle button on one of the two units in "Intercom" mode. Communication is enabled and remains active until you press again the middle button. The intercom need some seconds to activate, you will hear a beep tone when the intercom is open.
Voice activation (VOX)
Simply say something, after some seconds the communication will be opened and will remain active for the time you are talking. If there is no conversation the intercom will be closed after 40 seconds.
If needed you can close the intercom manually without waiting 40 seconds (just press the middle button).
If needed, you can enable/disable the VOX feature simply by pressing the Backward button for 7 sec. A voice announcement will advise you when the VOX is enabled/disabled. To turn the VOX on again, just press the same button and a voice announcement will advise you that the VOX is now active. This setting is remembered also if you turn off the unit.
Attention: The Voice activation (VOX) can open the intercom communication only to the unit that was paired with the Middle button. If you choose to use a different button (Forward or Backward), you will be able to active the intercom only manually.
Adjusting the volume
Your Midland BTX2 PRO S uses AGC technology, which automatically adjusts the listening volume in relation to background noises.
However, it is also possible to manually adjust the volume by means of the "Volume+" and "Volume-" buttons.
The volume setting is independent for each audio source: intercom, stereo music, phone call, FM radio.
Attention: volume can be adjusted only when an audio connection is active.
Set up of the AGC system
To adjust the sensitivity of the AGC system you can use the "BT UPDATER" Pc Software or the smartphone "BT SET-APP" application. You can choose different set up based on your motorbike type (naked, touring, sport) or if you are riding as a passenger. You can disable the AGC system pressing "Volume+" and "Volume -" together for 3 sec.
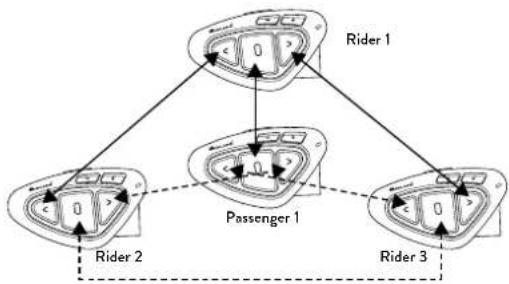
How to pair the Midland BTX2 PRO S to more than two units
One Midland BTX2 PRO S unit can be paired to maximum five other BT units, that means six in total (3 Midland unit + 2 Talk2All + yourself).
The Midland BTX2 PRO S has three main buttons (Forward, Middle and Rear). It is up to you which button to use to pair and activate the intercom, you are totally free to choose the button you like more. The same button you will use to pair the unit will be also used to activate the intercom communication. Remember that each device can always be paired with other 3 units at your choice; as shown in the picture here below, also 'crossed' pairing can be done.
flowchart
graph TD
    A["Rider 1"] --> B["Rider 2"]
    A --> C["Passenger 1"]
    A --> D["Rider 3"]
    B --> E["Return Path"]
    C --> F["Return Path"]
    D --> G["Return Path"]
For example you can decide to pair one motorbike rider unit to the Forward button, your passenger to the Middle button and another rider to the Rear button.
In this way you can have in total 4 units paired together and talk to each person, one by one, simply by pressing the corresponding button (the same used for the pairing). Every time you open the intercom connection to one person, the
previous connection will be closed. The connection is not a "chain", when two persons are talking it is not possible to break (interrupt) the communication by one of the other two units.
Pair the Midland BTX2 PRO S to another Midland BTX2 PRO S unit
To pair the Midland BTX2 PRO S to another Midland BTX2 PRO S unit, you must first enter the setup mode;
- Turn off the unit
- Press and hold down the middle button about 7 sec., until the Red light is on permanently.
- Now press one of the three buttons (Forward, Middle or Backward) for 3 seconds depending on which button you would like use to open the intercom to the other unit. The Blue and Red lights will flash.
- Repeat the same procedure on the other unit, you don't need to use the same button, you can choose one of the three buttons not previously used.
- When successfully paired, each unit will have the Blue light on for one second and then go back to the setup mode (Red light always on).
- Now the unit is ready for another pairing procedure, and you can pair another Midland BTX2 PRO S unit following the same procedure, but using a different button.
If you don't have more devices to pair, you must exit the setup mode before you can use the units:Double click on the Middle button, the Red light will turn off and the Blue light will start flashing. You can use now your Midland BTX2 PRO S
How to use the Intercom with more than two units
To use the intercom feature, be sure that all the units are turned on and correctly paired together.
Manual activation in Intercom mode
When in "Intercom Mode" press the button corresponding to the unit you would like to communicate with. After some seconds the intercom communication will open. The communication remains active until you press again the same button. To quickly open the intercom to another person, just press the button corresponding to the other unit, the intercom will be automatically closed and the new connection will be open (see Table A).
Voice activation (VOX)
The voice activation feature can open the intercom only to the unit paired to the Middle button.
Hint: this feature is very useful when you have a specific person that you like to talk to more often (for example your passenger). In this way you don't need to press a button to open the communication.
Unit already busy in a conversation
If you try to open an intercom connection to another person that is already talking with someone else (or is in a middle of a phone conversation), you will hear a "busy" double beep tone. Just wait sometime and try again, maybe this time the "line" is not busy.
The person who is called, will be advised that someone is trying to call and will hear a voice announcement with the number of the button from which the
A- Manual activation
| Mode Forward button Middle button Rear button | ||
| Intercom Short press: Open/Close intercom to paired raider | Short press: Open/Close intercom to paired raider | Short press: Open/Close intercom to paired raider |
| Long press: Change mode | ||
request is coming.
In this way as soon as the first conversation is over, the person can easily contact the caller by opening the intercom of the specific button number (indicated by the voice announcement).
text_image
Mucanu 1 2 3Conference
The "Conference" mode allows the simultaneous communication between 4 people or, if you pair a intercom device also on "Vol-", up to 8 people (4 couple). You can decide to use the BTX2 PRO S in "one to one" communication up to 6 people ("classic" Intercom mode) or with 8 people (4 couples) conference intercom (Conference mode).
How to use the conference mode
First of all you need to pair all the units in a "chain" mode, second the "Conference" feature must be active on all the units paired.
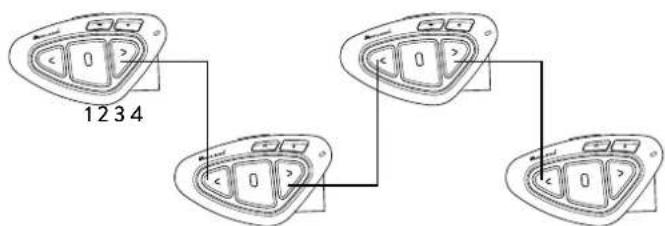
Pairing
To use the conference mode you need to pair all the units in a "chain" configuration. The BWD button of the first unit must be paired to the FWD button of the second unit. The BWD button of the second unit must be paired to the FWD button of the third unit and so on, till the fourth!
flowchart
graph TD
    A["Control Panel 1234"] --> B["Control Panel 1"]
    A --> C["Control Panel 2"]
    A --> D["Control Panel 3"]
www.midlandeurope.com 25
The first and the last unit must not be paired together (the chain must stay open). The unit number 1 can talk to the last unit (number 4) only "through" the unit number 2 and number 3. That means to have the conference with four people, all the unit must have the intercom open.
Activate Conference mode
In any mode with no active audio, keep pressed the FWD and Central buttons for 3 sec. The voice announcement "Conference" will tell you that it is active. When the Conference mode is active the bluetooth devices paired on "Vol+" button are disconnected, the paring on CTRL button and the Universal Intercom are not available. Now only the paring on FWD and BWD buttons are available, together with the device paired on the "Vol-" button. When in Conference mode, you can always move to "FM radio" mode to listen your favorite radio station or to "Phone" mode to control the phone connected on the "Vol-" button.
Disable Conference mode
In any mode with no active audio, keep pressed the FWD and Central buttons for 3 sec. The voice announcement "Intercom" will tell you that you are back to the "One to One" Intercom mode and the device connected to the "Vol+" is available again, together with the Phone, the pairing on CTRL button and the Universal Intercom.
Conference mode 4 people
When the conference mode is active, it is possible to open the conference communication pressing both the FWD and BWD buttons. One click on the button will open the intercom communication, one click on the same button will close it. The two units that are in the middle of the chain (unit 2 and 3) must keep the intercom open on both FWD and BWD buttons to allow the full communication of the four units together.
"One Click Talk" function
When the conference mode is active, is possible to open the conference communication to all the 4 users just in "one click". Press short the CTRL (middle) button and you will automatically open the conference to the four units connected.
Conference mode with one Bluetooth device on "Vol-"
When the conference mode is active the Bluetooth device connected on "Vol-" is still available, that mean you can listen to GPS street indication or answer your phone call without "brake" the Conference connection chain.
The audio from the "Vol-" button connection can be "Private" (not shared in the Conference) or "Public" (the audio is shared with conference).
By default the setting of conference mode is "Private".
Either in Privat or Public mode, if you receive a phone call, you are temporary disconnected from the Conference, but the other people can keep on talking to each other. As soon as the Phone call is over, you are automatically back to the Conference.
Activate Public mode: long press the "Vol-" button, you will here the voice "Public"
Activate Private mode: long press again the "Vol-" button, the voice will tell you "Private".
Attention: the incoming phone call is always "private" even if you are in "public" mode.
Conference mode up to 8 people (4 couples)
To have 8 people conference you need to pair one intercom device also to the "Vol-" button and be sure you selected the "Public" option.
Attention: The paring of the intercom device on "Vol-" must be as "Universal Intercom".
By default the setting of conference mode is "Private", that mean the first time you press long the "Vol-" button, you will hear the voice "Public". In case you hear "Private" you need to press again "Vol-" long until you hear the voice "Public" mode.
How to pair an Intercom device on the "Vol-" button
On the BTX2 PRO S go in "Setup mode", press the "Vol-" button for 3 sec. The Blue and Red Led lights will start flashing
On the other device, follow the procedure to pair as an Universal Intercom
How to open the Conference for the "Vol-" unit
To open the conference from the BTX2 PRO S to the unit connected to the
"Vol-", press in Phone Mode the "Backward" button
To open the conference from the other unit connected to the "Vol-", just use the command to open the Universal intercom connection.
The maximum distance of the device connected to the "Vol-" button is 10 mt, this is why is suitable only for Passenger.
Talk 2 All - Universal Intercom with different brand unit
Thanks to the "Talk2 All - Universal Intercom" feature it is now possible to pair your Midland BTX2 PRO S to a different brand intercom available on the market.
You can pair a maximum of two not Midland Intercom devices, one on the "Forward" button and the other one on the Backward button.
On the Midland BTX2 PRO S enter the setup mode: (with the unit OFF press and hold down the Middle button about 7 sec. until the Red light is on permanently).
Keep pressed the "Forward" button or "Backward" button for 7 seconds: the Red and Blu LED lights will start flashing fast, then (while you still keep the button pressed) the Red and Blu LED lights will change to slow flashing. Now you can release the button.
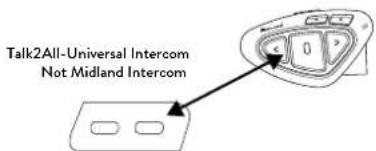
text_image
Talk2All-Universal Intercom Not Midland IntercomOn the other intercom (not Midland brand) follow the procedure to pair to a phone, because the BTX2 PRO S is paired as a Phone.
If successfully paired the red/blue lights will stop flashing and the blue light will slowly flash instead.
Attention: remember to switch OFF all the other Bluetooth devices during the pairing procedure, only the two devices involved in the pairing must be turned on.
To open the "Universal Intercom" communication on the Midland BTX2 PRO S while you are in "Intercom Mode", press long (3 sec) the Forward
button or "Backward" button (depending on wich button you used for pairing). On the other intercom just press the phone redial or voice dial button. Maybe it will be necessary to press the redial button two times, depending on the model of the not Midland intercom.
Attention: In order to use the "Talk2All-Universal Intercom" feature the pairing on the other unit must be done as a phone. The other intercom (not Midland brand) will be able to be paired to a phone only if two phones are supported.
You can pair also a Midland unit as Talk2All, that means the pairing must be done as a phone (one unit use the Talk2All procedure and the other unit use the pairing to "Phone" procedure).
Compatibility with Midland BT line units
The BTX2 PRO S is compatible with Midland BT devices.
When paired the max distance of the intercom is defined from the lower possible.
The BTX2 PRO S is compatible with the previous line of Midland BT only if you update the firmware.
Pairing the Midland BTX2 PRO S to Bluetooth devices
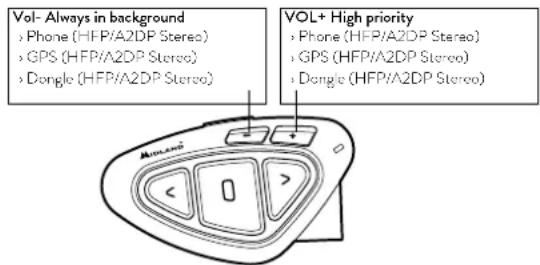
The Midland BTX2 PRO S unit can be paired to other Bluetooth devices, like Phone, GPS Navigator or PMR446 Radio with built-in or external Bluetooth (dongle). The pairing procedure must be done using the "Volume +" or the "Volume -" buttons.
text_image
Vol- Always in background > Phone (HFP/A2DP Stereo) > GPS (HFP/A2DP Stereo) > Dongle (HFP/A2DP Stereo) VOL+ High priority > Phone (HFP/A2DP Stereo) > GPS (HFP/A2DP Stereo) > Dongle (HFP/A2DP Stereo)Pairing to the "Volume+" button: for Phone with music A2DP stereo, GPS Navigator with A2DP audio or external mono/Stereo A2DP dongle. All devices paired to "Volume+" button has higher priority and will interrupt all the other communication (like Intercom, FM Radio and Music).
Pairing to the "Volume -" button: for Phone with music A2DP stereo, GPS Navigator with A2DP audio or external mono/Stereo A2DP dongle. All devices paired to "Volume -" button are always in active in background during the Intercom communication.
When a device is paired to the "Vol+" or "Vol -" buttons the "Phone" mode is activated.
Background feature
The audio connection on any device paired on "Vol-" button, even if it is stereo, is always in background. In this way the Intercom communication will not be interrupted, for example, by the GPS's street indication or other audio source. You can decide if the audio from the "Vol -" connection is shared with other people when the intercom is open (public) or if it must be private (private).
Attention: By default the audio is private
The audio from "Vol -" has always lower priority against the Intercom, that means when the intercom is open the audio is lowered by default to 50%. You can change this setting using the BTUpdater PC Software
Pairing with one or two phones
The cellular phone can be paired to the "Vol+" or to the "Vol -".
When a phone is paired to the "Vol+" or "Vol-" the "Phone" mode is activated. An incoming call has always the higher priority, that means all other communications will be closed (Intercom, FM Radio, Music).
If another incoming call will arrive on the second phone, an alert sound will notify it.
WARNING!
In order to have the best performance with your mobile phone, it is suggested to keep it as close as possible to your BTX2 PRO S unit, on the left side of your body and in the upper pocket of your jacket if it's possible.
How to pair the Midland BTX2 PRO S to a Phone
To pair the Midland BTX2 PRO S to a Phone, you must first enter the setup mode:
- Turn off the unit
- Press and hold down the middle button about 7 sec., until the Red light is on permanently.
- Now press for 3 seconds the "Volume +" or "Volume -" button, the Blue and Red lights will flash.
- Enable the Bluetooth device search feature on your mobile phone
- After some seconds, "Midland BTX2 PRO S" will be displayed on your mobile phone. Follow the pairing procedure of your Phone. If a pin code is requested you must enter "0000" (four time zero).
When successfully paired, the Blue light of the unit will be on for one second and than the unit will exit the setup mode and switch to the working mode (the Blue light will start flashing).
You can use now your Midland BTX2 PRO S together with the Phone.
How to use a Phone
After pairing your phone to the Midland BTX2 PRO S unit you must switch to the "Phone" mode in order to use it. Press the middle button until you hear "Phone" from the voice announcement. Now all the three main buttons are dedicated to the phone (see Table B)
Answering a call
When you hear the phone ring, you can answer in two different ways: Vocally:
Simply say one word just after the first ring to answer the call and start talking. Manually:
Tap the "Forward" or "Backward" button and start talking.
Rejecting a call
If you don't wish to answer, you can let the mobile phone ring or press the "Forward" or "Backward" button for 3 seconds (you will hear one audio confirmation tone).
Making a call
There are several ways to make a call.
To redial the last number:
Phone on "Vol+": Press"Forward"button for 3 seconds in order to redial the last number (you will hear one audio confirmation tone).
Phone on "Vol-": Press"Backward"button for 3 seconds in order to redial the last number (you will hear one audio confirmation tone).
To make a voice call:
) Phone on "Vol+": Briefly press"Forward"button. If your mobile phone supports voice calls, you will be asked to speak the name of the contact you wish to call.
Phone on "Vol-": Briefly press "Backward" button. If your mobile phone supports voice calls, you will be asked to speak the name of the contact you wish to call.
Priority: Calls have a high priority, which means that all other communications are temporarily disabled when a call arrives.
B - Phone mode
| Mode Forward button (Phone on “Vol+”) Middle button Backward button (Phone on “Vol-”) | |||
| Phone Short press: Voice dial /accept or close if it is in progressLong press: redial last number/ or reject | Long press: Change mode | Short press: Voice dial /accept or close if it is in progressLong press: redial last number/ or reject | |
| Phone (when music is plaing and paired on “Vol +”) | Short press: Forward the song Short press: Play/pauseLong press: Change mode | Short press: Backward the song | |
Ending a call
There are several ways to end a call:
Wait for the called person to end the call.
Press the "Forward" button (you will hear an audio confirmation tone).
Press "End" button on the mobile phone.
Speed dial
Only for the phone paired on "Vol+" is possible to store one phone number in the unit memory and use it when needed. You must first save the number using the "BT UPDATER" Pc software or the smartphone "BT SET-APP" application. Then when you are in phone mode, just press 7 sec. the "Forward" button.
Using the MP3 player feature of the mobile phone
The mobile phone, when paired on "Volume +" or "Volume -" can be used as stereo MP3 players. The Midland BTX2 PRO S device fully supports the A2DP and AVRCP protocols that enable you to listen to stereo music and remotely control your mobile phone's MP3 player. You can even use the buttons on the Midland BTX2 PRO S unit to control the following play options: Play, Pause, Forward and Backward the songs.
It is possible to control only one phone at the time. You can choose which phone to control, pressing 3 sec. the "Vol+" button:
You will hear the voice "Control on volume up". Now you can control the phone paired on "Vol+" button. If you want to switch the control to the other phone just press again for 3 sec. the "Vol+" button and you will hear the voice "Control on volume down".
Available controls:
To play/pause music: click on the "Middle" button.
To skip forward to the next song: press the "Forward" button.
To skip backwards to the previous song: press the "Back" button.
Priority: the music listening mode has the lowest priority. Therefore, it will always be disabled when another audio communication comes in.
To change the priority behaviour you can use the "BT UPDATER" Pc Software or the smartphone "BT SET-APP" application
text_image
Mouse Play/PauseForward BackwAttention: It is possible to have all the controls (Play/Pause, FWD, BWD) of the A2DP music only in "Phone mode".
If you are listening to A2DP music and you move from "Phone" mode to "FM Radio" or "Intercom" mode, you can still listening to A2DP music but you don't have all the controls buttons available. Only Play/Pause is available with double click on the "Middle" button.
Music Share
Music Share is possible only from the phone paired on the "Vol+" button. To start sharing your A2DP music with the passenger already paired on the middle button (maximum distance 10mt), you must press the "Backward" button long (3 sec.) while the music is playing.
The passenger can only stop the music share pressing short the middle button (but cannot control the music). The driver can stop the music sharing just pressing again the "Backward" button for 3 seconds.
With music share active you can not keep open the Intercom communication.
Attention: to enable the Music Share, make sure you sent a play command from the Intercom device.
Attention: while in Music Share mode, the driver can open the intercom to the passenger with a double-click on the Central button.
GPS Navigator
The GPS Navigator can be paired using the "Vol+" or the "Vol-" button.
Volume + button (support for stereo A2DP audio and HFP mono). All devices paired to "Vol +" button has higher priority and will interrupt all the other communication (like Intercom, and FM Radio).
Volume - button (support for stereo A2DP audio and HFP mono). All devices paired on "Vol -" button are always active in background during the Intercom communication. You can decide if the audio from the "Vol -" connection is shared with other people when the intercom is open ("Public" feature on) or if it must be private ("Private" feature on). See the "Background" paragraph above.
GPS Stereo (A2DP) voice announcement
Midland BTX2 PRO S supports Stereo (A2DP) voice announcement from GPS Navigators or smartphone application on both "Vol+" or "Vol-" connection. When connected on "Volume +" button, the GPS street voice announcements will interrupt all other communication. Only when connected on "Vol-" the GPS voice announcements are in background.
How to pair the Midland BTX2 PRO S to a GPS
In general it is possible to pair the Midland BTX2 PRO S to all the GPS for motorbike that support Bluetooth headset connection.
To pair the Midland BTX2 PRO S to a GPS, you must first enter the setup mode:
- Turn off the unit
-
Press and hold down the "Middle" button about 7 sec., until the Red light is on permanently.
-
Now press firmly (3 sec) the "Volume +" or "Volume -" button, the Blue and Red lights will flash.
-
Enable the Bluetooth device search feature on your GPS
-
After some seconds, "Midland BTX2 PRO S" will be displayed on your GPS.
-
Follow the pairing procedure of your GPS. If a pin code is requested you must enter "0000" (four times zero).
When successfully paired, the Blue light of the unit will be on for one second
and then the unit will exit the setup mode and switch to the working mode (the Blue light will start flashing).
You can now use your Midland BTX2 PRO S with the GPS for street voice announcement.
Pairing to a PMR446 radio with integrated or external Bluetooth
The PMR446 Radio can be paired to the "Volume +" or "Volume -" button. If paired on "Volume -", the PMR446 radio is always in the background even when you talk on the intercom.
Pairing procedure
, Turn off the unit
Press and hold down the "Middle" button about 7 sec., until the Red light is on permanently.
Now press firmly (3 sec) the "Vol +" or "Vol -" button, the Blue and Red light will flash.
Follow now the pairing procedure explained on the manual of the transceiver itself
How to listen to the FM Radio
The FM Radio receiver is integrated inside the unit. You just need to switch to the "FM Radio" mode in order to use it.
Long press the middle button until you hear "FM radio" from the voice announcement. Now all the three main buttons are dedicated to the FM Radio (See Table C).
Press short the "Forward" or the "Backward" button to seek the FM Radio station. When you press long the Forward or the Backward button, you can scan up or down the 6 recorded stations.
A voice announcement will tell you the number of which memory you are en-
C-Radio FM mode
| Mode Forward button Middle button Rear button | ||
| FM Radio Short press: seek station up | Short press: On/off | Short press: seek station up |
| Long press: Scan recorded | Long press: Change mode | Long press: Scan recorded |
tering.
To save the station you are listening to, press the Forward and Backward buttons together for 3 sec. You will hear a beep tone for confirmation.
The station is saved over the last recorded station used.
Thanks to the RDS system, the FM Radio will choose the strongest signal available for the radio station you like to listen.
The RDS system is OFF by default, if needed you can toggle on/off the RDS pressing together the "Volume+" and "Volume -" buttons for 3 sec when the radio is on. A voice announcement will tell you the RDS status.
How to Disable/Enable the FM Radio
By default the FM radio is on.
Disabling:
Enter the "Setup" mode: turn off the unit and hold down the "Middle" button about 7 sec., until the Red light is on permanently.
Press "Middle" and "Volume+" buttons together for 3 seconds. The blue LED will flash three times.
Double click on the "Middle" button to exit the "Setup" mode and use the Midland BTX2 PRO S.
Enabling:
Follow the same procedure up described; now the blue LED will flash once. To exit the "Setup" mode, double click the "Middle" button.
FM Radio with intercom
When you are in "FM Radio" mode it is not possible to manually open the intercom, you can only open it using VOX feature (just talk) to the unit paired on the "Middle" button. To manually activate the intercom you must switch to "Intercom" mode.
FM Radio in background
It is not possible to have the FM radio along with other audio sources.
Any active audio such as Intercom or coming from the "Vol+" or "Vol-" connection, will pause the FM radio.
Setup and special configurations
Resetting all paired devices
Sometimes you may find it necessary to delete all the pairing references stored in the Midland BTX2 PRO S unit (reset operation).
To perform this operation you must first enter the setup mode:
) Turn off the unit.
Press and hold down the "Middle" button about 7 sec., until the Red light is on permanently.
Then simultaneously press and hold down the "Volume +" and "Volume -" buttons for 3 seconds. The Blue Light will be lit on for 1 sec and then back to steady RED.
Double click on the "Middle" button to exit the "Setup" mode and use the Midland BTX2 PRO S.
This procedure deletes all the paired Bluetooth devices stored in the memory and it is therefore possible to start a new "clean" pairing session.
Attention: after resetting all the pairing, only the "FM Radio" mode will be available.
Back to factory setting
Sometimes you may find it necessary to go back to the factory setting, to reset all the changes/setup already made and have a "clean" unit.
To perform this operation you must first enter the setup mode:
Turn off the unit.
) Press and hold down the "Middle" button about 7 sec., until the Red light is on permanently.
Then simultaneously press and hold down all the three buttons "Forward" - "Middle" - "Backward" for 3 seconds. The Blue Light will be lit on for 1 sec and than back to steady RED.
Double click on the "Middle" button to exit the "Setup" mode and use the Midland BTX2 PRO S
These adjustments can be set through the program "BTPro Updater" suitable for PC/MAC
Adjusting/ Disabling the VOX feature (Intercom and telephone)
The Intercom feature can be enabled both manually and vocally (VOX). The
VOX activation is influenced by the helmet type, the background noise and therefore by the speed.
For optimum results, it is possible to choose one of the following four microphone sensitivity levels: high, medium, low and very low. It is also possible to disable the VOX feature in order to activate the Intercom and phone call answering features in manual mode only.
These adjustments can be set through the program "BTPro Updater" suitable for PC/Mac.
Setup and Firmware update
It is possible to configure and update the firmware of your Midland BTX2 PRO S using the USB connection to your PC. On the Midland web site www.midlandeurope.com in the Midland BTX2 PRO S page you can find the PC software and the new firmware updates if available.
ATTENTION DO NOT CONNECT THE UNIT TO THE PC BEFORE YOU DOWNLOAD AND INSTALL THE SOFTWARE
Use at your own risk
The use of the device will impair your ability to hear other sounds and others around you.
Listening to music or speaking on a telephone may prevent you from hearing others around you and distract you from riding safely. The use of such device while riding may endanger you and others, and its use, in some areas, could not be allowed.
Using this device at a high volume may result in permanent hearing loss.
If you experience ringing in your ear or any other hearing related pain, reduce the volume or discontinue using this device. With continued use at high volume, your ears may become accustomed to the sound level, which may result in permanent damage to your hearing.
Please use this device at a safe volume level.
Warranty
The warranty lasts 24 months for the main device and 6 months for the accessories (batteries, chargers, antennas, headsets, microphones).
For further information about the warranty, please visit:
www.midlandeurope.com.
European CE Notice Certification and Safety Approval Information
This product is CE marked according to the RED Directive 2014/53/UE and is free use in all the EU countries. Users are not permitted to make any changes or modifications to the device. Modifications which are not expressly approved by the producer invalidate the warranty card. For further information, please go to our website: www.midlandeurope.com.
Inhalt
Hauptmerkmale....34
natural_image
Simple line drawing of a device with two circular components connected by a curved line, no text or symbols present.Mikrofonbefestigung
Schwanenhalsmikrofon
natural_image
Technical illustration of a mechanical clamp or bracket assembly with tool and directional arrows (no text or symbols)natural_image
Technical line drawings of mechanical components (no text or symbols)text_image
Diagram of a device control panel with labeled buttons and directional indicatorsDual Core Intercom System
natural_image
Simple line drawing of a device with two circular components connected by a curved line, no text or symbols present.natural_image
Technical line drawing of a mechanical device with a cable and connector (no text or symbols)natural_image
Technical line drawing of a mechanical component with a cable and circular end (no text or symbols)natural_image
Technical line drawing of a mechanical component with arrows indicating assembly or movement (no text or symbols)natural_image
Technical line drawings of two mechanical components (no text or symbols)Función "One Click Talk"
text_image
Talk2All-Universal Intercom No dispositive Midlandtext_image
Volume - Volume + AVANCE ARRIÉCENTRALE LEDnatural_image
Simple line drawing of a device with two circular components connected by a curved line, no text or symbols present.Fixer le microphone
Microphone tige
natural_image
Pure mechanical component diagram without any text, numbers, or symbolsBoom microphone Wired microphone
natural_image
Mechanical component diagram showing a bracket and cable with a dot (no text or symbols)text_image
Bi-adhésifnatural_image
Technical line drawing of a mechanical component with arrows indicating assembly or movement (no text or symbols)natural_image
Technical line drawings of mechanical components (no text or symbols)flowchart
graph TD
    A["Button 1234"] --> B["Arrow to Button 1"]
    C["Button 1234"] --> D["Arrow to Button 2"]
    E["Button 1234"] --> F["Arrow to Button 3"]
natural_image
Simple line drawing of two circular components connected by a curved line to a rectangular device (no text or symbols)Mikrofon
natural_image
Pure electrical circuit lines without any symbolsNaglavni mikrofon Žični mikrofon

natural_image
Mechanical component diagram showing a bracket and cable with a dot (no text or symbols)Opis prireditvenega sistema na čelado
natural_image
Technical illustration of a mechanical component with arrows indicating assembly or disassembly (no text or symbols present)natural_image
Technical line drawings of two mechanical components with mounting holes (no text or symbols)flowchart
graph TD
    A["Control Panel 1234"] --> B["Control Panel 1"]
    A --> C["Control Panel 2"]
    A --> D["Control Panel 3"]
    B --> E["Output"]
    C --> F["Output"]
    D --> G["Output"]
Dual Core Intercom System
natural_image
Simple line drawing of two black circular objects connected by a curved line to a device with a terminal bracket (no text or symbols)Mikrofon
natural_image
Technical line drawing of a mechanical component with wires (no text or symbols)natural_image
Technical line drawing of a mechanical component with a cable (no text or symbols)natural_image
Technical diagram of a mechanical assembly with tool and directional arrows (no text or symbols)natural_image
Technical line drawings of two mechanical components (no text or symbols)flowchart
graph TD
    A["Ridič 1"] --> B["Ridič 2"]
    A --> C["Spolujezdec 1"]
    A --> D["Ridič 3"]
    B --> C
    C --> D
Hereby Cte International Srl declares that this product is in compliance with the essential requirements and other relevant provisions of Directive 2014/53/UE. The declaration of conformity is available on the web site http://www.midlandeurope.com/it/pagina/10090-certifications
AT / DE / CH / LI
http://www.midlandeurope.com/it/pagina/10090-certifications
NL
http://www.midlandeurope.com/it/pagina/10090-certifications
NO
http://www.midlandeurope.com/it/pagina/10090-certifications
FI
http://www.midlandeurope.com/it/pagina/10090-certifications
LT
- All articles displaying this symbol on the body, packaging or instruction manual of same, must not be thrown away into normal disposal bins but brought to specialised waste disposal centres. Here, the various materials will be divided by characteristics and recycles, thus making an important contribution to environmental protection.
Important: The equipment must be used at least 5cm away from the body of use
A/D/CH/FL
Produced or imported by:
CTE INTERNATIONAL srl
Via. R.Sevardi 7 42124 Reggio Emilia - Italy.
Read the instructions carefully before installation and use.
Vertrieb durch: