
T10 - Vacuum Cleaner DREAME - Free user manual and instructions
Find the device manual for free T10 DREAME in PDF.
User questions about T10 DREAME
0 question about this device. Answer the ones you know or ask your own.
Ask a new question about this device
Download the instructions for your Vacuum Cleaner in PDF format for free! Find your manual T10 - DREAME and take your electronic device back in hand. On this page are published all the documents necessary for the use of your device. T10 by DREAME.
USER MANUAL T10 DREAME
Cordless Vacuum Cleaner
User Manual
THANK YOU
FOR PURCHASING THIS DREAME VACUUM CLEANER.
Registration Quick Start
Welcome to register a Dreame account by scanning the QR code.
You are available for the User Manual and Special Offers.

With it you are obtaining a high quality product that is engineered for optimal performance. If you have any questions on the product, please contact us: aftersales@dreame.tech.
EN User Manual 1
DE Benutzerhandbuch 23
FR Manuel d'utilisation 46
IT Manuale Utente 69
ES Manual de usuario 90
RU RykoBoDCTBO Nolb30BaTeJ 115
PL Instrukcja Obslugi 139
SA 161
HE unnnn 183
Safety Instructions

To prevent accidents including electric shock or fire caused by improper use, please read this manual carefully before use and retain it for future reference.
Warning
-
This product can be used by children aged from 8 years and above and persons with physical, sensory, intellectual deficiencies, or limited experience or knowledge under the supervision of a parent or guardian to ensure safe operation and to avoid any risk of hazards. Cleaning and maintenance shall not be made by children without supervision.
-
The vacuum is not a toy. Children shall not play with or operate this product. Please exercise caution when using the vacuum near children. Do not allow children to clean or maintain the vacuum unless supervised by a parent or guardian.
-
Do not use the vacuum outdoors or on wet surfaces. Only use the vacuum on dry indoor surfaces. Do not touch the plug or any part of the vacuum with wet hands.
-
To reduce the risk of fire, explosion, or injury, check to make sure the lithium battery and charging adapter are undamaged before use. Do not use the vacuum if either the lithium battery or charger is damaged.
-
The multi-brush bar, battery, metal connector pin, and vacuum are electrically conductive and should not be immersed in water or other liquid. Make sure to dry all filters after cleaning.
-
Prevent injury caused by moving parts. Turn off the vacuum before cleaning the multi-brush bar. The multi-brush bar, dust compartment and filter must all be properly installed before using the vacuum.
-
Only use the original charging adapter. Never use an unoriginal adapter, as this may cause the lithium battery to catch fire.
-
Do not use the vacuum to pick up flammable or combustible liquids, such as gasoline, or bleach, ammonia, drain cleaners or other liquids.
-
Do not use the vacuum to pick up sharp or hard objects, such as glass, nails, screws, or coins, which may damage the machine. Do not use the vacuum to pick up drywall particles, ashes like fireplace ash, or smoking or burning materials such as coal, cigarette butts or matches.
-
Check the area to be cleaned before use. To prevent the openings from being blocked, clear the larger paper, spitball, plastic cloth or sharp objects (such as glass, nails, screws, coins, etc.) and any object which is larger than openings.
-
Keep hair, loose clothing, fingers and other parts of the body away from the vacuum's openings and moving parts. Do not point the hose, wand or tools at your eyes or ears or put them in your mouth.
-
Do not put any object into the vacuum's openings. Do not use the vacuum with any opening blocked. Keep free of dust, lint, hair, or other items which may reduce airflow.
-
Do not rest the vacuum against a chair, table, or other unstable surface, as this may cause damage to the machine or personal injury. If the vacuum becomes damaged
from being knocked over or is otherwise malfunctioning, please contact our authorized service department. Never attempt to disassemble the device on your own.
- All instructions in the manual for recharging the battery must be strictly followed. Failure to properly charge the battery within the specified temperature range could damage the battery.
- Please be extra careful when using the vacuum to clean stairs.
- Make sure the vacuum is unplugged when not used for extended periods as well as prior to performing any maintenance or repairs.
- Do not install, charge, or use this product outdoors, in bathrooms, or around a pool.
- Fire Hazard Warning: Do not apply any type of fragrance to the vacuum's filter. These types of products are known to contain flammable chemicals which may cause the vacuum to catch fire.
- Only use the original charger (Model YLS0251B-E300080 (EU) / YLS0241A-A300080 (AU)). Failing to do so may cause the lithium-ion battery to catch fire.
- Only use the approved battery type (Model P2010-7S1P-BW/P2010-7S1P-BWA/P2010-7S1P-BWB). Failing to do so may cause the lithium-ion battery to catch fire.
- Do not use and store in extremely hot or cold environments (below 0^ / 32^ or above 40^ / 104^ ). Please charge the cordless vacuum in temperature above 0^ / 32^ and below 40^ / 104^ .
This product is designed for home use only.
We, Dreame Trading (Tianjin) Co., Ltd., hereby, declares that this equipment is in compliance with the applicable Directives and European Norms, and amendments. The full text of the EU declaration of conformity is available at the following internet address: www.dreme-technology.com
For detailed e-manual, please go to https://www.dreame-technology.com/pages/user-manuals-and-faqs
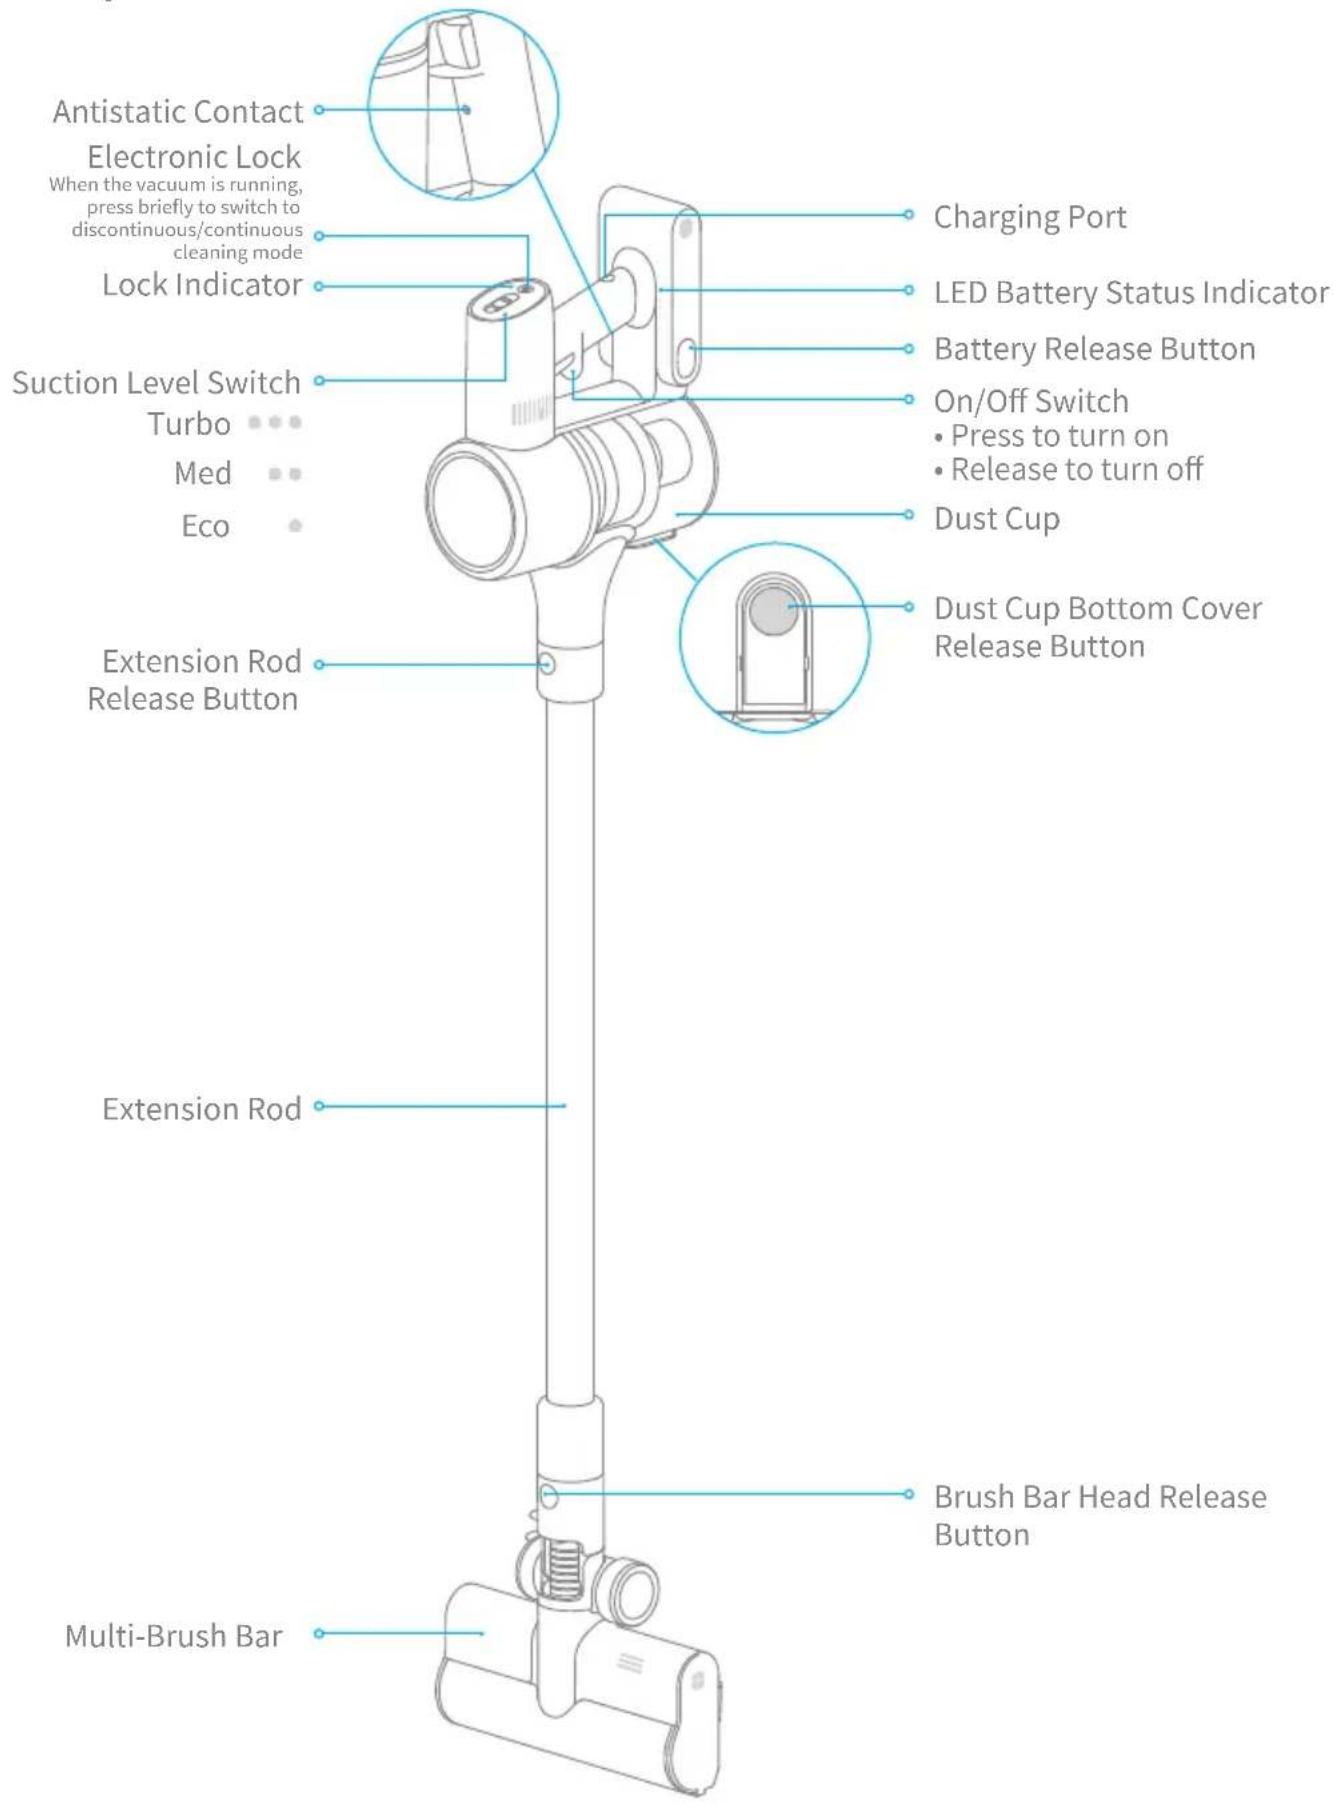
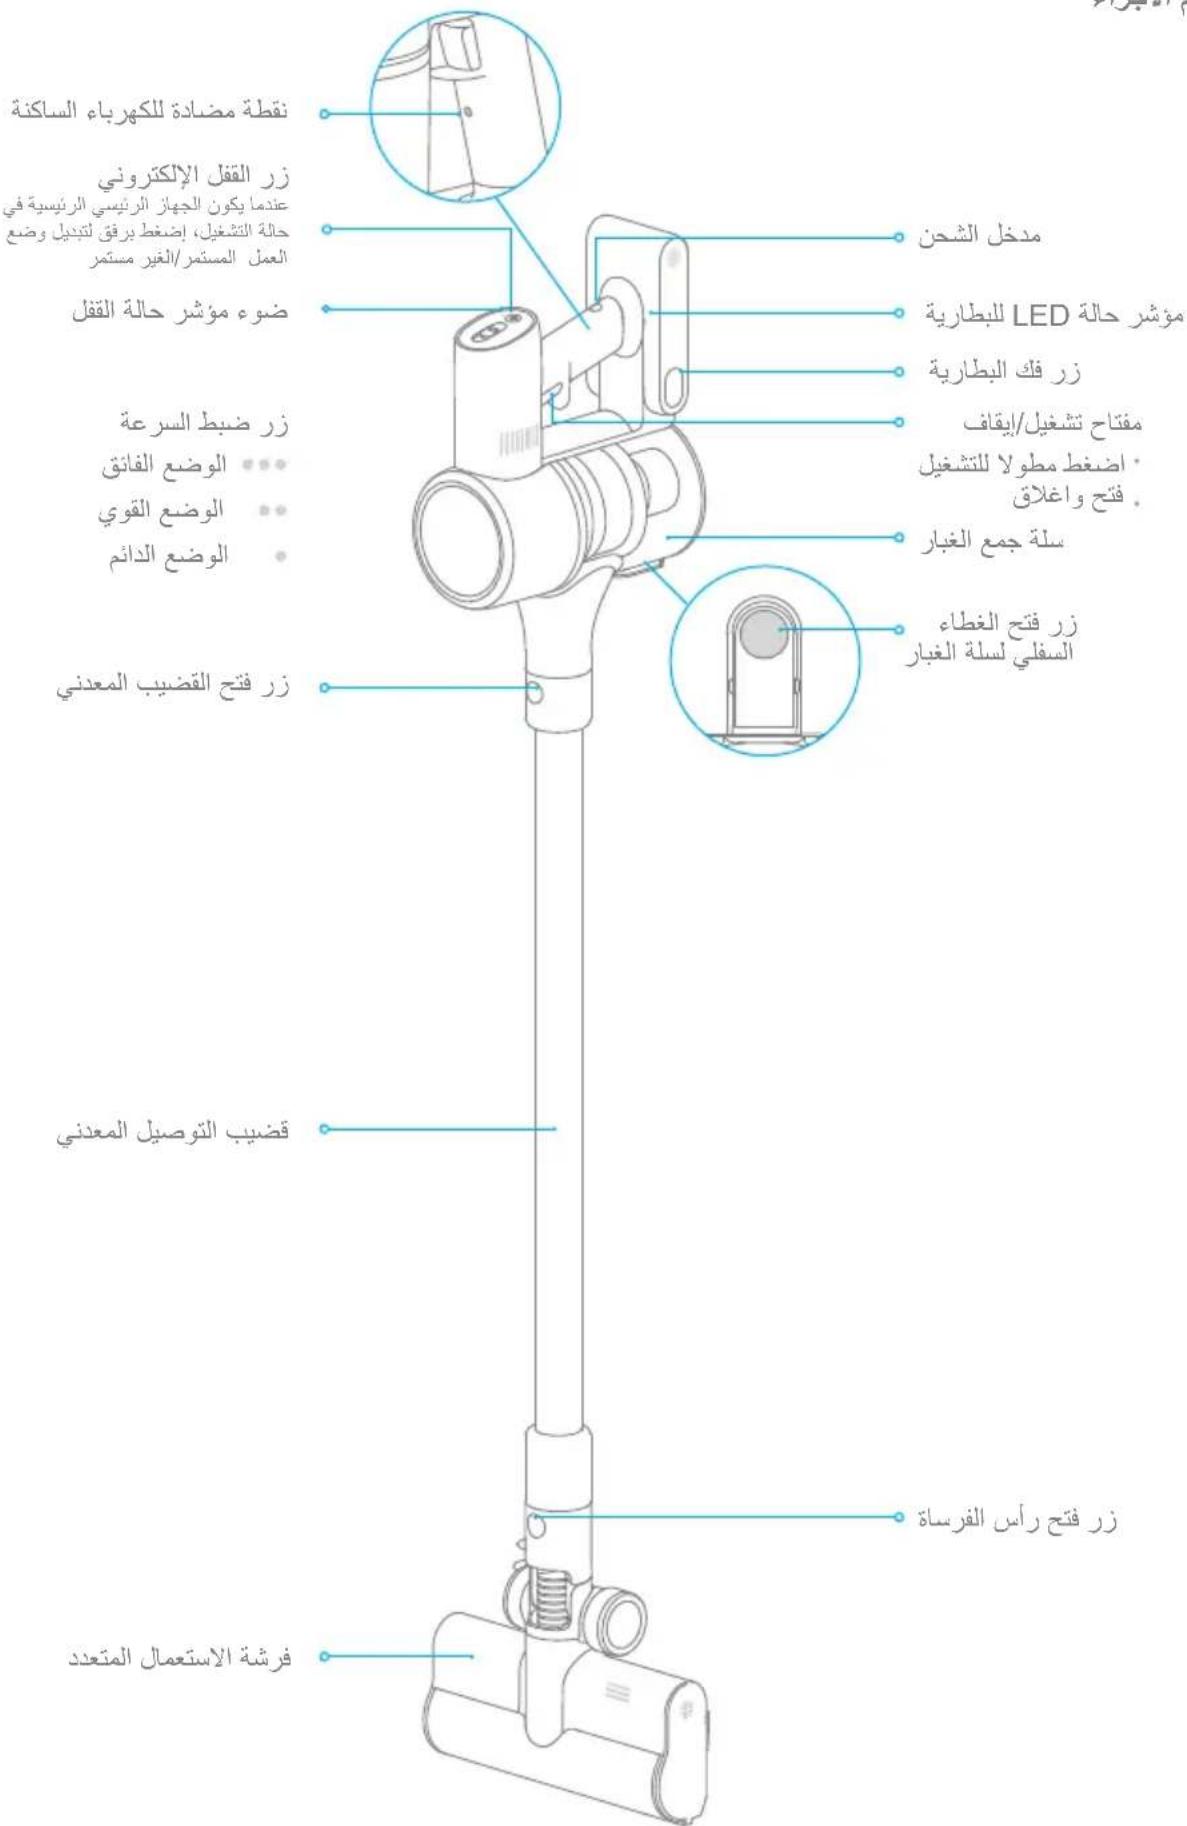
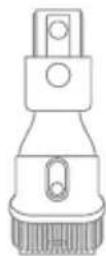
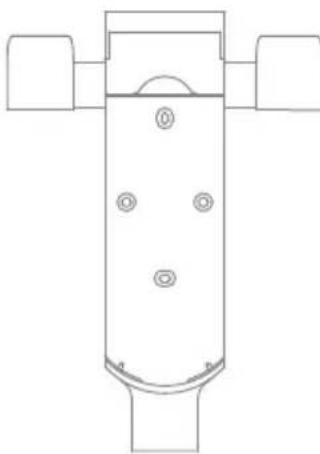
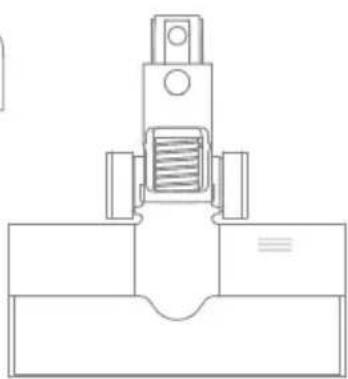
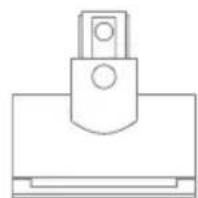
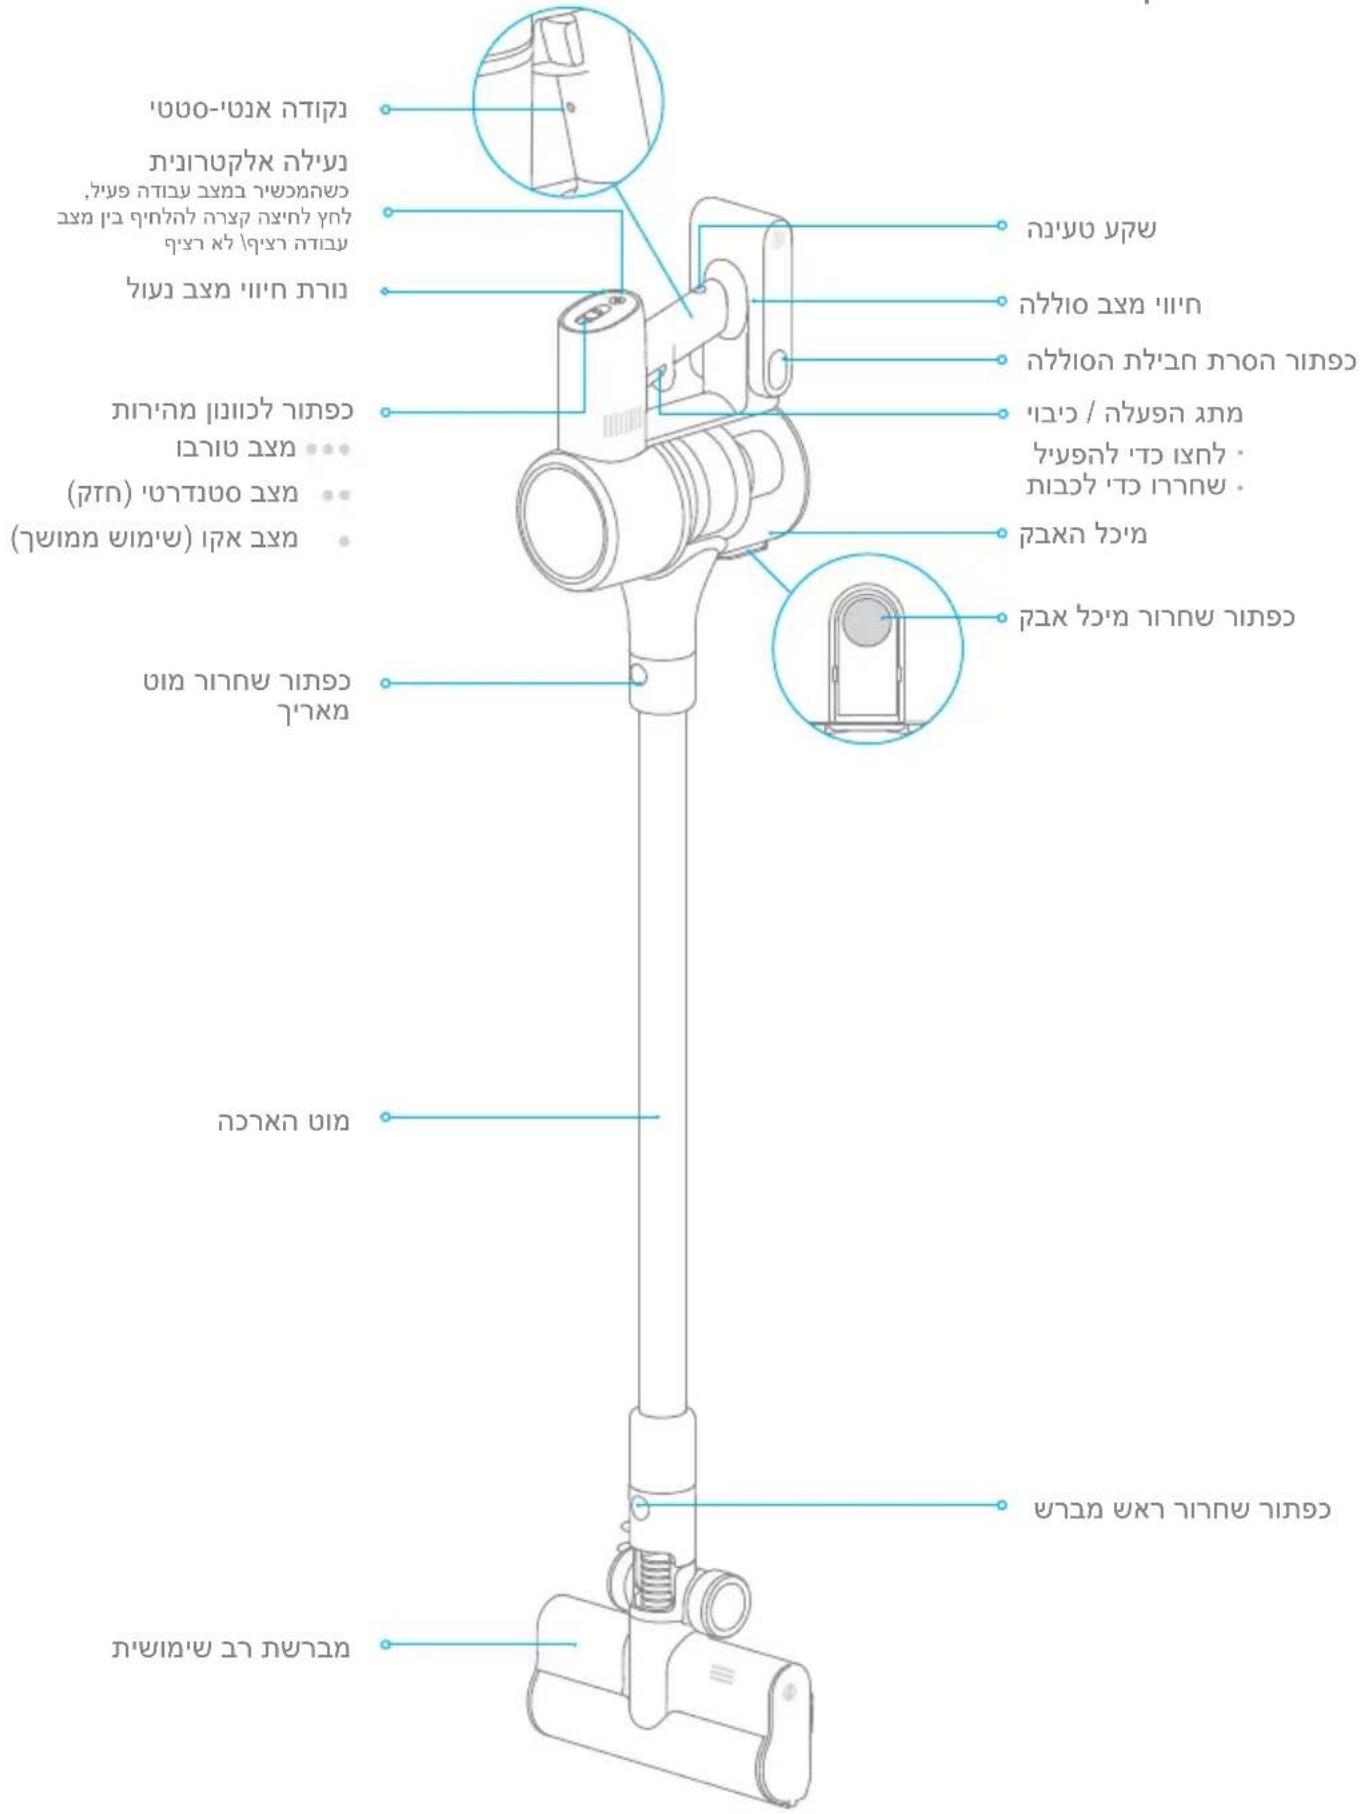
Component Names
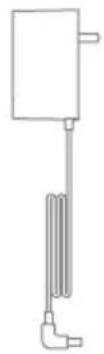
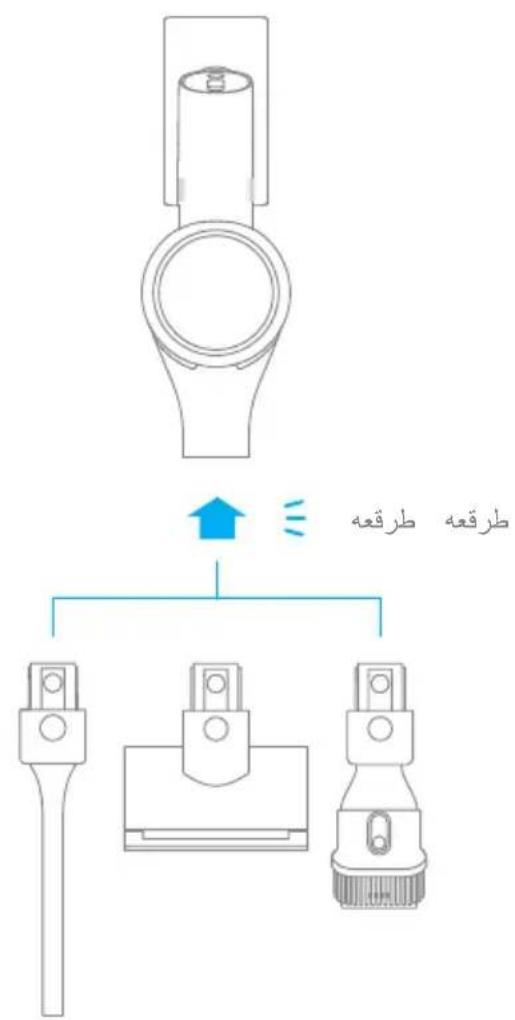
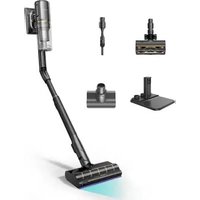
Accessories
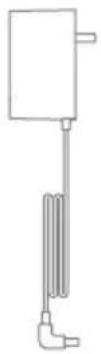
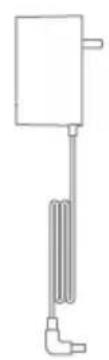
Charger Crevice Nozzle Extension Hose 2-in-1 Brush Nozzle

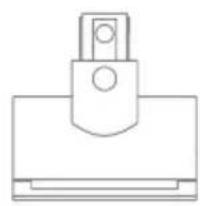
Storage Mount
(Including screws × 2 wall plugs × 2 and mounting template sticker)
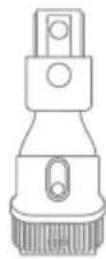
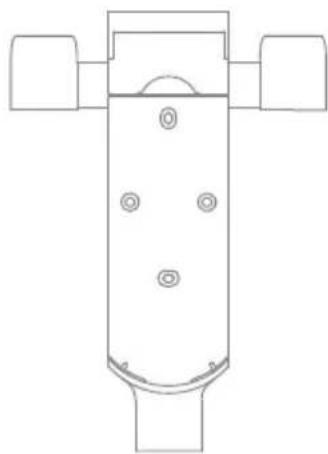
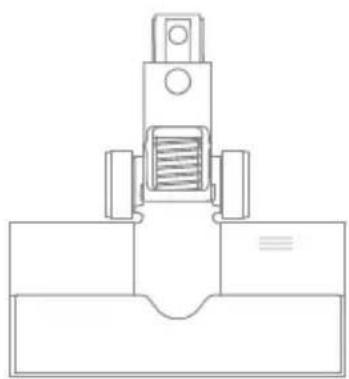
Multi-Brush Bar Mini Electric Brush2-in-1 Charging
Extension Rod
Note: The images in this manual are for illustrative purposes only. The actual product may differ.
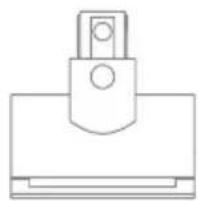
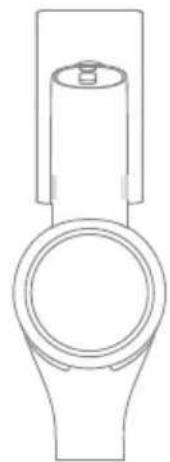
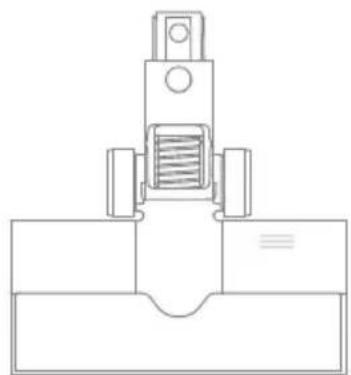
Installation
Vacuum Installation Diagram


Accessories Installation
Diagram
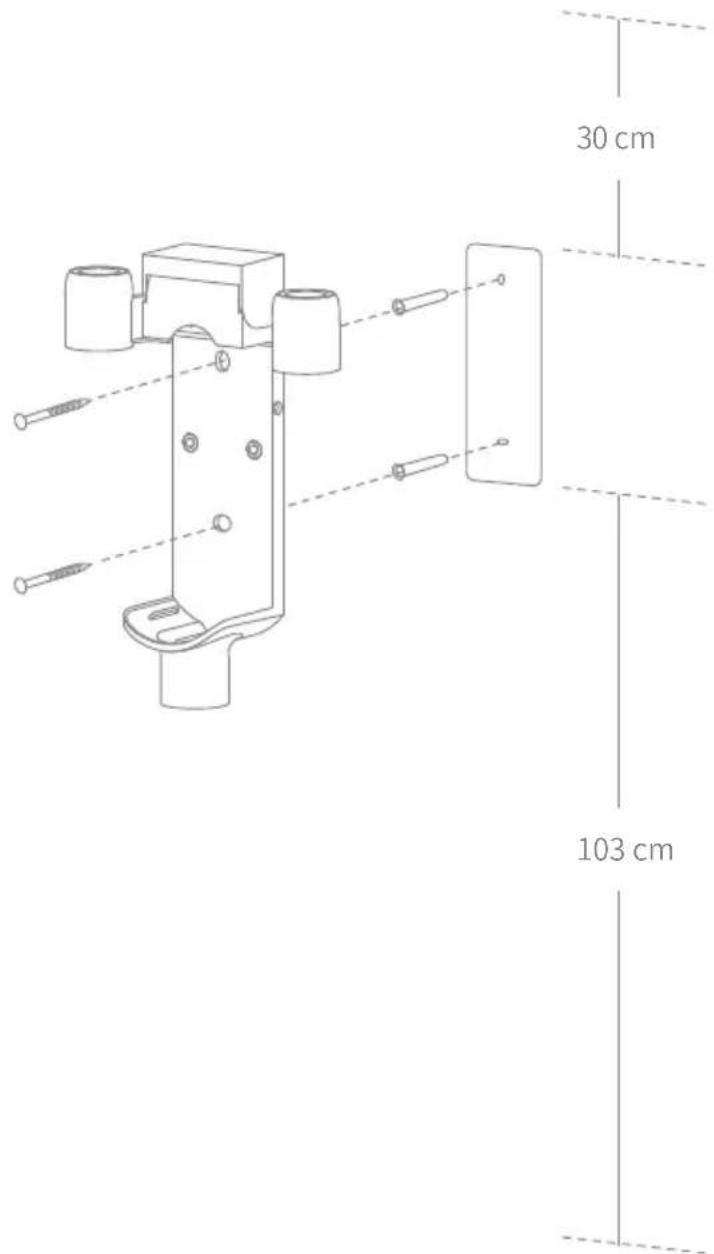
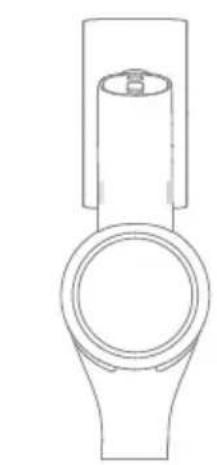
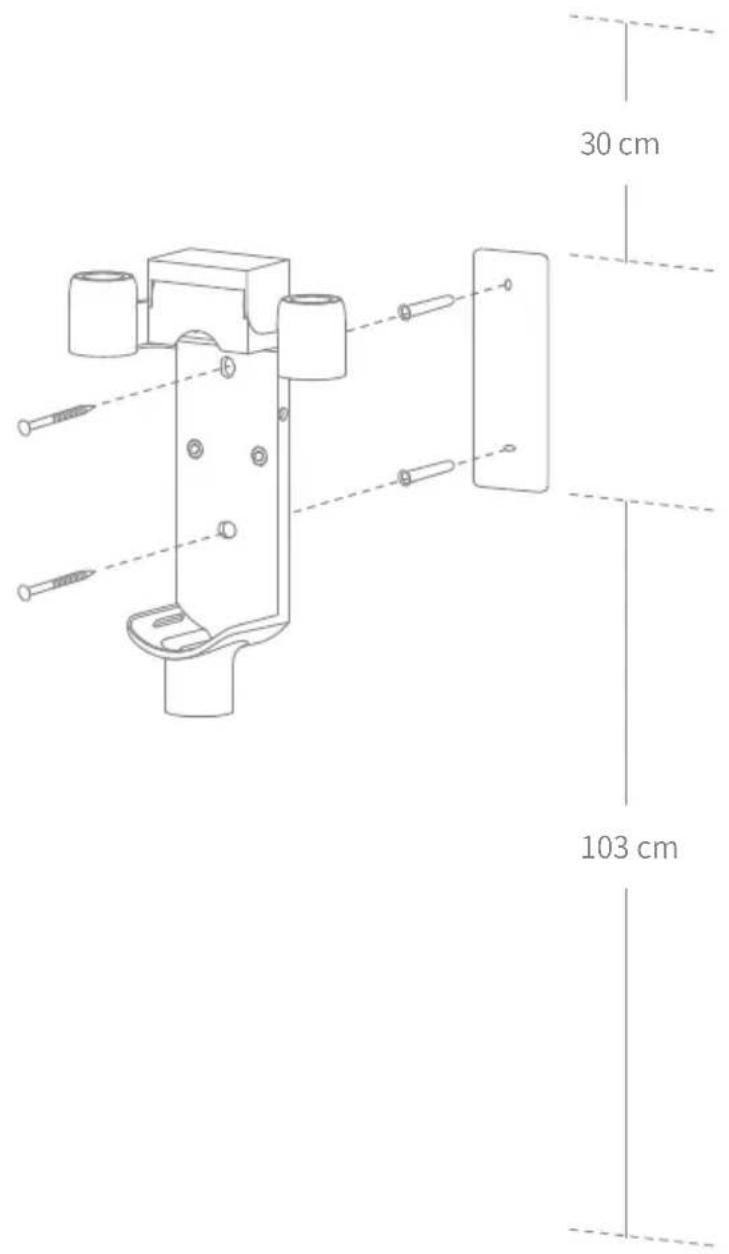
2-in-1 Charging & Storage Mount Installation Diagram
The 2-in-1 charging & storage mount is an optional accessory. You can install it based on your needs.
- The 2-in-1 charging & storage mount should be installed in a cool, dry place with an electrical outlet nearby. Prior to installing, ensure that there are no electrical wires or pipes in the space directly behind where the mount will be installed.
- The bottom of the mounting template sticker should be level and at least 103cm from the ground. The top should have at least 30cm^ of clearance above it. (30cm: Leave enough space just in case you may need to purchase the replaceable battery in the future.)
- Use a power drill with an 8 mm drill bit to drill a hole into each marker on the mounting template sticker, then insert a wall plug into each hole.
- Align the holes on the mount with the holes on the wall. Fasten it to the wall with the included screws.
Charging
Fully charge the vacuum before using it for the first time.
Note: A full charge will take approx. 3.5 hours. Using Turbo mode for a prolonged period will cause the battery to heat up, which increases charging time. Allow the vacuum to cool down for 30 minutes before charging it.
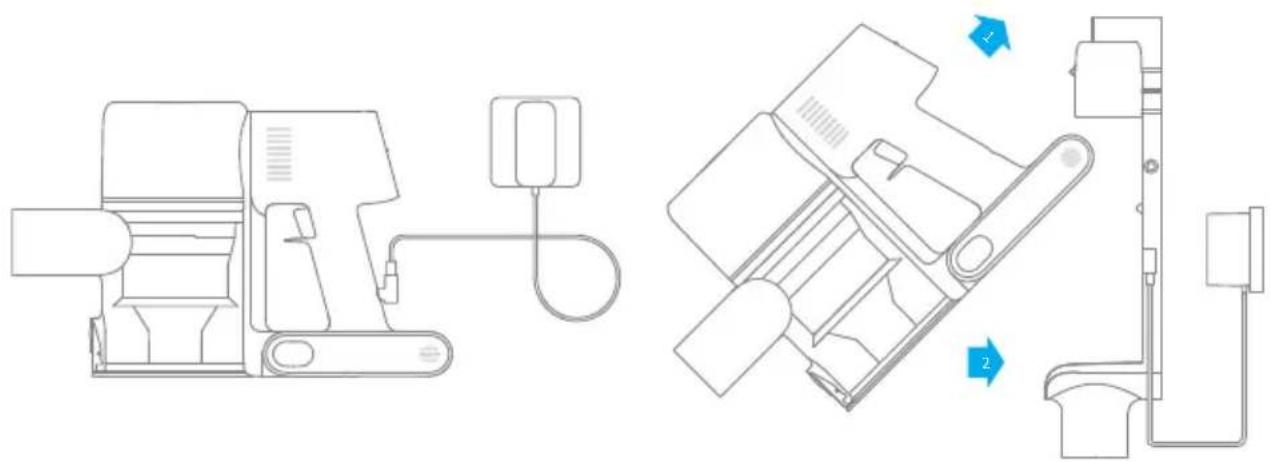
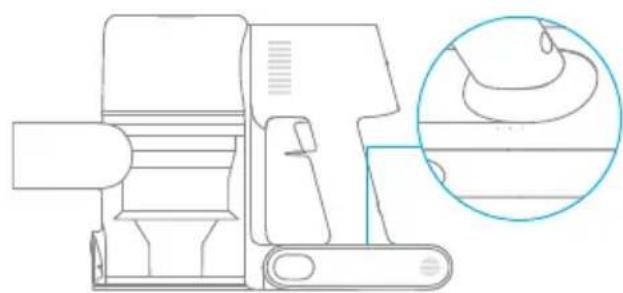
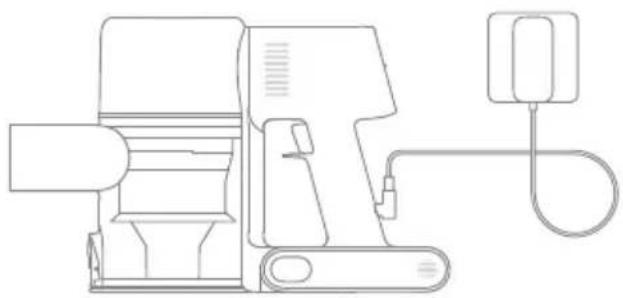
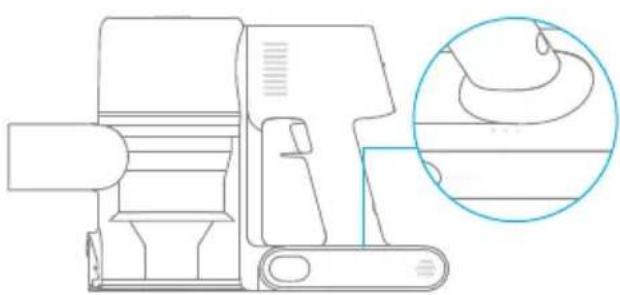
Charging Methods
Charging the vacuum with the charger Charging the vacuum on the charging mount
LED Battery Status Indicator
Low battery
Half battery
O Nearly full
O O O Fully charged
Off Blinking On
Note: Once the vacuum is fully charged, the indicator will turn off after 5 minutes, and the vacuum will enter the energy-saving mode.
How to Use

Working Methods
Select from two working methods for the vacuum, based on your needs.
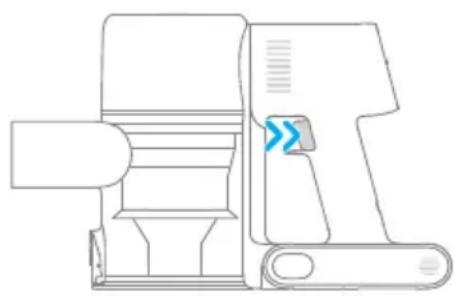
Method 1: Discontinuous Cleaning Mode
Press and hold the on/off switch to power it on, and release it to stop immediately.
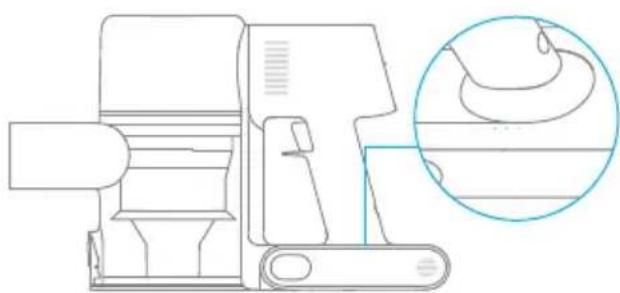
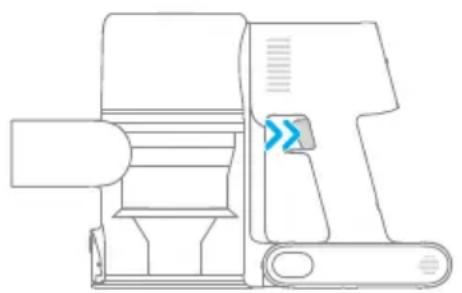
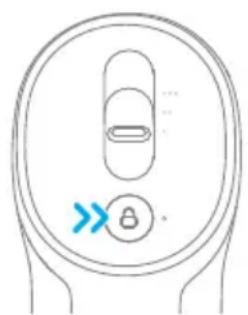
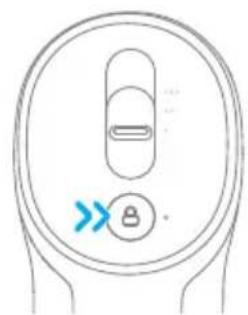
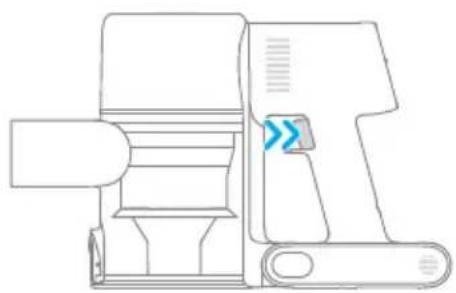
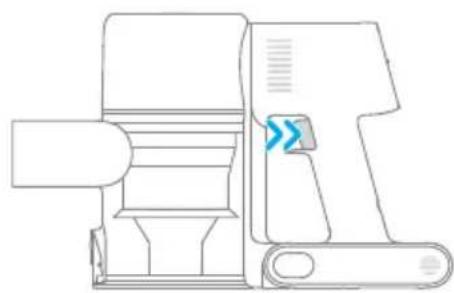
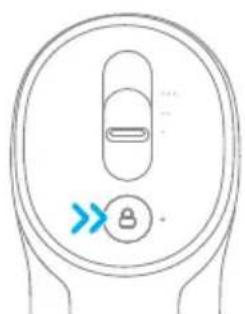
Method 2: Continuous Cleaning Mode (Electronic Lock)
Click the electronic lock to switch to Continuous Cleaning Mode when the vacuum is running. Then release the on/off switch to make the vacuum in Continuous Cleaning Mode.
Use the electronic lock to free your fingers and avoid finger fatigue caused by holding the switch.
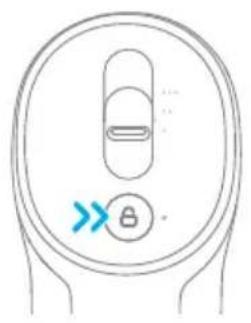
Note: In this mode, the lock indicator will illuminate steadily. Click the electronic lock again to quit the Continuous Cleaning Mode.
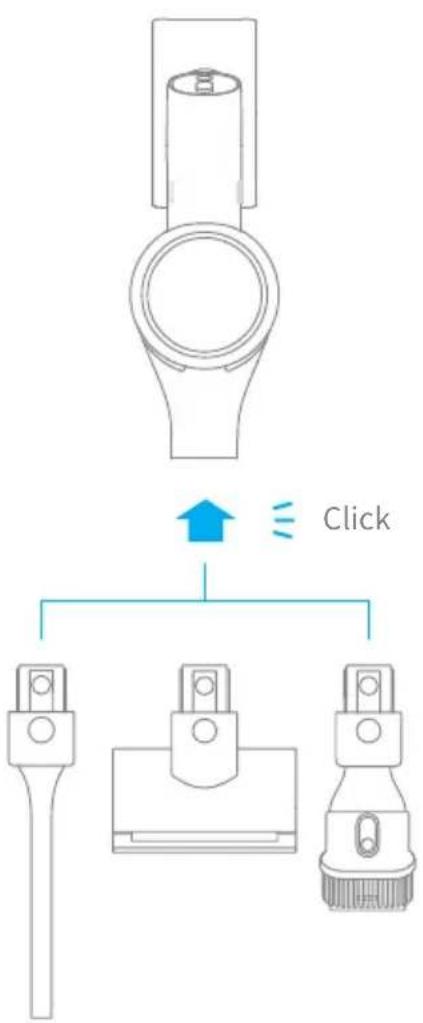
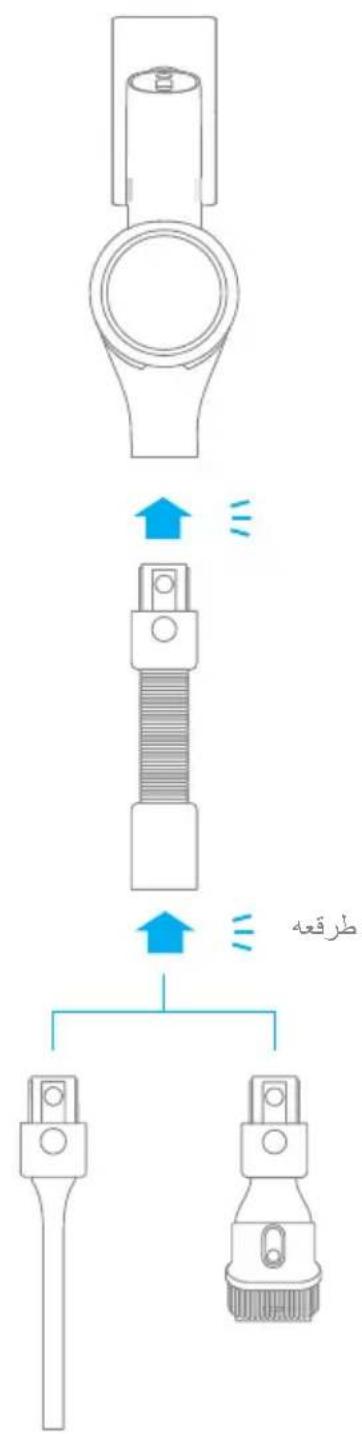
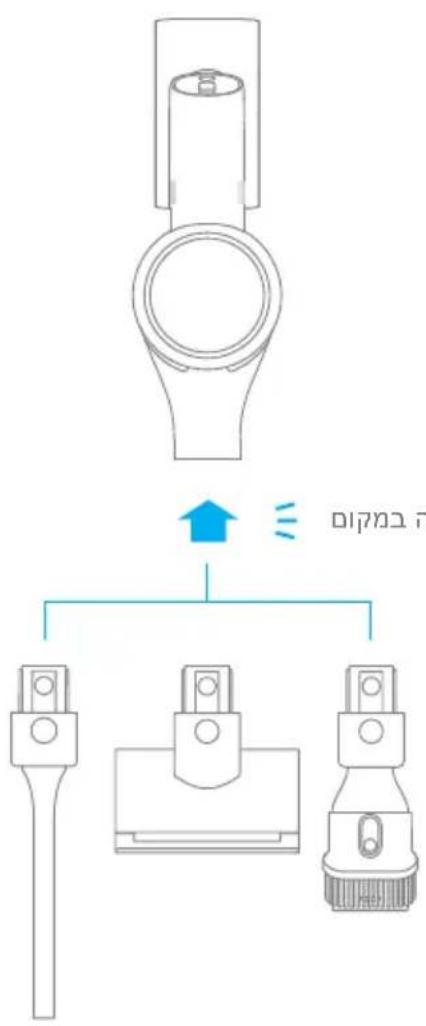
Using Different Accessories
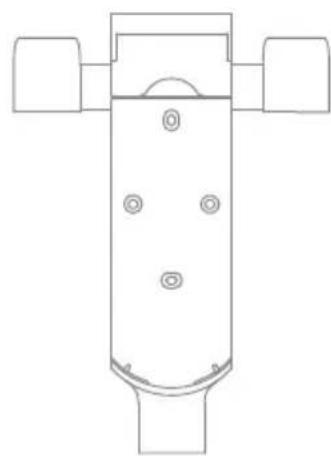
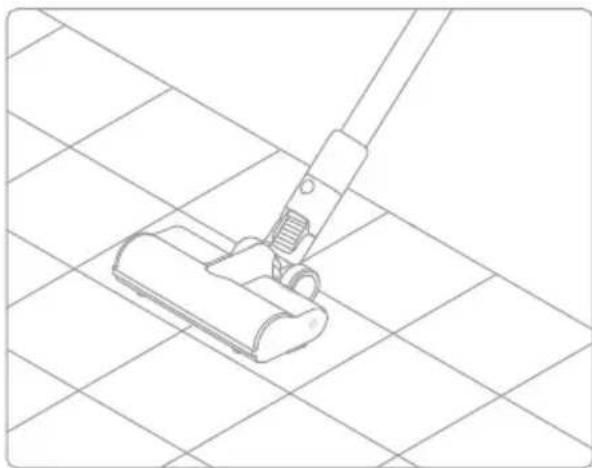
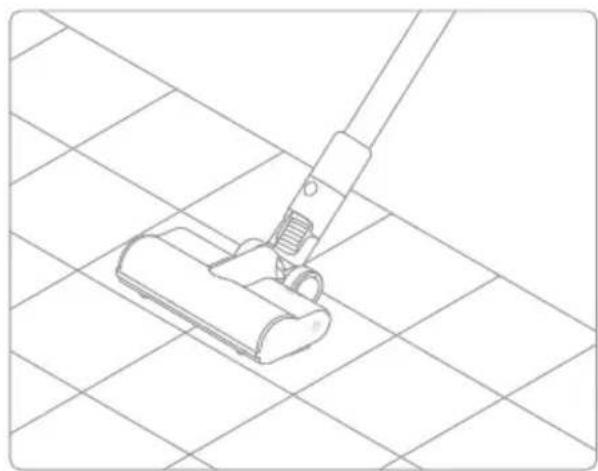
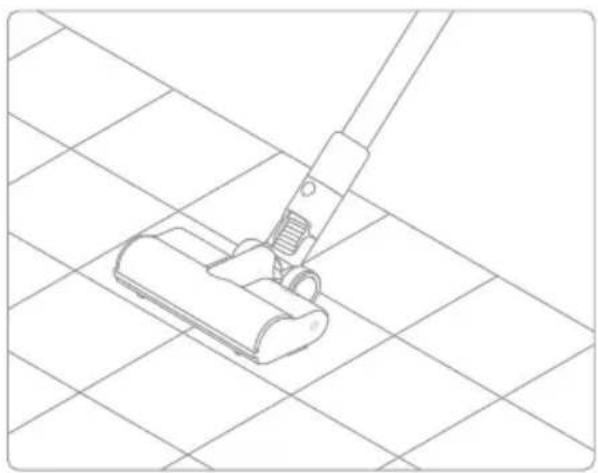
Multi-Brush Bar
Suitable for vacuuming on the med/short pile carpets, tiles and floors.
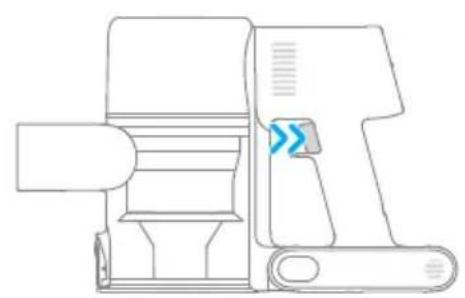
Note:The multi-brush bar can be attached directly to the vacuum.
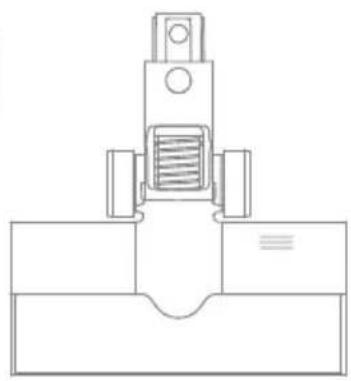
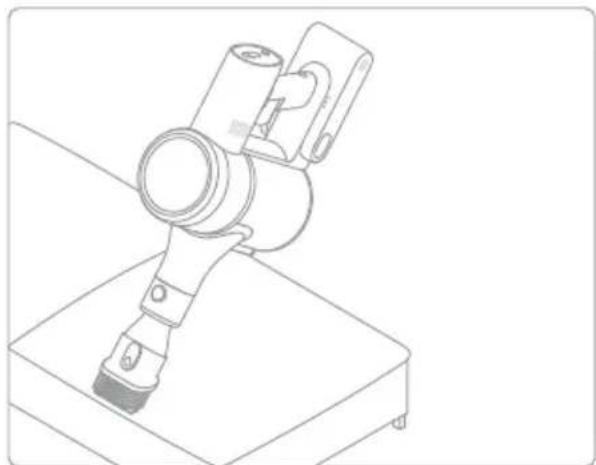
2-in-1 Brush Nozzle
For vacuuming curtains, keyboards, ceilings, sofas, vehicle interiors, coffeetables,etc.

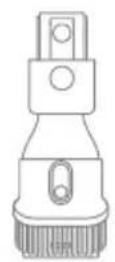
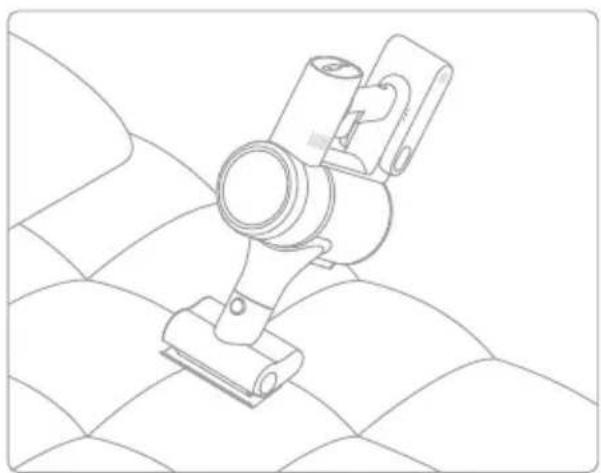
Mini Electric Brush
For vacuuming dirt, pet hair, and other stubborn debris from sofas, bedding, and other fabric surfaces.
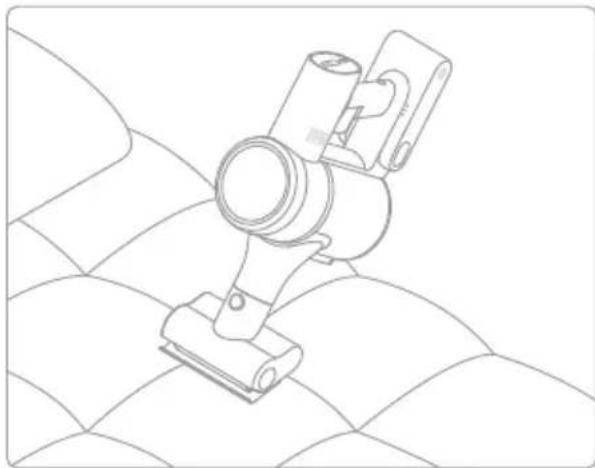
Note: It is not recommended to vacuum on fragile surfaces, such as silk.
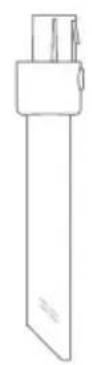
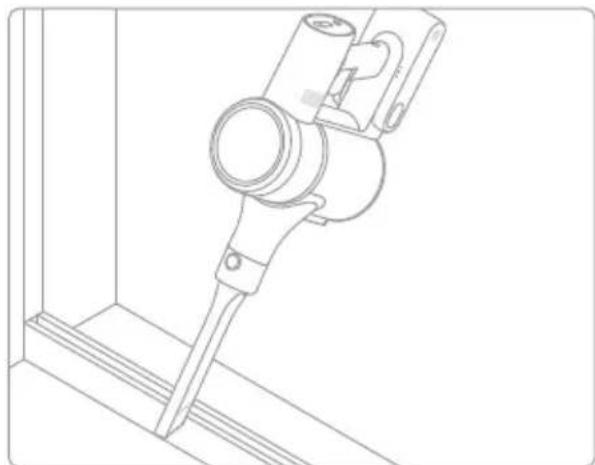
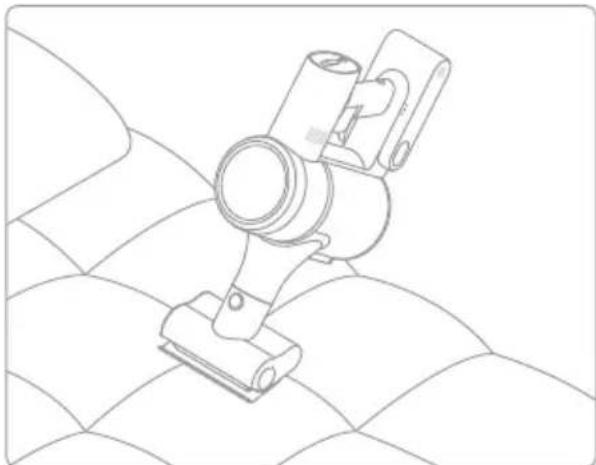
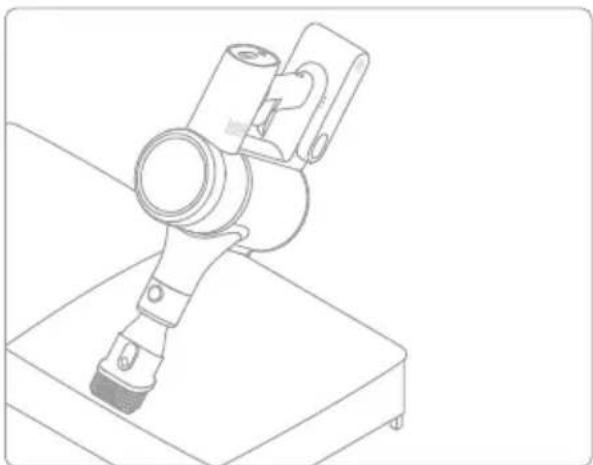
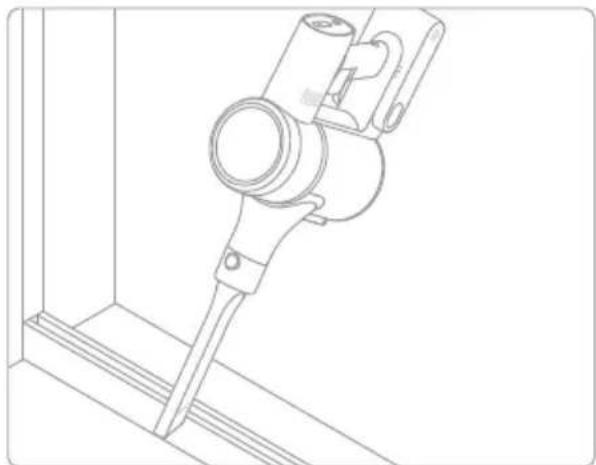
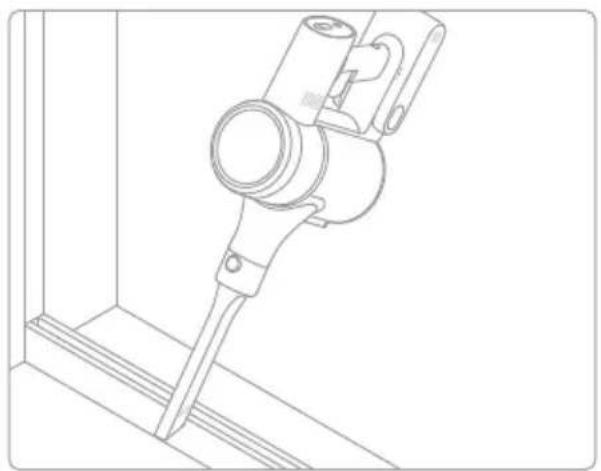
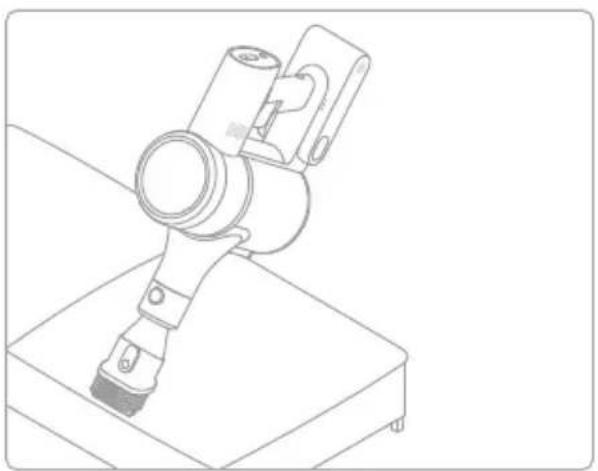
Crevice Nozzle
Suitable for vacuuming cracks, corners of doors and windows, stairs, and other hard-to-reach places.
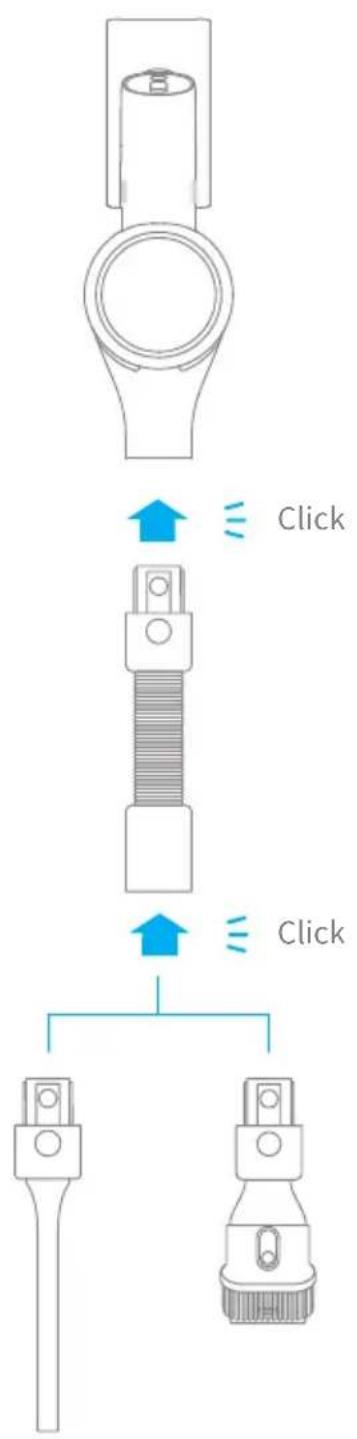
How to Use

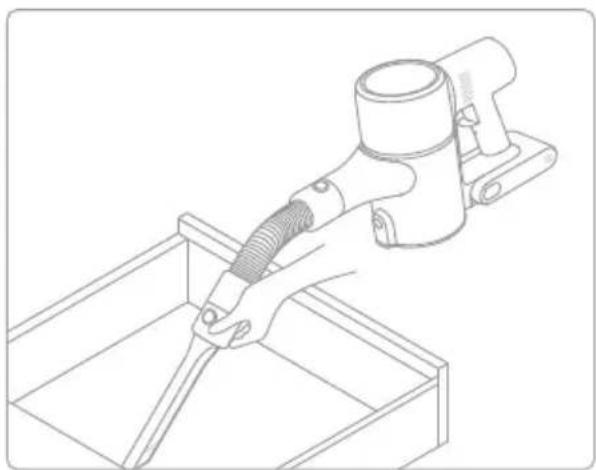
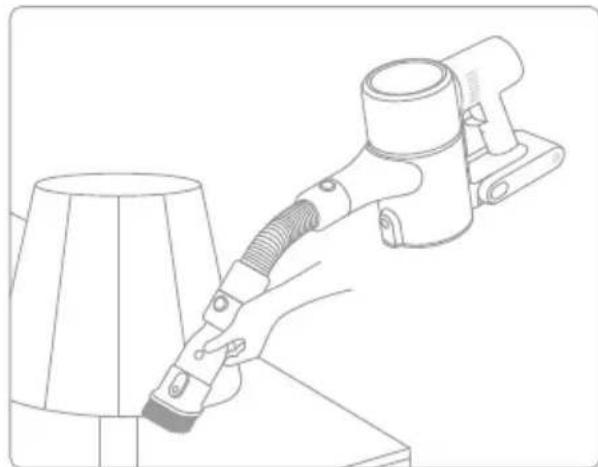
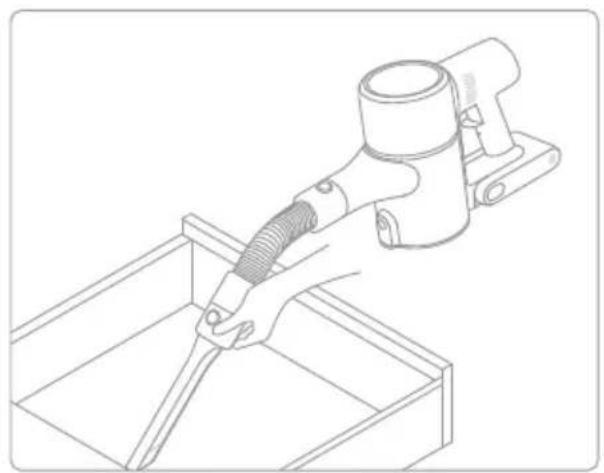
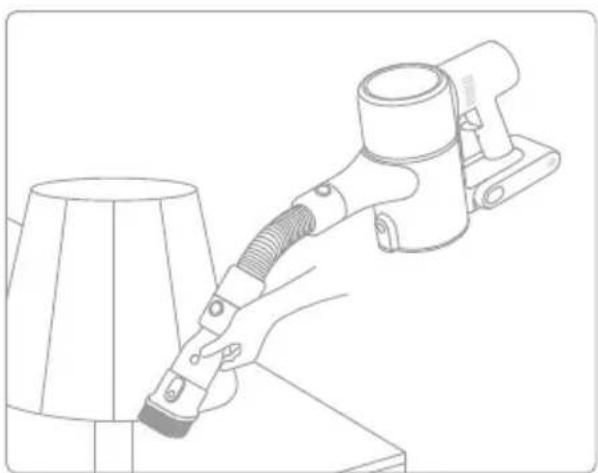
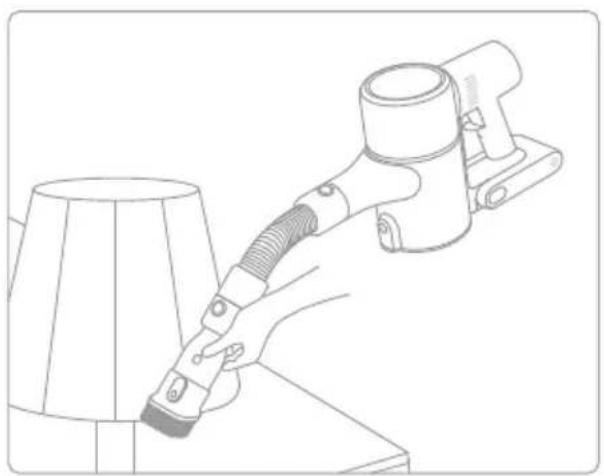
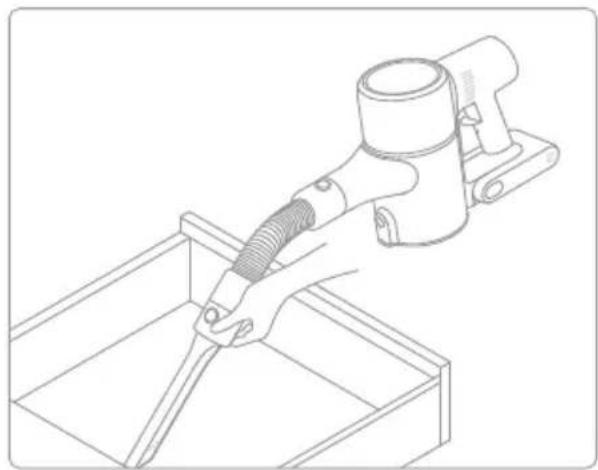
Extension Hose
Suitable for cleaning hard-to-reach corners such as drawers, vehicle interiors, sofa bottoms, etc.
Note:
- If any rotating part becomes stuck, the vacuum may shut off automatically. Remove any trapped foreign objects, then resume use.
- When the battery becomes overheated, the vacuum will automatically shut off. Wait until the battery temperature returns to normal, then resume use.
Care & Maintenance
Tips:
Always use genuine parts to keep your warranty from being void.
- If the filter or nozzle becomes clogged, the vacuum will stop working shortly after being turned on. Clear the tube to restore functionality.
- If the vacuum is not used for an extended period, fully charge it, unplug its charger, and store it in a cool, low-humidity environment away from direct sunlight. To avoid over-discharging the battery, recharge the vacuum at least once every three months.
Cleaning the Vacuum
Wipe the vacuum with a soft dry cloth.
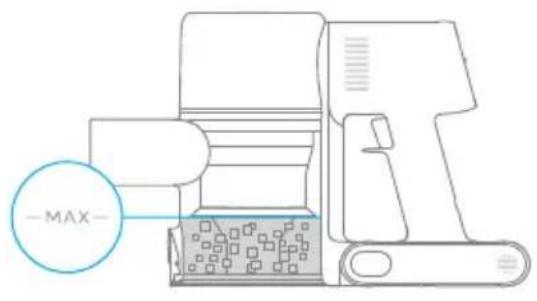
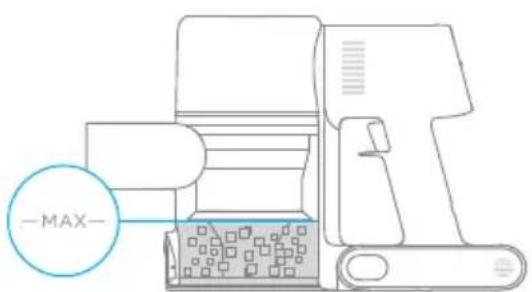
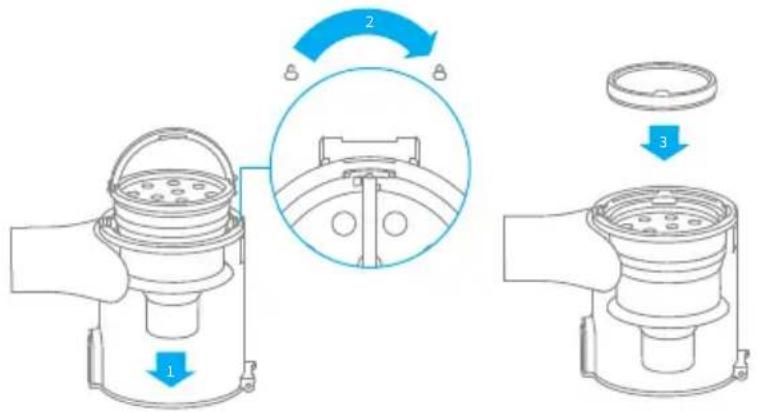
Cleaning the Dust Cup, Pre-Filter, and Cyclone Assembly
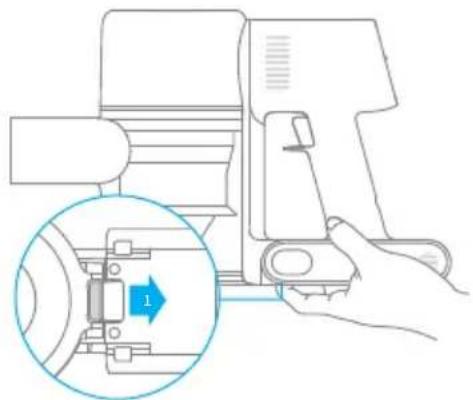
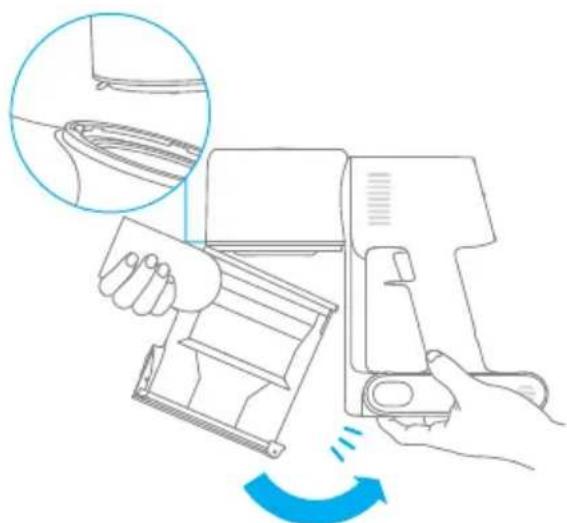
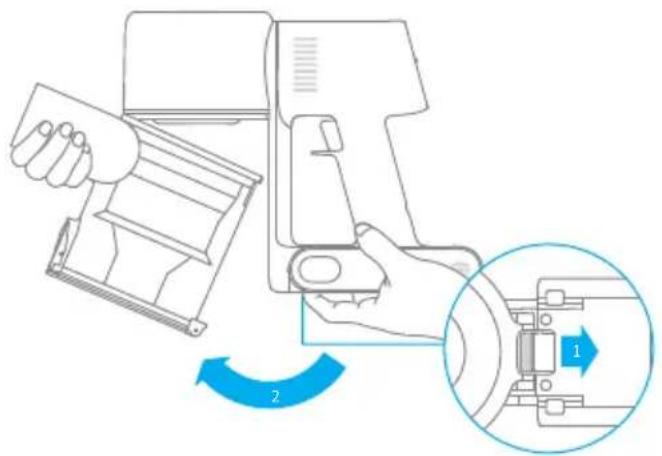
The vacuum's cleaning ability will be reduced if the dust cup is filled to the "MAX" mark. To regain performance, empty the dust cup in a timely manner. Before emptying the dust cup, make sure the vacuum is disconnected from the power, and do not press its power button.
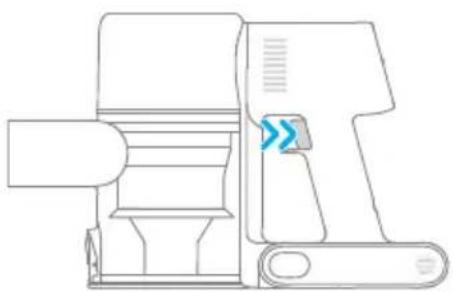
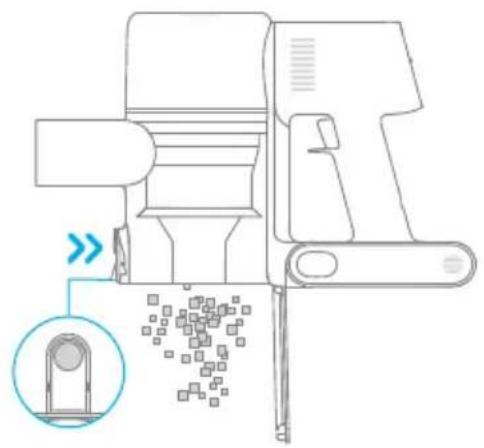
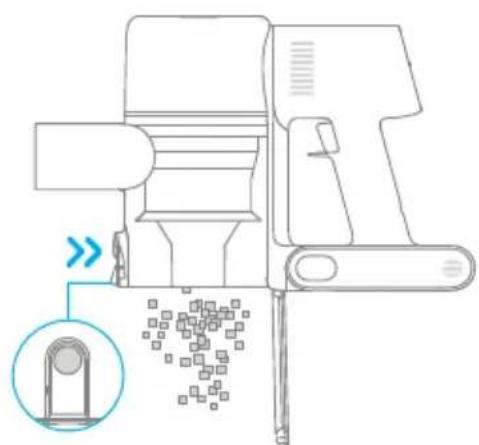
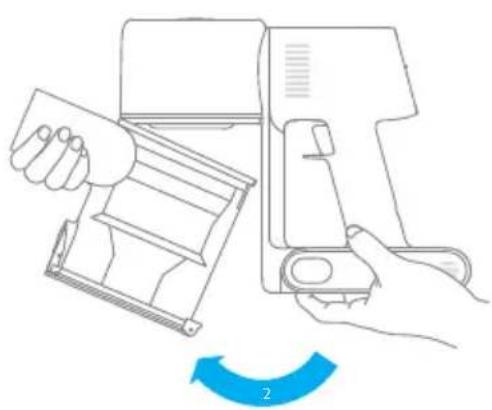
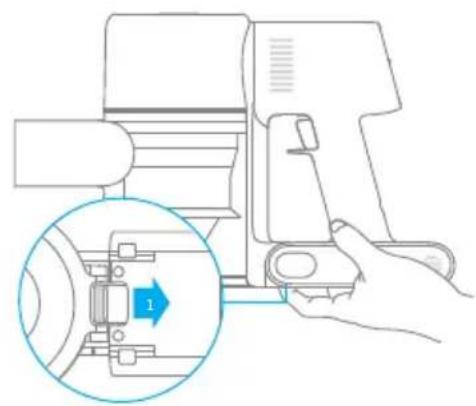
- Press the dust cup bottom cover release button, then empty the contents.
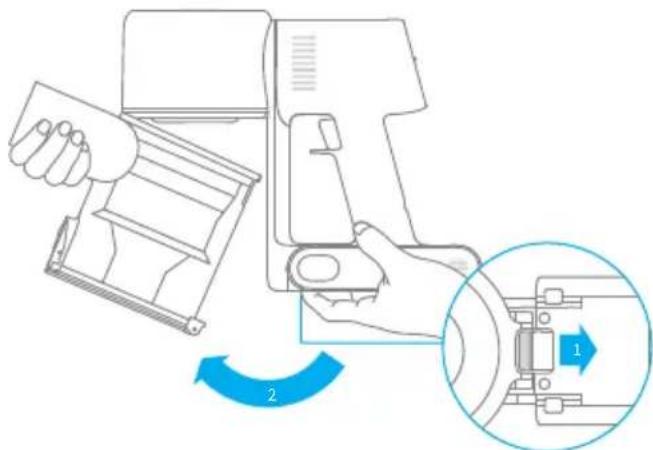
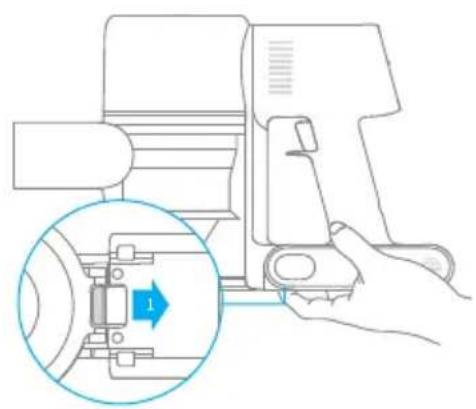
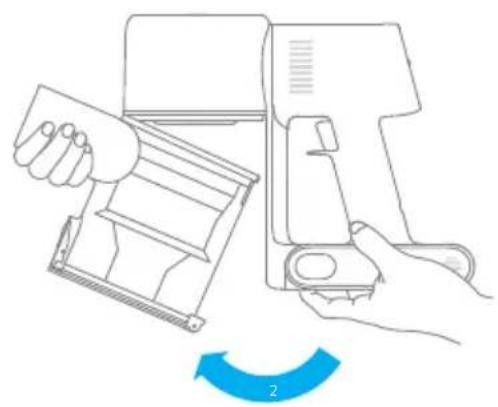
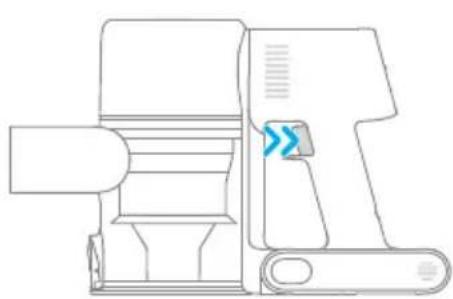
- Push the dust cup release switch in the direction indicated by the arrow, then gently remove the dust cup from the vacuum.

Care & Maintenance

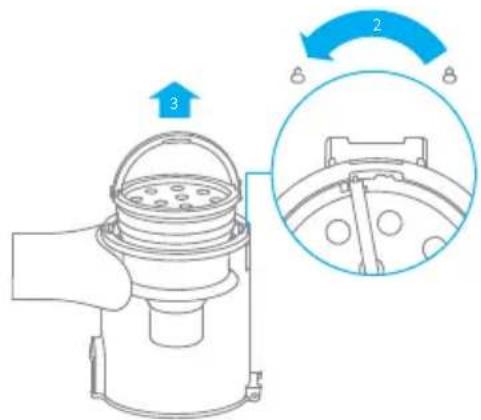
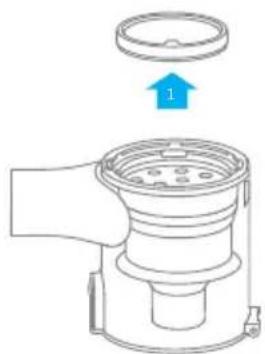
- Remove the pre-filter first, then lift the handle of the cyclone assembly and turn it counterclockwise until it stops, then pull to lift out the cyclone assembly.
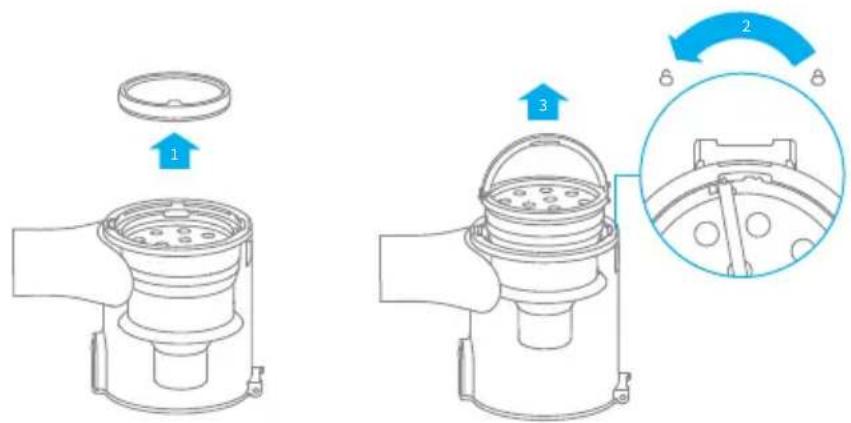
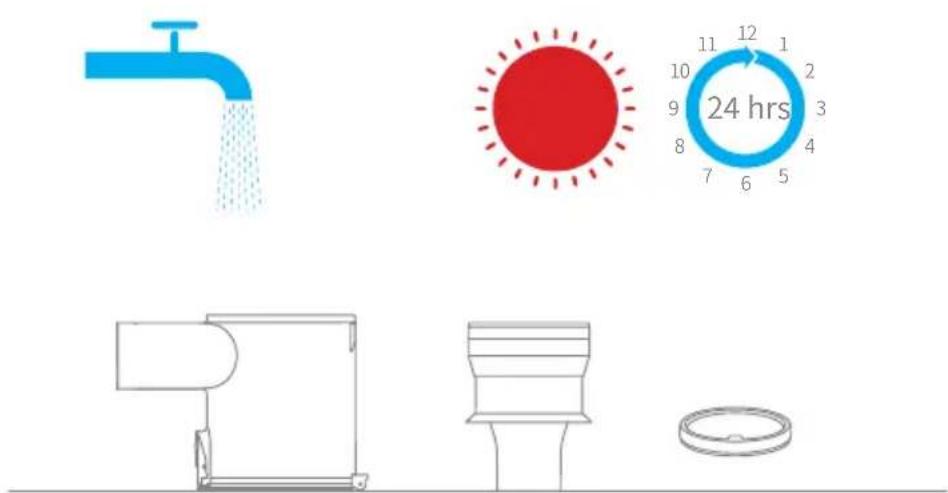
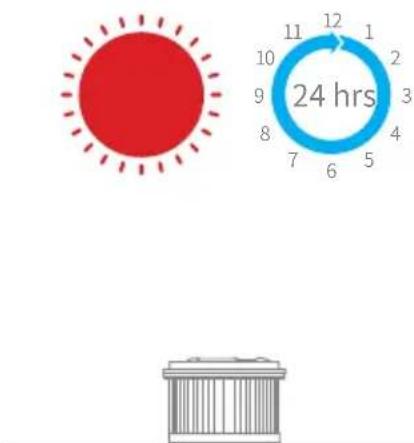
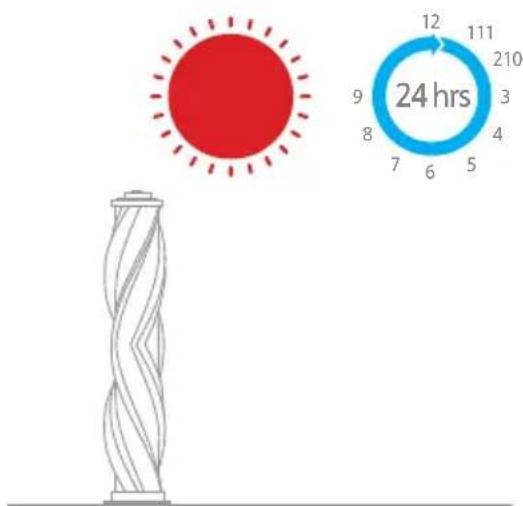
- Rinse the cyclone assembly, pre-filter, and dust cup until they are clean. After washing, air dry for at least 24 hours.
Pre-FilterDust Cup Cyclone Assembly
Note:
It is recommended to clean the dust cup once every month.
- It is recommended to clean the pre-filter at least once every 3 months and the cyclone system at least once every 6 months.
Care & Maintenance
Installing the Dust Cup, Pre-Filter, and Cyclone Assembly
- Insert the cyclone assembly vertically into the dust cup, and make sure that the handle of the cyclone assembly line up with the slot on the left side of the dust cup. Turn the handle clockwise until it locks, then flip the handle down.
- Place the pre-filter with its front side facing up into the cyclone assembly.
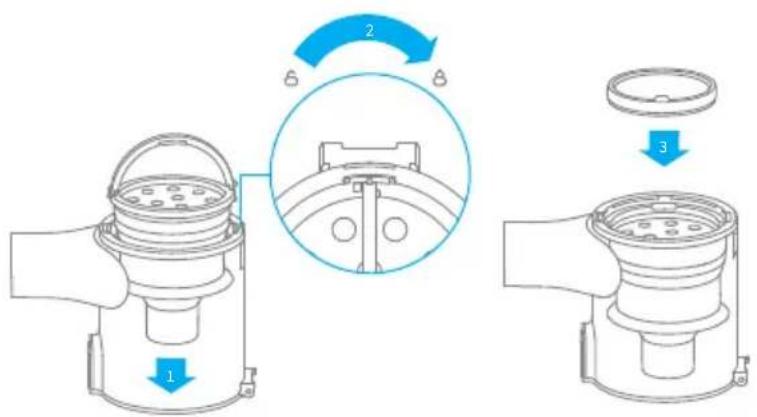
- Slightly tilt the dust cup so the slot aligns with the clip on the vacuum. Then gently push the dust cup until it clicks into place.
Care & Maintenance

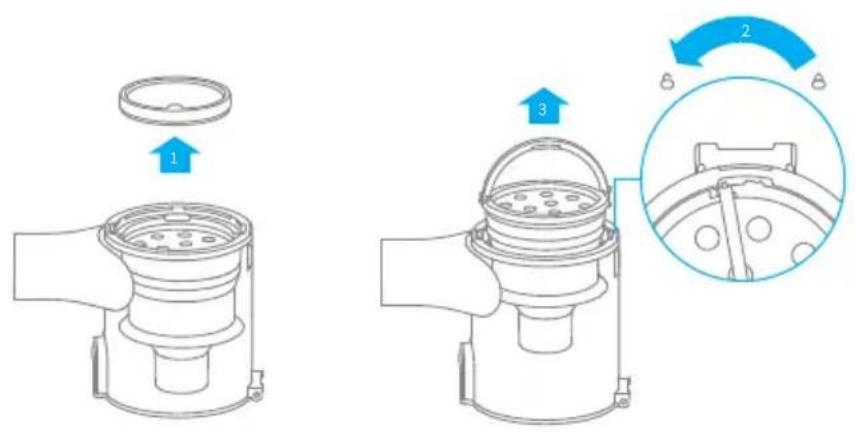
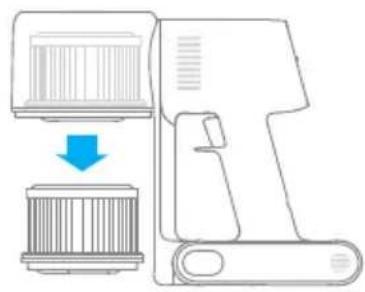
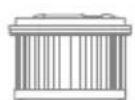
Cleaning the Filter
It is recommended to clean the filter once every 4 to 6 months.
-
Remove the dust cup as shown in the figure.
-
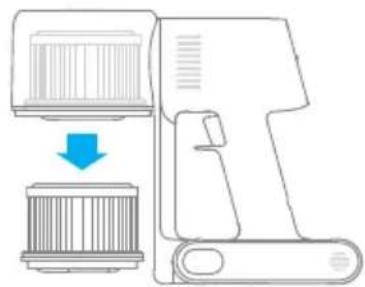
Remove the filter from the vacuum by pulling it down in the direction shown in the figure.
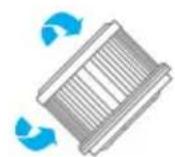
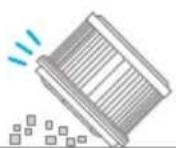
-
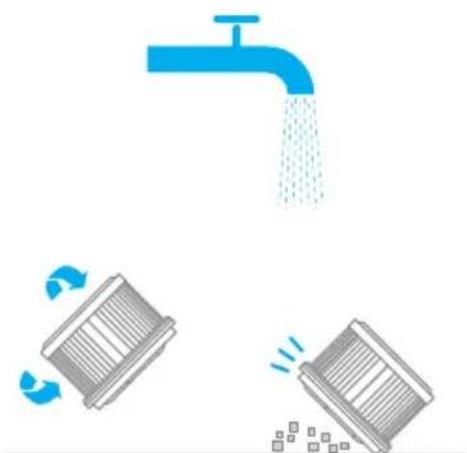
Clean the filter with clean water. Make sure you rotate the filter 360^ to thoroughly and remove all dust caught in the filter. Lightly tap the filter several times to remove any excess dirt.
-
Allow the filter to air dry for 24 hours.
Note:
- Only use clean water to wash the filter. Do not use detergent.
- Do not attempt to clean the filter with a brush or finger.
Care & Maintenance
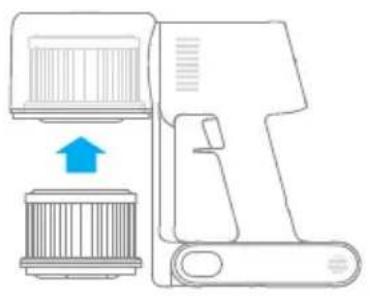
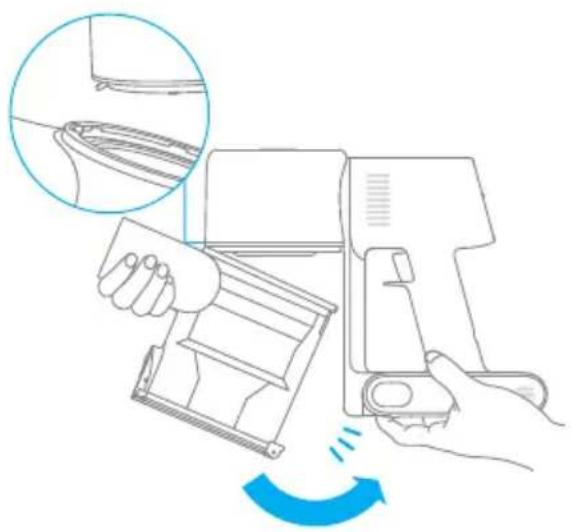
Installing the Filter
-
Insert the filter into the vacuum and gently press down, as illustrated.
-
Reinstall the dust cup.

Care & Maintenance

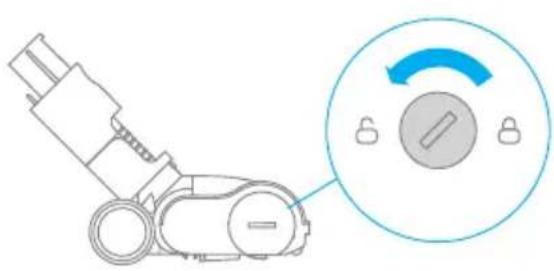
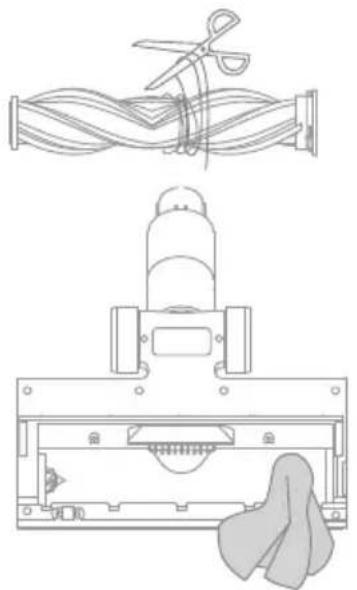
Cleaning the Multi-Brush Bar
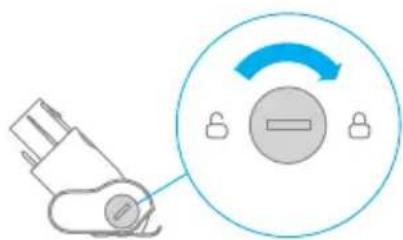
- Turn the lock counterclockwise until it stops, then remove the roller brush from the brush bar.
- Use scissor to cut off the hairs and fibers that get stuck on the brush bar head. Wipe the dust from the notch and transparent cover with a dry cloth or paper towel. Thoroughly dry before use.
-
When it is dirty, rinse the roller brush with clean water until it is clean.
-
Stand the roller brush upright for at least 24 hours until it is fully dry.

Care & Maintenance
Cleaning the Mini Electric Brush
- Use a coin as illustrated to rotate the lock counterclockwise until you hear a click.

- After unlocking the roller brush, remove it from the mini electric brush, then rinse and clean the brush head.


- Stand the roller brush upright in a well-ventilated area for at least 24 hours until it is fully dry.

- Once the mini roller brush is dry, reinstall it by following the disassembly steps in reverse.
Care & Maintenance

Battery Pack
The vacuum contains a removable rechargeable lithium-ion battery pack which has a limited number of recharge cycles. After extended use, the battery pack may no longer hold a charge. If this happens, it means the battery pack has reached the end of its life cycle and needs to be replaced.
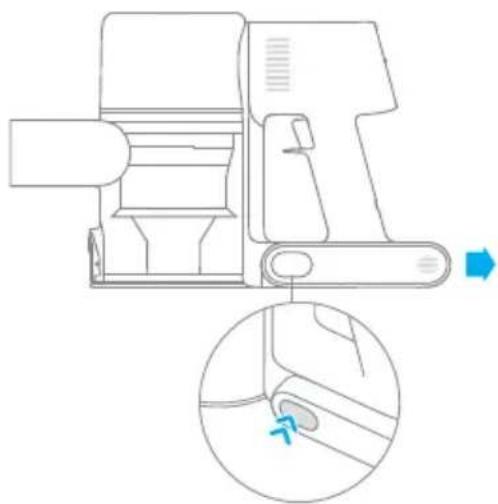
-
Press down the battery pack release button and slide the battery pack to the right, as illustrated, to remove it.
-
Install the new battery pack.
| Vacuum Cleaner | |||
| Model VTN1 Charging Voltage 30 V | --- | ||
| Rated Power 400 W Rated Voltage 25.2 V | --- | ||
| Charging Time Approx. 3.5 hours | |||
| Mini Electric Brush | |||
| Model DM002 | |||
| Rated Power 20 W Rated Voltage 25.2 V | --- | ||
| Multi-Brush Bar | |||
| Model AVB9 | |||
| Rated Power 40 W Rated Voltage 25.2 V | --- | ||
| Charger | |||
| Model | YLS0251B-E300080 | Average Active Efficiency | 88.53% |
| Input | 100-240 V~50/60 Hz 0.8 A max | Efficiency at Low Load (10%) | 78.66% |
| Output 30 V 800 mA | --- | No-load Power Consumption | 0.09 W |
| Charger | |||
| Model YLS0241A-A300080 | Average Active Efficiency | 86.98% | |
| Input | 100-240 V~50/60 Hz 0.8 A max | Efficiency at Low Load (10%) | 80.67% |
| Output 30 V 800 mA | --- | No-load Power Consumption | 0.08 W |
| Rechargeable Lithium-Ion Battery Pack | |||
| Model | P2010-7S1P-BW P2010-7S1P-BWB | Nominal Voltage | 25.2 V---- |
| Rated Capacity | 2400 mAh | Energy | 60.48 Wh |
| Rechargeable Lithium-Ion Battery Pack | |||
| Model | P2010-7S1P-BWA | Nominal Voltage | 25.2 V---- |
| Rated Capacity | 2350 mAh | Energy | 59.22 Wh |
If the vacuum is not working properly, please refer to the table below.
| Errors Possible Causes Solutions | ||
| Vacuum does not work. | Vacuum is out of battery or low on power. | Fully charge the vacuum, then resume use. |
| Overheat protection mode triggered by a blockage. | Clean the suction openings or air duct. Wait until the vacuum cools down, then reactivate it. | |
| Suction opening or air duct is blocked. | Clear any blockages from suction opening or air duct. | |
| Weak suction force. | Dust cup is full and/or filter assembly is clogged. | Empty the dust cup and clean the filter assembly. |
| Attachment is blocked. | Clear any blockages in the attachment. | |
| Motor makes a strange noise. | Main suction opening or extension rod is blocked. | Clear any blockage in the main suction opening or extension rod. |
| The first indicator is red after turning on the vacuum. | Battery pack is damaged. | Please contact after-sales service to arrange maintenance. |
| The first indicator blinks red when charging the vacuum. | The charger is incompatible. | Only use the original charger to charge the vacuum. |
| The battery indicator does not light up when charging. | The charger does not plug into the vacuum well. | Check whether the charger is properly plugged into the vacuum. |
| The battery is charged and switches to Sleep Mode automatically. | The vacuum runs normally. | |
| If the problem persists after ruling out the above two possibilities. | Please contact the after-sales department for maintenance. | |
| Charging too slow. | Battery temperature is too low or too high. | Wait until the battery's temperature returns normal, then resume use. |
The lithium-ion pack contains substances that are hazardous to the environment. Before disposing of the vacuum, please remove the battery pack, then discard or recycle it in accordance with local laws and regulations of the country or region it is used in.
WEEE Information

All products bearing this symbol are waste electrical and electronic equipment (WEEE as in directive 2012/19/EU) which should not be mixed with unsorted household waste. Instead, you should protect human health and the environment by handing over your waste equipment to a designated collection point for the recycling of waste electrical and electronic equipment, appointed by the government or local authorities. Correct disposal and recycling will help prevent potential negative consequences to the environment and human health. Please contact the installer or local authorities for more information about the location as well as terms and conditions of such collection points.
Sicherheitshinweise
Extension multi-brosses
Tuyau couple extensible
HnKaTOp COCTOHN aKymyIaTopa
KhONka CHaTna aKKymyIaTopa
KHONKa BKNIOUeHnI N BbIKIOUeHnI
HaKMMTe, YTO6bI BKNIOUHTb
OTnyCTnTe,TO6bI BbIKHouHTb
KoHTeHepIyIbIIN
KhONKa CHrTnA
HNXHHeKpbIiKn
KoHTeHepaIyIbIIN
KhoNkaДлЯсьemaHaCaN
CnncokakceccyapOB
3apnHoe yctpoNCTBO

tpy6ka
Hacapka nla uenuynn HuaaHaB 1"


yDnHnTeB
Iopctabka dny 3apdkn npaheHna "2B1"
MHorOΦyHKUHOHaJIbHaJ 电Tka
3JIeKtpnuecka MNHN-ETKa
(BKOMnIeKTe:2BnHTa,2IO6eN I CTnKeP MeCTaΦnKcaun)
IpiMeaHHe. Bce nllIOCTpaunB daHHOM pyKOBOcCTBe npuBeJeHb I NCKIoUHTeNbHO dIra cnpaBKn. IIO BHeSHnM napamETpam opneHTpyntecb Ha φakTNueckN BnI3dEInna.

HdkaTOp coCTOHN aKKymyIaTopa
Hn3KnypoBHeb3apya
CpeHnIypoBHe3apra
O O NouTn noJIhBiI yPoBeHb 3apra
O O O PoiHbI yPoBcHb 3apra
BbIKJ.

MuraHne
BKJ.
Приимechани.
Yepe3 5 MmHyT nocIe OKOHuaHn 3apAkn HndKatOp noracHe, a nbilecoc nepenet B 3nehepro6eperaUoyn pexum.
Pa6oynepexnmbi
OCTyHbI 2 pexima pa60tbl po60ta-tnlecoca, KOToPbIe MOryT 6bITb Bbl6paHbIB 3aBnCmOcTn OT Tpe6oBaHn K y6OpKe.
PexnM 1:"npepbBncta y6opka"
HaKmnte u ydepXnBaIte nepeKluoyatel nbIeocca, YTO6bl Haayatb pa6Oty, n OTnyctnte erO, YTO6bl HemeJeHNO OCTaHOBNTb.
Pexm2:"HenpepbHna y6opka"
B pa6ooyem coCTOAHN NblneCocA HaKMnTe KhoNky , qTo6bl BkIIOHTb peKIM 6e30ctaHOBOUHoi pa60tbl. 3aTeM OTnyCTnTe BBIKIOuHaTeJIb NblneCocA, qTo6bl IpeeITN B peKIM 6e30ctaHOBOUHoi pa60tbl.
C nomoubI O yHKuIN 3JIeKTPoHNO6IOKnPOBKn Bbl MoKeTe He ydepxNBA Tb KHOKNy nepeKlUoyehn NOCTOraHHo IJRA 3aunTbI OT yCTaNoCTn.
Приимechани.
B 3TOM peKIme haxmTe KhoNky nepeKIOUeyHn, UTo6bl npNoctaHObUTb pa6Otu nn NOBTOPO HO 3aNyCTuTB paleoc6be3 n3MeHeHHn peKIMa pa6OTbl.
HcnoJb3yeTcIy6OpKn rpr3n, WepctN KINBOTbIX N dpyrNX CTOIKNX 3aqr3HeHn Ha DnBaHe, MaPace N dpyrNX TkaHeBbIX NOBepxHOCTax.
IprimeaHne. He peKomeHdyetc HcnoJIb3OBaTb nbIeCoc dJa y6OpKn IOBepXHOCTe,Ha KOTopbIX MOryt OcTaTbc 3aueKNu capaNNbI (HaNP. IWeNK).
UeTKa "2 B 1"
NcNoJIb3yETcIdI OUHCTKu WTOp, KJIaBnAtypbl, NOTOnOuHOH IINTKu, CaNoHa ABTomO6nJI, KoΦeINhBX CToJNKOB uT. d.
HacaKa dIy IeJe
IcnoJb3yeTcA y6OpKn ByrJax DBepeN, OKOH,CTeH,JIecTHnUbl npyRnx y3Knx IOBepxHOCTeN.
YdInHHTeBHaTpy6Ka
NcnoIb3yeTcA Iy6OpKn ByrIax DBepei, OKOH, CTeH, NecTHNuBn npyRnx y3Knx NOBepxHOCTeI.

Приимechани.
Bcnyae 3aklnnBaHna KaKoJ-ln6o Bpaauouecra DeTaN PbIeCoc MoKeT ABTomatNueCKn OTKnIOuHTbcra. Y6epnte 3aCTpRABnne NocToPOHHne PpeDMeTbI n npOdoJIknte y6Opky.
B cnlyae neperpeba aKKymyIaTopa nbJIeOC aBTOMaTnueckN OTKJIouHTc. IIOJxIte, noka TemnepaTypa aKKymyIaTopa HOpMaJIu3YeTCa, a 3aTe mnpoJOnKInTe y6Opky.
yxoДиpeMoHT

MepbI npedoctopoxknoctn
- IcnoIb3yIte opuHnHaJIbHbIe 3aIyactN, B npOTNBOM clyuae rapaHTnHoe 6cbJxHBaHne 6ydt HeoCTynHO.
Bcnyae 3acopeHnIbTpa, HacaKn Iann "ymHO" MHOrofoyHKUHOHaJIbHOJ ueKn po6oT-NbIeCoc MoKeT BbIKNoHTbcra Cpa3y nocne 3aynsKa. Ounchte 3acopeHHbIe DetanI nepeD NOBTOPbIM 3aynCKOM. - EcIn BbI He nIaHpyeTe IcNoIb3OBaTb NbIeCoc B TeueHne dIITeBHoro nepnoDa BpeMeHN,IOJIHOCTbIO 3apAINTE eRO,OTKIIIOHTe OT pO3eTKN I IOLOXHTe Ha xpaHeHne B npoxlanHom MeCTe C Hn3KOI BnaJxHOCTbIO BdALN OT npRmBX COJIHeHbIX Lyuey.Bo n36eKaHne n36bIToOH No pa3pIaIKn AKKymIaTopa 3apJkaIte NbIeCoc KaK MInHMym pa3 B Tprn Mecaua.
Ounstka nbilecoca
PpOtpTe nIeCoc MrgKo cyXo TprkKo.
OuNCTKa KOHTeHepa IJIy IIJI, OIJIbTpappeBapntelbHO OUHCTKN UIKIOHHO 6JOKa
EcnKoHTeHep dIy nbIIN 3aONHeH Do OTMeTKN "MAX", 3ΦΦeKTNBHOCTb pa6Otbl nbIeCocA MoKeT 3HaHTeJIbHO CHN3NTbcra. Iy ONTImaJIbHOJ pa6Otbl CBOEBpeMeHHO OuIIaIte KOHTeHep dIy nbIIN. IpePd OUNCTKO KoHTeHepa y6eIITecb, YTO nbIeCOC OTKnIOueH OT po3ETkn, IN He HaxIMaTe KHNkY "Iyck".
- Haxmte KhoNky ChTnA HxKHe KpbIuKn KOHTeHepa Iny PbIIN B HaPpaBneHn, 6o3HaueHHom CTpeIKo, a 3aTeM OTKpoIte KpbIuKy n N3BLeKnte copeJxIMoe KOHTeHepa.
- NaKMnTe KhoNky n3BneueHnja nIy nIbIn B Ha npaBneHn, 6o3HaueHHom cTpeIKo, Ka n oka3aHo Ha Pnc.1, a 3aTe m n3BneKeTc KOHTeHep dIy nIbIn n3 nbIecoca, Ka h PaC.2.
- Chauha cHmnte pIpbItp npedBapntelbHO ONUCTKN, NOBepHnTe pyKy uKNOHHoro 6loka npotnb yacobO CTpeKN Do ynpa, a 3aTeM n3BNeKeTne uKNoHHbI 6nok.
YxOДиpeMoHT

- TuaTeIbHo npOMoTe pIJIbTp npedBapnteIbHO OUHCTKN, uKIOHHbI 6LoK I KOHTeINHeP dIa IIbI IN BOIO, a 3aTeM OTIOXHTe MUNIMYM Ha 24 Yaca IINHO npocuIKN.


KoHTeHepIyIbIINuIKJIOHHbI6JOK
ФиьтпрдварпьнОчNTK
PpimmeaHne.
KoHTeHepIyIbIINcIeNyETnpMbIbTaKaKMmHmympa3BMecaU.
- Pekomehdyetc ounuatab pfntp npedBapntelbno y6opkn He pexe odHoro pa3a B 3 Meca, a uKIOHHbI 6nok - He pexe odHoro pa3a B 6 MecaueB.
UcTaHOBka KOHTeHepa IJIy IIbIIN, PnIbTpappeBapntbHoOuNCTKn N CnKIOHNO 6Joka
- BCTaBbTe cKIOHbI 6LOK BepTKKaIbHO B KOHTeHep dIy Ibln TaK, yTO6bl pyka cIKIOHHoro 6IOKa CoEINHnIacb C OTBepCTneM Ha IeBOI CTeHKe KOHTeHepa dIy Ibln. IobepHInTe pyky no YacOBoi CTpeJIke do ynpa, a 3aTeM onyCTnte ee.
- BcTaBbTe ΦnIbTp npEaBapnteHbHO OuNCTKN B cNkIoHHbI 6LoK npeDHei CTOpOH BBepx.
- CnErKa HaKIOHnTe KOHTeHep dIy IblI, YTO6bl erO OTBepCTne COeHNHIOc b CfIKCaTOpOM Ha IIIEcoCe. 3aTeM OCTopoXHO HAXMMTe Ha KOHTeHepOB B HAnpaBLeHnn, O6o3HaueHHOM CTpeJIkoJ, Do IeJIyka, YTO6bl 3aBepuNTb yCTaHObKy.

OuIncKaΦnIbTpα
PeKOMeHdyETcOuIuTaBΦNlbTpKaKdbie4-6 MeCraueB.
1.ИЗВЛЕКИТЕ KOHTeHepДЯпБЛПТаК, KaK NOKa3aHoHa pIcUHKe.
2.ДocTaHbTeФиNbTp n3 nbIeCoca DBNKeHnEM BHN3, KaK NOKa3aHo Ha pncyHke.

3.ПромоITEФильТунCTоВODО, NOBOPaHbAЯФиьTpHa 360°,YTO6bl NOJIHOCTbU ydaJIHTb HAKOINBswIocr B HEM nbIb. HeckoNko pa3 cIeRka NOcTyuHTeNoФиьTpY,YTO6bl Y6paTb N36bltOK rpr3n.
aalalal alalalal alalalal alalalal alalal
jglg jglg jglg jglg jglg jglg jglg jglg jglg jglg jglg jglg jglg jglg jglg jglg jglg jglg jglg jglg jglg jglg jglg jglg jglg jglg jglg jglg jglg jglg jglg jglg jglg jglg j
lalai jiljill
y j y j j j j j j j j j j j j j j j j j j j j j j j j j j j j j j j j j j j j j j j j j j
jiall jieell alw gaiail Jiauiil aai jipic iic gialal plsiil giai piinally
a
Jia Jia iaiell jllal guiu w 1g jaiyI gaiuul alall s jzilj g uji y glal valuaia zaiial piai
jssssssssssssssssssssssssssssssssssssssssssssssssssssssss
a 1 a 1 1 1 1 1 1 1 1 1 1 1 1 1 1 1 1 1 1 1 1 1 1 1 1 1 1 1
a 1
a 1
42g j g p q 10000000000000000000000000000000000000000000000000000
gall yll s y d hia i aill lla ayy yll aiw kail jai yall ola g
i 1
https://www.dreame technology.com/pages/user-manuals-and-faqs
1
Caaal


aill jao a y g ddo a p c 1 2

2 2 2 2 2 2 2 2 2 2 2 2
211 1 2
SA
S APQ = S AOB + S_ QPQ
y

1
12n
jaiwll Jaiil g:ajilal aai jaii
4k = 3
Jaiwali Jaoell gao jiai iic liua aai Jao
Caiuai liuyi jie
Jiai jia i
a
#
Iaaii 1

o jyio 100011 4 8 yu 5a:abx o
jiei: jiei:oi 4.5ii sl jil i jai yao: ao
4
12 2
gill g y 1y j Jio aal SLoy1 aaiia aiaia
aaiy 1 y

aai aei li gji
Jgssg 1

ab = 12
wnnnn nnnn nn nnnn nn nnnn nn nnnn nn
N NNNNINNINNNNNNNNNNNNNNNNNNNNN
.0n7y nniuoy DTRIN nn Tynnnn nnnyo nn y
T 1000000000000000000000000000000000000000
.
n nn nnnnnnnnnnnnnnnnnnnnnnnnnnnnnnnnnnnnnnnnnnnnnnnnnnnnnnnnnnnnnnnnnnnnnnnnnnnnnnnnnnnnnnnnnnnnnnnnnnnnnnnnnnnnnnnnnnn
.1111 1111 1111 1111 1111 1111 1111 11
X117 117 117 117 117 117 117 117 117 117
.
n nn nnnnnnnnnnnnnnnnnnnnnnnnnnnnnnnnnnnnnnnnnnnnnnnnnnnnnnnnnnnnnnnnnnnnnnnnnnnnnnnnnnnnnnnnnnnnn
n nn nnnn nn
NIN IN IIN NIN NIN NIN NIN NIN NIN NIN NIN
.
TNTN. (nON,ON,ON,ON,ON,ON,ON,ON,ON)
wn nnon nn nnynnn 197 n97 ,nynnnn
111111111111111111111111111
n nn nn nn nn nn nn nn nn nn nn nn nn nn nn nn nn nn nn nn nn nn nn nn nn nn nn nn nn nn nn nn nn nn nn nn nn nn nn nn nn nn nn nn nn nn nn nn nn nn nn nn nn nn nn nn nn nn nn nn nn nn nn nn nn nn nn nn nn nn nn nn nn nn nn nn nn nn nn nn nn nn nn nn nn nn nn nn nn nn
17nnn nn nnnn nn nn nn nn nn nn nn nn nn nn nn nn nn nn nn nn nn nn nn nn nn nn nn nn nn nn nn nn nn nn nn nn nn nn nn nn nn nn nn nn nn nn nn nn nn nn nn nn nn nn nn nn nn nn nn nn nn nn nn nn nn nn nn nn nn nn nn nn nn nn nn nn nn nn nn nn nn nn nn nn nn nn
11nn nn n nn nn nn nn nn nn nn nn nn nn nn nn nn nn nn nn nn nn nn nn nn nn nn nn nn nn nn nn nn nn nn nn nn nn nn nn nn nn nn nn nn nn nn nn nn nn nn nn nn nn nn nn nn nn nn nn nn nn nn nn nn nn nn nn nn nn nn nn nn nn nn nn nn nn nn nn nn nn nn nn nn nn nn nn nn nn nn nn nn nn nn nn nn nn nn nn nn nn
n 7 n 7 n 7 n 7 n 7 n 7 n 7 n 7 n
NNN,NNNn nn nnnn nn nn nn nn nn nn nn nn nn nn nn nn nn nn nn nn nn nn nn nn nn nn nn nn nn nn nn nn nn nn nn nn nn nn nn nn nn nn nn nn nn nn nn nn nn nn nn nn nn nn nn nn nn nn nn nn nn nn nn nn nn nn nn nn nn nn nn nn nn nn nn nn nn nn nn nn
.
y
1111111111111111111111111111
NINU 100000000000000000000000000000000000000
JINNNN NNNNNNNNNNNNNNNNNNNNN
- n' 10 IN n'nnn Nn, DnNn Dn'nuan nn uin nuyny IN |ynn7 |nnn7
n nn nnnnnnnnnnnnnnnnnnnnnnnnnnnnnnnnnnnnnnnnnnnnnnnnnnnnnnnnnnnnnnnnnnnnnnnnnnnnnnnnnnnnnnnnnnnnn
n nn nnnn nn nnnnnnnnnnnnnnnnnnnnnnnnnnnnnnnnnnnnnnnnnnnnnnnnnnnnnnnnnnnnnnnnnnnnnnnnnnnnnnnnnnn
T
y ( YLS0251B-E300080 ( EU)/ YLS0241A-A300080 ( AU )n) n
11-1n7n770 7nn
P2010-7S1P-BWB/P2010-7S1P-BW/P2010-7S1P-BWA
11-11n n 7n nn nnn
-70°C 1 w n nn nnnn nn n nn n nn nn nn nn nn nn nn nn nn nn nn nn nn nn nn nn nn nn nn nn nn nn nn nn nn nn nn nn nn nn nn nn nn nn nn nn nn nn nn nn nn nn nn nn nn nn nn nn nn nn nn nn nn nn nn nn nn nn nn nn nn nn nn nn nn nn nn nn nn nn nn nn nn nn nn nn nn nn nn nn nn nn nn nn nn nn nn nn nn nn nn nn nn nn
.40°C
n 77,019n I17n n
https://www.dreame technology.com/pages/user-manuals-and-faqs
ninn
D


nnnnn nn nnnn 2nnnnn
1

1 2 nonXy7 (X2 yX 2
nunnnnnnnnnnnnnnnnnnnnnnnnnnnnnnnnnnnnnnnnnnnnnnnnnnnnnnnnnnnnnnnnnnnnnnnnnnnnnnnnnnnnnnnnnnnnnnnnnnnnnnnnn
JANNNN
D


1


177777777
D'ITX 901N
Dn nn n nn nn nn nn nn nn nn nn nn nn nn nn nn nn nn nn nn nn nn nn nn nn nn nn nn nn nn nn nn nn nn nn nn nn nn nn nn nn nn nn nn nn nn nn nn nn nn nn nn nn nn nn nn nn nn nn nn nn nn nn nn nn nn nn nn nn nn nn nn nn nn nn nn nn nn nn nn nn nn nn nn nn nn nn nn nn nn nn nn nn nn nn nn nn nn nn nn nn

四四
D
D
D
D
D

图
D
图
D
1 2 nnnynn
nno nnnn 1 2 nn nnnn
1
.1
.2
.3
.4
nyn nn ynn nn n nn nn nn nn nn
yinnnnn n nn nnnn nnnn nnnn nnnn nnnn nnnn nnnn nnnn nnnn nnnn nnnn nnnn nnnn nnnn nnnn nnnn nnnn nnnn nnnn nnnn nnnn nnnn nnnn nnnn nnnn nnnn nnnn nnnn nnnn nnnn nnnn nnnn nnnn nnnn nn
yuyu
nwn nny dy nn xiyu
yunnnynnnniu yu

nion nn nnn
n7n710

-

y

10

0nnnnn
100n 7 007 007 7 7 7 7 7 7 7 7 7 7 7 7 7 7 7 7 7 7
00000000000000000000
177 177 177 177 177
Tn nnnn nn nnnn nn nn nn nn nn nn
()2
y n7 y nn nn nn nn nn nn nn nn nn nn nn nn nn nn nn nn nn nn nn nn nn nn nn nn nn nn nn nn nn nn nn nn nn nn nn nn nn nn nn nn nn nn nn nn nn nn nn nn nn nn nn nn nn nn nn nn nn nn nn nn nn nn nn nn nn nn nn nn nn nn nn nn nn nn nn nn nn nn nn nn nn nn
in
111111111111111111
1
D
nwn nn n
n 1777777777
nwnnn
1000 10000000000000000000000000000
ynnnyn yin7ynn nynn (101un)
n nn nnnn nn nnnn nn nnnn nn nnnn nn nnnn nn nnnn nn nnnn nn nnnn nn nnnn nn nnnn nn nnnn nn nnnn nn nnnn nn nnnn nn nnnn nn nnnn nn nnnn nn nnnn nn nnnn nn nnnn nn nnnn nn nnnn nn nnnn nn nnnn nn nnnn nn nannn nn nnnn nn nnnn nn nnnn nn nnnn nn nnnn nn nnnn nn nnnn nn nnnn nn
1
n77y n77y77n77n77n77n77n77n77n77n
1 2 nn
17777777777777777
nynnnn nnnn nn nnnn nn nnnn
n nn nnnnnnnnnnnnnnnnnnnnnnnnnnnnnnnnnnnnnnnnnnnnnnnnnnnnnnnnnnnnnnnnnnnnnnnnnnnnnnnnnnnnnnnnnnnnnnnnnnnnnnnnnnnnnnnnnnnnnnnnnnnnnnnnnnnnnnnnn
D'9'D
PNNN NNNNNNNNNNNNNNNNNNNNNNNNNNNNNNN
T,1111111111111111111111111111.3
24 111111111111111111111111111111111


10777777777
:17
WTINOYNNNNNNN7
6n 17nn nnn nn nnn nnn nnn nnn nnn nnn
TINN TINN NINN 7 nnnn
inon 17y nn n no nn on.2
1

24 107 4
NNTI.130n 171.3
2x 360n pnn 1
y90n n 190 .p0n


27 = 10 时
n nn nnnnnnnnnnnnnnnnnnnnnnnnnnnnnnnnnnnnnnnnnnnnnnnnnnnnnnnnnnnnnnnnnnnnnnnnnnnnnnnnnnnnnnnnnnnnnnnnnnnnnnnnnnnnnnnnnnn
npo nnn
.72nn nn nn nn nn nn .2
1
nannnnn nnnnnnnnnn

"wnn nn nnnn"
| � � � � � � � � � � � � � � � � � � � � � � � � � � � � � � � � � � � � � � � � � � � � � � � � � � � � � � � � � � � � � � � � � � � � � � � � � � � � � � � � � � � � � � � � � � � � � � � � � � � � � � � � � � � � � � � � � � � � � � � � � � � � � � � � � � � � � � � � � � � � � � � � � � � � � � � � � � � � � � � � � � � � � � � � � � � � � � � � � � � � � � � � � � � � � � � � � � � � � � ⁄ � � � � � � � � � � � � � � � � � � � � � � � � � � � � � � � � � � � � � � � � � � � � � � � � � � � � � � � � � � � � � � � � � � � � � � � � � � � � � � � � � � � � � � � � � � � � � � � � � � � | ||||
| � � � � � � � � � � � � � � � � � � � � � � � � � � � � � � � � � � � � � � � � � � � � � � � � � � � � � � � � � � � � � � � � � � � � � � � � � � � � � � � � � � � � � � � � � � � � � � � � � ⁄� 3.5.10 | ||||
| � � � � � � � � � � � � � � � � � � � � � � � � � � � � � � � � � � � � � � � � � � � � � � � � � � � � � � � � � � � � � � � � � � � � � � � � � � � � � � � � � � � � � � � � � � � � � � � DM002 | ||||
| � � � � � � � � � � � � � � � � � � � � � � � � � � � � � � � � � � � � � � � � � � � � � � � � � � � � � � � � � � � � � � � � � � � � � � � � � � � � � � � � � � � � � � � � � � � ⁄� 25.2 | ||||
| � � � � � � � � � � � � � � � � � � � � � � � � � � � � � � � � � � � � � � � � � � � � � � � � � � � � � � � � � � � � � � � � � � � � � � � � � � � � � � AVB9 | ||||
| � � � � � � � � � � � � � � � � � � � � � � � � � � � � � � � � � � � � � � � � � � � � � � � � � � � � � � � � � ⁄� 25.2 | ||||
| � � � � � � � � � � � � � � � � � � � � � � � � � � ⁄� 25.2 | ||||
| � � � � � � � � � � � � � � � � � � � � ⁄� 25.2 | ||||
| 88.53% | � � � � � � � � � � � � � � � � � � � 78.66% | YLS0251B-E300080 | ||
| ~� 240-100 0.8 y/n 60/50 | ||||
| 10000000000000000000000000000000000000000000000000000000000000000000000000000000000000000000000000000 | YLS0251B-E300080 | |||
| 86.98% | YLS0241A-A300080 | |||
| 80.67% | ~� 240-100 10% 0.8 y/n 60/50 | |||
| 1000000000000000000000000000000000000000000000000000000000000000000000000000000000000000000000 | YLS0241A-A300080 | |||
| YLS0241A-A300080 | ||||
| 80.67% | ~� 240-100 10% 0.8 y/n 60/50 | |||
| 1000000000000000000000000000000000000000000000000 | YLS0241A-A300080 | |||
| 10000000000000000000000000000000000000000000000000000000000000000000000000000000000000000000 | YLS0241 A-A300080 | |||
| YLS0241A-A300080 | ||||
| 80.67% | ~� 240-100 10% 0.8 y/n 60/50 | |||
| 10000000000000000000 | YLS0241A-A300080 | |||
| 10000000000000000000 | YLS0241A-A300080 | |||
| YLS0241A-A300080 | ||||
| 80.67% | ~� 240-100 10% 0.8 y/n 60/60 | |||
| 10000000000000000000 | YLS0241A-A300080 | |||
| 10000000000000000000 | YLS0241A-A300080 | |||
| YLS0241A - 7S1P-BW P2010-7S1P-BW P2010-7S1P-BWB | ||||
| 80.67% | 2400 mAh | |||
| YLS0241A - 7S1P-BW P2010-7S1P-BWB | ||||
| YLS0241A - 7S1P-BWB | ||||
| YLS0241A - 7S1P-BWB | ||||
| YLS0241A - 7S1P-BWB | ||||
| YLS0241A - 7S1P-BWB | ||||
| YLS0241A - 7S1P-BWB | ||||
| YLS0241A - 7S1P-BWB | ||||
| YLS0241A - 7S1P-BWB | ||||
| YLS0241A - 7S1P-BWB | ||||
| YLS0241A - 7S1P-BWB | ||||
| YLS048 Wh | 2400 mAh | |||
| YLS048 Wh | 2400 mAh | |||
| YLS048 Wh | 2400 mAh | |||
| YLS048 Wh | 2400 mAh | |||
| YLS048 Wh | 2400 mAh | |||
| YLS048 Wh | 35mAh | |||
TNNNINONN,NNNNIUNIN097.207DIOIN DNNNII-DN NNNN
- The word "dreme" is the abbreviation of Dreame Technology Co., Ltd. and its subsidiaries in China. It is the transliteration of the company's Chinese name "追觅", which means striving for excellence in every endeavor and reflects the company's vision of continuous pursuit, exploration and search in technology.
- Das Wort "dreme" ist die Abkürzung von Dreame Technology Co., Ltd und seinen Tochterunternehmen in China. Es ist die Transliteration des chinesischen Namens "追觅" dieser Firma, was für das Streben nach Vollendung stehen und die Vision des Unternehmens widerspiegelt,)namlich im Bereich der Technologie unaufhaltsam weiterzustreben, zu erforschen und entdecken.
- Dreame est l'abréviation de l'entreprise chinoise Dreame Technology Co. et ses filiales, qui est la traduction phonétique du nom chinois de l'entreprise, reflétant la vision de l'entreprise qui consiste à poursuivre, explorer et rechercher constamment les avances technologiques.
- La parola "dreme" è l'abbreviation dell'azienda Dreame Technology Co., Ltd. e delle sue filiali in Cina. è la traslitterazione del nome cinese dell'azienda "追觅", che dimostra la continua ricerca, esploratione e visione di ricerca dell'azienda nella TECHNOIA.
- La palabra "dreame" es la abreviatura de Dreame Technology Co., Ltd. y sus subsidiaries en China. Es la transliteration del nombre chino de "Dreme", que significa luchar por la excelencia en cada esfuerzo y refleja la visión de la compañero de continuamente buscar, explorar e investigar en Tecnologías.
Dreame - cokpaeeHHoe Ha3BaHne KITaNcKo KOMnHn Dreame Technology Co., Ltd. n ee doyepnix npednpnTni. Dreame raBnaTeTc TpaHcnIePaueNei Ha3BaHn KOMnHa KaTaNckom Ra3bike «追觅», B KOtOpOM OTPaKeHO KopnapaTHBHe BVdeHne KOMnHn B Cpepe HayKn I TexHoJOrn - HnpepbIBhbl NOnCK, NCCJeOBAHn N CTpeMneHne Kycnexy. - SLOWO "dreme" to skrot od Dreame Technology Co., Ltd. i społek w Chinach. jest to transliteracja chińskiej nazwy firmy "追觅" co oznacza sążenie do doskonałość w kaźdym przydsiewzieciu, odzwierciedląc wizje firmy, jak jest ciągle prowadzenia, okrzywanie i poszukiwania w nauce i technologii.
Dreame Technology Co., Ltd. and its subsidiaries nn nn nn Drame .


- Cordless Vacuum Cleaner
- User Manual
- THANK YOU
- FOR PURCHASING THIS DREAME VACUUM CLEANER.
- Registration Quick Start
- Safety Instructions
- Warning
- Accessories
- Installation
- Accessories Installation
- Diagram
- 2-in-1 Charging & Storage Mount Installation Diagram
- Charging
- Charging Methods
- How to Use
- Working Methods
- Using Different Accessories
- Multi-Brush Bar
- 2-in-1 Brush Nozzle
- Mini Electric Brush
- Crevice Nozzle
- Extension Hose
- Note:
- Care & Maintenance
- Tips:
- Cleaning the Vacuum
- Cleaning the Dust Cup, Pre-Filter, and Cyclone Assembly
- Installing the Dust Cup, Pre-Filter, and Cyclone Assembly
- Cleaning the Filter
- Installing the Filter
- Cleaning the Multi-Brush Bar
- Cleaning the Mini Electric Brush
- Battery Pack
- WEEE Information
- Sicherheitshinweise
- Extension multi-brosses
- Tuyau couple extensible
- CnncokakceccyapOB
- HdkaTOp coCTOHN aKKymyIaTopa
- Приимechани.
- Pa6oynepexnmbi
- UeTKa "2 B 1"
- HacaKa dIy IeJe
- YdInHHTeBHaTpy6Ka
- yxoДиpeMoHT
- MepbI npedoctopoxknoctn
- Ounstka nbilecoca
- OuNCTKa KOHTeHepa IJIy IIJI, OIJIbTpappeBapntelbHO OUHCTKN UIKIOHHO 6JOKa
- PpimmeaHne.
- UcTaHOBka KOHTeHepa IJIy IIbIIN, PnIbTpappeBapntbHoOuNCTKn N CnKIOHNO 6Joka
- OuIncKaΦnIbTpα
- Jiai jia i
- #
- 4
- 2
- 2 nnnynn
- D
- nwn nn n
- nwnnn
- 1
- 2 nn
- "wnn nn nnnn"
Brand : DREAME
Model : T10
Category : Vacuum Cleaner