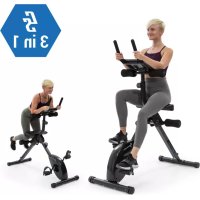
Strike Bike - Indoor bike trainer Capital Sports - Free user manual and instructions
Find the device manual for free Strike Bike Capital Sports in PDF.
User questions about Strike Bike Capital Sports
0 question about this device. Answer the ones you know or ask your own.
Ask a new question about this device
Download the instructions for your Indoor bike trainer in PDF format for free! Find your manual Strike Bike - Capital Sports and take your electronic device back in hand. On this page are published all the documents necessary for the use of your device. Strike Bike by Capital Sports.
USER MANUAL Strike Bike Capital Sports
text_image
QR code image containing encoded data, no visible human-readable textINHALTSVERZEICHNIS
text_image
Technical diagram of a mechanical device with numbered components and exploded view, likely for assembly or maintenance instructions.text_image
Technical diagram of a mechanical device with numbered components and rotational indicatorstext_image
Technical diagram showing mechanical assembly with numbered components and labeled partstext_image
Technical diagram of a stationary exercise machine with labeled components and an inset showing mechanical assembly details.text_image
Technical diagram of a stationary exercise machine with numbered components and labeled partstext_image
Technical diagram of a mechanical device with numbered components, likely an engine or pump assembly.text_image
Technical diagram of a mobility device with labeled parts and a side-view view showing front and top views.text_image
Technical diagram of a stationary bike with numbered parts for identification and assembly reference.text_image
SET WEIGHTtext_image
TARGET DIST DISTANCE KM 5.0
text_image
TARGET DIST USER TIME 0:05 Watt 100 HEART RATE 72 SPEED 22.4 DISTANCE KM 4.9text_image
TARGET WATT Watt 100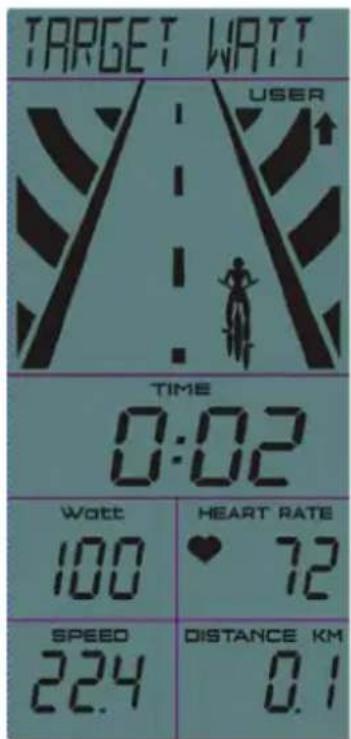
text_image
TARGET WATT USER TIME 0:02 WATC 100 HEART RATE 72 SPEED 22.4 DISTANCE KM 0.1(5) Zielpuls
text_image
TARGET H.R. HEART RATE 100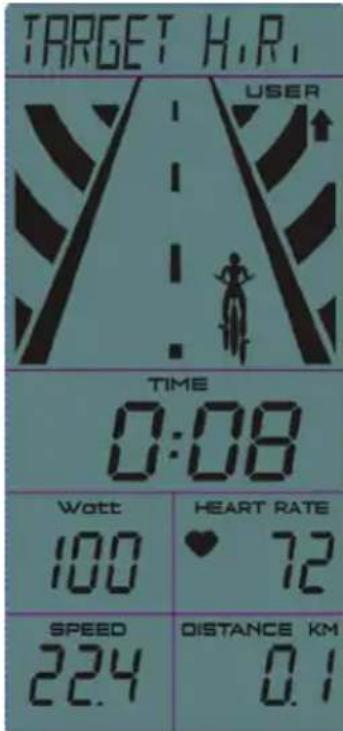
text_image
TARGET H.R. USER TIME 0:08 Watt 100 HEART RATE ♥ 72 SPEED 224 DISTANCE KM 0.1(6) Wattprogramm
text_image
WATT PROGRAM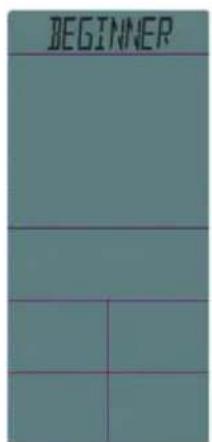
text_image
BEGINNER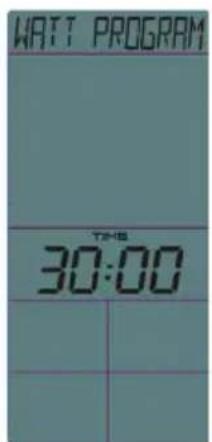
text_image
WATT PROGRAM T2-18 30:00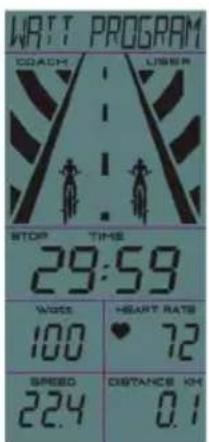
text_image
WATT PROGRAM COACH USER STOP TIME 29:59 WORSE HEART RATS 100 72 SPEED DISTANCE KH 224 0.1CARDIOTRAINING IM ÜBERBLICK
2. Cardio-Trainingsphase
natural_image
Person performing a seated forward stretch exercise (no text or symbols visible)text_image
iconsole+ Download on the App Store GET IT ON Google Play iconsole+natural_image
Symbol of a trash bin crossed with a diagonal line, no text or numbers presentCongratulations on purchasing this device. Please read the following instructions carefully and follow them to prevent possible damages. We assume no liability for damage caused by disregard of the instructions and improper use. Scan the QR code to get access to the latest user manual and more product information.

text_image
QR code image containing encoded data, no visible human-readable textCONTENT
Safety Instructions 34
Device Overview 36
Assembly 38
Control Panel and Buttons 45
Use and Operation 46
Overview of Cardio Training 54
Warming Up before a Workout 57
iConsole+ App 60
Care and Maintenance 60
Hints on Disposal 61
Declaration of Conformity 61
TECHNICAL DATA
| Item number 10032356 | |
| Power supply (console) 2 AA batteries |

WARNING
This stationary training device is not suitable for high accuracy purposes. The heart rate monitoring system may be faulty.
Excessive exercise may result in dangerous injury or death. If your performance deteriorates abnormally, stop training immediately.
SAFETY INSTRUCTIONS
Before operating this unit, please read this manual carefully to ensure optimum performance and safety. This is manual should be kept available for future reference. For product improvement, the company reserves the right to change the design and specification at any time without prior notice. Pictures are for reference use only and may differ from the actual product.
- Please keep this manual in a safe place for your reference when necessary.
- Please do not assembly or use this equipment until you read this manual thoroughly & carefully. The safety and efficiency only can be achieved when the equipment is assembled, maintained and used properly. It is your responsibility to ensure that all the users are informed of all the warnings and precautions.
- For totally safe use, a stable, leveled surface is required. Protect your floor with a mat. Do not use the equipment in a damp areas such as swimming pool sauna, etc. For safety space, the equipment must have at least 0.6 meter of free space all around it.
- Before starting any exercise program you must consult your doctor to determine if you have any physical or health conditions that could create a risk to your health and safety, or prevent you from using the equipment properly. Your doctor's advice is essential if you are taking medication that affects your heart rate, blood pressure or cholesterol level.
- Be aware of your body's signals. Incorrect or excessive exercise can damage your health. Stop exercising if you experienced any of the following symptoms: pain, tightness in your chest, irregular heartbeat, extreme shortness of breath, feeling light headed, dizzy or nauseous. If you do experience any of these conditions you must consult your doctor before continuing with your exercise program.
- Do not workout immediately after meals.
- Keep children and pets away from the equipment, the equipment must be assembled and used by adults only.
- The equipment is designed for home use only.
- The equipment is not suitable for therapeutic use, may only be used for exercises indicated in the training instructions
- Wearing proper clothing and athletic shoes while using the equipment, Avoid wearing loose clothing that may get caught in the equipment or that may restrict or prevent movements.
-
Keep your back straight while exercising.
-
Before using the equipment, check the handle bar, seat, the nuts and bolts are securely tightened.
- For adjustable parts, bear the maximum position in your mind, do not exceed the mark "Stop", otherwise will cause risk.
- Use the equipment only as described in this manual.
- If you find any defective components while assembling or checking the equipment, or if you hear any unusual noises coming from the equipment during use, stop immediately. Do not use the equipment until the problem has been solved.
- Care must be taken when lifting or moving the equipment so as not to injure your back. always use proper lifting techniques and /or seek assistance if necessary.
- All moveable accessories (e.g. pedal, handlebar, saddle etc.) require weekly maintenance. Check them before use every time. If anything broken or loose, please fix them immediately. You may continue using them only after they return to good conditions.
- Do not insert or drop any object into any opening.
- Switch off the exercise bike before moving or cleaning it. To clean, wipe surfaces down with mild detergents and a slightly damp cloth only; never use solvents.
- Do not use the exercise bike in any location that is not temperature controlled, such as, but not limited to, garages, porches, pool rooms, bathrooms, car ports or outdoors.
- Incorrect repair and structural modifications (e.g. removal or replacement of original parts) may endanger the safety of the user.
- This product is not designed for use by persons (including children) who have reduced physical, sensory or mental capacities or persons with no experience or knowledge, unless they are instructed and supervised in the use of the appliance by a person responsible for their safety.
- Children should be supervised to ensure that they do not play with the appliance.
Note: Maximum weight of the user is 150 kg.
DEVICE OVERVIEW

text_image
Technical diagram of a mechanical device with numbered components and exploded view, including wrenches, tools, and parts labeled 1 through 15.Parts Description
| 1 Main frame 17 Spring knob | ||
| 2 Left handle bar 18 Left pedal | ||
| 3 Right handle bar 19 Right pedal | ||
| 4 Front stabilizer 20 Bolt | ||
| 5 Rear stabilizer 21 Spring washer | ||
| 6 Saddle post 22 Flat washer | ||
| 7 Saddle sliding set 23 Adjusting pad | ||
| 8 Console support post 26 Flat washer | ||
| 9 Console 27 Nylon nut | ||
| 10 Saddle 28 Sensor wire | ||
| 11 Flat washer 29 Cross screw | ||
| 12 Knob 31 Connecting bar (left and right) | ||
| 13 Bottle holder 32 Hex wrench | ||
| 14 Cross screw 33 Multifunction-spanner | ||
| 15 Bolt 34 Spanner | ||
| 16 Flat washer 108 Socket spanner |
ASSEMBLY
Step 1:

text_image
Technical diagram of a mechanical device with numbered components for identification and assembly reference.- Attach the rear stabilizer (5) to the main frame (1) and fix it with flat washers (22), spring washers (21) and bolts (20) tightly by hex wrench (32).
- Then attach the front stabilizer (4) to the main frame (1) and fix it with flat washers (22), spring washers (21) and bolts (20) tightly by hex wrench (32).
Step 2:
text_image
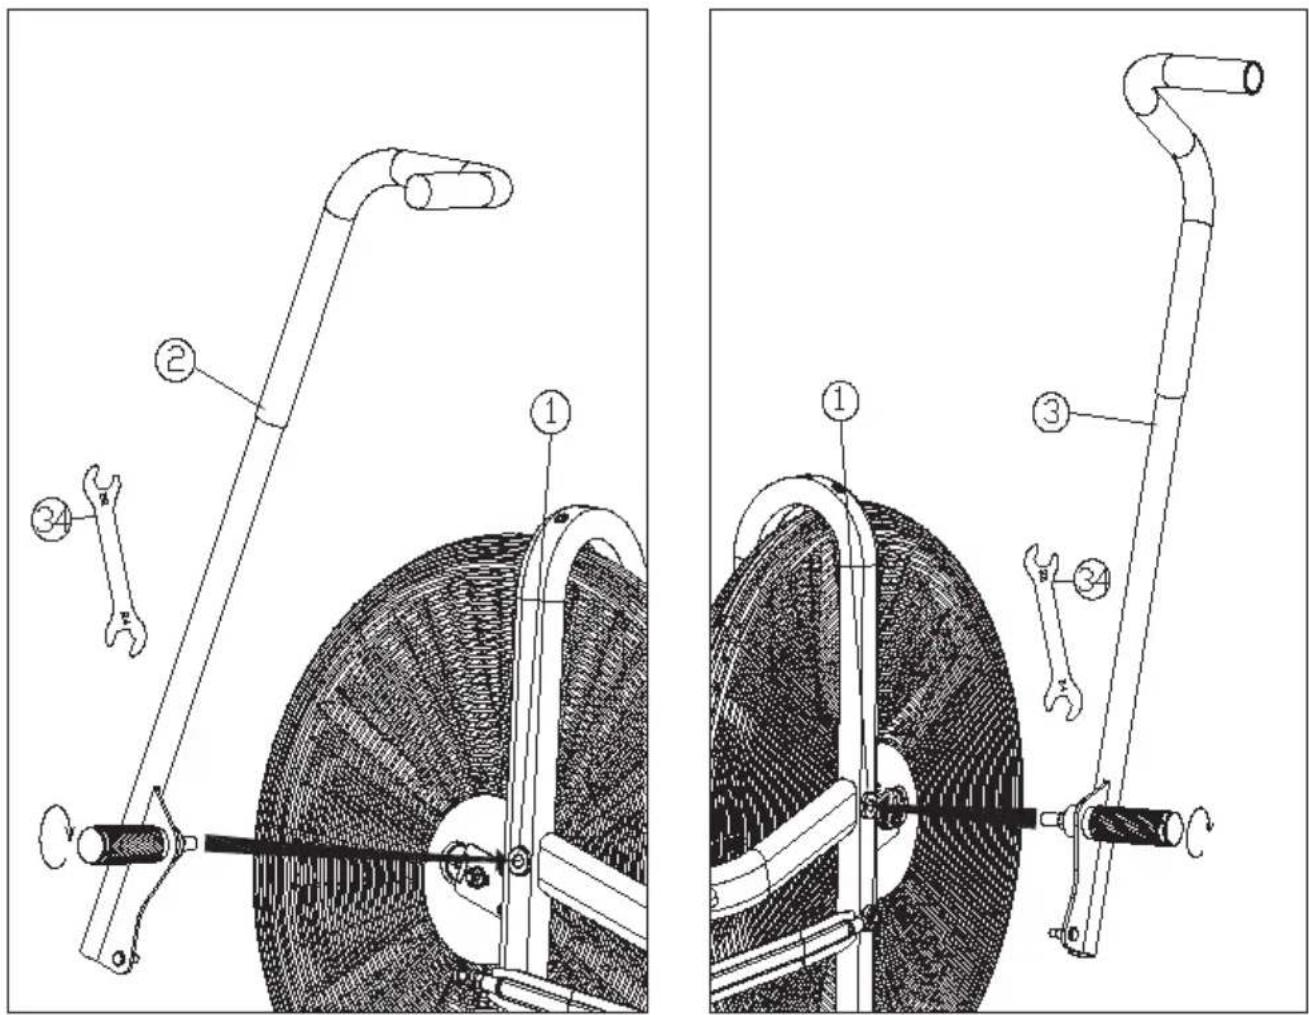
Technical diagram showing mechanical assembly with numbered parts and labeled parts, likely from an engineering manual.- Insert the handle bar (left and right) to the main frame as shown first, then screw it in clockwise and tighten it securely by spanner (34).
Step 3:
text_image
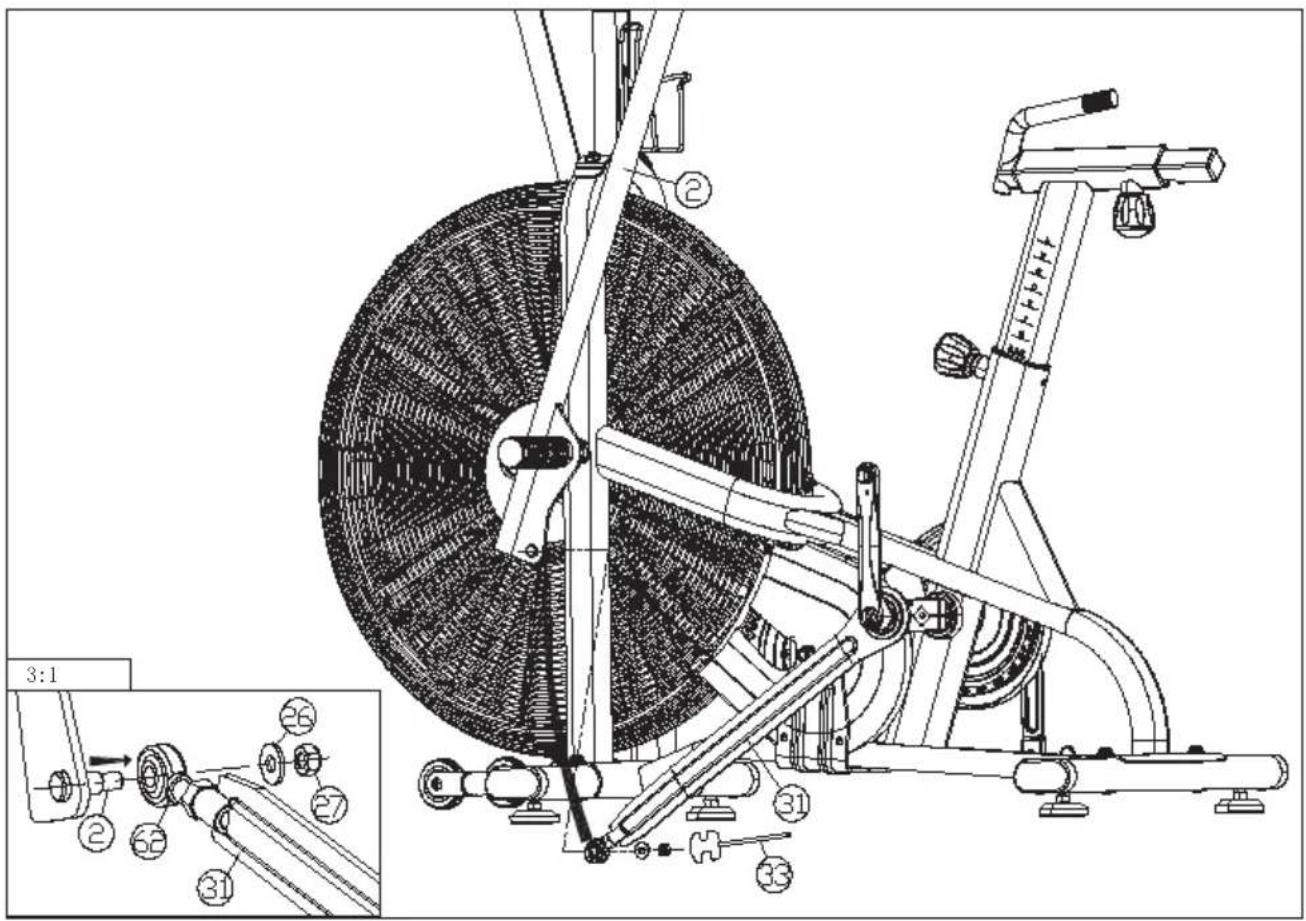
Technical diagram of a stationary exercise machine with numbered components and an inset showing mechanical assembly details.- Put the left handle bar (2) into the left connecting bar (31), then tighten the left handle bar (2) with flat washer (26) and nylon nut (27) securely by multifunction spanner (33). Then install the right handle bar (3) together with the right connecting bar (31) in the same way as above.
Step 4:
text_image
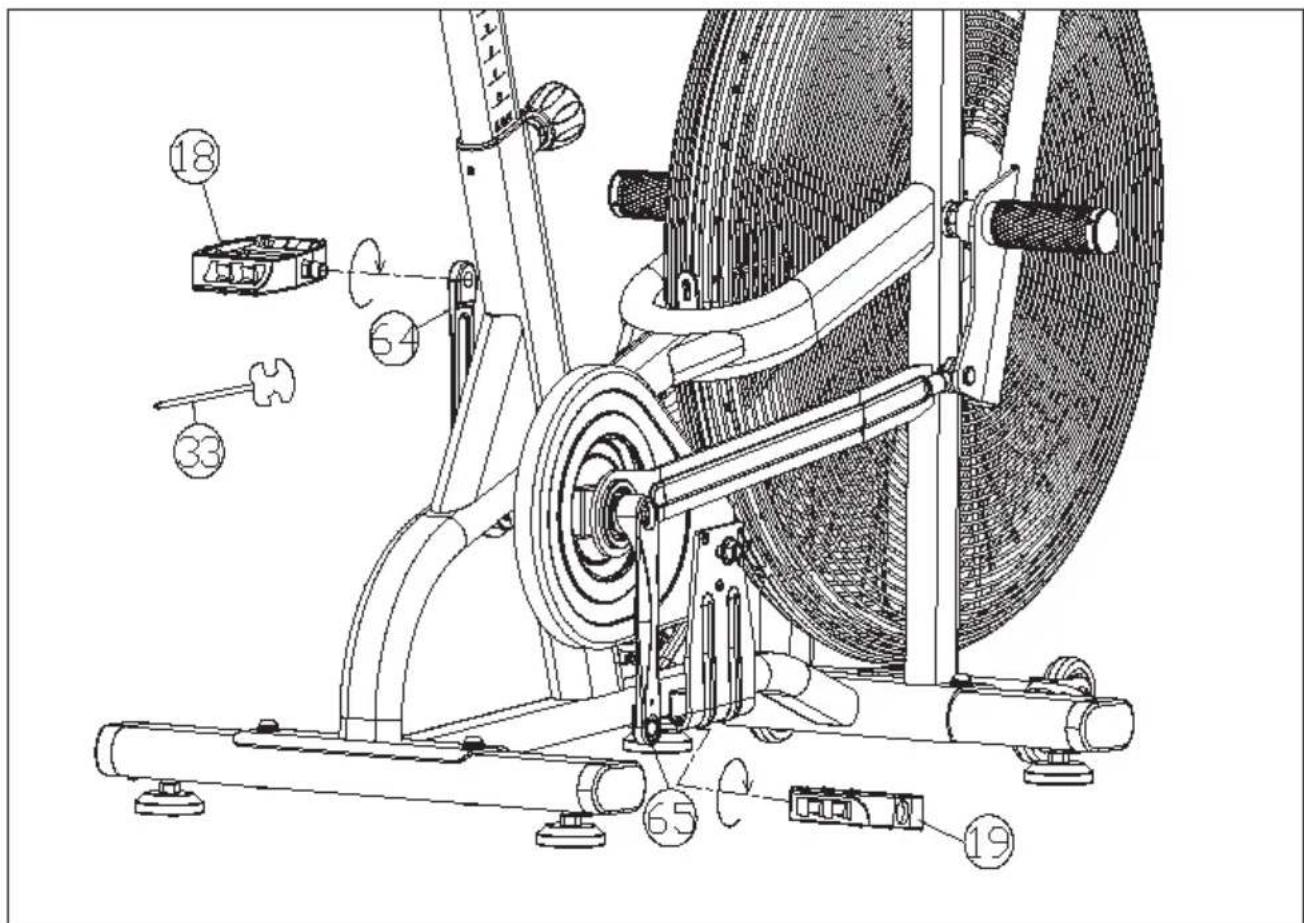
Technical diagram of a stationary exercise machine with numbered components and labeled parts- Fix the pedal (18) which is marked "L" on the crank (64) marked "L" by multifunction spanner (33) tightly in anticlockwise, and then fix the pedal (19) which is marked "R" on the crank (65) marked "R" by multifunction spanner (33) tightly in clockwise.
Step 5:
text_image
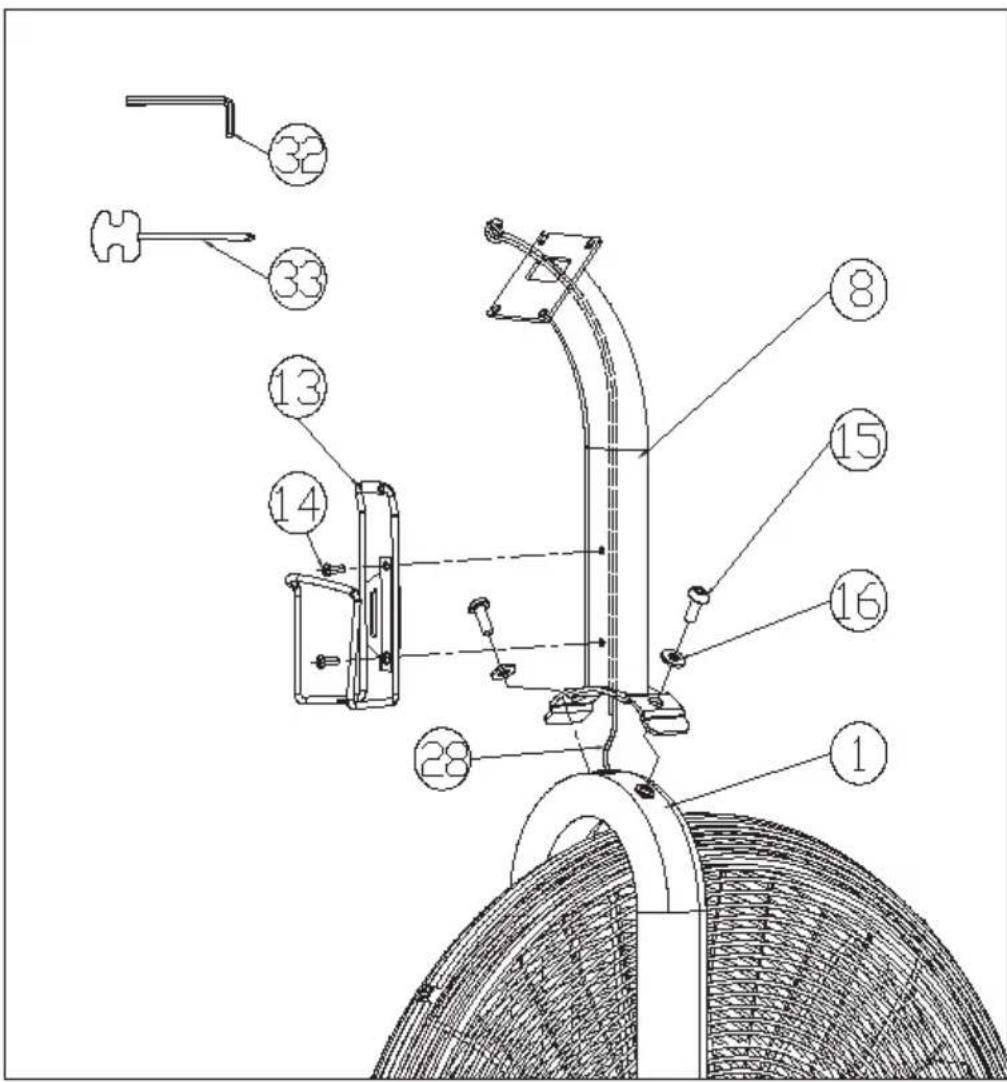
Technical diagram of a mechanical assembly with numbered components, likely an engine or motor assembly.- Insert the sensor wire (28) with a supportive hard wire into the console support post (8) and take the sensor wire (28) out. Finally you can remove the supportive hard wire away. Then fix the console support post (8) on the main frame (1) tightly with flat washers (16) and bolts (15) by hex wrench (32).
- Fix the bottle holder (13) on the main frame tightly with cross screws (14) by multifunction spanner (33).
Step 6:
text_image
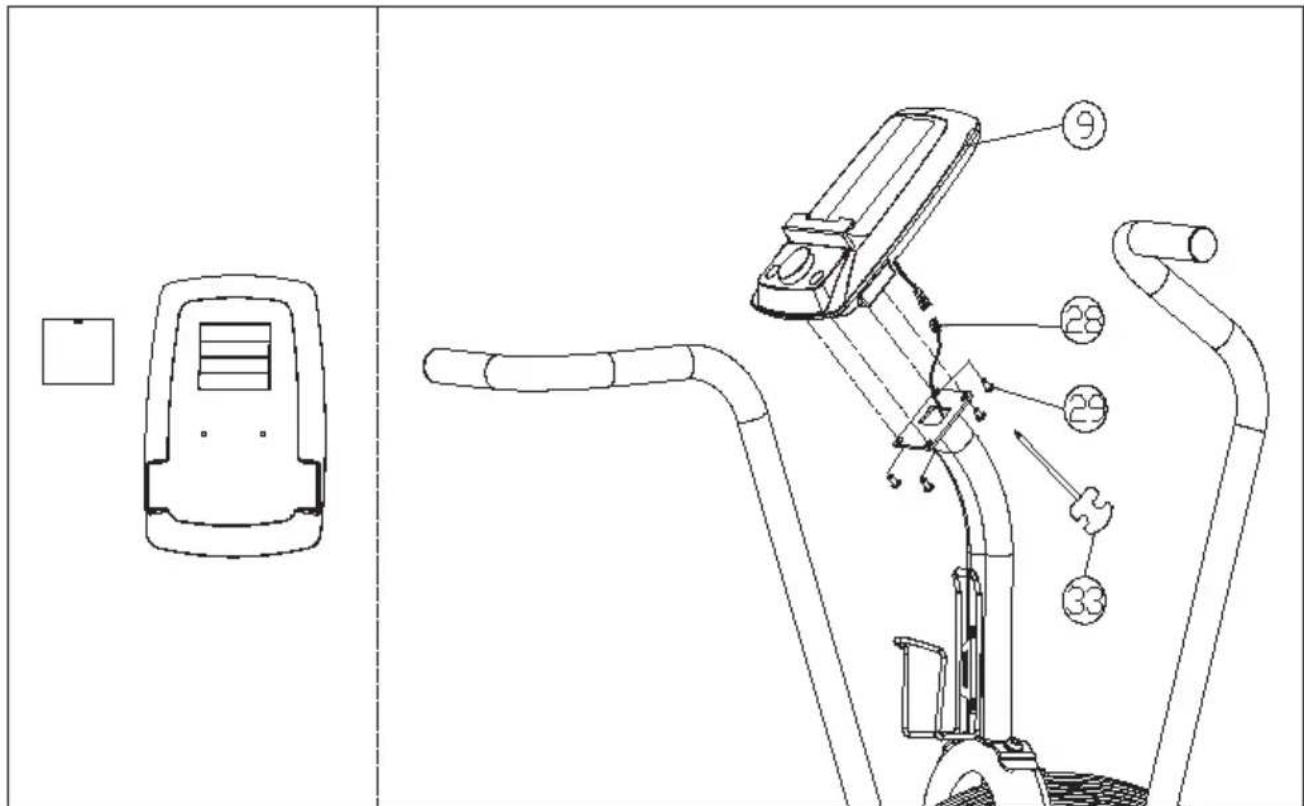
Technical diagram of a mobility device with labeled parts and exploded view, including a front panel and internal components.- Insert two batteries (type AA) correctly into the battery compartment of the console (9).
- Connect the wire on the console (9) together with the sensor wire (28) properly, and then fix the console on the plate of the console support post (8) tightly with cross screws (29) by multifunction spanner.
Step 7:
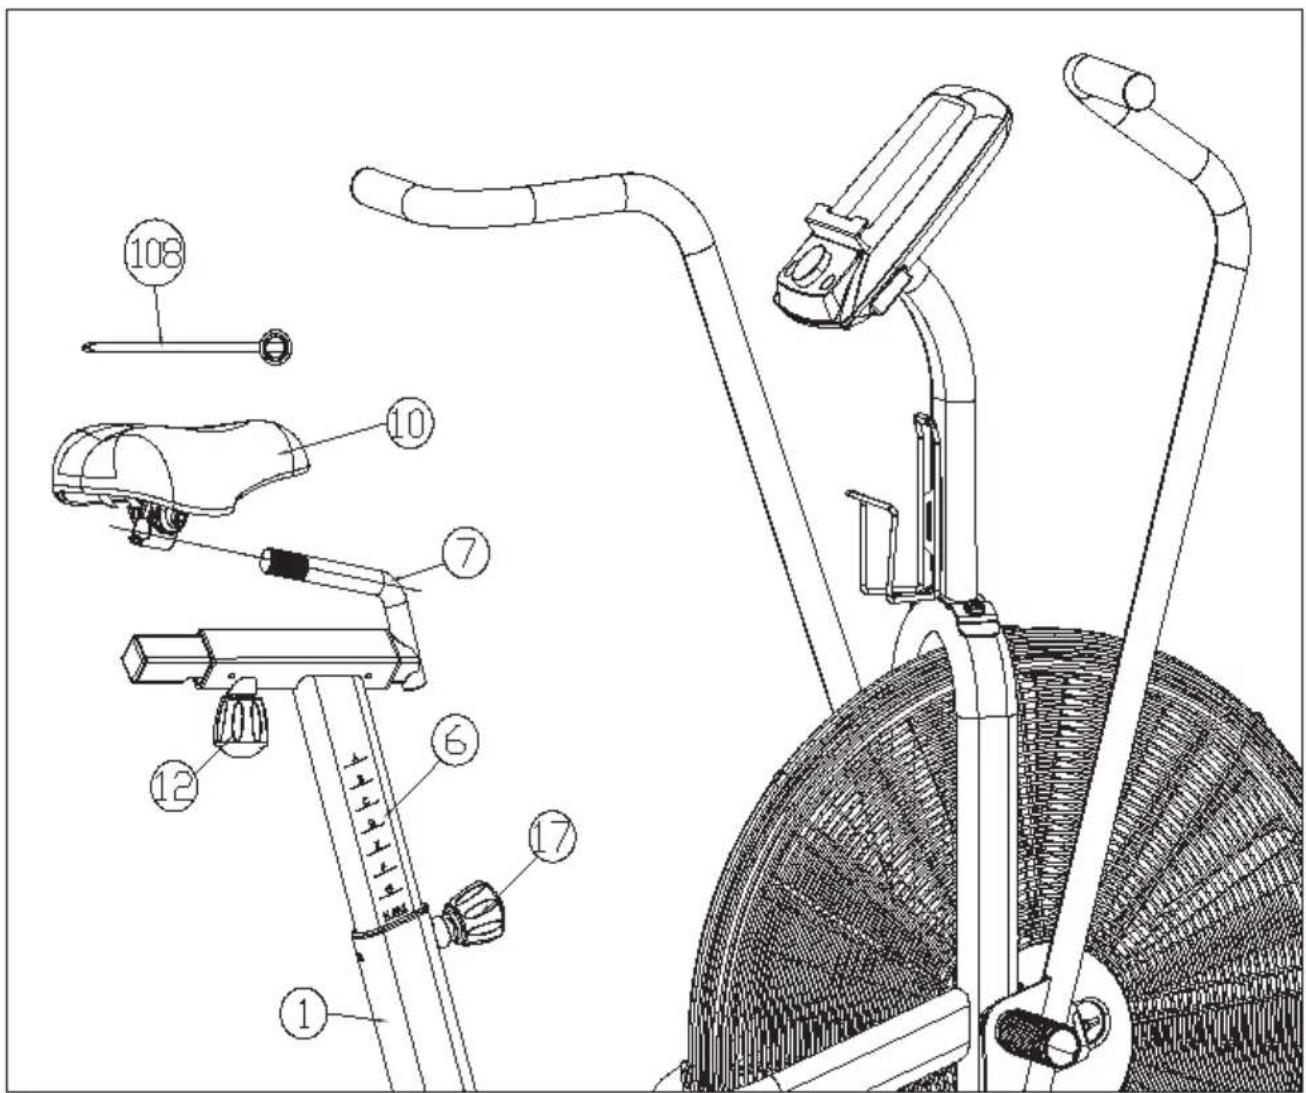
text_image
Technical diagram of a stationary bike with numbered parts for identification and assembly reference.- Fix the saddle (10) to the saddle sliding set (7) as shown tightly by socket spanner (108). Then you can loosen the knob (12) to slide the saddle (10) to a desired position and tighten it by the knob (12).
- If the saddle post 's height is not right for you, then you can loosen the spring knob (17) and pull out, then select a desired height to align the hole, and then fix it tightly by the spring knob (17).
Note: Do not exceed the mark "MAX".

CAUTION
Risk of injury! Now the equipment is completed assembled, if you find it is not leveled on the floor you can adjust it by the adjusting pads (23). Make sure you have tightened all the screws and nuts well before beginning your workout.
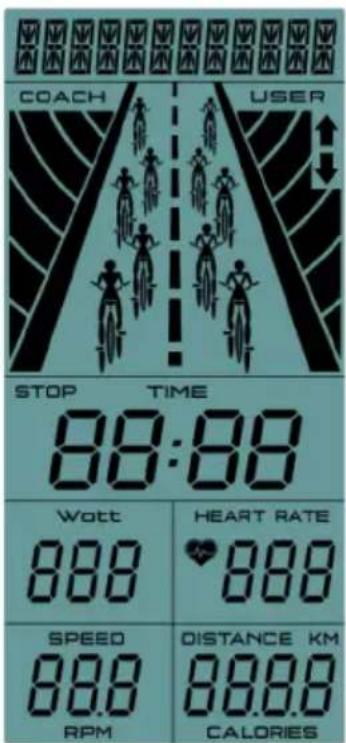
CONTROL PANEL AND BUTTONS
General Functions
| Item Description | |
| Time | Display user workout time.Display range 0:00 ~ 99:59 |
| Speed | Display user workout speed.Display range 0.0 ~ 99.9 |
| Distance | Display user workout distance.Display range 0.0 ~ 99.9 |
| Calories | Display calories consumption during workout.Display range 0 ~ 999 |
| Heart rate | Display user pulse during workout.When user pulse exceed preset target value, monitor will alarm with Bi-bi sound. |
| Rpm | Revolution per minute.Display range 0 ~ 999 |
| Watt | Display power consumption during workout.Display range 0 ~ 999Setting range 10 ~ 350 |
Button Functions
| Button Description | |
| Joggle wheel - Up | • Adjust function value or selection up. |
| Joggle wheel - Down | • Adjust function value or selection down. |
| Mode | • Confirm setting or selection. |
| Reset | • Hold on for 2s, monitor will reboot.• During setting or Stop mode, press it to go back to main menu . |
| Start/Stop | • Start or stop workout. |
USE AND OPERATION
Power on
Install 4PCS AA batteries (or press RESET KEY for 2s), monitor will power on along with BUZZER sound 1s, LCD will show all segments 2s then display wheel diameter and unit 1s. Then go to USER setting mode.
Without any signal input for 4 minutes, monitor will go to Sleeping mode. Press any key to wake up monitor.
text_image
COACH USER STOP TIME 88:88 Watt 88.0 HEART RATE 88.0 SPEED 88.0 DISTANCE KM 88.0 RPM CALORIES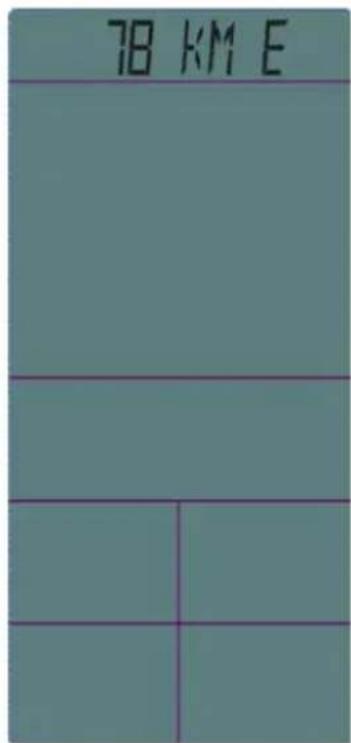
text_image
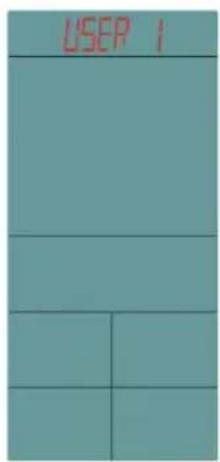
7B KM EUser data setting
Use joggle wheel to select USER group from U1\~U4, press MODE to confirm. Set Gender/ Age/ Height/ Weight, them come to workout page.
text_image
USER 1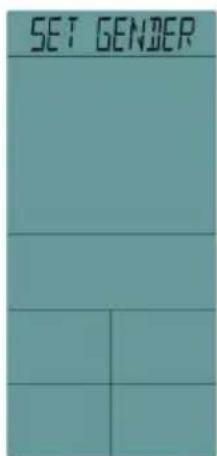
text_image
SET GENDER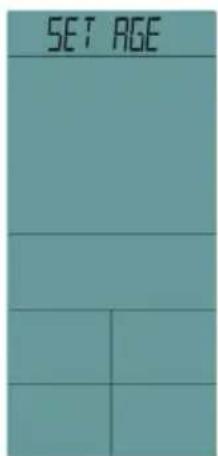
text_image
SET AGE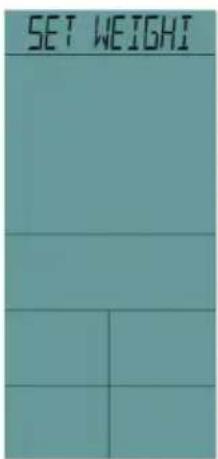
text_image
SET WEIGHTWorkout mode selection
Use joggle wheel to select workout mode as: Target Time > Target Distance > Target Calories > Target H.R. > Target Watt > Watt Program.
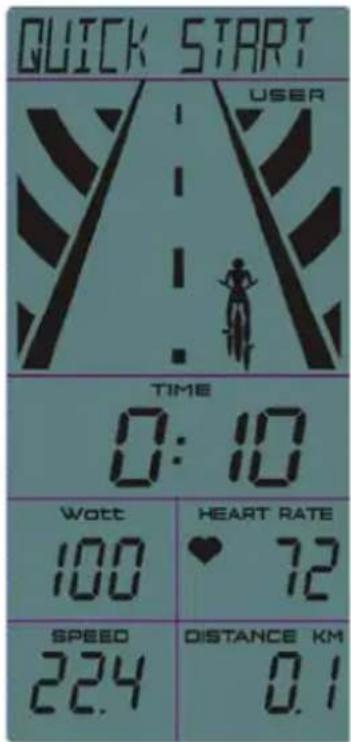
Quick start
-
Start workout directly, TIME begins to count up. DISTANCE/ CALORIES/ RPM/ SPEED/ WATT/ RPM & HEART RATE will display value accordingly.
-
The character animation only show USER, it will skip to next figure as per 0.1KM (or ML).
-
Press STRAT/STOP button to stop workout, STOP icon is blinking, all value will remain.
-
During workout, it is invalid to press RESET/Joggle wheel /ENTER button.
-
In STOP mode, press RESET button, monitor return to function setting page.
text_image
QUICK START USER TIME 0:10 WOTT 100 HEART RATE ♥ 72 SPEED 22.4 DISTANCE KM 0.1(1) Target Time
-
Use joggle wheel to set Target TIME (preset value = 10:00), press STRAT/STOP to workout in Target Time mode.
-
TIME begins to count down from Target value, DISTANCE/CALORIES/RPM/ SPEED/ WATT/ RPM & HEART RATE will display value accordingly
-
The character animation only show USER, it will skip to next figure as per one fifth of the preset Time.
-
Press STRAT/STOP button to stop workout, STOP icon is blinking, all value will remain.
-
During workout, it is invalid to press RESET /Joggle wheel /ENTER button.
-
In STOP mode, press RESET button, monitor return to function setting page.
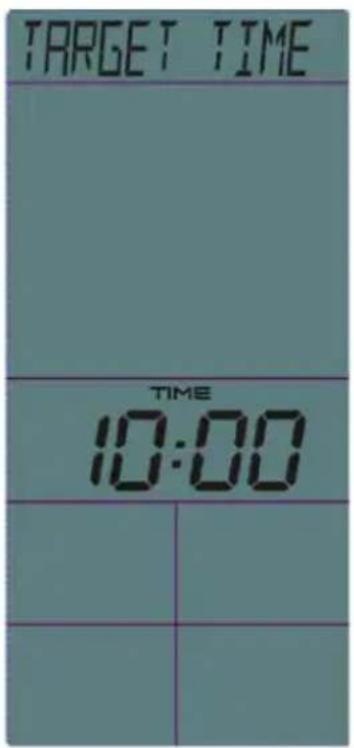
text_image
TARGET TIME TIME 10:00
text_image
TARGET TIME USER TIME 9:59 WOTT 100 HEART RATE ♥ 72 SPEED 22.4 DISTANCE KM 0.1(2) Target Distance
- Use joggle wheel to set Target DISTANCE (preset value = 5.0), press STRAT/STOP to workout in Target Distance mode.
- DISTANCE begins to count down from Target value, TIME/CALORIES/RPM/ SPEED/ WATT/ RPM & HEART RATE will display value accordingly.
- The character animation only show USER, it will skip to next figure as per one fifth of the preset Distance.
- Press STRAT/STOP button to stop workout, STOP icon is blinking, all value will remain.
- During workout, it is invalid to press RESET /Joggle wheel /ENTER button.
- In STOP mode, press RESET button, monitor return to function setting page.
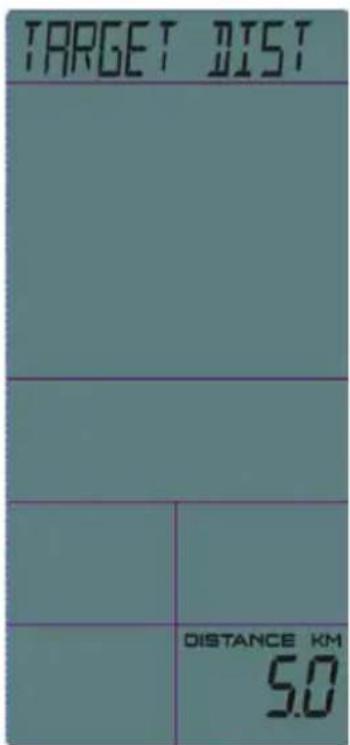
text_image
TARGET DIST DISTANCE KM 5.0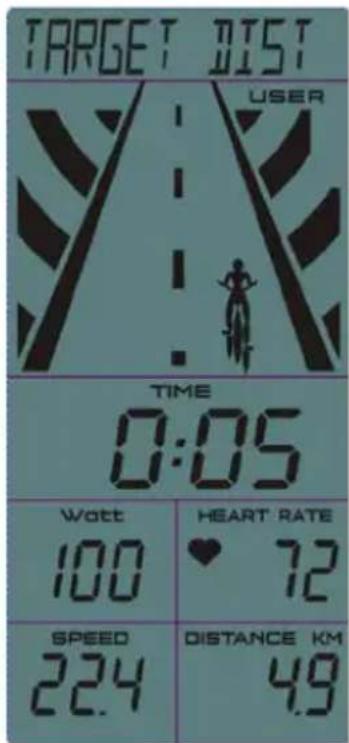
text_image
TARGET DIST USER TIME 0:05 WATT 100 HEART RATE ♥ 72 SPEED 224 DISTANCE KM 4.9(3) Target Calories
- Use joggle wheel to set Target CALORIES (preset value = 100), press STRAT/STOP workout in Target Calories mode.
- CALORIES begins to count down from Target value, TIME/DISTANCE/RPM/SPEED/WATT/RPM & HEART RATE will display value accordingly.
- The character animation only show USER, it will skip to next figure as per one fifth of the preset Calories.
- Press STRAT/STOP button to stop workout, STOP icon is blinking, all value will remain.
- During workout, it is invalid to press RESET /Joggle wheel /ENTER button.
- In STOP mode, press RESET button, monitor return to function setting page.
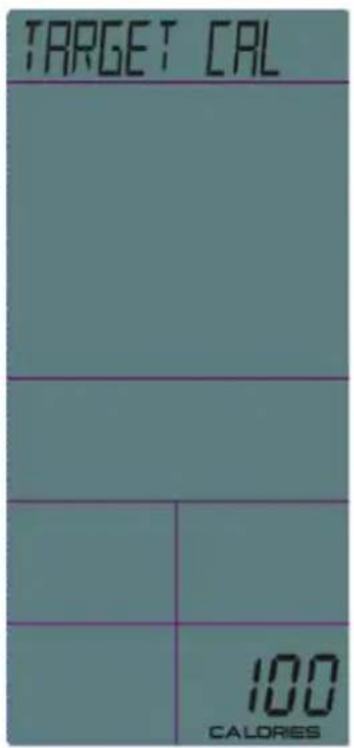
text_image
TARGET CAL 100 CALORIES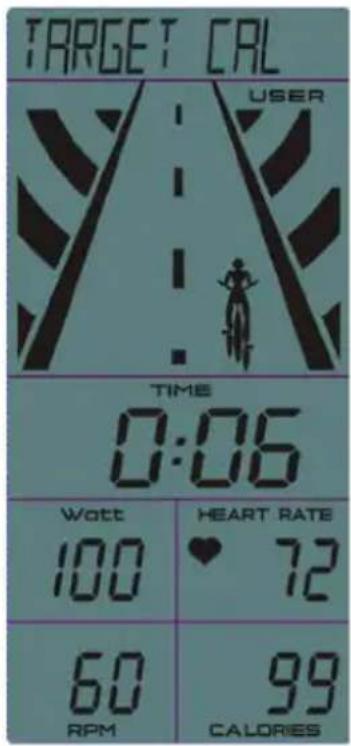
text_image
TARGET CRL USER TIME 0:06 Watt HEART RATE 100 ♥ 72 60 99 RPM CALORIES(4) Target Watt
- Use joggle wheel to set Target WATT (preset value = 100), press STRAT/STOP to workout in Target Watt mode.
- TIME begins to count up, DISTANCE/ CALORIES/ RPM/ SPEED/ WATT/ RPM & HEART RATE will display value accordingly.
- The character animation only show USER, it will skip to next figure as per 0.1KM (or ML).
- When actual WATT is 25% higher than Target Watt, ↑is flashing to remind user too fast; When actual WATT is 25% lower than Target Watt, ↓is flashing to remind user too slow.
- Press STRAT/STOP button to stop workout, STOP icon is blinking, all value will remain.
- During workout, it is invalid to press RESET /Joggle wheel /ENTER button.
- In STOP mode, press RESET button, monitor return to function setting page.
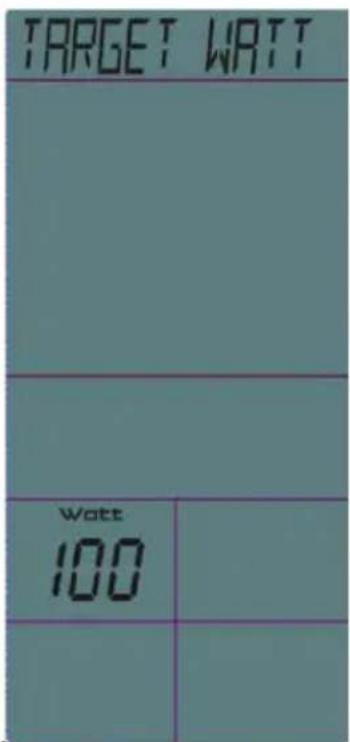
text_image
TARGET WRITT Watts 100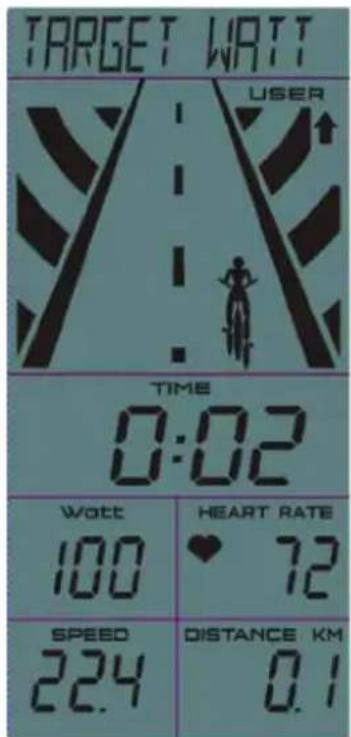
text_image
TARGET WATT USER TIME 0:02 WAT 100 HEART RATE ♥ 72 SPEED 224 DISTANCE KM 0.1(5) Target HR
-
Use joggle wheel to set Target PULSE (preset value = 100), press STRAT/STOP to workout in Target HR Mode. Keep both hands hold on hand grips.
-
TIME begins to count up, DISTANCE/ CALORIES/ RPM/ SPEED/ WATT/ RPM & HEART RATE will display value accordingly.
-
The character animation only show USER, it will skip to next figure as per 0.1KM (or ML).
-
When actual PULSE value is 50% higher than Target Pulse, ↑is flashing to remind user too fast; When actual PULSE is 50% lower than Target Pulse, ↓is flashing to remind user too slow.
-
Press STRAT/STOP button to stop workout, STOP icon is blinking, all value will remain.
-
During workout, it is invalid to press RESET /Joggle wheel /ENTER button.
-
In STOP mode, press RESET button, monitor return to function setting page.
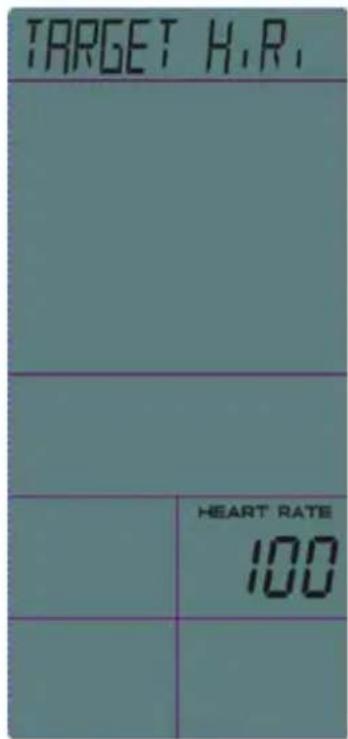
text_image
TARGET H.R. HEART RATE 100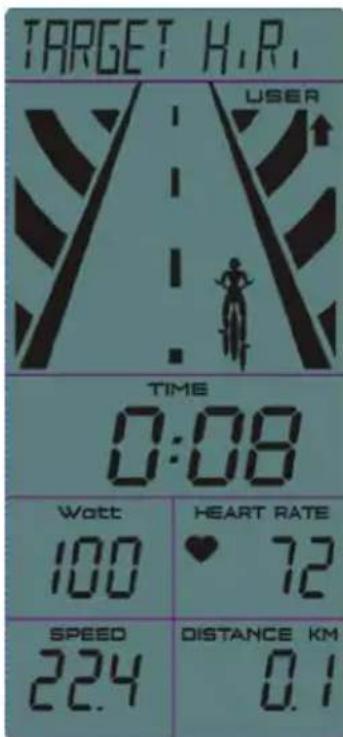
text_image
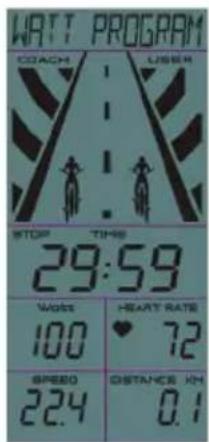
TARGET H.R. USER TIME 0:08 Watt 100 HEART RATE ♥ 72 SPEED 22.4 DISTANCE KM 0.1(6) Watt Program
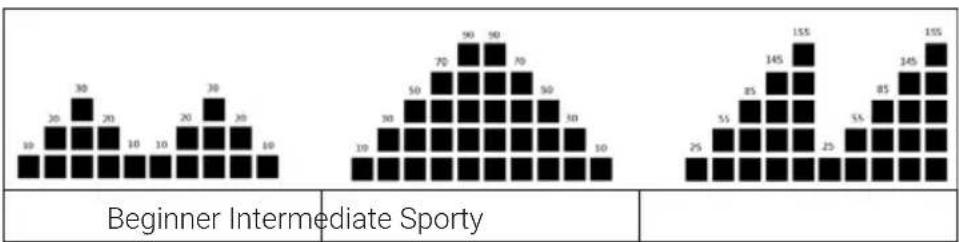
- Use joggle wheel to select: Beginner > Advance > Sporty, press MODE to confirm.
- Use joggle wheel to set Time (preset value = 30:00), press STRAT/STOP to workout in Watt Program mode.
- TIME begins to count down from Target value, DISTANCE/ CALORIES/RPM/ SPEED/ WATT/ RPM & HEART RATE will display value accordingly.
- The character animation will skip to display next figure as per one fifth of the preset Time.
- When USER WATT is 10% less than Coach WATT, Coach figure will precede one position; When USER WATT is over 10% than Coach WATT, Coach figure will fall behind one position; While the discrepancy is within plus or minus ±10%, Coach and USER are in same position.
- Press STRAT/STOP button to stop workout, STOP icon is blinking, all value will remain.
- During workout, it is invalid to press RESET /Joggle wheel /ENTER button.
- In STOP mode, press RESET button, monitor return to function setting page.
bar
| Category | Value 1 | Value 2 | Value 3 | Value 4 | Value 5 | Value 6 | Value 7 | Value 8 | Value 9 | Value 10 | |---|---|---|---|---|---|---|---|---|---|---| | Beginner Intermediate Sporty | 10 | 30 | 30 | 20 | 10 | 10 | 20 | 30 | 20 | 10 | | Overall Sporty | 19 | 30 | 50 | 70 | 90 | 90 | 70 | 50 | 30 | 10 | | **Beginner Intermediate Sporty** | 25 | 55 | 85 | 145 | 155 | 25 | 55 | 85 | 145 | 155 |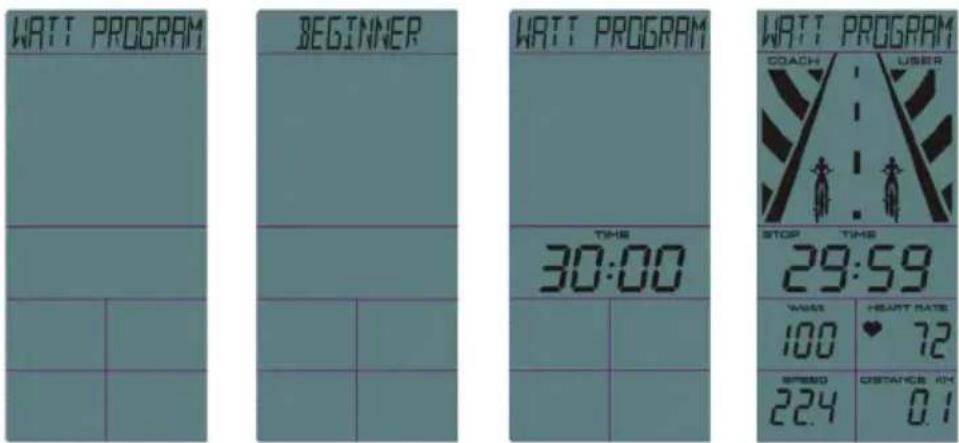
text_image
WATT PROGRAM BEGINNER WATT PROGRAM COACH USER TIME 30:00 STOP TIME 29:59 WARS HEART RATE 100 72 SPEED DISTANCE AM 224 0.1Regular cardio training stimulates the cardiovascular (heart and blood vessels) and respiratory system. It improves your general health and helps you to burn fat. It is the recommended workout if you want to lose weight. When exercising, glucose is burned off first, then the fat stored in the body.
Intensive cardio training (e.g. circuit training, training with high resistance and long duration training) requires a greater amount of effort and also trains the muscular system and your endurance. As a rule, the more regular you train, the more effective the training is (even with short training sessions of 20 minutes).
During the Training
The level of resistance used during the workout determines the training intensity and the associated results.
An optimal training session includes (1) a warm-up phase, (2) an intensive cardio training phase and finally (3) a cool down phase. If you want to progress or burn calories, you should go through these 3 phases as well as exercise for at least 20-30 minutes on the ergometer.
1. Warm-up Phase
Always start your training session with a low resistance level. A warm-up phase of 5-10 minutes is important because your muscles need to be warmed up. During the warm-up phase, you should give your circulatory system and muscles time to prepare for the subsequent workout. As a beginner, you can train for the first 3 minutes at the easiest level and then gradually increase the level to where you feel most comfortable.
2. Cardio Training Phase
After about 10 minutes, you can then begin the cardio training phase. When using the interval training program, the computer controls the resistance depending on the type of interval chosen and thus simulates changing intensities.
The cardio training phase is considered aerobic or anaerobic training depending on the energy expenditure. These two types of training are defined as follows:
Aerobic Training Zone
While you are in this zone, you are improving your cardiovascular system and burning fat.
Despite an increased heart rate, deeper breathing and light sweating, the body is not in a very stressed state, breathing is not significantly accelerated—you could still talk to someone without going out of breath—and you feel that you could sustain the physical exertion for a long time. It’s similar to when you briskly walk uphill.
The muscles and heart work more intensely than when the body is at rest and can get most of their energy needs met via aerobic energy production, which utilizes oxygen to facilitate energy production. At the same time, the anaerobic production of energy is also active, but only to a small extent. The lactic acid produced in this process can be broken down to produce energy. Most of your training should be aerobic training.
If you continue to increase the intensity, you will eventually come to the threshold where aerobic energy production is no longer able to increase its output. At this point, there is a shift towards anaerobic energy production being used to a greater extent. You are now doing anaerobic training.
Anaerobic Training
When in this zone, you are improving your performance and speed. When you increase the intensity while in this zone, the training becomes much more strenuous because of the rising lactate level in the body; you start sweating more; your breathing gets faster; and after some time depending on your fitness level, your muscles tire and you feel totally exhausted and that you can no longer continue at this level of intensity.
3. Cool-down Phase
At the end of the cardio training phase, you begin the cool-down phase, which should last for at least 5 minutes. Here, you use low levels of resistance. The recovery or cool-down phase is also helpful with regard to preventing possible muscle soreness. It is also advisable to do active recuperation after an intensive training session, such as a hot bath, a sauna session or a massage.
Training Progress
Each month you can make the training more challenging by extending the duration of the cardio training phase, by using a higher level of resistance within that phase or by doing a more demanding interval training.
Eating and Drinking
- Drink before, during and after training.
- Drink at least 2 sips of water (10 to 20 cl) every 10-15 minutes during a training session.
- If your workout lasts for more than 1 hour, you should drink a sports drink to protect the body from dehydration while training.
- For optimal cardio training, suitable nutrition before and after any physical activity is very important.
Before training, it is best to eat carbohydrates, such as those found in rice and pasta, as they provide the body with an important source of energy.
After training, you need to refuel with proteins, such as those found in eggs, yoghurt and dried fruits. Even if you want to lose weight, it is absolutely necessary to eat after training in order for your body to recuperate.
WARMING UP BEFORE A WORKOUT
Perform the movements before each workout to mobilize your joints and activate your muscles.
Should a movement be uncomfortable or painful, skip this movement and consult your doctor or fitness instructor about suitable warm-up movements.
Each movement should be repeated (right and left) so that you can start the cardio training relaxed.
Take about 5 minutes to do the following Capital Sports training routine:
| 1 | |
 |  |
| Nod the head slowly, then alternating turn the head to look to the right to left. Then mobilize the shoulders by making a circular motion with them. | |
| 2 | 3 |
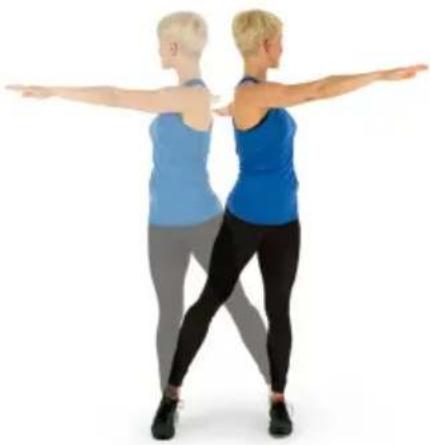 | 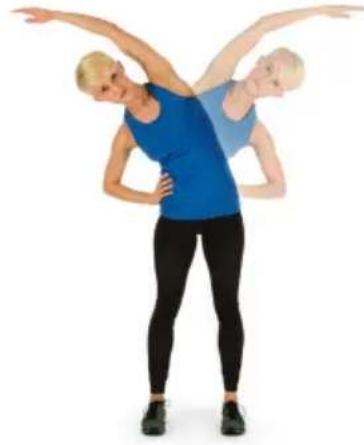 |
| Turn the hips while the arms are stretched. The feet are not firmly fixed to the ground; the ankles follow the body's rotation. | Bend at the hip with one arm stretched upward. Stay in this position for a few seconds on each side. |
| 4 | |
 |  |
| Stand on one leg and hold the instep of the other leg with your hand. While in this position, mobilize your ankle so as to stretch the thigh slightly. If necessary, hold on to something to keep your balance. Then Stand on one leg and draw a circle in both directions (clockwise and counterclockwise) with the ankle. | |
| 5 | 6 |
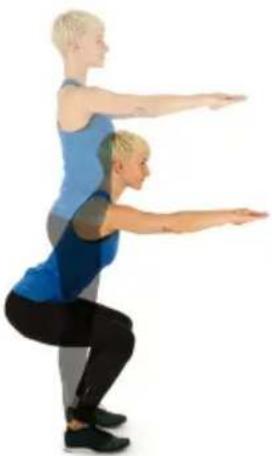 |  |
| When squatting, place your feet about shoulder-width apart and lower your hips while keeping your arms straight. Try to also keep your back straight. | Sit with your legs bent so that the soles of your feet touch. Slightly flap the knees by moving the knees up and down while keeping the feet on the floor. Hold your ankles and keep your back straight. |
natural_image
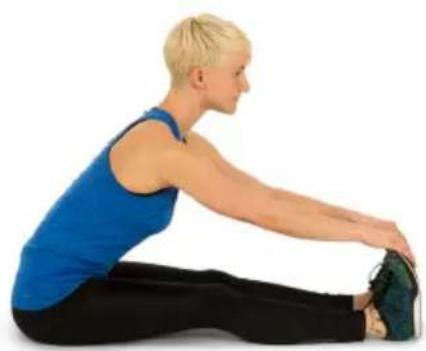
Person performing a seated forward stretch exercise (no text or symbols visible)While seated, stretch forward towards your toes. Try to keep the legs and back straight and reach for the tips of your toes.
7
ICONSOLE+ APP
Turn on BT on tablet, search for console device and press connect. Turn on iConsole ^+ app on tablet and start workout with tablet.

text_image
iconsole+ Download on the App Store GET IT ON Google Play iconsole+Note: Once the console is connected to the tablet via BT, it no longer displays any data. Close the app and turn off BT on the tablet. The console will automatically display data again.
CARE AND MAINTENANCE
Note: As with all training machines with mechanical, moving components, screws may loosen due to frequent use. We therefore recommend that you check them regularly and, if necessary, retighten them with a suitable key. Clean your training device regularly with a damp cloth to clean the surfaces from sweat and dust.
- Often clean the exercise bike with clean cloth to keep the clean appearance.
- The safety level of the equipment only can be maintained if it is regularly examined for damage and or /wear and tear.(e.g. handle bar, pedals and seat ...etc.).It is vital that any faulty parts are replaced and the it is not used until completed repaired.
- Regularly check that the elements fastened with nuts and bolts are correctly tightened.
• Remember regularly to grease moving parts. - Special attention to the component, most of them are susceptible to wear like brake system, foot pad etc.
- As sweat is very corrosive, do not allow it to come into contact with the enameled or chromed parts of the equipment, particularly the computer. Immediately wipe the equipment after using. The enameled parts can be cleaned using a damp sponge. All aggressive or corrosive products must be avoided.
- Storing the equipment in a clean and dry environment away from children.
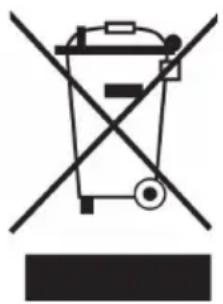
HINTS ON DISPOSAL
natural_image
Symbol of a trash bin crossed with a diagonal line, no text or labels presentAccording to the European waste regulation 2012/19/EU this symbol on the product or on its packaging indicates that this product may not be treated as household waste. Instead it should be taken to the appropriate collection point for the recycling of electrical and electronic equipment. By ensuring this product is disposed of correctly, you will help prevent potential negative consequences for the environment and human health, which could otherwise be caused by inappropriate waste handling of this product. For more detailed information about recycling of this product, please contact your local council or your household waste disposal service.
Your product contains batteries covered by the European Directive. 2006/66/EC, which cannot be disposed of with normal household waste. Please check local rules on separate collection of batteries. The correct disposal of batteries helps prevent potentially negative consequences on the environment and human health.
DECLARATION OF CONFORMITY

Producer:
Chal-Tec GmbH, Wallstraße 16, 10179 Berlin, Germany.
The complete declaration of conformity of the manufacturer can be found at the following link: https://use.berlin/10032356
Estimado cliente,
text_image
QR code image containing encoded data, no visible human-readable textÍNDICE
text_image
Technical diagram of a mechanical device with numbered components and exploded view, including wrenches, gears, and linkages.text_image
Technical diagram of a mechanical exercise machine with numbered components and rotational indicatorstext_image
Technical diagram showing mechanical assembly with numbered components and labeled partstext_image
Technical diagram of a stationary exercise machine with labeled components and an inset showing mechanical assembly details.text_image
Technical diagram of a stationary exercise machine with numbered components and labeled partstext_image
Technical diagram of a mechanical device with numbered components, likely an engine or pump assembly.text_image
Technical diagram of a mobility device with labeled parts and exploded view, including a front panel and internal components.text_image
Technical diagram of a stationary bike with numbered parts for identification and assembly reference.text_image
SET WEIGHTtext_image
TARGET DIST DISTANCE KM 5.0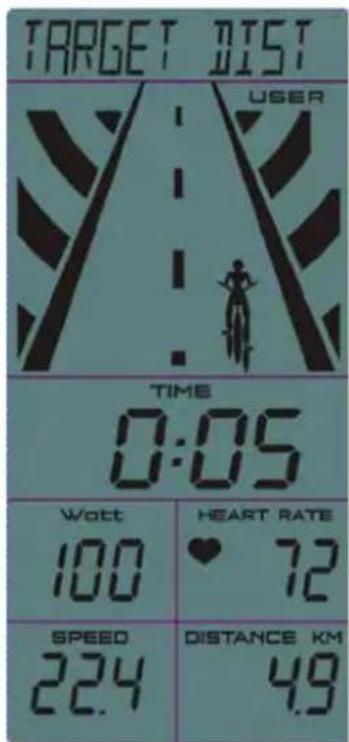
text_image
TARGET DIST USER TIME 0:05 Watt 100 HEART RATE ♥ 72 SPEED 22.4 DISTANCE KM 4.9text_image
TARGET WATT WATT 100
text_image
TARGET WATT USER TIME 0:02 WATC 100 HEART RATE ♥ 72 SPEED 22.4 DISTANCE KM 0.1(5) Pulso objetivo
text_image
TARGET H.R. HEART RATE 100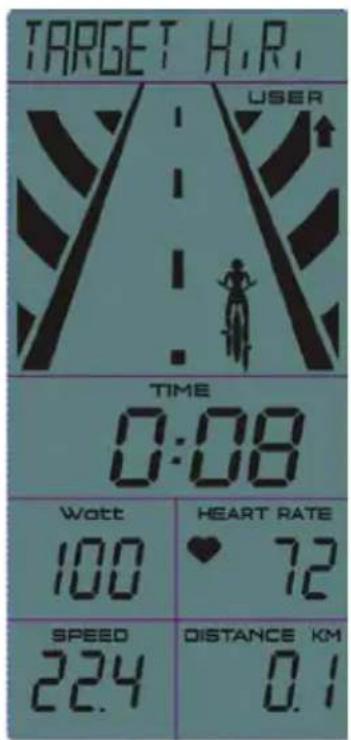
text_image
TARGET H.R. USER TIME 0:08 WATT 100 HEART RATE 72 SPEED 22.4 DISTANCE KM 0.1(6) Programa de vatios
text_image
WATT PROGRAM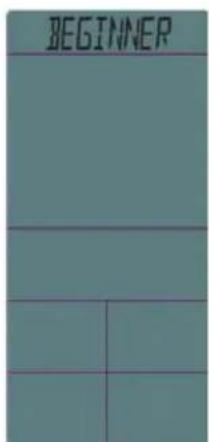
text_image
BEGINNER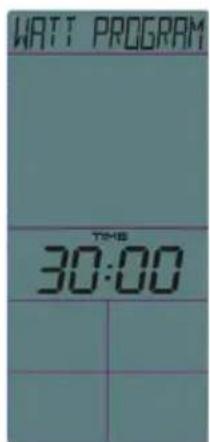
text_image
WATT PROGRAM TIME 30:00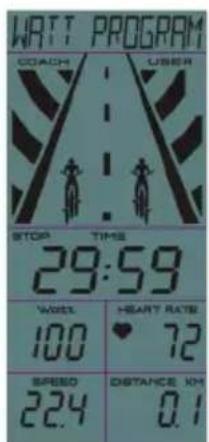
text_image
WATT PROGRAM COACH USER STOP TIME 29:59 WIREL 100 HEART RATE 72 SPEED 22.4 DISTANCE KH 0.1ENTRENAMIENTO DE CARDIO EN RESUMEN
natural_image
Person performing a seated stretch exercise (no text or symbols visible)text_image
iconsole+ Download on the App Store GET IT ON Google Play iconsole+natural_image
Symbol of a trash bin crossed with a diagonal line, no text or numbers presenttext_image
QR code image containing encoded data, no visible human-readable textSOMMAIRE
text_image
Technical diagram of a mechanical device with numbered components and exploded view, including wrenches, gears, and linkages.text_image
Technical diagram of a mechanical device with numbered components and rotational indicatorstext_image
Technical diagram showing mechanical assembly with numbered components and labeled partstext_image
Technical diagram of a stationary exercise machine with labeled components and an inset showing mechanical assembly details.text_image
Technical diagram of a stationary exercise machine with numbered components and labeled partstext_image
Technical diagram of a mechanical device with numbered components, likely an engine or pump assembly.text_image
Technical diagram of a mobility device with labeled parts and exploded view, including a front panel and internal components.text_image
Technical diagram of a stationary bike with numbered parts for identification and assembly reference.text_image
SET WEIGHTtext_image
TARGET DIST DISTANCE KM 5.0
text_image
TARGET DIST USER TIME 0:05 Watt 100 HEART RATE 72 SPEED 22.4 DISTANCE KM 4.9text_image
TARGET WATT Watt 100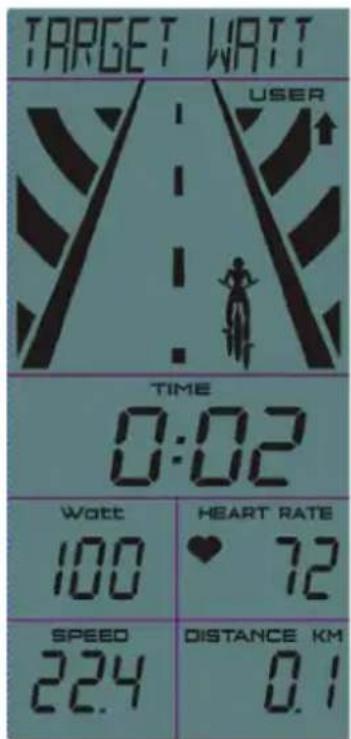
text_image
TARGET WATT USER TIME 0:02 WATC 100 HEART RATE 72 SPEED 22.4 DISTANCE KM 0.1text_image
TARGET H.R. HEART RATE 100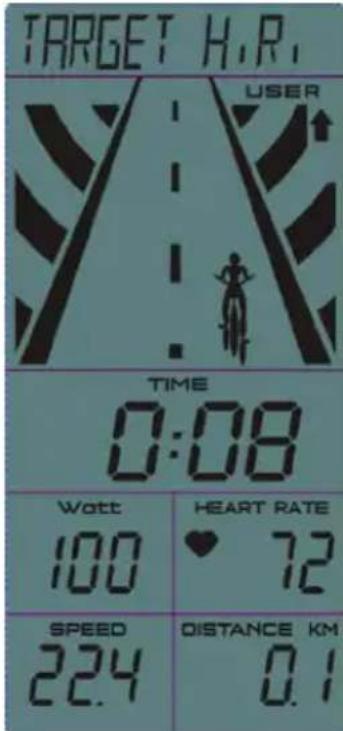
text_image
TARGET H.R. USER TIME 0:08 Watt 100 HEART RATE ♥ 72 SPEED 22.4 DISTANCE KM 0.1(6) Programme Watt
text_image
WATT PROGRAM
text_image
BEGINNER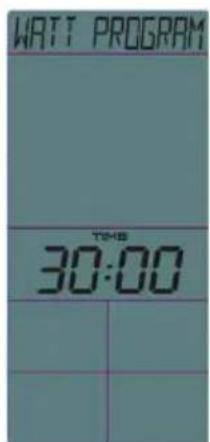
text_image
WATT PROGRAM TOM-18 30:00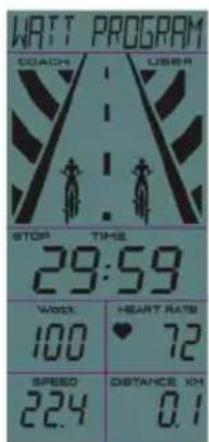
text_image
WATT PROGRAM COACH USER STOP TIME 29:59 WATI 100 HEART RATE 72 SPEED 224 DISTANCE WM 0.1APERÇU DE L'ENTRAINEMENT CARDIO
natural_image
Person performing a seated forward stretch exercise (no text or symbols visible)APPLICATION ICONSOLE+
text_image
iconsole+ Download on the App Store GET IT ON Google Play iconsole+natural_image
Symbol of a trash bin crossed with a diagonal line, no text or numbers presentDÉCLARATION DE CONFORMITÉ

text_image
C€Fabricant :
Chal-Tec GmbH, Wallstraße 16, 10179 Berlin, Allemagne.
text_image
QR code image containing encoded data, no visible human-readable textINDICE
text_image
Technical diagram of a mechanical device with numbered components and exploded view, including wrenches, gears, and linkages.text_image
Technical diagram of a mechanical exercise machine with numbered components and rotational indicatorstext_image
Technical diagram showing mechanical assembly with numbered components and labeled partstext_image
Technical diagram of a stationary exercise machine with labeled components and an inset showing mechanical assembly details.text_image
Technical diagram of a stationary exercise machine with numbered components and labeled partstext_image
Technical diagram of a mechanical device with numbered components, likely an engine or pump assembly.text_image
Technical diagram of a mobility device with labeled parts and a side-view view showing front and top views.text_image
Technical diagram of a stationary bike with numbered parts for identification and assembly reference.text_image
SET WEIGHTtext_image
TARGET DIST DISTANCE KM 5.0
text_image
TARGET DIST USER TIME 0:05 Watt 100 HEART RATE 72 SPEED 22.4 DISTANCE KM 4.9(3) Target Calories
text_image
TARGET WATT Watt 100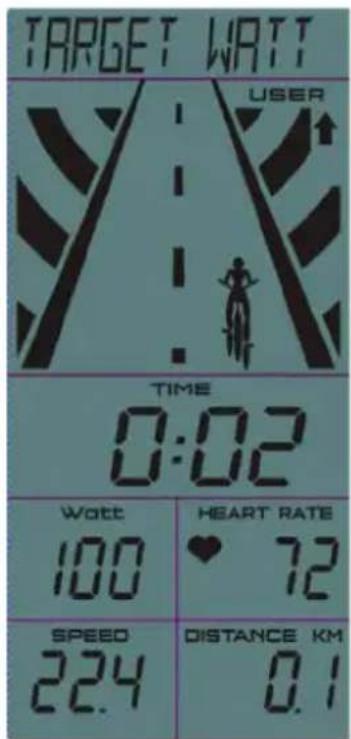
text_image
TARGET WATT USER TIME 0:02 WATC 100 HEART RATE 72 SPEED 22.4 DISTANCE KM 0.1(5) Target Pulse
text_image
TARGET H.R. HEART RATE 100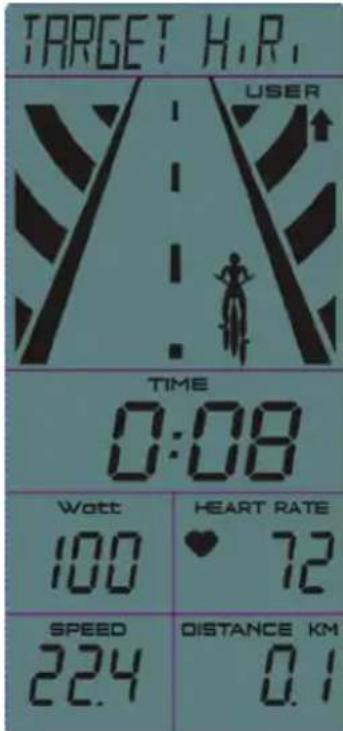
text_image
TARGET H.R. USER TIME 0:08 Watt 100 HEART RATE 72 SPEED 22.4 DISTANCE KM 0.1(6) Programma Watt
text_image
WATT PROGRAM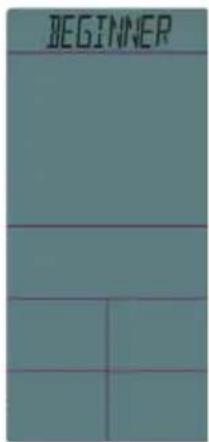
text_image
BEGINNER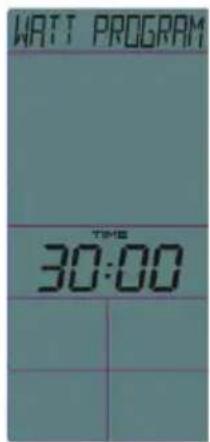
text_image
WATT PROGRAM 30:00